Sony MDS-S500 User manual

instruction manual
© 2003 Sony Corporation
This instruction manual describes important precautions to prevent accidents and
how to handle the product. Please read this instruction manual and the separate
"For Safety" carefully before using the product safely. After reading it, be sure to
keep it in a place where you can see it at any time.
Failure to follow safety precautions for electrical products can result
in fire or personal injury.
4-250-907-03(1)
Thank you for your purchase.
MDS-S500
Mini disc deck
Machine Translated by Google

About the attached manual
When adjusting the volume,
MDs are much less noisy than analog cassette tapes. If
you adjust the volume while listening to noise in a silent
area like when using an analog cassette tape, the volume
may be unexpectedly loud and the speaker may be
damaged. Be sure to turn down the volume before starting
playback.
Condensation
Water droplets may form inside the unit, such as immediately
after turning on the room when it is cold. This is called
condensation. Not only will it not work properly as it is, but
it will also damage the MD and internal parts. It is
recommended that you remove the MD when you are not
using this unit. If condensation forms, leave the product on
for about 1 to several hours, then turn it on again before
using it. If it does not work properly after hours, please
contact a Sony service representative.
Installation location Do
not place in the following locations. • On a
wobbling table or in an unstable place. • On
rugs and duvets. • Humid or poorly ventilated
areas. • Dusty areas. • Places exposed to direct
sunlight or high temperatures. • Extremely cold
place. • Close to tuners, TVs and VCRs. (When
used with a tuner, TV, or VCR, if placed near it,
noise may occur or the image may be distorted. Especially
when using an indoor antenna, use an outdoor antenna.
It is recommended.)
Etiquette when listening to stereo When you
enjoy music in stereo, listen at a
volume that does not bother your
neighbors. Especially at night,
even a small sound often passes
around. Let's keep in mind each
other, such as closing windows
and using headphones, to protect
a comfortable living environment.
This mark is a symbol of sound
etiquette.
How to clean the main unit Wipe
the cabinet and panel surface with a soft cloth soaked in a
small amount of neutral detergent solution. Do not use
thinner, benzine, alcohol, etc. as they will damage the
surface.
Symbol Meaning
This operation is possible only with the
button on the remote control.
When using the MDS-S500 main unit • MDS-
S500 Instruction Manual (this manual) This is an
instruction manual for the connection and operation of the main unit.
It is useful information to know.
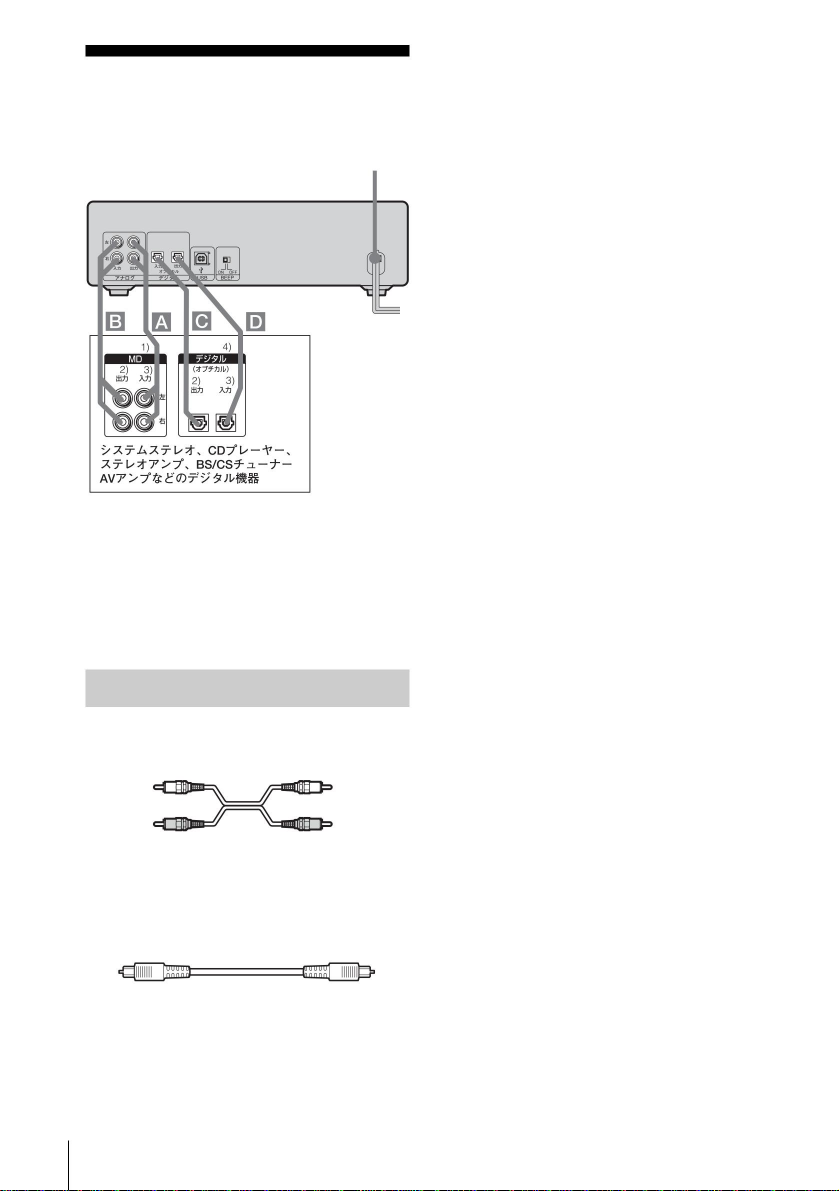
When connecting this unit to a PC • "Net
MD compatible SonicStage Ver. 1.5.5" instruction manual
How to install the software of the attached CD-ROM
"Net MD compatible SonicStage Ver. 1.5.5" on a PC and
basic operations It is a manual about. This CD-ROM also
contains help (electronic manual).
FROM
With
Precautions for use
2
Click here for details on how to operate the
SonicStage software.
If the product breaks down under normal use, we will repair it
in accordance with the conditions stipulated in the warranty card
for this product. However, the Company is not liable for any
incidental damages such as damages caused by missing the
opportunity to use the product for recording, playback, etc. due
to a malfunction, malfunction or malfunction of this product.
Please note.
The following instructions are attached to the MDS-S500. Please
use each manual as necessary.
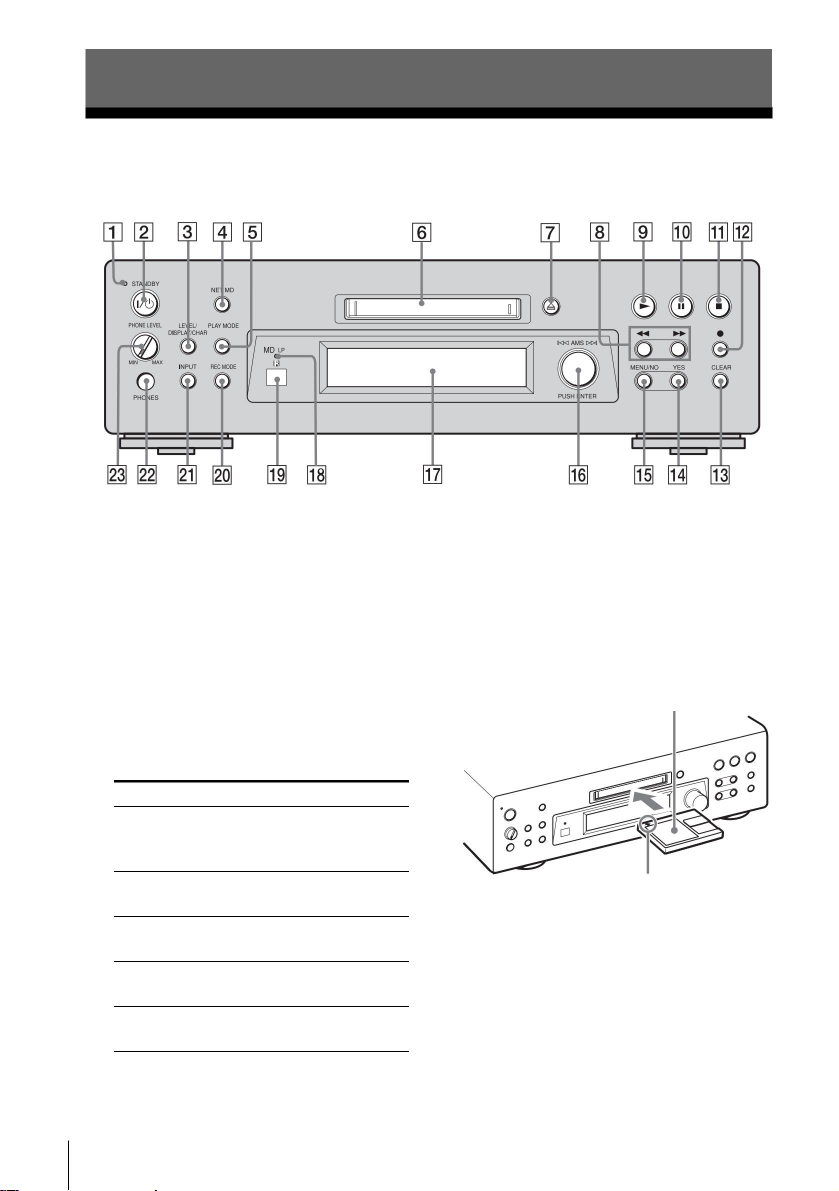
• This instruction manual mainly uses the buttons on the main unit.
Explains the operation. -If the
remote control has a button with the same display as the main
unit, you can use that button to perform the same operation
as the button on the main unit. -You may be able to perform
the same operation with buttons that have different displays on
the main unit and the remote control. In this case, the button
of the remote controller that performs the same operation is
put in () behind the buttons of the main unit. Example) Turn
the AMS knob to the right ( press> on the remote control) •
This instruction manual uses the following symbols.
Machine Translated by Google

table of contents
Play MD
3
Preparation
Before starting the connection ...................................................... ..............
9 Connect to audio equipment .............................. ..10 Connect to
a PC and use (Net MD) ....... 11
Play the songs you want to hear in any order
Synchronized recording with Sony CD player
(NAME) ...................................................... .................... 34
Change the recording level after recording (SF
EDIT) .................. ........................................... 38 Undo the
last edit operation (UNDO) ..... 40
(Program playback) .................................................. 26
About the attached manual ........................................................ .2
Precautions for use ..................................................... ..................... 2
(CD synchronized recording) Z ................. 21
Other functions Use fade-in /
fade-out Z ........................................ .........................
41 Use the sleep timer ..................... ................. 42 Operation
confirmation sound ........................... ................ 43
Editing MD Read before
editing .................. 28 Erase songs
(ERASE). ................................................ 29 songs Divide
(DIVIDE) ..................................... 31 songs Connect
(COMBINE) ..................... 32 Move songs
(MOVE) .. ..................................... 33 Name songs and discs
Record on MD
Record ................................... .................................. 13 Precautions
when recording ... .................................. 14 Record for a long
time ........... ................................................................. 15 Add song
number during recording (track marking) .................................. 16
When recording Convenient function for ..................... 17
Adjust the recording level ........ ................................... 19 Recording
from the sound 6 seconds ago (time machine
recording). ....................................... 20 Synchronize recording with
your favorite sound source (Music Sync Recording) Z ....... 20
Names and functions of each part Front of the main
unit .................................................. ...................................... 4 Rear of the
main unit ............ ................................................................. ...................... 5
Remote control ..................... ................................................................. .....
6 Display window .................................................. ...................................................... 7
Reproduce................................................ .............................. 22
Select the song you want to play .............. ...................................
23 Find the part you want to play ... .................................. 24 Repeat
playback (repeat playback) Z..24 Random playback (Shuffle
playback) .................................................. 26
Other information How to
handle MD ..................................... ...... 44 System
constraints ...................................... ............... 44 Is it a malfunction?
If you think ..................................................... 46 Self-diagnosis
function And display list ..................................... 47 Message display
list ...... .......................................... 48 Warranty and after-sales
service ... ............................ 49 Main
specifications .................. ................................................................. .........
49 List of items in the edit menu ..................... 50 List of items in
the setup menu ......... ..... 51
Index ..................................................... ............................................. 52
Machine Translated by Google

Names and functions of each part
Level / Display / Character
Play mode
Net MD
MD
stand-by
Label side up
When you press it to turn on the power, the STANDBY
lamp goes out. When you press it again to turn off the
power, the lamp lights up and the unit goes into standby mode.
Insert in the direction of the arrow
Front of the main body
2? / 1 (power) switch (pages 13 and 22)
While editing
6 MD Insert
the MD as shown below.
stop
4 NET MD button (page 11) Used to turn
the Net MD function on / off.
Slots (pages 13 and 22)
Recording 7 A (MD eject) button (pages 18 and 22)
Regenerating 8 m / M (fast rewind / fast forward) button (pages 24
and 35) Find the part of the song you want to
hear or move the cursor while entering characters.
When pressed Working During
recording or waiting for recording
5 PLAY MODE button (page 26) Switches
between normal playback, shuffle playback, and
program regeneration.
3 LEVEL / DISPLAY / CHAR button (pages 8, 19, 27,
35) The function changes as follows depending
on when it is pressed.
1 STANDBY lamp (pages 13 and 22)
You can adjust the
recording level using the
AMS knob. Shows disk
information. Displays
information about the song
being recorded. Displays
information about the song
being played. Select the
type of characters to enter.
4
Machine Translated by Google

qs z (record) button (pages 13, 16 and 18)
3 Digital optical input terminal (pages 10 and 13)
Digitally records the sound of the connected
device to the MD of this unit.
Knobs (pages 19, 23, 28)
G)
Play the MD sound with better sound quality through
the connected device. Also, digitally record the contents
of the MD of this unit on the connected device.
Terminal (page 11)
2 Analog output terminal (page 10) Plays
MD sound through the connected device. Also,
analog-record the contents of the MD of this unit on
the connected device.
4 Digital optical output terminal (10 pages)
wa INPUT button (pages 13 and 18) When
recording to MD, select the sound source to be input
to this unit.
qj Display window (page
7) Displays various information.
Indicator (page 15)
6 BEEP switch (page 43)
9 N (Play) button (pages 13 and 22)
ws PHONES terminal (page 22)
Connect headphones.
wd PHONE LEVEL knob (page 22) Adjusts the
headphone volume.
1 Analog input terminal (pages 10 and 13)
qg MENU / NO button (page 28) Displays
the "Edit Menu".
ql Remote control light receiving
part Operate the attached remote control toward the light receiving
part.
qd CLEAR button (pages 25 and 27) Cancels
the selected song number or character.
qk MD LP Lights
when the LP recording mode is set to LP2 or LP4
stereo recording. It also lights up during playback
of an MD recorded in LP2 or LP4 stereo.
qh AMS
5 USB
qa x (stop) button (pages 13, 22, 29)
0 X (pause) button (pages 13 and 22)
qf YES button (page 28) Confirms
the selected item.
w; REC MODE button (page 15) Switches
between stereo recording, LP2 stereo recording,
LP4 stereo recording, and monaural recording.
The sound of the connected device is recorded in analog on the
MD of this unit.
Connect to the USB terminal.
A confirmation sound (beep sound) can be emitted when the unit
is operated or when a specific condition is reached.
Use the included USB cable to connect to your computer
Stops playback, recording, etc. It also cancels the selected item.
Start playing. If you press this button while waiting for recording,
recording will start.
Pauses playback or recording. It also resumes paused playback
and recording.
Used when recording. It is also used when you want to monitor
the input signal or assign a song number yourself.
Cue the song, adjust the recording level, select characters and
items to enter, and so on. It is also used to confirm the selected
item.
clear
Record mode
input
Menu / No
Horns
MDLP
beep
AMS
USB
Horn level
Jesus
5
behind the body
Namesandfunctionsofeachpart
Machine Translated by Google

Play mode
Fader
clear
level
CDE Synchro
repeat
Music synchro
Jesus
INPUT REC MODE PLAY MODE
TUV
’-/,
A LOT
WXYZ
–
ABC
STOP START STANDBY
DEF
PQRS
WRITE THE
SKIP
JKL
T.REC
>10 10/0
H X
A
MUSIC
SYNC
Stop
STOP
button
Stops CD sync recording. Start
START button
(Page 21)
Start CD sync recording.
Standby STANDBY
button
(Pages 23 and 36)
Enter alphabets, numbers, and katakana. It
is also used when entering the song number.
LEVEL
REPEAT AyB
DISPLAY SCROLL FADER
1 ? / 1 (power) switch (pages 13 and 22)
2 PLAY MODE button (page 26) Switches
between normal playback, shuffle playback, and
program regeneration.
0 x (stop) button (pages 13, 22, 29)
9 X (pause) button (pages 13 and 22)
3 FADER button (page 41) Fade in /
out recording is performed.
5 Alphabet / Number / Katakana Input Bota
qa LEVEL +/- button (page 19) Adjusts the
recording level while recording or in recording
standby.
7 CD SYNCHRO
qs AyB button (page 25) Select AB
repeat playback.
8 MUSIC SYNC button (page 20) Starts music
sync recording.
qd REPEAT button (page 24) Select
repeat playback.
4 YES button (page 28) Confirms
the selected item.
6 CLEAR button (pages 25 and 27) Cancels
the selected song number or character.
ON/OFF
6
Remote controller
YES
/ SELECTMENU / NO NAME EDIT
When you press it to turn on the power, the STANDBY lamp
on the front of the main unit goes out. When you press it
again to turn off the power, the lamp lights up and the unit
goes into standby mode.
The CD sync recording standby state is set.
Stops playback, recording, etc. It also cancels the selected
item.
Pauses playback or recording. It also resumes paused
playback and recording.
qk
qj
qh
qg
qs
5
1
ql
qa
6
wd
ws
wa
w;
qd
8
qf
7
3
0
wf
2
4
9
CLEAR
CD SYNCHRO
GROUP
With x
. >
m M
7
4
98
1
5
2
6
3
` / 1
Machine Translated by Google

TRACK
Display
Lights when information about the song is displayed.
wd INPUT button (pages 13 and 18) When
recording to MD, select the sound source to be input
to this unit.
3 Reproduction indication
qj T .REC Press
during recording pause to start time machine recording.
2 Disc name and song name display
Button (page 15)
wa NAME EDIT / SELECT button (page 34) Used to give
or change a song name or disc name. Also, when
entering the song name or disc name, select the
character type.
Button (page 20)
qg./> (Cue) button (pages 19, 23, 29) Cue a song, adjust
the recording level, and select characters and items
to enter.
REC MODE
4 INPUT display (page 13)
qf m / M (fast rewind / fast forward) button (pages 24
and 35) Find the part of the song you want to
hear or move the cursor while entering characters.
wf A (MD eject) button (pages 18 and 22)
qk H (Play) button (pages 13 and 22) Starts
playback.
PGM
display (page 26)
Displayed when program playback is
selected. repeat
1 TOC display (pages 14 and 28) •
“TOC” is displayed when the recorded content has
not yet been recorded on the MD. "TOC" flashes
when the recorded content is recorded on the MD.
DISC
means
SHUF
display (page 26)
Displayed when shuffle playback is selected.
program
GROUP SKIP Not
used with this machine.
w; MENU / NO button (page 28) Displays the
"Edit Menu".
ws DISPLAY button (pages 8 and 27) Switches
the information in the display window. Scroll
button (page 22) SCROLL Scrolls and
displays long disc names andsong names.
REP
display (page 24)
Displayed when repeat playback is
selected. • If you select repeat all songs, "REP" will be displayed.
qh z (record) button (pages 13, 16 and 18)
ql GROUP ON / OFF button Not used
with this unit. Group skip button
Display window
Group on / off
disk
shuffle
input
Time machine record
Menu / No
Tok
display
Record mode
Name edit / select
input
7
vinegar.
• “D-IN” is displayed when a device connected to the
digital optical input terminal is selected as the
recording source. • “A-IN” is displayed when the
device connected to the analog input terminal is selected
as the recording source.
increase.
• "TOC EDIT" is displayed during editing
Switch between stereo recording, LP2 stereo recording,
LP4 stereo recording, and monaural recording.
Used when recording. It is also used when you want to
monitor the input signal or assign a song number yourself.
• If you select 1 song repeat, "REP 1" will be displayed.
Lights when information about MD is displayed. truck
Will be.
vinegar.
• When you select AB Repeat, "REP AB" is displayed.
Namesandfunctionsofeachpart
Machine Translated by Google

Level sync
sleep
• “MONO” when the recording mode is set to stereo
or during playback of a stereo-recorded MD.
* 4 The displayed time varies depending on the
recording mode (page 15). * 5 If there is no song
title, it will be displayed as "No Name".
* 1 The displayed time varies depending on the
recording mode (page 15). * 2 If the disk name is
not attached, "No Name" is displayed.
"LP2" and "LP4" turn off.
• “LP4” is displayed when the recording mode is set
to LP4 stereo or during playback of an MD
recorded in LP4 stereo.
* 3 If there is no song title, it will be displayed as "No
Name".
8
Note
Depending on the condition of this machine, the following may not be
displayed.
Remaining time of the entire disc
6 SLEEP display (page 42) Displayed when
the sleep timer is running.
Recording
t Song number being recorded and elapsed recording
time r Recordable time * 4 r
5 L.SYNC display (page 16) Displayed when
automatically numbering songs during recording.
8 Recording display
9 NX display
Displayed during playback or paused playback.
7 Name display (page 34) The disc
name, song name, and "Edit Menu" and "Setup Menu" settings
are displayed. The song title is displayed during playback. If there
is no disc name or song name, "No Name" is displayed.
r
LEVEL / DISPLAY / CHAR (remote control
Recordable time * 1 (Recording MD only)
r
The title of the song being recorded * 5
Sync
SYNC
display
Displayed during sync recording. Record
REC display Displayed during recording.
Recording mode display (page 15) • “MONO”
is displayed when the recording mode
is set to monaural or during playback of a
monaural-recorded MD. • “LP2” is displayed
when the recording mode is set to LP2 stereo or during playback
of an MD recorded in LP2 stereo.
Song number being played and remaining time
r
Playing song title * 3
Stopped t
Total number of songs and recorded time * 1
r
Playing t
Playing song number and elapsed playing time r
Press DISPLAY) repeatedly. Each time you
press it, the display changes as follows.
r
Disk name * 2
Switch the display
Input signal level (recording level adjustment value)
Machine Translated by Google

(1)
• For safety (1) • Warranty (1)
The following accessories are included with this machine. • Audio
connection cord (pin plug x 2n pin plug x 2) (2) • Optical digital
connection cable (1) • USB cable (1) • Remote control (1) • Sony
AA battery (2) • Net MD compatible SonicStage CD- ROM (1)
• Net MD compatible SonicStage instruction manual (1) • Information
on Sony service counters and consultation counters
When operating with the remote control,
point the remote control at the remote control light receiving part of the
main unit.
Insert 3 and # of the two attached dry batteries together with the
display inside the battery compartment.
z Dry batteries have a life of about 6 months.
Before starting the connection
The less you have left, the shorter the distance you can operate with
the remote control. Using this as a guide, replace both of them with
new dry batteries.
-Do not charge the dry cell. -If you do not use
the remote control for a long time, remove the dry batteries. -If
the liquid leaks, wipe off the liquid in the battery compartment
before inserting a new dry battery.
Precautions • If you use the dry battery incorrectly, it may leak or
explode. Be sure to observe the following. -Enter the correct
orientation of 3 and #. -Do not mix new and used dry batteries, or
different types of dry batteries.
Be sure to insert the battery
from the #pole side as shown
in the illustration .
Prepare
• When operating with the remote control, be careful not to expose
the remote control light receiving part of the main unit to direct
sunlight or strong light such as lighting equipment. It may not
accept operations from the remote control.
Insert batteries into the remote control
Check accessories
Prepare
9
Machine Translated by Google

Analog recording to B MD
Digitally record to C MD
Listen to the sound of D MD
Listen to AMD sounds
Necessary codes
An A or D connection is required to hear the MD. Also,
when recording to MD, B or C connection is required.
White (L: the left)
Reproduce the MD sound with better sound quality through
a system stereo or digital amplifier with a digital input terminal.
You can also digitally record the MD sound of this unit on a
system stereo MD or an MD deck that is digitally connected
to the amplifier.
The sound of the system stereo CD, radio, tape, CD player,
radio, cassette deck, etc. connected to the amplifier is
analog-recorded on the MD of this unit.
White (L: the left)
Red (R: right)
System stereo CD, MD, DAT deck,
Connection Precautions •
Connect the power cord until all connections are complete.
Insert the red plug of the audio connection cord into the right
(R) terminal and the white plug into the left (L) terminal.
please do not. • Turn
off the power of this unit and the devices connected to this
unit before connecting. • Insert the plug firmly into the
terminal. Incomplete connections can cause noise and
malfunction.
You can record the contents of MD in analog.
1) When there is no MD terminal, DAT, TAPE, VIDEO,
The sound of the BS / CS tuner, CD player connected to the
amplifier, MD deck, etc. is digitally recorded on the MD of
this unit.
Reproduces the MD sound through a system stereo or
amplifier. Also, on the tape of the system stereo, the tape
deck connected to the amplifier, etc.
Plug the optical digital connection cable in parallel until you
hear a click into the digital optical end. If the connection is
not correct, "Din Unlock" and "C71" may be displayed
alternately. Also, do not bend or bundle the optical digital
connection cable.
2) It may be written as "(REC) OUT", "OUTPUT", "REC",
"Recording", etc.
3) It may be written as "IN", "INPUT", "PLAY", "play", etc. 4)
It may be written as "optical digital", "DIGITAL", "OPT
(ICAL)", etc.
Red (R: right)
Connect B to D only if there is a corresponding terminal on
the system stereo or amplifier side.
Connect to either the LINE or AUX terminal.
Audio connection cord (supplied)
Used to connect AB.
Optical digital connection cable (only one
included) Used to connect a CD.
Plug the plug that connects
the power cord into the wall outlet.
Power cord
Connect to audio
equipment
10
Machine Translated by Google

This is to install the included Net MD
compatible SonicStage CD-ROM on your
computer and transfer (check out) or
return (check in) the digital music content
saved on the hard disk of the personal
computer to the MD. ..
See "Net MD Compatible SonicStage
Instruction Manual" and online help.
Be sure to install Net MD compatible
SonicStage on your computer before
connecting. For how to install, it is included
We recommend that you disconnect the USB cable.
USB cable (included)
I can't hear the playback sound of. To hear the playback sound of this
unit from a personal computer, connect the analog input terminal of
the personal computer to the analog output terminal of this unit with
an audio connection cord or a commercially available resistance-free
cable. • Do not connect or disconnect the USB cable when the Net
MD function is on. Turn off Net MD, and then connect / disconnect the
USB cable.
To the USB terminal of the personal computer
Please continue. Inserting it at an angle may cause a malfunction. •
Connect this unit to a computer via USB and the included software
Your personal computer
native
Before using the software, be sure to install the software before
connecting this unit to your computer. If you connect this unit to your
computer before installing the software, the wrong driver may be
selected and the unit may not operate properly. Similarly, when you
connect to your computer, the "Add New Device Wizard" will be
displayed. In that case, click [Cancel].
To USB terminal
Prepare
What is Net MD?
install
Connecting
• Except when connecting this unit to a personal computer for operation
• Simply connect the USB cable to this unit on your computer.
Notes •
Do not use a USB hub or USB extension cable. Be sure to connect the
computer directly to this unit with the included USB cable. • Insert
the USB connector straight all the way in to connect
Connect to a PC
and use (Net MD)
11
Machine Translated by Google

• When the Net MD function is turned on, the following
functions are canceled or the settings are canceled on
this unit. -Repeat playback, shuffle playback, program
Exit SonicStage
`/1 NET MD slot
Notes •
When the Net MD function is on, the following buttons are displayed on this unit.
2 Press the? / 1 (power) switch on this
unit to turn on the power . The
STANDBY lamp turns off.
The Net MD function is turned on and "Net MD"
is displayed in the display window.
5 For details on starting and operating
SonicStage on a PC, refer to the
separate "Net MD Compatible
SonicStage Instruction Manual" and
the online help.
7 Press NET MD to turn off the Net
MD feature
4 Press NET MD
1 Connect this unit and a computer
with a USB cable
3 Insert MD
6 (when the operation is finished)
Use Net MD function Only works. -A
(MD eject) button-NET MD
button- ? / 1 (power) switch
However, it may not work
depending on the operating status of this unit.
Play-
Sleep timer • When
"Check USB" is displayed, the USB cable is displayed.
Make sure the bull is connected properly. • Checked-
out songs cannot be edited on this unit other than
“Move songs” (page 33) and “Name songs and
discs” (page 34).
12
Machine Translated by Google

13
RecordonMD
Accidental erasure prevention knob
slot
Make a hole
z You can immediately play back the recorded song and
check it. Immediately after stopping recording, press N.
Playback starts from the first song recorded this time.
Continue to the next page
7 Adjust the recording level as needed
For more information, see
“Adjusting the recording level” (page
19).
1 Turn on the sound source you want to record
and the power source of the system
stereo (or amplifier).
Record
6 Press z
4 Insert MD for recording
3 Press the? / 1 (power) switch on
this unit to turn on the power .
The STANDBY lamp turns off.
2 Select a sound source with system
stereo (or amp)
8 Press N or X, then start playing the
sound source you want to record.
NX z
`/1
INPUT
Record on MD
Basic operation during
recording Operation in
such a case
Stop recording Press x. Pause
recording
Press X. Press it again to resume recording.
Take out the MD After stopping the recording
A-IN
Press A.
5 Press INPUT repeatedly to select the sound source you
want to record. Select the terminal to which the
sound source is connected . Display Digital optical
input D-IN Analog input
If you pause the recording and then resume it, the song
number will change. For example, if you pause recording
while recording the 4th song, it will be the 5th song from the
time you resume recording.
It will be in the recording standby state.
When recording to an MD that has already been recorded, it
will automatically record the continuation of the recorded part.
To prevent erroneous recording
erasure If you move the MD erroneous erasure
prevention knob to open a hole, you will not be able to
record. Once you close the hole, you will be able to record again.
Machine Translated by Google

z After recording, you can immediately start playing the
first song. 1 Immediately after stopping recording, press
x again.
Note
Digital recording from dts CD is not possible with this
unit.
When "TOC Writing" is blinking, the recorded
content is recorded on the MD. At this time, do not
unplug the power plug from the outlet or shake the main
unit. The recorded content may not be recorded correctly.
2 Press N.
Converts the digital signal input to this unit to the MD
sampling frequency (44.1kHz). Therefore, you can
monitor the sound of DATs and satellite digital broadcasts
(32kHz or 48kHz) with different sampling frequencies
(see “Monitoring the input sound” on page 18), or perform
digital recording.
The content recorded when "TOC" is lit
has not yet been recorded on the MD. Do not unplug the
power plug from the outlet when "TOC" is lit. You will
not be able to record the recorded content on the MD.
Playback starts from the first song on the MD.
The contents recorded when you try to remove the MD
or when you try to turn off the power of this unit are
recorded on the MD.
Precautions when
recording
Sampling rate converter
About the display during recording
14
Machine Translated by Google

3 Perform steps 6 to 8 of
"Recording" (page 13).
1 Perform steps 1 to 5 of
"Recording" (page 13).
Record for a long time
Music recorded on MDLP can only be played on devices
with the following marks printed on it. It cannot be played
on unsupported devices.
2 Press REC MODE repeatedly to select the recording
mode. Recording mode selected display
Stereo recording No display
LP4 stereo mode (4x long-time recording mode) realizes
long-time stereo recording by a special compression
method. When sound quality is important, we recommend
stereo recording or LP2 stereo recording (double longer
recording).
The recording time can be doubled or quadrupled for
stereo recording (MDLP recording). In monaural
recording, the stereo signal is converted to monaural and
recorded. The recording time is about twice that of normal
stereo recording.
z When you selected LP2 or LP4 stereo recording in step
2, the MDLP indicator lights up and “LP2” or “LP4” is
displayed.
LP2 stereo recording LP2
LP4 stereo recording LP4 monaural
recording
Notes •
Even after recording is complete, the recording mode
setting remains. Please check the recording mode
before recording.
MONO
RecordonMD
15
• When playing an MD recorded on an MDLP, use an
MDLP compatible device. It cannot be played on
other devices. • You cannot change the recording
mode during recording. • Even if the recording mode
is set to “MONO”, the sound source (stereo sound
when recording a stereo signal) can be heard from
the speaker. • Some MD editing functions such as
SF EDIT cannot be used.
AMS
REC MODE MENU/NO YES
Machine Translated by Google

3 Turn the AMS knob ( press the ./> on
the remote control repeatedly) to
display "T.Mark LSync" and display it.
Press the AMS knob or YES
2 Turn the AMS knob ( press the ./> on
the remote control repeatedly) to
display "Setup?", And press the
AMS knob or YES.
4 Turn the AMS knob ( press the ./> on
the remote control repeatedly) to
select a setting, then press the AMS
knob or YES.
During recording , press z where you want to add
a song number
T.Mark LSync
(default setting)
There are two methods, one is to attach it yourself and the other is to
attach it automatically. Adding a song number is convenient when you
want to find the beginning of a song or perform editing operations.
When digitally recording a CD or MD, the same
song number as the sound source CD or MD is
automatically added. To digitally record other sound
sources, or to automatically add song numbers when
analog recording is performed regardless of the type of
sound source, make the following settings. However, if
there is a lot of noise in the sound source such as tape
or radio, the song number cannot be added automatically.
Don't work T.Mark Off
To set the level of the input signal that is the
standard for auto track marking, after the signal
input below the level set here continues for 1.5
seconds or more, when a signal above the set level is
input again, a new song number Is attached. 1 Press
MENU / NO while stopped.
Select Auto Track
Marking Set to work
2 Turn the AMS knob (press ./> on the remote control
repeatedly) to display “Setup?”, And press the
AMS knob or YES.
If you select "T.Mark LSync", L.SYNC lights
up.
3 Turn the AMS knob (press ./> on the remote control
repeatedly) to display "LS (T)", and then press the
AMS knob or YES.
Settings to choose
1 Press MENU / NO while stopped
5 Press MENU / NO
16
AMS z
MENU/NO YES
Add song numbers
during recording (track marking)
Attach by yourself (manual
track marking)
Automatically attach (auto
track marking)
Machine Translated by Google

"Smart Space" is displayed.
If more than 30
seconds have passed since the auto-cut signal was
interrupted, the recorded silence will be automatically
erased with about 3 seconds between songs, and the
recording will be paused. When this feature is working,
you will see "Auto Cut".
When the input signal is interrupted during recording, the
silent part that has been recorded can be automatically
erased. The operation of this unit changes depending on
the length of the input signal interruption.
z Supplementary information on how to
number songs • When recording a CD or MD digitally
If the smart space signal
is re-introduced within 30 seconds of the interruption, the
recorded silence is automatically erased with about 3
seconds between songs, and the recording continues.
When this feature is working
z You can also add a song number after recording.
For details, see "Separating songs" (page 31).
RecordonMD
• When recording from an analog sound source without setting
auto track marking, or when digitally recording DAT or
satellite transmission, the entire recorded part is treated as
one song, so only one song number is used for the entire
song. Is not attached. • When digitally recording DAT or
satellite broadcasts
4 Turn the AMS knob (press ./> on the remote
control repeatedly) to select the level of the
input signal, and then press the AMS knob
or YES. Select in the range of –72dB to 0dB
(2dB unit). It is set to -50dB at the time of
shipment.
5 Press MENU / NO.
17
In the following cases, only one song number may be added to
the entire recorded part. -When recording one song with the
same disc repeatedly, such as by repeating one song-When
recording the same song number on different discs in
succession
Notes •
Even if the power of this unit is turned off or the power plug is
unplugged, the auto track marking settings are remembered. •
Even if "T.Mark L Sync" is turned off, the song number may be
added when the smart pace and auto cut are turned on. If the smart
space autocut is also turned off, the song number will not be
added.
When recording from a layer In
either case, separate the songs after recording (page 31). •
Recorded music is less than 4 seconds (stereo, LP2 stereo)
tree
Continue to the next page
E, when recording in monaural), or when it is 8 seconds or
less (when recording LP4 stereo), the song number may not be
added.
When the sampling frequency of the input signal changes, a new
song number is automatically added regardless of the auto track
marking setting.
-Some CD players or multi-disc players
MENU/NO YES
With
AMS x
FROM
Convenient function
when recording
Automatically erases silent
parts during recording (smart
space / auto cut)
Machine Translated by Google

4 Turn the AMS knob (press ./> on the remote control
repeatedly) to select the setting, and then select the setting.
Press x to stop the source monitor .
• When “D-IN” is selected for INPUT The signal
input from the digital optical input terminal is
output to the digital optical output terminal
through the sampling rate converter. The
signal is further D / A converted and output
from the analog output terminal and PHONES
terminal. At this time, "-DA" is displayed.
S.Space On (default
setting) that
automatically activates smart space and
auto cut
To set up the smart space and autocut function, follow
the steps below.
Press the AMS knob or YES.
2 Turn the AMS knob (press ./> on the remote control
repeatedly) to display “Setup?”, And press the
AMS knob or YES.
Don't work
Settings to choose
1 Press MENU / NO while stopped.
You can monitor the signal from each input terminal
without recording.
5 Press MENU / NO.
• When "A-IN" is selected for INPUT The signal
input from the analog input terminal is A / D
converted and output to the digital optical
output terminal. The signal is further D / A
converted and output from the analog output
terminal and PHONES terminal. At this time,
"AD --DA" is displayed.
3 Turn the AMS knob (press ./> on the remote control
repeatedly) to display "S.Space On", and press
the AMS knob or YES.
S.Space Off
Monitor the input sound
(source monitor)
Notes •
If you start recording with no signal input, smart space and
autocut will not work regardless of the settings. • The song
number may not change before and after the smart space
is activated.
• The settings are memorized even if the power of this unit is
turned off or the power plug is unplugged. • Recording will
stop automatically if the recording paused by auto cut
continues for about 10 minutes.
• The smart space and auto cut settings are the same. You
can't work just one or the other.
18
3 Press z
2 Press INPUT repeatedly to select the
sound source you want to monitor.
1 Press A to eject the MD
Machine Translated by Google

AMS
LEVEL/DISPLAY/CHAR
Performs step 8 and subsequent steps
of "Recording" (page 13).
Ru
4 Turn the AMS knob ( press the LEVEL +/–
of the remote controller repeatedly) to
adjust the recording level. When the
playback level is the highest, the peak
level meter “OVER” should not always
be lit. Adjust.
Press (DISPLAY on the remote
control) to display the level of
the input signal.
5 Stop playing the sound source you want to record
Adjust the recording level
2 Play the part with the highest playback level
(the part with the loudest sound) of the
sound source.
3 LEVEL/DISPLAY/CHAR
6 When you start recording as it is
1 Perform steps 1 to 6 of
"Recording" (page 13).
You can also adjust the recording level with the z remote
control. Z Press LEVEL +/- repeatedly during recording or while
recording is paused .
Adjust so that this is not always lit
19
RecordonMD
z You can return the recording level to the default value. If
you press CLEAR instead of turning the AMS knob in step
4, the default value will be restored.
You can adjust the recording level as needed.
4 Turn the AMS knob (press ./> on the remote
control repeatedly) to select "P. Hold On", and
then press the AMS knob or YES.
5 Press MENU / NO. To
stop the peak hold function, select "P. Hold Off"
in step 4.
z You can use the peak hold function. The state
of the peak level meter when the input signal level
is the highest can be stopped and displayed until a
signal exceeding that level is input. 1 Press MENU /
NO while stopped.
2 Turn the AMS knob (press ./> on the remote
control repeatedly) to display “Setup?”, And
press the AMS knob or YES.
Note
You can only increase the volume up to + 12.0dB
for analog recording and + 18.0dB for digital
recording. If the output level of the connected device
is low, you may not be able to maximize the recording level.
3 Turn the AMS knob (press ./> on the remote
control repeatedly) to display "P. Hold
Off" (default setting), and then press the AMS
knob or YES.
Machine Translated by Google

It will be in the recording standby state.
Note
Recording will start using the sound stored in the memory at the
time of step 3 above. When the recording standby state or the
sound source is regenerated for 6 seconds or less, the sound for 6
seconds is not stored in the memory, so the sound 6 seconds ago
cannot be recorded.
When you press the button, it will start recording
the sound stored in the memory, and then continue
recording using the sound in the memory.
Recording will start automatically.
Press x to stop music sync recording .
Recording can be started at the same time as the sound
source connected to the input terminal is played. The
numbering of songs depends on the sound source to be
recorded. For details, see "Adding song numbers during
recording" (page 16).
Press x to stop time machine recording .
Note
Smart Space and Auto Cut (page 17) work automatically
during music sync recording.
When in the recording standby state, the unit starts storing
the sound from the sound source in the memory, and always
stores the sound up to about 6 seconds before that point.
When recording with a time machine, this unit records the
sound stored in the memory from the sound source, not the
sound from the sound source. When recording from satellite
or FM, you can prevent missed timing and missing the
beginning of the recording.
With x
. >
AMS knob (remote control
Press T.REC)
Record from the sound 6
seconds ago (time machine recording)
Synchronized recording with
your favorite sound source
(musical synchronized recording) Z
AMS
MUSIC SYNC
1 Perform steps 1 to 6 of "Recording" (page
13).
2 Press MUSIC SYNC
3 Where you want to start recording
3 Start playing the sound source you want to record
2 Start playing the sound source you want to record 1 Perform steps 1 to 5 of "Recording" (page
13).
20
H X
A
x
` / 1
Machine Translated by Google
Table of contents
Other Sony Stereo System manuals

Sony
Sony HCD-H771 User manual

Sony
Sony HCD-V8900 User manual

Sony
Sony HCD-ZX9 - Receiver Cd User manual

Sony
Sony HCD-EC55 - Receiver System User manual

Sony
Sony ZS-D1 User manual

Sony
Sony CMT-NEZ3 - Micro Hi Fi Component System User manual

Sony
Sony CMT-EP707 (CMTEP707) Manual

Sony
Sony SS-CHP7 User manual

Sony
Sony MHC-ESX9 User manual

Sony
Sony HCD-F250AV - Compact Disc Receiver System User manual

Sony
Sony MHC-GRX40AV User manual

Sony
Sony SRS-XB2 User manual

Sony
Sony SRS-XB2 User manual

Sony
Sony ICF-C11iP User manual

Sony
Sony PHC-ZW770L User manual

Sony
Sony LBT-XGR99AV User manual

Sony
Sony DHC-AZ7DM User manual

Sony
Sony HCD-EX200 User manual

Sony
Sony PFV-SP3300 User manual

Sony
Sony HCD-A490 User manual