manuals.online logo
Brands
  1. Home
  2. •
  3. Brands
  4. •
  5. Sony
  6. •
  7. Stereo System
  8. •
  9. Sony MHC-C70 User manual

Sony MHC-C70 User manual

Other Sony Stereo System manuals

Sony MHC-GX470 - Mini Hi Fi Stereo System User manual

Sony

Sony MHC-GX470 - Mini Hi Fi Stereo System User manual

Sony CMT-CQ1 - Micro Hi Fi Component System Manual

Sony

Sony CMT-CQ1 - Micro Hi Fi Component System Manual

Sony CMT-F3MD User manual

Sony

Sony CMT-F3MD User manual

Sony DHC-MD55 User manual

Sony

Sony DHC-MD55 User manual

Sony LBT-G1300 - Compact Hifi Stereo System User manual

Sony

Sony LBT-G1300 - Compact Hifi Stereo System User manual

Sony CMT-LX20I Marketing User manual

Sony

Sony CMT-LX20I Marketing User manual

Sony MHC-EC619iP User manual

Sony

Sony MHC-EC619iP User manual

Sony MHC-GT3D User manual

Sony

Sony MHC-GT3D User manual

Sony MHC-DP700 User manual

Sony

Sony MHC-DP700 User manual

Sony SRS-XB12 User manual

Sony

Sony SRS-XB12 User manual

Sony BMZ-K2 User manual

Sony

Sony BMZ-K2 User manual

Sony SA-V90DW Reference guide

Sony

Sony SA-V90DW Reference guide

Sony MHC-V21D User manual

Sony

Sony MHC-V21D User manual

Sony DHC-NX5MD User manual

Sony

Sony DHC-NX5MD User manual

Sony MHC-VX55 User manual

Sony

Sony MHC-VX55 User manual

Sony CX-JDS22 User manual

Sony

Sony CX-JDS22 User manual

Sony MHC-GX570XM Marketing User manual

Sony

Sony MHC-GX570XM Marketing User manual

Sony SRS-XB2 Reference guide

Sony

Sony SRS-XB2 Reference guide

Sony CECH-ZVS1A User manual

Sony

Sony CECH-ZVS1A User manual

Sony HCD-GNX600 User manual

Sony

Sony HCD-GNX600 User manual

Sony HCD-441 User manual

Sony

Sony HCD-441 User manual

Sony MHC-EC70 - Mini Hi-fi Component System User manual

Sony

Sony MHC-EC70 - Mini Hi-fi Component System User manual

Sony HCD-DR7AV User manual

Sony

Sony HCD-DR7AV User manual

Sony game sync lbt-xg900av User manual

Sony

Sony game sync lbt-xg900av User manual

Popular Stereo System manuals by other brands

Philips MCM398D/12 user manual

Philips

Philips MCM398D/12 user manual

LG OM4560 owner's manual

LG

LG OM4560 owner's manual

JVC UX-G3 instructions

JVC

JVC UX-G3 instructions

Odys ODYS - LOOP instruction manual

Odys

Odys ODYS - LOOP instruction manual

Aiwa NSX-AJ700 Service manual

Aiwa

Aiwa NSX-AJ700 Service manual

Panasonic SC-AK100 operating instructions

Panasonic

Panasonic SC-AK100 operating instructions

Sharp CD-G10000V Operation manual

Sharp

Sharp CD-G10000V Operation manual

Bogen NEARSCAPES 4.1 manual

Bogen

Bogen NEARSCAPES 4.1 manual

Panasonic SCPM29 - MINI HES W/CD PLAYER operating instructions

Panasonic

Panasonic SCPM29 - MINI HES W/CD PLAYER operating instructions

Meyer LD-3 operating instructions

Meyer

Meyer LD-3 operating instructions

THOMSON MIC302U manual

THOMSON

THOMSON MIC302U manual

Philips MCM530 Service manual

Philips

Philips MCM530 Service manual

Cetacea Sound CVS-II user guide

Cetacea Sound

Cetacea Sound CVS-II user guide

Denon UCD-250 Service manual

Denon

Denon UCD-250 Service manual

Exibel BDX600-UK user manual

Exibel

Exibel BDX600-UK user manual

Sanyo DC-F320 Service manual

Sanyo

Sanyo DC-F320 Service manual

Philips FWM583X Specifications

Philips

Philips FWM583X Specifications

Onkyo CBX 300 - CD / MP3 Clock Radio instruction manual

Onkyo

Onkyo CBX 300 - CD / MP3 Clock Radio instruction manual

manuals.online logo
manuals.online logoBrands
  • About & Mission
  • Contact us
  • Privacy Policy
  • Terms and Conditions

Copyright 2025 Manuals.Online. All Rights Reserved.

SON_ "_757-494-_1 (1)
MiniHi-Fi
ComponentSystem
Operating Instructions
Mode d'emploi
mOffAL AUDIO
MHC-C70
©1993 by Sony Corporation
To preve.t firu u[ shuck hd.r_,_d, do i=u[
expose the unit to rain or moisture.
To avoid electrical shock, do not open the
cabinet. Refer servicing to qualified
personnel only.
RISK OF ELECIRIC SHOCK
DO NOT OPEN
GAUIlON: lL) HLDUL;E IHL HISKOF ELE(JIRiCSHOCK,
DO NOT REMOVE COVER (OR BACK).
NO USER-SERVICEABLE PARTS INSIDE.
REFER SERVICING TO QUALIFIED SERVICE PERSONNEL.
This symbol is intended to alert the user to
the presence of uninsulated "dangerous
voltage" within the product's enclosure
that may be of sufficient magnitude to
constitute a risk of electric shock to
persons.
This symbol is intended to alert the user to
the presence of important operating and
maintenance (servicing) instructions in the
literature accompanying the appliance.
For the customers in Canada
Ii AUTION:
O PREVENT ELECTRIC SHOCK, DO NOT USE THIS
OLARIZED AC PLUG WITH AN EXTENSION CORD,
ECEPTACLE OR OTHER OUTLET UNLESS THE
LADES CAN BE FULLY INSERTED TO PREVENT
LADE EXPOSURE.
i-or the uu_tomurs in the U.:5.A.
Owner's Record
The model and serial numbers are located at trle ru_ (JI thL: u_llt.
Record the serial number in the spaces provided below, Refer to
them whenever you call upon your Sony dealer regarding this
product.
Model No, DXA-C70 Serial No.
Model No. HCD-C70 Seria_ No.
Model No. SS-H3800N Serial No.
INFORMATION
This equipment has been tested and found to comply with the limits
for a Class B digital device, pursuant to Part 15 of the FCC Rules.
These limits are designed to provide reasonable protection against
harmful interference in a residential installation. This equipment
generates, uses, and can radiate radio frequency energy and, if not
installed and used in accordance with the instructions, may cause
harmful interference to radio communications. However, there is no
guarantee that interference will not occur in a particular installation.
If this equipment does cause harmful interference to radio or
television reception, which can be determined by turning the
equipment off and on, the user is encouraged to try to correct the
interference by one or more of the following measures:
- Reorient or relocate the receiving antenna.
- Increase the separation between the equipment and receiver.
-Connect the equipment into an outlet on a circuit different from
that to which the receiver is connected.
- Consult the dealer or an experienced radio/TV technician for
help.
CAUTION
You are cautioned that any changes or modifications not expressly
approved in this manual could void your authority to operate this
equipment.
CAUTION
The use of optical instruments with this product will
increase eye hazard.
iNote to CATV system installer:
This reminder is provided to call CATV system installer's
attention to Article 820-40 of the NEC that provides guidelines for
proper grounding and, in particular, specifies that the cable
ground shall be connected to the grounding system of the
building, as close to the point of cable entry as practical.
2
Afin d'eviter tout risque d'incendie ou
d'blectrocution, ne pas exposer cet appareil
_. la pluie ou & I'humidit@.
Afin d'@carter tout risque d'@lectrocution,
garder le coffret term@. Ne confier I'entretien
de I'appareil qu'i_ un personnel qualifi@.
Pour lee utlllsateurs eu Canada
-- ATTENTION:
POUR PREVENIR LES CHOCS
ELECTRiQUES, NE PAS UTILISER cETrE
FICHE POLARISEE AVEC UN
PROLONGATEUR, UNE PRISE DE
COURANT OU UNE AUTRE SORTIE DE
COURANT, SAUF SI LES LAMES PEUVENT
ETRE INSEREES A FOND
SANS EN LAISSER AUCUNE PARTIE A
DECOUVERT.
Getting Started
How to use this manual .................................. 3
Overview ........................................................... 4
Precautions ...................................................... 5
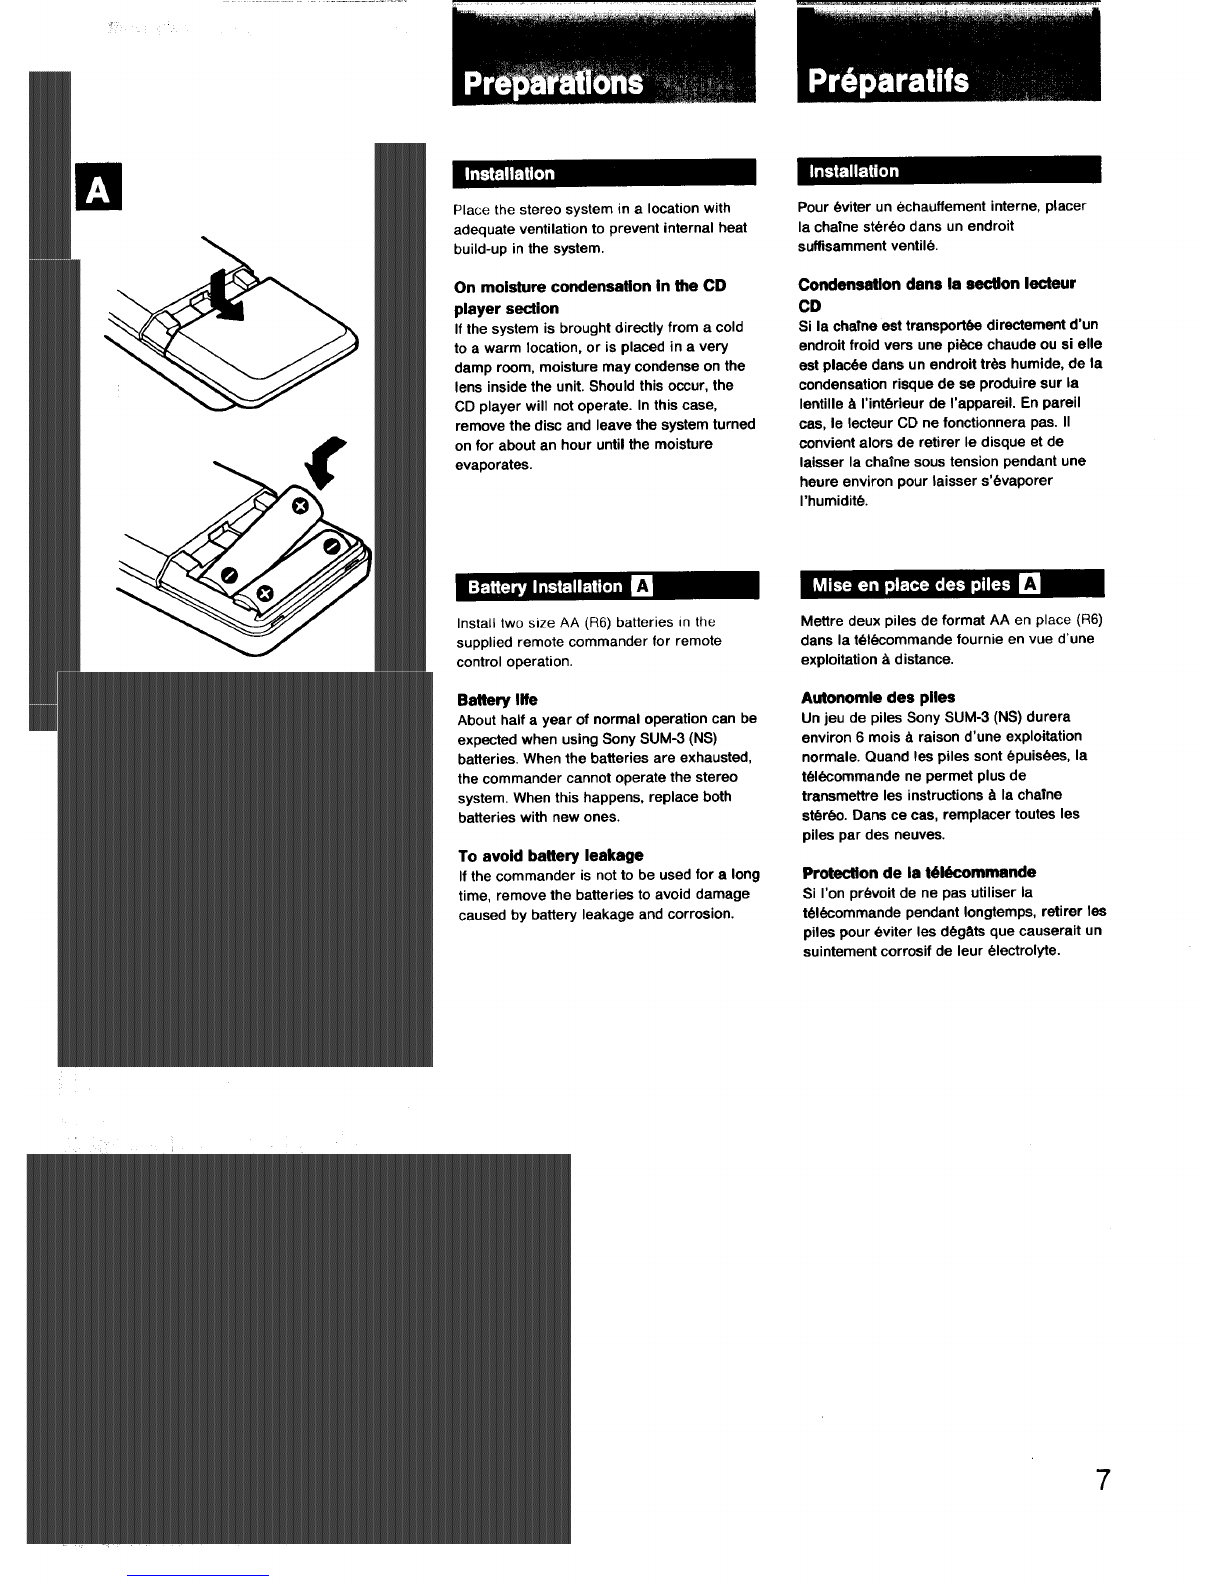
Preparations ..................................................... 7
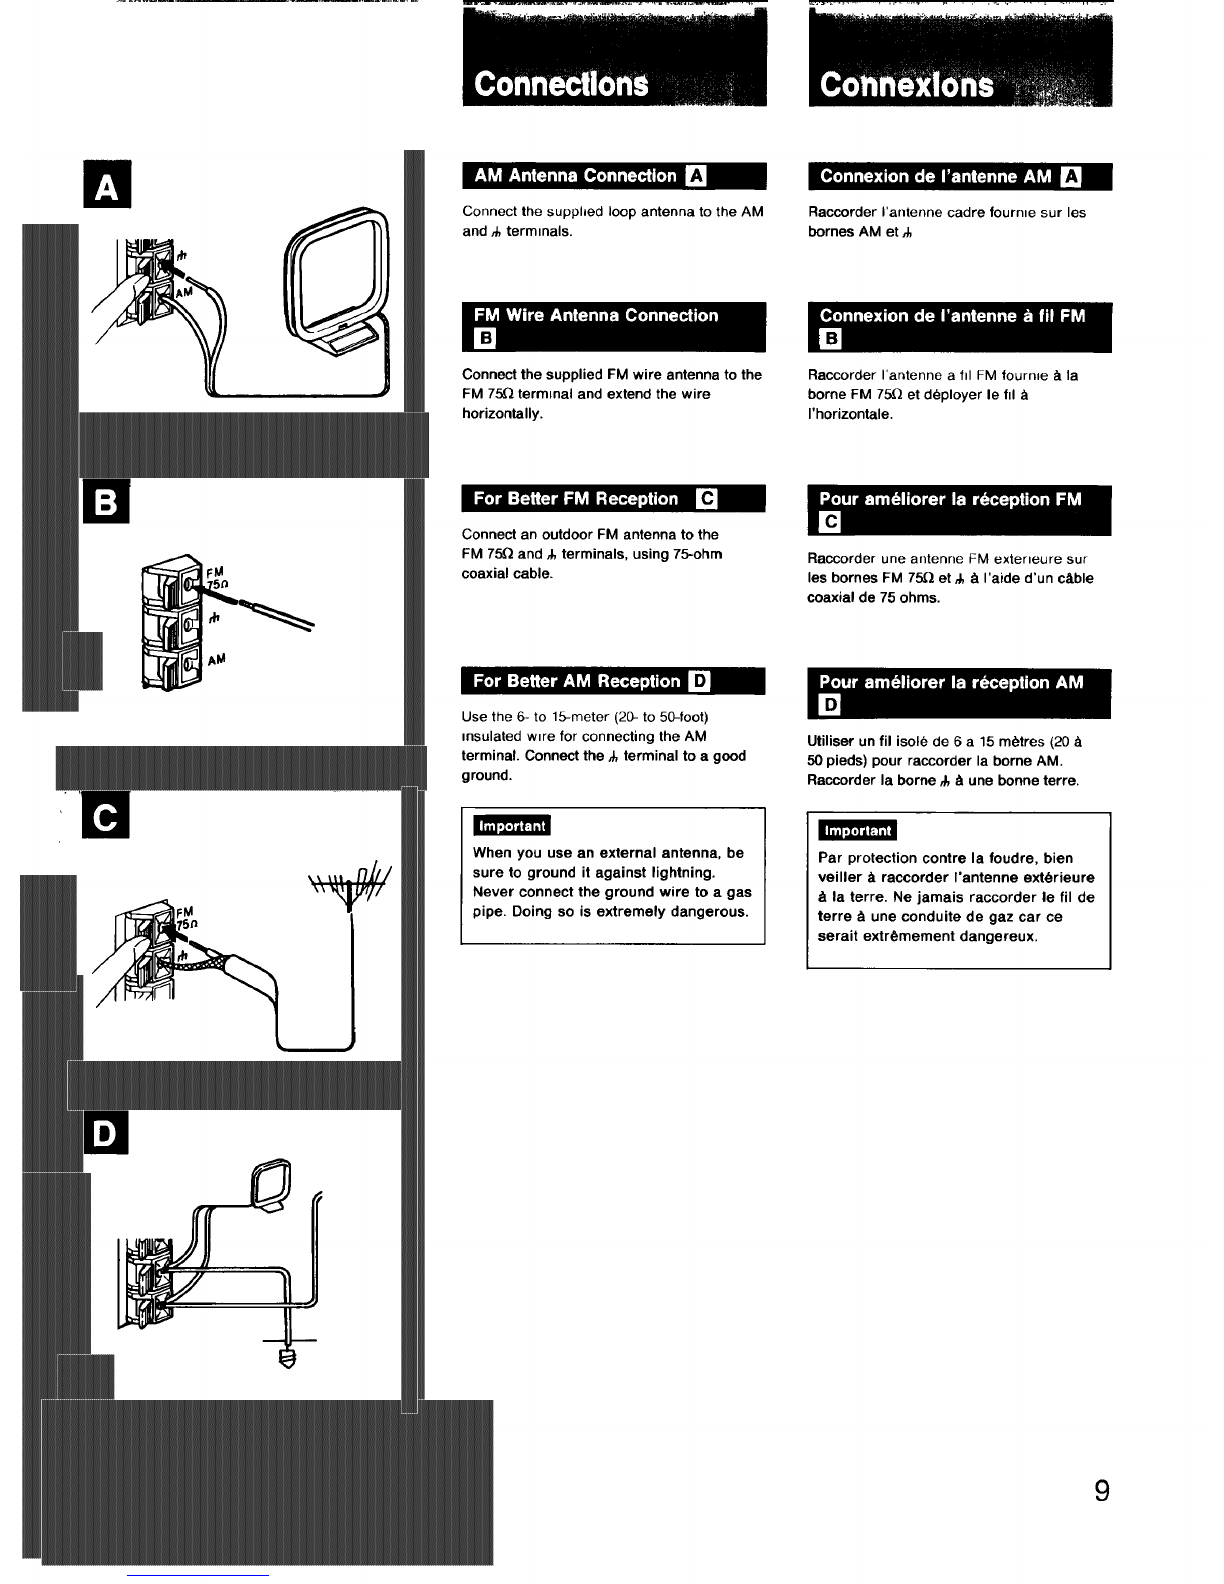
Connections ...................................................... 8
Clock setting ................................................... 11
Parts identification ......................................... 12
Turning on the power .................................... 16
Using Your Stereo
Amplifier operations -- Adjusting the Sound
Basic sound adjustment ............................... 17
CD player operations -- Listening to a CD
CD playing ...................................................... 18
Various CD playing modes ........................... 24
Custom files ................................................... 31
Tuner operations -- Listening to the radio
Radio reception ............................................. 35
Cassetta deck operations
-- Playing back and recording
Tape playback ................................................ 39
Recording ....................................................... 42
Tape dubbing ................................................. 45
CD recording operations
-- Editing and recording a CD
Synchronized CD recording ......................... 47
CD program editing ..................................... 50
Graphic Equalizer operations
-- Adjusting the sound quality
Adjusting the sound effects .......................... 53
Other operations
Timer-activated operation ............................. 57
General
Maintenance ................................................... 64
Specifications ................................................. 66
Troubleshooting guide .................................. 68
Pour commencer
Comment utiliser ce manuel .......................... 3
Pr0sentation du produit .................................. 4
Pr@cautions ...................................................... 5
Pr@paratifs ........................................................ 7
Connexions ....................................................... 8
R@glage de rhorloge .................................... 11
Nomenclature ................................................. 12
Mise sous tension ................................ ,....... 16
Utlllsation de la chaine st_r6o
Fonctionnement de I'ampllflcateur
RLkglage du son
R6glage de base du son .............................. 17
Fonctlounement du lecteur CD
Ecoute d'un disque compact
Lecture d'un disque compact ....................... 18
Les divers modes de lecture d'un disque
compact .......................................................... 24
Fichiers personnalis_)s .................................. 31
Fonctionnement du tuner
-- Ecoute de la radio
R@ception de la radio .................................... 35
Fonctlonnement de Is platine-caNeite
Lecture el enreglstrement
Lecture d'une cassette .................................. 39
Enregistrement .............................................. 42
Copie de cassette .......................................... 45
Enreglstrement d'un dlsque compact
Montage et eereglstrement d'un
dlsque compact
Enregistrement synchronis@ d'un disque
compact .......................................................... 47
Montage programm6 d'un disque
compact .......................................................... 50
Fonctlonnement de I'dbgellseur gmphlqne
R@glege de la sonodtb
R@glage des effets sonores ......................... 53
Aulres opbra_ions
D@clenchement par minuterie ...................... 57
Gdn@rellt_s
Entretien ......................................................... 64
Spbcificatiens ................................................. 66
Guide de d@pannage .................................... 70
How this manual is composed
Please read the instructions in this manual
referring to the illustrations.
eThe letters in the illustrations correspond to
the letters in the text.
ex. Speaker Cord Connection []
eThe step numbers in the illustrations
correspond to the step numbers in the text.
ComposlUon du manuel
Pri_re de lire les explications de ce manuel
en consultant les illustrations.
• Les lettres figurant sur les illustrations
correspondent _,celles du texte explicatif.
Ex: Connexion des cordons d'enceinte
[]
• Les num@ros des @tapes figursnt sur ies
illustrations correspondent _,ceux du texte
explicatif.
3
Tuner section
•You can store up to 30 stations; 20 stations
for FM and 10 stabons for AM
Amplifier section
• The Sound Field Coordinator system allows
you to enjoy various sound effects with
simple operahon.
--You can easily adjust the music to your
taste by selecting from 6 factory-preset
settings of graphic equalizer and surround
effect
• DBS (Dynamic Bass System) reinforces the
bass sound.
• The surround system adds surround effect
to stereo sound.
•You can select the desired program source
directly just by pressing the operation
buttons on the program source equipment:
BAND or -/+ to select the tuner, D to
select the CD player, and <3 or Dto select
the cassette deck (Automatic Source
Selection).
• You can play the desired program source
directly just by pressing the function
buttons (TAPE, CD, TUNER) while the
system is turned off (One Touch Play).
CD player section
• The CD player allows you to play up to 5
dMscs ma row.
•You can enjoy listening in various playing
modes.
• The Tape Select Edit function automatically
chooses the most suitable tape length for
recording a CD.
• The Custom File function allows you to
make your disc custom-made by.
--ass=gmng a name to the d_sc
(Disc Memo)
-- memorizing the sound adjustment on
the disc (Sound F=eld File).
Cassette deck section
• Auto-reverse decks enable repeated
playback of both s=des of the cassette
• The CD synchro function enables easy
recording of a CD.
•Double decks enable tape dubbing and
continuous playback.
• You can use synchronized dubbing at high
speed.
Remote commander
eA remote commander is supplied with this
umt
Section tuner
•II est possible de m_moriser un max=mum
de 30 stations, 20 stations FM et 10 stat=ons
AM
Section amplificateur
• Le syst_me coordmateur de champ sonore
permet d'obtenir des effets sonores van6s
en une seule op6ratmn.
--II est facile de r_gler la musique selon
ses preferences en s61ectionnant I'un des
6 r_glages d'6galiseur graphique et d'effet
amb=ant r6gl6s en usine.
•Le DBS (syst_me de grave dynamique)
renforce le grave.
•Le syst6me ambiant ajoute un effet
ambiant au son st_rL=o.
•II est possible de s61ectionner directement
la source de programme souhait6e par
simple pression d'une touche de fonction
sur I'appareil source: BAND ou -/+ pour
s61ectionner le tuner, Dpour s_lectionner
le lecteur CD, et <3 ou I> pour s61ectionner
la platine-cassette (s_lection automat_que
de la source)
•II est possible de lire la source de
programme souhait_e directement en
appuyant sur les touches de fonction
(TAPE, CD, TUNER) alors que la chaTne •st
hors tension (lecture par touche unique).
Section lecteur CD
•Le lecteur CO permet de hre un max=mum
de 5 disques &la suite
•II est possible de profiter de 1'6coute dans
divers modes de lecture
• La fonction de montage par s61ection de
bande choisit automatiquement la Iongueur
de bande quJ convient le mveux pour
I'enreglstrement d'un CD.
•La fonction de fich=er personnalis6 permet
de cr6er un d=sque personnalis6 en.
--donnant un nom au d=sque
(M_moire de disque)
--m6monsant les r6glages sonores du
disque (Fmhier de champ sonore).
Section platlne-casselte
•Les platines _ auto-mvers_on autonsent
une lecture r_p_t_e des deux faces d'une
cassette.
• La tonction "CD synchro" permet
d'enregtstrer un CD en tout famht6.
• Les deux platines rendent possibles la
copie de cassette et la lecture en continu.
• La copie synchronis_e est possible
vitesse acc_l_r_e
T61dcommande
•Une t_16commande est fourme avec
I'appareil.
4
On operating voltage
• Operate the un=tonly on 120V AC, 60 Hz.
On safety
• The unit is not disconnected from the AC
power source (mains) as long as it is
connected to the wall outlet, even if the unit
itself has been turned off.
• Unplug the system from the wall outlet if it
is not to be used for an extended period of
time To disconnect the cord, pull it out by
the plug. Never pull the cord itself.
•Be sure to turn off the power when you
unplug the AC power cord.
eShould any solid object or liquid fall into
the component, unplug the system and
have =tchecked by qualified personnel
before operating it any further.
• AC power cord must be changed only at
the qualified service shop
•Do not move the unit while a d=sc is in any
of the disc trays, otherwise the discs may
fall out of the trays and you w=ll be unable
to remove them
•Do not insert more than one disc in one
tray.
eDo not install the unit in a place where
there is excess=ve dust or smoke.
ethos unit uses several micro-computer
ch=ps to control aseries of operations.
Sometimes, an operahon may not work
properly due to the condition of the power
being supplied. In this case, unplug the AC
power cord, then re-connect it and retry the
operation.
For the customers in the U.S.A.
• As the laser beam used in this unit is
harmful to the eyes, do not attempt to
disassemble the cabvnet Refer servicing to
qualif=ed personnel only.
•For detailed safety precautions, see the
"IMPORTANT SAFEGUARDS" leaflet
Tension de fonctionnemenl
•Faire fonchonner I'appareil uniquement sur
un courant CA de 120V, 60 Hz
S_,curit_
• L'appareil n'est pas d_branch_)de la
source secteur rant qu'il reste raccord6
une pr=se secteur, mOme si son
alimentatmn a 6t6 couple
• D(_brancher la cha;ne au nvveau de la prise
secteur sr I'on pr_vo=t de ne pas I'ut_hser
pendant Iongtemps. Pour d6brancher le
cordon, saisir la fiche Ne jamais tirer sur
le cordon proprement dit.
•Bien 6teindre I'appareil avant de
d6brancher le cordon d'ahmentation.
• Si un liquide ou un solide venait _s'infiltrer
dans I'appareil, le d_brancher et le faire
v_rifier par un personnel qualifi_ avant de
le remettre en service.
• Le cordon d'ahmentation dovt _tre chang(_
uniquement par un service apr(_s-vente
quahh_.
eNe pas d_placer rappareil Iorsqu'il y a des
disques dans les tiroirs de disque, car les
disques risquera=ent de sortir des tiroirs et
il ne serait plus possible de les enlever.
eNe pas mettre plus d'un disque dans le
m_me tiroir.
• Ne pas installer I'appareil clans un endroit
renfermant de la poussl(_re ou des fum(_es
excessives.
•L'appareil fait appel _plusieurs puces de
microprocesseur pour commander une
s6rie donn6e d'op_rations. Quelquefols,
une op0ration risque de ne passe d(_rouler
correctement en raison de I'_tat
d'alimentation de I'appareil. Dans ce cas,
d_brancher le cordon d'ahmentat=on, pUBS
le rebrancher et recommencer rop_ration.
5
ooI
Transporting lock screws holden
Logement des vis de biocage pour transpor
On lock screws []
The lock screws on the bottom exterior of the
CD player protect the unit against shock
during transportation. Before operating the
CD player, remove the three lock screws by
following the instructions on the label, and
store them m the transporting lock screws
holder.
When transporting the unit, replace the lock
screws in their original holes and lock them.
Transporting lock screws holder []
There are three screw holes located on the
back of the CD player that can be used to
store the lock screws after they have been
removed in order to keep the screws from
being lost
Simply screw the lock screws into these
holders for safekeeping.
To re-install the screws
1 Take out the d=scs from all disc trays.
2 Press OPEN/CLOSE _for DISC 1.
The disc tray opens
3 Press SYSTEM POWER to turn off the
power,
The disc tray closes.
4 Disconnect the AC power cord.
5 Re-install the lock screws.
Note on the Indlcstor for the II PAUSE button
The indicator for the II PAUSE button flashes
each time you connect the AC power cord to
a wall outlet or turn on the power with the
SYSTEM POWER button; this is normal.
If you have any question or problem
concerning your stereo system, please
consult your nearest Sony dealer.
A propos des vls de blocage []
Les vis de blocage sur le fond ext6neur du
lecteur CD prot6gent I'appareil contre les
chocs pendant la dur6e du transport. Avant
de mettre le lecteur CD en service, retirer les
trois vis de blocage en proc6dant comms
indiqu6 sur 1'6tiquette, et les ranger dans le
Iogement des vis de blocage pour transport.
Lorsqu'on doit transporter I'appareil,
remettre les vis de blocage dans leurs
orifices originaux et les serrer &fond.
lement des vls de blocage pour transport
II y a trois orifices pour vis de blocage au
dos du Iocteur CD qui pourront _tre utilis_J
pour ranger les vis de blocage une fois
qu'on les a retir6es, pour 6viter de les
perdre.
II suffit de visser les vis de blocage dans ces
orifices pour les garder en sorer6.
Pour remettre lee vls en place
1 Sortir les disques de tousles tiroirs.
2 Appuyer sur OPEN/CLOSE _ de DISC 1.
Le tiroir du disque s'ouvre.
3 Appuyer sur SYSTEM POWER pour
couper ralimentation.
Le tiroir du disque se referme.
4 D6brancher le cordon d'alimentation.
5 Remettre les vis en place.
Remarque sur le t6moln de le touche
II PAUSE
Le t6moin de la touche II PAUSE clignote
chaque fois qu'on raccorde le cordon
d'alimentation secteur 8une prise secteur ou
qu'on allume I'appareil h I'aide de la touche
SYSTEM POWER; ceci est normal.
Pour toute question ou difficult6 au sujet de
cette chaTne st6r6o, pri6re de consulter le
concessionnaire Sony le plus proche.
6
IITL3FJIF_t'_
L_'£_tmt:JT
Place the stereo system in a location with
adequate ventilation to prevent internal heat
build-up in the system.
On moisture condensation In Ihe CD
player section
If the system is brought directly from a cold
to a warm location, or is placed in a very
damp room, moisture may condense on the
lens inside the unit. Should this occur, the
CD player will not operate. In this case,
remove the disc and leave the system turned
on for about an hour until the moisture
evaporates.
Pour eviter un echauflement interne, placer
la chatne stereo dans un endroit
suffisamment ventil_.
Condensation dans la section lecteur
CD
Si la chaTne est transportee directement d'un
endroit froid vers une piece chaude ou si elle
est plaoee dans un endroit tres humide, de la
condensation risque de se produire sur la
lentille _ rint6rieur de I'appareil, En pareil
cas, le lecteur CD ne fonctionnera pas. II
convient alore de retirer le disque et de
laisser la chaTne sous tension pendant une
heure environ pour laisser s'evaporer
I'humidite.
Install two size AA (R6) batteries in the
supplied remote commander for remote
control operation.
Battery life
About half a year of normal operation can be
expected when using Sony SUM-3 (NS)
batteries. When the batteries are exhausted,
the commander cannot operate the stereo
system• When this happens, replace both
batteries with new ones.
To avoid battery leakage
If the commander is not to be used for a long
time, remove the batteries to avoid damage
caused by battery leakage and corrosion.
Mettre deux piles de format AA en place (R6)
dans la t_lL=commande fournie en vue d'une
exploitation _, distance.
Autonomle des piles
Un jeu de piles Sony SUM-3 (NS) durera
environ 6 mois 8 raison d'une exploitation
normale. Quand les piles sont 6puis_es, la
t_lecommande ne permet plus de
transmettre les instructions _. la chaTne
st_r6o. Darts ce cas, remplacer toutes les
piles par des neuves.
Protection de la t_)h_ommande
Si I'on prl_voit de ne pas utiliser la
telecommande pendant Iongtemps, retirer lea
piles pour eviter les deg&ts que causerait un
suintement corrosif de leur electrolyte.
7
: o • o
1 2
15mm
(5/8 inch)
la[FTi[R';I_[._t_J]l_ [BI
DXA-C70 HCD-C70
I-_'1I:il
Notes on connection
eConnect the AC power cord last.
eCord plugs and jacks are color coded.
Red plugs and jacks are for the right
channel (R) and white ones for the left
channel (L).
Strip 15 mm (5/8 inch) of the speaker cord
coating from the end of the cord.
Twist each end of the wire.
Connect the right speaker to R, with the
red cord to + and the black cord to -.
Connect the left speaker to L, with the red
cord to + and the black cord to -.
Connect the system with the supplied flat
cord.
To connect, depress the middle of the
connector until it clicks into the male
connector.
To disconnect, pull the connector out. Never
pull the cord itself.
Remerquu sur le$ connexlons
• Brancher le cordon d'alimentation en
dernier lieu.
• Les fiches et prises des cordons sont
identifiables par leur couleur. Les fiches et
prises rouges sont destin_es au canal droit
(R), les blanches au canal gauche (L).
Denuder le cordon des enceintes sur
15 mm (5/8 pouce) a son extr6mit6.
Torsader chaque extr6mitb du ill.
Raccorder I'enceinte droite sur R, le
cordon rouge 6tant retie sur + et le
cordon noir sur -.
Raccorder I'enceinte gauche sur L, le
cordon rouge etant relie sur + et le
cordon noir sur -.
Raccorder la chafne &I'aide du cordon plat
fourni.
Pour raccorder, appuyer sur le milieu du
connecteur jusqu'& ce qu'il rentre avec un
d_clic dans le connecteur m&le.
Pour debrancher, sortir le connecteur. Ne
jamais tirer sur le cordon proprement dit.
Icl
Connect the supplied loop antenna to the AM
and _ terminals.
Connect the supplied FM wire antenna to the
FM 75Q terminal and extend the wire
horizontally.
Connect an outdoor FM antenna to the
FM 75_ and _, terminals, using 75-ohm
coaxial cable.
Use the 6- to 15-meter (20- to 50-foot)
insulated w=re for connecting the AM
terminal. Connect the _, terminal to agood
ground.
When you use an external antenna, be
sure to ground it against lightning.
Never connect the ground wire to agas
pipe. Doing so is extremely dangerous.
Raccorder rantenne cadre fournle sur les
bornes AM et ,_,
Raccorder I'antenne a fll FM tourn_e & la
borne FM 75Q el deployer le fil &
rhorizontale.
Raccorder une antenrle FM exterleure sur
les bornes FM 75,('4et ,I, & raide d'un c&ble
coaxial de 75 ohms.
Utiliser un fil isole de 6 a 15 mbtres (20 &
50 pieds) pour raccorder la borne AM.
Raccorder la borne ,/, &une bonne terre.
Par protection contre la foudre, bien
veiller & raccorder I'antenne ext_rieure
la terre. Ne jamais raccorder le fil de
terre &une conduite de gaz car ce
serait extremement dangereux.
9
©
AC IN
t
NE
[]
LINE IN -1
DIGITAL
OPTICAL IN IAU BUS
©
o
Connect the supplied AC power cord to
AC IN and the other end to a wall outlet.
VCR []
You can connect a VCR, etc. [] to the VIDEO
IN jacks. To listen to the connected
equipment, press the VIDEO button on the
front panel.
MD Recorder or DAT deck []
You can connect the Sony MDS-101 [] MD
(Mini Disc) recorder (not supplied) or aDAT
deck [] to the MD/DAT jacks. To listen to the
connected equipment, press the MD/DAT
button on the front panel.
For recording from a CD []
Connect an optical cord to the DIGITAL
OPTICAL OUT jack on the rear panel.
AU BUS []
You can connect other Sony equipment (MD
recorder, DAT deck, etc.) with AU BUS to the
AU BUS jack.
Note
You can use the Automatic Source Selection,
Synchronized Recording and Timer
Recording by connecting the AU BUS.
However, these functions may not be
provided on some models.
Brancher le cordon d'alimentation fourni sur
le connecteur AC IN et I'autre extremit_ sur
une prise secteur.
Magn_toscope []
On pourra raccorder un magnetoscope et
d'autres appareils similaires [] sur les
prises VIDEO IN. Pour faire fonctionner
I'appareil raccord6, appuyer sur la touche
VIDEO du panneau avant.
Enreglstreur MD ou platine OAT []
On pourra raccorder I'enregistreur MD (Mini
Disc) Sony MDS-101 [] (non fourni) ou une
platine DAT [] aux prises MD/DAT. Pour
faire fonctionner Fappareil raccord6, appuyer
sur la touche MD/DAT du panneau avant.
Pour I'enregistrement d'un dlsque
compact []
Raccorder un cordon optique _la prise
DIGITAL OPTICAL OUT sur le panneau
arri_re.
AU BUS r_
On pourra raccorder un autre appareil Sony
(enregistreur MD, platine DAT etc.) avec
AU BUS &la prise AU BUS.
Remerque
On pourra utiliser la s_lection automatique
de la source, I'enregistrement synchronis6 et
I'enregistrement par minuterie en raccordant
le AU BUS. Toutefois, ces fonctions n'existent
pas sur tousles modules.