ENTER
Execute the selected menu item or begin
playback.
VOL +/– (Volume plus/minus)
Adjust the volume.
Note
Some operations may differ or may not be
available for different models of iPod.
When to replace the battery
With normal use, battery life (CR2025) should
last for about 6 months. When the remote can no
longer operate the unit, replace the battery with a
new one.
side facing up
Note
If you are not going to use the remote for a long
time, remove the battery to avoid any damage
that may be caused by leakage and corrosion.
Compatible iPod/
iPhone models
The compatible iPod/iPhone models are as
follows.
Update the software of the iPod/iPhone to the
latest version before using it with this unit.
iPod touch (5th generation)
iPod nano (7th generation)*
iPhone 5
* The iPod nano (7th generation) cannot be
controlled by the remote when the command of
“MENU,” “,” “,” and “ENTER” is pressed.
On copyrights
iPhone, iPod, iPod nano, and iPod touch are
trademarks of Apple Inc., registered in the U.S.
and other countries.
Lightning is a trademark of Apple Inc.
“Made for iPod,” and “Made for iPhone” mean
that an electronic accessory has been designed to
connect specifically to iPod or iPhone,
respectively, and has been certified by the
developer to meet Apple performance standards.
Apple is not responsible for the operation of this
device or its compliance with safety and
regulatory standards. Please note that the use of
this accessory with iPod or iPhone may affect
wireless performance.
Note
This unit is not specified for use with an iPad,
and malfunction may result if used with one.
Operating an iPod
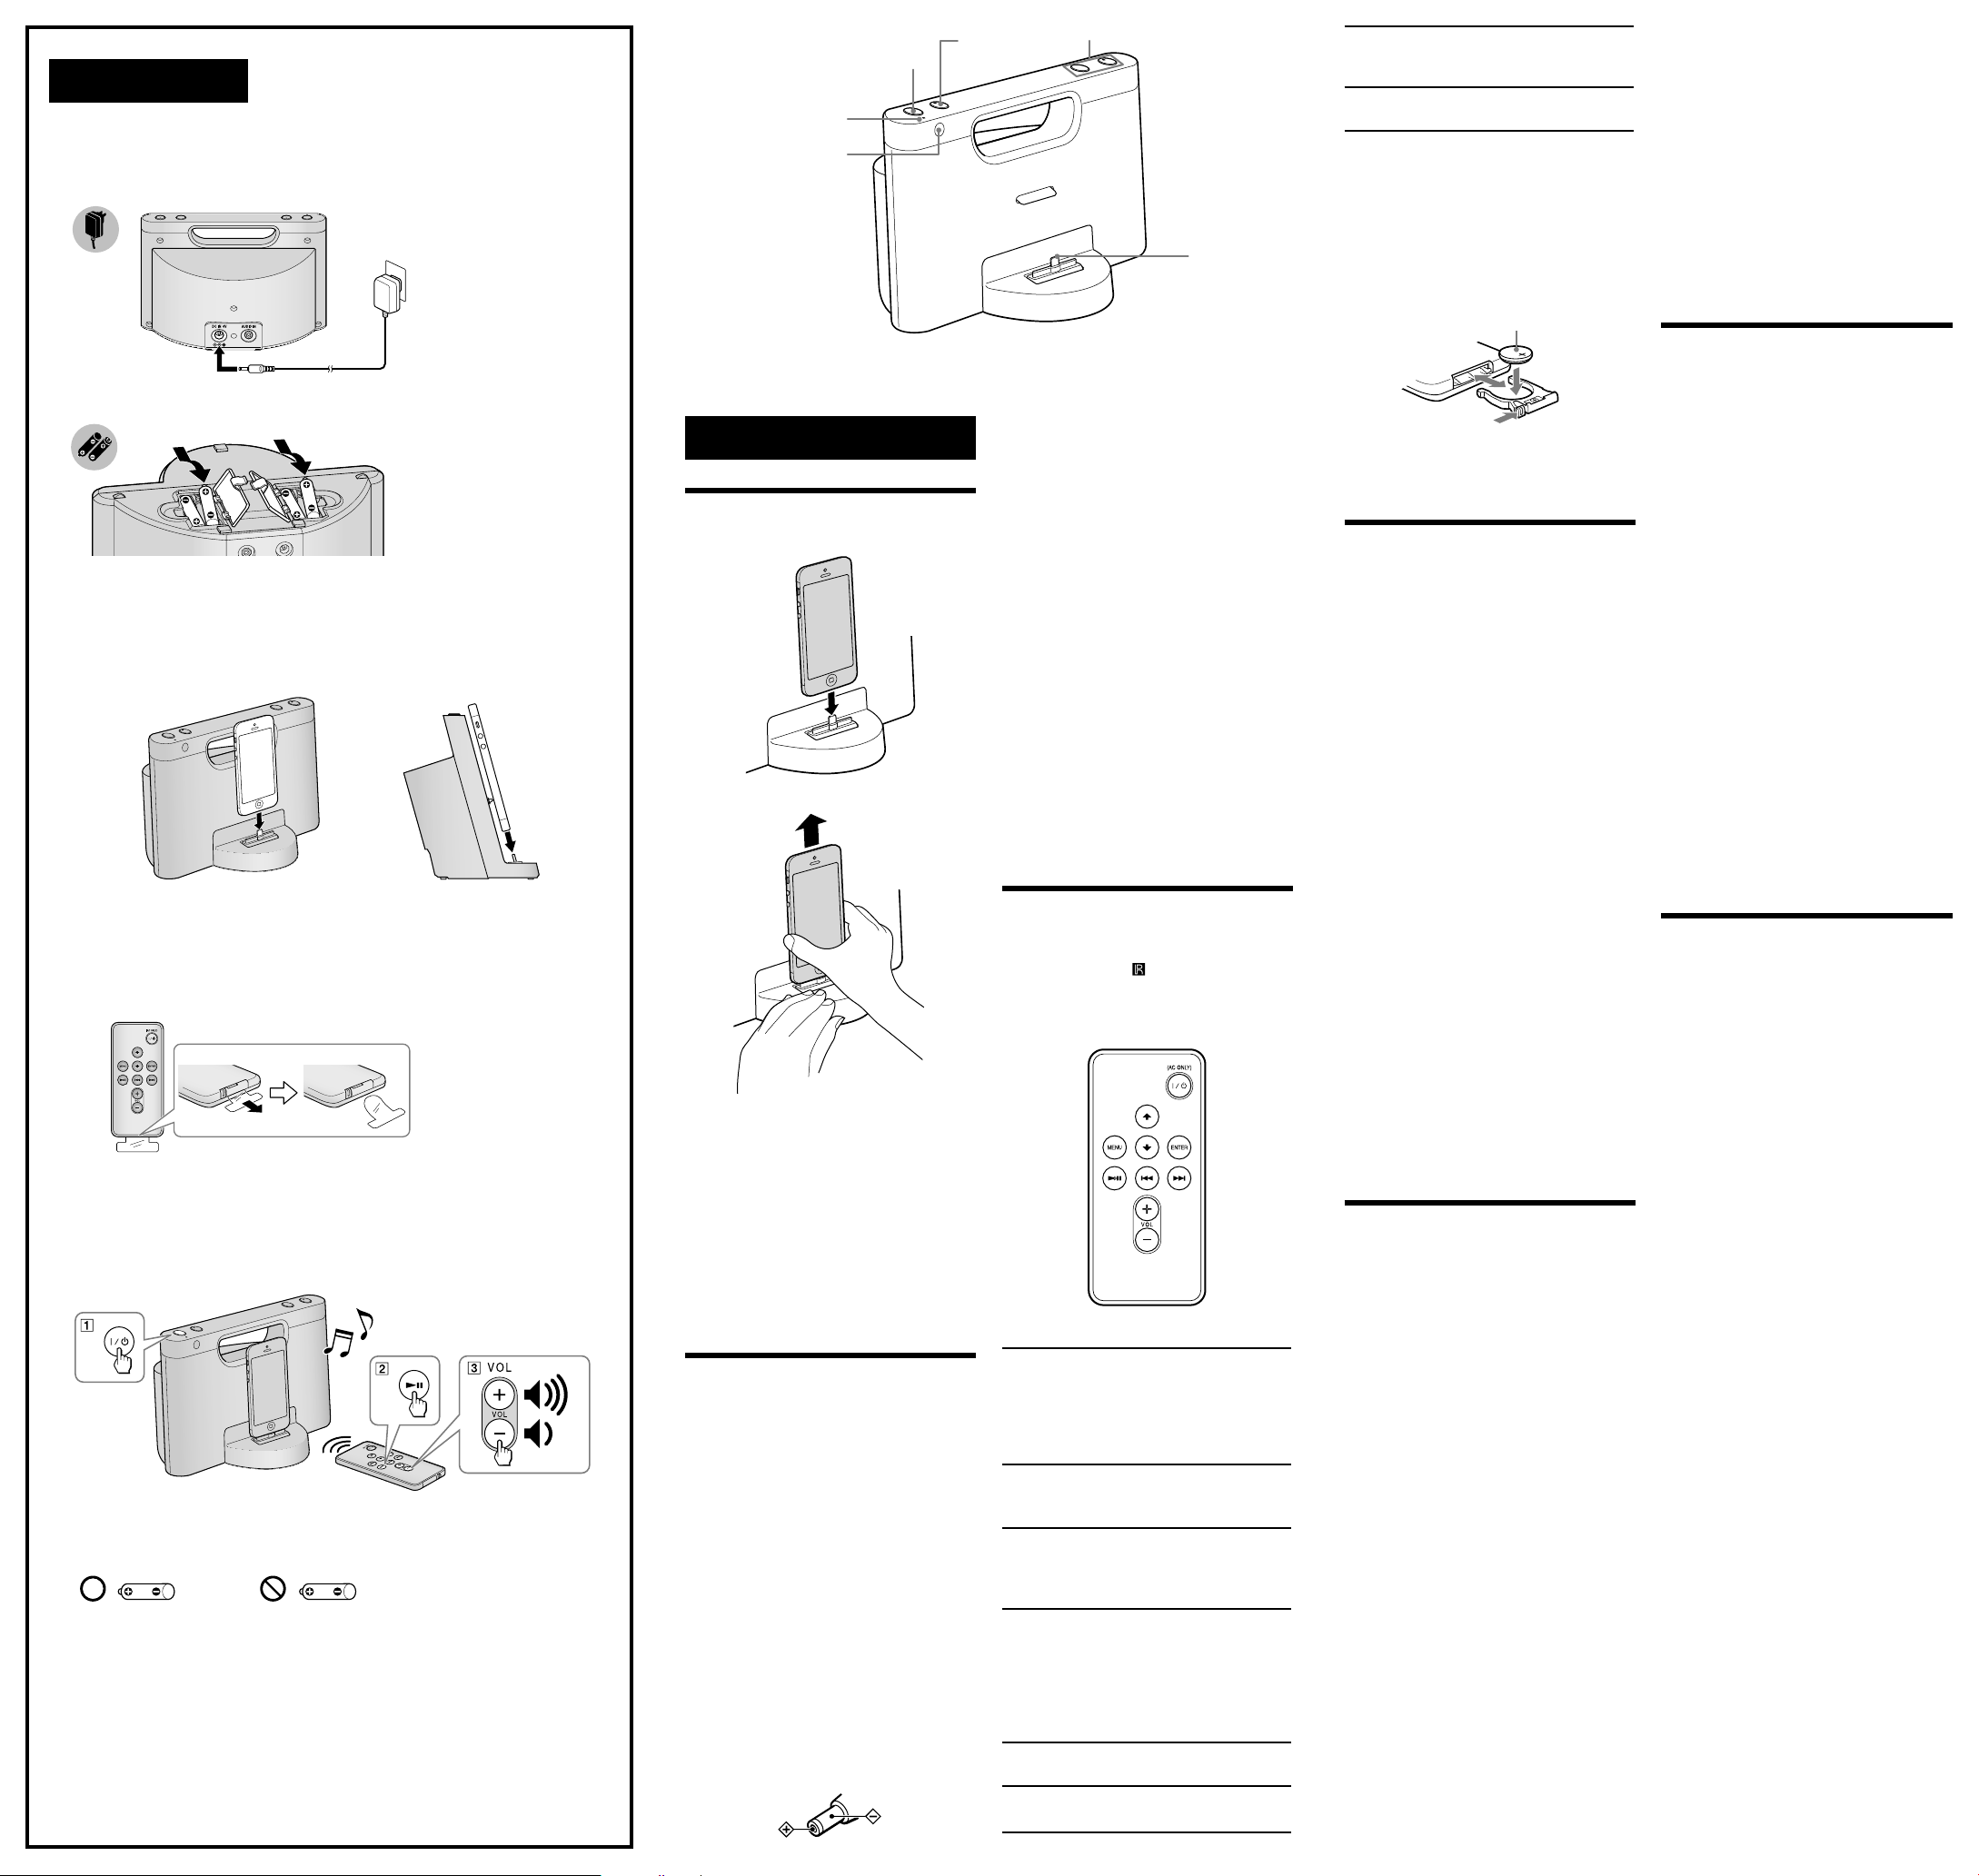
1Set an iPod on the dock connector.
The dock connector can be tilted slightly.
For details, see “How to handle an iPod.”
2Press .
When using batteries, press /on the unit,
then press .
The iPod begins playback.
You can operate the connected iPod via this
unit or the iPod itself.
Notes
If a pop-up message appears on the display of
the iPod touch or iPhone, see “About App.”
If the battery of the iPod is extremely low,
charge it for a while before operation.
Sony cannot accept responsibility in the event
that data recorded to an iPod is lost or damaged
when using an iPod connected to this unit.
For details of environmental conditions for
operating the iPod, check the website of Apple
Inc.
To remove the iPod
For details, see “How to handle an iPod.”
To adjust the volume
Press VOLUME +/− (VOL +/− on the remote).
Tip
The OPR/BATT indicator flashes three times
when the sound is set to either maximum or
minimum volume.
To charge an iPod (AC only)
You can use the unit as a battery charger for an
iPod when the power is supplied by the AC adaptor.
Charging begins when the iPod is connected to
the unit. The charging status appears in the
display on the iPod. For details, refer to the user’s
guide of the iPod.
Connecting optional
components
You can enjoy the sound from an optional
component, such as a portable digital music
player, through the speakers of this unit. Be sure
to turn off the power of each component before
making any connections.
1Firmly connect the line output jack of a
portable digital music player (or other
component) to the AUDIO IN jack on the
back of the unit, using a suitable audio
connecting cable (not supplied).
2Press to turn on the unit.
3Turn the connected component on.
4Play the connected component.
The sound from the connected component is
output from the speakers of this unit.
Notes
The necessary type of audio connecting cable
depends on the optional component. Make sure
to use the correct type of cable.
If the volume level is low, adjust the volume of
the unit first. If the volume is still too low,
adjust the volume of the connected component.
When playing an optional component
connected to the AUDIO IN jack, stop playback
of an iPod.
Disconnect the audio connecting cable from
the unit when it is not in use.
About App
A dedicated Dock App for iPod touch/iPhone
available at Apple App Store.
Search for “D-Sappli” and download the free App
to find out more about the functions.
Features
D-Sappli includes various timer functions:
Alarm, Music Play Timer, and Sleep Timer.
You can set up to 10 alarms, using songs in iPod
or Preset Sound in D-Sappli for the alarm
sound.
The Music Play Timer allows you to play/pause
desired music at a desired time. The Sleep
Timer allows you to specify a time at which to
stop music playback. The Music Play Timer and
Sleep Timer work in combination with the
power supply of the unit.
Music Play Timer, Sleep Timer and Alarm are
available only when D-Sappli is activated.
D-Sappli also includes a clock display enlarge
feature.
Notes
If the App to link with this unit is not
downloaded to your iPod touch/iPhone, a pop-
up message prompting you to download D-
Sappli may appear repeatedly.
Deactivate the App’s link function to stop the
pop-up message.
To deactivate the App’s link function: Connect
the AC adaptor, and then press /to turn off
the unit. Remove your iPod touch/iPhone from
the dock connector. While holding down ,
also press and hold /on the unit for at least 2
seconds. (The OPR/BATT indicator flashes
twice when the function is deactivated.)
To re-activate the App’s link function, repeat the
above steps. (The OPR/BATT indicator flashes
once when the function is activated.)
Operations
How to handle an iPod
To set an iPod
To remove an iPod
Notes
An iPod in a case or cover can be set in this
unit. However, if the case or cover interferes
with the connection, remove the case or cover
before setting the iPod on the dock connector.
When placing or removing the iPod, hold it at
the same angle as the dock connector on the
unit. Do not pull the iPod forward too far.
When placing or removing the iPod, hold the
unit securely.
Do not twist or bend the iPod as this may result
in connector damage.
Remove the iPod when transporting it;
otherwise, a malfunction may result.
Power source
You can use this unit with mains electricity or
with batteries.
Auto power off
After playback of an iPod (or component
connected to the AUDIO IN jack) has finished, if
no operation is performed for about 20 minutes,
the unit will automatically turn off.
To use AC adaptor
Connect the supplied AC adaptor to the DC IN
6V jack on the back of this unit firmly, and then
plug the adaptor into a wall outlet.
Note on the AC adaptor
When operating the unit with internal batteries,
remove the AC adaptor from the wall outlet
and the DC IN 6V jack. Make sure that the plug
of the external power source is disconnected
before operating the unit.
Use the supplied Sony AC adaptor only. The
polarity of the plugs of other manufacturers
may be different. Failure to use the supplied AC
adaptor may cause the unit to malfunction.
To use batteries
Insert four AAA/LR03 alkaline batteries, or four
NH-AAA rechargeable batteries (not supplied).
When to replace the batteries
When the batteries are weak, the OPR/BATT
indicator will become faint, and the sound may be
distorted.
Notes on batteries
Manganese batteries cannot be used.
The unit cannot recharge any batteries.
Do not carry batteries with coins or other
metallic objects. It can generate heat if the
positive and negative terminals of the batteries
are accidentally contacted by a metallic object.
Be sure to observe the correct polarity when
installing the battery.
If you are not going to use the unit for a long
time, remove the batteries to avoid damage
from battery leakage and corrosion.
Do not use different types of batteries at the
same time.
When you replace the batteries, replace all of
them with new ones.
Battery performance depends on manufacturer
and type, and battery life may be reduced,
especially when used in low temperature.
Remote control
Before using the supplied remote for the first
time, remove the insulation film.
Aim the remote at the (Remote sensor) of the
unit.
The OPR/BATT indicator flashes when the
remote’s signal is received.
The VOL + and buttons have a tactile dot.
/(On/Standby)
Turns the unit on/off. The OPR/BATT
indicator lights up when the unit is turned on.
When using batteries, press the /button on
the unit. The /button of the remote works
only when the AC adaptor is used.
(Play/Pause)
Start playing an iPod. Press again to pause/
resume playback.
(Forward)
Go to the next track.
Press and hold while listening to the sound to
locate a desired point.
(Backward)
Go back to the previous track. During
playback, this operation returns to the
beginning of the current track. To go back to
the previous track, press twice.
Press and hold while listening to the sound to
locate a desired point.
MENU
Go back to the previous menu.
(Up)/(Down)
Select a menu item or track for playback.
The VOLUME + and buttons have a tactile dot.
OPR/BATT indicator
Remote sensor
Dock connector
iPod −VOLUME +
/
Startup Guide
AAA/LR03 × 4 *
Alkaline battery
Alkaline batteries are not supplied. Manganese batteries (R03) cannot be used. The unit
cannot recharge any batteries.
Manganese battery
*