Sound Cart Maverick User manual
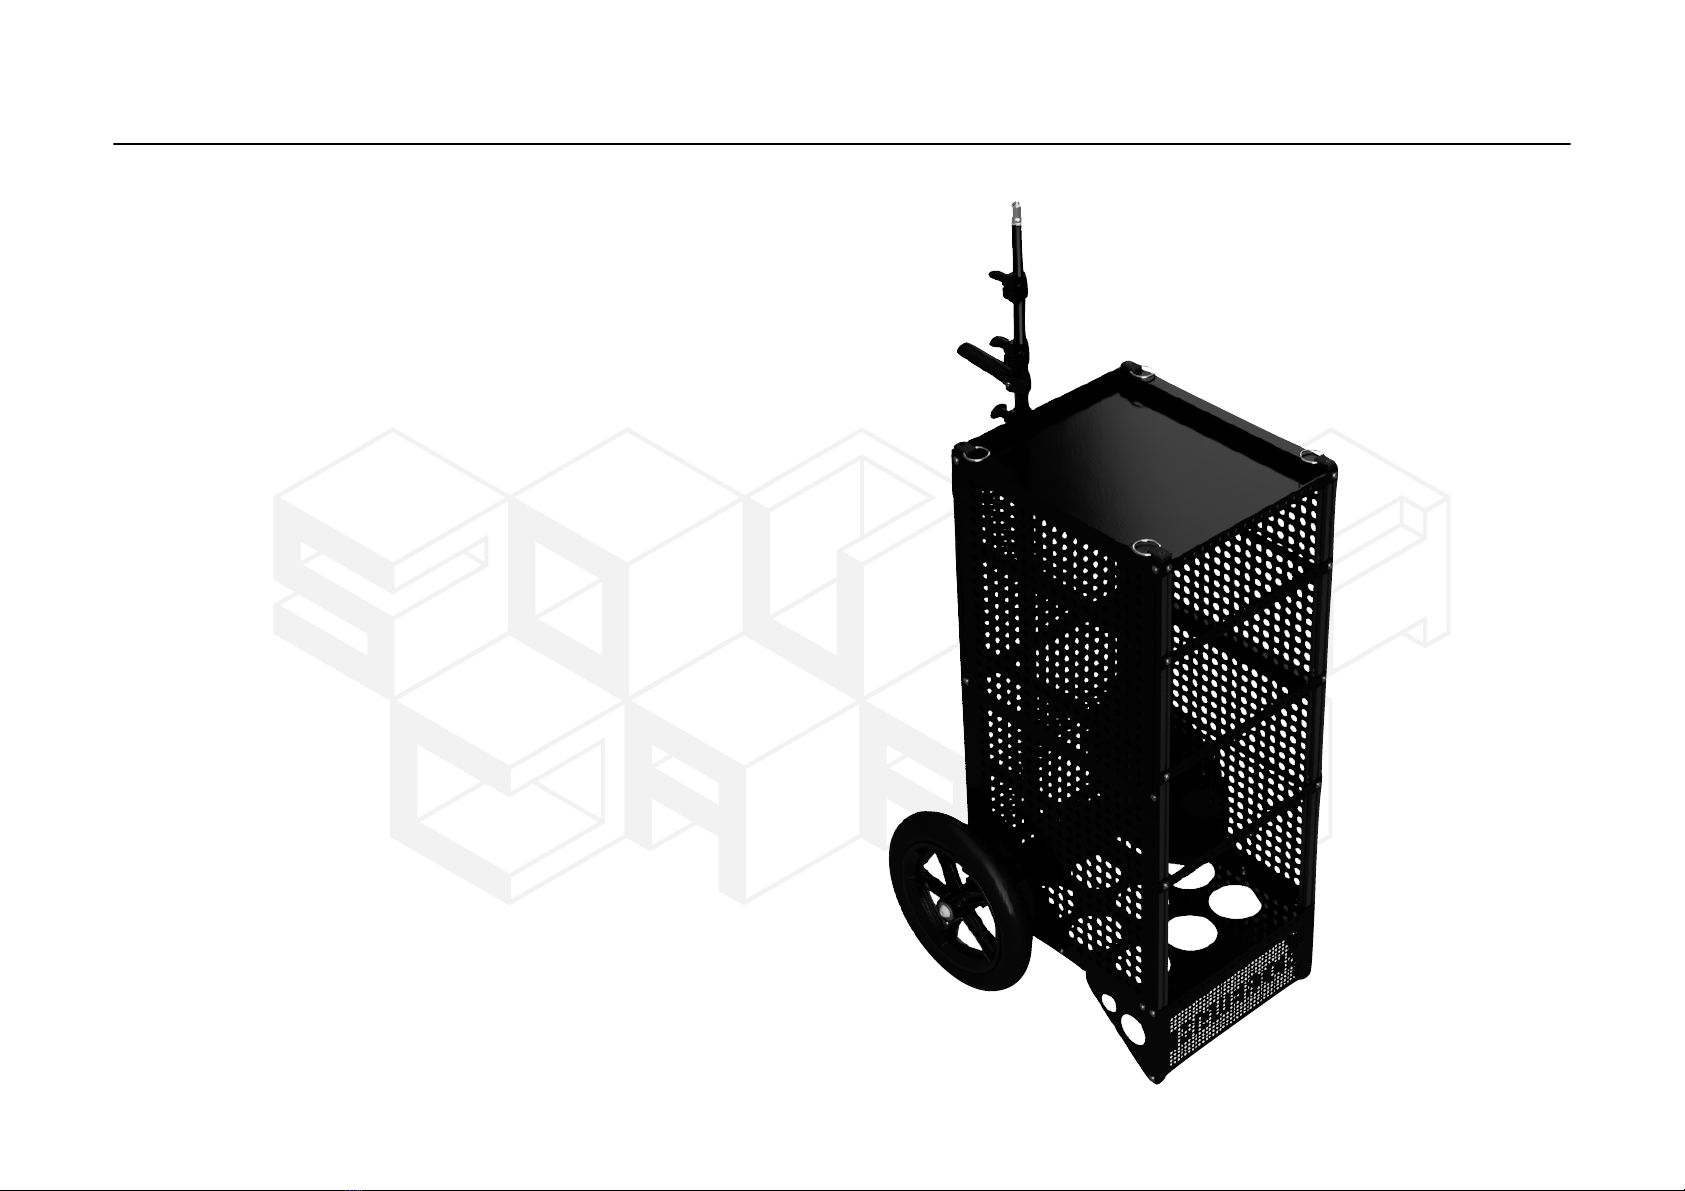
SC-MAVRK
Maverick
Contents:
4x SC-MAVRK.001
1x SC-MAVRK.002
1x SC-MAVRK.003
1x SC-MAVRK.004
2x SC-MAVRK.005
1x SC-MAVRK.006
2x SC-MAVRK.007
2x SC-MAVRK.008
2x SC-MAVRK.009
2x SC-MAVRK.010
4x SC-MAVRK.011
02/03/2021
6x SC-MAVRK.012
1x SC-MAVRK.013
46x SC-MAVRK.014
54x SC-MAVRK.015
10x SC-MAVRK.016
6x SC-MAVRK.017
1x SC-MAVRK.018
1x SC-MAVRK.019
1x SC-MAVRK.020
1x SC-MAVRK.021
SC-MAVRK
THANK YOU!
Thank you for purchasing this Maverick Cart.
To assemble it, please follow the instructions
found within this guide.
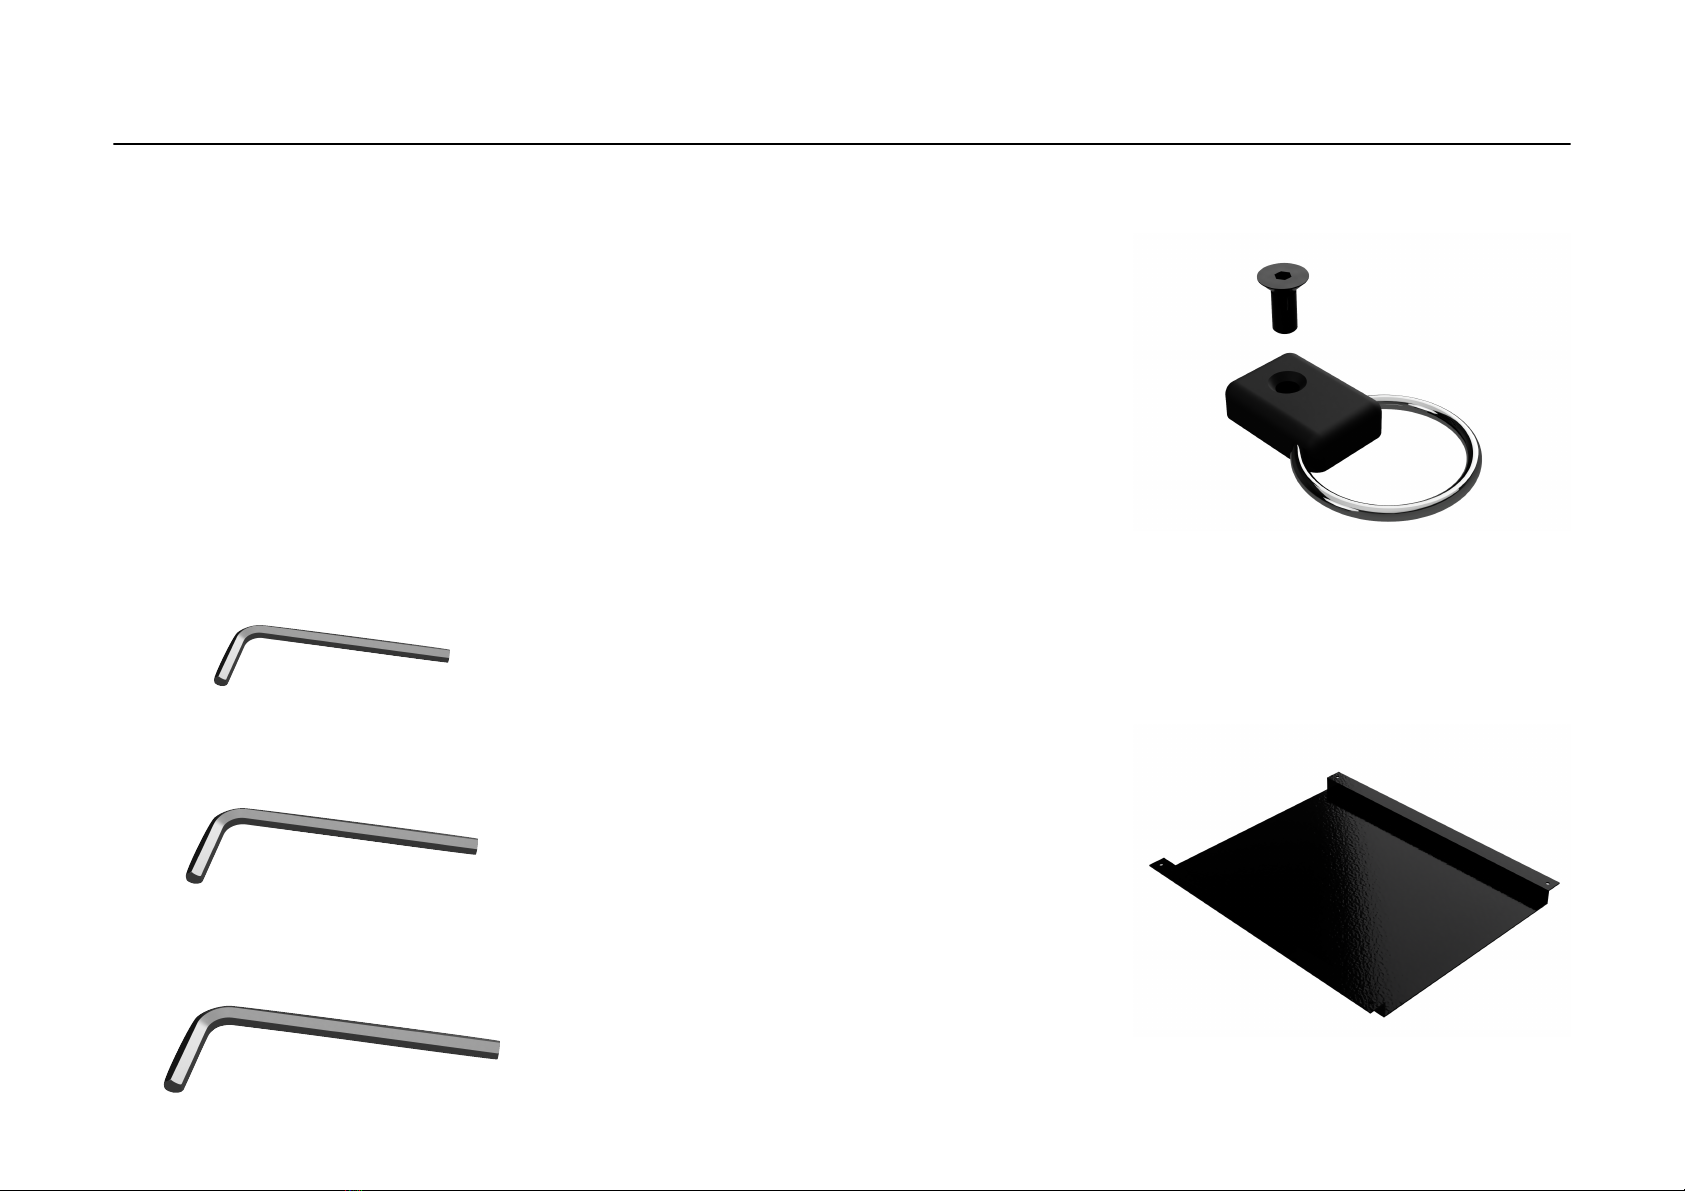
YOU WILL NEED
You will need the following tools to install
this cart:
1x 3mm HEX key / Allen key *
1x 5mm HEX key / Allen key *
1x 6mm HEX key / Allen key *
* Supplied
STEP 1
After removing the Maverick from its
packaging and check that you have the
following:
4x SC-MAVRK.001
1x SC-MAVRK.002
1x SC-MAVRK.003
1x SC-MAVRK.004
2x SC-MAVRK.005
1x SC-MAVRK.006
2x SC-MAVRK.007
2x SC-MAVRK.008
2x SC-MAVRK.009
2x SC-MAVRK.010
4x SC-MAVRK.011
6x SC-MAVRK.012
1x SC-MAVRK.013
46x SC-MAVRK.014
54x SC-MAVRK.015
10x SC-MAVRK.016
6x SC-MAVRK.017
1x SC-MAVRK.018
1x SC-MAVRK.019
1x SC-MAVRK.020
1x SC-MAVRK.021
_______________________________________
SC-MAVRK.001 (D Ring)
SC-MAVRK.002 (Recessed Lid)
SC-MAVRK
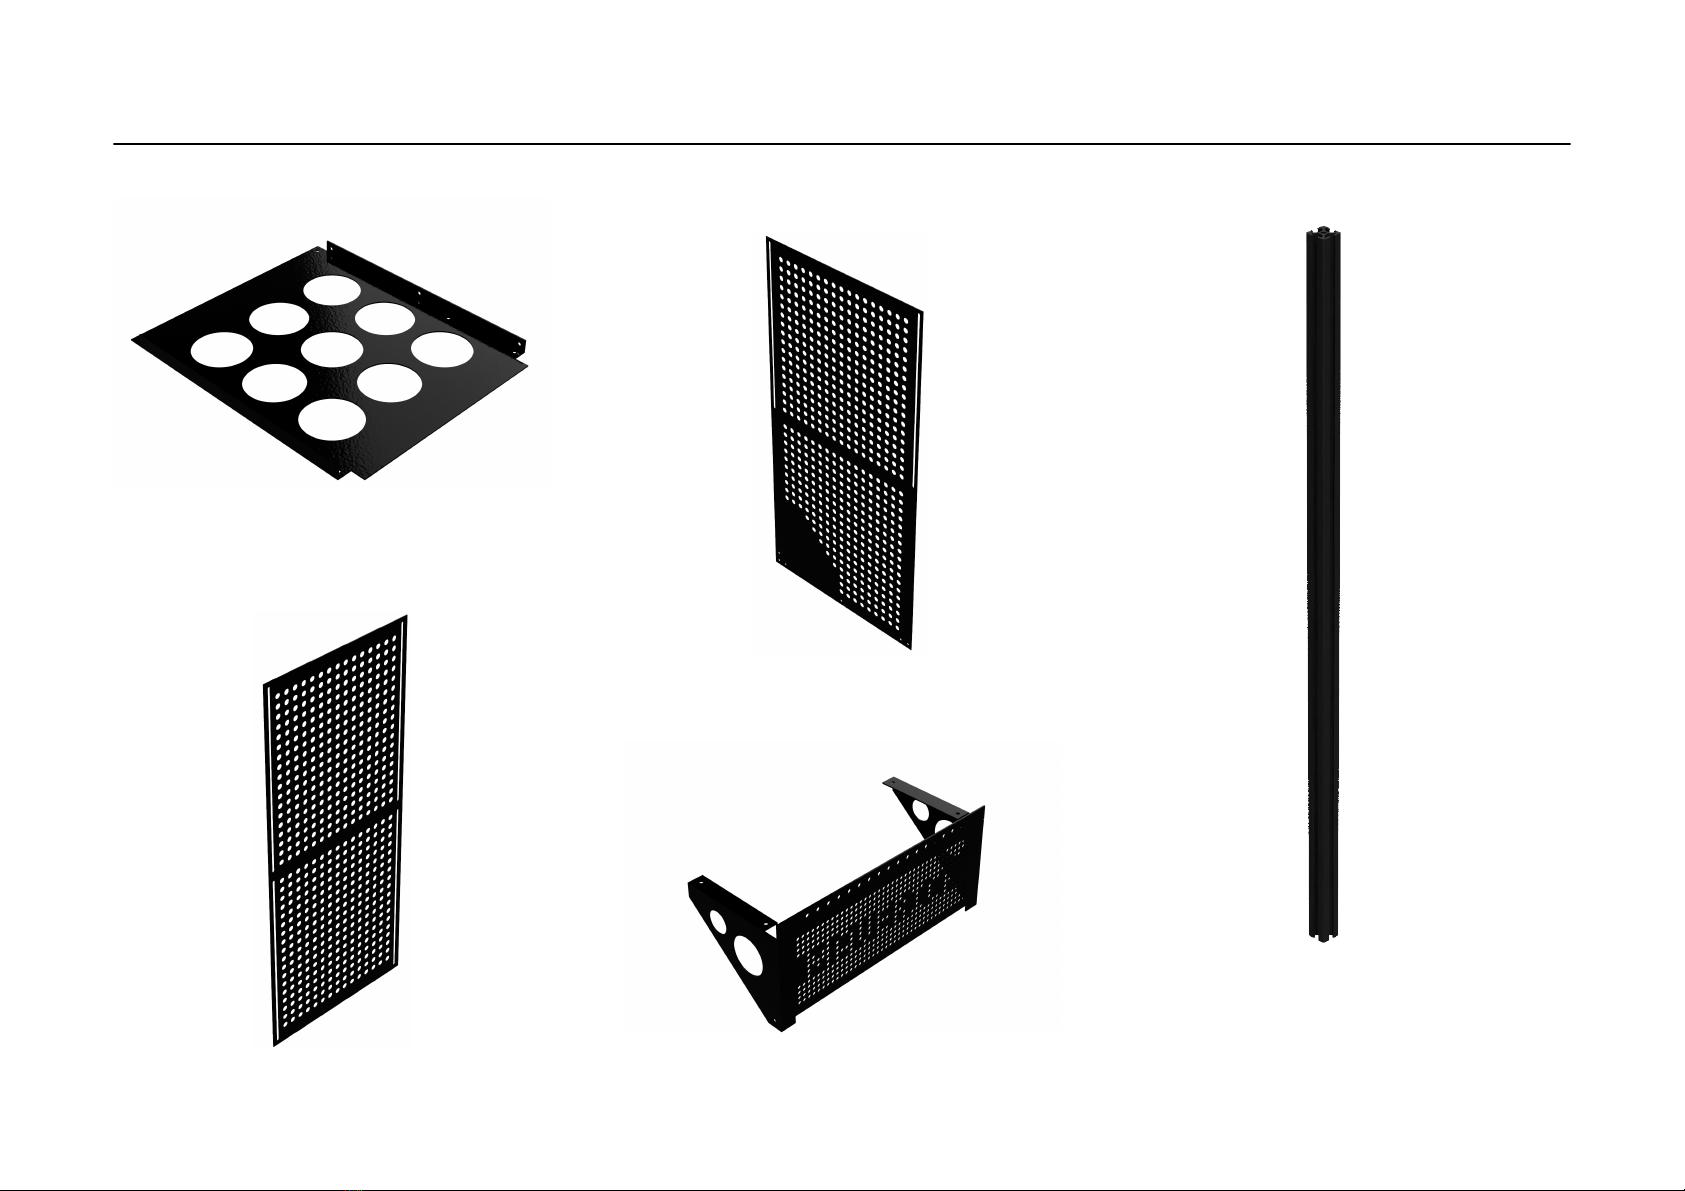
SC-MAVRK.003 (Base)
SC-MAVRK.004 (Back Panel)
SC-MAVRK.005 (Side Panel)
SC-MAVRK.006 (Skirt)
SC-MAVRK.007 (Rear Upright)
Note: Shorter than SC-MAVRK.008
SC-MAVRK
SC-MAVRK.008 (Front Upright) SC-MAVRK.009 (Wheel Set)
SC-MAVRK.010 (Handle Cross-brace)
SC-MAVRK.011 (Container Lip)
SC-MAVRK.012 (Container Support)
SC-MAVRK
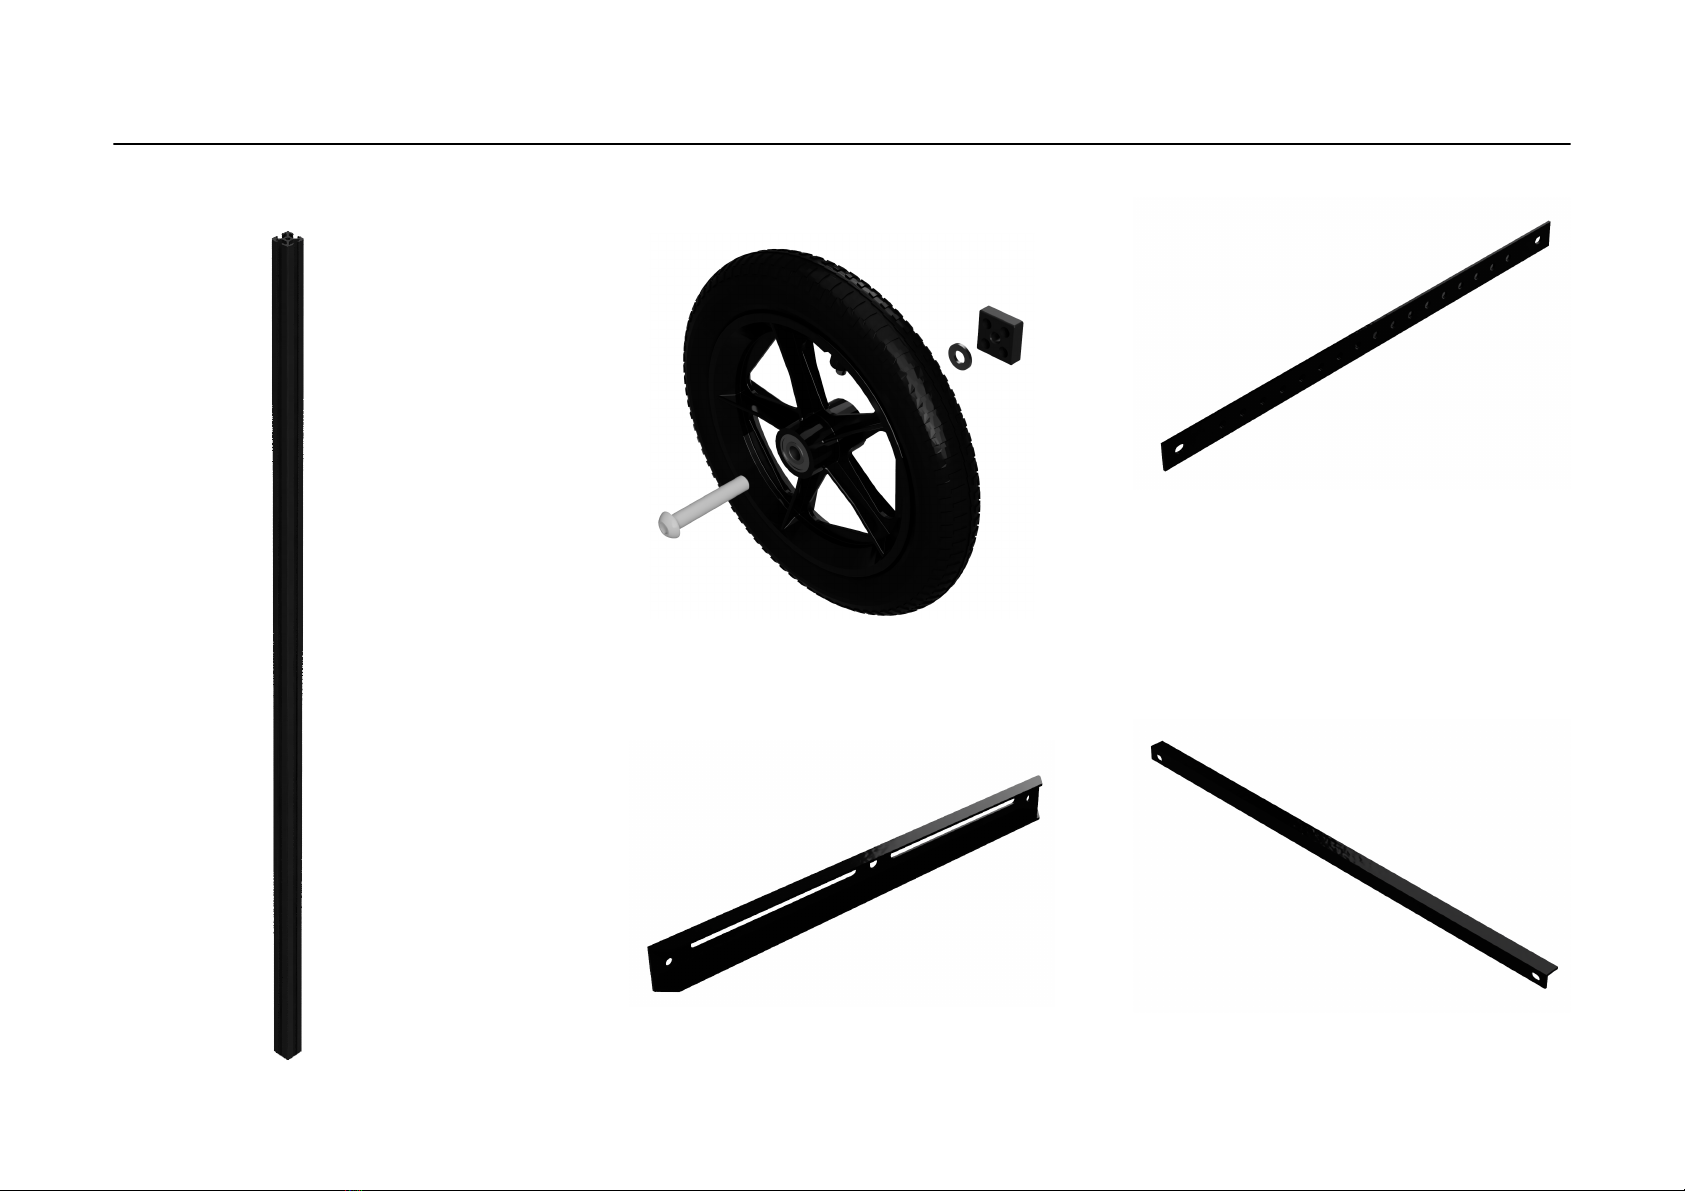
SC-MAVRK.013 (Handle Riser)

SC-MAVRK
SC-MAVRK.014 (T-slot Nut)
SC-MAVRK.015 (Flanged Screw)
SC-MAVRK.016 (Flanged Nut)
SC-MAVRK.017 (Socket Cap Screw)
SC-MAVRK.018 (3mm HEX Key)
SC-MAVRK.019 (5mm HEX Key)
SC-MAVRK.020 (6mm HEX Key)
SC-MAVRK.021 (8mm HEX Key)

SC-MAVRK
!
STEP 2
Insert one T-slot Nut (SC-MAVRK.014) into a
slot of each Front Upright (SC-MAVRK.008)
and position it at the bottom.
STEP 3
Insert both Front Uprights (SC-MAVRK.008)
into the Skirt (SC-MAVRK.006) with their end
caps towards the floor.
Next, insert two Flanged Screws (SC-
MAVRK.015) as shown and tighten clockwise
into each of the T-slot Nuts (SC-MAVRK.014)
to secure.
STEP 4
Attach the Skirt (SC-MAVRK.006) to the front
of the Base (SC-MAVRK.003) using four
pairs of Flanged Screws & Flanged Nuts
(SC-MAVRK.015 & SC-MAVRK.016) until
finger tight.
Please note the orientation of the front and
rear pairs of the Flanged Screws (SC-
MAVRK.015) and Flanged Nuts (SC-
MAVRK.016).

SC-MAVRK
!
STEP 5
Secure both Rear Uprights (SC-MAVRK.007)
to the rear of the Base (SC-MAVRK.003)
using two Flanged Screws (SC-MAVRK.015).
STEP 6
Attach the Recessed Lid (SC-MAVRK.002) to
the top of each Front & Rear Upright (SC-
MAVRK.007 & SC-MAVRK.008) using four
D- Rings (SC-MAVRK.001).
Your cart should now look like this.
SC-MAVRK
!
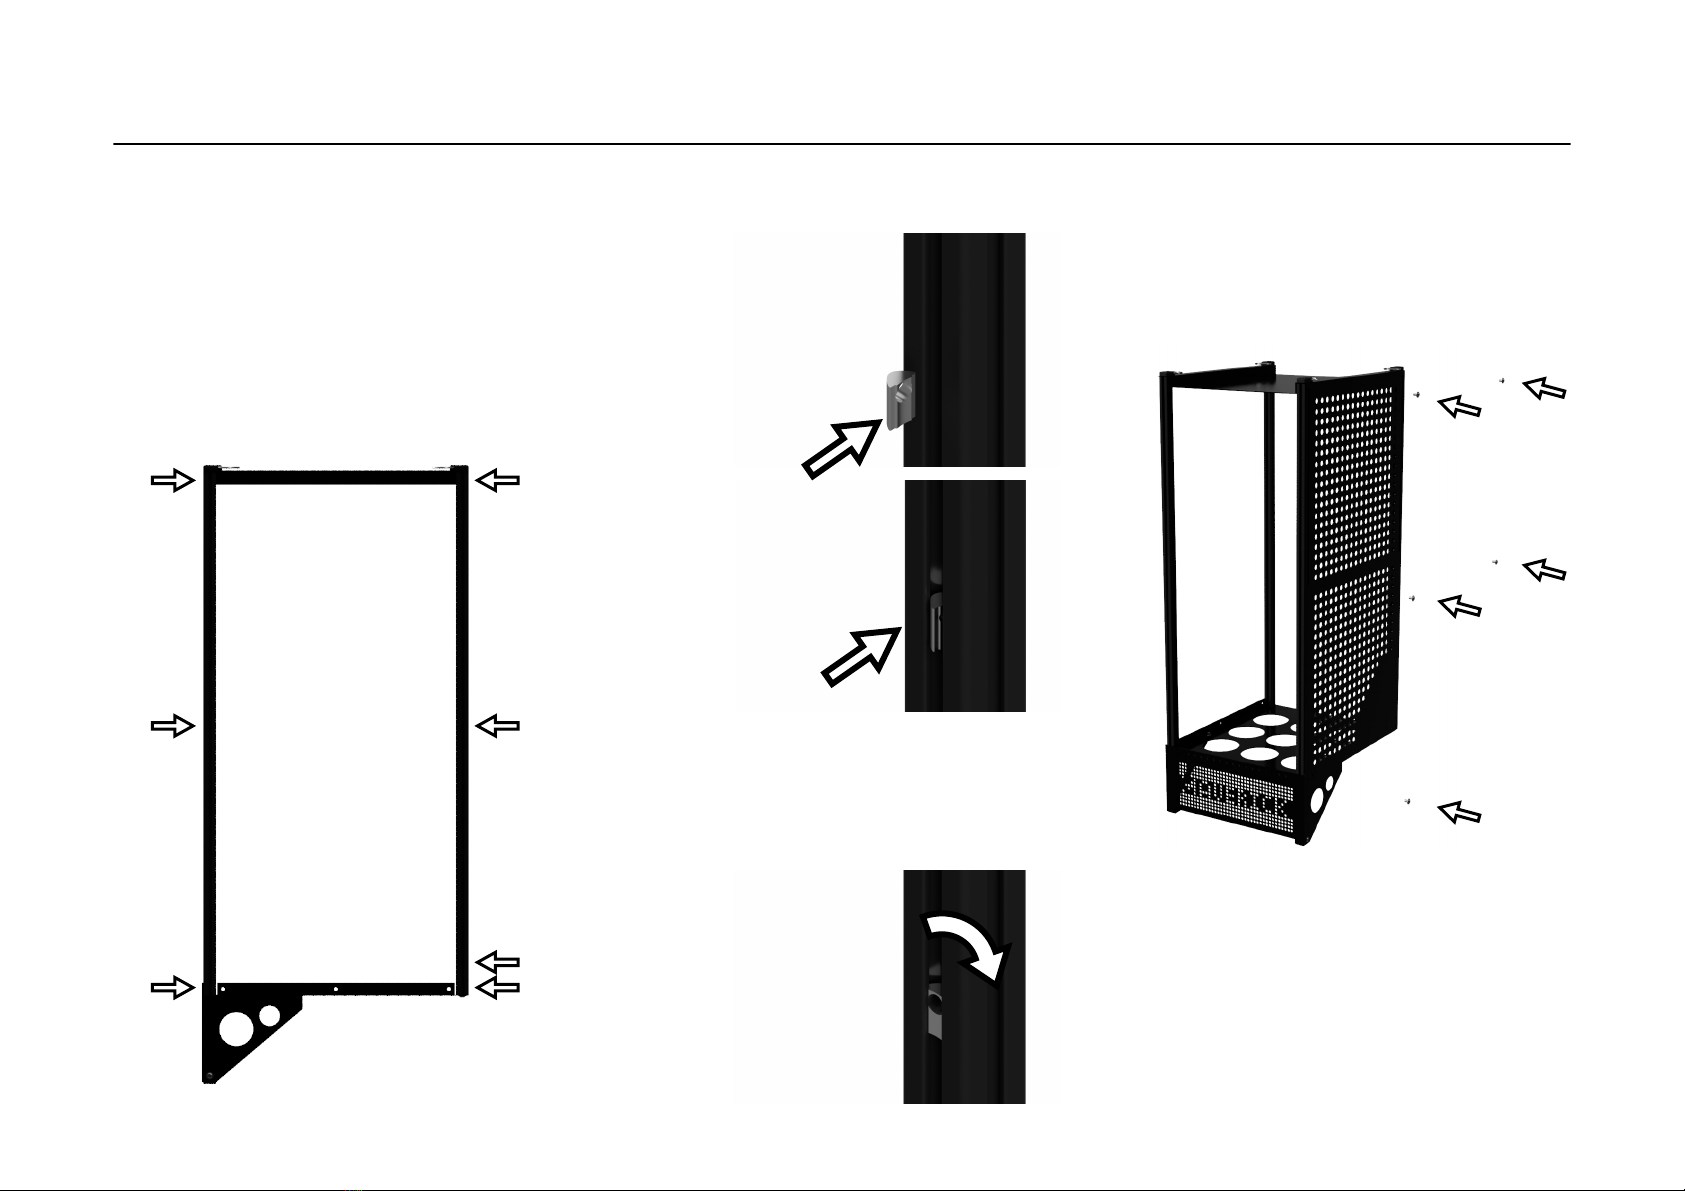
STEP 7
Before each Side Panel (SC-MAVRK.005) can
be attached, seven T-slot Nuts (SC-
MAVRK.014) must be inserted into the slots
of the Front & Rear Uprights (SC-
MAVRK.007 & SC-MAVRK.008) on each
side.
This is done using the following method.
Turn the T-slot Nut (SC-MAVRK.014) by 90
degrees once in the slot of the upright.
STEP 8
Secure each Side Panel (SC-MAVRK.005)
using five Flanged Screws (SC-MAVRK.015).

SC-MAVRK
!
STEP 9
Before the Back Panel (SC-MAVRK.004) can
be attached, ten T-slot Nuts (SC-
MAVRK.014) must be inserted into the slots
of the Rear Uprights (SC-MAVRK.008).
STEP 10
Secure the Back Panel (SC-MAVRK.004)
using six Flanged Screws (SC-MAVRK.015).
STEP 11
With the open slot at the top, attach the
Handle Cross-braces (SC-MAVRK.010) to the
Rear Uprights using four Flanged Screws
(SC-MAVRK.015).
SC-MAVRK
!
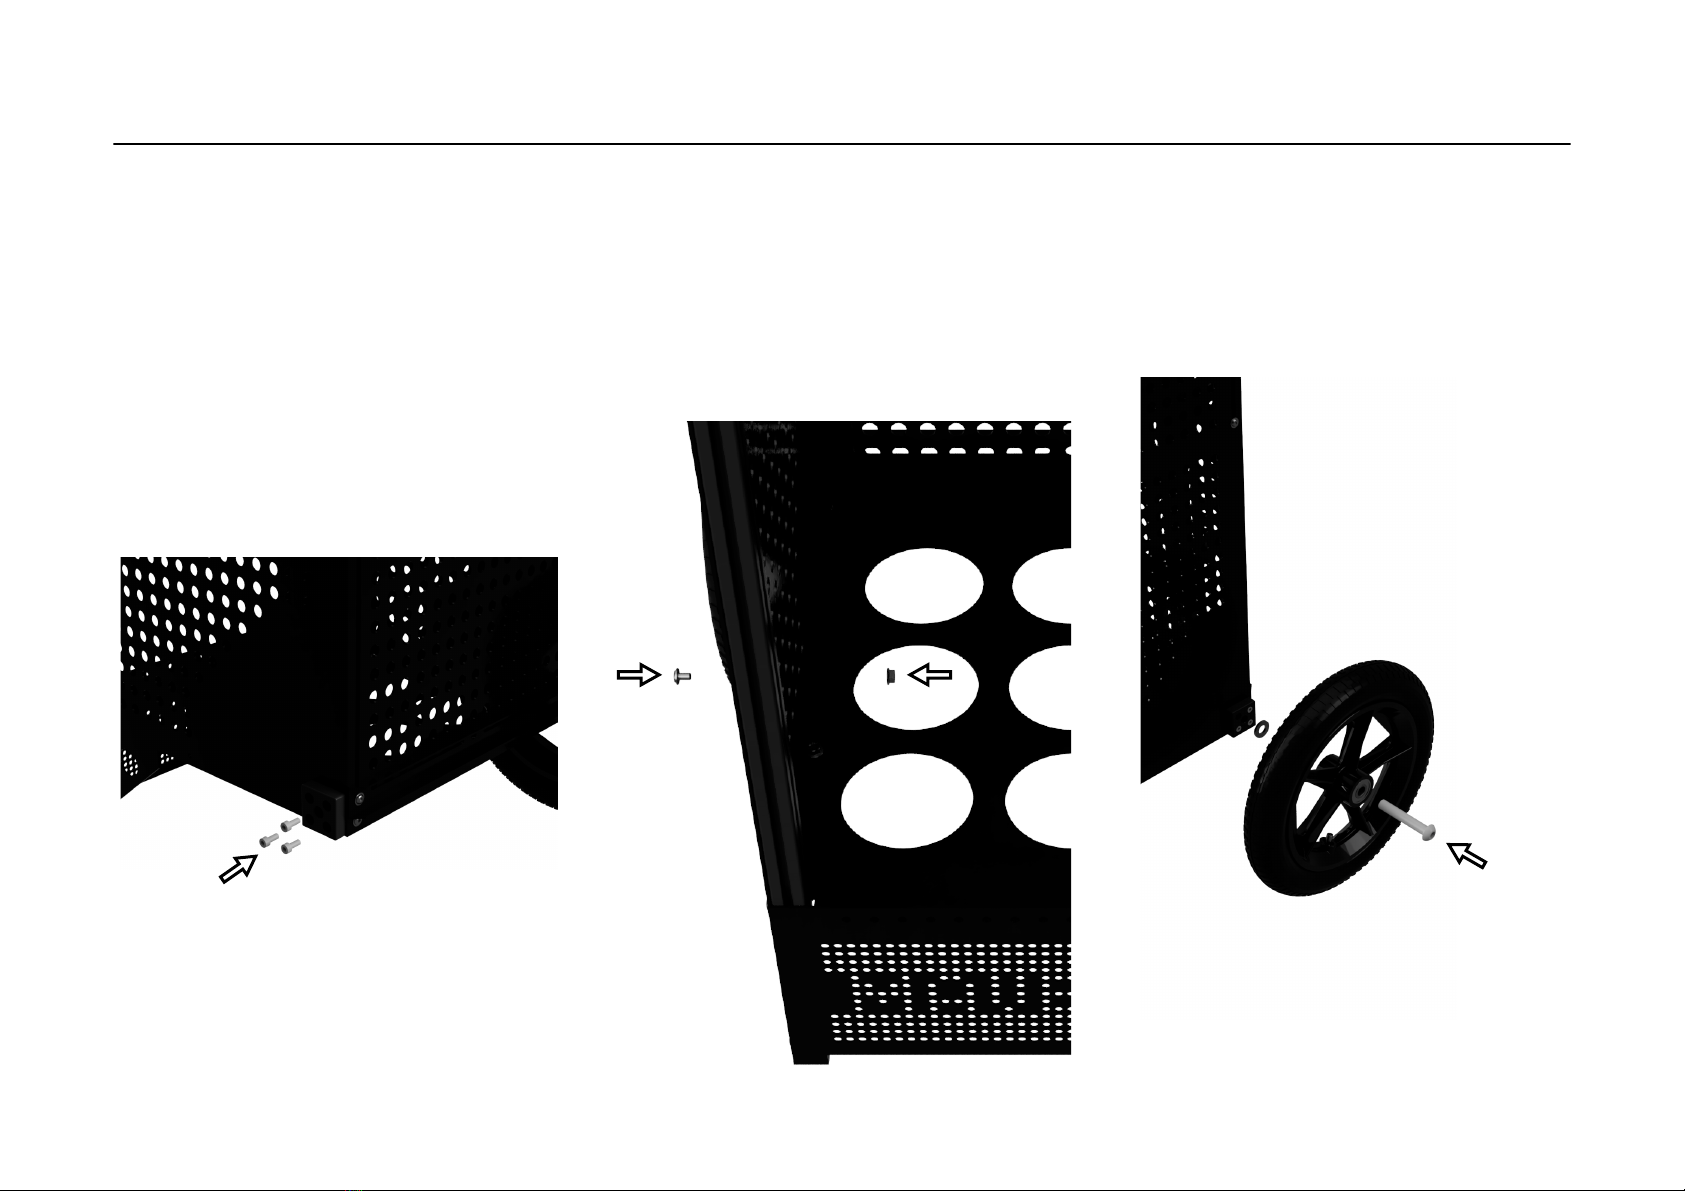
STEP 12
To attach the Wheel Set (SC-MAVRK.009)
you also require the six Socket Cap Screws
(SC-MAVRK.017) and two Flanged Nuts
(SC-MAVRK.016).
Use three Socket Cap Screws (SC-
MAVRK.017) per side to attach the plate
from the Wheel Set (SC-MAVRK.009).
Use one Flanged Nuts (SC-MAVRK.016) per
side to secure the loose Socket Cap Screw
(SC-MAVRK.017).
STEP 13
Next, use two Flanged Screws & Flanged
Nuts (SC-MAVRK.015 & SC-MAVRK.016) to
attach each Side Panel (SC-MVRK.005) to
the Base (SC-MVRK.003).
STEP 14
Attach the remainder of the Wheel Set (SC-
MAVRK.009) using the 8mm Hex Key (SC-
MAVRK.021) by tightening clockwise.
SC-MAVRK
!
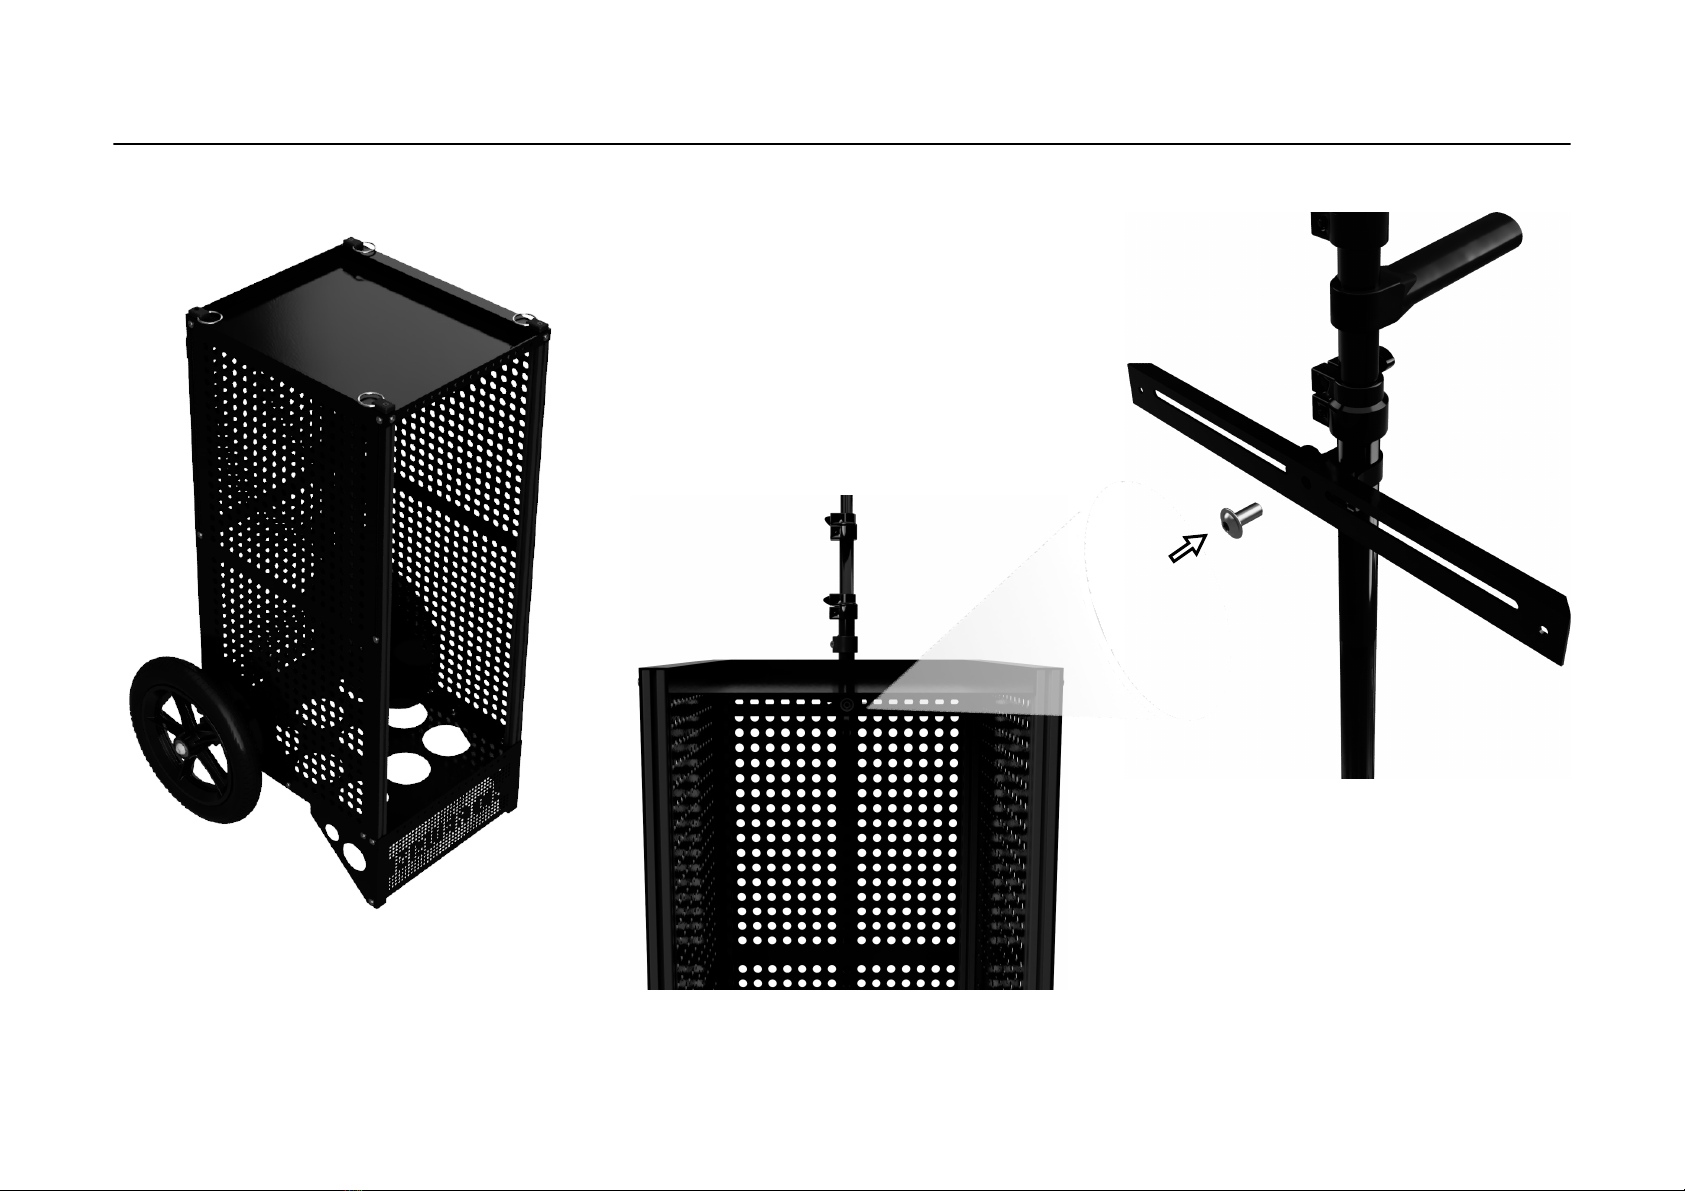
Your cart should now look like this.
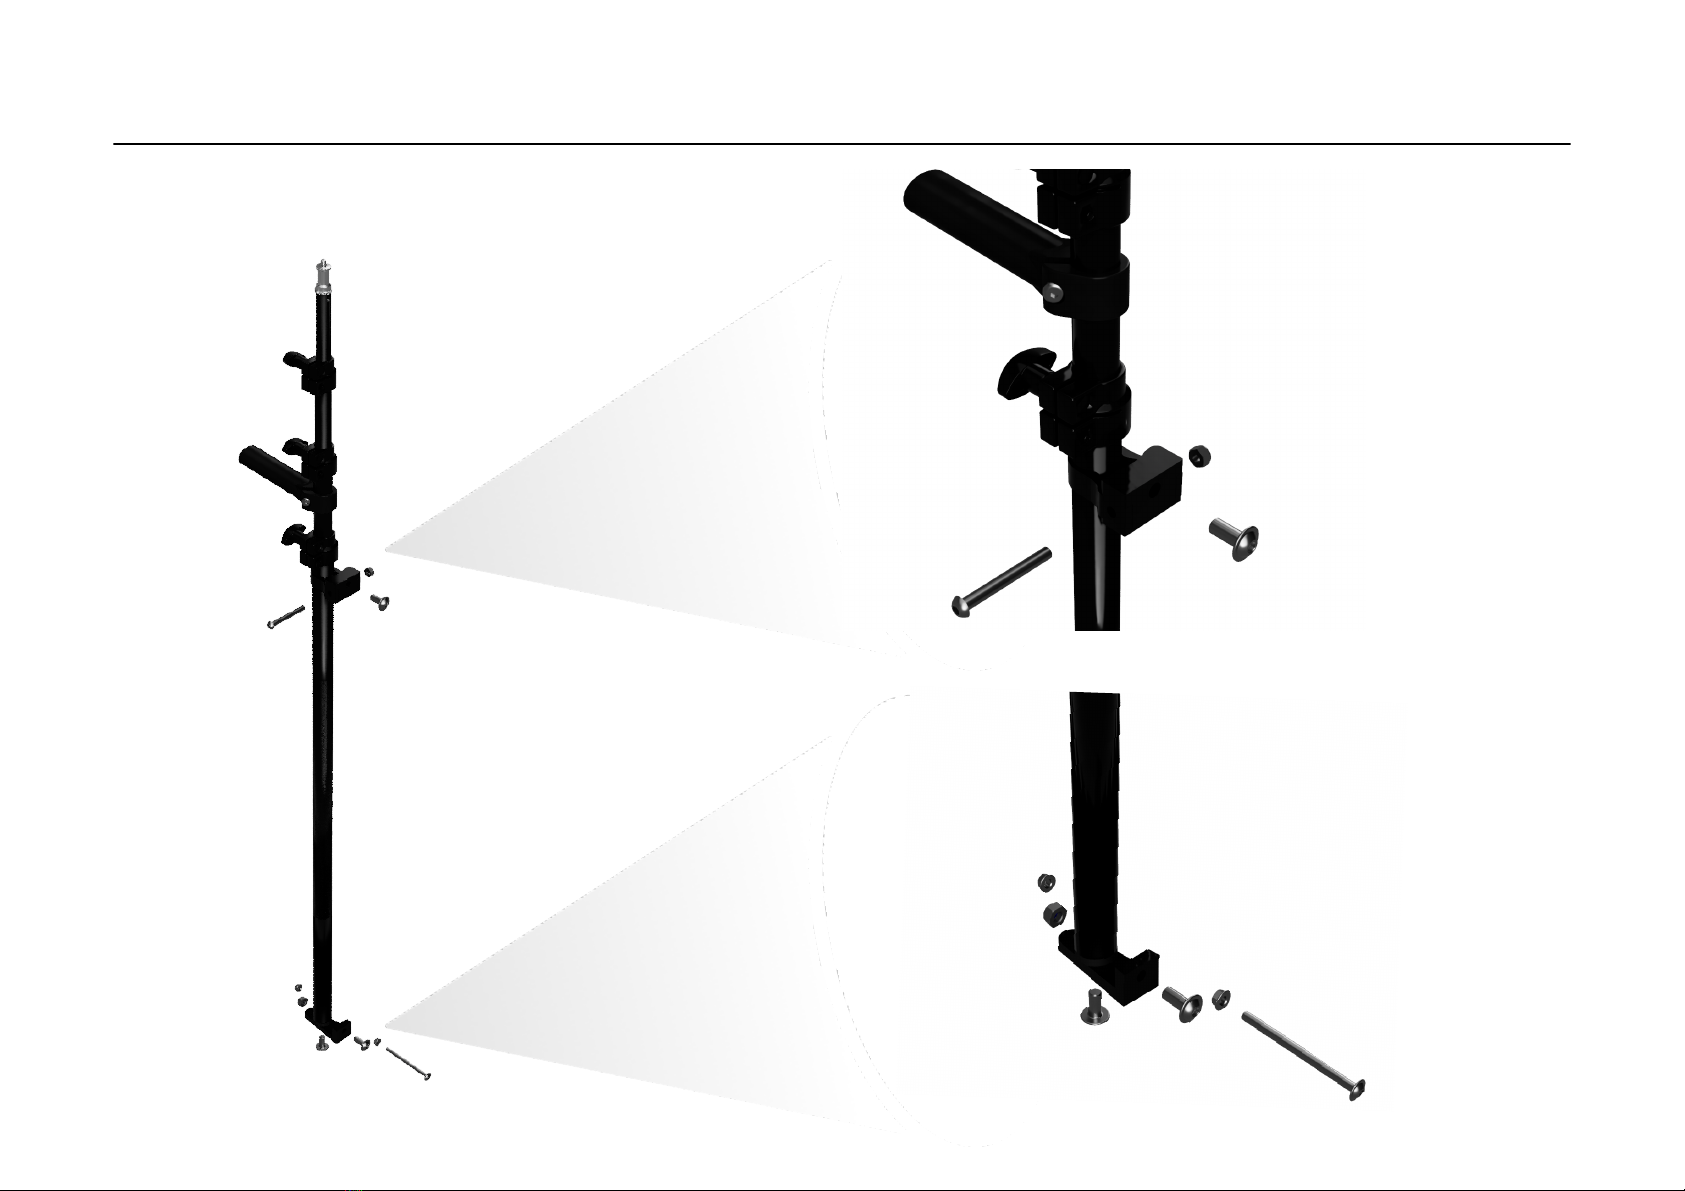
STEP 15
The Handle Riser (SC-MAVRK.013) secures
to the top Handle Cross-brace (SC-
MAVRK.10) using a single M8 flanged screw
which threads through the Back Panel (SC-
MAVRK.004) into the top bracket of the
Handle Riser (SC-MAVRK.013).

SC-MAVRK
!
STEP 16
The Handle Riser (SC-MAVRK.013) secures
to the bottom Handle Cross-brace (SC-
MAVRK.10) using a M8 flanged screw and
nut as well as a M6 flanged screw and two
nuts. They thread through the Back Panel
(SC-MAVRK.004) into the bottom bracket of
the Handle Riser (SC-MAVRK.013).
Your cart should now look like this.
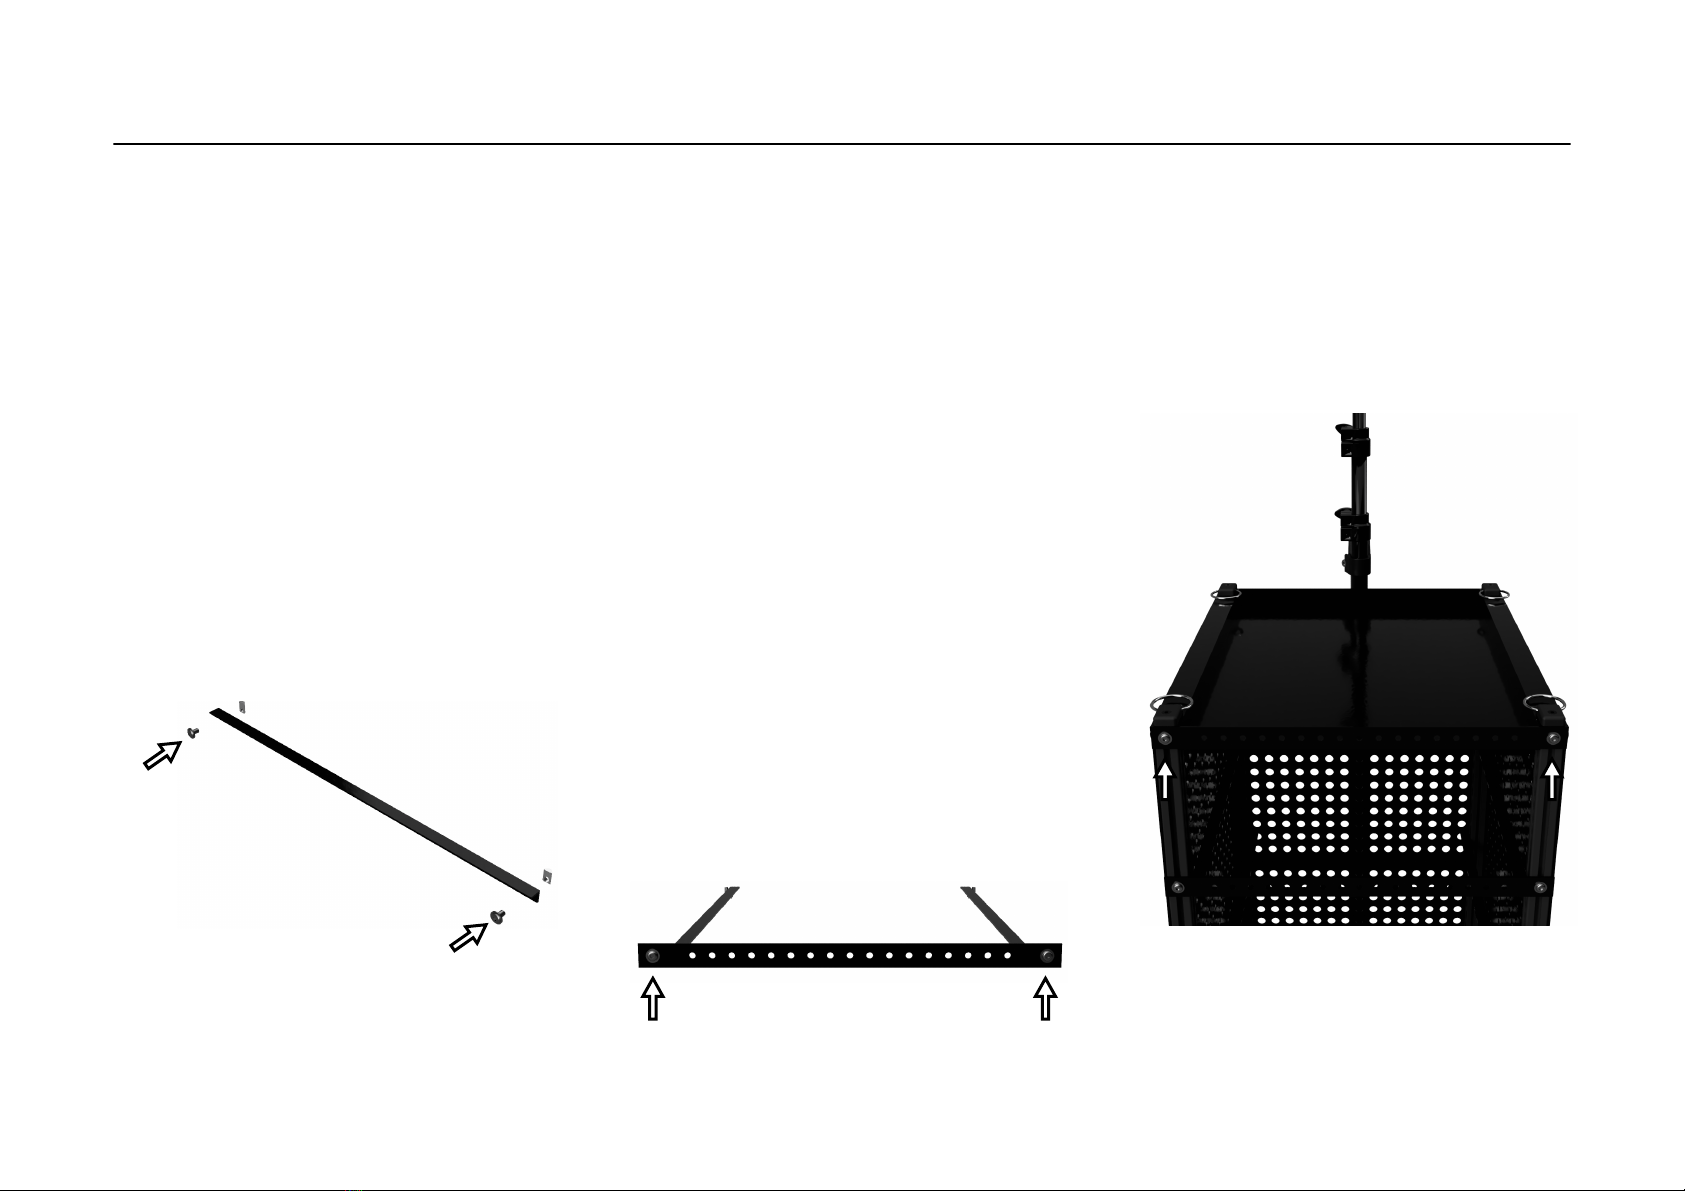
All that remains to do is position the internal
Container Supports (SC-MAVRK.012) and
Container Lips (SC-MAVRK.011) which help
prevent the containers from sliding out.
SC-MAVRK
!
STEP 17
Each Container Support (SC-MAVRK.012)
attaches to the Rear & Front Uprights (SC-
MAVRK.007 & SC-MAVRK.008) using two T-
slot Nuts (SC-MAVRK.014) and two Flanged
Screws (SC-MAVRK.015).
To install the T-slot Nuts (SC-MAVRK.014),
see Step 7.
The vertical position of the Container
Supports (SC-MAVRK.012) depends entirely
on the height of your storage containers.
Tip: When installing the Container Supports
(SC-MAVRK.012), add a minimum of 20mm
above the storage container.
STEP 18
Once the Container Supports (SC-
MAVRK.012) are secured, to prevent the
storage containers from sliding out during
transportation, the Container Lips (SC-
MAVRK.011) must be installed.
Each Container Lip (SC-MAVRK.011) is
secured using two T-slot Nuts (SC-
MAVRK.014) and two Flanged Screws (SC-
MAVRK.015).
They are attached to the Front Uprights (SC-
MAVRK.008) and should be positioned so
that the base of the Container Lip (SC-
MAVRK.011) aligns with the bottom of the
corresponding Container Supports (SC-
MAVRK.012).
STEP 19
Finally, install the Container Lip (SC-
MAVRK.011) for the Recessed Lid (SC-
MAVRK.002) using the same method as
described in the previous step.
SC-MAVRK
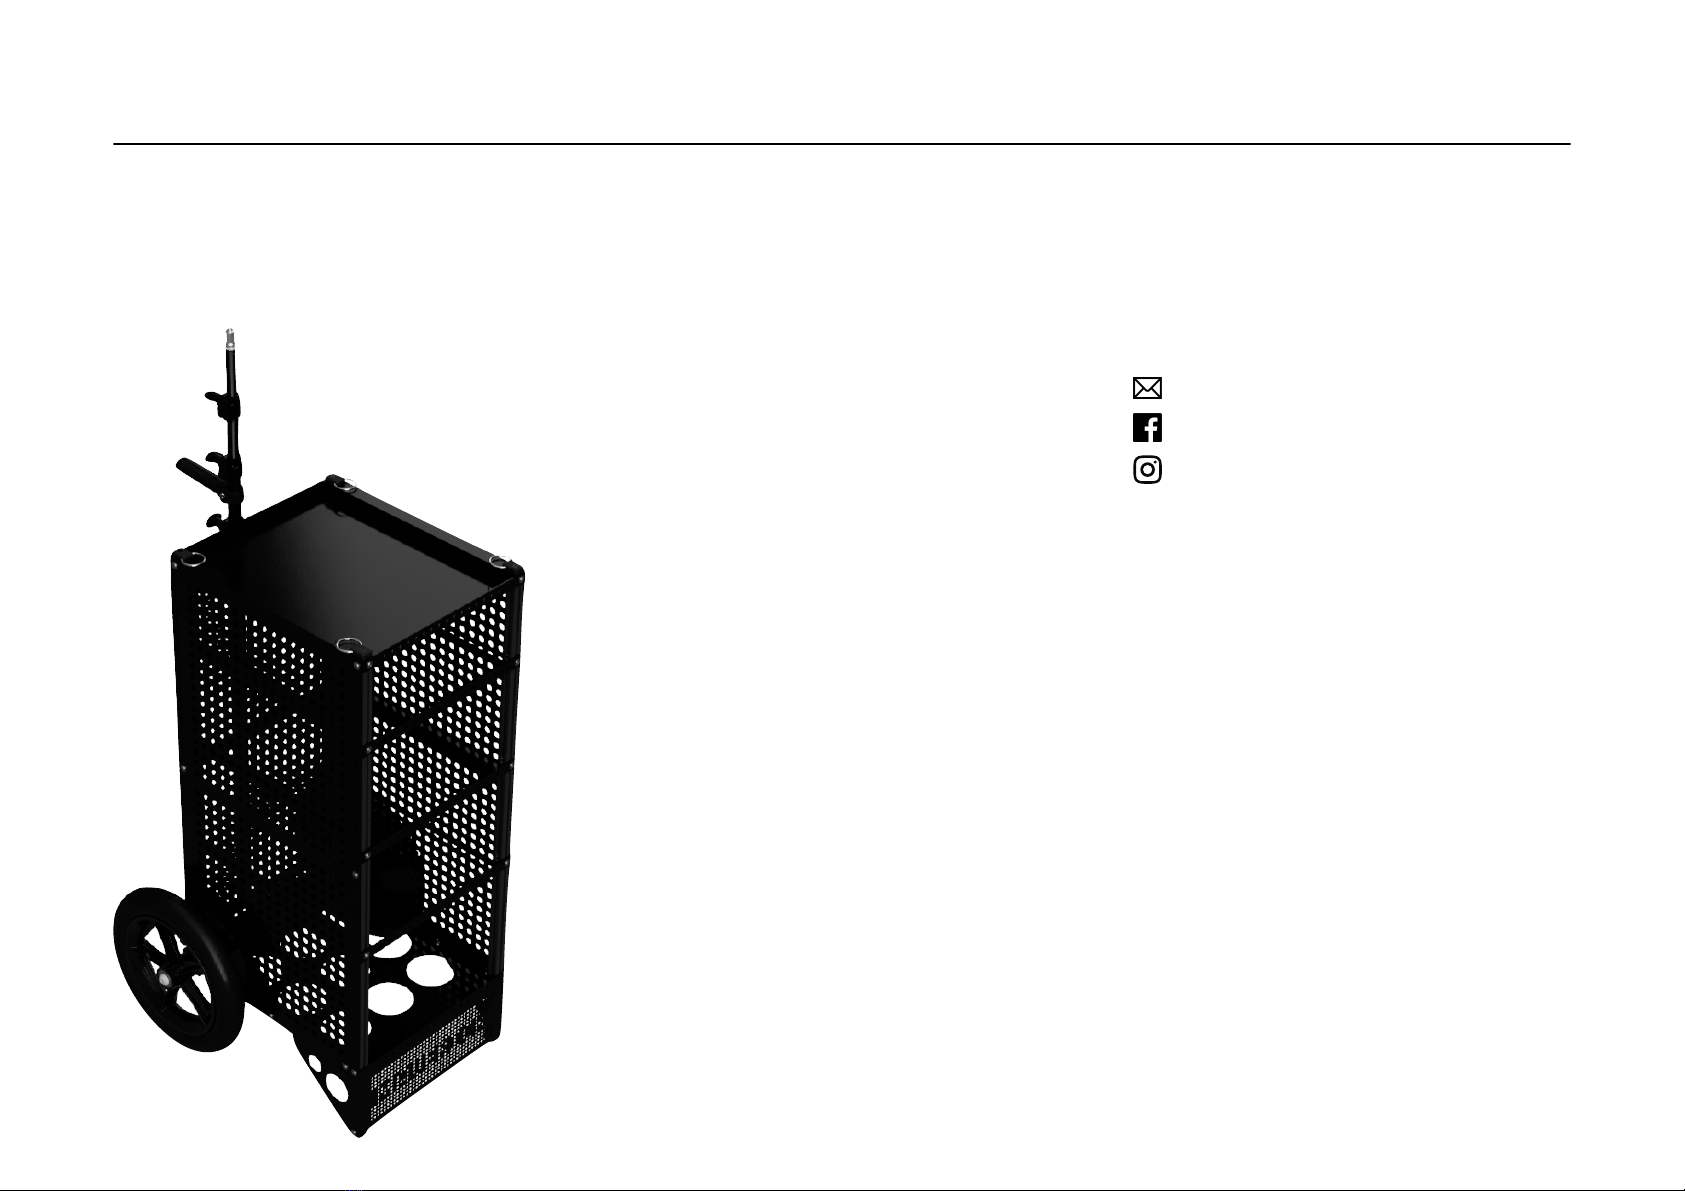
CONGRATULATIONS!
Congratulations you have successfully built
your Maverick cart.
STORAGE CONTAINERS
Having built your Maverick cart, simply add
your choice of storage container. These
should be Euro Containers measuring
300x400mm (11.7x15.7 inches) in whatever
height you require.
Euro Containers come in a variety of
heights, colours and configurations. They
are available with/without lids, solid or
vented, with/without handles etc.
A quick google search “Euro Container” or
“Automation Totes” will often reveal a local
stockist. Meanwhile here are some
suggestions.
www.auer-packaging.com/choosecountry/
www.plastor.co.uk
www.solentplastics.co.uk
www.3jc.co.uk
www.goplasticpallets.com
www.bito.com
If you find a local supplier in your country,
please email us and let us know.
SUPPORT
Please contact us if you have any comments,
suggestions or questions regarding this
accessory at:
www.facebook.com/soundcart
www.instagram.com/soundcart
Warranty
SOUNDCART.audio extends a limited one-year parts and labour warranty to all
owners of this accessory from the date of original purchase. SOUNDCART.audio
warrants this accessory to be free of defective material and workmanship for a
period of one year from the original date of purchase and agrees to repair or
replace such defective part(s) or the entire product at its option, provided it is
returned to SOUNDCART.audio. Shipping and insurance costs to
SOUNDCART.audio must be prepaid by the owner.
This warranty does not cover damage due to accident, abuse or misuse, careless
handling, improper connection and/or installation, improper electrical contact or
grounding. This warranty does not cover damage due to improper use or force
being applied. This warranty will be null and void in the event of service or repair
work not performed by SOUNDCART.audio or an authorised agent, failure to
properly maintain this accessory or continued use after a defect becomes
apparent. Proof of purchase date (copy of invoice) must be provided prior to any
warranty service or repair work being performed.
This warranty is in lieu of any other warranty, expressed or implied, including
warranties without limitation, products being merchantable at the time of
purchase or suitable for a particular purpose. This warranty does not extend to, or
include consequential damage. SOUNDCART.audio reserves the right to change
the specifications of this accessory without any prior notification.
Legal Notices
This document is protected under copyright law. Owner’s of this product may
reproduce this publication for their own personal use. This document may not be
reproduced or distributed, in whole or in part, for commercial purposes (which
includes selling copies).
Great care has been taken in preparing this document for publication, however
since product specifications are subject to change, this document may contain
omissions and technical or typographical inaccuracies. The information provided
in this manual only serves general information purposes, it may be subject to
change at any time without prior notice to improve reliability, function, design or
otherwise.
Governing Law
This agreement and limited warranty are governed by the laws of the United
Kingdom
This manual suits for next models
1
Table of contents
Other Sound Cart Outdoor Cart manuals


Popular Outdoor Cart manuals by other brands


Techly
Techly ICA-TR216T user manual

Kayoba
Kayoba 325-011 operating instructions

rst brands
rst brands VERONA SL-KCRT-1-WHT Assembly instructions

LDI Spaces
LDI Spaces SAFCO 5333 Assembly instructions

Gude
Gude GGW 500 Translation of the original instructions

Copernicus
Copernicus Tech Tube FTT624 Assembly guide