Arcan ASC8013DLX User manual

ASC8013DLX: Parts Breakdown & Operating Manual 4 033109
Item Part # # Req’d Description
1 * 2 Chrome Leg/ea.
2 RSSCPLW 2 Locking Caster/ea.
3 RSSCPW 2 Non-Locking Caster/ea.
4 RSSCPP1 1 Set of 4 Plastic Inserts
5 RSSCPHK 1 Bolt Kit (Incl. 8 ea. of 10mm and 14mm
bolts, nuts, washers and 4 screws)
6 8011 1 Pry Bar Holder
7 8004 1 Side Work Station
8 8002 1 Top Lid
2
1
4
5
3
6
7
Part # Description
RS3HDL Short Drawer Handle
RS8006HDL Long Drawer Handle
RS8006HDLS Handle Screws (Set of 4)
RSRBSLIDEC2 Clip-On Roller Bearing Slide/pr.
8006 Replacement Large Drawer
8016 Replacement 3 Drawer Unit
8007 Replacement Third Shelf
8013LS 4-Piece Lock & Key Set, Keyed Alike
1110 EVA Foam for Trays / 10-pk.
1111 EVA Foam for Drawers / 10-pk.
8004SSM Rubber Liner for Side Shelf / 10-pk.
1
* For replacement, purchase RSSC7, Chrome Leg, and 8014, Leg Extensions.
PARTS BREAKDOWN
MODEL ASC8013DLX
SERVICE CART WITH
LOCKING TOP & DRAWERS
INCLUDES PRY BAR HOLDER AND SIDE WORK BENCH
REPlAcEmENT PARTS lIST AlSO AVAIlABlE
8
Ar c A n Pr o f e s s i o n A l To o l s cu s T o m e r se r v i c e
1 800-879-7316

ASC8013DLX: Parts Breakdown & Operating Manual 1 033109
Chrome Legs (2)
(With Inserts Installed)
Keys
(Attached to Legs)
Locking Casters (2)Non-Locking Casters (2)Locking Drawer Assembly
14mm Bolts, Nuts, & Washers
(8 Pcs. Each)
Bottom Tray
Pry Bar Holder
Side Work Bench
Rubber Mallet
Table or Workbench
10mm WrenchPhillips Head
Screwdriver
2 People
Long Drawer Handle (1)
Drawer Handle Screws (14)
Short Drawer Handles (4)
TOOlS NEEDED
OPERATING mANUAl
THIS OPERATING MANUAL CONTAINS IMPORTANT SAFETY INFORMATION.
READ CAREFULLY AND UNDERSTAND ALL INFORMATION BEFORE OPERATING
THIS TOOL. SAVE THIS MANUAL FOR FUTURE USE.
PARTS lIST
Examine box contents, then proceed with the following instructions.
MODEL ASC8013DLX
SERVICE CART WITH
LOCKING TOP & DRAWERS
INCLUDES PRY BAR HOLDER AND SIDE WORK BENCH
10mm Bolts, Nuts, & Washers
(8 Pcs. Each)
AlSO AVAIlABlE
© Copyright 2009, Arcan®

ASC8013DLX: Parts Breakdown & Operating Manual 2 033109
Do not fully tighten fasteners
until prompted.
Step 1: Assembly preparation.
Clear table top and set Locking Drawer Assembly
on table top, with lid facing up. Position the Locking
Drawer Assembly so that one end hangs off of the
table enough to allow the chrome legs to go through
the square holes. Insert one set of chrome legs
through the overhanging holes as shown in Figure 1.
Do not bolt legs to top.
Step 2: Connecting legs and side
accessory to drawer assembly
Choose one of the side accessories (Pry Bar Holder
or Side Work Bench - Figure 2 shows Pry Bar Holder)
for attachment to the overhanging end of the service
cart. Align the outermost bolt holes in the accessory
with the bolt holes in the end of the cart and with
the uppermost holes the chrome legs. Position a
washer and insert a 10mm bolt through the washer,
bolt holes, and legs as shown. Secure bolts with a
flat washer, lock washer, and nut on inside of Lock-
ing Drawer Assembly. Tighten bolts until parts fit
together firmly.
Repeat steps 1 and 2 for other end of cart,
using remaining side accessory.
2.
3.2
Locking
Drawer Assy.
Chrome
Legs
Table
10mm
Bolt
Table
Pry Bar
Holder
Chrome
Legs
Locking
Drawer Assy.
1.
2.
Locking Top
Locking Top
ASSEmBlY INSTRUcTIONS
NOTE
ASC8013DLX: Parts Breakdown & Operating Manual 3 033109
Bottom
Tray
10mm
Bolts
Chrome
Legs
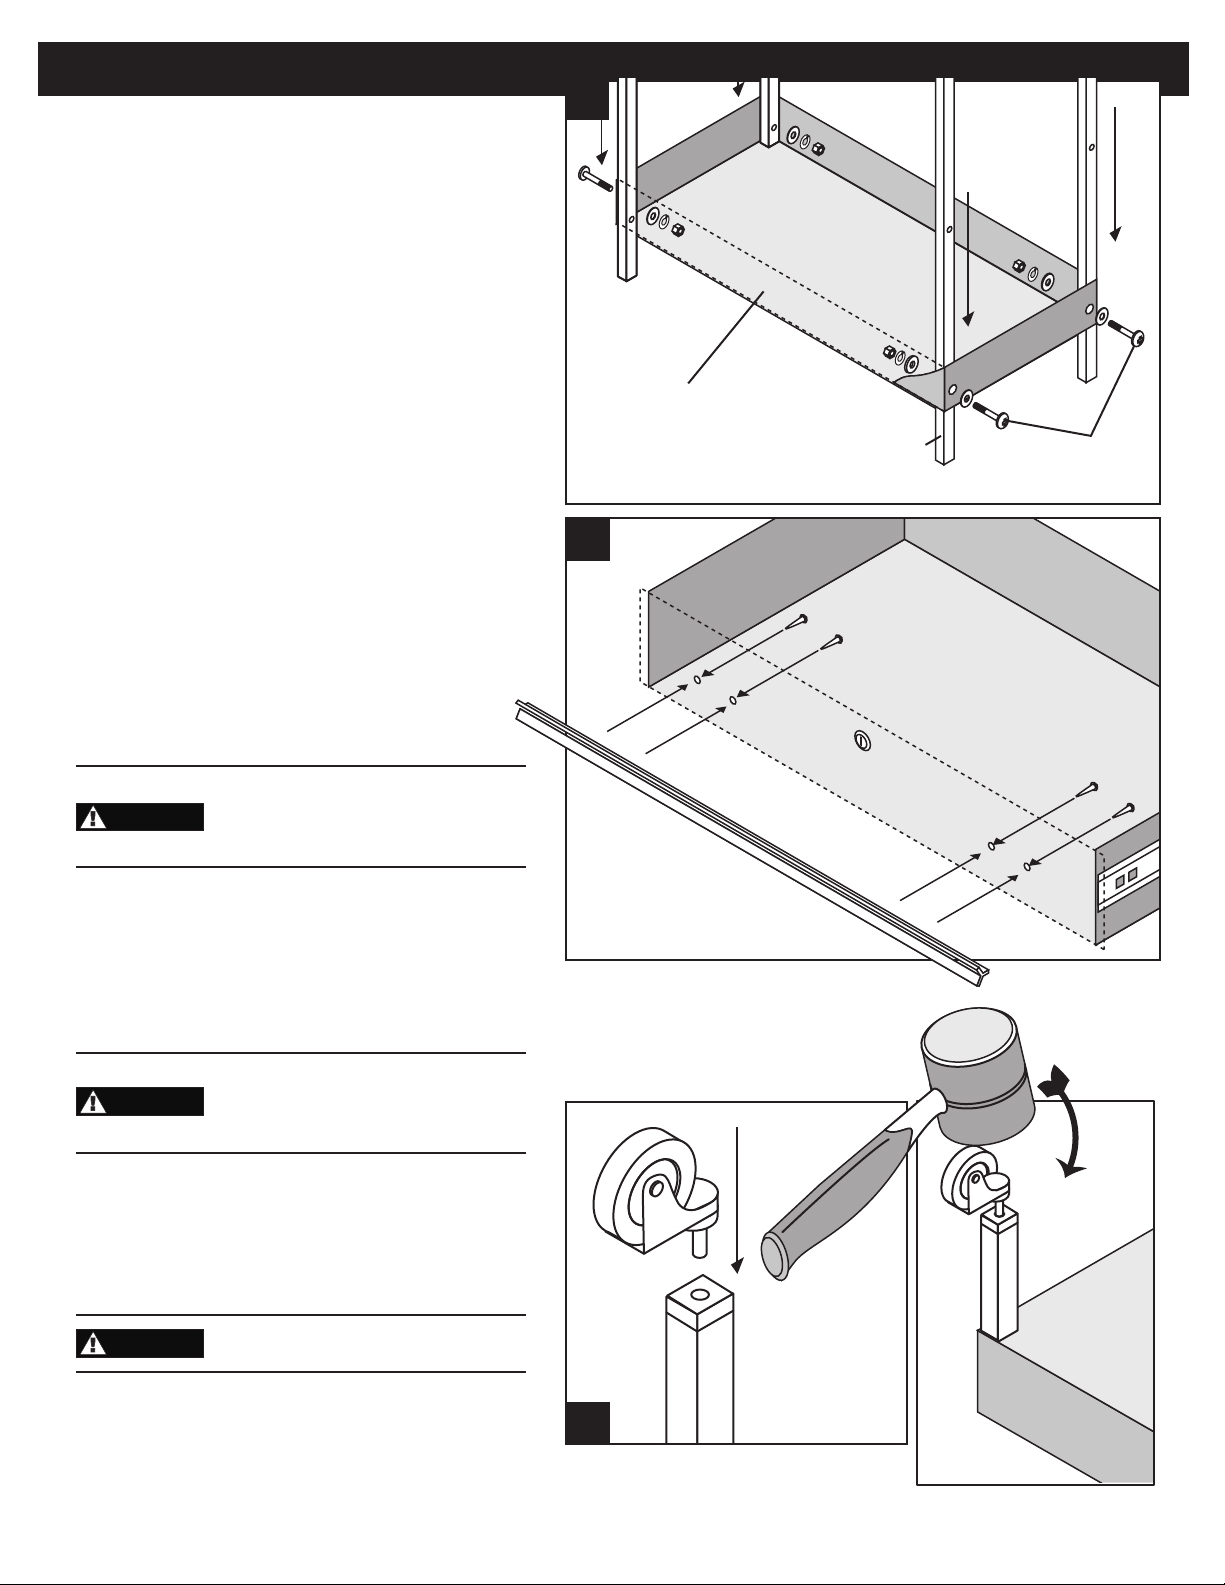
Step 3: Connecting the bottom tray to the
chrome legs.
Lift the cart and place on top of the bottom tray with
chrome legs through the square leg-holes. Align bolt
holes in bottom tray with lower holes in legs and
insert a 10mm bolt through the washer, bolt holes,
and legs as shown. Repeat with all remaining holes
in bottom tray.
Step 4: IMPORTANT: Tighten all bolts.
At this point, all bolts should be tightened. Tighten
bolts opposite each other rather than tightening all
bolts on one side first so that cart remains aligned.
Avoid using excessive force when tightening bolts.
Over-tightening bolts can make drawers bind and
hinder their operation.
Step 5: Attaching handles to drawer faces.
Open the bottom drawer of the service cart. Align the
ends of the long handle with the edges of the bot-
tom drawer, so that the channel in the handle covers
all four holes in the front of the drawer. Insert screws
through each hole from inside the drawer and into the
drawer handle channel. Tighten the screws. Repeat
for all remaining drawers using short handles.
Do not allow the handles to over
hang the ends of the drawer faces,
as they will interfere with the
operation of the drawer.
Step 6: Attaching casters.
With the provided keys, lock all drawers, the top, and
the Pry Bar Holder to prevent them from opening. Turn
the cart upside down, allowing it to rest on chrome leg
tops with the plastic inserts facing up.
Do not allow the Side Work
Bench to swing freely, as it may
be damaged or cause injury as
cart is turned upside down.
Insert the stem of one caster into the hole in a plastic
insert. Using a rubber mallet, hammer the casters into
place until the stem is no longer visible. Repeat with
other casters.
Ensure that both locking casters
are on same end of the cart.
Once casters are installed, stand cart upright.
Assembly is complete.
ASSEmBlY INSTRUcTIONS
3.
5.
NOTE
NOTE
NOTE
6.
Other Arcan Outdoor Cart manuals


