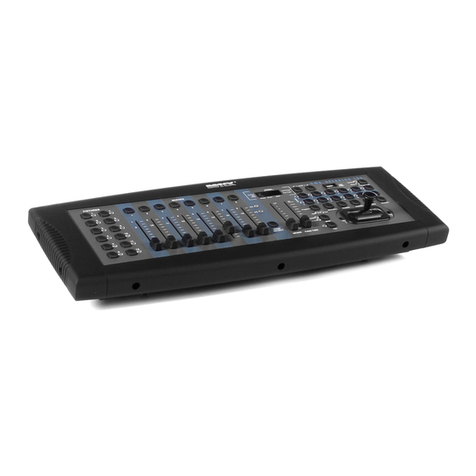
Sound Sation Scenemaker 1216 Pro USB User manual

Please read this manual carefully and proper take care of this manual.
USER MANUAL
Intelligent Lighting Controller
with USB Data Backup
Leggete questo manuale e conservatelo per future consultazioni!
MANUALE utente

Dear customer,
First of all thanks for purchasing a SOUNDSATION® product. Our mission is to satisfy
all possible needs of musical instrument, professional audio and lighting users offering
a wide range of products using the latest technologies.
We hope you will be satised with this item and, if you want to collaborate, we are
looking for a feedback from you about the operation of the product and possible im-
provements to introduce in the next future. Go to our website www.soundsationmusic.
com and send an e-mail with your opinion, this will help us to build instruments ever
closer to customer’s real requirements.
One last thing: read this manual before using the instrument, an incorrect operation
can cause damages to you and to the unit. Take care!
The SOUNDSATION Team
Gentile Cliente,
Grazie per aver scelto un prodotto SOUNDSATION®. La nostra missione è quella di
offrire ai nostri utenti una vasta gamma di strumenti musicali ed apparecchiature audio
e lighting con tecnologie di ultima generazione.
Speriamo di aver soddisfatto le vostre aspettative e, se voleste collaborare, saremmo
lieti di ricevere un vostro feedback sulla qualità del prodotto al ne di migliorare co-
stantemente la nostra produzione. Visitate il nostro sito www.soundsationmusic.com ed
inviateci una mail con la vostra opinione, questo ci aiuterà a sviluppare nuovi prodotti
quanto più vicini alle vostre esigenze.
Un’ultima cosa, leggete il presente manuale al ne di evitare danni alla persona ed al
prodotto, derivanti da un utilizzo non corretto.
Il Team SOUNDSATION

TABLE OF CONTENTS
1. 1. INTRODUCTION ....................................................................................................6
1.1. UNPACKING .............................................................................................................................................................6
1.2. ACCESSORIES ..........................................................................................................................................................7
2. OVERVIEW..................................................................................................................7
3. MAIN FEATURES........................................................................................................7
4. OVERVIEW..................................................................................................................8
4.1. Front Panel................................................................................................................................................................8
4.2. Rear Panel ...............................................................................................................................................................10
4.3. Common Terms.....................................................................................................................................................11
5. OPERATION GUIDE..................................................................................................12
5.1. Display Information.............................................................................................................................................12
6. SETUP........................................................................................................................12
6.1. Setting up the system ........................................................................................................................................12
6.2. Fixture Addressing...............................................................................................................................................13
6.3. Wheel Assignment ..............................................................................................................................................13
6.4. Review Wheel Assignment or Reverse.........................................................................................................14
6.5. Copy Scanner.........................................................................................................................................................14
6.6. Reverse Channel Output...................................................................................................................................14
6.7. Fade Time Assign .................................................................................................................................................15
7. OPERATION..............................................................................................................15
7.1. Manual Mode........................................................................................................................................................15
7.2. Review Scene or Chase......................................................................................................................................16
8. PROGRAMMING......................................................................................................16
8.1. Entering Program Mode....................................................................................................................................16
8.2. Create a Scene ......................................................................................................................................................16
8.3. Running a Bank.....................................................................................................................................................17
8.4. Check a Bank .........................................................................................................................................................17
8.5. Editing a Program................................................................................................................................................18
8.6. Copy a Bank...........................................................................................................................................................18
9. CHASE PROGRAMMING .........................................................................................18
9.1. Create a Chase......................................................................................................................................................18
9.2. Running a Chase ..................................................................................................................................................19
9.3. Checking a Chase.................................................................................................................................................19
9.4. Edit a Chase............................................................................................................................................................19
9.5. Delete all CHASE Programs..............................................................................................................................21
3
ENGLISH

10. SCENE PROGRAMMING (Steps).............................................................................21
10.1. Insert a Scene........................................................................................................................................................21
10.2. Copy a Scene.........................................................................................................................................................21
10.3. Delete a Scene ......................................................................................................................................................22
10.4. Delete all Scenes ..................................................................................................................................................22
11. PLAYBACK ................................................................................................................22
11.1. Running in Sound Mode...................................................................................................................................22
11.2. Running in Auto Mode......................................................................................................................................23
11.3. Run Multiple Chases Cycle...............................................................................................................................23
11.4. Blackout...................................................................................................................................................................23
12. MIDI OPERATION ....................................................................................................23
13. USB DISK ..................................................................................................................24
13.1. Save Console Data to USB Drive....................................................................................................................24
13.2. Upload USB Data to Console ..........................................................................................................................24
13.3. Reset to Factory Default Settings ..................................................................................................................25
14. APPENDIX ................................................................................................................25
14.1. DMX Introduction................................................................................................................................................25
14.2. Building a Serial DMX Chain............................................................................................................................25
14.3. DMX Terminator ...................................................................................................................................................26
14.4. 3-Pin vs 5-Pin DMX cables...............................................................................................................................27
15. SPECIFICATIONS ......................................................................................................27
16. WARRANTY AND SERVICE .....................................................................................28
17. WARNING.................................................................................................................28
4
ENGLISH

IMPORTANT SAFETY SYMBOLS
The symbol is used to indicate that some hazardous live terminals are
involved within this apparatus, even under the normal operating con-
ditions, which may be sufcient to constitute the risk of electric shock
or death.
The symbol is used in the service documentation to indicate that spe-
cic component shall be replaced only by the component specied in
that documentation for safety reasons.
Protective grounding terminal
Alternating current/voltage
Hazardous live terminal
Denotes the apparatus is turned on
Denotes the apparatus is turned off
WARNING: Describes precautions that should be observed to prevent the danger
of injury or death to the operator.
CAUTION: Describes precautions that should be observed to prevent danger of
the apparatus.
TAKING CARE OF YOUR PRODUCT
fRead these instructions
fKeep these instructions
fHeed all warning
fFollow all instructions
Water / Moisture
The apparatus should be protected from moisture and rain and can not be used near
water; for example near a bathtub, a kitchen sink, a swimming pool, etc.
Heat
The apparatus should be located away from heat sources such as radiators, stoves or
other appliances that produce heat.
Ventilation
Do not block areas of ventilation opening. Failure to do could result in re. Always
5
ENGLISH
SCENEMAKER 1216 PRO USB User manual

install according to the manufacturer’s instructions.
Object and Liquid Entry
Objects do not fall into and liquids are not spilled into the inside of the apparatus for
safety.
Power Supply
In case of external power supply, the apparatus should be connected to the power sup-
ply only of the type as marked on the apparatus or described in the manual. Failure to
do could result in damage to the product and possibly the user. Unplug this apparatus
during lightning storms or when unused for long periods of time.
Electrical Connection
Improper electrical wiring may invalidate the product warranty.
Cleaning
Clean only with a dry cloth. Do not use any solvents such as benzene or alcohol.
Servicing
Do not implement any servicing other than those means described in the manual. Refer
all servicing to qualied service personnel only. Only use accessories/attachments or
parts recommended by the manufacturer.
1. 1. INTRODUCTION
Thank you for purchasing our SCENEMAKER 1216 PRO USB Intelligent Lighting Con-
troller with USB Data Backup. Enjoy your new equipment and make sure to read this
manual carefully before operation!
This user manual is made to provide both an overview of controls, as well as informa-
tion on how to use them. In order to help you to understand the connections between
the various controls, we have gathered in groups according to their functions.
1.1. UNPACKING
Your SCENEMAKER 1216 PRO USB controller was carefully packed to ensure safe
transport. Despite this, we recommend you to carefully examine the package and its
contents for any signs of physical damage, which can occur during transport. It is com-
posed by following parts:
f1x SCENEMAKER 1216 PRO USB unit
f1x External Power Adapter
f1x USB goose-neck lamp
fThis User Manual
6
ENGLISH
SCENEMAKER 1216 PRO USB User manual

ATTENTION: Packaging bag is not a toy! Keep out of reach of children!!! Keep in
a safe place the original packaging material for future use.
1.2. ACCESSORIES
SOUNDSATION can supply a wide range of quality accessories that you can use with
your DMX controller, like Cables, Splitters, Stands, and a wide range xtures.
All products in our catalogue has been long tested with this device so we recommend
to use Genuine SOUNDSATION Accessories and Parts.
Ask your SOUNDSATION dealer or check out our website www.soundsationmusic.com
for any accessories you could need to ensure best performance of the product.
2. OVERVIEW
SCENEMAKER 1216 PRO USB is a universal intelligent lighting controller. It allows you
to manage up to 12 xtures composed of 16 channels each (192 channels in total), and
up to 240 programmable scenes.
Six chases can contain up to 240 steps composed by the saved scenes (the steps) and
in any order. Programs can be triggered by music, MIDI, automatically or manually.
On control surface you will nd various programming tools such as 8 universal channel
sliders, two assignable wheels, a lot of switches and an LCD display for easier navigation
of controls and menu functions. You can control PAN and TILT of different intelligent
lighting xtures using the same wheel at the same time. These wheels allow the user to
assign individual PAN and TILT channels for every xture.
Finally, the SCENEMAKER 1216 PRO USB is equipped with a USB port that, in addition
to operate the LED goose-neck lamp (supplied), allows the connection of an external
USB drive to back up the data, and then to recall them at any time.
3. MAIN FEATURES
f12 Fixtures with 16 DMX Channels each; 192 Channels in total
f30 banks of 8 programmable scenes, 240 scenes total
f6 chases of 240 programmed scenes from 30 bank
fExecute multiple chases simultaneously
f8 Sliders x 2 Pages for direct control of channels
fAuto Mode controlled by Speed and Fade Time
f2 assignable jog wheels for easy PAN and TILT movement
fFine adjustment of PAN and TILT
7
ENGLISH
SCENEMAKER 1216 PRO USB User manual

fReversible DMX channels xture in opposition to others in a chase
f8-CH / 16-CH modes for Assigned or Reversed DMX channels
fManual Override Button allow you to grab any xture on the y
fMaster Blackout
fRCA Line in for Music triggering
fUSB Data Backup and Restore
fAuto-Save last running Program when Power/Off
fAll data can be sent or received between two units
fUSB LED Goose-neck Lamp
fLCD Display for easy navigation of menus
fMIDI control over banks, chases and Blackout
fPlastic end housing
4. OVERVIEW
4.1. Front Panel
Intelligent Lighting Controller
Scanners
1 7
2 8
3 9
410
511
612
ERROR
WORK
usb disk
Page
A
Page
B
Page Select
MIDI / REC
Program
1 2 3 4 5 6 7 8
Scenes
CH1
CH2
CH3
CH5
CH6
CH7
CH8
CH4
SPEED FADE
TIME
0.1 SEC. 30 SEC.
10 MIN. 0 SEC.
Auto
DEL
Music
Bank Copy
Assign
Reverse
FineMode
Override CHASE 1
CHASE 4
CHASE 2
CHASE 5
CHASE 3
CHASE 6
Music
Manual
Auto
BANK
BANK
TAP/DISPLAY
BLACKOUT
PAN TILT
20
21
12
4
5
6
7
8
9
10 11 13
12 14 15
16
17
18
19
24
25
23 22
26
3
29
28
27
1. Scanner Buttons (1-12): 12 scanners of 16 DMX channels & fader control. Press a
scanner button to turn on manual fader control. Press the scanner button again to
turn off fader control.
Scanners DMX channels Fader control LED
1 1-16 Off/On Off/On
2 17-32 Off/On Off/On
3 33-48 Off/On Off/On
4 49-64 Off/On Off/On
8
ENGLISH
SCENEMAKER 1216 PRO USB User manual

5 65-80 Off/On Off/On
6 81-96 Off/On Off/On
7 97-112 Off/On Off/On
8 113-128 Off/On Off/On
9 129-144 Off/On Off/On
10 145-160 Off/On Off/On
11 161-176 Off/On Off/On
12 177-192 Off/On Off/On
2. Scanner Indicator LEDs: The LED next to the button lights up or goes out to indi-
cate your selection.
3. Scene Select Buttons: Press the scene buttons to load or store your scenes. There
are a maximum of 240 programmable scenes.
4. Channel Faders: These faders are used to control the intensity of channel 1-8 or
channel 9-16 depending upon the selected page (A or B).
5. Page A indicator LED: Represents Ch 1-8 range selected.
6. Page B indicator LED: Represents Ch 9-16 range selected.
7. Page Select Button: Used to select Page A (1-8) and Page B (9-16). In manual
mode, press to toggle between the two pages or to select both pages simultane-
ously. Both LEDs on will allow control of both lower and upper range channel.
8. Program Button: Used to enter Program mode.
9. Music/Bank Copy: Activates Music mode or copies a bank of scenes.
10. LCD Display: Shows current activity or programming state.
11. Mode indicator LEDs: Provides operating mode status (Manual, Music or Auto).
12. Bank Up: Selects target bank from the available 30 banks.
13. Bank Down: Selects target bank from the available 30 banks.
14. Tap/Display: This is a Tap-Sync during playback, and commutes DMX value chang-
es displayed in the LCD panel to percentages during programming.
15. Blackout button: Sets all channel to “0”.
16. MIDI/Rec Button: Activates MIDI external control and is also used to conrm the
record/save process.
17. Assign LED: Indicates that the controller is in Channel assign mode during initial
setup
9
ENGLISH
SCENEMAKER 1216 PRO USB User manual

18. Auto/Del Button: Used to activate Auto mode and as delete function during
programming.
19. Chase Buttons (1-6): These buttons are used to activate chases of programmed
scenes.
20. Speed fader: This will adjust running time of a scene or a step within a chase.
21. Fade-Time fader: Also considered a cross-fade, sets the interval time between two
scenes in a chase.
22. Fine button: Activates 16 bit control of the wheels; movement will be in extremely
small increments.
Note: While FINE is active Bank UP/DOWN buttons will increase and decrease
DMX values by one for either the wheels or the sliders in focus or currently
moved.
23. Reverse LED: Indicates REVERSE mode.
24. Pan/Tilt Jig Wheels: Generally used to control Pan (horizontal) and Tilt (vertical)
movement of a xture or for programming.
25. Mode Button: By pressing Fine and Mode buttons, it allows to activate Assign or
Reverse mode.
26. Override Button: Under AUTO mode, it selects manual control channel
27. USB Disk Button: It is the USB port to connect a USB drive to backup or recall
data.
28. Work status LED: During data saving operation, it indicates that the procedure is
accomplished and data have been properly saved.
29. Error Status LED: During data saving operation, it indicates that the saving proce-
dure failed.
4.2.Rear Panel
30 31 32 33
34 35
36
30. AUDIO IN: Direct audio input for use in sound-active mode
10
ENGLISH
SCENEMAKER 1216 PRO USB User manual

31. MIDI IN: For triggering of Banks/Chases using a MIDI device
32. DMX Out: This connector sends your DMX values DMX scanners or DMX packs.
33. DMX In: This connector accepts your DMX input signals.
34. DC Input: DC 9 -12V, 1000mA min.
35. USB Port: Used to connect a USB goose-neck lamp or a USB Drive.
36. Power Switch: This switch turns On/Off the console.
4.3.Common Terms
The following are common terms used in intelligent light programming.
Blackout is a state by where all lighting xtures light output are set to 0 or off, usually
on a temporary basis.
DMX-512 is an industry standard digital communication protocol used in entertain-
ment lighting equipment. For more information read Sections “14.1. DMX Introduction”
at page 25 and “14.2. Building a Serial DMX Chain” at page 25 in the Appendix.
Fixture refers to your lighting instrument or other device such as a moving head or
dimmer of which you can control.
Programs are a bunch of scenes stacked one after another. It can be programmed as
either a single scene or multiple scenes in sequence.
Scenes are static lighting states.
Sliders, also known as faders.
Chases can also be called programs. A chase consists of a bunch of scenes stacked one
after another.
Scanner refers to a lighting instrument with a Pan and Tilt mirror; however, the SCEN-
EMAKER 1216 PRO USB controller it can be used to control any DMX-512 compatible
device as a generic xture.
MIDI is a standard for representing musical information in a digital format. A MIDI
input would provide external triggering of scenes using MIDI device such as a MIDI
keyboard or sequencer.
Stand Alone refers to a xture’s ability to function independently of an external con-
troller and usually in sync to music, due to a built in microphone.
Fade slider is used to adjust the time between scenes within a chase.
11
ENGLISH
SCENEMAKER 1216 PRO USB User manual

Speed slider affects the amount of time a scene will hold its state. It is also considered
a waiting time.
Shutter is a mechanical device in the lighting xture that allows you to block the light
path. It is often used to lessen the intensity of the light output and to strobe.
5. OPERATION GUIDE
This unit allows you to program 12 scanners of 16 DMX channels, 30 banks of 8
programmable scenes, 6 chases of 240 programmed scenes using 8 faders and other
function buttons. With the use of two jog wheels, you may easily control the Pan or Tilt
of the scanners. To tailor your special effect lighting, this unit enables you to Assign or
Reverse the DMX channels.
5.1. Display Information
The LCD Display contains a maximum of 2x8 characters. When you turn the unit on the
LCD shows Scene 1, Bank 1 as follows:
Below some examples of display messages:
LCD Display Message
CHASE 5 Chase 5 is activated
STEP 002 The 2nd step of a chase
DATA 151 DMX value (000-255)
WT:1M36S The current Wait Time is 1 minute and 36 seconds
TP:5.32S The time of the last two taps is 5.32 seconds
FT:10.5S Fade Time is 10.5 seconds
ASS07 08 Assign DMX channels 7 and 8
RES10 13 Reverse DMX Channels 10 and 13
SN 6 Scene 6
BK 03 Bank 03
6. SETUP
6.1. Setting up the system
1. Connect this xture to electric power via DC adapter.
2. Plug in DMX cable(s) to your intelligent lighting as described in the xtures respec-
12
ENGLISH
SCENEMAKER 1216 PRO USB User manual

tive manual. For a quick introduction on DMX see the “14.1. DMX Introduction” at
page 25 section in the Appendix of this manual.
6.2.Fixture Addressing
SCENEMAKER 1216 PRO USB is programmed to control 16 channels of DMX per xture,
therefore the xtures you wish to control with the corresponding “SCANNER” buttons
on the unit, must be spaced 16 channels apart. Please refer to your individual xture’s
manual for DMX addressing instructions.
6.3.Wheel Assignment
Because not all lighting xtures are alike or share same control attributes, this Control-
ler allows the user to assign the wheel the correct PAN and TILT channel for every indi-
vidual xture, including 16-bit channel assignments. It also allows the user to re-assign
physical faders to xture DMX channels so that the user can combine or unify control of
similar or the same attributes across different types of xtures.
1. Press and hold PROGRAM button until the led blinks.
2. Press and hold Fine & Mode buttons together 2 times to access channel assign-
ment mode. Assign led will light. The wheel can be re-assigned to output on a
different DMX channel.
3. Press a SCANNER button that represents the xture you would like to set PAN &
TILT movements.
4. Use the BANK UP/DOWN buttons to select what you want to set
5. Press the Tap/Display button to switch pages to choose channels.
6. Press and hold Mode button, then press the Scenes buttons to select the DMX
channel. All LEDs will blink and LCD display will show Pan/Tilt set channel.
7. Press and hold FINE & MODE buttons together to exit.
NOTE: All wheels can be re-assigned to output on different DMX channels.
You can re-assign X/Y channel to all controller fader channels.
Delete a Scanner of DMX Channels
1. Press and hold the PROGRAM button until the led blinks.
2. Press and hold FINE & MODE buttons together 2 times to access channel assign-
ment mode, the assign led will light. The wheel can be re-assigned to output on
a different DMX channel.
3. Press a SCANNER button that represents the xture you would like to set the
13
ENGLISH
SCENEMAKER 1216 PRO USB User manual

PAN & TILT
4. Press AUTO/DEL & MODE buttons together to delete the channel assignment
mode.
6.4.Review Wheel Assignment or Reverse
Reverse Review
1) Press and hold FINE & MODE buttons together one time to access the wheel as-
signment mode.
2) press a SCANNER button to select a scanner
3) Press and hold FINE & MODE buttons together 2 times to exit
wheel assignment Review
1) Press and hold FINE & MODE buttons together 2 times to access the channel
reverse mode
2) Press a SCANNER button to select a scanner
3) Press and hold FINE & MODE buttons one time to exit.
6.5.Copy Scanner
Example: Copying Scanner 1 into Scanner 2
1. Press and hold SCANNER button 1.
2. While holding button 1press scanner button 2.
3. Release SCANNER button 1 rst before releasing SCANNER button 2and LED
indicator of SCANNER 2will ON.
4. The target SCANNER LED indicators will ash to conrm successful copy.
NOTE: To save time, you can copy the settings of one Scanner button to an-
other.
6.6.Reverse Channel Output
Action:
1. Press and hold PROGRAM button until the led blinks
2. Press and hold FINE & MODE buttons together to access REVERSE mode. RE-
VERSE LED turns on. Then press the SCANNER button.
14
ENGLISH
SCENEMAKER 1216 PRO USB User manual

3. Use the Bank up/Down buttons to select PAN/TILT.
4. Press the TAP/DISPLAY button to switch between pages.
5. Press and hold MODE button, then press the SCENES buttons to select the DMX
channel. All LEDs will blink.
6. Press and hold FINE & MODE buttons 2 times to exit.
Notes:
NOTE: You can permanently reverse the output of any given channel on the
controller. Press AUTO/DEL & MODE buttons together to delete the reverse
channel.
6.7. Fade Time Assign
You can choose whether fade time during scene execution is implemented broadly
to all output channels, or only to the Pan & Tilt movement channels. This is relevant
because often you will want gobos and colors to change quickly while not affecting the
movement of the light.
1. Turn OFF the controller
2. Hold the MODE and TAP/DISPLAY buttons simultaneously.
3. Turn on the controller.
4. Press the TAP/DISPLAY button to toggle between the two modes. Either ALL CH
(all channels) or ONLY X/Y (Pan & Tilt only).
5. Press MODE and TAP/DISPLAY to save settings. All LEDS will blink to conrm
setting.
7. OPERATION
7.1. Manual Mode
Manual mode allows direct control of all scanners. You are able to move them and
change attributes by using the channel faders and wheel.
1. Press the AUTO/DEL button repeatedly until the MANUAL LED is lit.
2. Select a SCANNER button.
3. Move wheel and faders to change xture attributes.
4. PAGE SELECT A/B button: Use to switch between fader control of (A: Ch1~8),
15
ENGLISH
SCENEMAKER 1216 PRO USB User manual

(B: Ch 9~16).
5. TAP/DISPLAY button: Press to toggle the output indicator on LCD display be-
tween DMX values (0-255) or percentage (0-100).
NOTES: All changes made while in Manual Mode are temporary and will not
be recorded.
7.2. Review Scene or Chase
This instruction assumes that you have already recorded scenes and chases on the con-
troller. Otherwise, please skip this section and go to programming.
SCENE Review
1. In manual mode, select one of the 30 banks by pressing the BANK UP/DOWN
buttons.
2. Select a SCENE button (1to 8) to review.
3. Move wheels and faders to change xture attributes.
CHASE Review
1. In manual mode, press any one of the 6 CHASE buttons.
2. Press TAP/DISPLAY button to view step number on display.
3. Press BANK UP/DOWN buttons to review all scenes in the chase.
NOTES: Press Auto/DEL to MANUAL mode.
8. PROGRAMMING
A program (bank) is a sequence of different scenes (or steps) that will be called up one
after another. In the SCENEMAKER 1216 PRO USB, 30 programs can be created of 8
scenes in each.
8.1. Entering Program Mode
1. Press Program button around 2 seconds until its LED blinks.
8.2. Create a Scene
A scene is a static lighting state. Scenes are stored in banks. There are 30 bank memo-
ries on the controller, and each bank can hold 8 scene memories. The console can save
240 total scenes.
16
ENGLISH
SCENEMAKER 1216 PRO USB User manual

1. Press the PROGRAM button until the LED blinks.
2. Position SPEED and FADE/TIME sliders all the way down.
3. Select the SCANNERS you wish to include in your scene.
4. Compose a look by moving the sliders and wheels.
5. Tap MIDI/REC button to prepare save.
6. Choose a BANK (1 - 30) to change if necessary.
7. Select a SCENES button to store.
8. Repeat steps 3 through 7 as necessary. 8 scenes can be recorded in a Program.
9. To exit program mode, hold the PROGRAM button.
Notes: De-select Blackout if LED is lit. You can select more than one xture.
You can access channels 9~16 by pressing the Page Select button. This is
necessary for xtures that use more than 8 channels of control.
There are 8 scenes available in every bank.
All LEDs will ash to conrm. The LCD display will now indicate the Scene
number and Bank number used.
SHORTCUT: Press [PROGRAM] [SCANNERS]. Adjust [Faders & Wheel].
Press [BANK] [SCENE]. Press [PROGRAM] to store.
8.3.Running a Bank
1. Use BANK UP/DOWN buttons to change Program banks if necessary.
2. Press the AUTO/DEL button repeatedly until the AUTO LED turns on.
3. Adjust PROGRAM speed via the SPEED fader and the loop rate via the FADE
TIME fader.
4. Alternatively you can tap the TAP/DISPLAY button twice (also called Tap-
Sync). Time between two taps sets the time between SCENES (up to 10 min-
utes).
NOTE: De-select Blackout if LED is lit.
8.4.Check a Bank
1. Press Auto/Del to enter manual mode.
2. Use the BANK UP/DOWN buttons to select the PROGRAM bank to review.
17
ENGLISH
SCENEMAKER 1216 PRO USB User manual

3. Press the SCENES buttons to review each scene individually.
8.5.Editing a Program
Scenes will need to be modied manually.
1. Press and hold the PROGRAM button until the LED blinks.
2. Use BANK UP/DOWN buttons to change Program banks if necessary.
3. Select the desired xture via the SCANNERS button.
4. Adjust and change xture attributes using the channel faders and wheel.
5. Press the MIDI/REC button to prepare the save.
6. Select the desired SCENES button to save.
NOTE: De-select Blackout if LED is lit.
8.6.Copy a Bank
1. Press and hold the PROGRAM button until the LED blinks.
2. Use BANK UP/DOWN buttons to select the PROGRAM bank you will copy.
3. Press the MIDI/REC button to prepare the copy.
4. Use BANK UP/DOWN buttons to select the destination PROGRAM bank.
5. Press the MUSIC/BANK COPY button to execute the copy. All LEDs on the con-
troller will blink.
NOTE: All 8 scenes in a Program bank will be copied.
9. CHASE PROGRAMMING
A chase is created by using previously created scenes. Scenes become steps in a chase
and can be arranged in any order you choose. It is highly recommended that prior to
programming chases for the rst time; you delete all chases from memory. See “9.5.
Delete all CHASE Programs” at page 21 for instructions.
9.1. Create a Chase
A chase can contain 240 scenes as steps. The term steps and scenes are used inter-
changeably.
18
ENGLISH
SCENEMAKER 1216 PRO USB User manual

1. Press PROGRAM button until the LED blinks.
2. Press CHASE (1 - 6) button you wish to program.
3. Change BANK, if necessary, to locate a scene.
4. Select the SCENE to insert.
5. Tap the MIDI/REC button to store.
6. Repeat steps 3 - 5 to add additional steps in the chase. Up to 240 steps can be
recorded.
7. Press and hold the PROGRAM button to save the chase.
9.2. Running a Chase
1. Press a CHASE button then press the AUTO/DEL button.
2. Adjust Chase speed by tapping TAP/DISPLAY button twice at a rate of your
choosing.
NOTE: The time between 2 taps will set chase speed (up to 10 minutes).
9.3.Checking a Chase
1. Press Auto/Del to manual mode. Manual LED will on, then move all sliders to
bottom.
2. Select the desired CHASE button.
3. Press the TAP/DISPLAY button to switch the LCD display to steps.
4. Review each scene/step individually by using the BANK UP/DOWN buttons.
9.4.Edit a Chase
Copy a Bank into A Chase
1. Press and hold the PROGRAM button to enter programming mode.
2. Press the desired CHASE button.
3. Select the BANK to be copied using the BANK UP/DOWN buttons.
4. Press MUSIC/BANK COPY button to prepare copy.
5. Press MIDI/REC button to copy the bank. All LEDs will blink.
19
ENGLISH
SCENEMAKER 1216 PRO USB User manual

Copy A Scene Into A Chase
1. Press and hold the PROGRAM button to enter programming mode.
2. Press the desired CHASE button.
3. Select the BANK that contains the scene to be copied using the BANK UP/
DOWN buttons.
4. Press the SCENE button that corresponds to the scene to be copied.
5. Press MIDI/REC button to copy the scene. All LEDs will blink.
Insert A Scene Into A Chase
1. Press and hold the PROGRAM button to enter programming mode.
2. Press the desired CHASE button.
3. Press the TAP/DISPLAY to switch the LCD display to steps view.
4. Use the BANK UP/DOWN buttons to navigate steps and locate the insert point
of the new scene. The display will read the step number (for example: to insert a
scene between Step 05 and 06, navigate using BANK buttons until the display
reads STEP 05).
5. Press MIDI/REC button to prepare the insert and LCD display shows “STEP 06”.
6. Use the BANK UP/DOWN button to locate the SCENE.
7. Press the SCENE button that corresponds to the scene to be inserted.
8. Press MIDI/REC button to insert the scene. All LEDs will blink.
Delete a Scene in a Chase
1. Press and hold the PROGRAM button to enter programming mode.
2. Press the desired CHASE button that contains the scene to be deleted (LCD will
show selected chase number).
3. Press the TAP/DISPLAY button to switch the LCD display to steps.
4. Select the scene/step to be deleted using the BANK UP/DOWN buttons.
5. Press AUTO/DEL button to delete the step/scene. All LEDs will blink.
Delete a Chase
1. Press and hold the PROGRAM button to enter programming mode.
2. Press the desired CHASE button (1 - 6) to be deleted.
20
ENGLISH
SCENEMAKER 1216 PRO USB User manual
Table of contents
Languages:
Popular Controllers manuals by other brands
Chauvet Professional
Chauvet Professional WELL COM V2 Quick reference guide
Flybox
Flybox EFC57-P Installation and user manual

Parker
Parker ACR7000 Series Hardware guide
ADLINK Technology
ADLINK Technology PXIe-3988 user manual

Savant
Savant SSC-W485 Quick reference guide

Shimaden
Shimaden FP23 Series instruction manual
