Soundking SKD360 User manual
Module:SKD360
ECNJG2106168

ECNJG2106168

DEMO SONG LIST
SHUFFLE
90
110
117
128
105
120
138
140
123
100
82
159
120
108
140
180
120
110
180
110
SHUFFLE
ROCKBLUES
DANCE
SWING
BOSSA
RAGGE
LATIN
FLAMINGO
— 39 —
CONTENT:
Front panel
Rear panel
Side panel
Adjusting pad curve
Adjust pad threshold
Eliminate pad crosstalk
Adjust pad sensitivity
Adjust triggering mask time
Adjust signal attenuation
MIDI SETTING
TROUBLE SHOOTING
AUDIO SOURCE SPECIFICATIONS
DRUM KIT LIST
VOICE LIST
GM DRUM KIT LIST
DEMO SONG LIST
RELOAD DEFAULT SETTING
Single user drum kit is restored to
factory settings
Drum pad triggering parameters restore
factory settings
MIDI connection
Connect with external audio device
Used as an audio source device
MIDI list
Connect to audio system or amplifier
Connect to headphones
Connect to MP3 or CD player
Connect with computer
Connect to computer via MIDI
Connect the MIDI keyboard via the
MIDI port
Adjusting the click
CONNECT WITH EXTERNAL DEVICES
ASSEMBLY GUIDE
FUNCTION BUTTON DESCRIPTION
CONNECTION
ADJUST PAD TRIGGER
BASIC OPERATION
DEMO SONG
RECORD YOUR PERFORMANCE
METRONOME
EDIT AND SAVE DRUM KIT VOICE
Edit the voice
Save the voice
Recording quickly
Playing back the recorded performance
Play and switch the DEMO SONG
Adjusting DEMO SONG accompaniment
and drum volume
Mute the drums of DEMO SONG
Adjusting DEMO SONG tempo
Selecting a drum kit
Playing the pads
HI-HAT demonstration
Connect with power supply
1
2
3
3
3
EFFECT SETTING
EQ setting
Reverb setting
21
21
22
SELECT TRIGGER
Tom and snare rim trigger setting
HI-HAT trigger setting
25
25
25
Kick sensor type 26
All parameters restore factory settings 24
22
22
23
27
28
28
29
30
32
SYSTEM SOFTWARE UPDATE 31
33
34
35
37
39
4
6
6
6
7
7
8
8
9
9
9
10
11
11
11
12
12
13
13
13
13
14
14
15
15
16
17
18
19
19
19
19
20
ECNJG2106168
— 38 —— 1 —
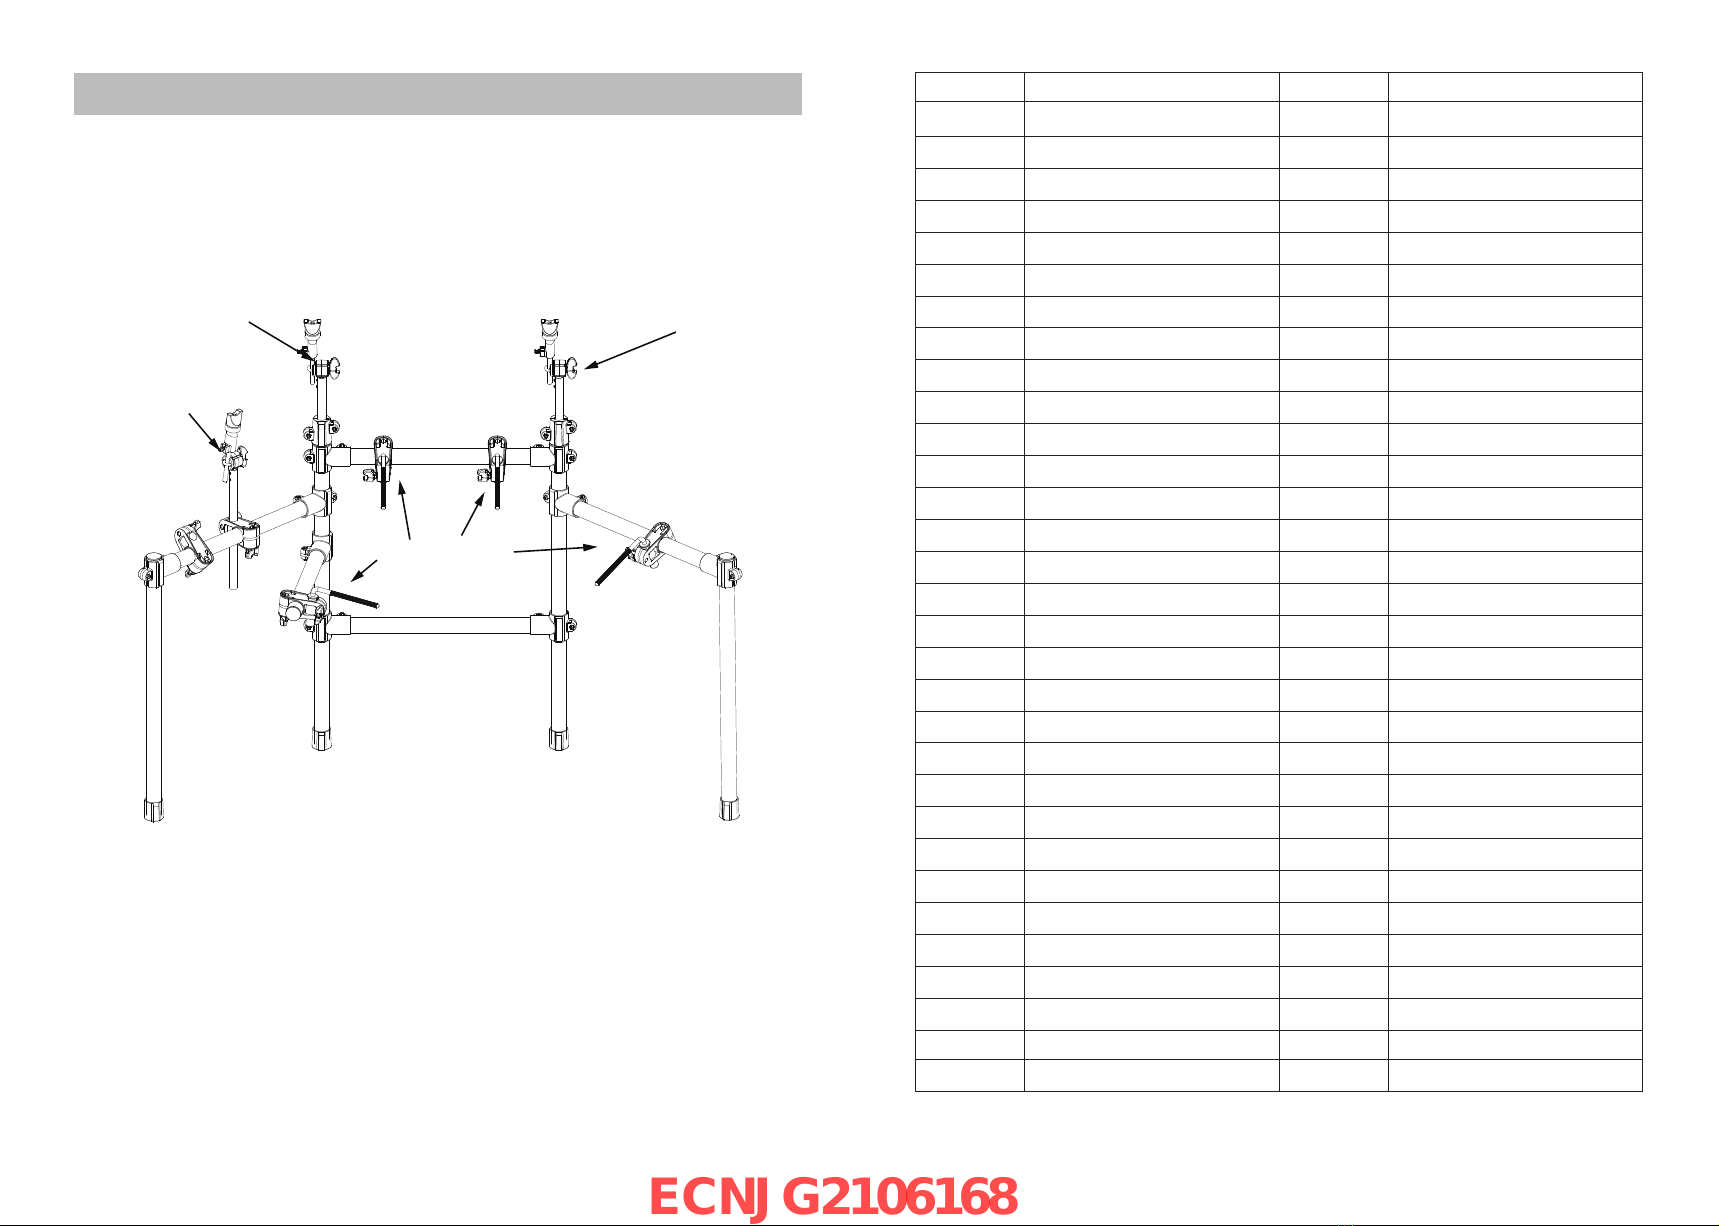
ASSEMBLY GUIDE
1.Set up the drum stand.
2.Put the long cymbal tube/short cymbal tube/L shape pad rod into the drum stand.
3.Put the pads/cymbal/module to the relative position.
Short cymbal tube
Long cymbal tube
L shape pad rod
Long cymbal tube
Note No. Standard name Voice No. Voice Name
57-A3
58-A#3
59-B3
60-C4
61-C#4
62-D4
63-D#4
64-E4
65-F4
66-F#4
67-G4
68-G#4
69-A4
70-A#4
71-B4
72-C5
73-C#5
74-D5
75-D#5
76-E5
77-F5
78-F#5
79-G5
80-G#5
81-A5
82-A#5
83-B5
84-C6
85-C#6
86-D6
87-D#6
Crash Cymbal 2
Vibraslap
Ride Cymbal 2
Hi Bongo
Low Bongo
Mute Hi Conga
Open Hi Conga
Low Conga
High Timbale
Low Timbale
High Agogo
Low Agogo
Cabasa
Maracas
Short Whistle
Long Whistle
Short Guiro
Long Guiro
Claves
Hi Wood Block
Low Wood Block
Mute Cuica
Open Cuica
Mute Triangle
Open Triangle
Shaker
Jingle Bell
Bell Tree
Castanets
Mute Surdo
Open Surdo
185
241
209
242
243
244
246
248
250
252
254
255
256
257
258
259
260
262
263
264
265
266
267
269
270
271
273
274
275
277
278
CRASH12
VSLP1
RIDE8
HIBONGO
LOBANGO
MUTECONGA1
HICONGA1
LOCONGA1
HTIMBL1
LTIMBL1
HIAGOGO
LOAGOGO
CABASA
MARACS
WHISTLE_S
WHISTLE_L
SGUIRO
GUIRO_L
CLAVES
WBLK_H
WBLK_L
CUICA_M
CUICA_O1
MTRIANGLE
OTRIANGLE
SHAKER1
JNGLBL
BLTREE
CSTNTS1
SURDO_M
SURDO_O
ECNJG2106168

— 2 —— 37 —
CONNECTION
Note
When connecting the pads and audio source box, turn off the power switch,
Please, otherwise it will destroy the drum kit!
CRASH RIDE
HI-HAT
MODULE
HH CONTROL
KICK
SNARE
TOM1 TOM2
TOM3
GM DRUM KIT LIST
Note No. Standard name Voice No. Voice Name
27-D#1
28 E1
29-F1
30-F#1
31-G1
32-G#1
33-A1
34-A#1
35-B1
36-C2
37-C#2
38-D2
39-D#2
40-E2
41-F2
42-F#2
43-G2
44-G#2
45-A2
46-A#2
47-B2
48-C3
49-C#3
50-D3
51-D#3
52-E3
53-F3
54-F#3
55-G3
56-G#3
High Q
Slap
Scratch Push
Scratch Pull
Sticks
Square Click
Metronome Click
Metronome Bell
Acoustic Bass Drum
Bass Drum 1
Side Stick
Acoustic Snare
Hand Clap
Electric Snare
Low Floor Tom
Closed Hi Hat
High Floor Tom
Pedal Hi-Hat
Low Tom
Open Hi-Hat
Low-Mid Tom
Hi-Mid Tom
Crash Cymbal 1
High Tom
Ride Cymbal 1
Chinese Cymbal
Ride Bell
Tambourine
Splash Cymbal
Cowbell
223
224
225
226
227
228
229
230
1
6
55
49
231
28
160
72
160
88
151
104
144
144
184
144
206
193
213
234
191
235
High Q
SLAP
SCRCH1
SCRCH2
STICK
SQCLCK
CLICK
BELL
KICK01
KICK06
SNRIM1
SNARE23
CLAP1
SNARE02
TOML3
CLHIHAT01
TOML3
PDLHHT01
TOMM2
OPNHHT01
TOMH2
TOMH2
CRSH11
TOMH2
RIDE5
CRSH20
RDBELL4
TAMBRINE
CRSH18
COWBELL1
ECNJG2106168
— 36 —
PERCUSSION
RIDE3
RIDE4
RIDE5
RIDE6
RIDE7
RIDE8
RDBELL1
RDBELL2
RDBELL3
RDBELL4
RDBELL5
RDBELL6
RDBELL7
ELCRASH1
ELCRASH2
ELCRASH3
ELCRASH4
ELCRASH5
ELCRASH6
HI_Q
SLAP
SCRCH1
SCRCH2
STICK
SQCLCK
CLICK
BELL
CLAP1
CLAP2
CLAP3
TAMBRINE
COWBELL1
COWBELL2
COWBELL3
ELCRASH4
VSLAP
HIBONGO
LOBANGO
MUTECONGA1
MUTECONGA2
LOCONGA1
LOCONGA2
HTIMBL1
HTIMBL2
LTIMBL1
LTIMBL2
HIAGOGO
LOAGOGO
CABASA
MARACS
WHISTLE_S
204
205
206
207
208
209
210
211
212
213
214
215
216
217
218
219
220
221
222
223
224
225
226
227
228
229
230
231
232
233
234
235
236
237
238
239
240
241
242
243
244
245
246
247
248
249
250
251
252
253
254
PIATIM
ESCRCH
ECLK
CIRCLE
DOWN
VOCAL1
VOCAL2
VOCAL3
VOCAL4
VOCAL5
VOCAL6
VOCAL7
VOCAL8
VOCAL9
307
308
309
310
311
312
313
314
315
316
317
318
319
320
255
256
257
258
259
260
261
262
263
264
265
266
267
268
269
270
271
272
273
274
275
276
277
278
279
280
281
282
283
284
285
286
287
288
289
290
291
292
293
294
295
296
297
298
299
300
301
302
303
304
305
306
LOAGOGO
CABASA
MARACS
WHISTLE_S
WHISTLE_L
SGUIRO
GUIRO_S
GUIRO_L
CLAVES
WBLK_H
WBLK_L
CUICA_M
CUICA_O1
CUICA_O2
MTRIANGLE
OTRIANGLE
SHAKER1
SHAKER2
JNGLBL
BLTREE
CSTNTS1
CSTNTS2
SURDO_M
SURDO_O
TLKNDML
TLKNDMH
TABLA1
TABLA2
SNAP
DJMB1
DJMB2
DJMB3
CAJON1
CAJON2
CAJON3
TMPNI1
TMPNI2
GONG_L
ELCLKH
ELCLKL
TAIKO
BELL
BAN
SIGU
DONG1
DONG2
GONG1
PIATIH
HGONG1
HGONG2
GONG2
GONG3
— 3 —
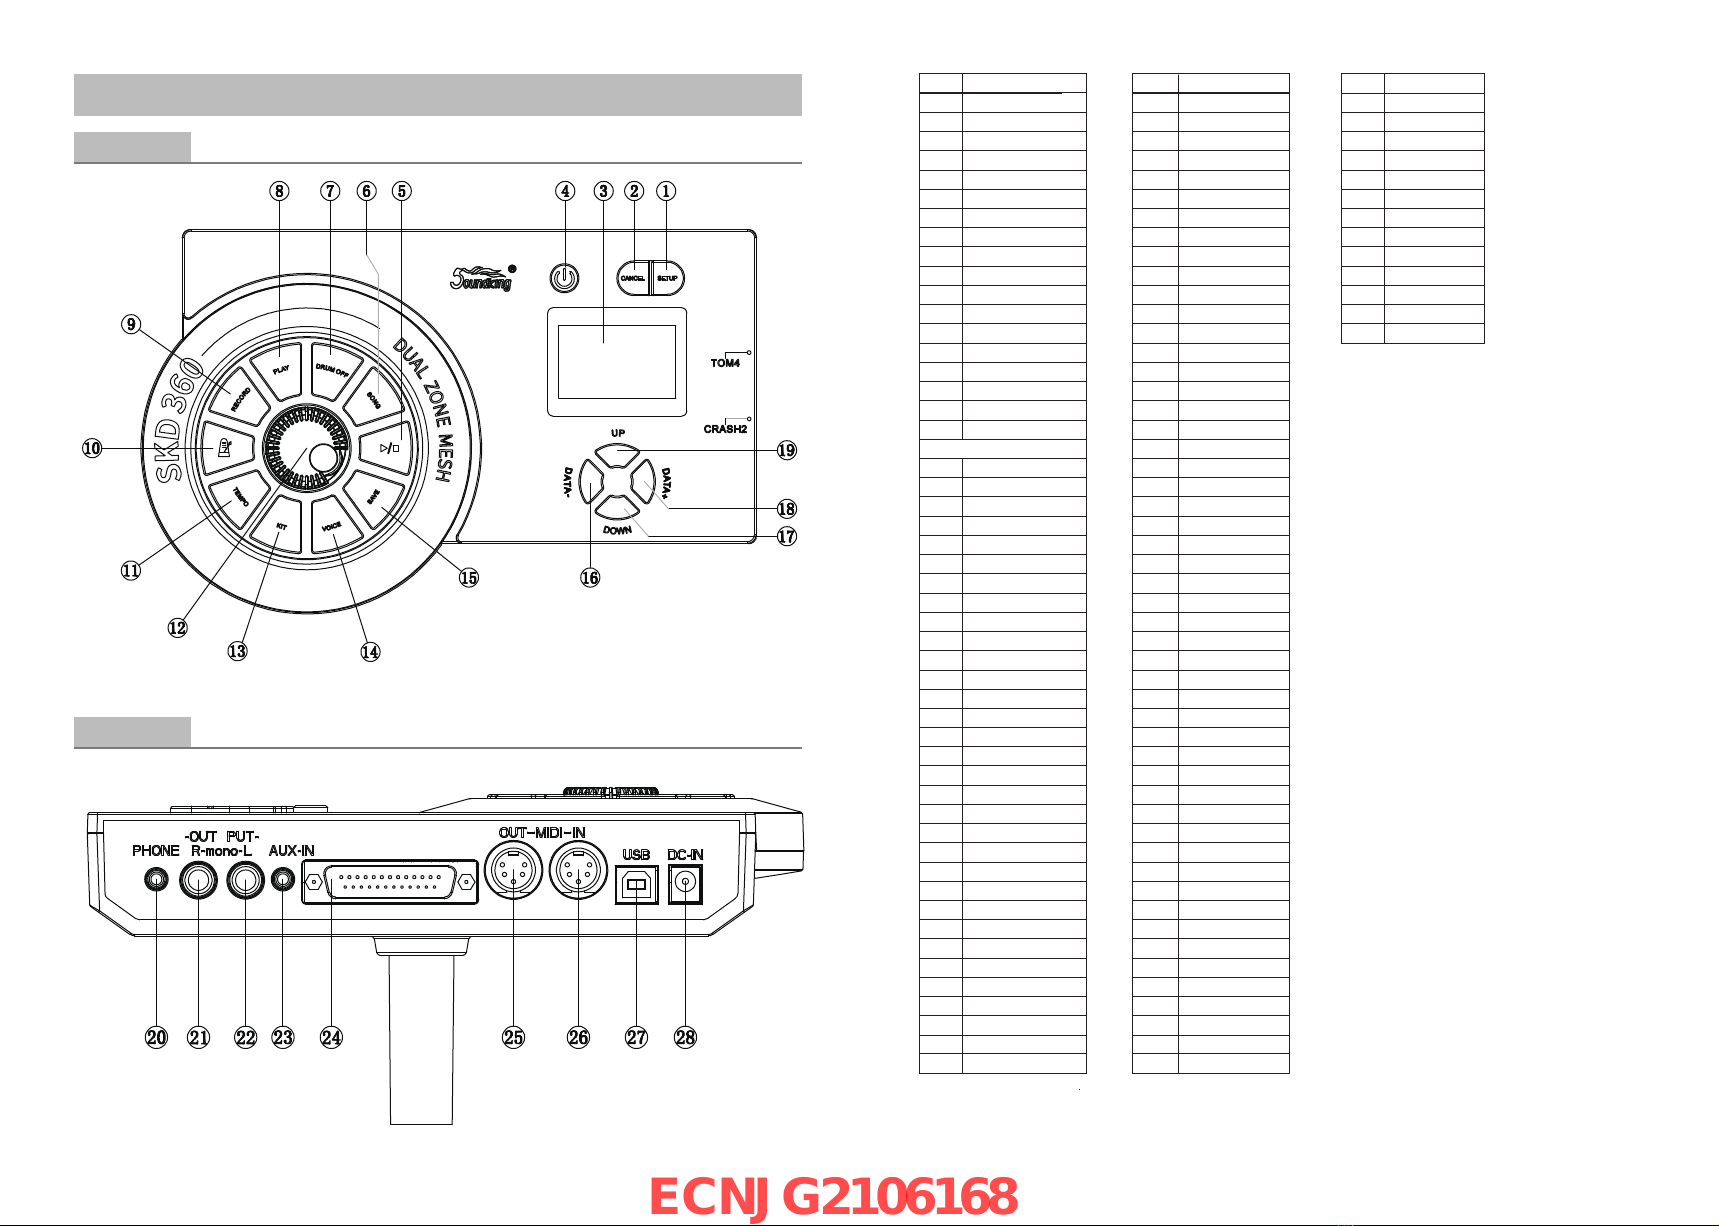
FUNCTION BUTTON DESCRIPTION
Front panel
Rear panel
ECNJG2106168
— 4 —— 35 —
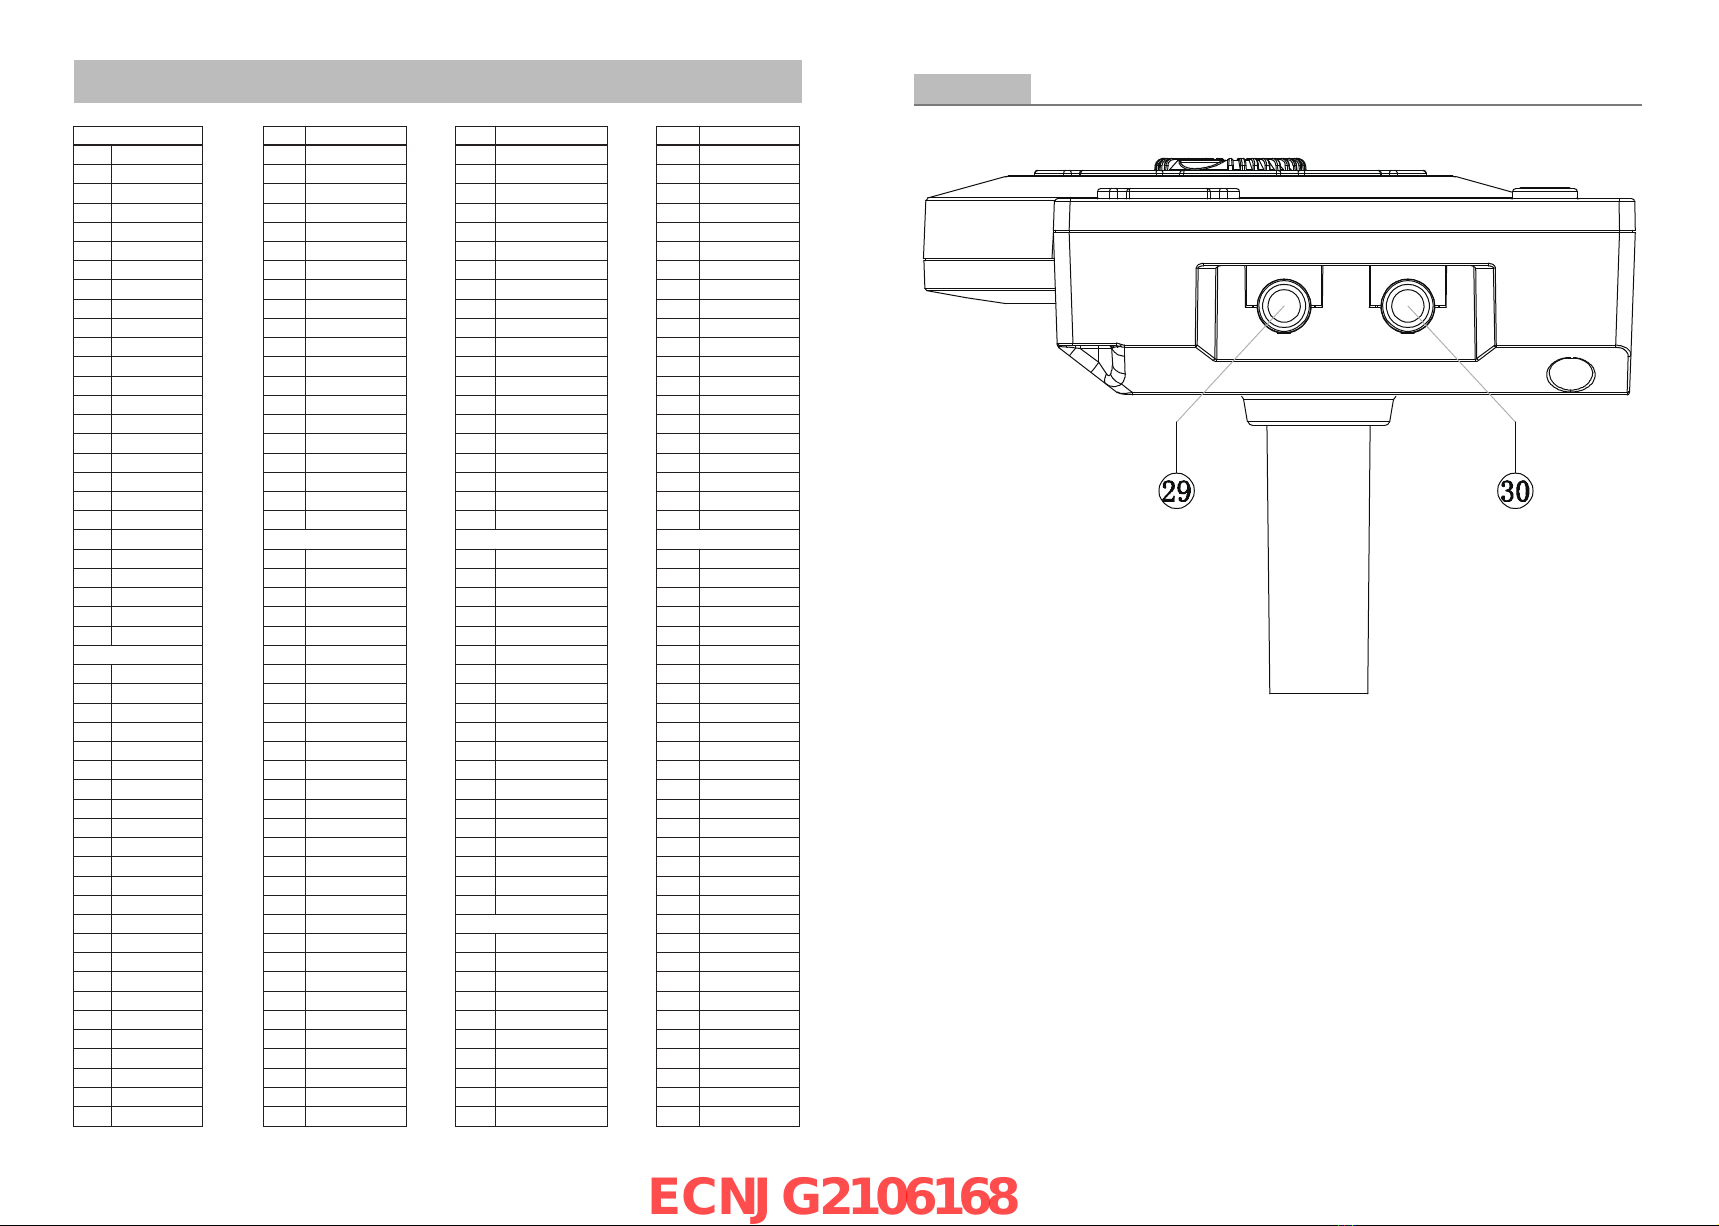
Side Panel
VOICE LIST
KIT01
KIT02
KIT03
KIT04
KIT05
KIT06
KIT07
KIT08
KIT09
KIT10
KIT11
KIT12
KIT13
KIT14
KIT15
KIT16
KIT17
KIT18
KIT19
KIT20
KIT21
KIT22
KIT23
KIT24
KIT25
KIT26
SNARE01
SNARE02
SNARE03
SNARE04
SNARE05
SNARE06
SNARE07
SNARE08
SNARE09
SNARE10
SNARE11
SNARE12
SNARE13
SNARE14
SNARE15
SNARE16
SNARE17
SNARE18
SNARE19
SNARE20
SNARE21
SNARE22
SNARE23
SNARE24
KICK
SNARE
1
2
3
4
5
6
7
8
9
10
11
12
13
14
15
16
17
18
19
20
21
22
23
24
25
26
27
28
29
30
31
32
33
34
35
36
37
38
39
40
41
42
43
44
45
46
47
48
49
50
CYMBAL
TOMM4
TOMM5
TOMM6
TOMM7
TOMM8
TOML1
TOML2
TOML3
TOML4
TOML5
TOML6
TOML7
TOML8
TOML9
TOME1
TOME2
TOME3
TOME4
TOME5
TOME6
TOME7
153
154
155
156
157
158
159
160
161
162
163
164
165
166
167
168
169
170
171
172
173
174
175
176
177
178
179
180
181
182
183
184
185
186
187
188
189
190
191
192
193
194
195
196
197
198
199
200
201
202
203
CRSH01
CRSH02
CRSH03
CRSH04
CRSH05
CRSH06
CRSH07
CRSH08
CRSH09
CRSH10
CRSH11
CRSH12
CRSH13
CRSH14
CRSH15
CRSH16
CRSH17
CRSH18
CRSH19
CRSH20
CRSH21
CRSH22
CRSH23
CRSH24
CRSH25
CRSH26
CRSH27
CRSH28
RIDE1
RIDE2
TOM
TOMH1
TOMH2
TOMH3
TOMH4
TOMH5
TOMH6
TOMH7
TOMM1
TOMM2
TOMM3
PDLHHT15
PDLHHT16
OPNHHT01
OPNHHT02
OPNHHT03
OPNHHT04
OPNHHT05
OPNHHT06
OPNHHT07
OPNHHT08
OPNHHT09
OPNHHT10
OPNHHT11
OPNHHT12
OPNHHT13
OPNHHT14
OPNHHT15
OPNHHT16
HOPNHHT01
HOPNHHT02
HOPNHHT03
HOPNHHT04
HOPNHHT05
HOPNHHT06
HOPNHHT07
HOPNHHT08
HOPNHHT09
LSHHT1
LSHHT2
LSHHT3
LSHHT4
LSHHT5
LSHHT6
LSHHT7
ELCHHT1
ELCHHT2
ELCHHT3
ELCHHT4
ELCHHT5
ELCHHT6
ELCHHT7
102
103
104
105
106
107
108
109
110
111
112
113
114
115
116
117
118
119
120
121
122
123
124
125
126
127
128
129
130
131
132
133
134
135
136
137
138
139
140
141
142
143
144
145
146
147
148
149
150
151
152
SNARE25
SNARE26
SNARE27
SNARE28
SNRIM1
SNRIM2
SNRIM3
SNRIM4
SNRIM5
SNRIM6
SNRIM7
SNRIM8
ESNR1
ESNR2
ESNR3
ESNR4
ESNR5
ESNR6
ESNR7
ESNR8
ESNR9
CLHIHAT01
CLHIHAT02
CLHIHAT03
CLHIHAT04
CLHIHAT05
CLHIHAT06
CLHIHAT07
CLHIHAT08
CLHIHAT09
CLHIHAT10
CLHIHAT11
CLHIHAT12
CLHIHAT13
CLHIHAT14
CLHIHAT15
CLHIHAT16
PDLHHT01
PDLHHT02
PDLHHT03
PDLHHT04
PDLHHT05
PDLHHT06
PDLHHT07
PDLHHT08
PDLHHT09
PDLHHT10
PDLHHT11
PDLHHT12
PDLHHT13
PDLHHT14
HIHAT
51
52
53
54
55
56
57
58
59
60
61
62
63
64
65
66
67
68
69
70
71
72
73
74
75
76
77
78
79
80
81
82
83
84
85
86
87
88
89
90
91
92
93
94
95
96
97
98
99
100
101
ECNJG2106168
— 34 —— 5 —
NO.
1SETUP Enter the menu setting interface
Exit the current operation and return to the previous interface
LCD display:content of menu
Power switch (long press to turn off)
Start/stop DEMO SONG playing
Enter the DEMO SONG setting interface
Drum track playback control, LED lights up means off and goes off
means on
Press once to play the recording sound/press the second time to stop
Metronome play switch
Quick access to speed adjustment
Adjust the master volume
Quick access to the KIT home page
Enter the voice page
Save current settings
Editor the parameters
Next menu options
Editor the parameters
Former Menu options
Stereo headphone output connector
Audio output of right channel and LOUTPUT constitute stereo output
Left channel output, can be separately connected to the drum amplifier
via mono - channel cable
Connect to a digital audio player or as listening input for live performance
Drum signal input port
Connect to other MIDI output interfaces with MIDI devices
Connect to other MIDI input interfaces with MIDI devices
Connect with PC connector(MIDI input/output or software update via USB)
Power adapter port:12V 1A
Connect with CRASH2
Connect with TOM4
CANCEL
LCD display
POWER
┃■
SONG
DRUM OFF
PLAY
TEMPO
MASTER LEVEL
KIT
VOICE
SAVE
DATE-
DOWN
DATE+
UP
PHONE
R OUTPUT
L(MONO) OUTPUT
AUX IN
TRIGGERS IN
MIDI IN
MIDI OUT
USB
DC IN
CRASH2
TOM4
2
3
4
5
6
7
8Enter the recording waiting state, hit any pad to start the recording ,
button light flashing
RECORD
9
10
11
12
13
14
15
16
17
18
19
20
21
22
23
24
25
26
27
28
29
30
NAME DESCRIPTION DRUM KIT LIST
No.
KIT01
KIT02
KIT03
KIT04
KIT05
KIT06
KIT07
KIT08
KIT09
KIT10
KIT11
KIT12
KIT13
KIT14
KIT15
KIT16
KIT17
KIT18
KIT19
ROCK
FUNK/POP
JAZZ
LATIN
DANCE
POP1
POP2
POP3
HARD RCK
METAL
FUNK1
FUNK12
HIP-HOP
FUSSION
BLUES
CUBAN
BRUSH
ELE1
ELE1
Name No.
KIT20
KIT21
KIT22
KIT23
KIT24
KIT25
KIT26
KIT27
KIT28
KIT29
KIT30
KIT31
KIT32
KIT33
KIT34
KIT35
KIT36
KIT37
COUNTRY
ORCH
SONGGU
WORLD
PERC.1
PERC.2
USER01
USER02
USER03
USER04
USER05
USER06
USER07
USER08
USER09
USER10
USER11
USER12
Name
ECNJG2106168
CONNECT WITH EXTERNAL DEVICES
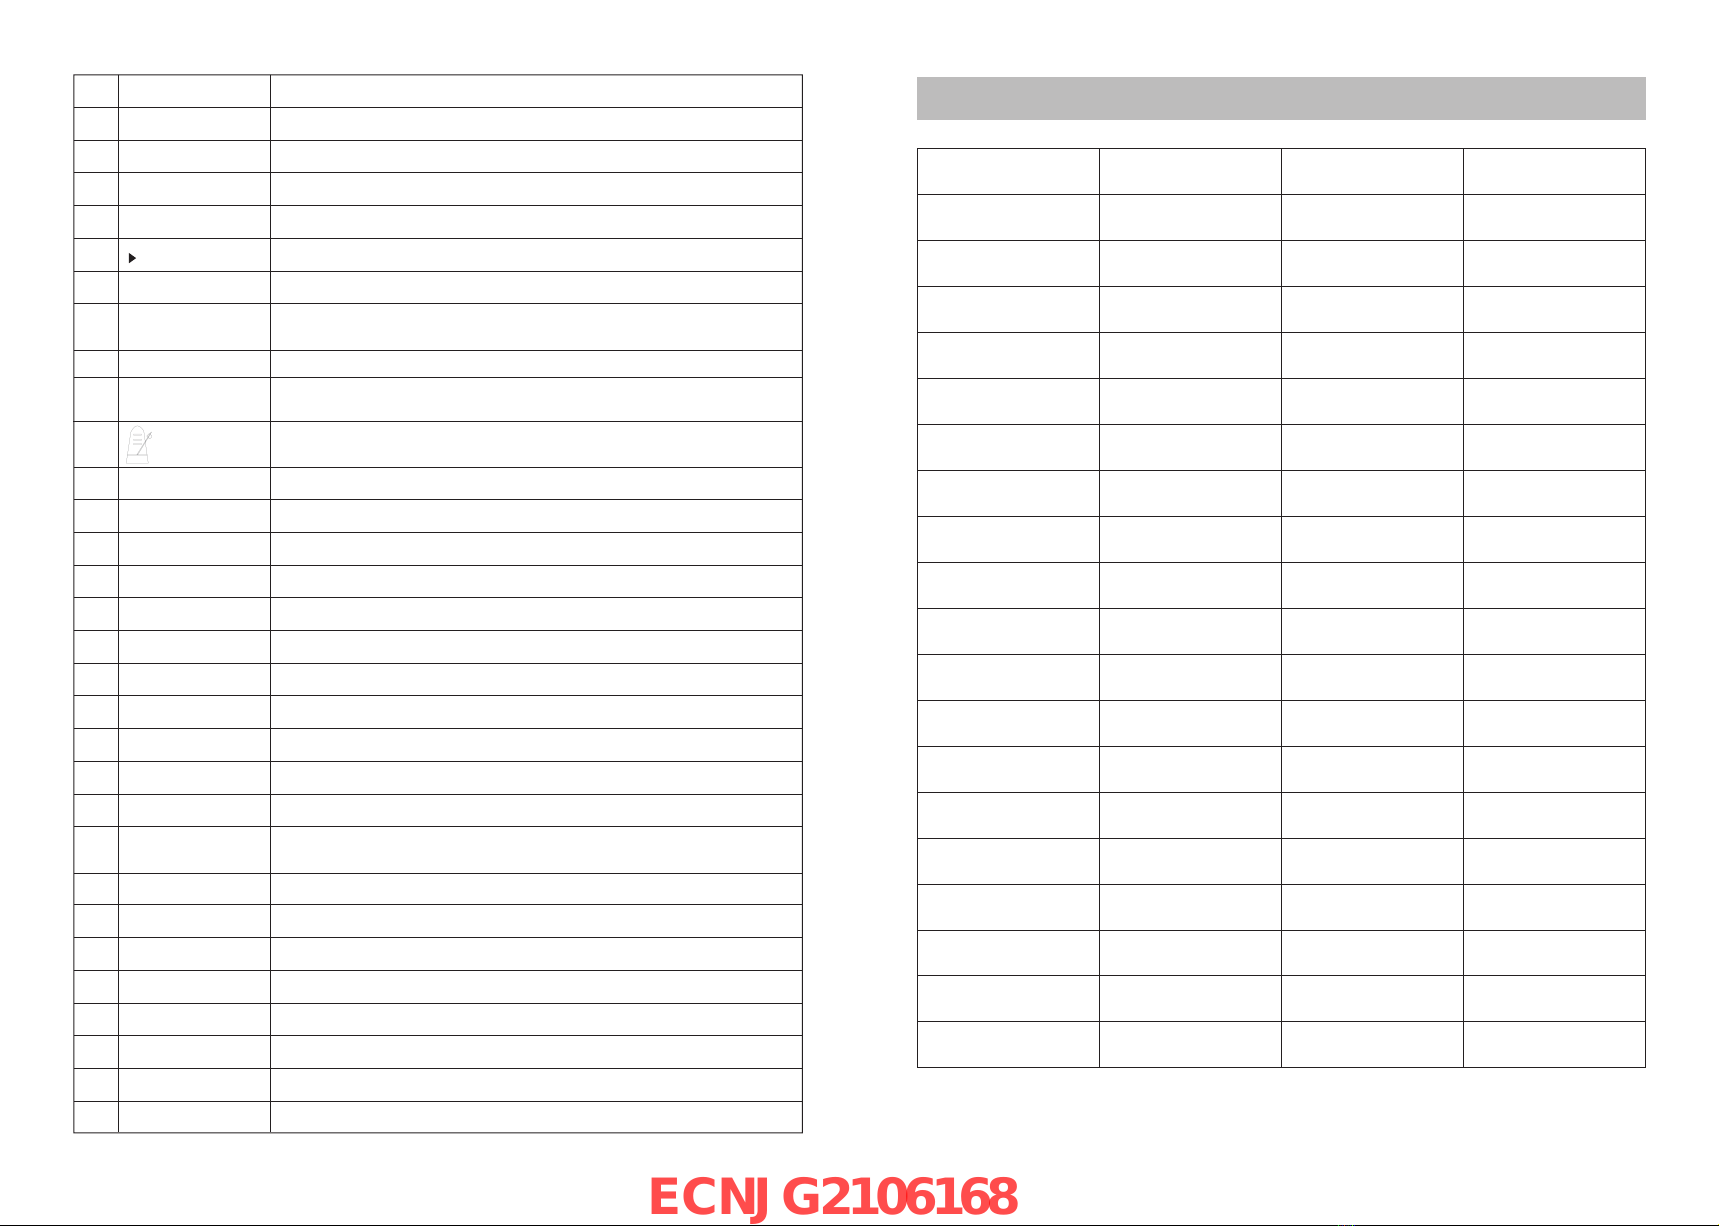
Connect to audio system or amplifier
— 6 —— 33 —
When connecting with audio system or drum amplifier, connect one end of the audio cable
with the module OUTPUT: R L/mono, and the other end with the audio system or drum
amplifier.
Note:
1. Plug into L/mono connector when connecting with mono audio device.
2. Plug into L/mono and R connectors when connecting with stereo device. The output
volume can be adjusted via the master volume knob on the module or that on the audio
device.
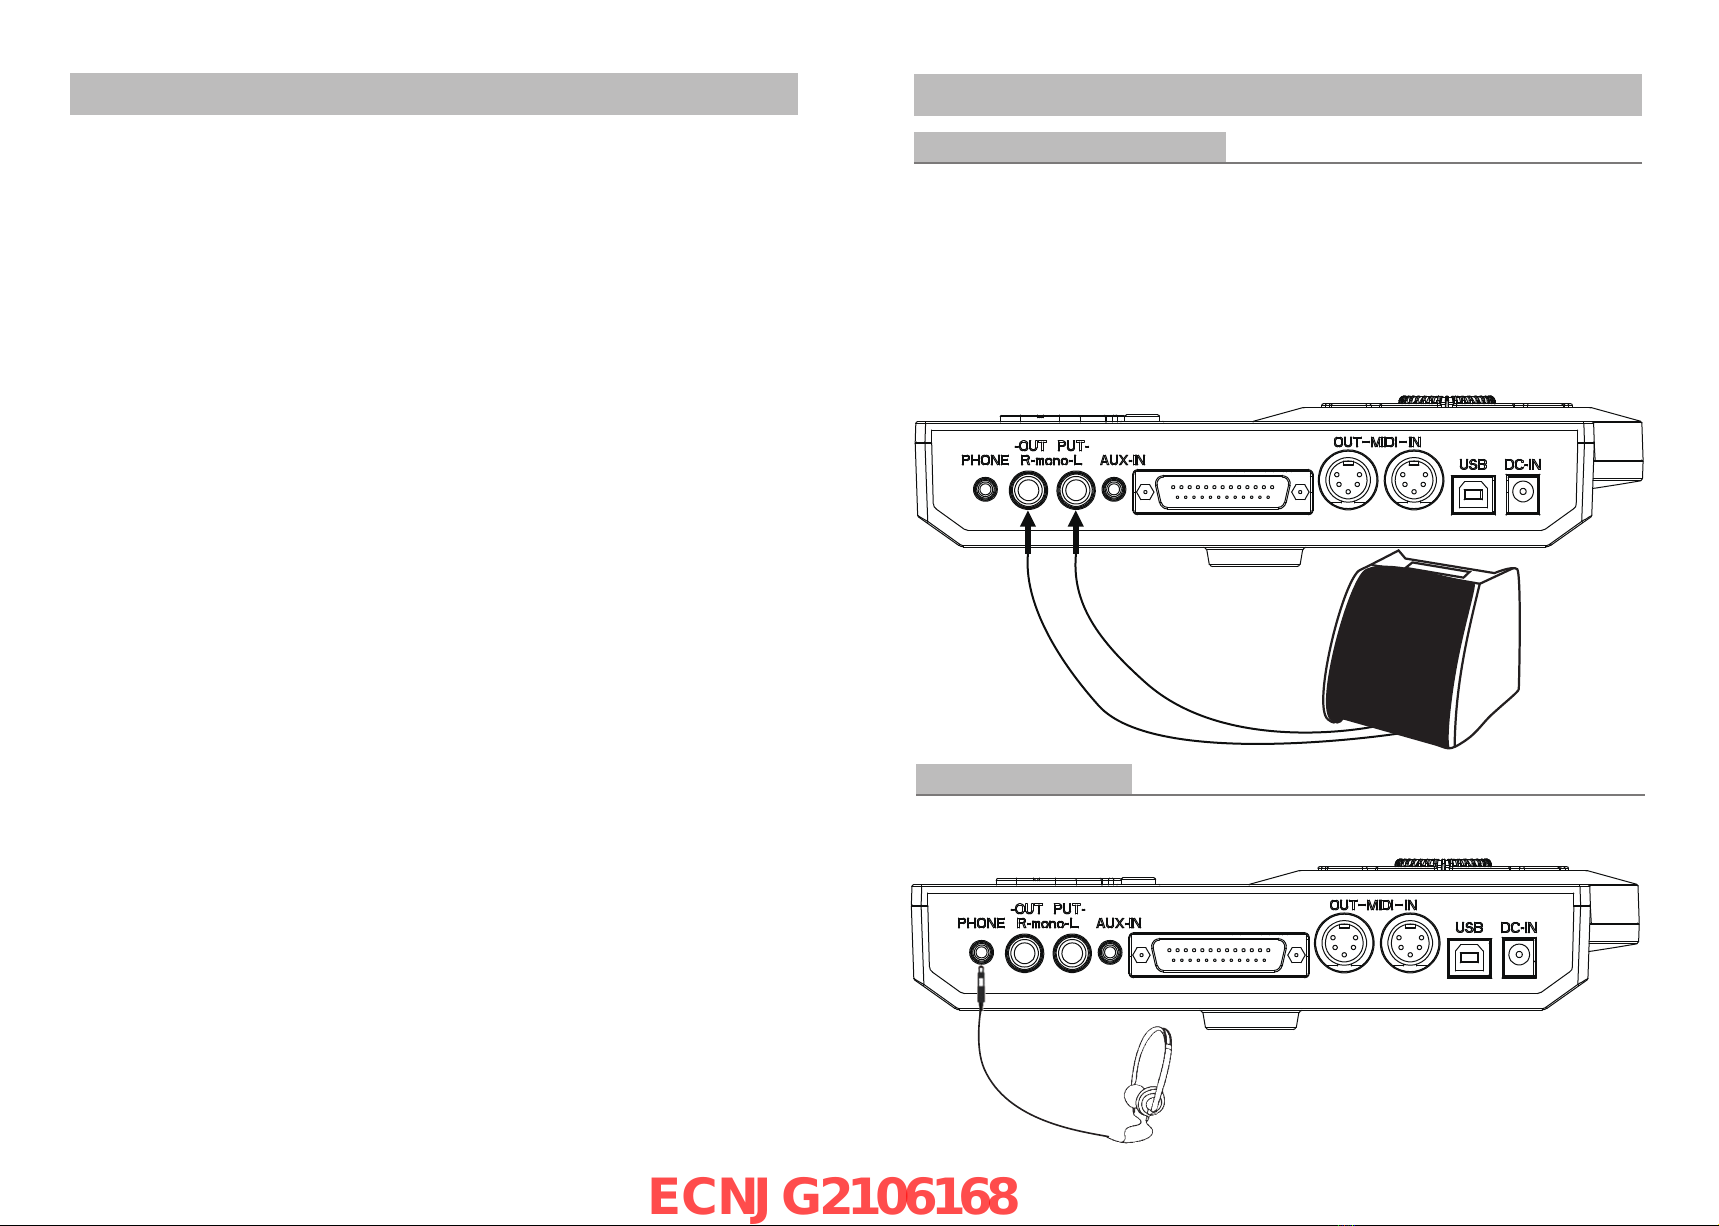
Connect to headphones
The module has 1/8" stereo headphone connector, the volume is controlled by the master
volume knob on the module
AUDIO SOURCE SPECIFICATIONS
POLYPHONY:64
Display: lattice 128 X 64 LCD
VOICE: 320 drum and other percussion voices + 128 kinds of GM music tone
DRUM KITS: 25 preset drum kits + 12 user drum kits
Effect:
1)2 stage EQ setting (high/low) /GAIN adjustment
2)Reverb setting, 6 reverberation field Settings (room 1, room 2, room 3, hall 1, hall 2,
plate), reverberation size 0-4/ reverberation time value 0-127
SEPUENCER:
1)Single track recording 1000 notes
2)Normal mode: 20 preset song
TEMPO FUNCTION:
1)Tempo tone:3 kinds
2)Adjustable range:30--250
3)Tempo:1/2-9/8
CONNECTION:
Headphone stereo output (1/8")、AUX INPUT stereo port (1/8")
Audio output interface LMONO OUT(1/4")、R OUT(1/4")、
Sensor interface(D-SUB 25P)
MIDI IN/MIDI OUT Interface (standard 5-pin port)
USB Data interface (USB B-type interface)
Extension:CRASH2、TOM4(1/4")
Battery power supply interface
*** The specification is subject to change without prior notice. ***
ECNJG2106168
— 32 —— 7 —
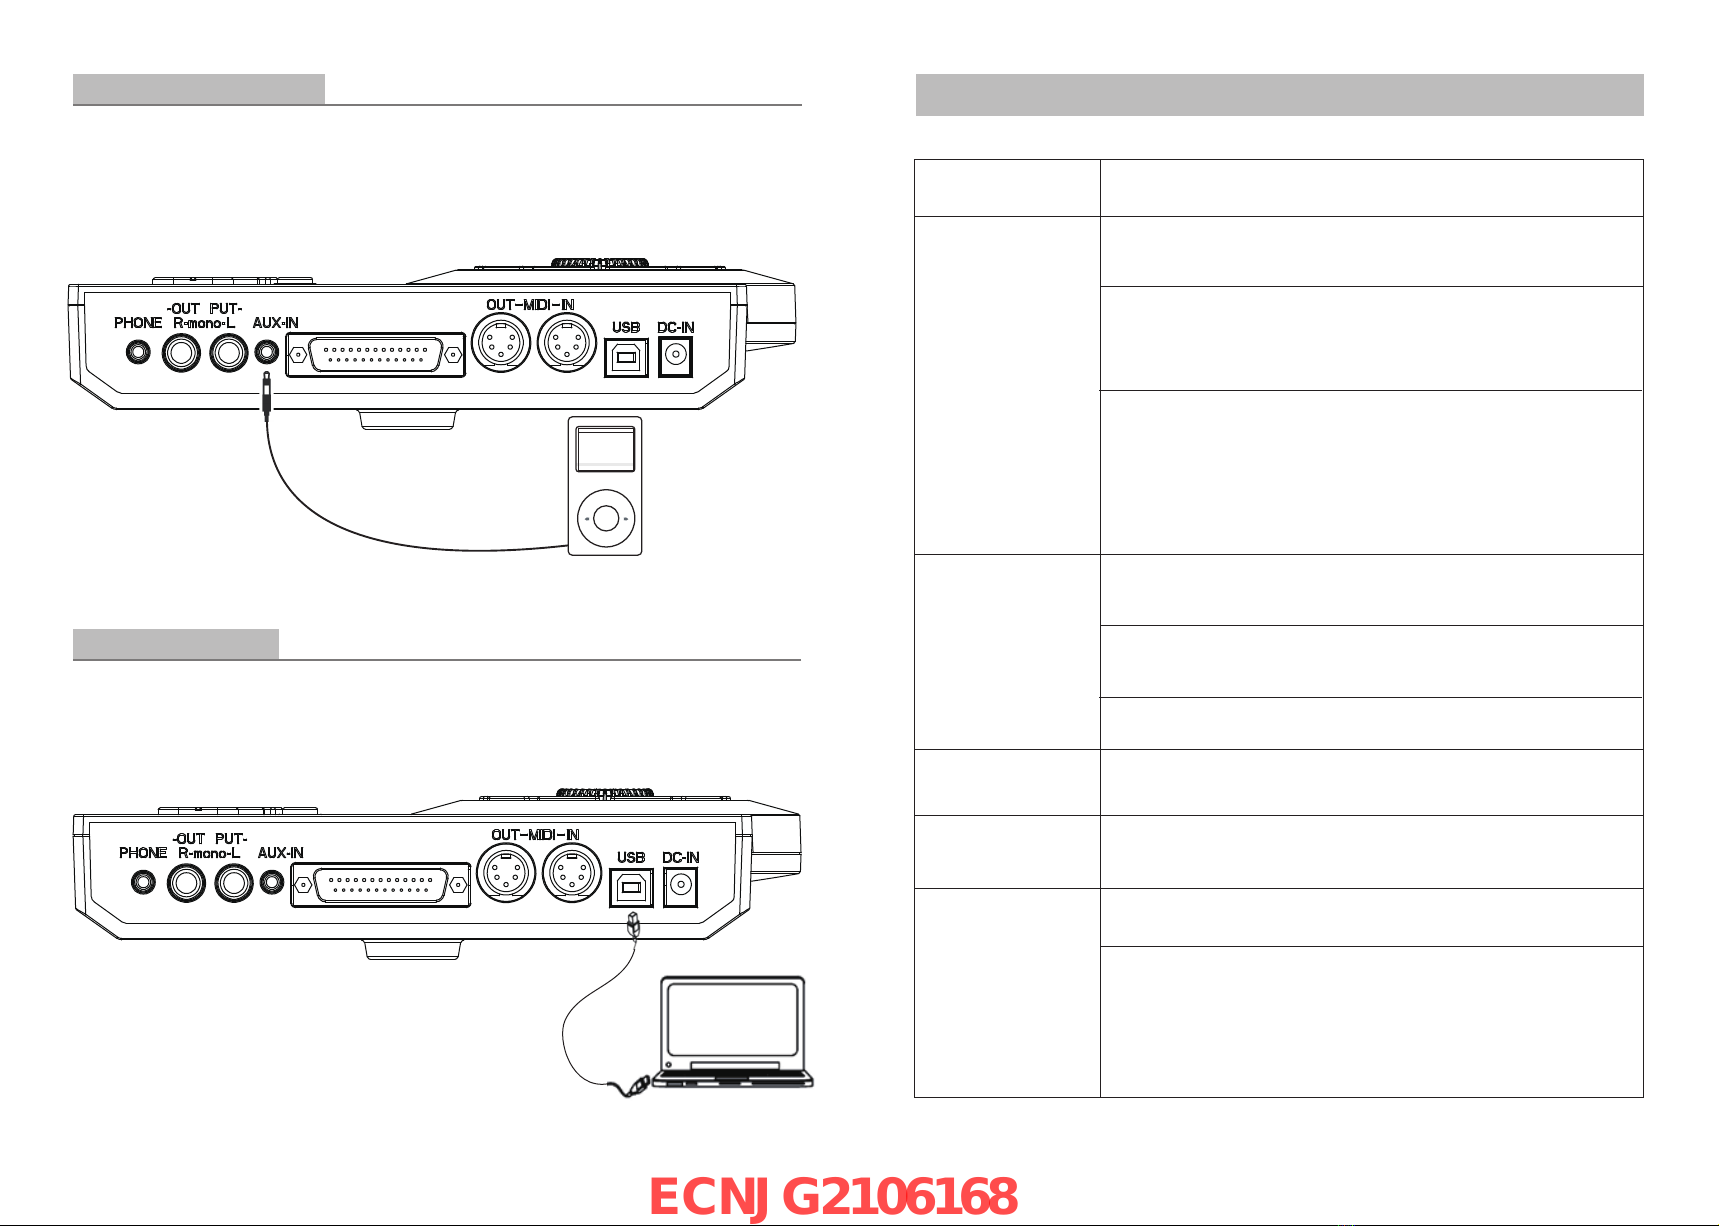
Connect to MP3 or CD player
Connect the output of MP3 or CD player or other audio sources withAUX. IN connector. The
volume can be adjusted by the master volume control knob on the module. The input signal
can be mixed with the drum signal, strike the pads according to the rhythm of the input signal.
Connect with computer
1. Connect the computer via USB cable when it’s powered off
2. Turn on the computer and then turn on the device, when the connection is successful,
you can receive and send MIDI information.
TROUBLE SHOOTING
Reason or solutionProblem
No sound /
sound is too low
No sound on the
external drum pad
No sound on the
external drum pad
No sound on
DEMO SONG
There is no sound
output connected to
MIDI communication
devices
1、Make sure the volume knob is set correctly and adjust
the volume knob
2、Check whether the audio cable between the audio source and
the power amplifier or other playback equipment is connected
correctly. Replace the cable to test.
3、If you are connecting to the audio device through the mixer,
please insert a good earphone into the headphone output jack of
the audio source. If there is sound, please check whether the cable
is normal, the Settings and connections of the mixer and audio
equipment normal?
1、Please make sure that the connecting wire between the drum pad
and the host machine is connected correctly and in place.
2、Check whether setting "LOCAL" to "OFF". If setting to "OFF",
there is no sound output on the drum pad.
3、Check whether the corresponding drum volume is set to 0.
Whether the metronome volume is 0
Please make sure the volume of DEMO SONG is not 0
1、Check whether the USB cable used to connect is damaged.
2、Verify whether the communication channel is set correctly. The
communication channel set by the audio source is 10 channels by
default. If the audio source is set to other channels, other MIDI
devices should also be set to corresponding channels.
ECNJG2106168

— 8 —— 31 —
Connect to computer via MIDI
MIDI IN:Receive MIDI signals from external MIDI devices or computers
MIDI OUT:Sends pads signal to external MIDI device or computer
Connect the MIDI keyboard via the MIDI port
MIDI-IN/OUT:If external keyboard or MIDI device are used to control the drum, it needs
MIDI cable one end connecting with MIDI IN of the module, and other end
with MIDI OUT of the MIDI keyboard. This drum is used as audio source.
The connection is as follows:
SYSTEM SOFTWARE UPDATE
Press 【SETUP】to enter SETTING menu, and press【DOWN】to select DRUM OPTION,
then press【SETUP】to enter UPDATE menu
Connect the module to the computer via the USB cable before operation, then select Yes by
pressing 【DATE+】or【DATE-】in the UPDATE option and press 【SETUP】again. The
system will have USB devices identified ,And on my computer in the form of a USB
flash drive . You can double click the left mouse button to open, to update
the program file (file name) copy and paste in the U disk, you can complete the software
upgrade.
Note:The upgrade file can be downloaded from the company's official website, or consult
relevant sales staff. The correct file name is “A005000.bin” . Do not turn off
the mainframe power during the upgrade process. Keep the mainframe power supply stable
and have no other operation.
SETTING
MIDI
UPDATE
UPDATE
UPDATE YES NO
VER HT01.1
ECNJG2106168

BASIC OPERATION
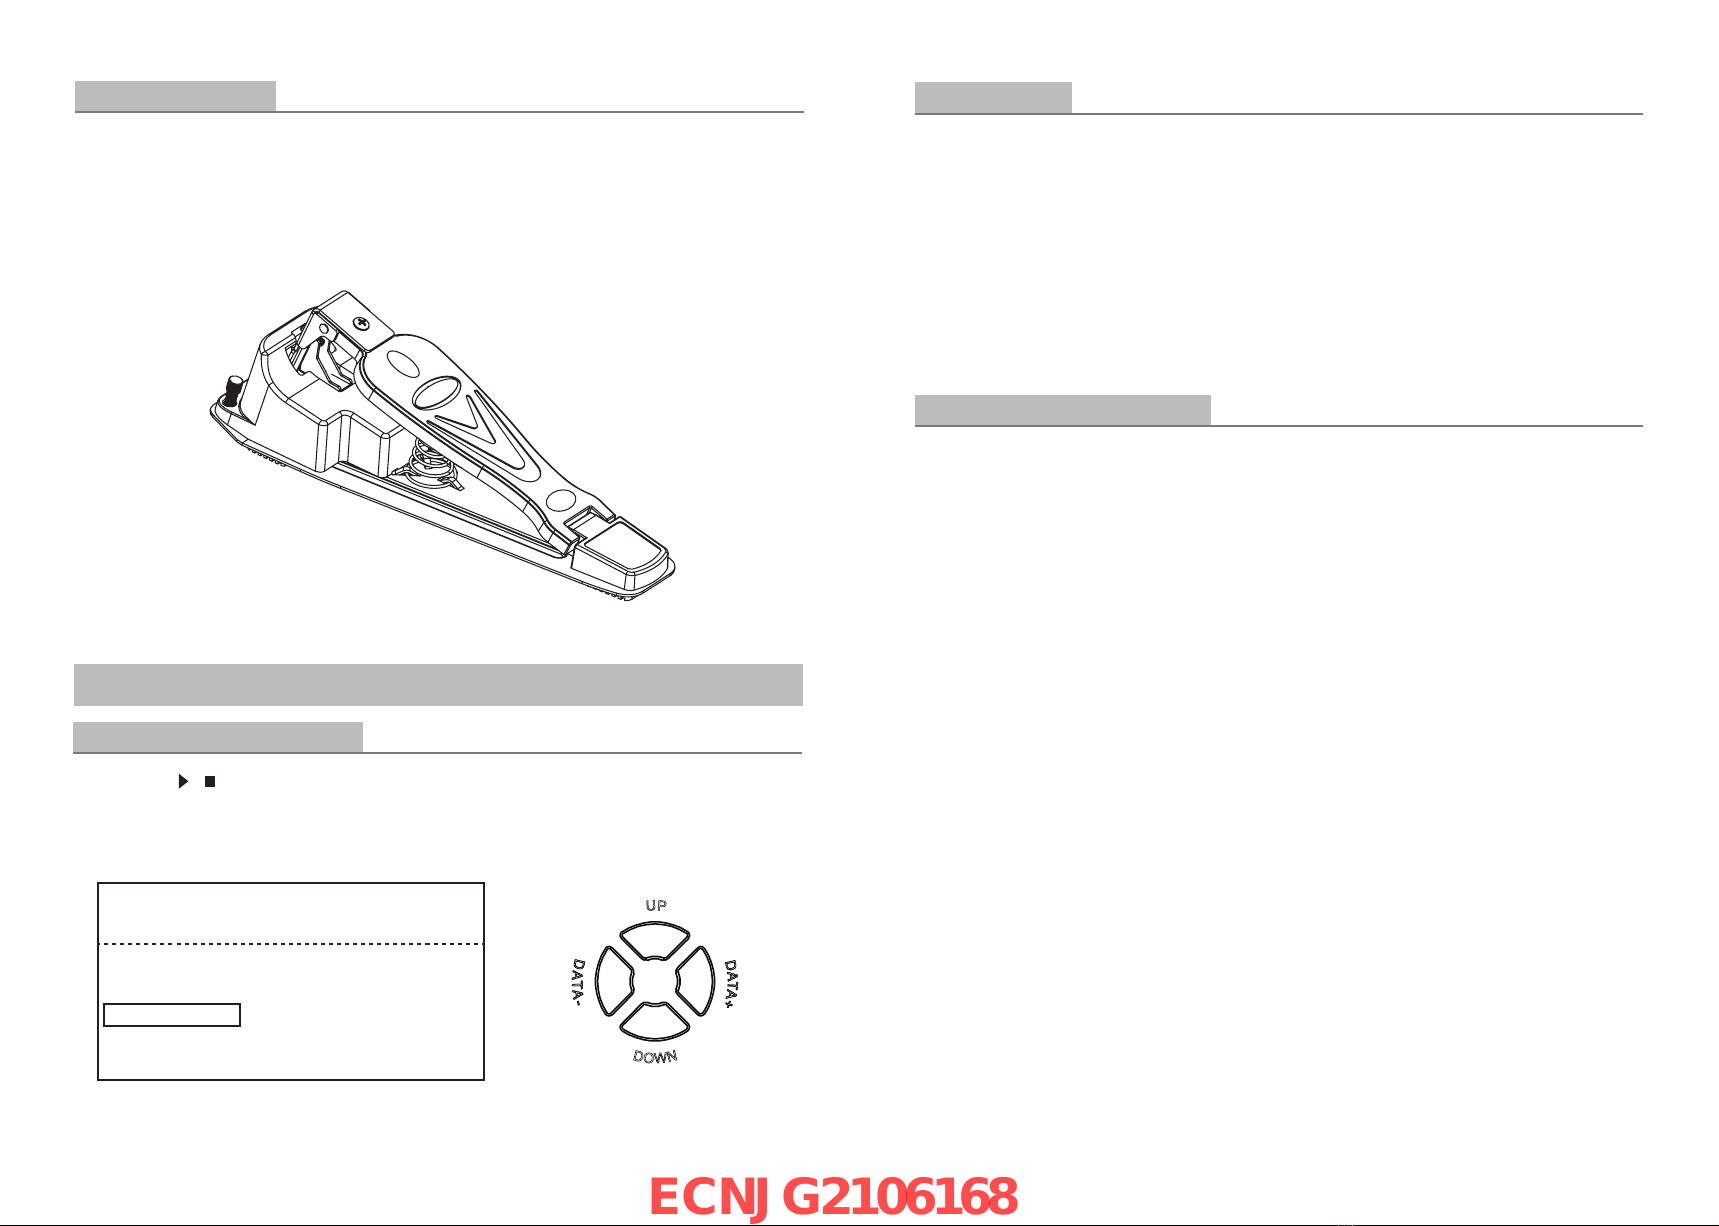
Select a drum kit
— 30 —— 9 —
Connect with power supply
1. Plug the power adapter into DC IN connector
2. Make sure all drum pads are connected, turn the master volume on the drum module to
the minimum, and then press the power button down. At which point the display will light
up and enter the drum set menu.
Drum sets can be switched between 【DATA+】and 【DATA-】. 37 sets of drum kits in all.
25 set of preset drum kits:KIT01---KIT25
12 set of user drum kits:KIT26---KIT37
After powering up, the display should look like the following figure(KIT01 ROCK)
MIDI list
KIT 01 ROCK
CLICK
TEMPO
SONG
DRUM
4/4
100
01
OFF
ECNJG2106168
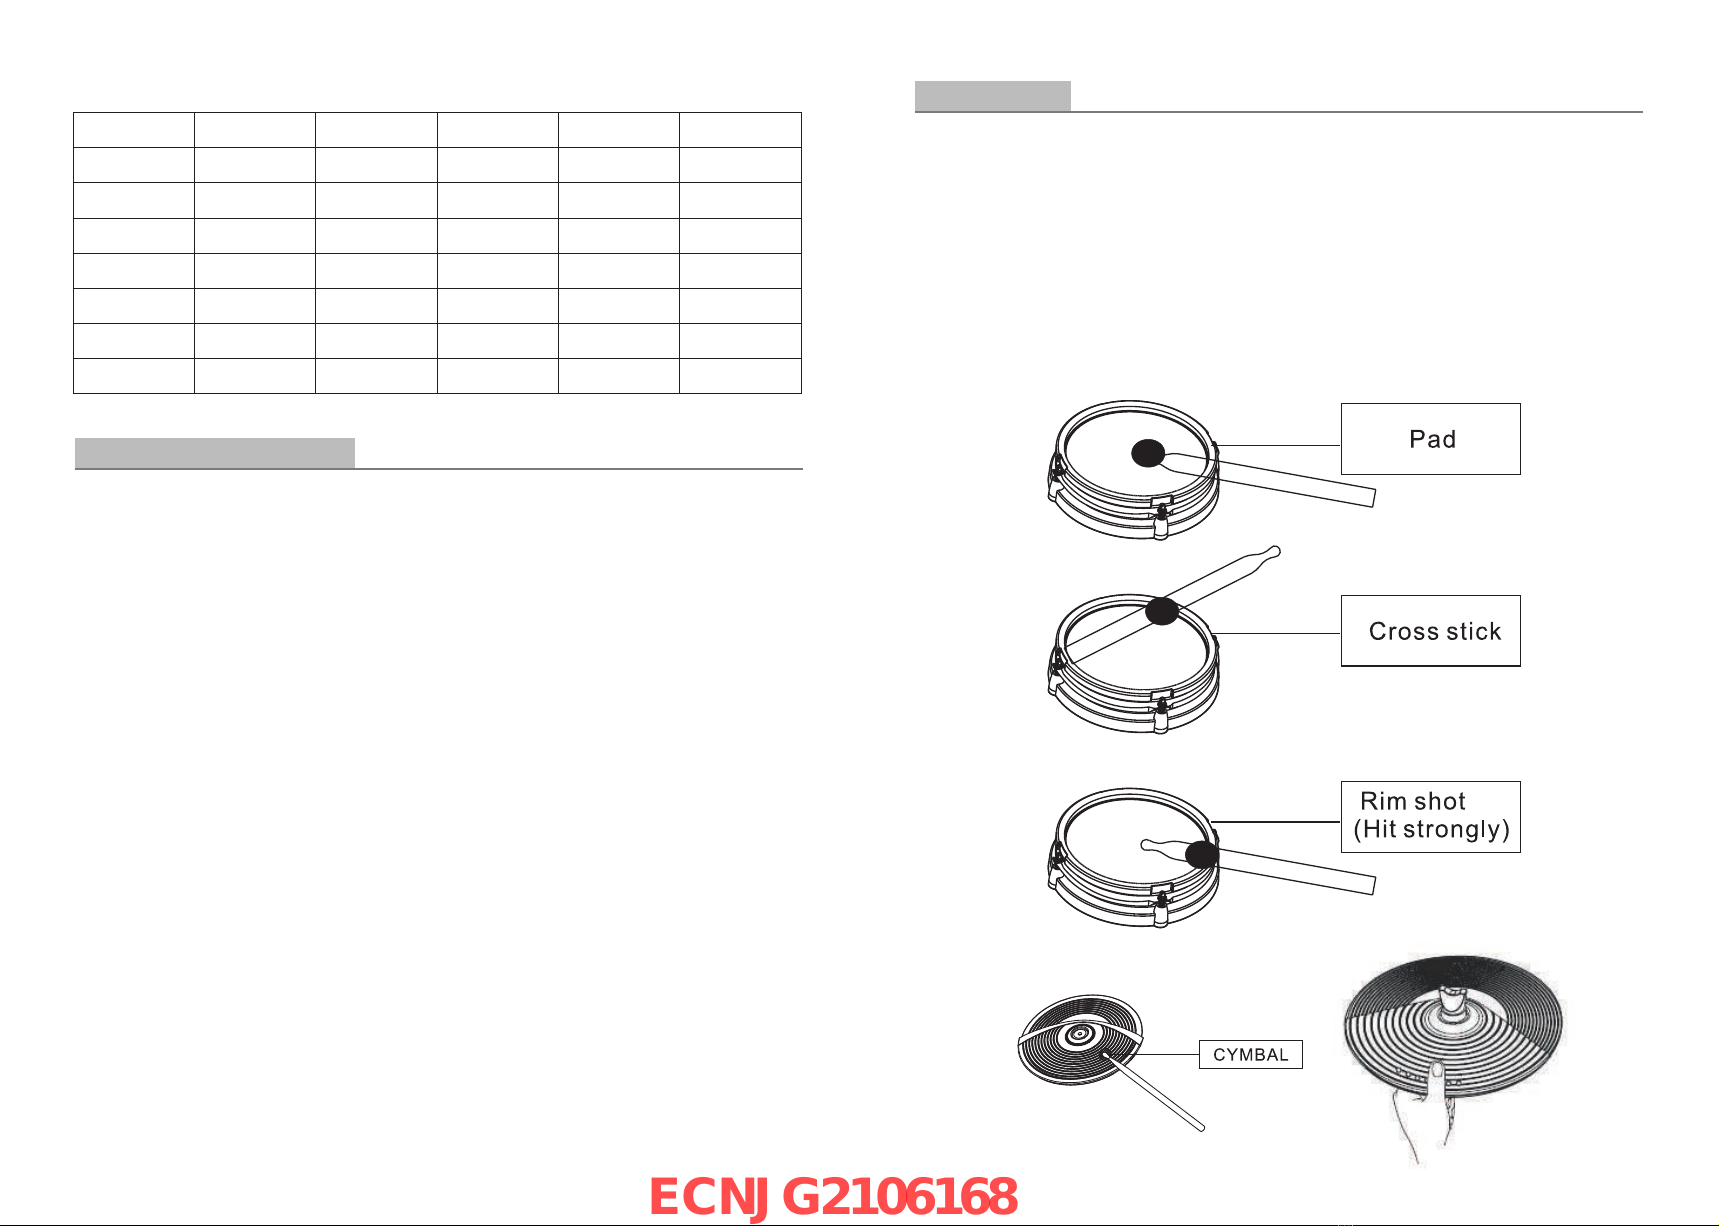
Similar to an acoustic drum kit, the digital drum responds differently to various playing
techniques and dynamics. All the pads senses the striking force.And some voices change
tone depending on the striking force.
The digital drum pad detects head and rim shorts (rim shorts are different from the pad shorts)
Note:
1.SNARE and TOM1-TOM3 are dual zone.
2.All pads are single zone,CRASH and RIDE have the choke, e.g. hit the cymbal then
hold the rim to choke (stop) the sound.
3.SNARE delivers one sound when hit the pad rim strongly.
Playing the pads
— 10 —— 29 —
Used as an audio source device
When connected with external MIDI keyboard or sequencer through MIDI OUT or USB
cable, the device can receive its MIDI output signal, and then the device can play OUT the
valid signal. The output tone changes with the switch of drum kit. This equipment has most
GM drum kit tone. Users can build their own USER drum kit if necessary.
Other MIDI support and limitations are described in the MIDI list
Default factory setting as below:
TRIGGER
KICK
SNARE
SANRE RIM
TOM1
RIDE
HI-HAT O
TOM1 RIM
MIDI NOTE
36
38
37
48
51
46
50
TRIGGER
TOM2
TOM2 RIM
TOM3
CRASH2
HI-HAT C
TOM3 RIM
TOM4
MIDI NOTE
45
47
43
57
42
58
41
TRIGGER
TOM4 RIM
CRASH
HI-HAT CTRL
MIDI NOTE
39
49
44
ECNJG2106168
HI-HAT demonstration
The Hi-Hat: sound varies depending on the position of the Hi-Hat pedal:
Open Hi-Hat: strike the Hi-Hat pad without pressing the pedal.
Half-open Hi-Hat: strike the Hi-Hat pad with the pedal pressed but not completely down.
Close Hi-Hat: strike the Hi-Hat pad with the pedal pressed completely down.
Hi-Hat pedal close: press the pedal completely down without striking the pad.
DEMO SONG
Play and switch the DEMO SONG
Press the【 ┃ 】to play DEMO SONG, press again to stop. Use 【DOWN】to select
the SONG, then press 【DATE+】or【DATE-】to switch(refer to DEMO SONG LIST for
DEMO SONG)
— 28 —— 11 —
MIDI connection
MIDI IN:inputs MIDI signal when connecting with external MIDI device
MIDI OUT:outputs MIDI signal when connecting with external MIDI device
USB:standard USB2.0 interface. It can be connected to any MIDI device or PC with a
standard USB driver, and the corresponding driver is included in the general
operating system, so there is no need for repeated installation. Can be compatible
with common computer operating systems such as: XP, Win7, Vista, Mac OSX, etc.
(USB is only used for MIDI connection).
Note:When USB connects with PC, all MIDI data will be received and transmitted via USB
Connect with external audio device
This device automatically connects via channel 10 transfers drum signal to other MIDI
device including notes, forces, pedal performance, etc.
Note: Song playback data and metronome notes are not transferred.
Record your performance with external sequencer
1.Connect with external sequencer or PC via MIDI OUT and IN for playback or USB
interface
2.Use the sequencer or the software to set channel 10 as a device to start recording.
3.Play the drum pads
4.Stop performance and recording. Playback the recording
Setting MIDI note number to be transferred/received by each pad
1.Press VOICE button to enter the VOICE menu.
2.Strike the relative pad, use【UP】or【DOWN】to select MIDI KEY
3.Use 【DATE+】or【DATE-】to adjust the MIDI value for a pad.
4.Press save button to save USER drum kit.
KIT 01 ROCK
CLICK
TEMPO
SONG
DRUM
4/4
100
01
OFF
ECNJG2106168

Adjusting DEMO SONG accompaniment and drum volume
Press 【SONG】to enter SONG setting menu, after entering, use 【DATE+】or【DATE-】
to select the preset DEMO SONG.
Press 【DOWN】to select ACC VOLUME, use【DATE+】or【DATE-】to adjust DEMO
SONG accompaniment volume.
Press 【DOWN】to select DRUM VOLUME, use【DATE+】or【DATE-】to adjust drum
volume.
Mute the drums of DEMO SONG
1.Press【DRUM OFF】can quickly ON or OFF the drum volume of DEMO SONG
2.Use【UP】or【DOWN】key to select DRUM OFF, ON or OFF the drum volume of
DEMO SONG by【DATE+】or【DATE-】key.
— 12 —— 27 —
MIDI SETTING
This device is compatible with various MIDI devices. When it is used as trigger device or
audio source, it is compatible with GM standard, and can be used with most sequencer
software.
Press 【SETUP】to enter SETTING menu, and press【DOWN】to select MIDI option,
then press【SETUP】to enter MIDI menu
RECEIVE CH: Receive channel selection, default is channel 10
LOCAL:Local control to control the connection between the trigger and the drum module
ON:The drum pad is connected with the internal sound module, and the drum pad is
tapped to produce sound, which defaults to ON
OFF:The drum pad is disconnected from the internal sound module, and the drum pad
does not sound
TRANSMIT:Output channel selection, default is channel 10
010
ON
101
KIT 01 ROCK
CLICK
TEMPO
SONG
DRUM
4/4
100
01
OFF
SONG DEMO01
ACC VOLUME
DRUM VOLUME
055
101
SETTING
MIDI
UPDATE
MIDI
RECEIVE CH
LOCAL
TRANSMIT CH
ECNJG2106168
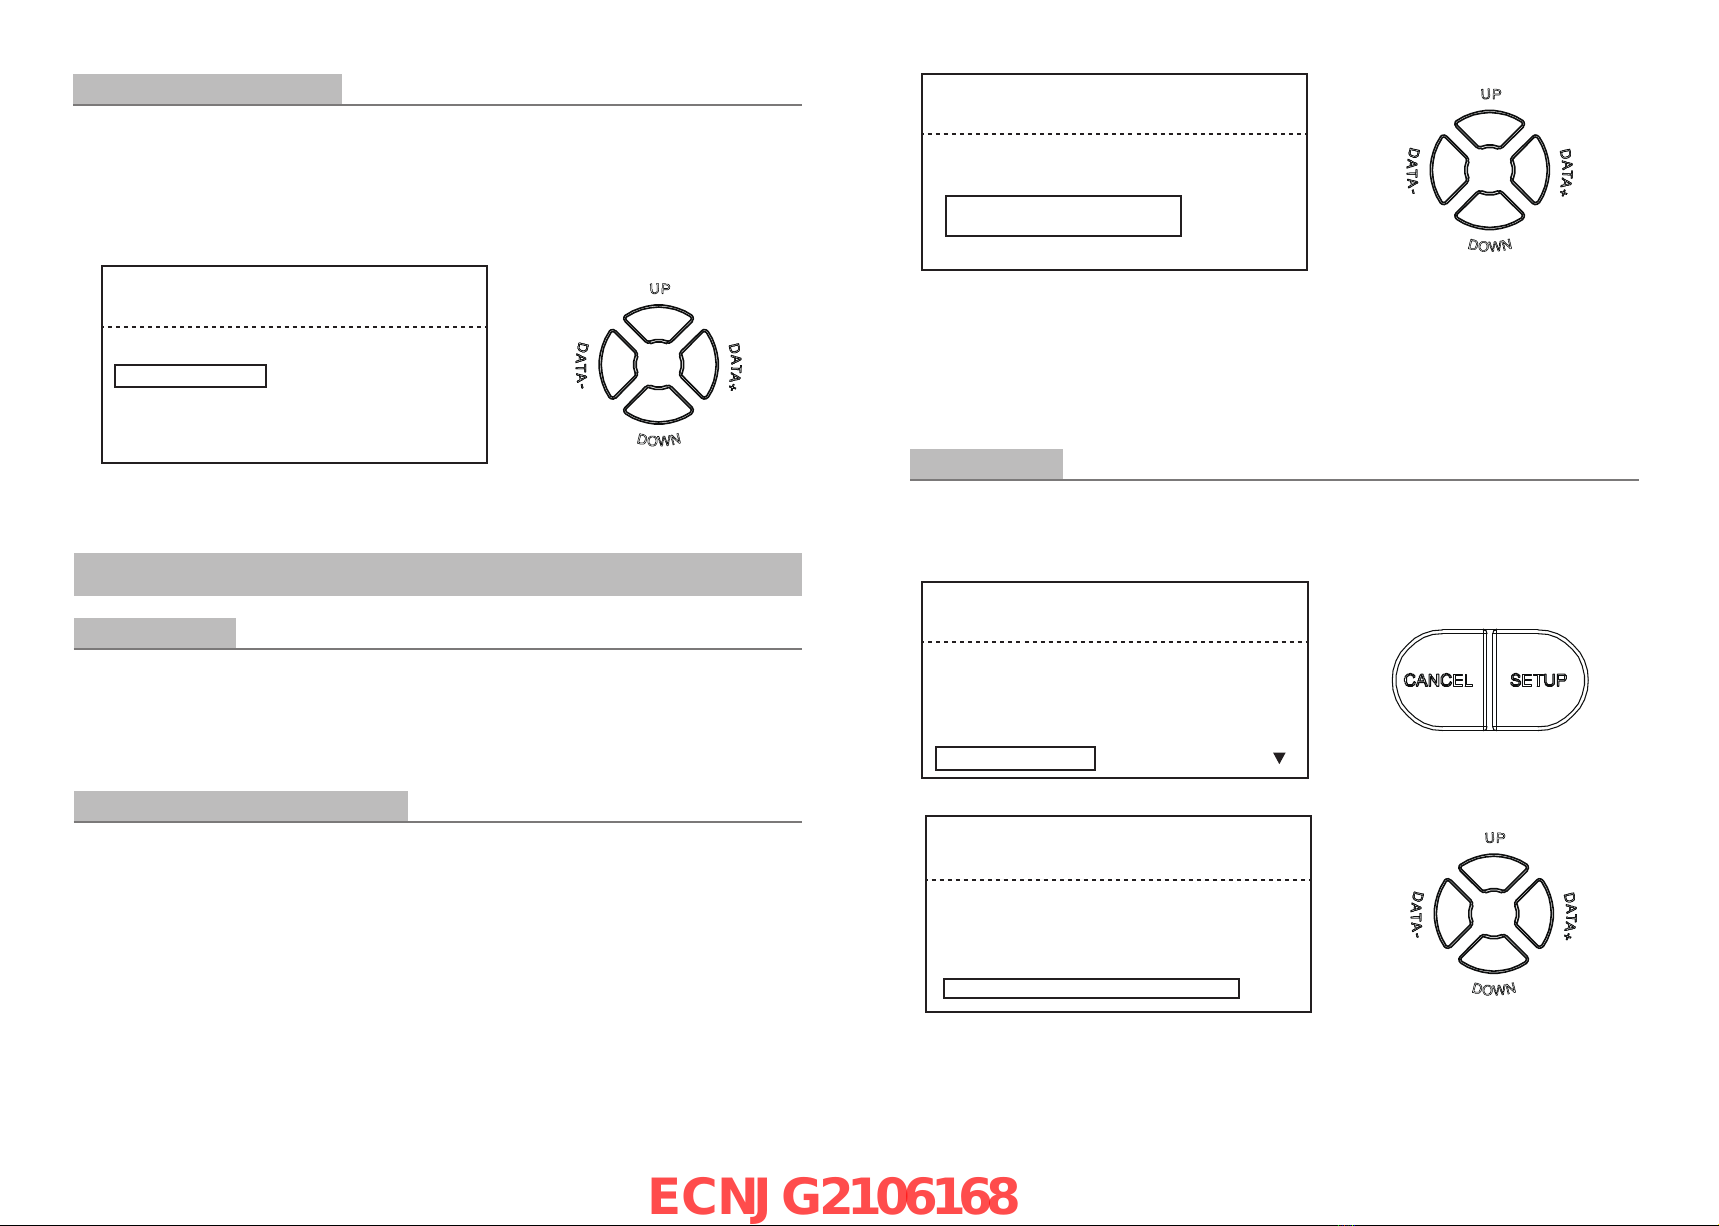
Adjusting DEMO SONG tempo
1.Press【TEMPO】to select TEMPO, use【DATE+】or【DATE-】to adjust DEMO SONG
tempo.
2.Use【UP】or【DOWN】on home page to select TEMPO, then adjust the tempo by
【DATE+】or【DATE-】
RECORD YOUR PERFORMANCE
Recording quickly
Press 【RECORD】then 【RECORD】LED lights up, strike any pad to start recording
and the LED start flashing. Press 【RECORD】again to stop recording and the LED lights
off.
Playing back the recorded performance
Press【PLAY】then【PLAY】LED lights up, and it plays the recorded performance, press
【PLAY】again to stop playing.
If you are unsatisfied with the recorded performance, press【RECORD】to record once
again.
Note:it can record the performance but can not save. This means the recorded
performance will replace the former recorded performance
— 26 —— 13 —
Kick sensor type
Press【SETUP】to enter SETTING menu, and press【DOWN】to select DRUM OPTION,
then press【SETUP】to enter KICK TYPE menu
HIHATTYPE: pedal type selection, default: HH(standard equipped: pedal type)
HIHATTYPE: simulate hi-hat, default: HHS
In the HIHAT SENS option, press【DATE+】or【DATE-】to adjust the velocity slope of HI
HAT.
In the KICK TYPE option, press【DATE+】or【DATE-】to switch KICK type
KICK TYPE: pedal type, default: P
KICK TYPE: hammer type, default: H(standard equipped)
ON
ON
HH
08
P
KIT 01 ROCK
CLICK
TEMPO
SONG
DRUM
4/4
100
01
OFF
SETTING
VOICE
PAD TRGGER
EFFECT
DEFAULT SETTING
DRUM OPTION
ON
ON
HH
08
P/H
DRUM OPTION
TOM RIM
SNARE RIM
HIHATIYPE
HIHA SENS
JICK TYPE
DRUM OPTION
TOM RIM
SNARE RIM
HIHATIYPE
HIHAT SENS
KICK TYPE
ECNJG2106168

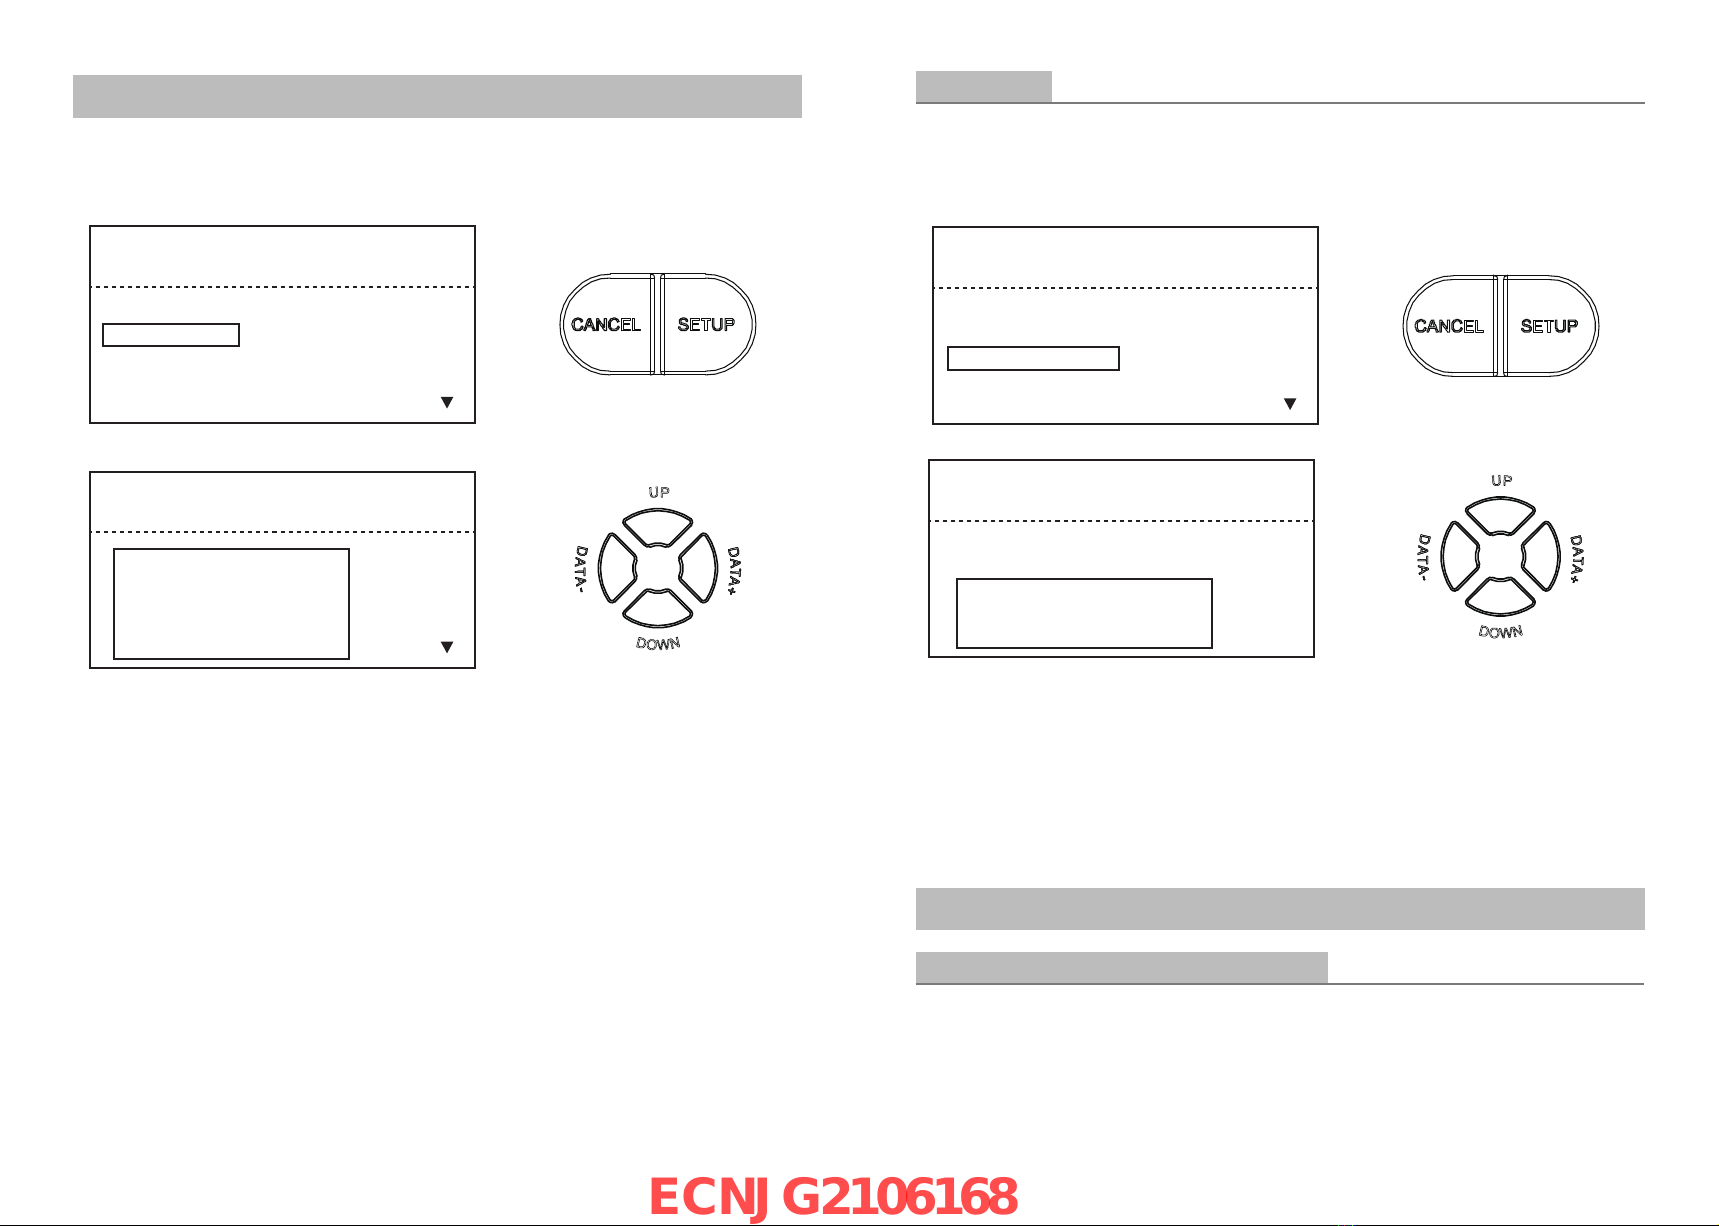
METRONOME
Adjusting the click
User can use the 【 】button to turn on/off metronome,When the metronome is
turned on, the first beat of the metronome button will be light up red, the other beats will be
light up green and the cycle lights up
Long press【】to enter the CLICK SETTING page.
METER:1/2、2/2、3/2、4/2、5/2、6/2、7/2、8/2、9/2、1/4/、2/4、3/4、4/4、5/4、6/4
7/4、8/4、9/4、1/8、2/8、3/8、4/8、5/8、6/8、7/8、8/8、9/8
VOICE:user can adjust the voice (001-004);
VOLUME:user can adjust the voice volume (000-127)
— 14 —— 25 —
CLICK SETTING
METER
VOICE
VOLUME
4/4
001
060
SELECT TRIGGER
Tom and snare rim trigger setting
Press【SETUP】to enter SETTING menu, and press【DOWN】to select DRUM OPTION,
then press【SETUP】to enter DRUM OPTION menu.
HI-HAT trigger setting
Press 【SETUP】to enter SETTING menu, and press【DOWN】to select DRUM OPTION,
then press【SETUP】to enter DRUM OPTION menu.
In the TOM RIM or SNARE RIM option, press【DATE+】or【DATE-】to switch ON or OFF.
Rim trigger is valid in the ON state and invalid in the OFF state.
SETTING
VOICE
PAD TRGGER
EFFECT
DEFAULT SETTING
DRUM OPTION
SETTING
VOICE
PAD TRGGER
EFFECT
DEFAULT SETTING
DRUM OPTION
ON
ON
1
08
P/H
DRUM OPTION
TOM RIM
SNARE RIM
HIHATIYPE
HIHA SENS
JICK TYPE
ECNJG2106168

EDITAND SAVE DRUM KIT VOICE
Edit the voice
Press【SETUP】to enter SETTING page,press【SETUP】to enter VOICE sub menu.
On the right side of the title bar in the VOICE menu, the current name of the drum to be
adjusted will be displayed. You can switch it by hitting the drum to be adjusted.
The sound number and the voice name are displayed below the title bar, and use【DATE+
】and【DATE-】to select the voice you want. As shown below:
— 24 —— 15 —
All parameters restore factory settings
Press 【SETUP】to enter SETTING menu, and press【DOWN】to select RESTOREALL,
then press【SETUP】to enter RESTOREALL menu
Press【SETUP】on RESTOREALL to start restore. It shows RESTORE ALL SUCCEED
after completion.
Press 【SETUP】on RESTORETRIGGER to start restore, the system will show RESTORE
TIGGER SUCCEED after completion.
VOICE KICK
VOLUME
PAN
MIDI KEY
REVERB
KICK01
111
036
038
0-10
001
VOICE KICK
VOLUME
PAN
MIDI KEY
REVERB
KICK01
111
036
038
0-10
001
SETTING
VOICE
PAD TRIGGER
EFFECT
DEFAULT VSEEING
DRUM OPTION
SETTING
VOICE
PAD TRGGER
EFFECT
DEFAULT SETTING
DRUM OPTION
USER001
TRIGGER
ALL
DEFUALT SETTING
RESTORE
RESTORE
RESTORE
SETUP FOR YES
USER001
TRIGGER
ALL
DEFUALT SETTING
RESTORE
RESTORE
RESTORE
SETUP FOR YES
ECNJG2106168

1. VOLUME: Adjust voice volume
2.PAN:Adjust the pan of L/R channel
3.MIDI KEY:Adjust MIDI output pitch value(000-127)
4.REVERB:Adjust reverberation
Press【UP】and【DOWN】to switch settings, press【DATE+】or【DATE-】to adjust the
parameters. All parameters in the VOICE menu will be saved in real time after being
adjusted. If you need to restore the default value of the system, you can simultaneously
press 【DATE+】and 【DATE-】buttons for more than 3 seconds to reset.
Save the voice
Press【SAVE】after finish the voice adjustment, press【DATE+】or【DATE-】to select
the user drum kit you want to save, press【SAVE】again to save the corresponding user
drum kit.
— 16 —— 23 —
VOICE KICK
VOLUME
PAN
MIDI KEY
REVERB
KICK01
111
036
038
0-10
001
Note: Only one drum kit can be restored at a time (the relevant PAD TRIGGER Settings
cannot be restored)
Restore a single user drum kit to its default settings, select drum kit, press【ENTER】to
restore, the system will show a restoration query, press 【ENTER】again to start
restoration. After restoration is completed, the system will prompt that restoration is
completed.
Drum pad triggering parameters restore factory settings
Press【SETUP】to enter SETTING menu, and press 【DOWN】to select RESTORE
TRIGGER, then press【SETUP】to enter RESTORE TRIGGER menu.
SETTING
VOICE
PAD TRGGER
EFFECT
DEFAULT SETTING
DRUM OPTION
SETTING
VOICE
PAD TRGGER
EFFECT
DEFAULT SETTING
DRUM OPTION
USER001
TRIGGER
ALL
DEFUALT SETTING
RESTORE
RESTORE
RESTORE
SETUP FOR YES
SAVE SETTING
SAVE AS UERR001
SAVE FOR YES
CANCLE FOR NO
ECNJG2106168
ADJUST PAD TRIGGER
On the right side of the title bar in the VOICE menu, the current name of the drum to be
adjusted will be displayed. You can switch it by tapping the drum to be adjusted.
Note:Press【UP】and【DOWN】to switch settings, press【DATE+】or【DATE-】to
adjust the parameters. All parameters in the drum pad trigger menu will be saved in
real time after being adjusted. If you need to restore the default value of the system,
you can simultaneously press 【DATE+】and 【DATE-】buttons for more than 3
seconds to reset.
Press【SETUP】to enter SETTING menu, press【DOWN】to select PAD TRIGGER,
press【SETUP】again to enter TRIGGER sub-menu.
— 22 —— 17 —
1
2
06
08
06
SETTING
VOICE
PAD TRGGER
EFFECT
DEFAULT SETTING
DRUM OPTION
TRIGGER TOM1
VEL CURVE
THRSHLD
CROSSTALK
SENSITIVITY
MASKTIME
RELOAD DEFAULT SETTING
Single user drum kit is restored to factory settings
Press【SETUP】to enter SETTING menu, press【DOWN】to select DEFAULT SETTING,
then press【SETUP】to enter DEFAULT SETTING menu.
Reverb setting
Press 【SETUP】to enter SETTING menu, press【DOWN】to select EFFECT, then press
【SETUP】again to enter EFFECT menu.
REVERB TYPE: adjust the reverb type. Press【DATE+】or【DATE-】to adjust parameter.
REVERB TIME: adjust the reverb delay time. Press【DATE+】or【DATE-】to adjust
parameter.
REVERB SIZE: adjust the reverb size. Press【DATE+】or【DATE-】to adjust parameter.
SETTING
EFFECT
VOICE
PAD TRGGER
EFFECT
DEFAULT SETTING
DRUM OPTION
085
110
000
057
004
HI GAIN
LOW GAIN
REVERB TYPE
REVERB TIME
REVERB SIZE
ECNJG2106168
Table of contents
Other Soundking Drum manuals


