SoundMax SM-DVR77FHD User manual
CACAR VIDEO RECORDER
АВТОМОБИЛЬНЫЙ ВИДЕОРЕГИСТРАТОР
SM-DVR77FHD
Instruction manual
Руководство по
эксплуатации

2
Instruction manual
Dear customer!
Thank you for purchasing our product. For safety, it is strongly recommended to read
this manual carefully before connecting, operating and/or adjusting the product and keep
the manual for reference in the future.
If you want to dispose this product, do not mix it with general household waste. There is
a separate collection system for used electronic products in accordance with legislation
that requires proper treatment, recovery and recycling.
Please contact your local authorities for the correct method of disposal. By doing so, you
will ensure that your disposed product undergoes the necessary treatment, recovery and
recycling and thus prevent potential negative effects on the environment and human health.
Utilization of the product
Important safeguards
• Read carefully through the manual to
familiarize yourself with this unit.
• Keep this manual handy as a reference
for operating procedures and precautions. Do
not allow persons who have not read through
this manual to use this unit.
• Connect this unit only to the vehicle lighter
jack of your car with +12-24 V DC power. If the
voltage is too high, it may cause damage to
this unit.
• Careful handling of the unit can prolong
its operation life.
• Fully charge the battery before the first
use.
• To ensure a longer battery life fully
discharge and charge it several times
before using.
• Due to variety of car lighter jack sizes
depending of vehicle type, ensure that this unit
is properly contacted in the lighter socket.
• The unit should be used only with original
accessories included. The Manufacturer is
not responsible for possible damage of this
unit cause by using other accessories than
provided by Manufacturer.
• Should this product fail to operate
properly, contact your local dealer.
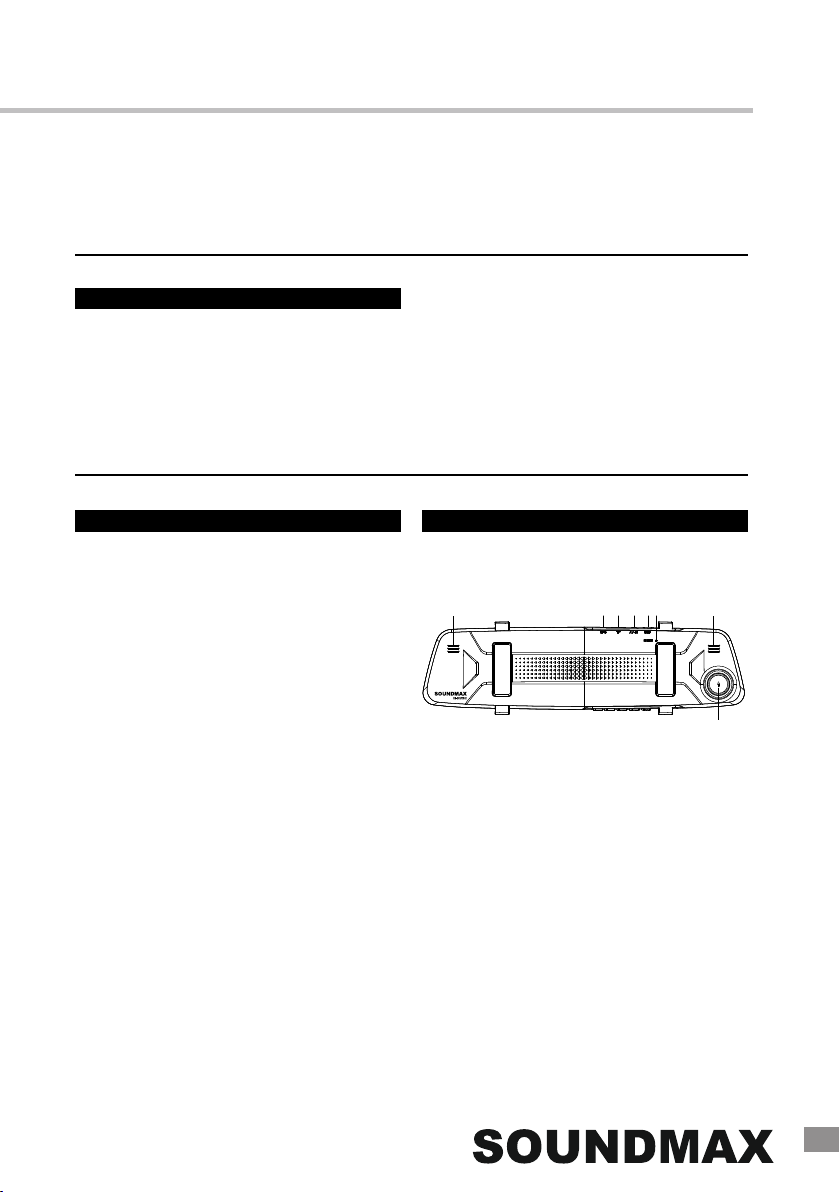
Controllers
Rear panel
1
62 3 4 5 6
7
1. GPS interface*
2. TF (microSD) card slot
3. AV-IN input*
4. MiniUSB port
5. Reset button (hole)
6. Speakers
7. Camera lens
*Not available in this model
3
Instruction manual
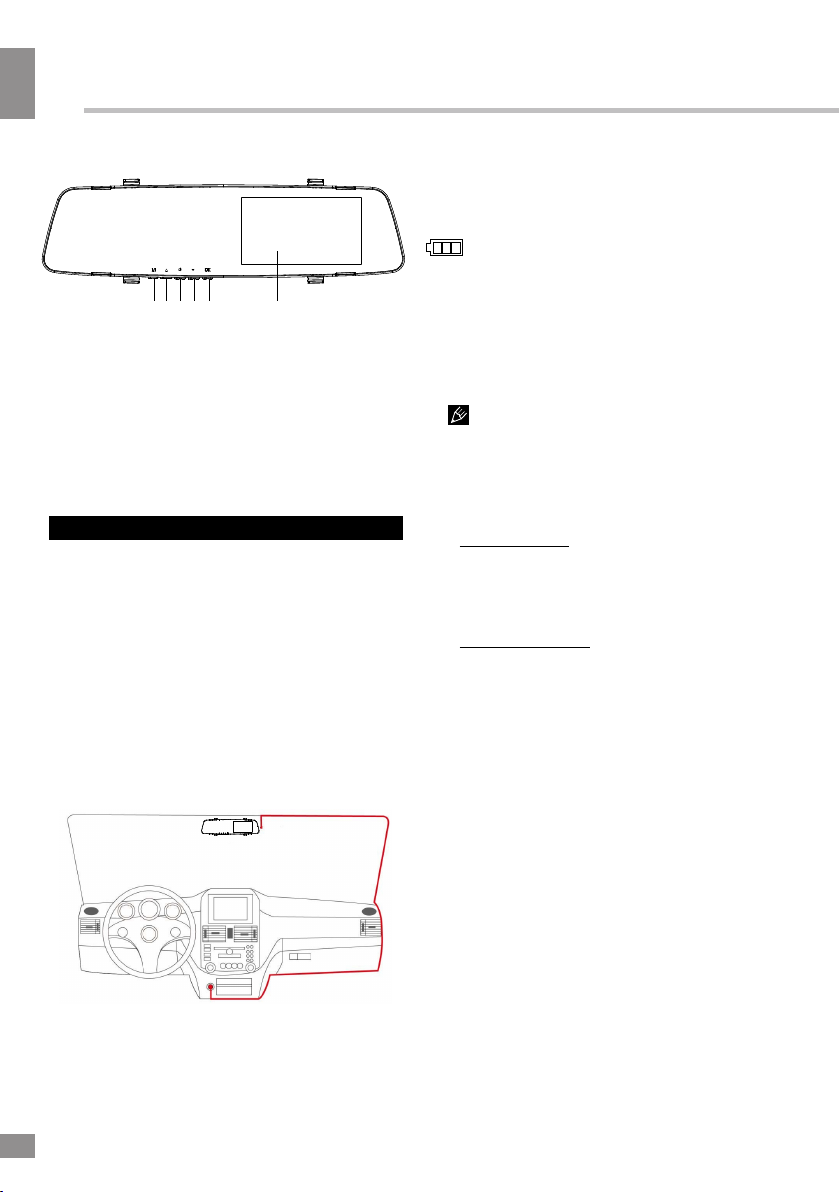
Front panel
Operations
Power and charging
To charge the battery of this unit use a
miniUSB-USB cable (not included); or
connect it to a car lighter socket with the
supplied car adapter. The power icon
on the display indicates the remaining
battery power.
Video mode
• Before you start recording, insert a MicroSD
memory card into the memory card slot of this
unit until a click. Insert the card with correct side.
Press POWER button to turn the device on.
MicroSD capacity supported: up to
32 GB, class 10 or higher. For correct and
satisfactory operation, licensed MicroSD
memory cards of famous brands should be
used with this unit. Avoid using memory cards
of unknown brands.
• Auto recording: After you connect
the unit to car power source, recording will
be started automatically. After you
disconnect the power source, the unit will
automatically shut down in 5 seconds.
• Manual recording: Press POWER to
switch on the unit (press and hold it again if
you want to switch off the unit). In recording
mode the top left corner of the display shows
the camera symbol indicating that the unit is
ready for recording. Press OK button to start
recording. Press this button again to stop
recording.
• While recording, the recording time is
shown in red figures in the top right corner of
the display. The unit will save video files
automatically after each 1/2/3/5 minutes (see
the "Setup" paragraph below for more details).
When the memory card is filled, old files will be
deleted and the new files will be recorded
instead. Press OK button to stop and to
continue recording.
8 9 10 11 12 13
8. M (MENU/MODE) button
9. UP button
10. POWER button
11. DOWN button
12. OK button
13. Display
Mounting
•Clean the car rearview mirror with a cloth.
•
•
Tear off the adhesive protective tape on the
recorder.
Attach the recorder on top the car rearview
mirror so as not to block the camera lens
and secure with rubber straps.
•Connect the USB terminal of the car charger
to the DC 5V mini USB socket of the recorder.
•Adjust the horizontal and vertical position of
the camera.

4
4
Instruction Manual
• Before removing memory card stop
recording. Press on the card until a click to
remove it.
• Motion detector recording is available
after you switch on this item in the setting
menu (see “Setup“ paragraph below for more
details). The unit will go to recording mode if
there is image motion in front of the lens. When
a motion is detected, the unit will start to record
a video fragment (no matter whether there is
motion or not during the recording period), after
the fragment is recorded, the unit comes to
standby mode till a motion is detected again.
• G-sensor. If overload resulting from an
impact exceeds the setup value (1 g =
9.8m/s^2; see “Setup“ paragraph below for
more details), the current video fragment
will be automatically protected from re-
recording.
Playback mode
•Stop the recording and press M
to enter playback mode. Press UP/DOWN
button to choose the file. Press OK button
to play the selected file. Press OK button to
stop or resume playback.
• In file playback mode select a file, then
press the M button. A menu will appear
in which you can select to delete, protect
it or slideshow files. Select either option,
then press OK button to confirm.
Connection to PC
• Connect this unit to a computer using
a miniUSB-USB connection cable (not
included). Now this unit can be used as a
mass storage device ("Mass Storage") or as
a webcam for your PC ("PC Camera").
•The computer will launch the automatic
driver management software. Follow the on-
screen instructions to properly install the
camera driver.
Setup
In recording mode press the M button to
choose the needed operation mode (Video/
Photo/Playback). Press and hold M to enter
the setup menu for the current mode.
In the menu press UP/DOWN buttons to select
settings. Press OK button to go
to adjustment of the selected setting; select
options with cursor button and press OK button
to confirm.
Some menu items may be in grey color,
in this case they are not adjustable. The menu
in your unit may be changed without prior
notice and hence be different from the menu
described below.
General system setup
•Screen Saver: activate and set the idle
time period of the screen saver or turn it
off.
•Auto Power Off: select the time period
after which the unit will automatically switch
off or disable this function.
•Frequency: 50Hz/60Hz.
•During recording press UP to
mute the sound.
Photo mode
•Stop the recording and press M
to enter the photo mode. In this mode press
the OK button to take photos according to
the settings listed in the "Photo setup"
paragraph.
•To use this unit in webcam mode connect
it to a PC as described above. All standard
DVR features are available and the PC is
used as a power source.

5
• Beep Sound: enable or disable beeping
sounds when pressing buttons on the unit.
• Language: select the system language.
•Date/Time: set the current year, month
• Format: select this option to
format the inserted SD card. WARNING: all
data on the card will be deleted.
• Default Setting: select OK to reset all
settings to default values.
• Version: check the current firmware
version info.
Video setup
Photo setup
•Resolution:
12M(4032*3024) / 10M(3648*2736) /
8M(3264*2448) /5M(2592*1944) /
3M(2048*1536) / 2MHD(1920*1080) /
1.3M(1280*960)
Select the size and resolution of the image.
• Anti-Shaking: Off/On. Enable or disable
the anti-shaking feature.
• Date Stamp: Off/On. Activate
or deactivate showing of date on the photo.
Playback mode setup
• Delete: Delete Current/Delete All. Select
“OK“ to delete or “Cancel“ to cancel.
• Protection: Lock Current File/Unlock
Current File/Lock All/Unlock All. Enable or
disable the protection of files from manual
deleting or overwriting.
Instruction manual
• Resolution: select video resolution:
1080FHD 1920*1080 /
1080P 1440*1080 /
720P 1280*720.
•Loop Recording: off/1/2/3/5.
Select the maximum record cycle time
(in minutes) or switch it off.
• Motion Detection: Off/On. Activate or
deactivate the motion detection function.
•Audio Recording: Off/On. Activate or
deactivate recording of sound for video
recording.
• Date Stamp: Off/On. Enable or disable the
display of the current date on the recorded
video.
•G-SENSOR: Off/High/Medium/Low.
Adjust the G-sensor sensitivity or turn
this feature off.
and day by pressing UP/DOWN
buttons and pressing OK button to
confirm.

6
Instruction Manual
Accessories
1 pc
1 pc
2 pcs
1 pc
Video recorder
Car adaptor
Rubber straps
Instruction Manual
Specifications
Lens view angle
Display
Video resolution
Video record format
Audio format
Photo format
Interfaces
Built-in battery
Operation period
Nominal voltage
Motion detector
Cycled recording
G-sensor
Parking mode
Webcam mode
Max record fragment
Memory
Operation temperatures
Storage temperatures
Humidity
Unit dimensions
Net/Gross weight
170°
color TN, 4.5” (11.4 mm)
1080FHD 1920*1080; 1080P 1440*1080; 720P 1280*720
AVI
PCM
JPEG
miniUSB
150 mAh
5 min
5 V; 0.5 А
+
+
+
+
+
1/2/3/5 minutes
microSD memory card support, up to 32 GB
-10°С ... +50°С
-10°С ... +50°С
15 - 70%
299 х 76 х 8 mm
191 g / 372 g
Specifications are subject to change without notice. Weights are approximate.

12
Руководство по эксплуатации
7
Уважаемый покупатель!
Благодарим Вас за покупку нашего изделия. Чтобы понять, как правильно и безо-
пасно пользоваться Вашей моделью изделия, рекомендуется тщательно изучить
на-стоящее руководство перед подключением, настройкой и эксплуатацией
изделия. Сохраняйте руководство для использования в будущем.
обычным бытовым мусором. Существует отдельная система сбора использованных
электронных изделий в соответствии с законодательством, которая предполагает
соответствующее обращение, возврат и переработку.
Обращайтесь в органы местного управления за инструкциями по правильной
утилизации продукта. Тем самым Вы обеспечите утилизацию Вашего изделия с
соблюдением обязательных процедур по обработке, утилизации и вторичной пере-
работке и, таким образом, предотвратите потенциальное негативное воздействие на
окружающую среду и здоровье людей.
Утилизация изделия
Меры предосторожности
• Внимательно изучите данное руко-
водство, чтобы правильно использовать
устройство.
• Держите данное руководство под
рукой в качестве справочника по правилам
эксплуатации и мерам предосторожности.
Не допускайте к использованию устройства
посторонних лиц, не ознакомившихся и не
усвоивших данные инструкции по эксплуа-
тации.
• Подключайте устройство только в
штатный разъем прикуривателя автомоби-
ля с напряжением +12-24 В. Превышение
напряжения питания может привести к вы-
ходу устройства из строя.
• Бережное обращение с устройством
продлит срок его эксплуатации.
• Перед началом эксплуатации про-
ведите полный заряд аккумуляторной
батареи устройства.
• Для продления срока службы аккуму-
ляторной батареи, после первого вклю-
чения необходимо провести несколько
циклов полного заряда и разряда батареи.
• В связи с возможным разбросом раз-
меров гнезда прикуривателя в различных
марках автомобилей убедитесь в надежно-
сти соединения контакта в гнезде прикури-
вателя для нормального функционирования
устройства.
• Используйте только оригинальные
аксессуары, входящие в комплект поставки.
Производитель не несет ответственности за
возможные повреждения изделия в случае
применения посторонних аксессуаров.
• При неполадках в работе устройства
свяжитесь с торговым представителем.
Если вы желаете утилизировать данное изделие, не выбрасывайте его вместе с
8
Руководство по эксплуатации
Органы управления Операции с устройством
Крепление устройства
Питание и зарядка
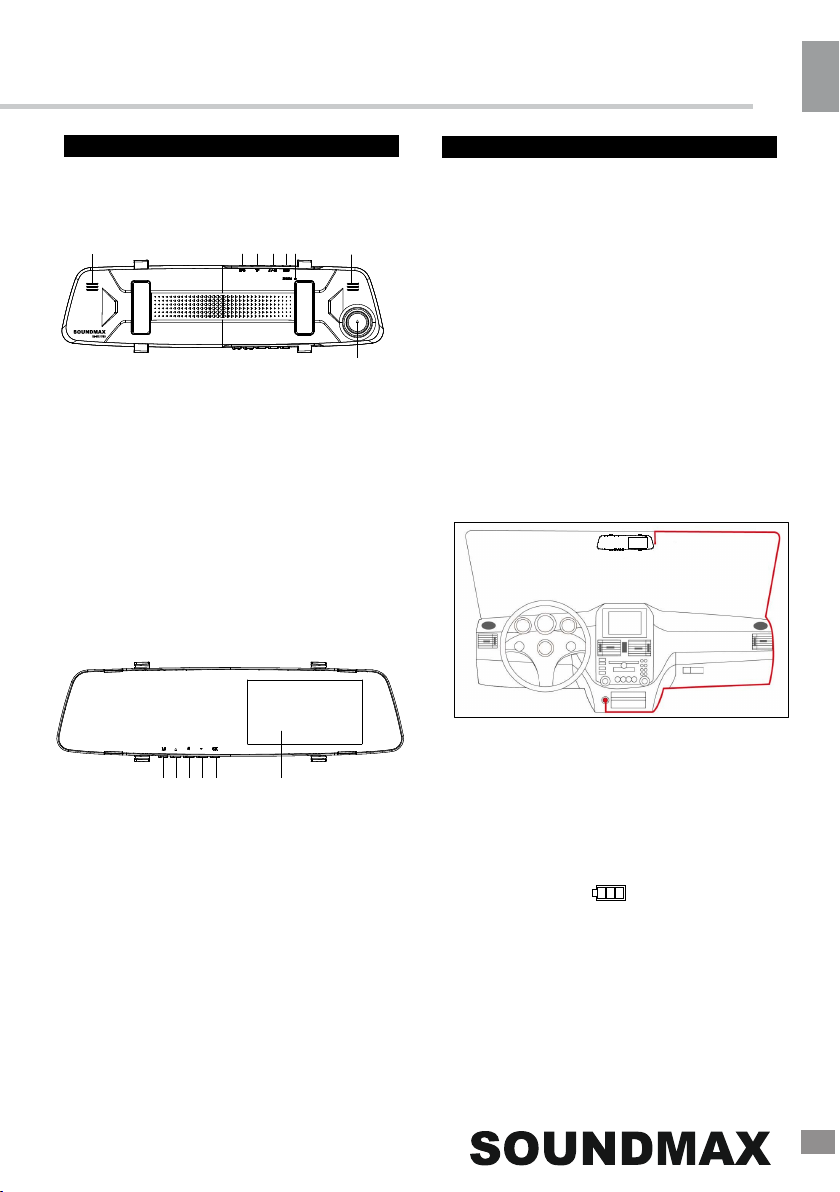
Задняя панель
Передняя панель
Для зарядки аккумулятора устройства
подключите его через USB-порт к персо-
нальному компьютеру с помощью кабеля
miniUSB-USB (в комплект не входит), либо
к разъему прикуривателя автомобиля с
помощью автомобильного адаптера.
Индикатор заряда ( ) на экране
указывает на оставшийся заряд батареи.
61 2 3 4 5 6
7
1. GPS интерфейс*
2. Слот для TF (microSD) карты
3. Вход AV-IN*
4. MiniUSB порт
5. Кнопка (отверстие) RESET
6. Динамики
7. Объектив
*Недоступно в этой модели
8. Кнопка M (MENU/MODE)
9. Кнопка UP
10. Кнопка POWER
11. Кнопка DOWN
12. Кнопка OK
13. Дисплей
•Протрите зеркало заднего вида мягкой
тканью.
•
•
Снимите защитную пленку с
видеорегистратора.
Подключите разъем питания устройства
к гнезду прикуривателя.
•Приложите видеорегистратор на
штатное зеркало заднего вида таким
образом, чтобы не закрывать объектив
камеры, и закрепите при помощи
резиновых колец.
•Отрегулируйте положение
видерегистратора по вертикали и
горизонтали.
8 9 10 11 12 13

12
9
Руководство по эксплуатации
Режим видео
• Перед началом видеосъемки установи-
те карту памяти Micro SD в слот устройства,
нажав на нее до щелчка. Устанавливайте
карту в слот правильной стороной.
Емкость карты памяти: до 32 ГБ. Для
корректной работы устройства используйте
лицензионные карты памяти известных
производителей. Избегайте использова-
ния нелицензионных карт памяти. Класс
быстродействия карты должен быть не
ниже 10, в противном случае возможна
потеря качества видеоизображения,
выражающаяся в неравномерности
воспроизведения.
• Автоматическая запись: При подклю-
чении источника питания в автомобиле
к USB-разъему устройства, оно
автоматически начнет запись видео. После
отключения от источника питания
устройство будет продолжать запись в
течение 5 секунд.
• Запись вручную: Нажмите кнопку
POWER для включения устройства
(питание устройства можно отключить,
удерживая эту кнопку). В режиме записи на
экране отображается символ камеры, что
указывает на готовность устройства к за-
писи. Нажмите кнопку OK для начала
записи; чтобы остановить запись, нажмите
эту же кнопку.
• Время записи отображается
в углу дисплея. Устройство будет
автоматически сохранять записанные
видеофайлы каждые 1/2/3/5 минут
(более подробно выбор периода
сохранения описан в разделе
“Настройки“ ниже). Когда карта памяти
заполнится, старые видеофайлы будут
удалены и запись начнется заново. Для
остановки или возобновления записи
нажимайте кнопку OK.
• Перед извлечением карты памяти оста-
новите запись. Нажмите на карту памяти до
щелчка, чтобы извлечь ее из слота.
• Запись с помощью детектора движения
доступна после того, как вы активируе-
те эту функцию в меню настроек (более
подробно это описано в разделе “Настрой-
ки“ ниже). Устройство перейдет в режим
записи, если детектором движения будет
обнаружено движение предметов перед
объективом камеры; устройство запи-
шет фрагмент видео независимо от того,
имеется ли движение перед объективом
в течение времени записи фрагмента.
После записи фрагмента устройство опять
перейдет в режим ожидания до нового
обнаружения движения.
• G-сенсор. Если перегрузка, возникаю-
щая вследствие столкновения, превышает
заданную величину (1 g = 9,8 м/с^2; более
подробно выбор величины перегрузки опи-
сан в разделе “Настройки“ ниже), текущий
фрагмент записи будет автоматически
защищен от перезаписи.
•Во время записи можно отключить
запись звука нажатием кнопки UP.
Режим фото
•Остановите видеозапись и
нажимайте кнопку M, чтобы перейти в
режим фото. В данном режиме при
нажатии кнопки OK будет сдел½но
фото в соответствии с установленными
настройками (см. раздел "Настройки
фото").
Table of contents
Languages:


