Sparkfun Electronics LilyPad ProtoSnap Plus Technical document

1/22/2018 LilyPad ProtoSnap Plus Hookup Guide - learn.sparkfun.com
https://learn.sparkfun.com/tutorials/lilypad-protosnap-plus-hookup-guide?_ga=2.234157401.659504291.1516640116-204410570.1509632255 1/23
Hardware Overview and Features
Don’t snap apart your LilyPad ProtoSnap Plus until you're ready to use the pieces in a project. If you leave
the pieces attached to the board, you'll be able to prototype and test your project before you start sewing.
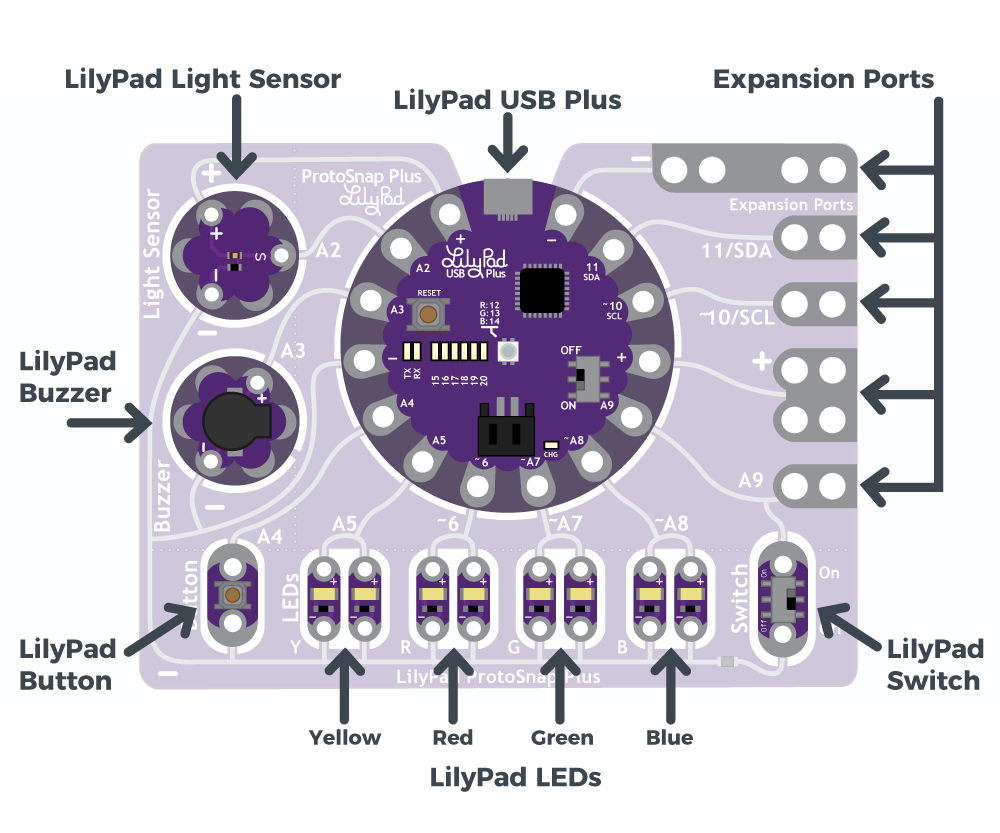
The LilyPad ProtoSnap Plus features twelve LilyPad components connected to a LilyPad microcontroller by
conductive pathways called traces. For reference, each component on the ProtoSnap has a nearby label with its
name and the number of the LilyPad USB Plus sew tab it is connected to.
LilyPad USB Plus
The LilyPad USB Plus is an Arduino-compatible microcontroller similar to the LilyPad Arduino USB - ATmega32U4
Board but with some additional features and three additional sew tabs. It is currently only available on the LilyPad
ProtoSnap Plus.

1/22/2018 LilyPad ProtoSnap Plus Hookup Guide - learn.sparkfun.com
https://learn.sparkfun.com/tutorials/lilypad-protosnap-plus-hookup-guide?_ga=2.234157401.659504291.1516640116-204410570.1509632255 2/23
Features:
USB port for connecting to a computer.
Two sets of power (+) and ground (-) sew tabs.
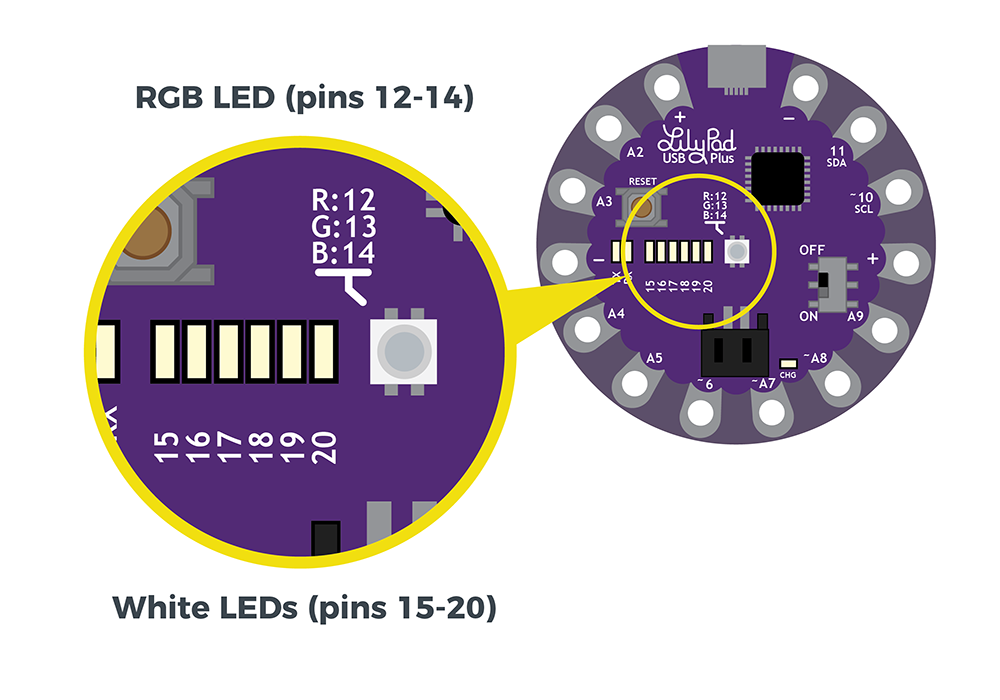
Built-in RGB LED attached to pins 12 (R), 13 (G), and 14 (B).
A row of six white LEDs attached to pins 15-20.
Charging circuit for single-cell (3.7V) Lithium-Polymer batteries.
Some of the sew tabs on the LilyPad USB Plus have special functionality:
An 'A' in front of the number denotes a tab that can function as an analog input. These sew tabs can read
sensors that output a varying voltage like the light sensor built into the ProtoSnap Plus.
A '~' symbol in front of the number indicates that tab supports PWM (Pulse Width Modulation) output.
These tabs can output an "analog" signal that can be used to vary the brightness on LEDs, etc.
Note: The "A" in front of analog sew tab numbers in your code is optional. However, do not include the "~"
symbol for PWM outputs. It is only provided to make it easy for you to check which pins can produce PWM
(analog) output and is not used in programming.
Below is a table that lists the components connected to the LilyPad USB Plus sew tabs.
LilyPad
Component
Connected
to LilyPad
USB Plus
Sew Tab
Description
LilyPad
Light
A2 LilyPad USB Plus receives ambient
light level input from light sensor.

1/22/2018 LilyPad ProtoSnap Plus Hookup Guide - learn.sparkfun.com
https://learn.sparkfun.com/tutorials/lilypad-protosnap-plus-hookup-guide?_ga=2.234157401.659504291.1516640116-204410570.1509632255 3/23
Sensor (S)
LilyPad
Buzzer (+)
A3 A buzzer that create tones controlled
by LilyPad USB Plus.
LilyPad
Button
A4 LilyPad USB Plus receives button
press input.
2x LilyPad Y
LEDs (+)
A5 A pair of yellow LEDs controlled by
LilyPad USB Plus.
2x LilyPad
R LEDs (+)
~6 A pair of red LEDs controlled by
LilyPad USB Plus.
2x LilyPad
G LEDs (+)
~A7 A pair of green LEDs controlled by
LilyPad USB Plus.
2x LilyPad B
LEDs (+)
~A8 A pair of blue LEDs controlled by
LilyPad USB Plus.
LilyPad
Switch
A9 LilyPad USB Plus receives switch
state (on/off) input to change modes.
Expansion
Port A9
A9 Clippable pads to connect another
LilyPad piece to. Shares connection
with the LilyPad Switch.
Expansion
Port (+)
(+) Clippable pads connected to LilyPad
USB Plus's power (+) sew tab.
Expansion
Port
~10/SCL
~10/SCL Clippable pads connected to LilyPad
USB Plus's sew tab 10. This can be
used to connect to a I2C clock pin.
Expansion
Port 11/SDA
11/SDA Clippable pads connected to LilyPad
USB Plus's sew tab 11. This can be
used to connect to a I2C data pin.
Expansion
Port (-)
(-) Clippable pads connected to LilyPad
USB Plus's ground (-) sew tab.
All
components
(-)
(-) All components share a common
ground connection back to the
LilyPad USB Plus.
Powering the LilyPad ProtoSnap Plus
The LilyPad ProtoSnap Plus can be powered in two ways:

1/22/2018 LilyPad ProtoSnap Plus Hookup Guide - learn.sparkfun.com
https://learn.sparkfun.com/tutorials/lilypad-protosnap-plus-hookup-guide?_ga=2.234157401.659504291.1516640116-204410570.1509632255 4/23
If you have a USB power source available (a computer, 5V USB wall adapter, USB battery pack, etc.), you can
run the board from a USB cable.
If you’d like your project to be more portable, you can easily attach a rechargable Lithium-polymer battery to
the board. See Technical Notessection for more information on batteries and charging.
Exploring the Sample Circuit
Don’t snap apart your LilyPad ProtoSnap Plus until you're ready to use the pieces in a project. If you leave
the pieces attached to the board, you'll be able to prototype and test your project before you start sewing.
The LilyPad ProtoSnap Plus ships with pre-loaded code that showcases all of the LilyPad pieces connected to it. To
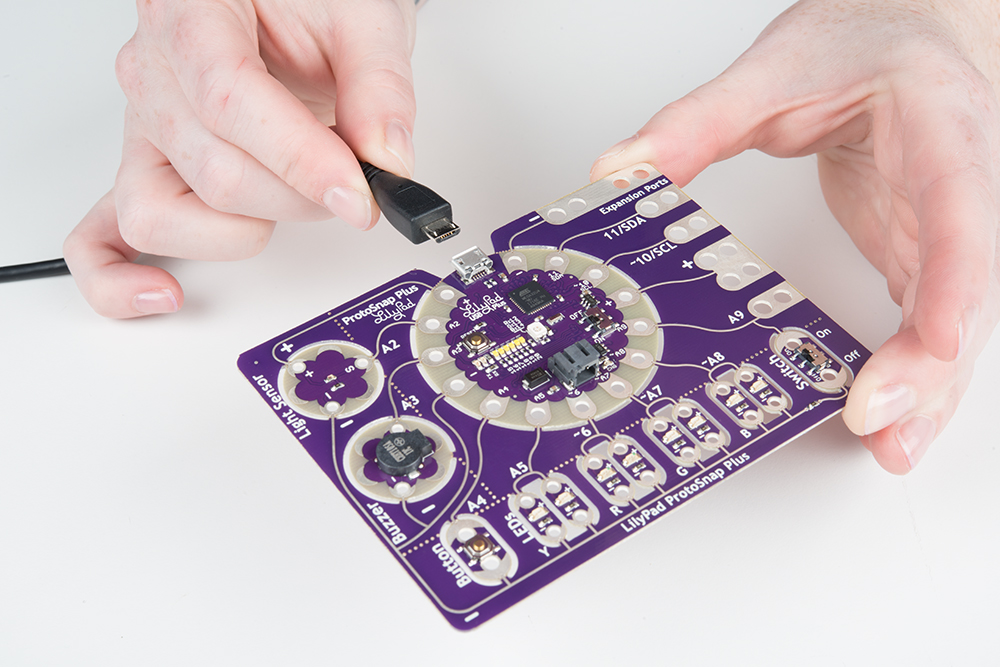
power up the ProtoSnap Plus, connect it to your computer using a micro-B USB cable or attach an E-Textiles Battery.
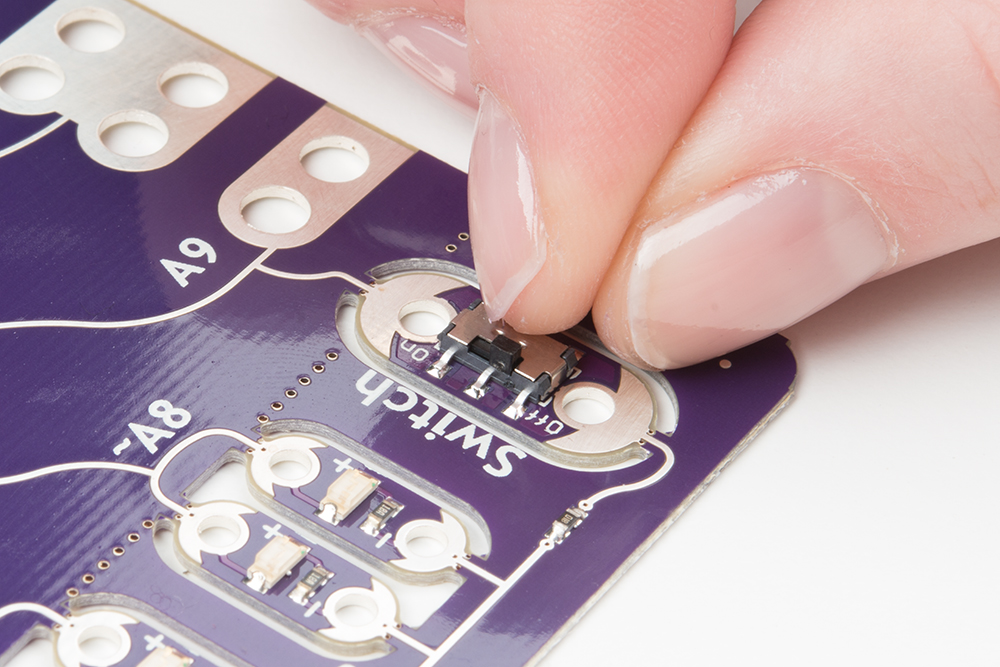
Then slide the switch on the right side of the LilyPad USB Plus to the ON position.
The board has two modes to choose from: when the LilyPad Slide Switch (the other switch at the bottom right of the
board) is turned OFF, all of the LEDs will turn on in sequence. When the LilyPad Slide Switch is turned ON, the white
LEDs on the LilyPad USB Plus will form a bar graph showing the ambient light level - move your hand over the Light
Sensor to see the level change. And if you press the LilyPad Button (at the bottom left of the board), you’ll be treated
to a short song.

1/22/2018 LilyPad ProtoSnap Plus Hookup Guide - learn.sparkfun.com
https://learn.sparkfun.com/tutorials/lilypad-protosnap-plus-hookup-guide?_ga=2.234157401.659504291.1516640116-204410570.1509632255 5/23
Continue to the Setting Up Arduino section for directions on installing the LilyPad USB Plus support for Arduino to
enable you to upload your own custom code.
Using the Expansion Ports
The LilyPad ProtoSnap Plus features five expansion ports connected to sew tabs on the LilyPad USB Plus. These
allow you to easily attach external components to the board, including LilyPad and non-LilyPad boards. The
expansion ports can accommodate alligator clips, IC clips, and other temporary attachment cables for testing and
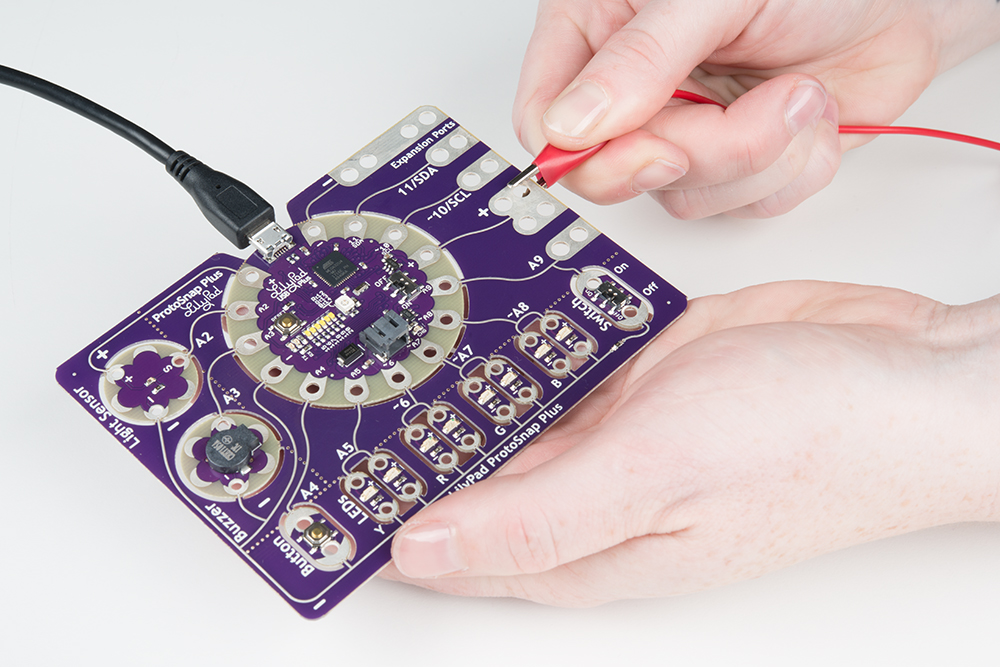
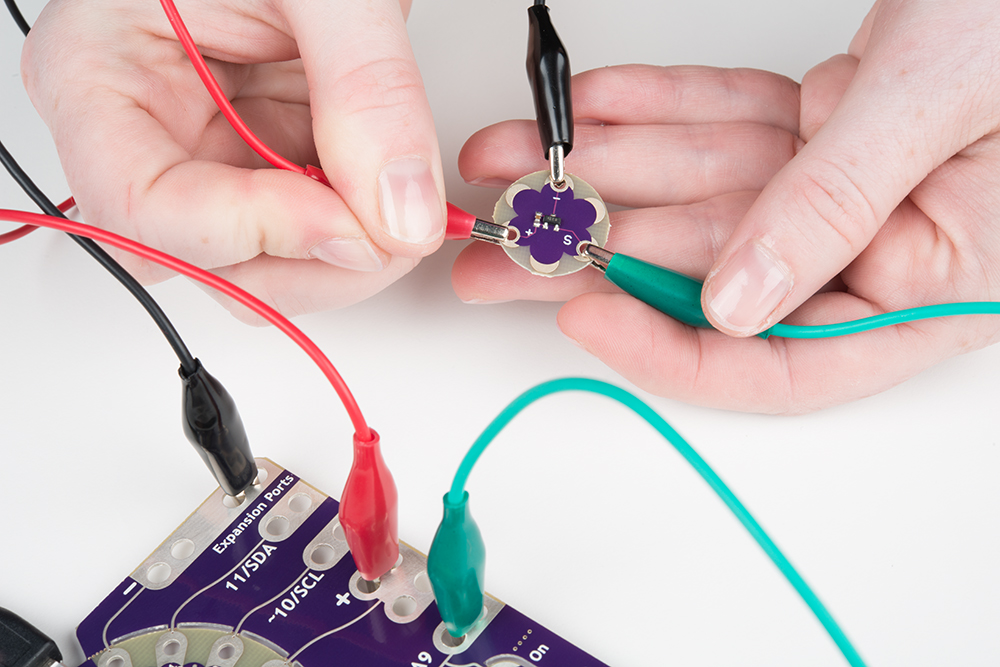
experimentation. Below are a few ways to connect an alligator cable to the sew tabs.
Alligator clip attached parallel to the expansion port.

1/22/2018 LilyPad ProtoSnap Plus Hookup Guide - learn.sparkfun.com
https://learn.sparkfun.com/tutorials/lilypad-protosnap-plus-hookup-guide?_ga=2.234157401.659504291.1516640116-204410570.1509632255 6/23
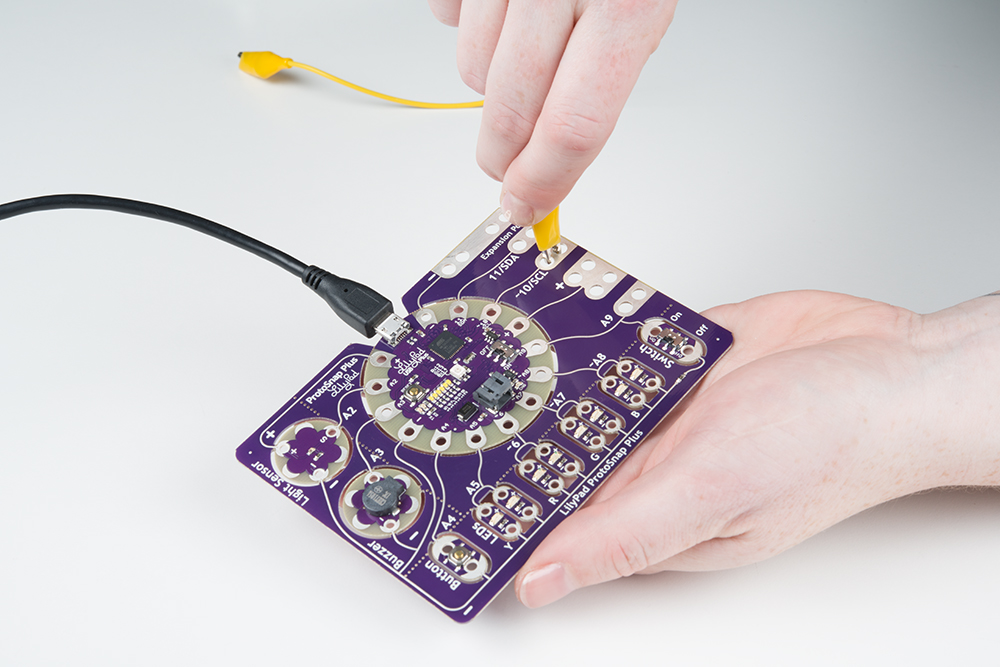
Alligator clip attached perpenticular to the expansion port.
A LilyPad temperature sensor attached to the LilyPad ProtoSnap Plus expansion ports for testing.
Using Expansion Port A9
You may have noticed that tab A9 is connected to both the LilyPad Slide Switch and an Expansion Port. You can only
use A9 for one of these connections; either the switch as an input or the expansion port as an input/output.

1/22/2018 LilyPad ProtoSnap Plus Hookup Guide - learn.sparkfun.com
https://learn.sparkfun.com/tutorials/lilypad-protosnap-plus-hookup-guide?_ga=2.234157401.659504291.1516640116-204410570.1509632255 7/23
If you’re using an external component or sensor on expansion port A9, move the slide switch to the OFF position to
keep the switch from interfering with your input or output signal.
Below is an image of the LilyPad temperature sensor attached to the LilyPad ProtoSnap Plus expansion ports for
testing.
For more information about about expansion port A9 in the Technical Notessection.
Setting Up Arduino

1/22/2018 LilyPad ProtoSnap Plus Hookup Guide - learn.sparkfun.com
https://learn.sparkfun.com/tutorials/lilypad-protosnap-plus-hookup-guide?_ga=2.234157401.659504291.1516640116-204410570.1509632255 8/23
COPY CODE
Note: The LilyPad ProtoSnap Plus and the LilyPad USB Plus requires Arduino version 1.8 or higher. If this is
your first time using Arduino, you can install it by following our Installing the Arduino IDE tutorial. Otherwise,
please make sure to install (or update to) the latest version of Arduino and verify that you are connected to the
internet to download the LilyPad USB Plus software add-ons.
Now that you’ve explored the board’s features, it’s time to upload some code! When you first install Arduino, it knows
how to program a number of “standard” Arduino-compatible boards. Since the LilyPad USB Plus is a newer LilyPad
microcontroller, you will need to manually add it to this list by following the steps below. You’ll only have to do this
once to add the board to Arduino.
Note for Linux Users: If you are installing the LilyPad ProtoSnap Plus in Linux, this document has some
specific
notes:https://github.com/sparkfun/LilyPad_ProtoSnap_Plus/blob/master/Documentation/LinuxInstallation.md.
1. Add SparkFun Boards to Arduino’s Preferences
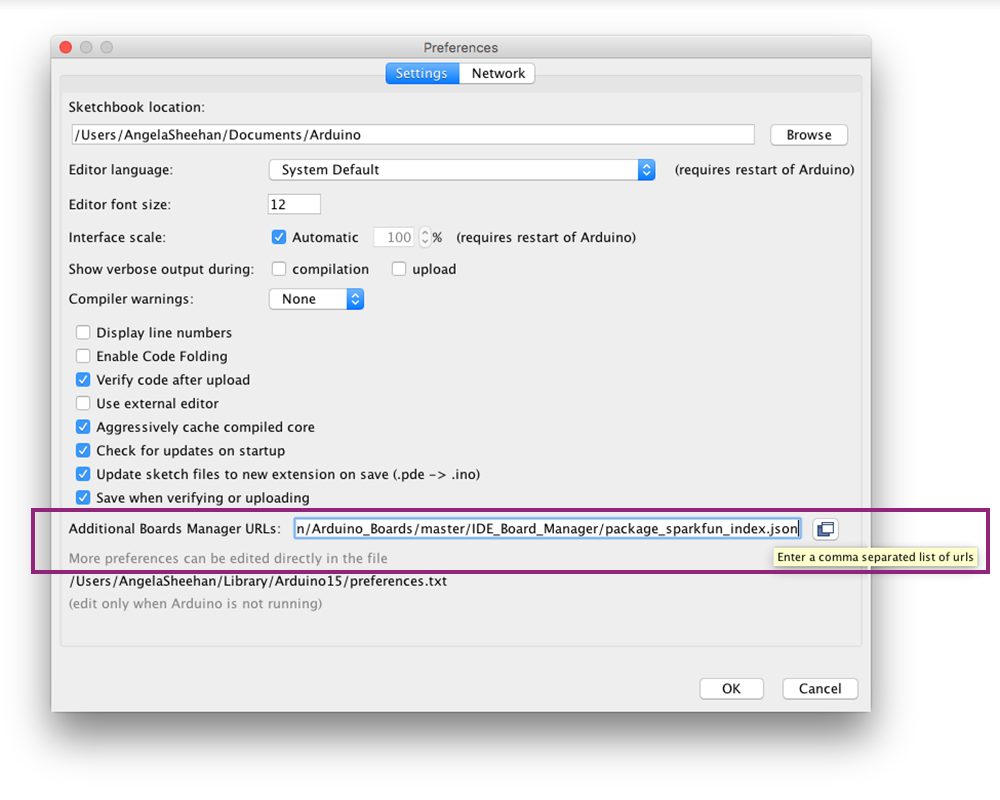
Start the Arduino IDE software (version 1.8 or higher) and open the Preferences window by
choosing File > Preferences from the menu.
Now copy the below text and paste it into the “Additional Boards Manager URLs” text box:
https://raw.githubusercontent.com/sparkfun/Arduino_Boards/master/IDE_Board_Manager/pac
kage_sparkfun_index.json

1/22/2018 LilyPad ProtoSnap Plus Hookup Guide - learn.sparkfun.com
https://learn.sparkfun.com/tutorials/lilypad-protosnap-plus-hookup-guide?_ga=2.234157401.659504291.1516640116-204410570.1509632255 9/23
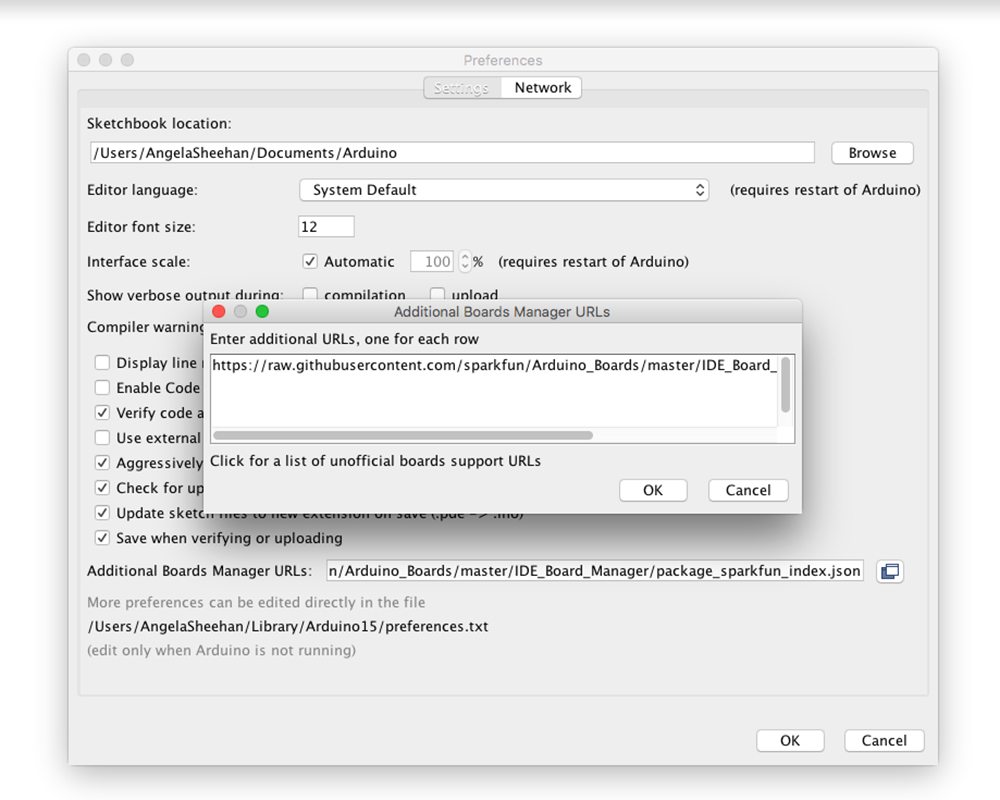
No room? If there is already a URL in the box, click the button to the right of the box. This will open a window
allowing you to paste the URL onto a new line.
When you’re done, click the “OK” button.
2. Install SparkFun AVR Boards
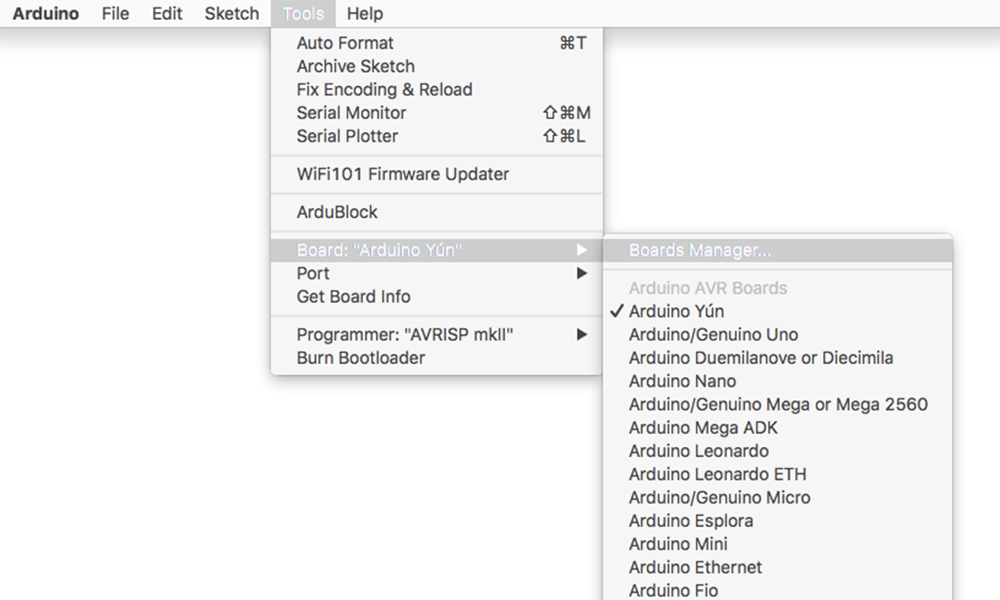
Next, you’ll add the LilyPad USB Plus through Arduino’s Boards Manager Menu. Open the Boards Manager by
choosing Tools > Board > Boards Manager…(The Boards Manager option is at the very top of the list of boards;
you may need to scroll up to see it.)

1/22/2018 LilyPad ProtoSnap Plus Hookup Guide - learn.sparkfun.com
https://learn.sparkfun.com/tutorials/lilypad-protosnap-plus-hookup-guide?_ga=2.234157401.659504291.1516640116-204410570.1509632255 10/23
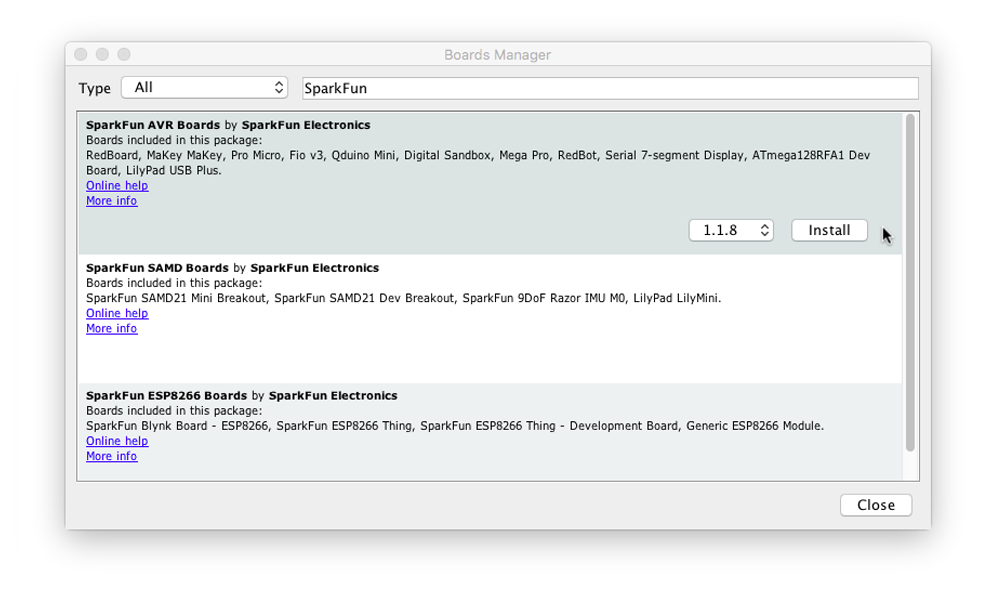
When the Boards Manager window opens, it will present a long list of options. Type “sparkfun” (without quotes) into
the “Filter your search” box at the top of the window. This will shrink the list down to SparkFun’s options.
You should see several entries. Look for the one labeled SparkFun AVR Boards by SparkFun Electronics.
Troubleshooting: If you don't see a SparkFun entry, it may mean that the URL you pasted into the Additional
Boards Manager section of Arduino's preferences did not load correctly in Step #1, or you're not connected to
the internet. Double check that the entire link was copied into the Additional Boards Manager URLs, and that
you're connected to the internet. You might also try closing and restarting the Arduino software to refresh the
preferences.
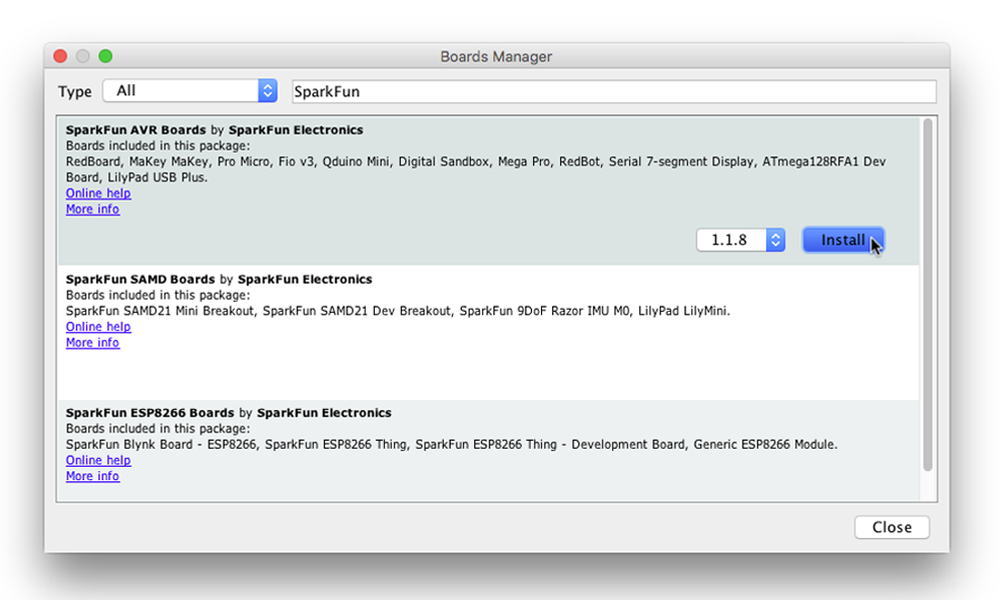
Click anywhere in the SparkFun AVR Boards box. A version number and an “Install” button will appear. Click the
install button. This will download and install the extension. If you have already installed the SparkFun AVR Boards

1/22/2018 LilyPad ProtoSnap Plus Hookup Guide - learn.sparkfun.com
https://learn.sparkfun.com/tutorials/lilypad-protosnap-plus-hookup-guide?_ga=2.234157401.659504291.1516640116-204410570.1509632255 11/23
support, update to the latest version (LilyPad USB Plus and example code is included in 1.1.8 and higher).
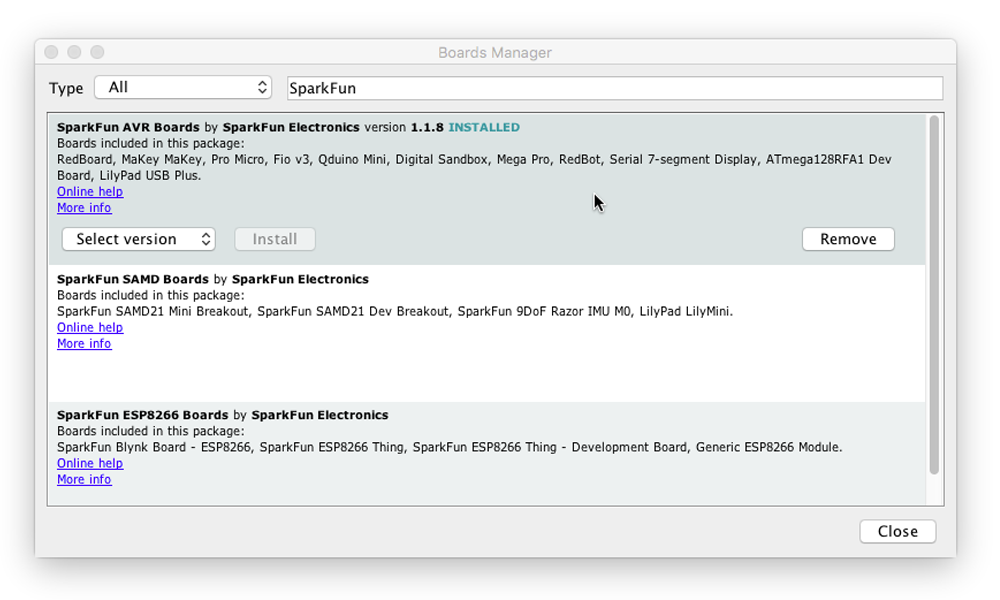
If everything worked, a blue “INSTALLED” note should appear next to the SparkFun AVR Boards title. You’re ready to
start programming.
Uploading Code
Once you’ve installed the LilyPad USB Plus extensions to Arduino, you’re ready to start programming the board!
Note that you won’t have to install the extensions again, but you will need to perform the below three steps every time
you want to program the board. These three steps are:
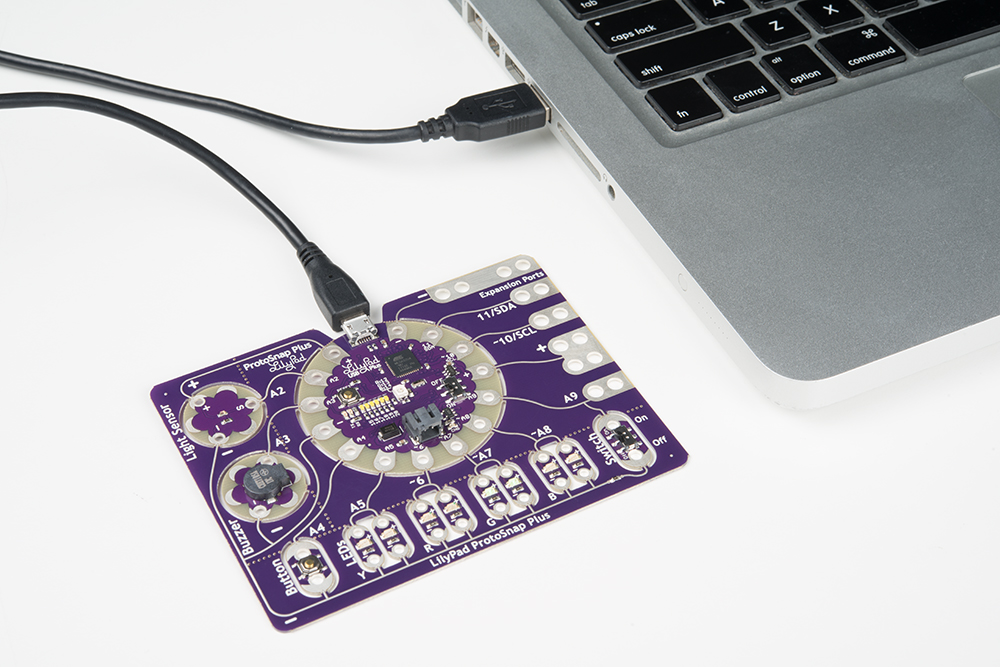
1. Connect the LilyPad ProtoSnap Plus to your computer using a USB cable
2. Select "LilyPad USB Plus" from Arduino's "Board" menu

1/22/2018 LilyPad ProtoSnap Plus Hookup Guide - learn.sparkfun.com
https://learn.sparkfun.com/tutorials/lilypad-protosnap-plus-hookup-guide?_ga=2.234157401.659504291.1516640116-204410570.1509632255 12/23
3. Select "LilyPad USB Plus" from Arduino's "Port" menu
Let’s go over the three steps in detail:
1. Connect the LilyPad ProtoSnap Plus to Your Computer
Place the LilyPad ProtoSnap Plus on a clean, non-metal work surface. Connect the LilyPad ProtoSnap Plus to a USB
port on your computer using a micro-B USB cable. The cable can only be inserted one way, and should snap in
securely.
Tip: Both the micro-B USB cable and the connector on the LilyPad have a subtle "D" shape to them. Match this
shape to plug it in properly.

1/22/2018 LilyPad ProtoSnap Plus Hookup Guide - learn.sparkfun.com
https://learn.sparkfun.com/tutorials/lilypad-protosnap-plus-hookup-guide?_ga=2.234157401.659504291.1516640116-204410570.1509632255 13/23
Slide the switch on the LilyPad USB Plus to the ON position. You will not be able to upload code to the board if it is
set to the OFF position.
2. Select LilyPad USB Plus from the Board Menu
If the Arduino board support was installed correctly, “LilyPad USB Plus” option will be available in
the Tools > Board list under the SparkFun AVR Boards group. Open the menu and select LilyPad USB Plus.
Depending on how many boards are already in the list, you may need to scroll down a bit to get to it. A dot (Windows)

1/22/2018 LilyPad ProtoSnap Plus Hookup Guide - learn.sparkfun.com
https://learn.sparkfun.com/tutorials/lilypad-protosnap-plus-hookup-guide?_ga=2.234157401.659504291.1516640116-204410570.1509632255 14/23
or check mark (Mac) will show next to the board in the menu when it is selected, and it will show next to Board in the
Tools menu.
IMPORTANT: You'll see some LilyPad entries higher in the Arduino menu, but the LilyPad USB Plus is not one
of them. You'll need to scroll down to the SparkFun section at the bottom of the list to find it. We're working on
getting the LilyPad USB Plus added to the LilyPad group in the future.
Troubleshooting: If you don't see "LilyPad USB Plus" in the board list, go back to Setting Up Arduino and
double check that you performed all the steps. You might try restarting Arduino as well.
3. Select LilyPad USB Plus from the Port Menu
Arduino needs to know which port your LilyPad USB Plus is attached to so it can program it. Whenever you plug a
USB device into your computer, your computer will assign it a port number. This used to be difficult to determine, but
this board has a handy feature that identifies itself. Go to the Tools > Port menu, and select the port that has “LilyPad
USB Plus” next to it.
On Windows ports are listed as COM##; on a Mac or Linux machine they will be “/dev/cu.usbmodem####”. Your
screen may look different than the image below, depending on what operating system you are using, but all should

1/22/2018 LilyPad ProtoSnap Plus Hookup Guide - learn.sparkfun.com
https://learn.sparkfun.com/tutorials/lilypad-protosnap-plus-hookup-guide?_ga=2.234157401.659504291.1516640116-204410570.1509632255 15/23
show LilyPad USB Plus next to the port address.
Troubleshooting: If you don't see a port with "LilyPad USB Plus" next to it, ensure that the board is powered up
(switch in the ON position), and that the USB cable is securely connected to both the board and your computer.
Some micro-USB cables are only meant for charging and don't pass data - they'll power the board, but it won't
show up in the port menu. If needed, try a different cable.
Uploading Code
To review, once you’ve:
1. Connected the LilyPad ProtoSnap Plus to your computer using a USB cable.
2. Selected the board type (“LilyPad USB Plus” NOT “LilyPad Arduino USB”).
3. Selected the COM port.
You are ready to upload code! Let’s upload some code to try it out:
Load the “Blink” example from the menu File > Examples > 01.Basics > Blink, and click the “Upload” button (the
large round button with the right arrow in it). This is a very simple example program; it just blinks a LED on and off
once per second.

1/22/2018 LilyPad ProtoSnap Plus Hookup Guide - learn.sparkfun.com
https://learn.sparkfun.com/tutorials/lilypad-protosnap-plus-hookup-guide?_ga=2.234157401.659504291.1516640116-204410570.1509632255 16/23
COPY CODE
Arduino will compile the code, then send it to the LilyPad USB Plus via the USB cable. While the code is uploading,
the built-in LED will blink to signal the code is transferring. When the code finally runs, the RGB LED at the center of
the board will slowly blink green. Success!
If this all works, congratulations! You’re all set up and ready to prototype with the LilyPad ProtoSnap Plus. Check out
our activity guide for more information on writing your own code to prototype for the ProtoSnap Plus:
Troubleshooting: Error
Messages on Upload?
If you are using a Mac and get an
error message like the following:
Board LilyPad U
SB Plus (platfo
rm avr, package SparkFun) i
s unknown
It is possible that old Arduino
versions left over after updates are
interfering with the LilyPad USB
Plus support installation. If you
want to clear out this old
information, follow these steps:
WARNING: The following
instructions will delete any
extensions you've previously
applied to Arduino, returning it
to its factory-default state. It
should not delete any sketches that you've created.
1. Open Arduino’s “Preferences” window.
2. At the bottom of the window will be a link to your preferences file. Click on it and it will open a finder window.
LilyPad ProtoSnap Plus Activity Guide
DECEMBER 7, 2017
Learn how to program in Arduino with the LilyPad ProtoSnap Plus. This guide
includes 10 example activities that use the pre-wired LilyPad boards on the
LilyPad ProtoSnap Plus.

1/22/2018 LilyPad ProtoSnap Plus Hookup Guide - learn.sparkfun.com
https://learn.sparkfun.com/tutorials/lilypad-protosnap-plus-hookup-guide?_ga=2.234157401.659504291.1516640116-204410570.1509632255 17/23
3. In the finder window, look for an “Arduino15” folder and delete it.
4. Now open a finder window and open your personal folder (the one with your login name and a house icon next
to it). Look for an “Arduino” folder (possibly in “Documents”). If the “Arduino” folder contains a “Hardware”
folder, delete it. Your Arduino installation is now clean. Restart Arduino and repeat the LilyPad installation
instructions from the previous page.
Stitching Into a Project
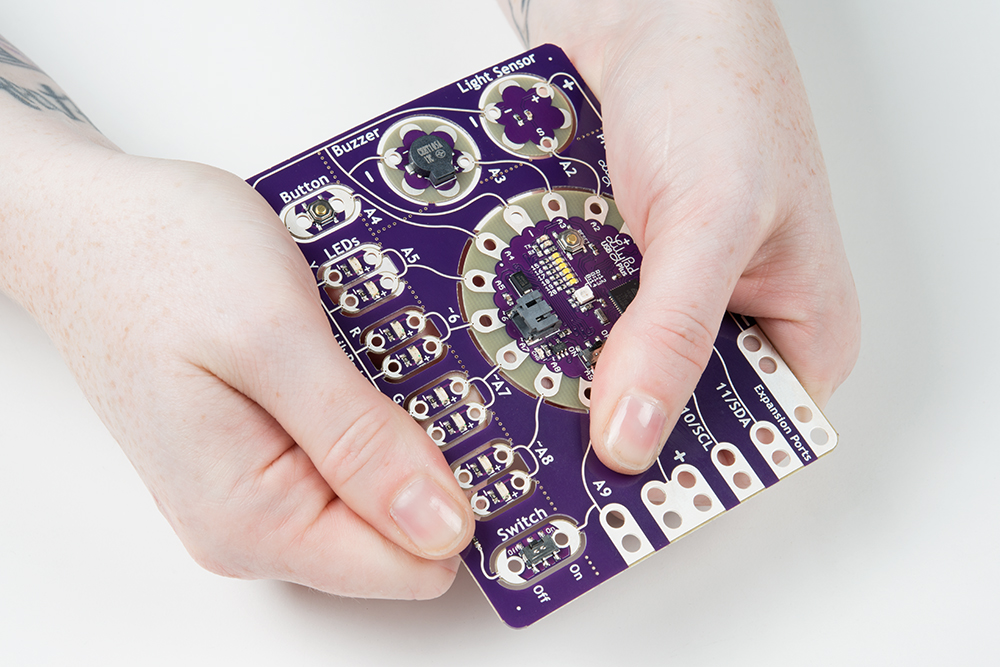
Once you are done exploring the parts of the ProtoSnap Plus and prototyping your code, you can snap along the
perforations on the board to remove the individual LilyPad pieces and build them into a project.
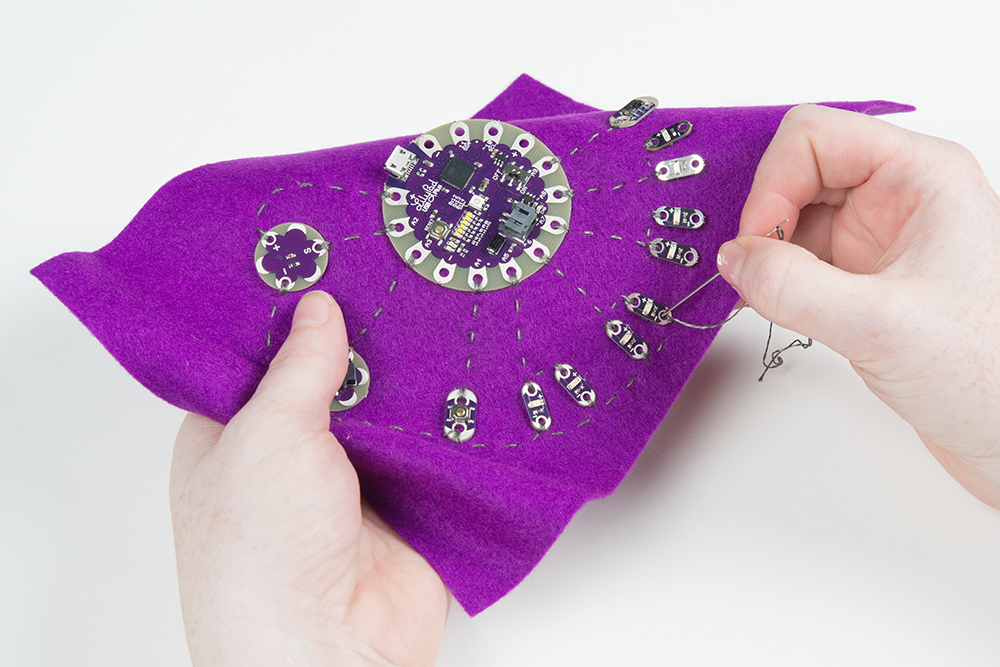
Carefully snap the pieces of the ProtoSnap apart to prepare for sewing. Use a set of pliers or diagonal cutters if you
are having trouble snapping the pieces apart. Discard the non-sewable pieces and scraps. The conductive pathways
on the ProtoSnap can then be recreated with conductive thread by stitching the components in your project.

1/22/2018 LilyPad ProtoSnap Plus Hookup Guide - learn.sparkfun.com
https://learn.sparkfun.com/tutorials/lilypad-protosnap-plus-hookup-guide?_ga=2.234157401.659504291.1516640116-204410570.1509632255 18/23
These tutorials will give you some tips and tricks for project construction and insulation:
Technical Notes
If you’ve already programmed
Arduino for a while, read on for
some additional notes about the
LilyPad ProtoSnap Plus. It’s very
similar to other Arduinos, but has
some special features and
limitations you’ll want to know
about.
Pin Numbering
Below is a list of the LilyPad USB
Plus I/O pins and each function.
Legend:
n = digital pin
~n = PWM-capable pin
An = analog-capable pin
(n) = internal pin (not connected to sew tab)
[n] = internal pin (available on an exposed via)
Function Digital Analog
RX_LED (0)
RX_LED/SS (1)
Light Sensor 2 A2
Insulation Techniques for e-
Textiles
Learn a few different ways to protect
your conductive thread and LilyPad
components in your next wearables
project.
LilyPad Basics: E-Sewing
Learn how to use conductive thread
with LilyPad components.

1/22/2018 LilyPad ProtoSnap Plus Hookup Guide - learn.sparkfun.com
https://learn.sparkfun.com/tutorials/lilypad-protosnap-plus-hookup-guide?_ga=2.234157401.659504291.1516640116-204410570.1509632255 19/23
Buzzer 3 A3
Button 4 A4
Yellow LED 5 A5
Red LED ~6
Green LED ~7 A7
Blue LED ~8 A8
Switch / Expansion Port 9 A9
Expansion Port / SCL ~10
Expansion Port / SDA 11
RGB LED - Red (~12)
RGB LED - Green (~13)
RGB LED - Blue (~14)
Bar Graph LED 0 (15)
Bar Graph LED 1 (16)
Bar Graph LED 2 (17)
Bar Graph LED 3 (18)
Bar Graph LED 4 (19)
Bar Graph LED 5 (20)
SCLK [21]
MOSI [22]
MISO [23]
Expansion Port A9 Notes
If you look closely at the ProtoSnap board, you’ll notice that sew tab A9 is shared between the switch and an
expansion port. Because of this, remember: if you’re using the A9 expansion port, ensure that the switch is
turned OFF to keep the input or output signal from shorting to ground.

1/22/2018 LilyPad ProtoSnap Plus Hookup Guide - learn.sparkfun.com
https://learn.sparkfun.com/tutorials/lilypad-protosnap-plus-hookup-guide?_ga=2.234157401.659504291.1516640116-204410570.1509632255 20/23
A hard short between power and ground could damage the board. But if you look even closer at the ProtoSnap, you’ll
see a tiny 1K surface-mount resistor in the ground trace connected to the switch. (On the back of the board you’ll see
a zig-zag resistor symbol in that spot.) This resistor prevents hard shorts from power to ground if the switch is ON and
you connect a voltage source to the expansion port (or output a HIGH signal from A9).
Using a Battery and Battery Charging
SparkFun sells a number of LiPo batteries compatible with this board. If you are new to the LilyPad system, we
recommend the E-Textiles Battery. If you’re supplying your own battery, use a single-cell (3.7V) LiPo battery with a
JST connector.
Batteries with larger capacities (measured as amp-hours or Ah) will run the board longer before needing recharging.
How long will depend on how many LEDs your program turns on, etc. If you’re just running a few LEDs, you can
expect the board to run about 5 hours for every 100mAh of battery capacity.
Charge Rate
To recharge an attached battery, plug the board into a USB power source. While the battery is charging, the “CHG”
LED will illuminate. When the battery is fully charged the LED will turn off. The default charge current is set to 100mA,
so a 100mAh battery will recharge in one hour, a 1000mAh battery in 10 hours, etc. Since the board is set to charge
at a rate of 100mA, we do not recommend connecting a lower capacity LiPo battery (i.e. 40mAh LiPo battery) to
charge.
Table of contents
Other Sparkfun Electronics Other manuals

Popular Other manuals by other brands


Mannington commercial
Mannington commercial Amtico installation guide

Gecko
Gecko AYERS ROCK Series owner's manual

FILTRON
FILTRON K 1332 Installation instruction

Katsumi
Katsumi ele-key EK-150 manual

Altec Lansing
Altec Lansing SIGNAL PROCESSING PROGRAMMABLE EQ MASTER... manual

Kaiser Baas
Kaiser Baas VR-X quick start guide