Spectravision PLA100-RGB User manual

Adagio
Your ADAGIO+ color Pool-light is an
advanced underwater luminaire with
high quality LEDs
Ultra thin LED lamp for Pool & Spa
OWNER’S MANUAL
Color
Cool white
Warm white
Blue

Table of contents
Technical specifications
Box contents
Installation instructions
Wiring instructions setup 1
Wiring instructions setup 2
Retrofit with PAR56 niche (only PLA170)
14 Color programs
Synchronizing & color changing: Classic ON/OFF control
Synchronizing & color changing: Intelligent PLC control
Troubleshooting
Page 3
Page 4
Page 5
Page 6-7
Page 8-9
Page 10
Page 11
Page 12
Page 13
Page 14

Technical specifications
Reference
PLA100-RGB
PLA170-RGB
PLA100-WH (-KAD)
PLA170-WH (-LC)
PLA100-WW
PLA170-WW (-LC)
PLA100-BL
PLA170-BL
Description
RGB color 100mm
RGB color 170mm
Sun White 100mm
Sun White 170mm
Warm white 100mm
Warm white 170mm
Blue fixed 100mm
Blue fixed 170mm
Voltage
9-13 V AC
9-13 V AC
9-13 V AC
9-13 V AC
9-13 V AC
9-13 V AC
9-13 V AC
9-13 V AC
Power
55 W
80 W
35 W
65 W
35W
65W
30W
60W
Nominal CCT
n.a.
n.a.
5650K
5650K
2700K
2700K
n.a.
n.a.
Electrical specifications Environmental specifications
For operation only with a safety isolation
transformer
Minimum input voltage: 9 VAC 50/60 Hz
(at lamp terminals)
Nominal input voltage: 12 VAC 50/60 Hz
(at lamp terminals)
Maximum input voltage: 13 VAC 50/60 Hz
(at lamp terminals)
Power factor: > 0,96
Maximum water temperature: +35°C
Lamps have to be kept out of ice zones
Ingress protection rate: IP68 (measured at 1m)
Adagio+ Pool lamps must be completely
submerged into water during operation.
Not doing so, will void warranty.
Page 3
Page 4
Page 5
Page 6-7
Page 8-9
Page 10
Page 11
Page 12
Page 13
Page 14
!
page 3 of 16

Box contents
11
2
3
5
(100mm models) (170mm models)
page 5
4
(only for 170mm models)
page 4 of 16

page 5
Installation instructions
STEP 1 STEP 2 STEP 3
PLEASE NOTE
.The face plate is sold separately
.The conduits/niches are sold
separately
.The electrical connection to the
lamp is not polarized.
Any of the two wires in the
supplied cable can be connected
to any terminal of the lamp.
PZA-WTM
PZA-WC
PZA100-XX-XX
PZA170-XX-XX
!
Warning: The back side of the lamp and the
driver tube have to be exposed to free flowing
water during operation. Fixing the lamps with ad-
hesives or silicone kit into a niche is not allowed
and will void the warranty.
page 5 of 16

Max cable length
4m cable included in lamp package
Separate cable (not included)
* Toroïdal transformer is preferred because of better eciency
Wiring instructions Setup 1
Each lamp is connected to the transformer by a separate cable (Preferred for new installations)
page 5
page 6 of 16

page 5
PLA100-WH (-KAD)
PLA100-WW 25m 45m 75m 110m 53
PLA100-BL
PLA170-WH (-LC)
PLA170-WW (-LC) 15m 25m 40m 60m 98
PLA170-BL
PLA100-RGB 15m 25m 40m 60m 87
PLA170-RGB 7m 12m 20m 30m 120
LAMP TYPE 1,5 mm2 2,5 mm2 4,0 mm2 6,0 mm2
VA
TRANSFORMER
12VAC *
MAX CABLE LENGTH BY CABLE SECTION
* The transformer VA rating must be greater or equal to the sum of VA ratings of all connected lamps.
These cable lenghts are calculated with worst case voltage drops in the electrical wiring.
page 7 of 16

Max cable length
All lamps are connected to the transformer via 1 cable
Wiring instructions Setup 2
4m cable included in lamp package
Separate cable (not included)
* Toroïdal transformer is preferred because of better eciency
page 8 of 16

1 45m 75m 110m 190m 53
2 20m 35m 50m 90m 106
3 15m 25m 35m 60m 159
4 10m 15m 25m 45m 212
LAMP TYPE 2,5 mm2 4,0 mm2 6,0 mm2 10,0 mm2
VA
TRANSFORMER
12VAC *
MAX CABLE LENGTH BY CABLE SECTION
QTY
LAMPS
PLA100-WH (-KAD)
PLA100-WW
PLA100-BL
1 25m 40m 60m 100m 98
2 10m 20m 30m 50m 196
3 5m 10m 20m 30m 294
4 5m 10m 15m 25m 392
PLA170-WH (-LC)
PLA170-WW (-LC)
PLA170-BL
1 25m 40m 60m 110m 87
2 12m 20m 30m 50m 174
3 7,5m 15m 20m 35m 261
4 5m 10m 15m 25m 348
1 12m 20m 30m 65m 120
2 7,5m 12,5m 20m 35m 240
3 5m 10m 15m 25m 360
4 / 7,5m 10m 15m 480
* The transformer VA rating must be greater or equal to the sum of VA ratings of all connected lamps.
These cable lenghts are calculated with worst case voltage drops in the electrical wiring.
PLA100-RGB
PLA170-RGB
page 9 of 16

RETROFITWITHPAR56NICHE(ONLYPLA170)
5
Silicone
tube
Ifoldcableisreused Ifnew(thinner)cableisused
OR
Retrofit with PAR56 niche (only PLA170)
RETROFITWITHPAR56NICHE(ONLYPLA170)
5
Silicone
tube
Ifoldcableisreused Ifnew(thinner)cableisused
OR
1
2
3
RETROFITWITHPAR56NICHE(ONLYPLA170)
5
Silicone
tube
Ifoldcableisreused Ifnew(thinner)cableisused
OR
page 10 of 16

14 Color programs (only for RGB lamps)
PROGRAM 1 to 7
7 fixed colours
.DEEP BLUE SEA
Saturated blue
.DAYLIGHT BLUE
Light blue
.SUNSET
Orange red
.LOVE IS IN THE AIR
Red
.FOREST PINK
Azur blue
.THINK PINK
Pink
.SUNSHINE
Yellow
PROGRAM 8 to 11
4 dynamic colors
.JUNGLE, BEACH
Saturated blue
Light blue, Azur blue
Mid blue, Light blue
(slowly changing)
.VOODOO
Red, Wine red
Purple, Bordeau
(slowly changing)
.DISCO
Lila, pink, peach,
light yellow,
light green, light blue
(quickly changing)
.PARTY
Blue, azure blue,
green, green/red,
red, red/blue, lila,
light pink, peach,
yellow, light green,
light blue, lila
(slowly changing)
PROGRAM 12 to 14
3 white tones
.SUN WHITE
Cool white
.NEUTRAL WHITE
Neutral white
.WARM WHITE
Warm white
1
2
3
4
5
6
7
8
9
10
11
12
13
14
Dimmable: only with
intelligently controlled
RGB lamps (see p.13)
page 11 of 16

Only in combination with the following devices:
PL-REM(-P), PL-REM-60, PL-REM-200
page 14
1. Switch ON the 12 VAC line voltage
and make sure that all lamps light
up. Each lamp can be in a dierent
program now.
2. Switch OFF the 12 VAC line voltage
and wait for at least 20 sec.
3. Switch ON the 12 VAC line voltage
and switch OFF
4. Switch ON the 12 VAC line voltage
and switch OFF
5. Switch ON the 12 VAC line voltage
and switch OFF
6. Switch ON the 12 VAC line voltage
7. The lamps should all be on the
“Deep Blue Sea”, program 1
showing fixed blue light.
Manual synchronization procedure
After synchronization all lamps will run
the same color program of choice.
To make synchronization possible,
all lamps should be connected to the
same power line.
(12 VAC)
Changing colors
• PL-REM(-P), PL-REM-60, PL-REM-200:
Push the color button on the remote
• Simple ON/OFF wall switch:
Turn switch OFF/ON a specific number of times
Synchronizing & color changing Option 1: Classic ON/OFF control
page 12 of 16
page 14
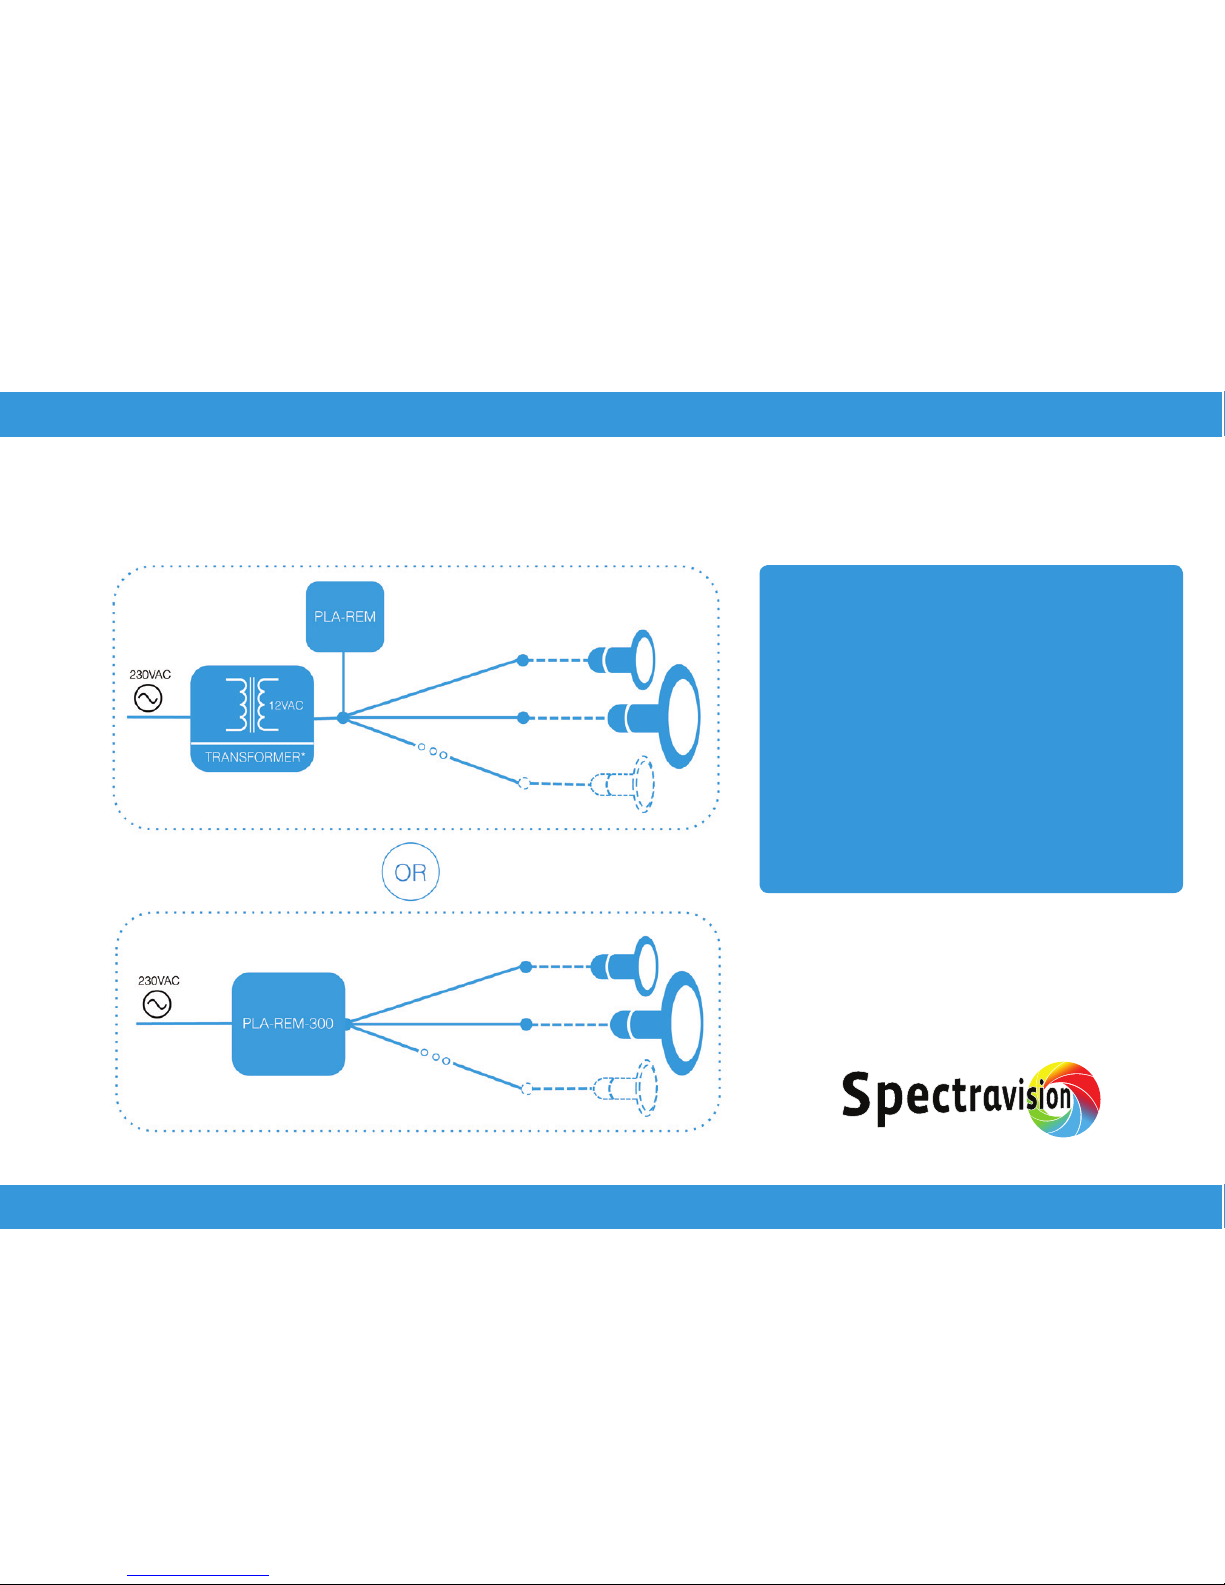
Only in combination with the following devices:
PLA-REM and PLA-REM-300
• When the intelligent PLA-REM
or PLA-REM-300 are used, the
RGB lamps are automatically
synchronized
• All the color programs and
white tones are dimmable
• When the PLA-REM or PLA-
REM-300 are connected to an
external interface (e.g. DMX
controller), each lamp can be
controlled individually!
Synchronizing & color changing
For more detailed information
about changing colors, or individual
pool light control, see manual
PLA-REM(-300)
Option 1: Classic ON/OFF control Option 2: Intelligent PLC control
page 13 of 16

Troubleshooting
PROBLEM SOLUTION
.The pool light is flickering
3. The voltage at the lamp should be at least 9VAC 50/60hz.
If the measured line voltage is below 9VAC:
.Several pool lights in the
pool show dierent
color programs
Make sure that all lamps are connected to the same 12VAC
power line. Execute the synchronization as explained on p.12
(only for classic ON/OFF control)
1. Switch the lamps ON
For RGB lamps: select the Sun White color program
2. Measure the voltage at the lamp terminals
A. Check the output voltage at the transformator terminals.
This voltage should be between 12VAC and 13VAC.
Verify that the used transformator VA rating is sucient
for powering all connected lamps
B. If the transformator output voltage is ok, then install a
thicker cable between the transformator and the lamp.
page 14 of 16

Merchtem, Belgium
page 15 of 16

Contact details
402-0017-140423
Propulsion Systems bvba
Dooren 72
1785 Merchtem, Belgium
Tel +32 2 461 02 53
Fax +32 2 706 59 60
www.propulsionsystems.be
page 16
We reserve the rights to change all or part of the contents of this document without prior notice
This manual suits for next models
12
Table of contents
Popular Work Light manuals by other brands


Vision & Control
Vision & Control SLF-100-IR850-P-24V Instructions for use

Konyks
Konyks Dallas Easy quick start

Alemlube
Alemlube 20066 Owner technical manual

Osram
Osram LEDinspect PRO FLOODER HELICOPTER 1000 quick start guide

Matco Tools
Matco Tools MWLHH300UV instruction manual

Smith Light
Smith Light Traveller operating instructions