Spectrum Technologies WatchDog 3000 Series User manual

1
WatchDog® 3000 Series Weather Stations
Product Manual
“To Measure Is To Know”“To Measure Is To Know”
info@specmeters.com www.specmeters.com 800 - 248 - 8873
Models 3580, 3550, 3540, 3250, 3240, 3230, 3220, 3210
2
This manual will familiarize you with the features and operaon of your new WatchDog Weather Staon. Please read this
manual thoroughly before launching the units.
For customer support or to place an order, call Spectrum Technologies, Inc. at 800-248-8873 or 815-436-4440, FAX at
815-436-4460, or e-mail at info@specmeters.com.
www.specmeters.com
Spectrum Technologies, Inc.
3600 Thayer Court
Aurora, IL 60504
INTRODUCTION
Thank you for purchasing a WatchDog 3000 Wireless Weather Staon. The 3000 Series Weather Staons are easy to
install and operate. The staon features internal modem/radio and integrated solar power. Connects via Bluetooth to
smartphones running the free WatchDog Mobile App. Use the app to congure the staon and check current condions.
The communicaon opons are Cellular Modem, Wi-Fi, Direct Connecon to PC, and USB ash drive. These opons allow
for automac upload of the data to a computer or the web for further analysis. Growers can monitor their crops on their
computer or smartphone and make real-me decisions that improve yield and quality, conserve resources, and increase
prots.
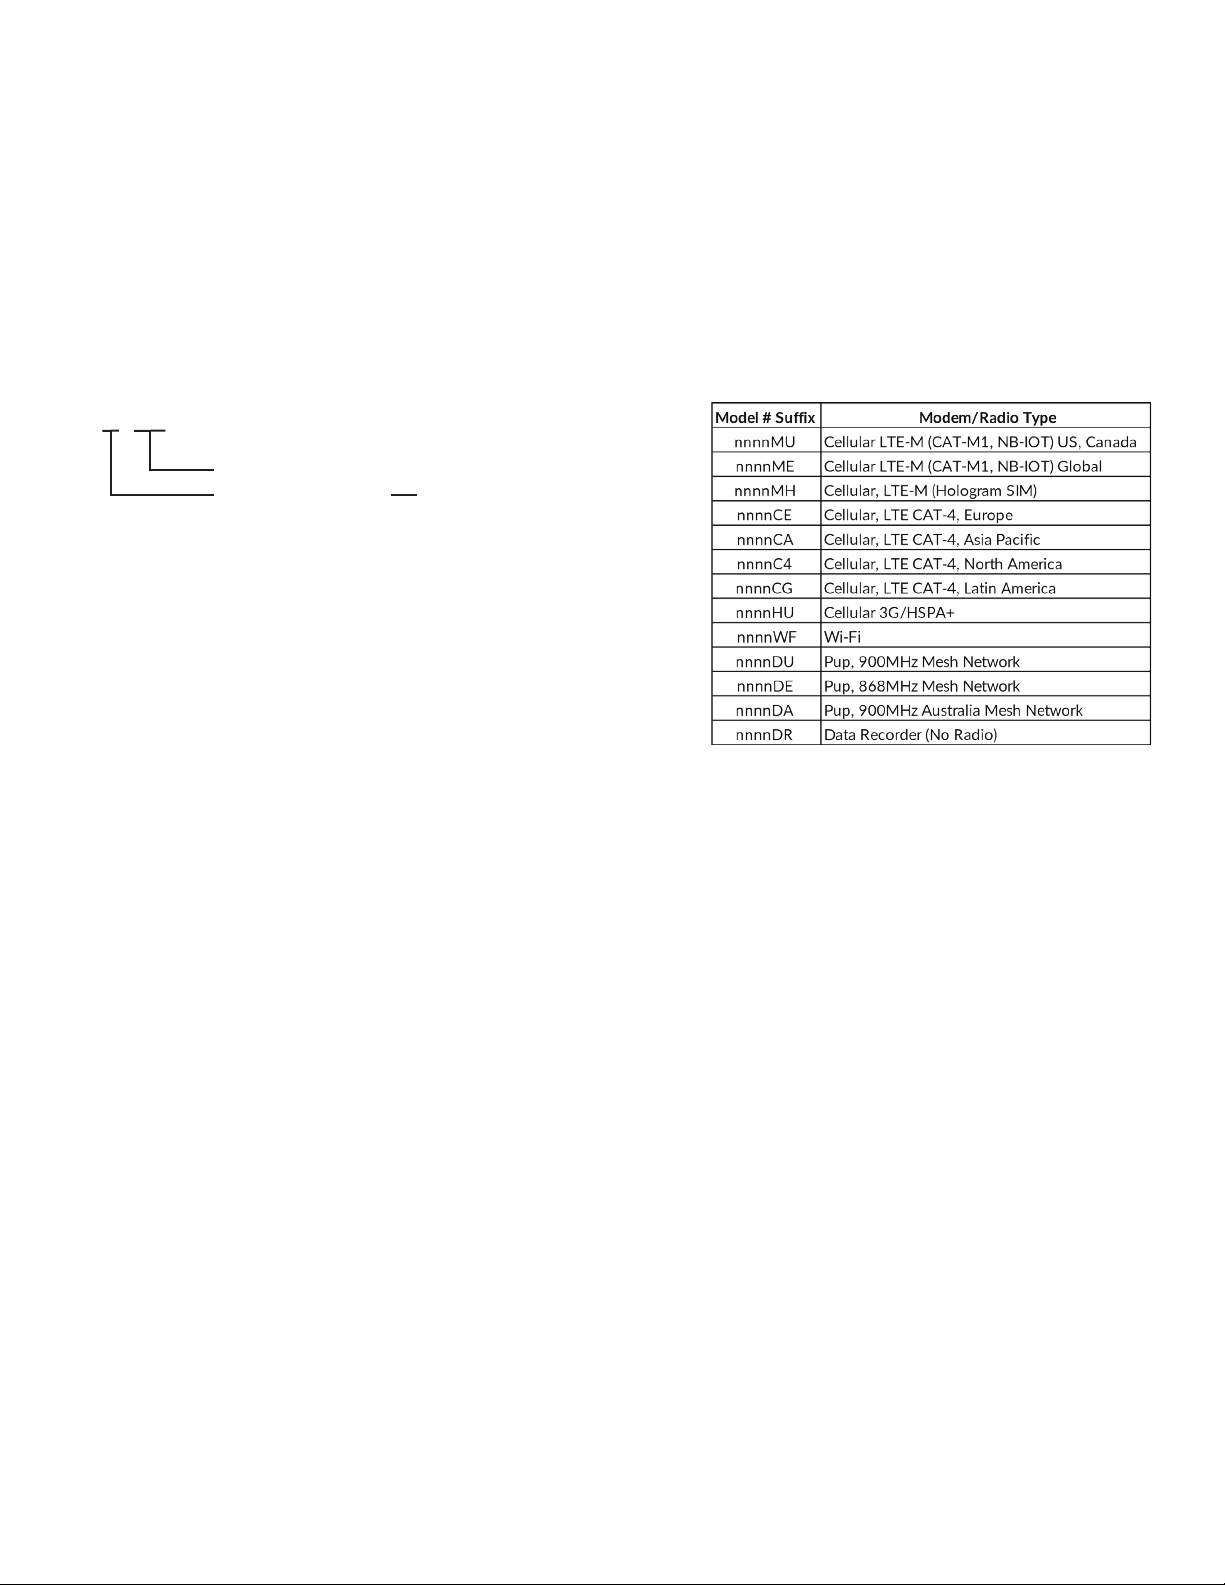
3n ss
*Sensor Package
10 Temperature/Relave Humidity
20 Temperature/Relave Humidity, Rain
30 Temperature/Relave Humidity, PAR Light
40 Temperature/Relave Humidity, Rain, Wind
50 Temperature/Relave Humidity, Rain, Wind, Solar Radiaon
80 No Sensors Included, Ports Only
Sensor Package*
Sensor Ports Group
TABLE OF CONTENTS
Installaon...............................................................................
Preparaon..............................................................
Assembly..................................................................
Inial Power-Up......................................................
Winterizing..............................................................
Conguraon..........................................................................
WatchDog Mobile using Bluetooth....................
Device Key...............................................................
Set North for the Wind Vane...............................
Connecng to a WiFi Network...........................
Connecng to a Retriever & Pup Network.......
SpecConnect...........................................................
Live Readings...........................................................
Manual Data Upload.............................................. 7
Current Condions.................................................
WatchDog Mobile App...........................
SpecConnect.............................................
Downloading Data to a Flash Drive....................
Imporng Data into SpecWare.............................
Status LED Meaning...............................................
Using the SELECT Buon......................................
Addional Sensors..................................................
Rain Collector Adjustment....................................
Specicaons...........................................................
Warranty...................................................................
UKCA & CE Declaraons of Conformity...........
3-4
3
3
4
4
4-5
4-5
5
5
6
6
6
7
8-9
8-9
8-9
9
9
10
11
12
13
14
14
15-18
3000 SERIES MODEL NUMBERS 3000 SERIES ITEM NUMBERS
2: Two general sensor ports
5: Six general sensor ports

3
INSTALLATION
PREPARATION
The weather staon should be located in an open, unobstructed, grassy area to ensure accurate measurement of wind,
rainfall, sunlight, and evapotranspiraon.
Mounng hardware is provided to aach the weather staon to a mast/pole with a 1.25" to 1.66" (32mm to 42mm) outside
diameter and a wall thickness of at least 0.13" (3.3mm). The mounng pole should be securely anchored perpendicular to
the ground.
For mounng at an approximately 6' (1.8m) height, a 1.5" (40mm) OD or larger pole should be used for any staon with a
rainfall sensor. If that size is not available, then the staon should be mounted on a tripod, such as Spectrum
Technologies item #3396TPS. Mounng the staon at a greater height requires both the 1.5" (40mm) OD or larger pole and
guy wires to keep the staon from swaying in the wind.
If you are using the mounng tripod, open it and place it where the weather staon is to be located. The tripod feet can
also serve as mounng brackets if the unit is located on a solid surface. Slide the 3’ post through both center screw clamps,
adjust the height as desired and ghten the screws so that the post is perpendicular to the ground.
ASSEMBLY
Tools Required: 1/2" (13mm) wrench
#2 Phillips screwdriver
The majority of the assembly of each 3000 Series Wireless Staon is completed prior to shipment. Some parts are not
aached to protect them from damage in shipping. The nal assembly can be done either at the installaon site or on a
table for convenience.
If nal assembly is being done at the installaon site, mount the staon to the pole with the provided U-bolts. Use a 1/2"
(13mm) wrench to ghten the nuts. Face the solar panel south in the Northern Hemisphere or north in the Southern
Hemisphere.
1. For all models except 3nssDR - Aach the antenna to the top of the bracket by twisng it into the connector. Connect
the antenna (nger ght) so it does not unscrew. If you have a Temp Alert Staon, go to step 5.
2. For Weather and ET Staons (3n50, 3n40) - Aach the anemometer arm to the front of the
bracket using the provided screws. The arm should extend parallel to the bracket. Aach the
wind cups and wind vane using the included allen wrench.
3. For ET and Plant Growth Staons (3n50, 3n30) - Slightly loosen the le screw and remove
the right screw from the Light Sensor bracket. Rotate the sensor into posion and replace the
right screw.
4. For ET, Weather and Rain Staons - (3n50, 3n40, 3n20c) - Open
the Bird Guard packaging and follow the included instrucons.
Current Condions.................................................
WatchDog Mobile App...........................
SpecConnect.............................................
Downloading Data to a Flash Drive....................
Imporng Data into SpecWare.............................
Status LED Meaning...............................................
Using the SELECT Buon......................................
Addional Sensors..................................................
Rain Collector Adjustment....................................
Specicaons...........................................................
Warranty...................................................................
UKCA & CE Declaraons of Conformity...........

4
5. Unlatch the enclosure latches and open the front door of the enclosure. The sensor connecon requirements are as
follows:
· Temperature/RH: already connected to port labeled “Temp/RH”on all models except 3580.
· Rain: Already connected to port labeled “Rain” on ET, Weather and Rain Staons.
· Wind: For ET and Weather Staons (3n50, 3n40), connect the cable from the anemometer into port labeled Wind.
· Solar Radiaon Sensor: for ET Weather Staons (3n50), connect the cable from the sensor to Port D.
· PAR Light Sensor: for Plant Growth Staons (3n30), connect the cable from the sensor to Port D.
· Oponal External Sensors: if any were purchased, connect each to an available port.
6. Conrm that all sensor cable connectors are securely pushed into their sockets.
7. If not already installed onsite, mount the staon to the pole with the provided U-bolts. Use a 1/2" (13mm) wrench to
ghten the nuts. Face the solar panel south in the Northern Hemisphere or north in the Southern Hemisphere.
INITIAL POWER-UP
1. Open the door and slide the power switch to the “ON” posion.
2. Monitor the LED. You should see the following signals. The LED will be o for several seconds between these.
a. Long Green to indicate startup is occurring.
b. Fast Green/Amber/Red to indicate startup is complete.
c. Short Amber ash when inial data is sent to SpecConnect.*
d. Short Green ash indicang the transmission was successful, or a short Red ash to indicate that it failed.*
*Steps c and d do not apply to Pups (models DE, DU, and DA) and data recorders (model DR).
3. Congure the device with one of the two opons: Bluetooth with the WatchDog Mobile app on a smartphone (see
below) or SpecConnect (non DR models) with computer (see pages 6-7). Please note that for the Weather and ET
Staons, the Wind Vane can only be congured (to idenfy “North”) using WatchDog Mobile.
WINTERIZING
WARNING
If you are removing the staon at the end of the growing season and storing it unl spring, be sure to open the door and
slide the power switch to the “OFF” posion. This will preserve the baery unl you need it again. Leaving the staon
powered on without providing sunlight will discharge the baery completely and destroy at least half of its charging
capacity.
CONFIGURATION
WATCHDOG MOBILE (BLUETOOTH)
1. Download the free WatchDog Mobile app from the app store (Apple or Google Play) to your phone. If it is already
installed, check that you have the latest version.
2. Turn on the staon’s Bluetooth radio by pressing and holding the “Select” buon unl the Status LED lights (less than 1
second). The LED will repeatedly ash once/second unl it connects to a smartphone. The ash will be green if the
baery level is 80% or above, amber if it is below 80%, and red if it is below 40%.
3. Aer opening the WatchDog Mobile app, there are two ways to connect to the
staon via Bluetooth.
Note: Many Android phones require Locaon to be acvated to use Bluetooth.
a. If you are not sending data to SpecConnect, simply press the “Bluetooth” buon.
The app will display the Bluetooth Devices screen.

5
b. If you will be sending data to SpecConnect, press the “Login” buon and enter your SpecConnect login credenals. The
app will display the Equipment Status screen. Tap the menu buon (3 parallel lines) in the top le corner and select
“BLUETOOTH” from the list of opons. The app will display the Bluetooth Devices screen.
4. In the Bluetooth Devices screen, tap “Start Scan” and select the staon’s serial number from the list of found devices.
5. Tap on the sengs (gear-shaped) icon. This will display the conguraon page.
6. Tap the “General” tab located on the top le of the screen.
7. Set Latude and Longitude by tapping the “Use My Locaon” buon. Alternavely,
the “Locate on Map” buon can also be used for seng Latude and Longitude.
8. a. Set the Time Zone using the drop-down menu at the boom of the screen.
b. For the 3000 Pup Staons, “Upload Interval” and “Time Zone” are replaced with
“Radio Channel”. Set it to the channel used by your Retriever (it defaults to 0).
9. If addional sensors are connected to an external ports, congure them by tapping
the “Ports” tab at the top of the page.
10. Once complete, tap the Save icon in the top right corner. For cellular and WiFi
versions, changes will appear in SpecConnect within 5 minutes.
DEVICE KEY
Note: To protect the Series 3000 staon sengs from being modied by other app
users with Bluetooth access, you can set a device (write) key, by tapping the Edit
Device Key buon on the conguraon page. This key can be shared with other
privileged users to make changes on the device aer they have saved the key within
their app (Save Device Key). Aempng to change sengs on a device without the
correct key will generate a “Permission Denied” error.
SET NORTH FOR THE WIND VANE
The Wind Vane on the Weather and ET Staons senses where it is poinng with respect to the anemometer arm, not the
Earth. You must use the WatchDog Mobile app to congure the staon to “know” which way is North.
1. If you congured your staon using SpecConnect, please follow all the
instrucons on Page 4 to use the WatchDog Mobile app with Bluetooth
connecvity.
2. Tap the “Other” tab located on the top right of the Conguraon page.
3. Tap the “Set North” buon.
4. Point the wind vane in the north direcon. When the “Are you ready?” prompt
appears, tap “Yes”.
5. You should see “Success—North Set”. Tap OK, then tap the Save icon in the top
right corner.

6
CONNECTING TO A WIFI NETWORK
In order to connect your staon to a WiFi network you will need the network’s Access Point name (SSID) and its passphrase
(password).
1. If the staon is not already connected to your phone, follow the instrucons on Page 4 to use the WatchDog Mobile app
with Bluetooth connecvity.
2. Tap the “Other” tab located on the top right of the conguraon screen.
3. Tap the “WiFi Sengs” buon.
4. Enter the SSID and the Pass Phrase. Tap the “Save WiFi Sengs” buon. Then tap the “X” in the
upper le corner to exit conguraon and display the “Bluetooth Devices” screen.
5. To conrm your connecon, tap the serial number, then the “thermometer”icon to get current
condions (see Live Readings Page 7).
6. Tap the icon in the upper right and wait up to 60 seconds for the current condions to display with
the “Time Since Last Upload” changed to “0 minutes”.
CONNECTING TO A RETRIEVER & PUP NETWORK
If you are seng up a new network, please see the “WatchDog Retriever & Pup Product Manual” for instrucons for
conguring the Retriever. The Retriever should be running the latest rmware version. Once the Retriever has been
congured, and the wireless network created, a nnnnDU, nnnnDE, or nnnnDA Pup Staon can be added to the network
using the following steps.
1. Change the Radio Channel to the one set in the Retriever. Tap the Save icon.
2. If the network’s Retriever is not already in Setup mode (LED ashing
AMBER connuously), press and hold its buon for 2 seconds.
3. With the 3000 Pup Staon at its desired locaon, press and hold its
SELECT buon for 6 to 9 seconds. The LED will display the signal strength.
If the LED is RED or AMBER, move the staon, use an antenna extension,
or add a Repeater.
4. Aer the last Pup is deployed, return to the Retriever and hold the buon
for 2 seconds to enter Acve mode (the LEDs will stop ashing amber).
This saves baery life.
NOTE: If the 3000 Pup Staon is part of a Retriever and Pup network that uses SpecWare (instead of SpecConnect) to
store and analyze data, SpecWare 10 is required to process data from the Retriever.
.

7
SPECCONNECT
1. Open a web browser and navigate to www.specconnect.net. Log in with credenals.
2. Click on the “Equipment” tab on the le side of the screen.
3. Navigate to the device on the equipment page and click the “Congure” buon.
4. Set the me zone (except for Pup Staons).
5. Congure any addional sensors connected to an external port.
6. Make any other desired changes including staon or sensor name.
7. Once complete, click the save buon in the boom le corner.
8. The device setup is almost complete. If applicable, the wind vane
must be calibrated for North. This must be done at the installaon
site using a Bluetooth connecon to the WatchDog Mobile app on a
smartphone (see page 5).
LIVE READINGS
While connected via Bluetooth to the staon, the WatchDog Mobile App allows
you to check the values the sensors are currently reading.
Tap the thermometer icon. This will display the Current
Condions screen. In addion to the sensor readings, it will
also display the staon serial number and the current date
and me. A countdown clock indicates when the reading will be refreshed.
MANUAL DATA UPLOAD
From this screen it is possible to manually perform a data upload. This data will
be in addion to the regularly scheduled uploads. This is also a way to conrm
the staon has a good connecon to the web. Iniate the upload by tapping the
Cloud buon in the upper right corner. If a good connecon exists, the me
since last upload will be refreshed to 0 minutes.

8
CURRENT CONDITIONS
The condions of the staon from the last data upload can be viewed in the
WatchDog Mobile App or in SpecConnect. This does not require a Bluetooth
connecon, but you must have a SpecConnect account to see Current
Condions in the App.
WatchDog Mobile App
1. Select a staon from the Equipment Status screen.
Select the thermometer shaped icon from the opons that are displayed.
2. The Current Condions screen will be displayed. In addion to the sensor readings, it will also display the staon serial
number and the date and me of the last data upload. Tapping on one of the parameters will bring up a graph of that
parameter for the last 24 hours. Pressing and holding your nger on the graph will enable the trackball feature which
allows you to view the exact value of the data point for a given date and me.
3. If the star icon next to any of the parameters on the current condions screen is colored yellow,
that parameter will appear in the WatchDog App’s Favorites secon. Tapping the star will add or
remove the parameter from the Favorites.
Note: Selecng the gear icon will bring up a conguraon
screen. Selecng the magnifying glass icon will
display the staon’s communicaon as it is recorded
in SpecConnect.

9
SPECCONNECT
1. From the SpecConnect Equipment page, you will see a list of weather staons. Tapping on the staon will bring up a
dashboard with the current condions.
2. A graph of the previous 24 hours of data appears below the dashboard. Floang your cursor over the chart will enable
the trackball feature which allows you to view the exact value of the data point for a given date and me.
DOWNLOADING DATA TO A FLASH DRIVE
Logged data can be collected from a WatchDog 3000 staon using a USB ash drive. The data will be stored in a le named
ssssssss.WD3, where “ssssssss” is the staon’s serial number. Note that if there is a previous le by that name on the ash
drive, the new data will be appended to the exisng data le. The le must be imported into SpecWare Pro (version 9.71 or
above) to convert it into an “.swd” text le that can be read by Excel.
Open the door and insert the ash drive in the USB port.
Downloading without a smartphone:
1. Press and hold the “Select” buon. The Status LED will light green. When it changes to amber, release the buon.
2. The Status LED will return to green while the download is occurring. Three green ashes will indicate the download was
successful; three red will indicate a problem [probably either a formang error (it should be FAT32) or the drive is full].
3. Remove the drive and close and latch the door.
Downloading using the WatchDog Mobile smartphone app:
1. Follow the instrucons on Page 4 through step 5 to use the WatchDog Mobile app with Bluetooth connecvity.
2. Tap the “USB Drive” icon to take you to the “Save to USB Drive” page.
3. Tap the “Save New Records to USB Drive” buon to only download data logged since you last downloaded. Tap the
“Save All Records to USB Drive” buon to download all logged data on the staon.
4. The Status LED will turn to green while the download is occurring. Three green ashes will indicate the download was
successful; three red will indicate a problem [probably either a formang error (it should be FAT32) or the drive is full].
5. Remove the drive and close and latch the door.

10
IMPORTING DATA INTO SPECWARE
Data downloaded to a USB ash drive (see Page 9) can be imported into SpecWare soware. Insert the ash drive contain-
ing the data into an available USB Port then follow the instrucons below.
Selecng the data le using SpecWare 10
a. Click on the “WatchDog 3000 Data Import” buon (see image to the right)
b. Open the File menu and select the Imports opon. Click the “Import WatchDog 3000 les” opon. Selecng the data le
using SpecWare 10
1. Click the Equipment buon in upper le corner of the screen to bring up the
“Equipment and Imports” screen.
2. Click the 3000 Series buon. This will bring up the Download buons.
3. Click the Download USB Sck File buon in the lower le poron of the
screen.
Saving the data to your PC
1. In the Open dialog box, navigate to your USB drive and select the le to be imported.
This will bring up the “Save Logger Data” (SpecWare 9) or “Save Data” (SpecWare 10)
window. If you have imported data from the staon already, select the Logger
Locaon where the data should be saved and click the Save buon. If this is the rst
me imporng data from this staon, or if you would like to import the data to a
dierent locaon, that new locaon must be named. The default Logger Locaon will
be named “WatchDog Wireless Staon”. Click the Create Locaon buon to bring up
a eld for typing in a dierent Logger Locaon name. The data will be saved as an
.SWD le compable with SpecWare soware.
2. Click the Save buon.
3. The “Import WatchDog 3000 Data” screen will appear.
a. Clicking the OK buon will clear the data le from the drive.
b. Clicking the Cancel buon will retain the le on the drive.
Note that if the le is retained, the next download to the drive
will add the new data to the end of the les. Over me, this
will slow the SpecWare import process signicantly as all the
old records will be processed again and then deleted as duplicates.
SpecWare 9 SpecWare 10

11
STATUS LED MEANINGS
Depending on the current state of the staon, the STATUS LED conveys dierent informaon. Except as noted below, the
LED color indicates the baery status.
· GREEN = 81 - 100%
· AMBER = 41 - 80%
· RED = 0 - 40%
When connecng or connected via Bluetooth to a smartphone running WatchDog Mobile:
· Quick ash, once per second: Bluetooth is acve, but it is not connected to a smartphone.
· On for 1 second, o for four seconds: Connected to the smartphone.
During normal processing with a modem, WiFi, or Pup connecon:
· Quick AMBER ash: Start of record upload process.
· Quick GREEN ash: Upload successful.
· Quick RED ash: Upload failed or other communicaon issue.
During Power-up (turning the ON/OFF switch ON):
· Connuous RED: Fatal rmware error. Update rmware with USB drive. Refer to rmware download page:
www.specmeters.com/rmware
USING THE SELECT BUTTON
Short (under 2 second) press (LED turns GREEN):
Turns Bluetooth on.
2 to 6 second press (LED turns AMBER):
Export Logged Data
· Save all records in staon ash memory to a plugged-in USB drive. Time varies by the volume of data stored on the staon
and the USB ash drive used, generally under one minute.
· 5 rapid Green ashes indicate success; 5 rapid RED ashes indicate failure.
· Bluetooth is turned on.
6 to 9 second press (LED turns RED):
Connecon Status
· If the buon is released while the LED is RED, cellular, WiFi, and Staon Pup units test the modem or radio signal strength.
GREEN for 3 seconds if good, AMBER for OK, and RED for poor or no signal.
· For WiFi and Cellular models, the staon will aempt to upload to SpecConnect.
Over 9 second press (LED turns o):
Bluetooth rmware update
· Aer the buon is held for over 9 seconds, the LED turns o. When the buon is released, the Bluetooth rmware le will
be loaded from the USB drive and the Bluetooth update process will begin. If the rmware is successfully loaded from the
USB, the LED will perform 5 rapid GREEN ashes, RED for failure. The actual update process takes about 30 seconds.
When complete there will be 5 rapid LED ashes, GREEN for success and RED for failure. If successful, Bluetooth is
turned on.
Clearing all records from ash memory:
· With the ON/OFF switch set to OFF, press and hold the SELECT buon while seng the switch to ON.
· The LED will turn RED.
· Connue holding the buon for at least three seconds.
· LED will remain RED unl all records are deleted.

12
ADDITIONAL SENSORS
The WatchDog 3000 Wireless Staons have addional sensor ports for sensor input. The following table lists some of the
available oponal sensors. See www.specmeters.com for a complete list. Most sensors include a 6' cable with
pin-type connector. Items 3667-20, 6460-20, 6470-20 and 6450WD20 have 20' cables.

13
RAIN COLLECTOR ADJUSTMENT
If rain collector is not reading correctly (or at all):
1. Check the inside of the rain bucket for debris such as leaves that may be blocking the grid at the boom of the bucket.
Remove the rain bucket from the base by loosening the four screws, rotang the bucket slightly counter-wise, and liing
it o. Check for any obstrucons (spider webs, debris, etc.) that may be prevenng the pping spoon from moving freely.
If the hole beneath the grid gets clogged with dirt, the coer key can temporarily be removed to allow it to be cleared.
2. Using the WatchDog Mobile app, connect to the staon via Bluetooth using steps 1 through 5 of the instrucons on
page 7. Then tap the current condions (thermometer) icon.
3. Note the current rainfall value. Manually move the pping spoon back and forth several mes. Wait up to 20 seconds for
the rainfall value to change. Check that these ps have been recorded. Do this several mes.
4. If the ps are being counted, skip to step 6.
5. If the app is not showing any or all of the manual ps of the spoon, it may be that the magnec sensor on the pping
spoon is too far from the read switch or that the sensor cable is bad. There are two cams holding the axle of the pping
spoon that can be rotated to move the pping spoon closer to or further away from the read switch. Make this
adjustment and repeat step 3. If the app shows that the staon recorded the manual ps of the spoon, proceed to step
6. If not, the sensor may need to be sent in for service.
7. If all the ps are being counted, replace the rain bucket and trickle a known amount of water into the bucket. 84 ml of
water should register 0.1" (2.5 mm) of water. This is equivalent to 10 ps of the pping spoon. The best results
are aained when the water is added slowly. It is recommended that the water be put in a ziplock bag which is then
punctured with a pin to allow the water to slowly enter the rain bucket.
8. If the reading is slightly high or slightly low, the sensor can be calibrated. When the spoon ps, it lands on screws on
either side. If sensor is reading high, lower the screws. If it is reading low, raise the screws. It is recommended to adjust
the screws a quarter turn and again run a known amount of water through the bucket to determine if addional
adjustment is necessary.
9. If the rain collector is reading very high or recording rainfall amounts when there is no rain, it may be that wind is
shaking the staon and causing the pping spoon to move.

14
SPECIFICATIONS
WARRANTY
This product is warranted to be free from defects in material or workmanship for one year from the date of purchase.
During the warranty period Spectrum will, at its opon, either repair or replace products that prove to be defecve. This
warranty does not cover damage due to improper installaon or use, lightning, negligence, accident, or unauthorized
modicaons, or to incidental or consequenal damages beyond the Spectrum product. Before returning a failed unit, you
must obtain a Returned Materials Authorizaon (RMA) from Spectrum. Spectrum is not responsible for any package that is
returned without a valid RMA number or for the loss of the package by any shipping company.

15

16

17

18
Spectrum and WatchDog are registered trademarks of Spectrum Technologies, Inc.
3600 Thayer Court
Aurora, IL 60504
800.248.8873
www.specmeters.com
Form 108 (22-114) Rev. E 1/2023
This manual suits for next models
8
Table of contents
Other Spectrum Technologies Weather Station manuals

Spectrum Technologies
Spectrum Technologies WatchDog 2900ET User manual

Spectrum Technologies
Spectrum Technologies WatchDog 3500 User manual

Spectrum Technologies
Spectrum Technologies WatchDog 2400 User manual

Spectrum Technologies
Spectrum Technologies WatchDog Retriever User manual

Spectrum Technologies
Spectrum Technologies WatchDog 2000 User manual

Spectrum Technologies
Spectrum Technologies WatchDog 2000 Series User manual

Spectrum Technologies
Spectrum Technologies WatchDog 2000 Series Service manual


