Speech Technology Center STC-H476 User manual

User Guide
GNOME 7.0
Portable Digital
Stereo Voice Recorder
STC-H476
Operation manual

The manufacturer retains the right to make amendments to this manual in connection with improve-
ments made to Gnome design without special notification.
Any such amendments will be published in a new edition of the Gnome manual and on the compa-
ny’s website: http://www.speechpro.com.
We welcome your feedback, questions and concerns regarding Gnome.
If you have any questions concerning the use of this product, please contact Speech Technology Cen-
ter’s technical support service or your regional dealer.
For technical support:
St. Petersburg
Phone +7(812) 325-8848
Fax: +7(812) 327-9297
http://speechpro.com/support_form
Moscow
Phone: +7(495) 669-7440
Fax: +7(495) 661-7444
Help us assist you by having the following information ready:
– Product name and model/version number;
– Problem description;
– Computer configuration;
– Operating system name/version number.

CONTENTS
CONTENTS
INTRODUCTION............................................................................................................................................... 4
GENERAL INFORMATION .............................................................................................................................. 5
ALLOCATION .......................................................................................................................................................................5
ABOUT THE PRODUCT ......................................................................................................................................................5
SPECIFICATION ................................................................................................................................................ 6
CAPABILITIES .................................................................................................................................................... 7
GENERAL...............................................................................................................................................................................7
CONTROL AND DISPLAY FUNCTIONS...........................................................................................................................7
VOICE RECORDER FUNCTIONS........................................................................................................................................8
VOICE RECORDER CONTROL SOFTWARE FUNCTIONS..............................................................................................9
RECORDING DURATION....................................................................................................................................................9
GETTING STARTED ........................................................................................................................................10
INSERTING MEMORY CARD........................................................................................................................................... 10
INSERTING THE BATTERY ...............................................................................................................................................10
CONNECTING THE RECORDER TO EXTERNAL DEVICES .........................................................................................11
CONTROLS ......................................................................................................................................................12
SWITCHING ON AND OFF...........................................................................................................................13
SWITCHING THE VOICE RECORDER ON .....................................................................................................................13
SWITCHING THE VOICE RECORDER OFF .................................................................................................................... 13
RECOMMENDATIONS FOR BATTERY USE..................................................................................................................13
BATTERY TRAINING .........................................................................................................................................................13
LOCKING AND UNLOCKING THE RECORDER........................................................................................14
LOCKING THE RECORDER.............................................................................................................................................. 14
UNLOCKING THE RECORDER........................................................................................................................................14
DISPLAY STATUS INDICATORS ..................................................................................................................15
DISPLAY VIEW WHEN RECORDER IS ON ....................................................................................................................15
1st SCREEN LINE................................................................................................................................................................16
2nd SCREEN LINE............................................................................................................................................................... 17
3rd-4th SCREEN LINES .......................................................................................................................................................17
5th SCREEN LINE................................................................................................................................................................17
6th-8th SCREEN LINES .......................................................................................................................................................18
9th SCREEN LINE................................................................................................................................................................18
10th SCREEN LINE .............................................................................................................................................................18
11th SCREEN LINE .............................................................................................................................................................19
SIGNAL LEVEL INDICATOR.............................................................................................................................................19
FACTORY DEFAULTS.......................................................................................................................................................19

CONTENTS
RECORDING ....................................................................................................................................................20
FILE NAMES.....................................................................................................................................................21
ADJUSTING RECORDING PARAMETERS..................................................................................................23
TIMERS..............................................................................................................................................................27
LOOP.................................................................................................................................................................32
VOICE ACTIVITY..............................................................................................................................................34
MEMORY..........................................................................................................................................................37
PIN-CODE ........................................................................................................................................................39
DATE AND TIME.............................................................................................................................................42
MISCELLANEOUS...........................................................................................................................................44
PLAYBACK .......................................................................................................................................................49
DELETING FILES .............................................................................................................................................54
GETTING INFORMATION ABOUT THE VOICE RECORDER...................................................................55
ACCUMULATOR CHARGING......................................................................................................................56
USB-MICROPHONE MODE..........................................................................................................................57
VOICE RECORDER MANAGER ....................................................................................................................58
INSTALLING THE MANAGER..........................................................................................................................................58
LAUNCHING THE MANAGER ........................................................................................................................................60
VOICE RECORDER MANAGER ....................................................................................................................61
MAIN WINDOW................................................................................................................................................................ 61
SETTING UP RECORDING OPTIONS.............................................................................................................................63
DATE AND TIME SETUP.................................................................................................................................................. 66
TIMER SETUP.....................................................................................................................................................................67
PIN CODE AND USB HASP SECURITY HARDWARE..................................................................................................68
INTERNAL PROGRAM UPDATE.....................................................................................................................................69
FILE MANAGER WINDOW..............................................................................................................................................70
CONVERTING TO MP3 FORMAT................................................................................................................................... 71
FILE SIGNATURE...............................................................................................................................................................73
DIGITAL SIGNATURE VERIFICATION ............................................................................................................................ 74
FILE INTEGRITY CHECK ...................................................................................................................................................76
PUBLIC KEY EXPORT........................................................................................................................................................78
PRIVATE KEY EXPORT...................................................................................................................................................... 79
PRIVATE KEY IMPORT......................................................................................................................................................80
ABOUT THE VOICE RECORDER MANAGER ................................................................................................................80
EXITING THE VOICE RECORDER MANAGER............................................................................................................... 80
PACKAGES AND ACCESSORIES .................................................................................................................81
Business Package............................................................................................................................................................. 81

CONTENTS
Professional Package ...................................................................................................................................................... 81
Optional Equipment and Software............................................................................................................................. 81
WARRANTY .....................................................................................................................................................82
REGISTRATION CERTIFICATE ......................................................................................................................83

INTRODUCTION
4
INTRODUCTION
The manual uses the following typographical conventions:
Formatting Description
Bold
Indicates names of construction and software components, names of con-
trols and interface elements (headings, buttons, etc.).
Bold italics
Indicates file names and access paths.
Format PCM16 Represents a line on the voice recorder screen.
In the Manager Program description, the word combination “click a button” means: “to place the
mouse pointer on the button and click it.”
The manual uses the following notification symbols:
Note: indicates important information that helps you make better use of the product.
Caution: informs you about potential problems with hardware or software.
Warning: warns you about potentially serious problems in certain situations and tells you how
to avoid them.
The names Windows®, Windows® XP, Windows® 7 and Windows® 8 are trademarks of the Microsoft®
Corporation.
The logotypes and represent Secure Digital (SD) and Secure Digital High Capacity
(SDHC) memory cards developed by Matsushita (Panasonic), SanDisk and Toshiba.
All other company and product names mentioned in this document are the property of their corre-
sponding owners.
To convert audio files to the mp3 format, the Manager program can use lame_enc.dll software (the
LGPL license can be found at: http://www.gnu.org/copyleft/lesser.html).
No part of this manual may be reproduced or transmitted in any form, stored in a searchable system or translated into any
language without the written consent of Speech Technology Centre.

GENERAL INFORMATION
5
GENERAL INFORMATION
ALLOCATION
Gnome 7.0 is a portable digital stereo voice recorder. It is a professional device designed for mono or
stereo recording in noisy acoustic environments.
Gnome 7.0 can be used for real-time speech recording (i.e. needing no preliminary preparation) dur-
ing investigative activities, business negotiations, lectures, judicial sessions, meetings, interviews, etc.,
both indoors and outdoors.
Audio files recorded with Gnome 7.0 can be used in voice and speech analysis, including for
identification purposes.
ABOUT THE PRODUCT
Name:
Gnome 7.0
portable digital stereo voice recorder
Model
STC-H476
Producer:
Speech Technology Center, Ltd.
Address:
Russia, St. Petersburg, Krasutskogo str. 4a, 196084, PO Box 124
Phone:
+7 (812) 325-88-48
Fax:
+7 (812) 327-92-97
SPECIFICATION
6
SPECIFICATION
Feature Description/Value
Recording channels 2
External microphone inputs 2
Line inputs 2
Flash memory volume 4 GB
Plug-in memory card volume 32 GB
Plug-in memory card micro SDHC
Recording format
PCM 16 and 24 bit without compres-
sion; 8 bit with compression
according to A- or μ-law
Sampling rate
8; 11.025; 16; 22.05; 32; 44.1; 48 and
96 kHz
Amplitude-frequency characteristic ripple 2 dB
Signal-to-noise ratio—recording through microphone
input
minimum 75 dB
Signal-to-noise ratio—recording through line input minimum 89 dB
Harmonic distortion coefficient –recording through line
input (without compression), nominal level 1000 Hz maximum 0.06 %
Harmonic distortion coefficient – recording through
microphone input (without compression), nominal level
1000 Hz
maximum 0.15 %
Built-in microphones 2
Microphone type electret
Lithium battery life:
– recording mode minimum 14 hours
– timer mode minimum 200 hours
– Voice Activation mode minimum 72 hours
Running time in recording mode, using Duracell Plus or
Ultra rechargeable battery minimum 24 hours
PC connection USB 2.0 (hi-speed)
OS compatibility Windows XP, Windows 7, Windows 8
Interface language Russian, English
Product material metal, screen – glass
Product dimensions 114х39х19 mm
Weight, with battery 125 g

CAPABILITIES
7
CAPABILITIES
GENERAL
Audio can be recorded onto removable microSD card or to microSDHC (Secure Digital High Capacity)
flash memory card.
For optimal functioning, use microSD cards with Speed Class 6 or higher.
Audio is recorded using built-in or external microphones, or line outputs of audio equipment.
Recording can be controlled manually and/or automatically (with preset timers or by input signal
level).
The voice recorder has switch controls and LCD screen indicator controls; use these to regulate the
voice recorder and use head phones to listen to recordings.
When the device is connected to PC you can listen to recorded audio files, copy them to the PC hard
drive and change device configuration. You cannot record files to the internal and external device
memory through USB port.
The recorder can be powered in 4 ways: 2 rechargeable batteries (LR03 AAA), non-recoverable batter-
ies, external DC source or from a computer via USB-connector.
CONTROL AND DISPLAY FUNCTIONS
The voice recorder performs the following control and display functions:
–Control audio recording with RECORD-STOP switch and buttons;
–Power ON and OFF;
–Buttons lock;
–Set recording parameters;
–Automatic detection/display of connected accessories;
–Indication of the voice recorder operating modes;
–Erase recorded data;
–Regulate battery charge level;
–Switch on/off noise reduction on playback.

CAPABILITIES
8
VOICE RECORDER FUNCTIONS
The voice recorder, with its control software, performs the following functions:
1. Recording (p. 20):
– Records stereo or mono signals;
– Records audio files and saves them to built-in, non-volatile memory, 4 GB;
– Records audio files and saves them to replaceable, non-volatile microSD cards;
– Records with built-in or external microphones, and through line inputs;
– Automatically detects the input signal type fed to the external jack (IN jack);
– Records in PCM format (16 or 24 bit), with or without compression by μ- or А-law;
– Records with different sample rates according to recording conditions;
– Records by sliding the RECORD-STOP switch (p. 20);
– Records according to a programmable timer (p. 27);
– Records cyclically and stores to a memory-saving microSD card (p. 32);
– Automatically stops recording when signal reaches predetermined threshold (auto-stop mech-
anism, p. 34).
2. Additional recording functions:
– Automatic recording level adjustment in left and right channels;
– Automatic power-saving display mode;
– Automatic menu-lock when recording starts.
3. Audio file list view and playback (p. 48).
4. Playback functions (p. 48):
– Noise cancellation;
– Change playback speed;
– Adjust volume (separately for different channels);
– Set time stamps (marks, tags) during continuous playback;
– Search for fragments containing speech.
5. Safeguard against non-authorized listening and copying (p. 79).
6. Use PIN (Personal Identification Number) to access voice recorder controls (p. 39).
7. Automatic device switching off and blocking (p. 44).

CAPABILITIES
9
VOICE RECORDER CONTROL SOFTWARE FUNCTIONS
The voice recorder control software facilitates the following functions:
– Setting recording parameters (p. 63.);
– Setting date and time (p. 66.);
– Setting timers (p. 67);
– Setting, changing PIN-codes (p. 68);
– Updating voice recorder software (p. 69);
– File management (p. 69);
– Converting from WAV to MP3 (p. 71);
– Digital signature verification (p. 73);
– Exporting and importing private keys (p. 79);
– Exporting public keys (p. 78).
RECORDING DURATION
Recording duration depends on selected parameters and available memory space.
Continuous stereo recording duration is approximately 30 hours – with PCM, 16 kHz, and us-
ing lithium batteries of 1.5 V, given sufficient free space in internal memory and/or external
microSD memory card.
Recording durations for various modes and sampling rates (with 4 GB memory):
Mode
Recording duration, hours
Sampling rate, kHz
96 48 44.1 32 22.05 16 11.025 8
μ-law 16 bit, mono 9.6 19.2 20.8 28.8 41.6 57.6 82.2 115.2
μ -law 16 bit, stereo 4.8 9.6 10.4 14.4 20.8 28.8 41.6 57.6
μ-law 24 bit, mono 6.4 12.8 14.0 19.2 28.0 34.4 56.0 68.8
μ -law 24 bit, stereo 3.2 9.6 7.0 9.6 14.0 17.2 28.0 34.4
PCM 16 bit, mono 4.8 9.6 10.4 14.4 20.8 28.8 41.6 57.6
PCM 16 bit, stereo 2.4 4.8 5.2 7.2 10.4 14.4 20.8 28.8
PCM 24 bit, mono 3.2 6.4 7.0 9.6 14.0 17.2 28.0 34.4
PCM 24 bit, stereo 1.6 4.8 3.5 4.8 7.0 9.6 14.0 17.2
Recording duration can be increased with mono recording and data compression.

GETTING STARTED
10
GETTING STARTED
INSERTING MEMORY CARD
Before installing or replacing the
memory card, ensure the recorder is
switched off.
Removing the memory card while
recording may result in complete
data loss.
To save recorded data to external memory, insert a
memory card.
The memory card slot is on the left side panel of the
voice recorder, marked with the icon and covered
with a protective tab marked SD.
To install the memory card:
– Open the protective tab;
– Carefully direct the memory card into the slot;
– Press the edge of the card lightly to secure it in
the slot;
– Close the protective tab.
To extract the memory card:
– Open the protective tab;
– Press the edge of the card lightly and carefully ex-
tract it from the slot;
– Close the protective tab.
INSERTING THE BATTERY
The battery chamber is located on the back panel under the pro-
tective cover.
To insert the batteries:
–open the ptotective cover;
–insert the batteries with regard to polarity;
– close the protective cover.
To avoid malfunction, the type of the batteries must co-
incide with the type stipulated in the settings of the
device.
GETTING STARTED
11
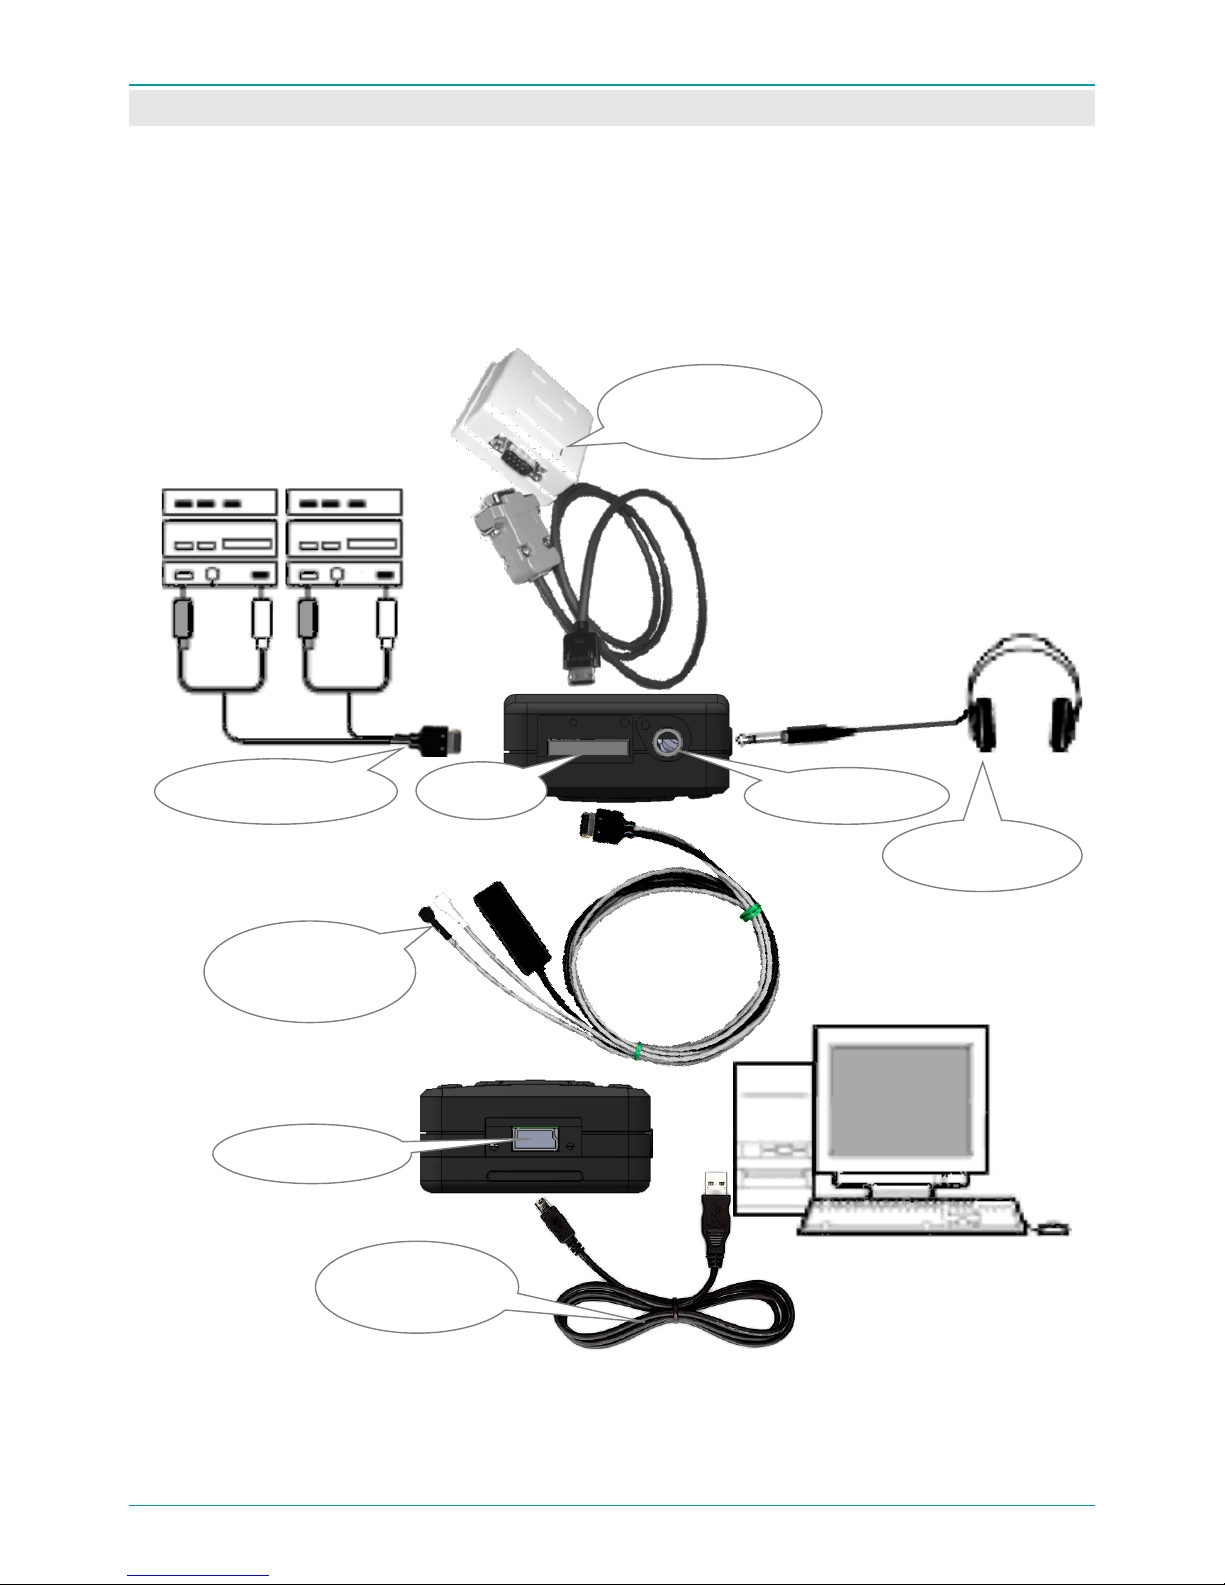
CONNECTING THE RECORDER TO EXTERNAL DEVICES
To connect the voice recorder to external devices, use the following jacks:
USB – mini-USB jack to connect to a PC;
OUT – 3.5 mm headphone jack;
IN – ten-needle jack for external microphone set, line input cable or adaptor for recording from tele-
phone line.
Various connection possibilities are illustrated below:
Connection to a PC
Connection to audio
equipment
External micro-
phone
connection
Phone line connection
USB jack
IN jack
External
microphones
OUT jack
Headphone
connection
Phone line
adaptor
Line input cable
USB cable
АM-miniUSB
Headphones

CONTROLS
12
CONTROLS
To control the voice recorder, use the 9 buttons
on its front panel. An Activation switch on the
right-side panel of the voice recorder starts and
stops Record mode.
To turn on Record mode, slide the Activation
switch to the position. To turn off Record
mode, slide the switch to the position.
Basic functions of each button (more details provided in later sections):
1. Hold the button down (about 3 seconds), to
turn recorder on and off.
2. Press the button once:
a) to display parameters menus;
b) to switch to edit mode;
c) to confirm changes;
d) for playback control.
1. Decrease volume.
2. Move down through parameter selection/
adjustment menus.
1. Open the list of rec-
orded files.
2. Exit the list of record-
ed files, exit parameter
selection/adjustment
menu.
1. Switch on end-to-end channel.
2. Switch on noise cancellation (and oth-
er functions) during playback.
3. Help.
4. PIN-code security/saving.
5. Delete selected phonogram.
1. Increase volume.
2. Move up through parameter
selection/adjustment menus.
In playback mode, jump to the
end of the recording. In Loop
mode, jump to the final time tag.
In playback mode, jump to
the start of the recording. In
Loop mode, jump to the start
time tag.
1. Move left through editable
parameter menus (values and
answers).
2. Hi-speed rewind.
1. Move right through ed-
itable parameter menus
(values and answers).
2. Fast forward.
3. Switch on Voice Activity
Detection (VAD) during
playback.

SWITCHING ON AND OFF
13
SWITCHING ON AND OFF
SWITCHING THE VOICE RECORDER ON
To switch the voice recorder on, hold the button down for 3 seconds or longer.
A set of indicators will appear on the display. For more information, see DISPLAY VIEW
WHEN RECORDER IS ON (p. 15).
SWITCHING THE VOICE RECORDER OFF
To switch the voice recorder off, hold the button down for 3 seconds or longer.
The voice recorder can only be turned off via the main window (p. 15).
The following message appears as the voice recorder is being switched off:
RECOMMENDATIONS FOR BATTERY USE
Ni-MH and Ni-Cd batteries are subject to “memory effect,” wherein the battery looses its energy ca-
pacity if being charged after not being fully discharged.
It is not recommended to charge the battery before it is completely discharged.
If the battery capacity has already reduced, it is possible to restore its capacity partially by means of
battery training.
It takes approximately 3 hours to fully charge the battery.
BATTERY TRAINING
A soon as the battery state of charge reaches its critically low level ( ), the devise goes into an
accelerated discharge mode that lasts approximately 2 hours.
After the accelerated discharge mode is completed the battery must be charged fully.
Charging/discharging cycles should be repeated 3-5 times.

LOCKING AND UNLOCKING THE RECORDER
14
LOCKING AND UNLOCKING THE RECORDER
To avoid accidental button pressing that can lead to changes in settings, it is possible to lock the but-
tons of the recorder.
LOCKING THE RECORDER
To lock the recorder press and hold buttons and on the front panel of the re-
corder simultaneously for at least 3 seconds.
A red lock icon should appear in the bottom of the screen.
The recorder can be only locked via the main window.
Locking does not influence the work of the recording control switch.
UNLOCKING THE RECORDER
To unlock the recorder press and hold, press and hold buttons and on the
front panel of the recorder simultaneously for at least 3 seconds.

DISPLAY STATUS INDICATORS
15
DISPLAY STATUS INDICATORS
DISPLAY VIEW WHEN RECORDER IS ON
Recorder status is displayed using icons, indicators and messages on eleven lines from screen-top to
screen-bottom.
Display options are described below (pp. 16-19) and in later sections on using and adjusting the voice
recorder.
The following icons and symbols may appear on the display:
Loop mode
Memory
used
indicator
Year
Headphones, noise can-
cellation, end-to-end
channel
Current file name
Recording format
Internal
left channel
microphone
External
left channel
microphones
Left channel
signal level
Automatic adjustment of
left channel signal level
Timer indicator
PIN
Battery type
Battery indicator
Time
RECORDER
Mode
Button guide
display
Automatic adjustment of
right channel signal level
Right channel
signal level
Month, date
Sampling rate
Internal
right channel
microphone
External
right channel
microphones
Right channel
line inputs
Left channel
line inputs

DISPLAY STATUS INDICATORS
16
1st SCREEN LINE
Headphones, noise cancellation and end-to-end channel
Indicator
Description
Headphones are not connected
Headphones are connected
Playback mode is on (end-to-end channel)
Noise cancellation mode is on
Memory used
Indicator
Description
100% No memory card (% audio recorded to internal memory).
Recording to removable memory card
Recording to locked removable memory card
Timer status
Indicator
Description
No timer is set
At least one timer is on and active
PIN-code
Indicator
Description
PIN-code protection is off
PIN-code protection is on
Battery charge status
Indicator
Description
Alkaline batteries*.
Rechargeable batteries*.
Blinking at the rate of 1 Hz, from yellow to red, indicates critical low charge (recording
will turn off automatically)
Charge level is 20 %
Charge level is 40 %
Charge level is 60 %
Charge level is 80 %
Charge level is 100 %
Charging is complete
* Battery type is selected manually. For more in-depth information, see MISCELLANE-
OUS, p. 44.

DISPLAY STATUS INDICATORS
17
2nd SCREEN LINE
The 2nd screen line displays date and time.
3rd-4th SCREEN LINES
The 3rd line displays RECORDER, current recording duration or playback time.
The 4th line displays the current file name.
5th SCREEN LINE
The 5th screen line displays the recording format, recording mode (stereo or mono )and sampling rate.
Recording format
Indicator
Description
PCM16
PCM24
А–law
u–law
Before recording and during recording, recording format shows 16- or 24-bit record-
ing.
During playback, recording format shows A-law or u-law signal.
Recording mode
Indicator
Description
mono
stereo
Left channel is on (single-channel format for WAV files).
Both channels are on (double-channel file format for WAV files).
Sampling rate
Indicator
Description
8000
11025
16000
22050
32000
44100
48000
96000
Sampling rate is 8000 Hz.
Sampling rate is 11025 Hz.
Sampling rate is 16000 Hz.
Sampling rate is 22050 Hz.
Sampling rate is 32000 Hz.
Sampling rate is 44100 Hz.
Sampling rate is 48000 Hz.
Sampling rate is 96000 Hz.

DISPLAY STATUS INDICATORS
18
6th-8th SCREEN LINES
Lines 6 to 8 display internal microphone, external micro-
phone and line input connections.
Internal microphone connection
Indicator
Description
Internal microphone indicators are on the 6th line (IntMic).
Internal microphone is not connected.
Internal microphone is connected.
Additional markers:
Lindicates left channel, Rindicates right channel.
External microphone connection
Indicator
Description
External microphone indicators are on the 7th line (ExtMic).
External microphone is not connected.
External microphone is connected.
Additional markers:
1indicates first channel, 2indicates second channel.
Line input connection
Indicator
Description
Line input indicators are on the 8th line (Line).
Line input is not connected.
Line input is connected.
Additional markers:
1indicates first channel, 2indicates second channel.
9th SCREEN LINE
The 9th line contains the Volume indicator.
10th SCREEN LINE
or
The 10th line contains a range of indicators, including automatic level adjustment (AGC), manual am-
plification adjustment (in decibels (dB)), Loop mode and Voice Activity mode.
AGC indicates that amplification level is automatic (for either or both channels). If you are in AGC, you
do not see any amplification level in dB.
Other manuals for STC-H476
1
Table of contents
Other Speech Technology Center Voice Recorder manuals


