Speedway 53498 User manual

TRICYCLE AND WAGON COMBINATION
Model: 53498
*Actual product may vary slightly
Please carefully read and save these instructions before attempting to assemble, maintain, install, or operate this
product. Observe all safety information to protect yourself and others. Failure to observe the instructions may
result in property damage and/or personal injury. Please keep instructions for future reference.
53498 07/16
For Customer Service, please call 1-800-348-5004 or
For warranty purchases, please keep your dated proof of purchase. File or attach to the manual for safe keeping.
WARNING!
TO AVOID SERIOUS INJURY
● Continuous adult supervision required.
● Never use near motor required.
● Never use near street, swimming pools, hills, steps, or sloped driveways.
● Never rids this tricycle on the public roads.
● Always wear shoes when using the tricycle.
● Riders should always wear a properly fitted helmet that complies with U.S.
consumer product safety commission (CPSC) standard 16 CFR. 1203.
● Inspect before each use.
● Do not use broken, bent, cracked or damaged parts.
● Age 3 and up only.
● Max loading capacity--tricycle: 130 lbs; wagon: 100 lbs.
● Allow only one rider.
CALIFORNIA PROPOSITION 65
WARNING:
You can create dust when you cut, sand, drill or grind materials such as wood,
paint, metal, concrete, cement, or other masonry. This dust often contains
chemicals known to cause cancer, birth defects, or other reproductive harm.
Wear protective gear.
WARNING:
This product or its power cord may contain chemicals, including lead, known
to the State of California to cause cancer and birth defects or other reproductive
harm. Wash hands after handling.
IMPORTANT!
When using equipment, a few safety precautions must be observed to avoid
injuries and damage. Please read the complete operating manual with due
care. Keep this manual in a safe place, so that the information is available
at all times. If you give the equipment to any other person, give them
these operating instructions as well. We accept no liability for damage
or accidents which arise due to non-observance of these instructions
and the safety information herein.
PLEASE SAVE THIS OWNERS MANUAL AND READ BEFORE EACH USE.
This manual will explain how to use the product safely and effectively.
Please read and follow these instructions and precautions carefully.
IMPORTANT SAFETY INSTRUCTIONS
1-800-348-5004

ASSEMBLY INSTRUCTIONS
PRE-ASSEMBLY
You will need a slot screwdriver, hex screwdriver long nose pliers and an adjustable wrench
for assembly. Make sure to assemble the product by following this instruction completely
and properly.
MAINTENANCE
For the sake of safety, periodically inspect all moveable parts of the unit, and perform
proper maintenance if necessary.
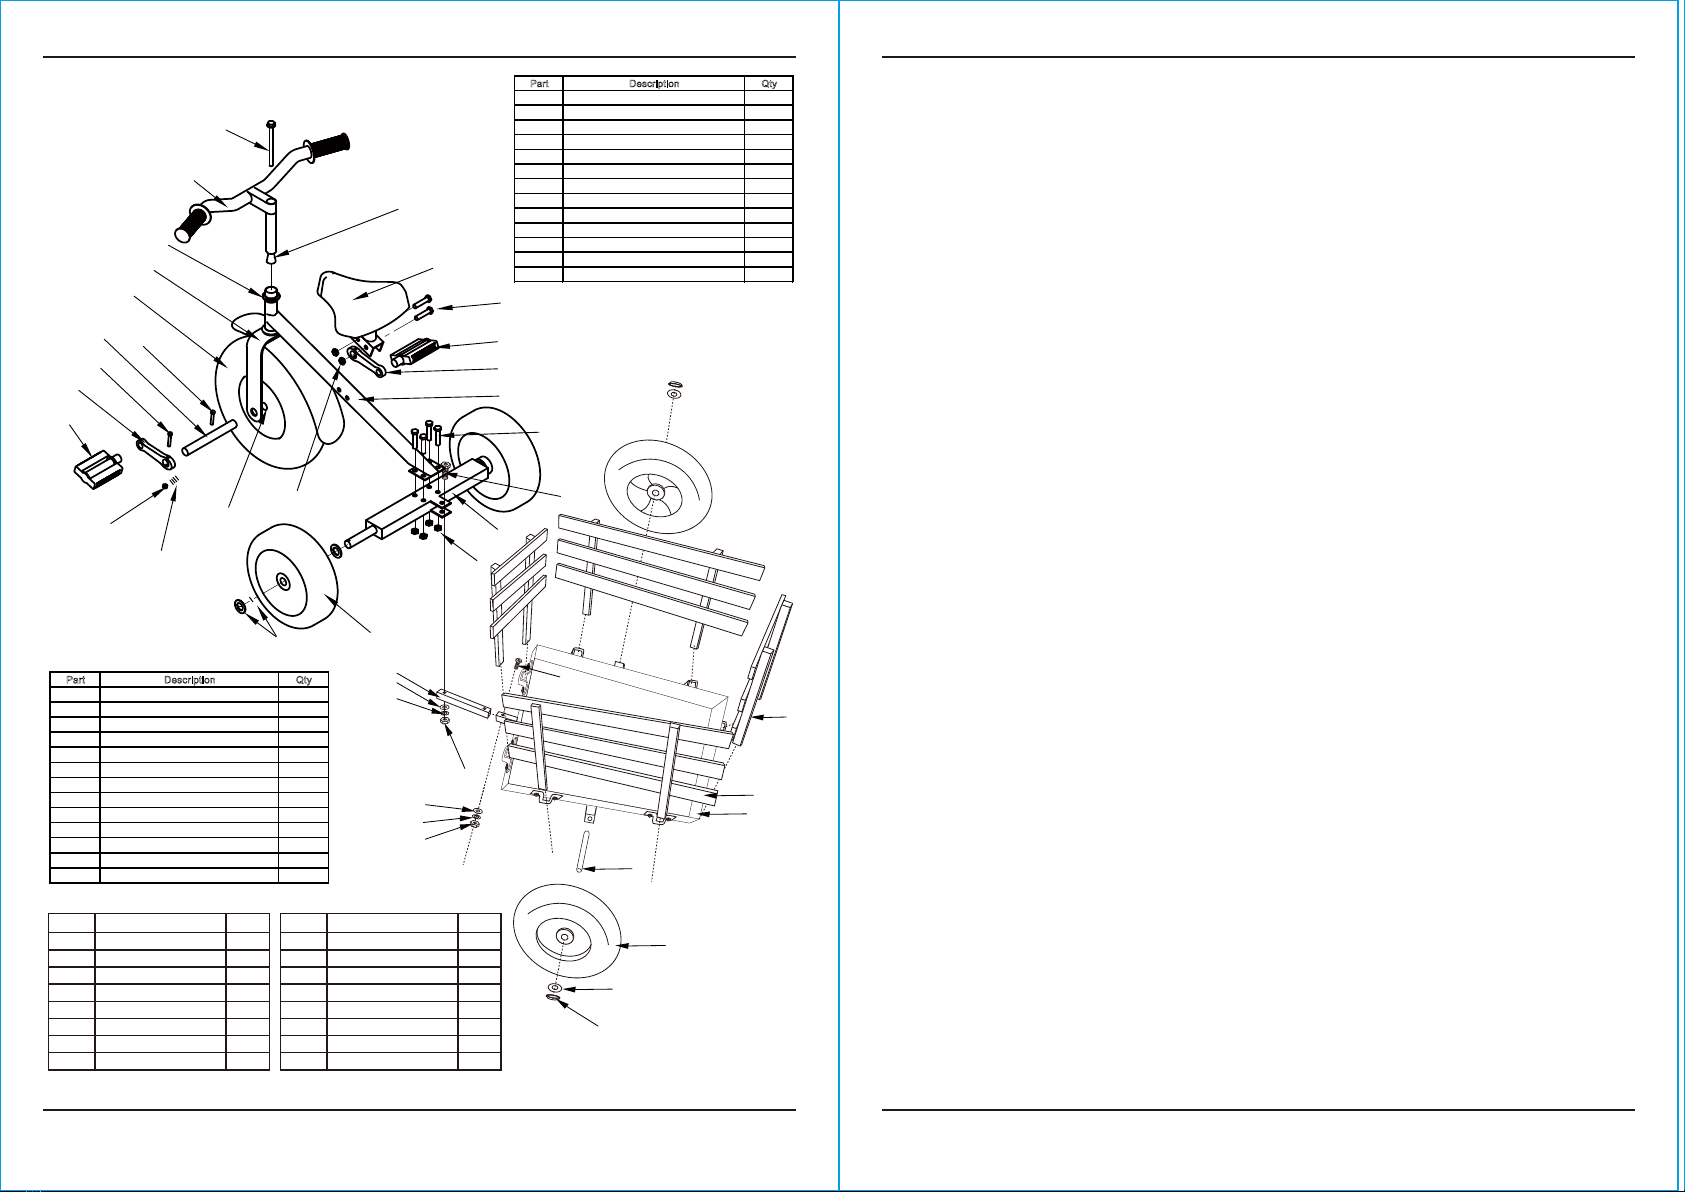
TRICYCLE HARDWARE LIST
TRICYCLE ASSEMBLY INSTRUCTIONS
SETUP 1.
Place the back wheel (E) onto the back axle (A), put a flat
washer (4) on the axle, use pin (5) and wheel cover (7)
to lock the back wheel in place. Repeat stet 1 to assembly
other back wheel.
SETUP 2.
Attach the back axle (A) to the fork and frame
(H). Secure the back axle (A) with bolts (E),
washers (2) and nuts (3) by a phillips screwdriver
and wrench.
SETUP 3.
Use wrench to secure the pedal (D) onto the threaded crank
adjacent to the front wheel (G). Repeat step 3 to install the
second pedal. Fasten the short bolt (8) at the right side of
front wheel axle.
SETUP 4.
Follow diagram 4 to put nuts, washer, rings, fork and frame
together.
SETUP 5.
To assemble the handlebars (F). align the “nut boss” with
the slot into the tube, tighten the top screw by hand, Insert
the handlebars (F) into the hole of the front axle, use hex
screwdriver to tighten top screw. Please ensure over minimum
insertion marking position when tighten the top screw.
1-800-348-5004
No.:
1
2
3
4
5
6
4
4
6
2
2
1
Bolt Ø8mm
Washer Ø8mm
Nut Ø8mm
Washer
Wheel Cover
Socket Head Cap Screw & Nut
Description Qty’s
5
6
See step 4 for assembly
Place seat on the seat
connector, tighten screw
on the seat support at
the bottom of the seat

TRICYCLE ASSEMBLY INSTRUCTIONS
TRICYCLE PART LIST:
SETUP 6.
To adjust the seat position, unscrew screws, place
seat connector to match holes to the desired position,
tighten screws to lock seat in place.
NOTE: While seat installation/adjustment, reverse
seat connector to desired position.
WAGON ASSEMBLY INSTRUCTIONS
SETUP 1.
Put the axle (E) to the deck (A), place the wheel (B) to the axle (E). Use pin (2) and
wheel cover (3) to lock the wheel. Repeat step 1 to assemble other wheel.
SETUP 2.
Attached the deck (A) to the tricycle with clevis pin (1) and pin (2).
SETUP 3.
Insert the long fences (C) and short fence (D)to the deck (A).
SETUP 7.
Test the Tricycle by checking all bolts and fittings,
make sure everything is securely tightened. Roll the
tricycle to check for proper wheel operation.
Periodically check tire pressures, for front and rear
tires, do not exceed 35 (front) and 30 (rear) PSI
respectively.
1-800-348-5004
WAGON ASSEMBLY INSTRUCTIONS
WAGON HARDWARE LIST
No.
1
2
3
4
5
1
1
1
1
1
Bolt M8 x 45mm
Washer Ø8mm
Nut M8
Washer Ø16mm
Nut Cover
Description Qty’s
A. Back Axle x1 B. Seat x1 C. Seat Connector x1
D. Pedals x2 E. Back Wheels x2
G. Front Wheel x1 H. Fork and Frame x1
F.Handlebars x1
1
2
3
5
4
WAGON PART LIST:
A. Deck x1 C. Long Fence x2
D. Short Fence x2
B. Wheels x2
E. Axle x1
1-800-348-5004
PART LIST
1-800-348-5004
Limited Manufacturer Warranty
North American Tool Industries (NATI) makes every effort to ensure that this product
meets high quality and durability standards. NATI warrants to the original retail consumer
a 1-year limited warranty from the date the product was purchased at retail and each
product is free from defects in materials. Warranty does not apply to defects due directly
or indirectly to misuse, abuse, negligence or accidents, repairs or alterations, or a lack of
maintenance. This product is intended for personal use. The warranty will be voided if
used in commercial, rental, or industrial applications. NATI shall in no event be liable for
death, injuries to persons or property, or for incidental, special or consequential damages
arising from the use of our products. To receive service under warranty, the original
manufacturer part must be returned for examination by an authorized service center.
Shipping and handling charges may apply. If a defect is found, NATI will either repair or
replace the product at its discretion.
DO NOT RETURN TO STORE
For Customer Service:
Email [email protected] or
Call 1-800-348-5004
Part Description
Steel Deck
Wagon Wheel
Axle
Extention Rod
Long Fence
Short Fence
Washer Φ16mm
Nut Cover M16
Qty Part Description Qty
18
19
20
21
22
23
24
25
1
2
1
1
2
2
2
2
Bolt M6 x 45mm
Washer Φ6mm
Spring Washer Φ6mm
Nut M6
Bolt M8 x 45mm
Washer Φ8mm
Spring Washer Φ8mm
Nut Φ8mm
26
27
28
29
30
31
32
33
1
1
1
1
1
1
1
1
18
22
23
19
24
25
26
30
27
28
29
20
21
31
32
33
1
2
3
4
5a
5b
6a
9a
6b
7a
7c
7b
4a
8
8a
9
10
8b
11
12
13
14
15
9b
17
Part Description Qty
8a Frame Install Bolt 4
8b Frame Install Nut 4
9 Seat 1
9a Seat Install Bolt 2
9b Seat Install Nut 2
10 Rear Frame 1
11 Rear Wheel 2
12 Handle Bar 1
13 Socket Head Cap Screw & Nut 1
14 Cover & Washer 2 set
15 Bushing(Front Wheel) 2
16 Bearing(not shown,inside Rear Wheel) 2
17 Insert 1
Part Description Qty
1 Front Wheel 1
2 Front Fork & Fender 1
3 Bearing Head Set 1
4 Front Wheel Axle Shaft 1
4a M8 Bolt of Axle Shaft 1
5a Pedal(Left side,normal threads) 1
1
5b Crank(Left side,normal threads)
6a Pedal(Right side,reverse threads) 1
6b Crank(Right side,reverse threads) 1
7a Crank Nut 2
7b Crank Pin 2
7c Washer for Crank Nut 16
8 Frame 1
Popular Bicycle manuals by other brands


Scott
Scott SCALE RC manual

Coleman Powersports
Coleman Powersports DT200 owner's manual

AIPAS
AIPAS A6 instruction manual

Razor
Razor Scream Machine Jr owner's manual

Falcon
Falcon Daymak user manual

International Surrey Company
International Surrey Company South Coast Cruzer Slingshot Assembly and operating manual


