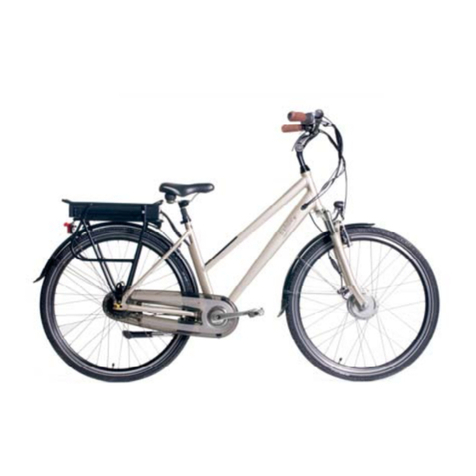
Belize Bicycle 98304 User manual

PLEASE READ THIS MANUAL BEFORE RIDING YOUR ELECTRIC TRIKE
We included in the preparation of this manual
WARNINGS
and
INFORMATION
for your safety.
·GENERAL WARNING: Riding an electric powered trike can be hazardous. When on a trike you could have an accident resulting in
injury or even death. This manual makes an effort to give you enough information that could prevent riding into danger. We can
not cover all contingencies but hope to make you an informed and aware rider .
Since you will be sharing the road at times with other vehicles a good rule to follow is “If you can’t do it with a car or bicycle .don’t
do
it with a trike.”
·
A trikes widest point is behind you, if the front goes by an obstacle there is no guarantee that the rear wheels will also clear.
When riding, you must give clearance to the edge of the road or sidewalk. Stay clear of potholes and be aware that you can lose
Control if any wheels should drop into a hole or ditch.
·
Always ride defensively. Watch out for the unexpected. This means everything from cars to children, pets and rough road surfaces. Be
prepared to avoid danger.
CHECKLIST BEFORE RIDING
·
Check your tires for proper air pressure. If you need to inflate them do not inflate over the recommended air pressure on the side
wall of your tires. If using a compressor or the air hose at a gas station, be very careful not to blow the tire off the rim .Check the hard
ness of the tire and stop inflating to check the air pressure. DO not over inflate.
·Test your front brake and rear brake and make sure they stop the trike. If you have any doubts, do not ride trike and see your
dealer. ALL the trikes are equipped with front and rear brakes as standard equipment. Under no circumstance should the brakes be
removed. They are also your parking brakes. When stopping your Trike, apply both and rear brakes together for a safe smooth stop.
·Check that the handlebar is tight and that the ends are plugged. Now check the saddle for tightness.
·
Safety check: Apply your front and rear brakes and rock your trike back and forth. If you hear or feel a movement coming from the
fork or front wheel or any other part of the trike, DO NOT RIDE. Have your dealer or qualified mechanic check the trike.

PRECAUTIONS
·A trike does not handle like a bicycle, therefore, you cannot lean into a turn. All wheels must be on the ground at all times. Do not
make sudden changes of direction, you could unbalance the trike and have an accident.
·We suggest you practice riding in a quiet area to get the feel of the trike.
·When beginning to ride. Stay at a slow speed .You must acclimate yourself to handling and turning this three wheeler. If you feel inse-
cure, slow down, and proceed at a slower pace. With practice, you will get comfortable riding and stopping.
·Never ride with your ears covered with earphones or anything else that would prevent hearing. Hearing your surroundings is important
for your safety.
·We recommend that you not ride at night ,or at times of reduced visibility. If you should ride at night or during reduced visibility, you
must outfit your trike with a front white light and a rear red light, Relying solely on reflectors is not adequate protection, Most munici-
palities require lights for night riding. Your bicycle dealer can help you in selecting the correct lighting system for your needs.
·Avoid riding on rainy days since you don’t have the same control, handling, and stopping power as on a dry day.
·When making a turn or stopping use hand signals to show your intent, To signal use your left arm while maintaining control of the throt-
tle with your right.
·Always ride with the flow of traffic never against traffic
·The rear basket is only intended for light storage. DO NOT EVER PUT A CHILD, PERSON IN THE BASKET! They could be
seriously injured by the turning wheel and/or the moving parts. There is also the risk of the passenger falling out of the basket.
The trike is made for one person only and the basket is not built to hold a passenger.
Assembly Instructions
Please read through and follow all instructions to ensure that your trike is properly assembled and ready for use.
1. Remove the tricycle from the box by cutting the plastic strapping, then Cutting two sides of the box away. Avoid lifting the trike
straight up out of the box. Remove all of the wrappings and ties that protect the tricycle during shipment.
2. Position the handlebars so that the stem fits into the bicycle frame. Line the handlebars up with the front wheel and tighten them
with an Allen wrench .Observe the stem --- There is a marking on the stem that indicates the minimum safe insertion. The line or
marking must be inside the frame. If the stem is not inserted this far into the frame it may break and the rider may lose control.
GETTING STARTED
TO GET STARTED
1.
Insert the battery key, turn on and then turn on the power switch.
2.
Pedal until a fast walking speed is achieved and either use pedal assist or twist the throttle for motor power.

3.
You’re on your way.
FIG.1 Power Key Switch FIG.2 headlight with Battery Indicator
A flashing LED light on the monitor means insufficient battery power. This would be time to recharge.
You can control the rate of power with your throttle grip or pedal assist level. Practice the various positions to get
familiar with the power released. We recommend using “Pedal Assist”, a combination of Electric power with pedal power, to extend your powered range.
If you slow below a walking speed the motor will cut off and you need to pedal assist again to turn it back on.
When your ride is over, Press the off button to turn off the power and close the key switch on the battery. ALWAYS TURN OFF YOUR TRIKE if you are no using
it. THIS IS NOT A TOY!
Do not allow children to operate this trike without adult supervision.
HOW TO OPERATE THE ANTI-SWERVE DEVICE
What's the biggest problem with normal tricycles? Getting around corners!
This new Electric Leaning Tricycle uses patented tilt technology! When you lean or any sudden change of direction is made, the front section of the bike
tilts but the rear wheels remain on the ground flat and stable! Practice riding in a quiet area.
WHEN THE LEVER IS PUSHED

TO BE IN THIS POSITION
THE ANTI SWERVE LEANING DEVICE OPERATES. IN THE EVENT OF A SUDDEN CHANGE OF DIRECTION OR TURN
THE TRICYCLE WHEELS STAY ON THE GROUND.
THE ANTI SWERVE OPERATING CABLE
RECHARGING THE BATTERY
Keep the charger in a protected and covered area. The charger cannot be exposed to water or humidity and must be used in a well-ventilated space under a
covered and dry area.
The battery case can be removed by unlocking and sliding out the battery.
If the motor is used for a long time and overheats it will shut off. It can be started again after it cools off. The same thing applies to the
Charger if it gets too hot it gets too hot if will shut off and restart when cooled down.
If the battery charge gets very low the red LED will blink and the motor will shut off. Recharge the battery.
To recharge the battery use only the charger provided by manufacturer. Any other charger could seriously damage the batteries and motor or
Injure the user.
Our charger can be plugged into a standard 110v receptacle. . Please keep water away from the charger and battery case. Our charger is calibrated to correctly
charge our battery and you should check the lights until full charge is achieved. Full charge can take up to 6 to 8 hours. The light will change from Red to a steady
Green when fully charged. Do not leave the charger connected longer than 8 hours.

If a month goes by between riding the trike, recharge the battery before using.
This Lithium battery does not remember its charge. Multiple charging does not shorten its life.
Do not allow children to touch the battery.
Remarks:
You should recharge the batteries after every use for optimum performance and battery life, do not wait for the battery to be fully discharged. One
cycle is one complete charge and discharge of the battery. You will need to replace your batteries when they no longer hold a sufficient charge.
At just 30Kg the trike is very light weight for a trike using a compact Lithium battery pack located below the large rear basket.
TROUBLE SHOOTING
Failure
Symptoms
Check
Resolution
Fails
To charge
Indicator
Light doesn’t
Light up
Check power pin and
Jack contact or
Electricity to outlet
Check pin and jack,
Clean them to improve
Contact, or change them
With the same size fuse.
Indicator
Light
shines
Charger output wire and
Charger jack contact not
good.
Range is less
After being
Charged once
Bike doesn’t
Go far on
Battery
Check tire pressure
Check that charger
Works
Check electric supply
Inflate tires
Replace Charger
Recharge completely
Li-Ion Battery
Remove the Battery Pack
Recharging Jack
Battery Pack Lock

Tire has
No
pressure
The tire
Can not be
inflated
1. Inner tube is cracked
2. Inner or outer tire is
damaged
Repair tire like common
bicycle
TRICYCLE SPECIFICATIONS
Description
Specification
Carton Size
1520*560*760mm ( 7 layer corrugated paper)
Max. Speed
25km/h
Distance Per Charge
25-30km
Noise
Less than 6odB(A)
Consumption Per 100km
.06kWh
Battery
48V/10Ah Li-Ion Battery
Motor
BLDC
Gear System
Single speed
Motor Power
350 watts
Wheel Size
20’’ front wheel; 20’’ rear wheels
Charging Time
4~6 hours
Battery Life Span
About 600 to 800 cycles
Front Brake
V brake
Rear Brake
Shimano roller brake
Weight including battery
30kg
Note:
Speed and distances quoted will vary according to rider weight, road and weather conditions, type of terrain traveled, and age of battery.
This Manual applies to the model 98304
Table of contents
Other Belize Bicycle Bicycle manuals
Belize Bicycle
Belize Bicycle TRI-RIDER R-2 User manual

Belize Bicycle
Belize Bicycle BUDDY TRIKE Instruction Manual

Belize Bicycle
Belize Bicycle Super SOCO User manual

Belize Bicycle
Belize Bicycle PUNTA User manual

Belize Bicycle
Belize Bicycle Twin Tri-Rider Tandem User manual

Belize Bicycle
Belize Bicycle TRI-RIDER R-3 User manual

Belize Bicycle
Belize Bicycle Comfort Tri-Rider User manual

Belize Bicycle
Belize Bicycle TRI-RIDER User manual
