Heybike CITYRUN User manual
YOUR LIFE,
HEYBIKE
ELECTRIC BIKE
USER MANUAL
The manufacturer resees the right to make changes to the product and manual at any time
Visit www.heybike.com to download the latest user manuals
COPYRIGHT 2022 HEYBIKE.ALL RIGHTS RESERVED. HEYBIKE CITYRUN
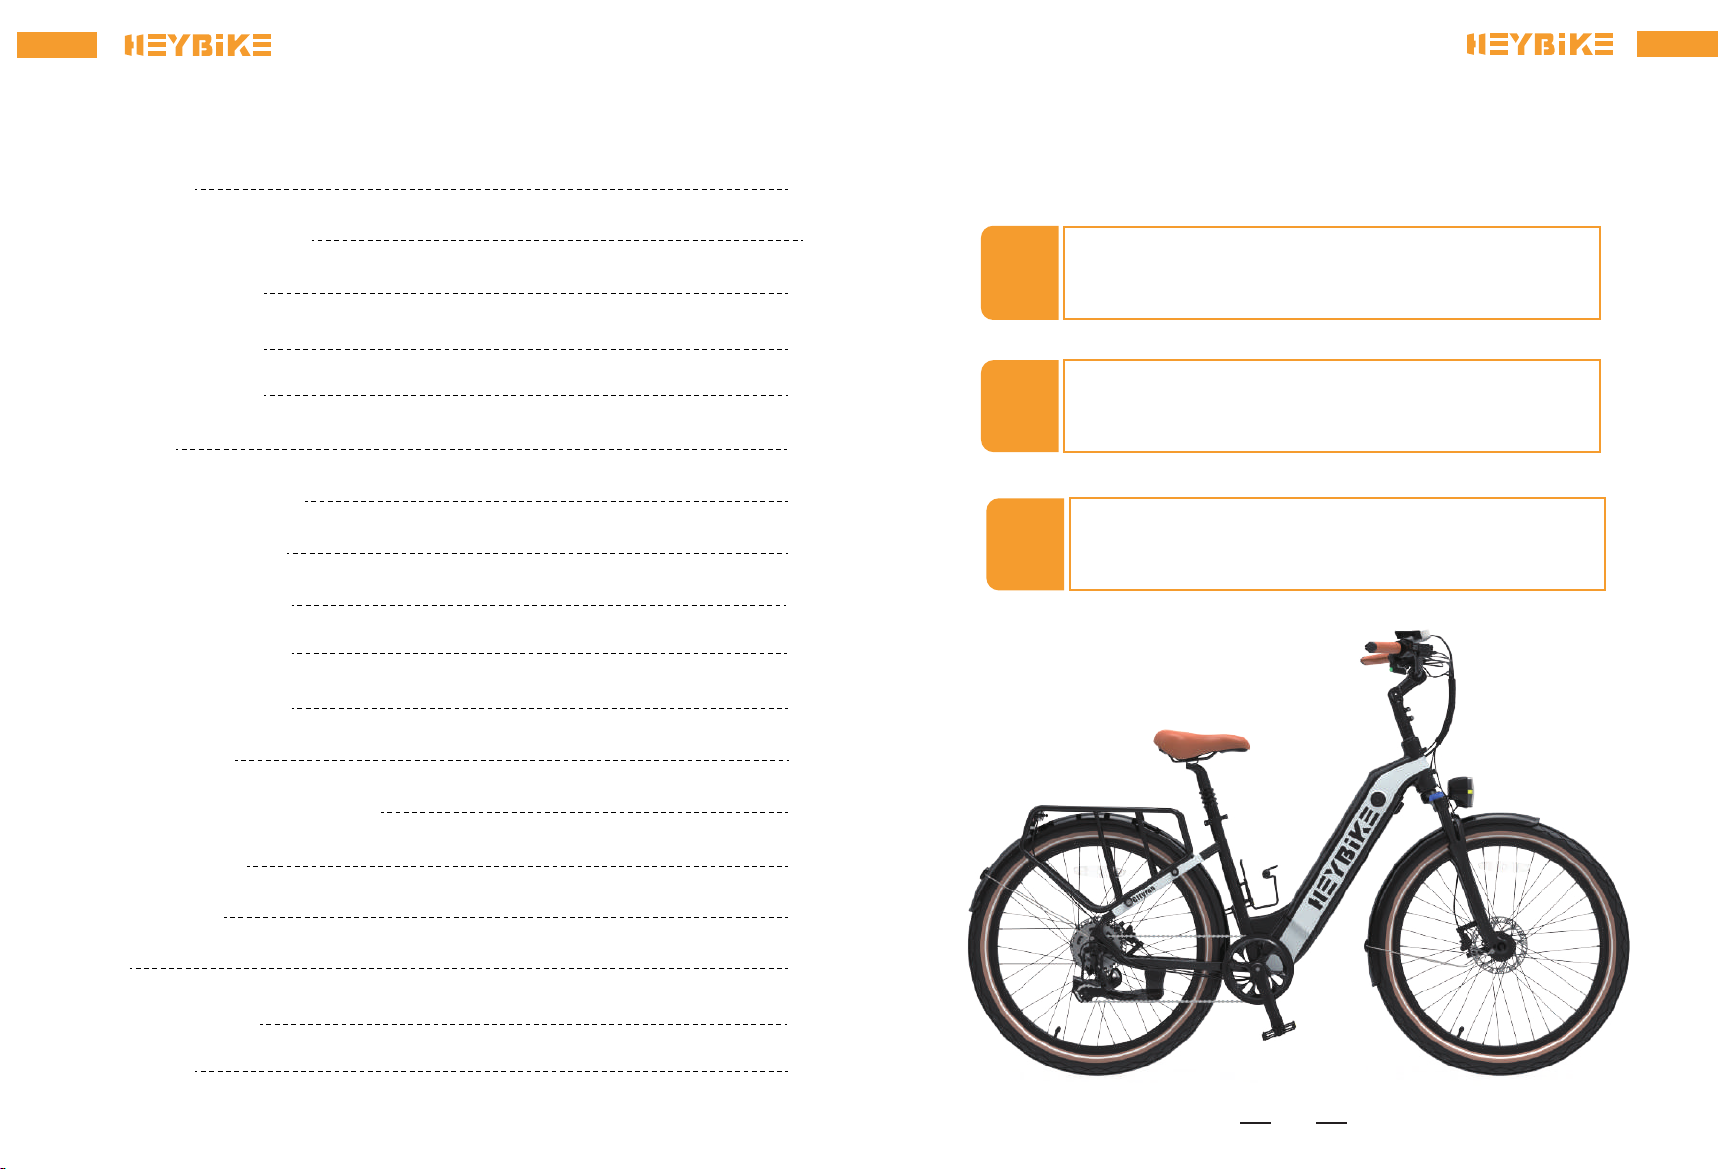
CONTENTS
Home Page
Product Safety Notice
Warning Message
Package Contents
Product Oveiew
Assembly
Batte Key Positions
Sta-up Procedure
Remove the Batte
Charge Your E-Bike
Display and Setting
APP Operation
Daily Care and Maintenance
Troubleshooting
Specications
FAQS
Limited Warranty
Contact Us
01
02
03
04
05
06
14
15
16
17
19
22
25
29
30
31
32
34
CONGRATULATIONS
ON YOUR PURCHASE!
This user manual will help you assemble and operate your new electric
bike. Be sure to read all the information in this manual before riding.
1
NOTE TO ALL RIDERS UNDER 18 YEARS OF AGE: It's ve impoant
that you get parental permission before riding your electric bike.
2
If there is any assistance needed, please feel free to contact Heybike
Suppo.
3
1
Warning Message
Avoid water - The electric bike is not waterproof. The electronics may be damaged due to
water and water damage is not covered by our warranty. Riding in wet conditions is also ve
dangerous and may result in inju.
Avoid prolonged exposure to sun or rain and avoid storage in places with high temperatures
or corrosive gas.
Abuse - We do not cover physical damage due to negligent care and extreme riding.
Whenever you ride the heybike Electric Bike, you risk severe inju or even death from loss
of control, collisions, and falls. Use caution and ride at your own risk.
Do not modify the product from manufacturer’s original design.
Avoid touching the charging po directly and do not let it make contact with a metal
object.
Keep hands and all body parts away
Before riding - be sure to check the electric bike over and make sure the electric bike is
operating correctly before each use.
Before riding - be sure to check that the braking system is functioning properly; also be
sure to check that all safety labels are in place and you understand the safety warnings.
Before riding - be sure that any and all axle guards, chain guards, or other covers or
guards supplied by the manufacturer are in place and in seiceable condition.
Before riding - be sure to check that the tires are in good condition, inated properly, and
have sucient tread remaining.
Never exceed the 264 Ibs (120 kg) maximum load rating.
The electric bike should never be used by children under the age of 18.
Maximum Speed - Your electric bike goes at a maximum speed of 20 mph.
Make note that additional insurance may be required to cover situations you encounter
while riding an electric bike. It is recommended that you contact an insurance company or
broker for advice and consultation.
To consee electricity, use assist mode, and avoid zero staing, frequent braking, driving
against the wind, caring heavy loads including other people and riding with insucient
air pressure.
Do not exceed the posted speed limit and obey all trac laws.
3
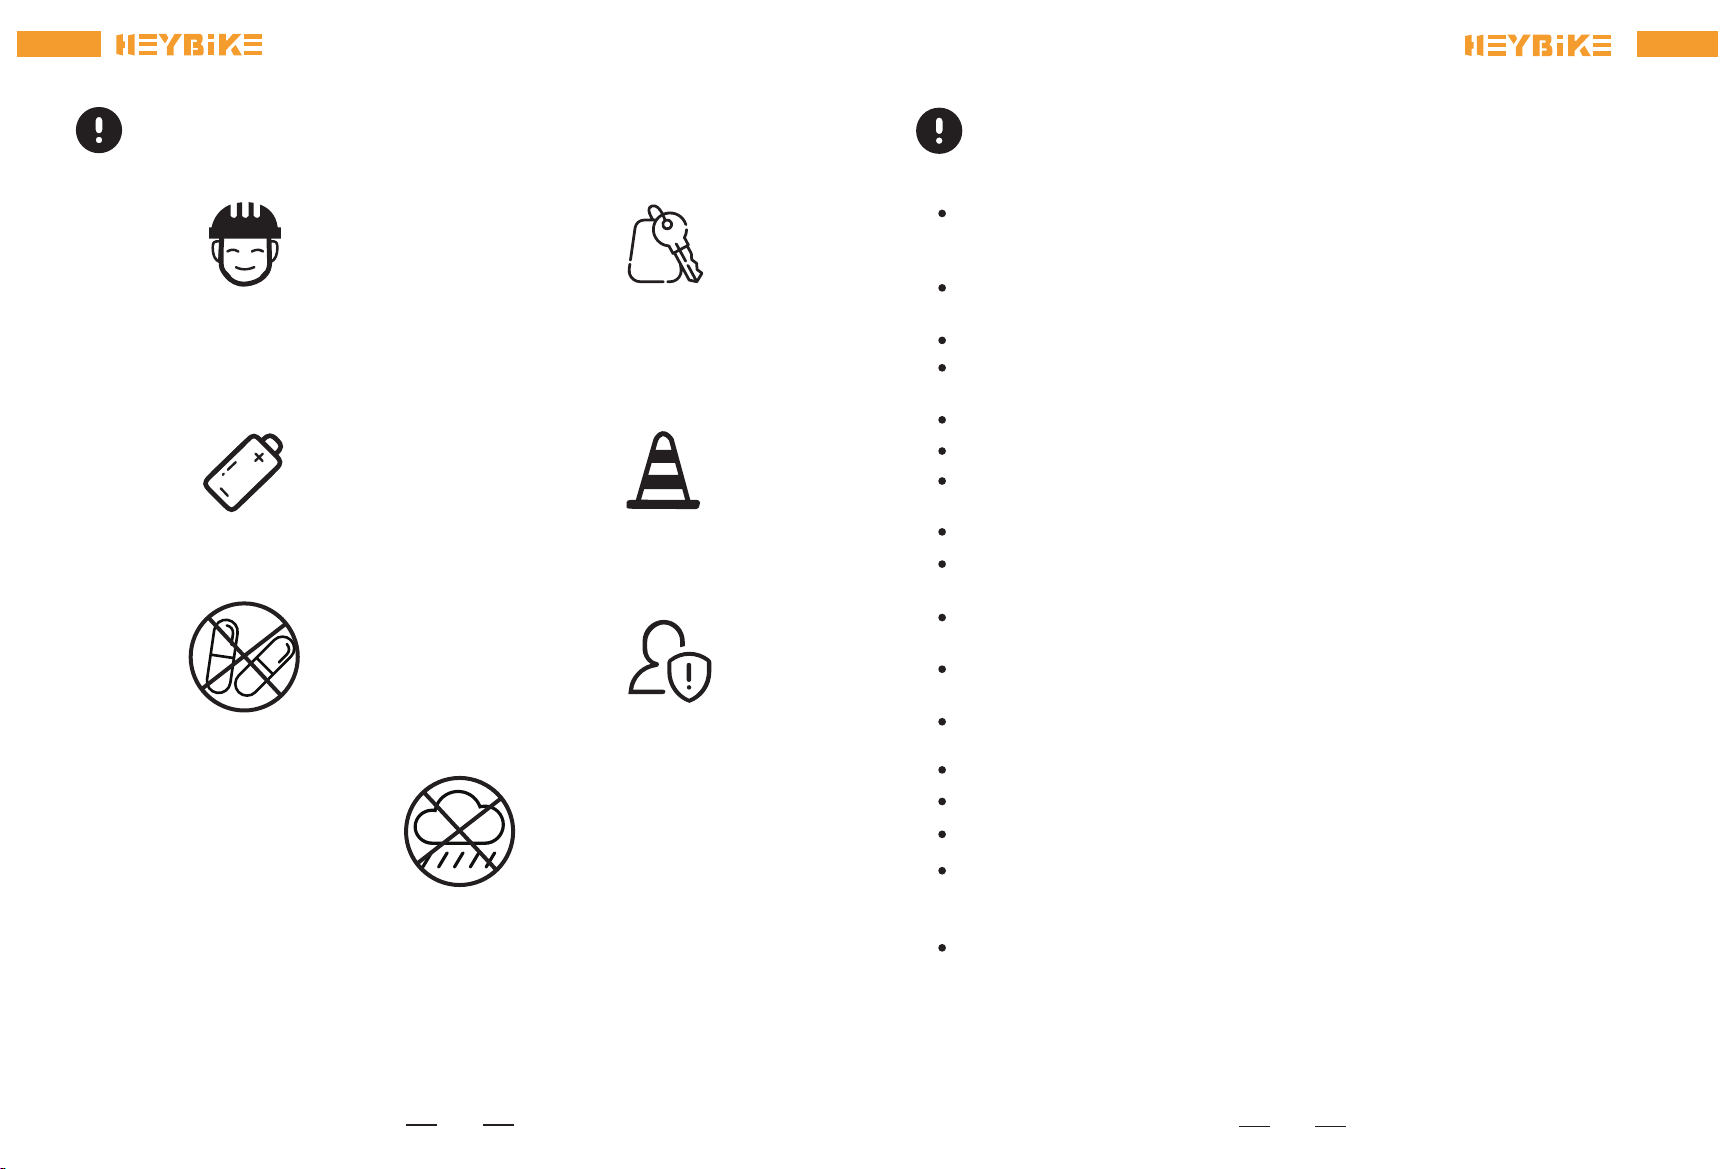
Product Safety Notice
DON'T RIDE UNTIL YOU READ THIS:
Always wear a helmet when
riding your electric bike.
Make sure your electric bike
has a full batte before taking
it out to ride.
Do not ride the bike under the
inuence of drugs or alcohol.
Do not ride under wet conditions. The
electric bike may slide from under your feet
causing inju. Wet conditions may damage
the electronics and void the warranty.
Always respect pedestrians.
Always be aware of local road
laws, and follow them.
Keep the two keys properly. If the unique
keys are lost, you will not be able to turn on
the bike or replace the batte. If necessa,
you should get more spare keys (We don't
have a backup key).
2
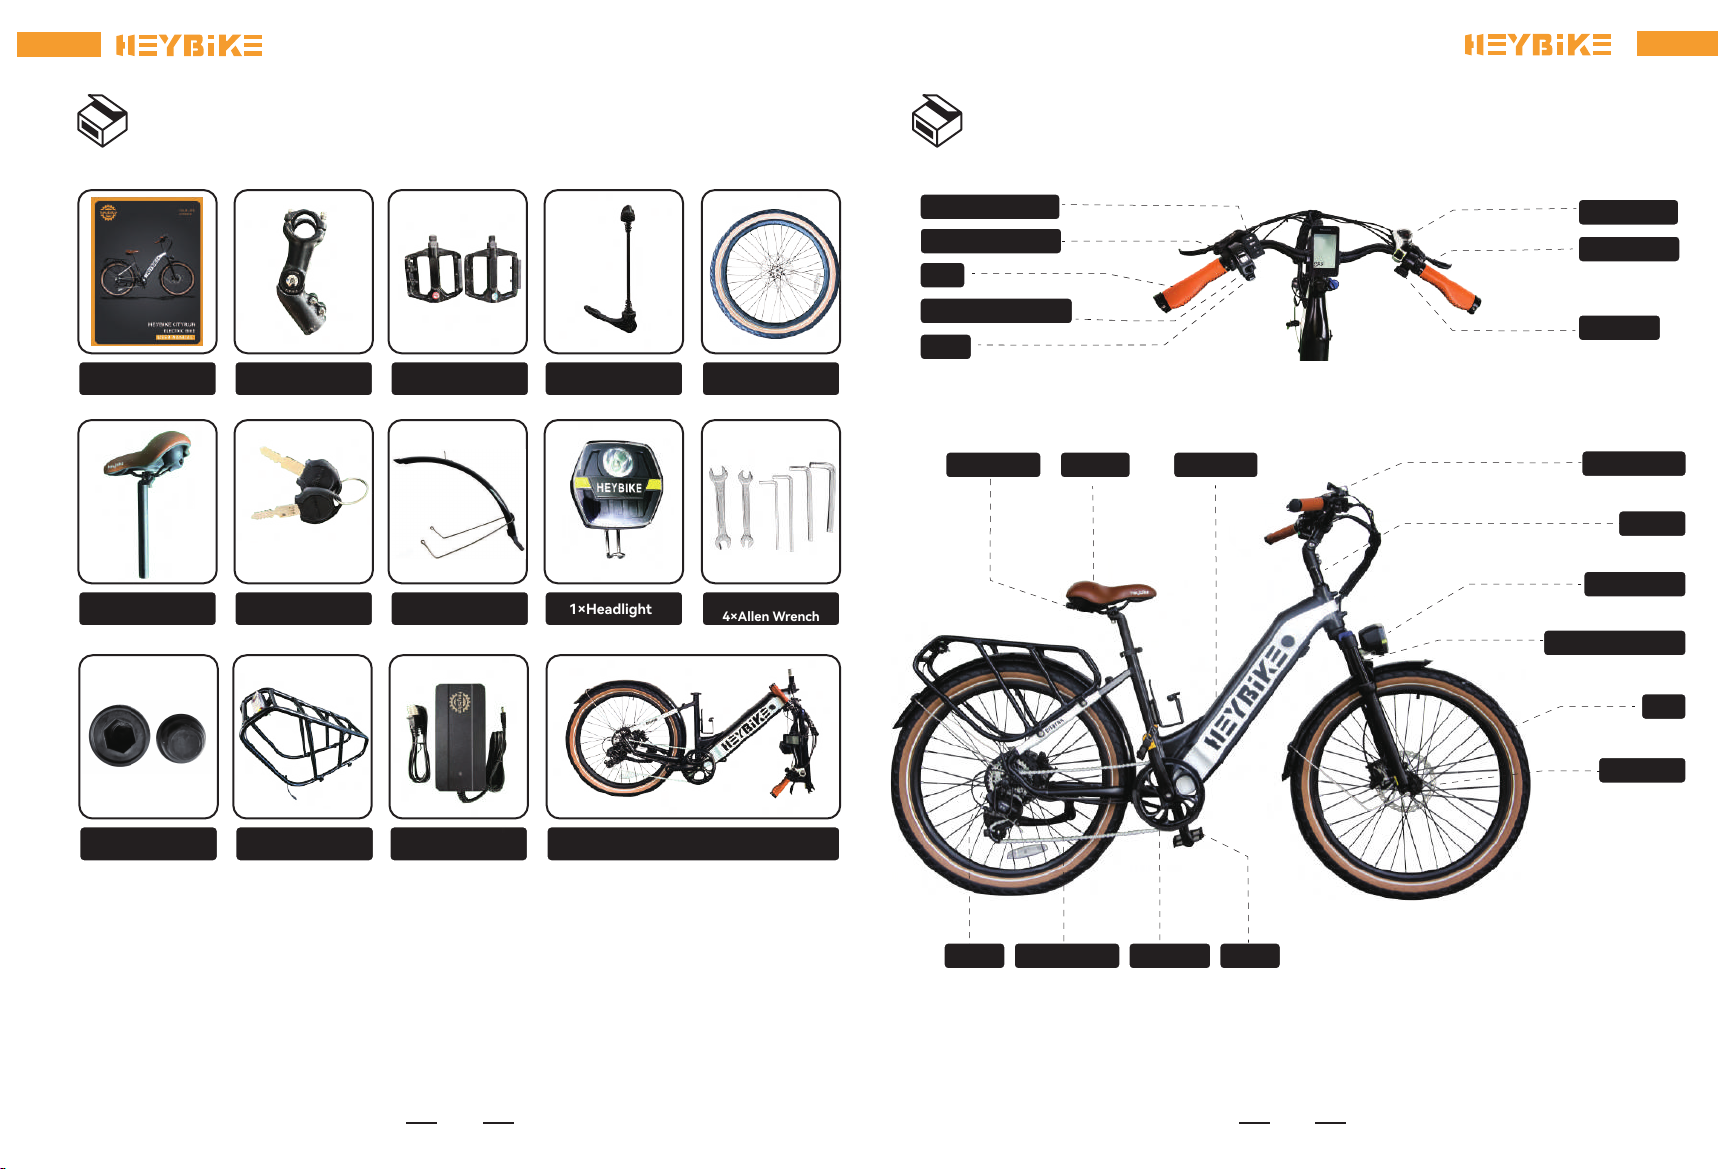
Product Oveiew
Grip
Headlight Switch
Display Controls
Throttle
Derailleur
Brake Level
Horn
Turn Signal Switch
LCD Display
Stem
Front Light
Suspension Front
Disc Brake
Tire
Pedals
Wheel Chain Crankset
Batte
Seat Post Saddle
Motor
5
Package Contents
Carefully check package contents, if anything is missing or damaged, please contact Heybike Suppo.
Unpack the bike. Open the bike box and remove the small box inside. With the help of another person
capable of safely lifting a heavy object, remove the bike from the bike box. Carefully remove the packaging
material protecting the bike frame and components. Please recycle packaging materials especially
cardboard and foam whenever possible. Open the small box and carefully set out all contents.
1×User Manual 1×Stem 2×Pedals 1×Fornt
Wheel Screw 1×Fornt Wheel
1×Seat 2×Keys 1×Fender 1×Headlight 2×Open-end Wrench
4×Allen Wrench
1×Rear Rack
2×Front Wheel
Bowl Upper Cover 1×Charger 1×Electric Bike
4
Assembly
Scan QR code to download assembly video:
Congratulations on your purchase of a Heybike Cityrun electric bike! The instructions that follow are
intended to see as a guide in unboxing and getting familiar with your new bike. Please visit
www.heybike.com for additional help with assembly, including a step-by-step video.Or you can Scan
the code to download the tutorial about how to assemble the bike.
If you do not feel comfoable assembling the bike yourself, we recommend taking your new bike to
a bike shop for assembly and inspection. If you are willing to assemble the bike yourself, be sure to
follow all instructions, properly adjust gears and brakes, and set tire pressure.
6
Assembly
If you do not feel comfoable assembling the bike yourself, we recommend taking your new bike to a
bike shop for assembly and inspection. If you are willing to assemble the bike yourself, be sure to follow
all instructions, properly adjust gears and brakes, and set tire pressure.
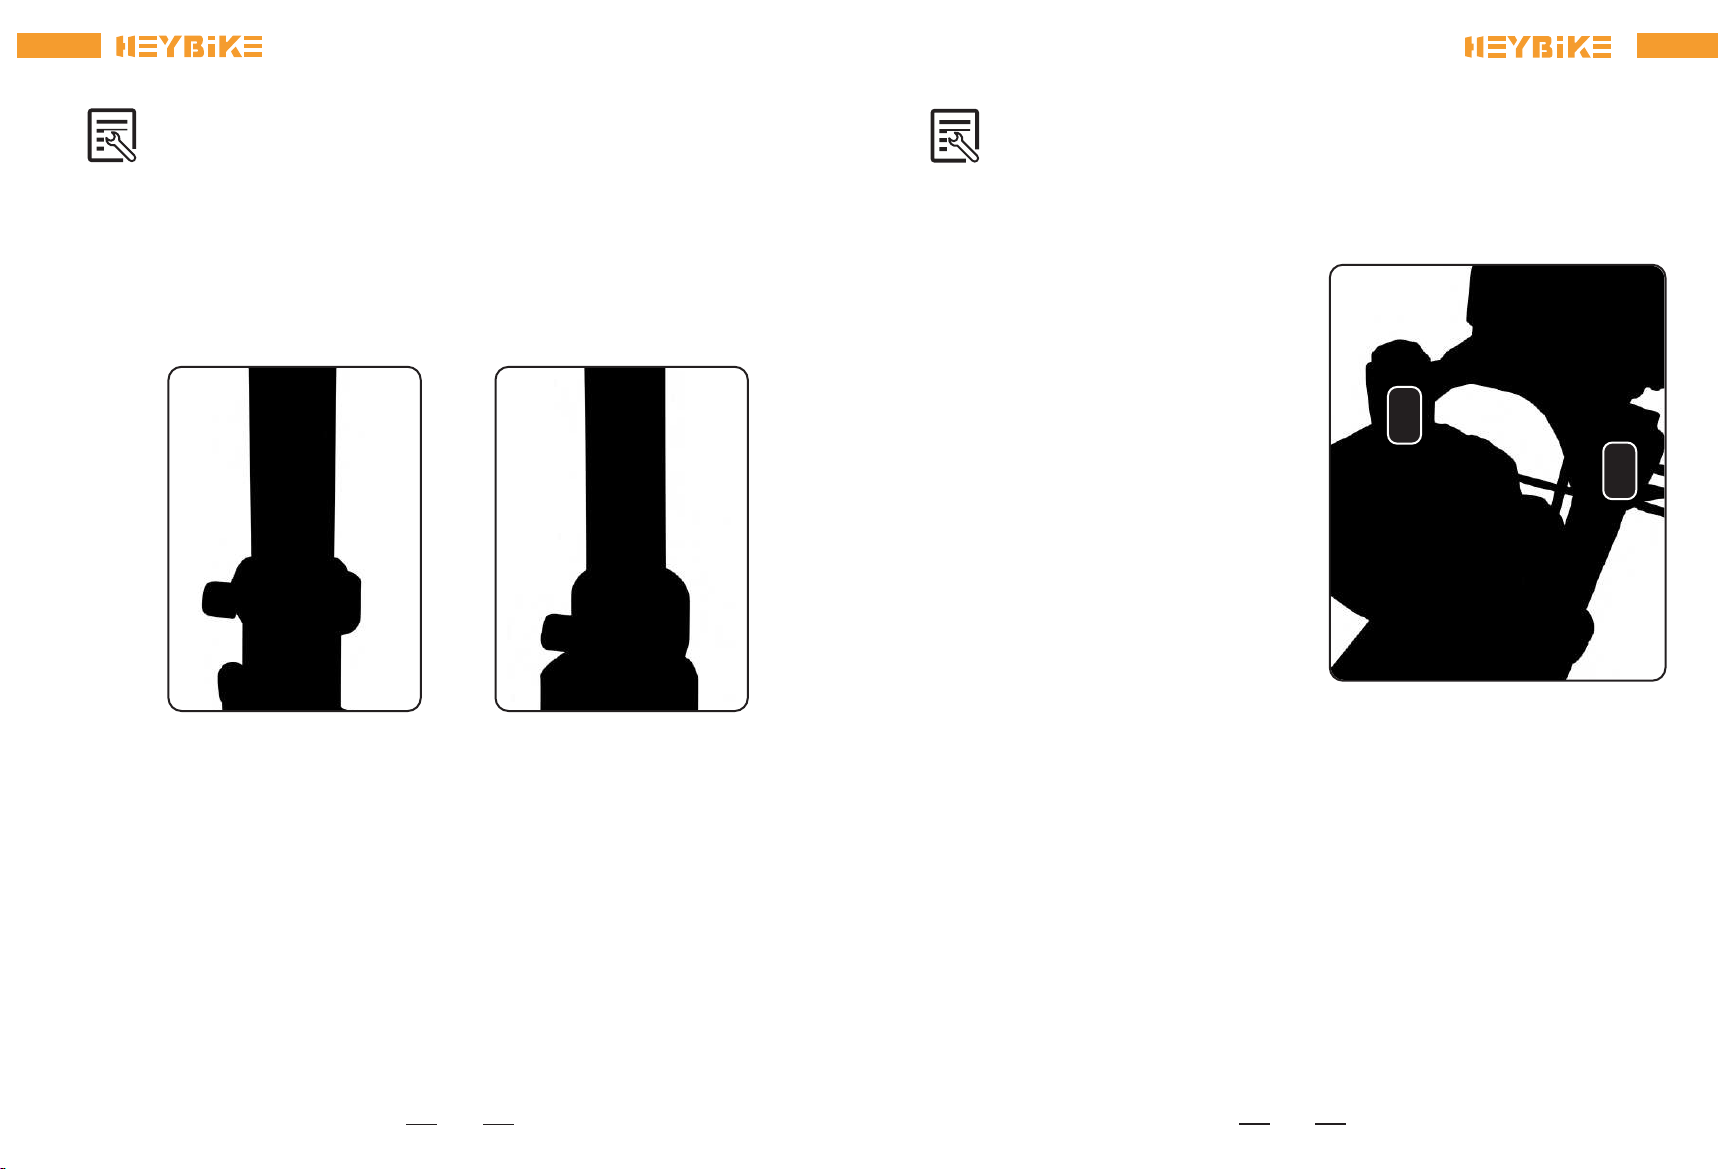
Note: Closing the quick-release lever should require enough pressure that it leaves an imprint in your
hand. If it’s too easy or too dicult to close, adjust the lever tension by turning the adjustment nut
opposite the quick-release lever.
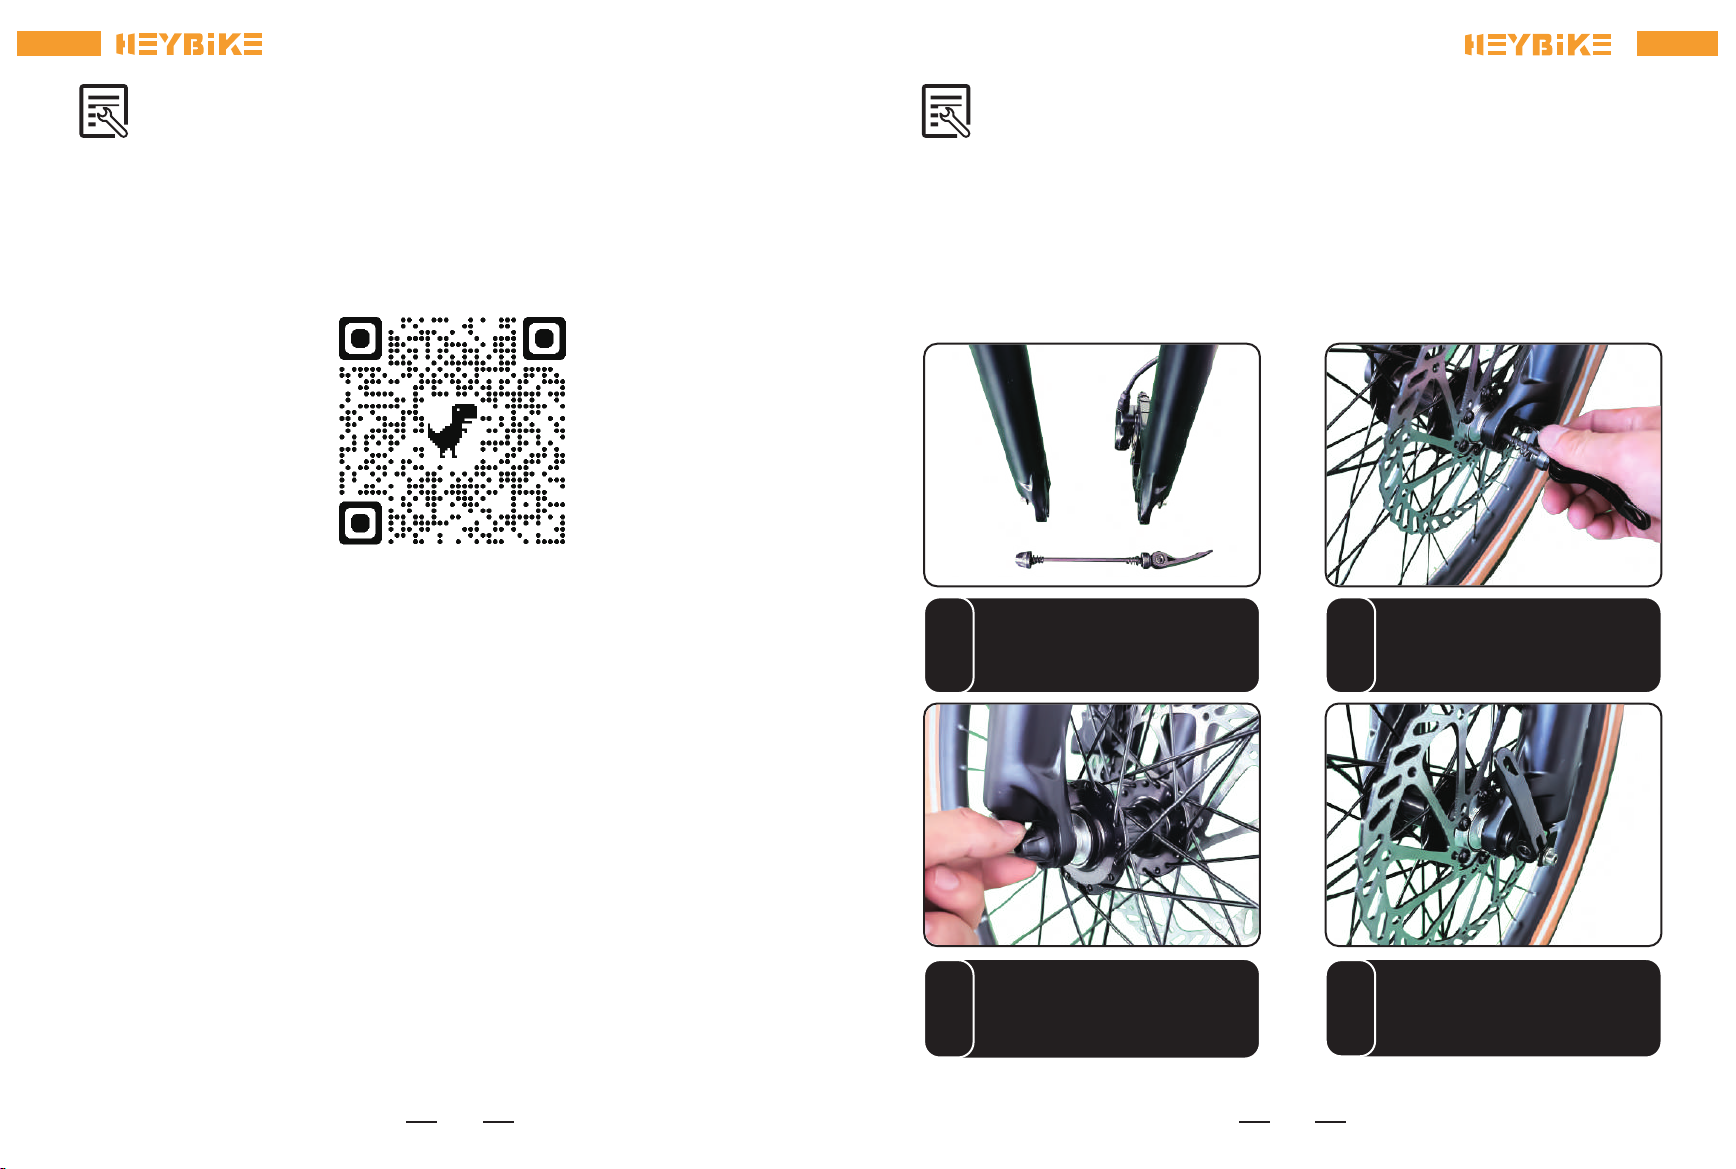
2
1
4
3
7
Locate the quick-release lever. Open the lever
and remove the thumb nut and cone spring
(opposite the lever). Keeping the washer and
other cone spring in place on the lever side
Line up the fork with the axle at the center of
the wheel. Make sure there's a spacer between
the fork and wheel on each side.The disc brake
is on the left.
Hold the nut on one side andtighten the nut
on the other side of the wheel onto the fork.
Ensure the front wheel andquick-release lever
are properly secured before moving on to the
next step
Assembly
56
78
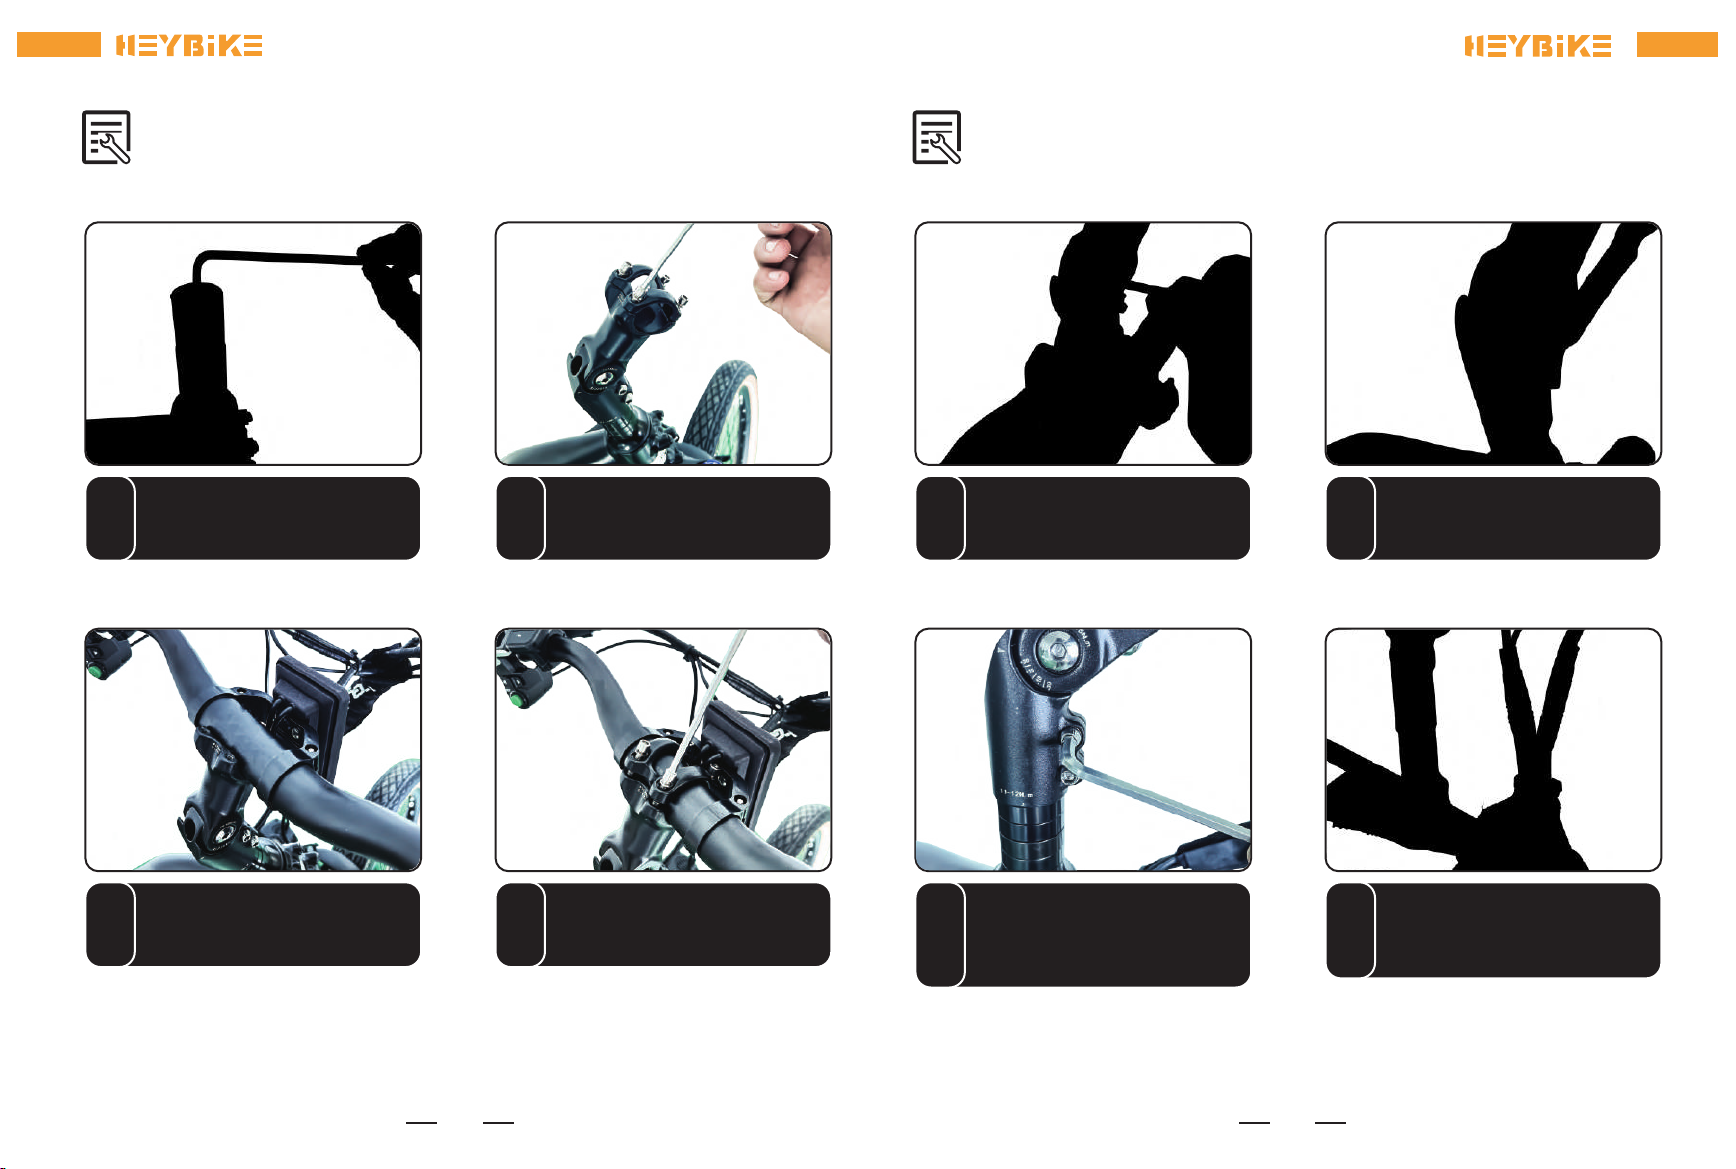
Adjust the handlebar height to your need
and tighten the Allen screws on the stem. Cover the hole with the rubberstopper.
Use the wrench to tighten the screw and x
the handlebar stem in place. Check it again to
make sure the handlebar stem is in line with
the top tube, then use the wrench to tighten
the screw and x the handlebar stem in place.
Find out the display cable and connect it.
9
Assembly
1 2
3 4
Loosen the Allen screws and
remove the protection mold. Install the stem and loosen the four
Allen screws.
Place the whole handlebar onto the
stem correctly.
Place the cover onto the handlebar and
tighten the four Allen screws.
8
Assembly
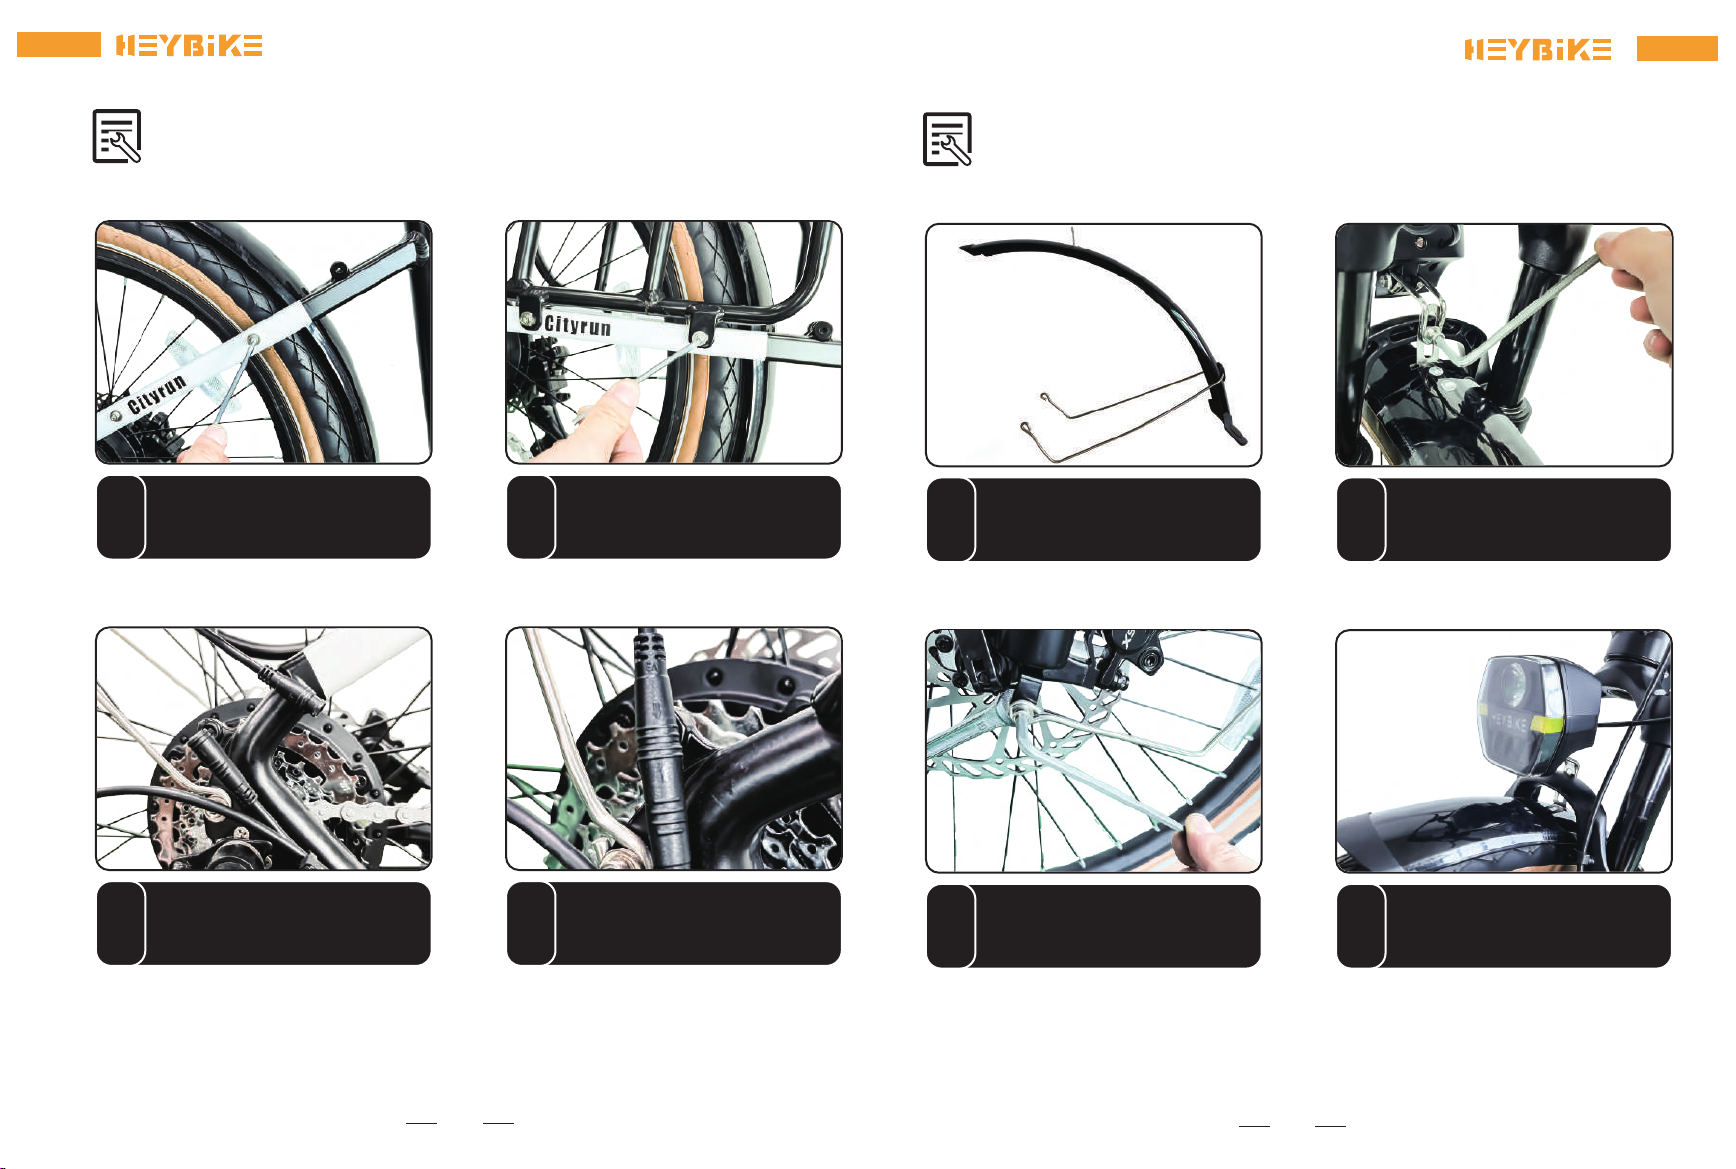
1 2
3 4
Take out the fender, remove the nut,
washers and bolt at the top and bottom of
the front fork.
Tighten the screws on the each side of
the front wheel.
Hold the front fender and the headlight
onto the bike frame and tighten them
with the screw.
Connect the headlight cable. Please note
to connect it aim at the direction of the
arrow.
11
Assembly
1 2
3 4
Take o the four screws from the
bike frame.
Hold the rack onto the bike frame and
tighten the rack with the screw
Find out the taillight cable.
Connect the taillight cable. Please
note to connect it aim at the
direction of the arrow.
10
Assembly
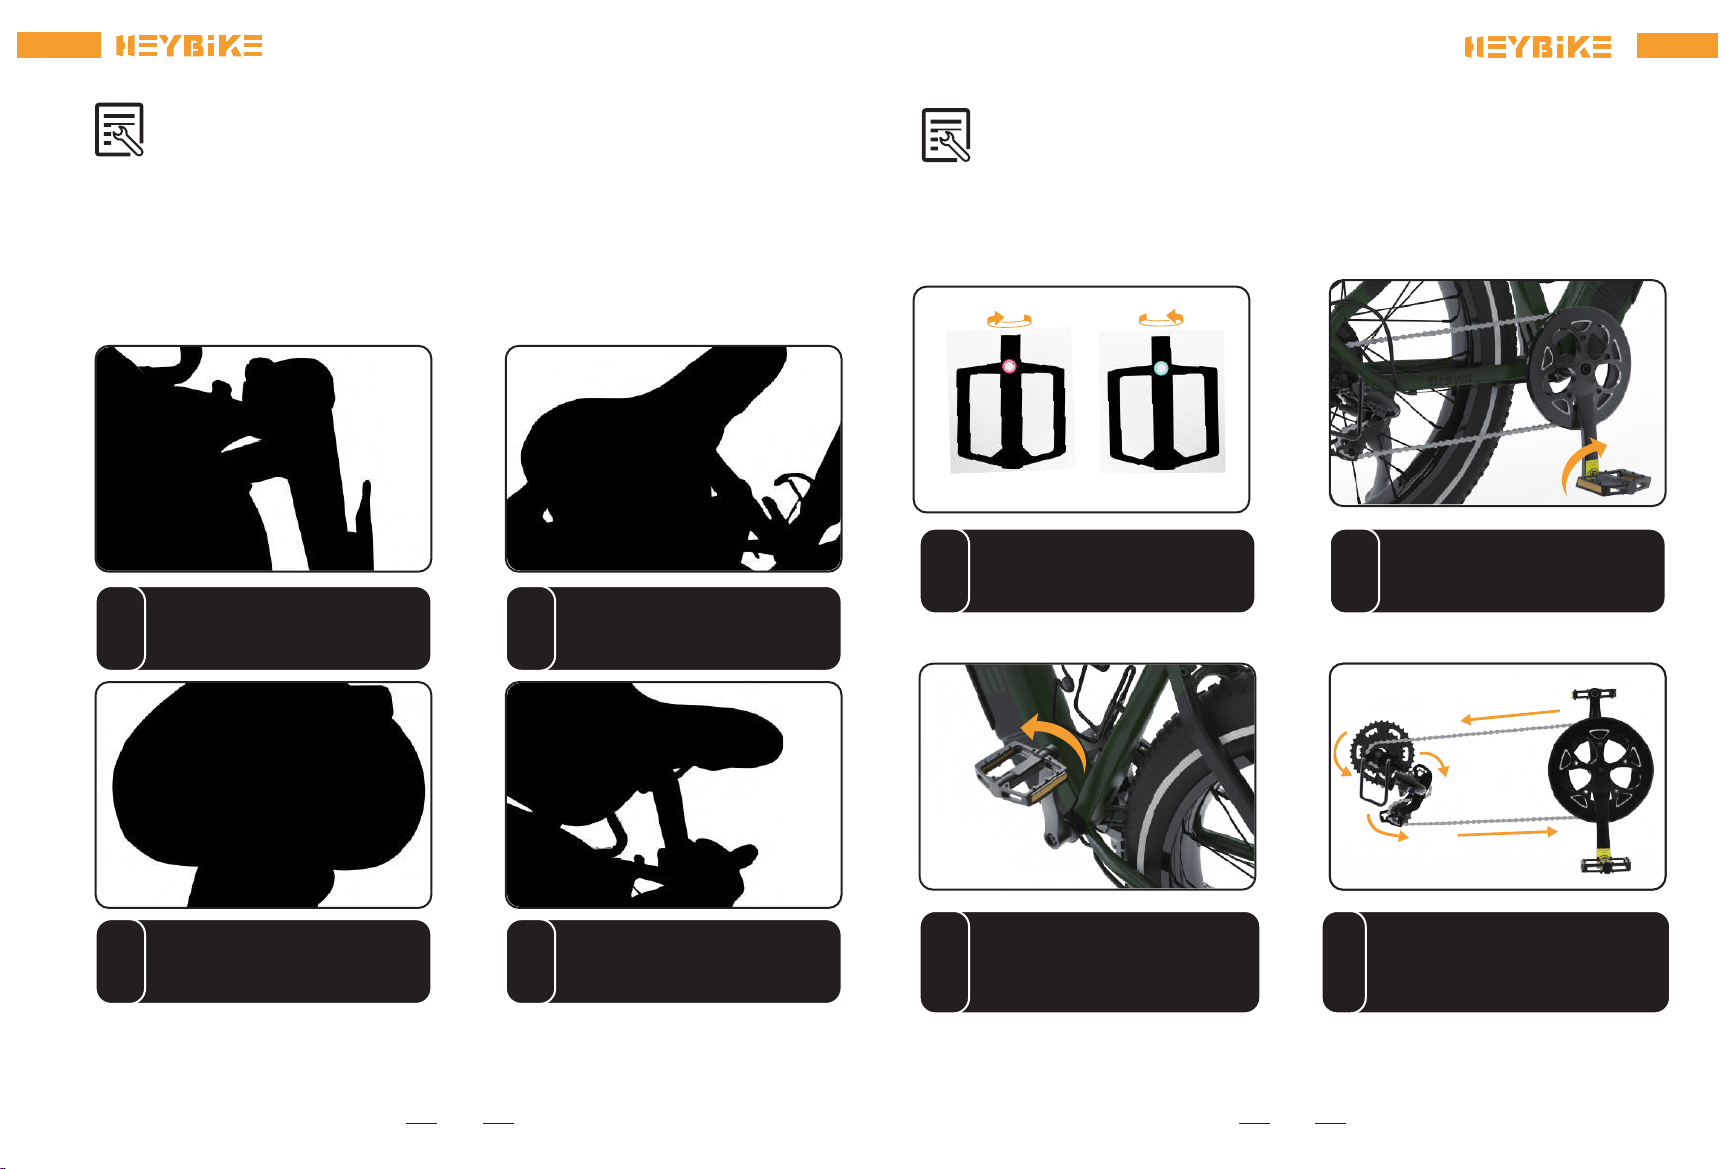
1 2
3 4
Note: If the pedal/ chain doesn't run smoothly or something seems misaligned, please contact
Heybike Suppo.
Thread the right pedal onto the right crank
gently by hand, turning clockwise. Then
tighten pedal by allen wrench.
Thread the left pedal onto the left crank gently by
hand, turning counter-clockwise. Then tighten
pedal by allen wrench.
Check the chain alignment. Rotate the right pedal and
crank toward the back of the bike as though pedaling
backward. Watch the chain and ensure the chain runs
through the drivetrain (the rear cog, chain tensioner,
and around the front chainring) smoothly.
13
RL
Locate the right-side/ left side pedal,
which is marked “R,” “L,” should have an
“R”“L,” sticker attached.
Assembly
1 2
3 4
For better pedaling, safety and overall riding comfo, positioning the seat at the right height is
impoant. The rider's leg length is used to determine the seat's position. When you pedal, your hips
should remain level and your legs should be almost fully extended at the bottom ofthe pedal stroke, but
not over-extended.
To determine the right seat height, sit on the eBike with one pedal at its lowest point andplace the ball
of your foot on the pedal. Your leg should be almost fully extended(not lockedout) with a slight bend
at the knee.
Adujst the seat and the head of the seat
is parallel with the top tube.
Close the quick-release lever using your
palm or nger.
12
Open the quick-release lever by swinging
the lever open and outward fully.
Move the seat up and down by sliding the
seatpost in or out of the seat tube. DO NOT
raise the seatpost beyond the minimum
inseion marking etched into the seatpost
tube
Assembly
1
2
The suspension fork can move up and down up
to 80mm to cushion bumps in the riding suace,
which can make riding on a rough road or trail
smoother and more comfoable.Depending on
a rider’s preference, the suspension fork can be
locked out as a rigid fork, which will typically
yield higher eciency while pedaling.
The lockout lever (1) , located on top of
the right side of the suspension fork, can be
turned counterclockwise until it stops to
completely lock out the suspension fork’s travel.
To unlock the lockout lever, turn the knob clock-
wise until it stops. When the lockout lever is
unlocked, resistance can be adjusted by turning.
The preload adjustment knob (2), located on the top of the left side of the suspensionfork.
To soften the ride, subtract resistance by turning the preload adjustment knob counterclockwise, in
the direction of the small “-” on the knob. To make the suspension stier when going over bumps,
add resistance by turning the preload adjustment knob clockwise, in the direction of the small “+”
on the knob.
Adjusting the Suspension Fork
15
Assembly
(1)
(2)
NOTICE: Ensure the seatpost and seat are properly adjusted before riding. DO NOT raise the
seatpost beyond the minimum inseion marking etched into the seatpost tube (as shown at
right). If the seatpost projects from the frame beyond these markings (shown far right), the
seatpost or frame may break, which could cause a rider to lose control and fall. Ensure the
minimum inseion markings on the seatpost are inside the seat tube of the frame.
Before using the bike, always check to ensure all latches, levers, and quick releases are properly
secured and undamaged. Check that they are correctly secured before eve ride and after
eve time the bike is left unsupeised, even for a sho time. Otherwise, the handlebar stem
and/or seatpost may come loose and can result in loss of control, damage to the bike, propey,
serious inju, and/or death.
14
√×
1 2
3
Sta-up Procedure
After the bike has been properly assembled according to the assembly video, all components are
secured correctly, a ceied, reputable mechanic has checked the assembly, and you have read this
entire manual, turn on the bike and select a pedal assist level following the steps below:
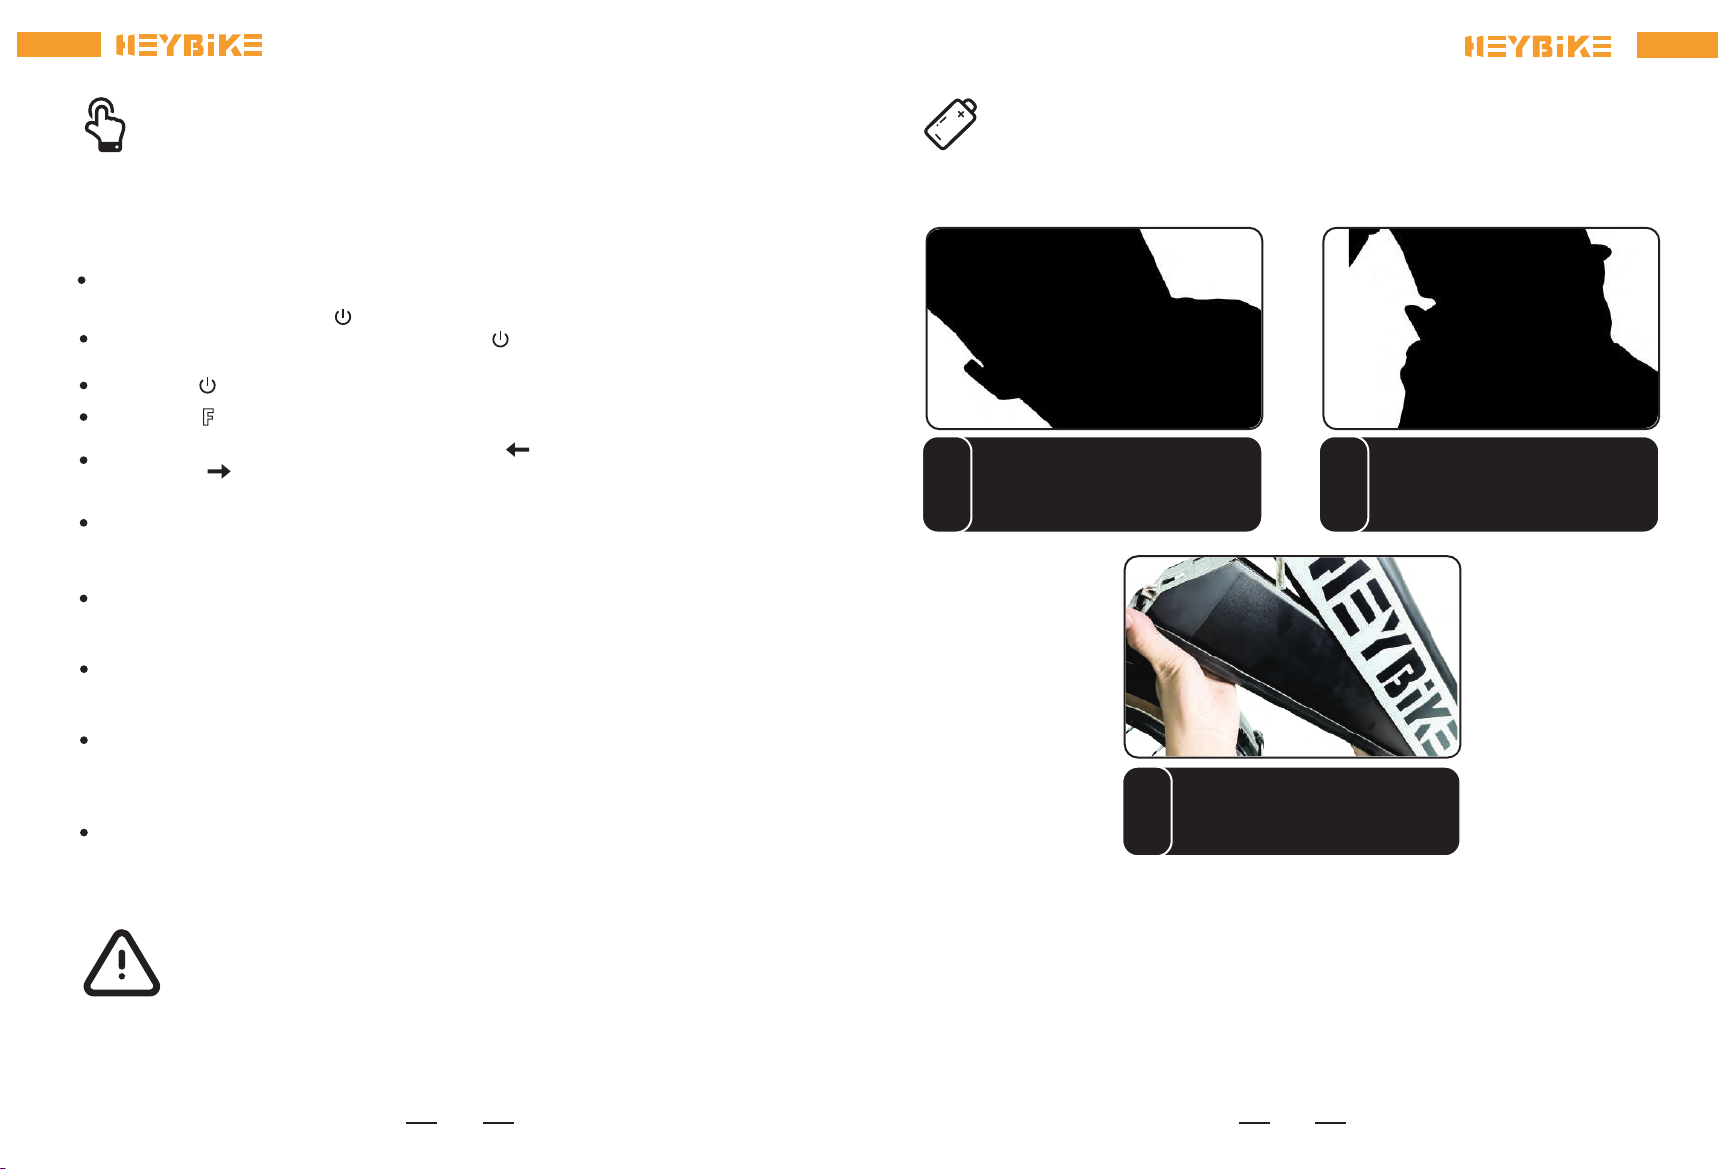
Familiarize yourself with the batte power positions. Fully charge the batte rst and cover the
rubber stopper, ready for a ride.
Sho press to change DST or ODO.
Turn on the bike. Hold down for approximately 3 seconds until power is delivered to the LCD
display and turned on.Turn o the bike. Hold down for approximately 3 seconds and there is an
"OFF" on the display.
Turning Light on the taillight: turn on your left signal before staing to turn left; turn on your
right signal before staing to turn right.
Sho press to change Current speed, MAX speed, and AVG speed.
Turn on/o the headlight and taillight. Press the switch to ON/OFF. Note: the headlight will light up
automatically when the light is dim when the display is on even if the switch is OFF.
Select the desired level of pedal assistance (PAS) between levels 0~5 using the + and - on the LCD
display. Level 1 corresponds to the lowest level of pedal assistance, and level 5 corresponds to the
highest level of pedal assistance. Level 0 indicates pedal assistance is inactive. Sta in PAS level 0 or 1
and adjust from there.
Long press the “-” button to sta the Walking Mode. The e-bike will travel at 6 km/h (3.73miles/h),
easy to push.
Begin riding carefully. With the proper safety gear and rider knowledge, you may now operate your
bike. On a at suace, in a low gear (1 or 2), most riders should be able to begin pedaling the bike with
pedal assist level 0 or 1. You may also use the throttle to accelerate and maintain your desired speed.
The throttle is used by slowly and carefully rotating the throttle backward toward the rider. Do not use
the throttle unless you are on the bike. Do not use the throttle while dismounted. Avoid accidental
application of the throttle while dismounted; anytime you are moving the bike while dismounted,
ensure the bike is powered o to prevent the accidental application of the throttle.
Do not use the throttle while dismounted. Avoid accidental application of the throttle
while dismounted; anytime you are moving the bike while dismounted, ensure the bike
is powered o to prevent accidental application of the throttle.
When the batte is removed, be careful not to drop or damage the batte when loose from the bike.
Avoid damaging the exposed connector terminals and keep them clear of debris.
When installing the batte, ensure the batte is turned o before putting the batte into the frame
mount receptacle. Do not force the batte onto the receptacle; slowly align and push the batte into
the receptacle. Ensure the batte has been properly secured to the bike before each use by carefully
pressing the batte to the bike frame with both hands to test the security of the attachment of the
batte to the mount.
Ensure the bike is turned o. Align the
key po with the appropriate "locked"
position by inseing the key into the
key po, and then rotating to align the
key with the "unlock" icons, and the
batte will pop up.
Hold the bike frame with your right
hand, locate the locking device on the
batte with your left hand then turn
anticlockwise.
Prop up the batte with your left hand
and then remove the batte with both
hands. Note: the batte weighs 9.45 lbs
and should be handled with care.
For your convenience, the Heybike batte can be removed.
17
16
Remove the Batte

1
2
3
Charge Your E-Bike
The batte can be charged o the bike.
To remove the batte, turn the key to
theUNLOCK position.(see the previous
remove batte section for details), Then
carefully pull the batte up until the
batte detaches from the receptacle.
Plug the charger into a power outlet, charging
should initiate andwill be indicated by the LED
charge status lights on the chargeurning red.
Once fully charged, the charging indicator light
turning green. Unplug the charger from the wall
outlet rst and then remove the charger output
plug from the batte charging po.
Remove the rubber cover on the charging
po on the opposite side of the batte
from the key switch. Connect the DC
output plug from the charger to the
charging po on the side of the batte.
19
Charge Your E-Bike
Remove the rubber cover on the charging po on the opposite side of the batte from the key
switch.
Plug the charger into the batte’s charging po. With the batte on or o the bike, place the
charger in a at, secure place, and connect the DC output plug from the charger to the charging
po on the side of the batte.
Plug the charger into a power outlet, charging should initiate and will be indicated by the LED
charge statuslights on the charger turning red. Once fully charged, the charging indicator light
turning green. Unplug the charger from the wall outlet rst and then remove the charger output
plug from the batte charging po.
Before using the electric bike, you must fully charge the batte.
Ensure the batte is o, by rotating the key to align with the o icon.
Charging Po
18
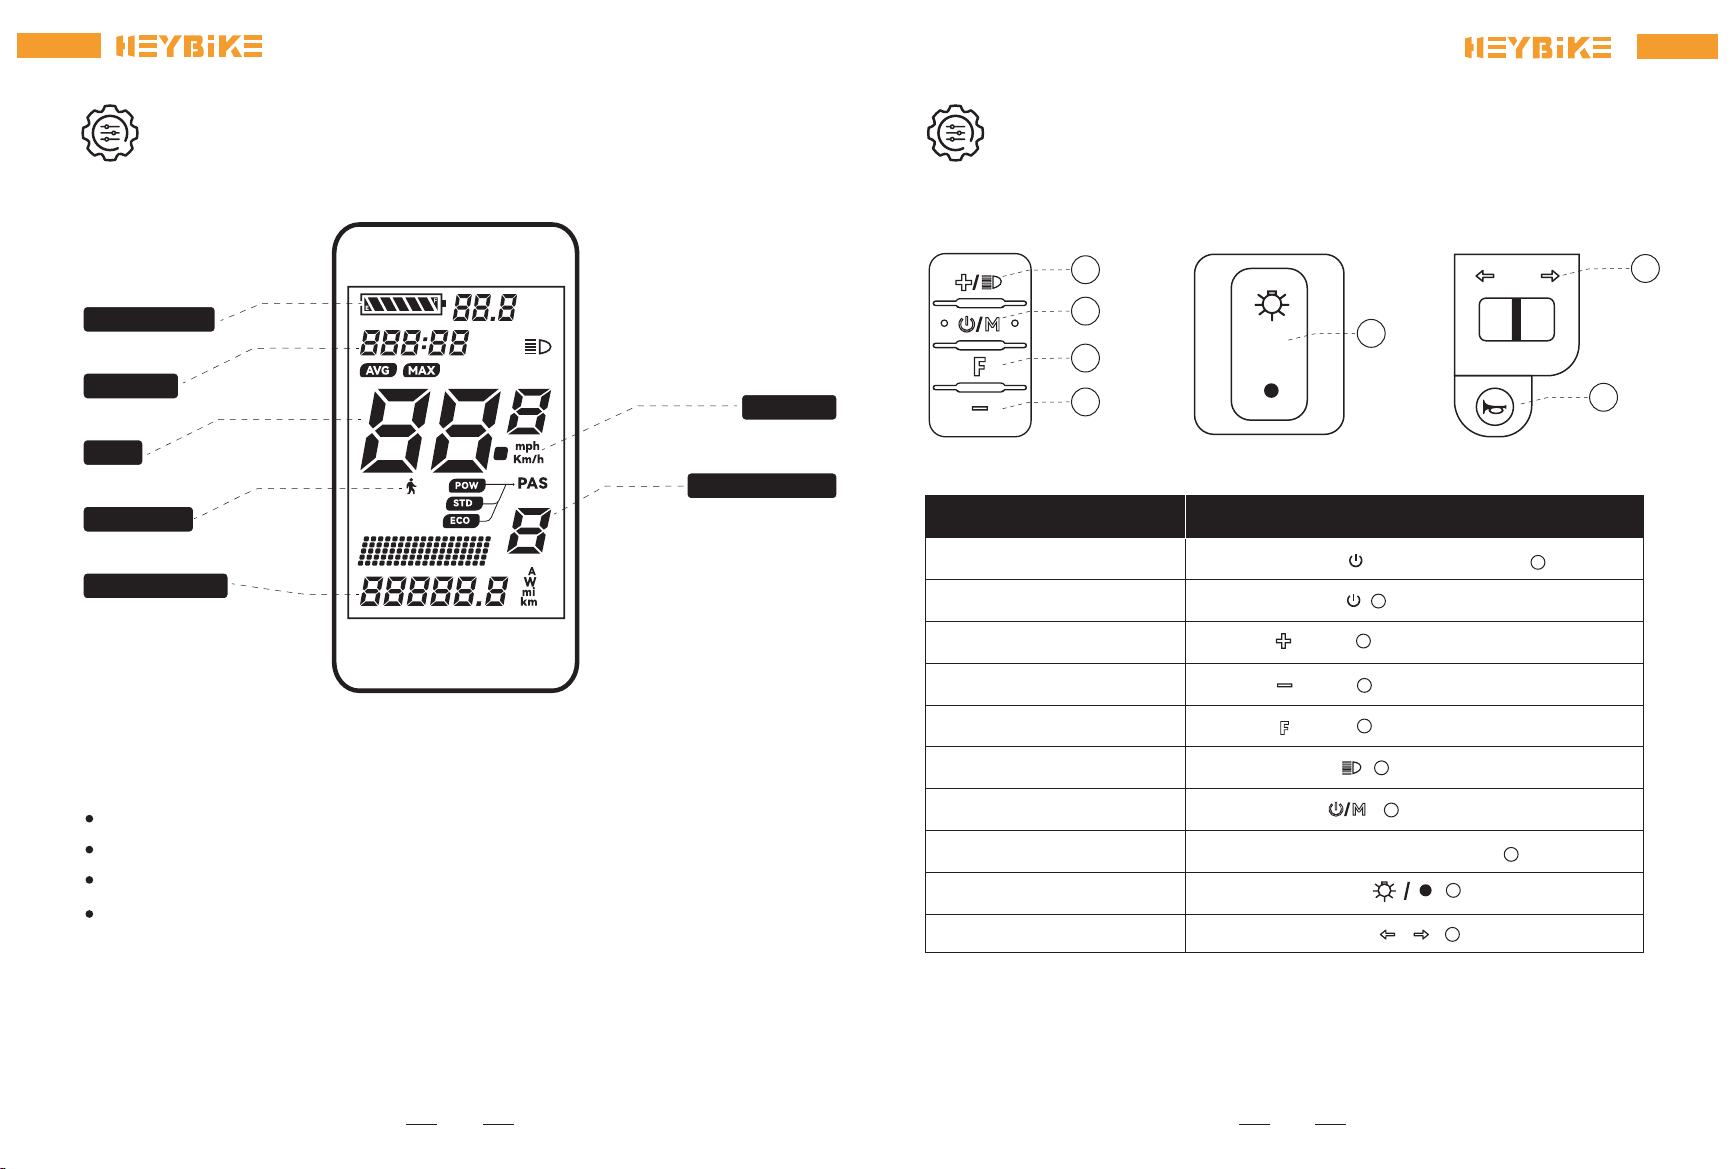
Display and Setting
Batte Indicator
Riding Time
Speed
Walking Mode
Ranges/Power Unit
Speed Unit
Pedal Assisted Level
ODO: These numbers show odometer data(i.e., cumulative distance).
MAX: These numbers show maximum speed data for a single trip.
AVG: These numbers show average speed data for a single trip.
Batte Level: This icon indicates how much batte life you have left.
20
2
2
2
1
1
2
4
5
6
4
3
Display and Setting
LCD Display Controls
Turn on bike
Turn o bike
Increase pedal assist (PAS) level
Decrease pedal assist (PAS) level
Press button
Press button
Press button
Long press +/
Sho press
Turn on the bike, long press - button
Push the button to
Push the button to
Change Current speed
/MAXS/AVG speed
Turn on backlight
Change DST/ODO
Turn on walking mode
Turn on/o headlight
Turn on/o turning light
Operation Directions
Long press the until power engages
Long press the
3
4
5
16
7
21

2
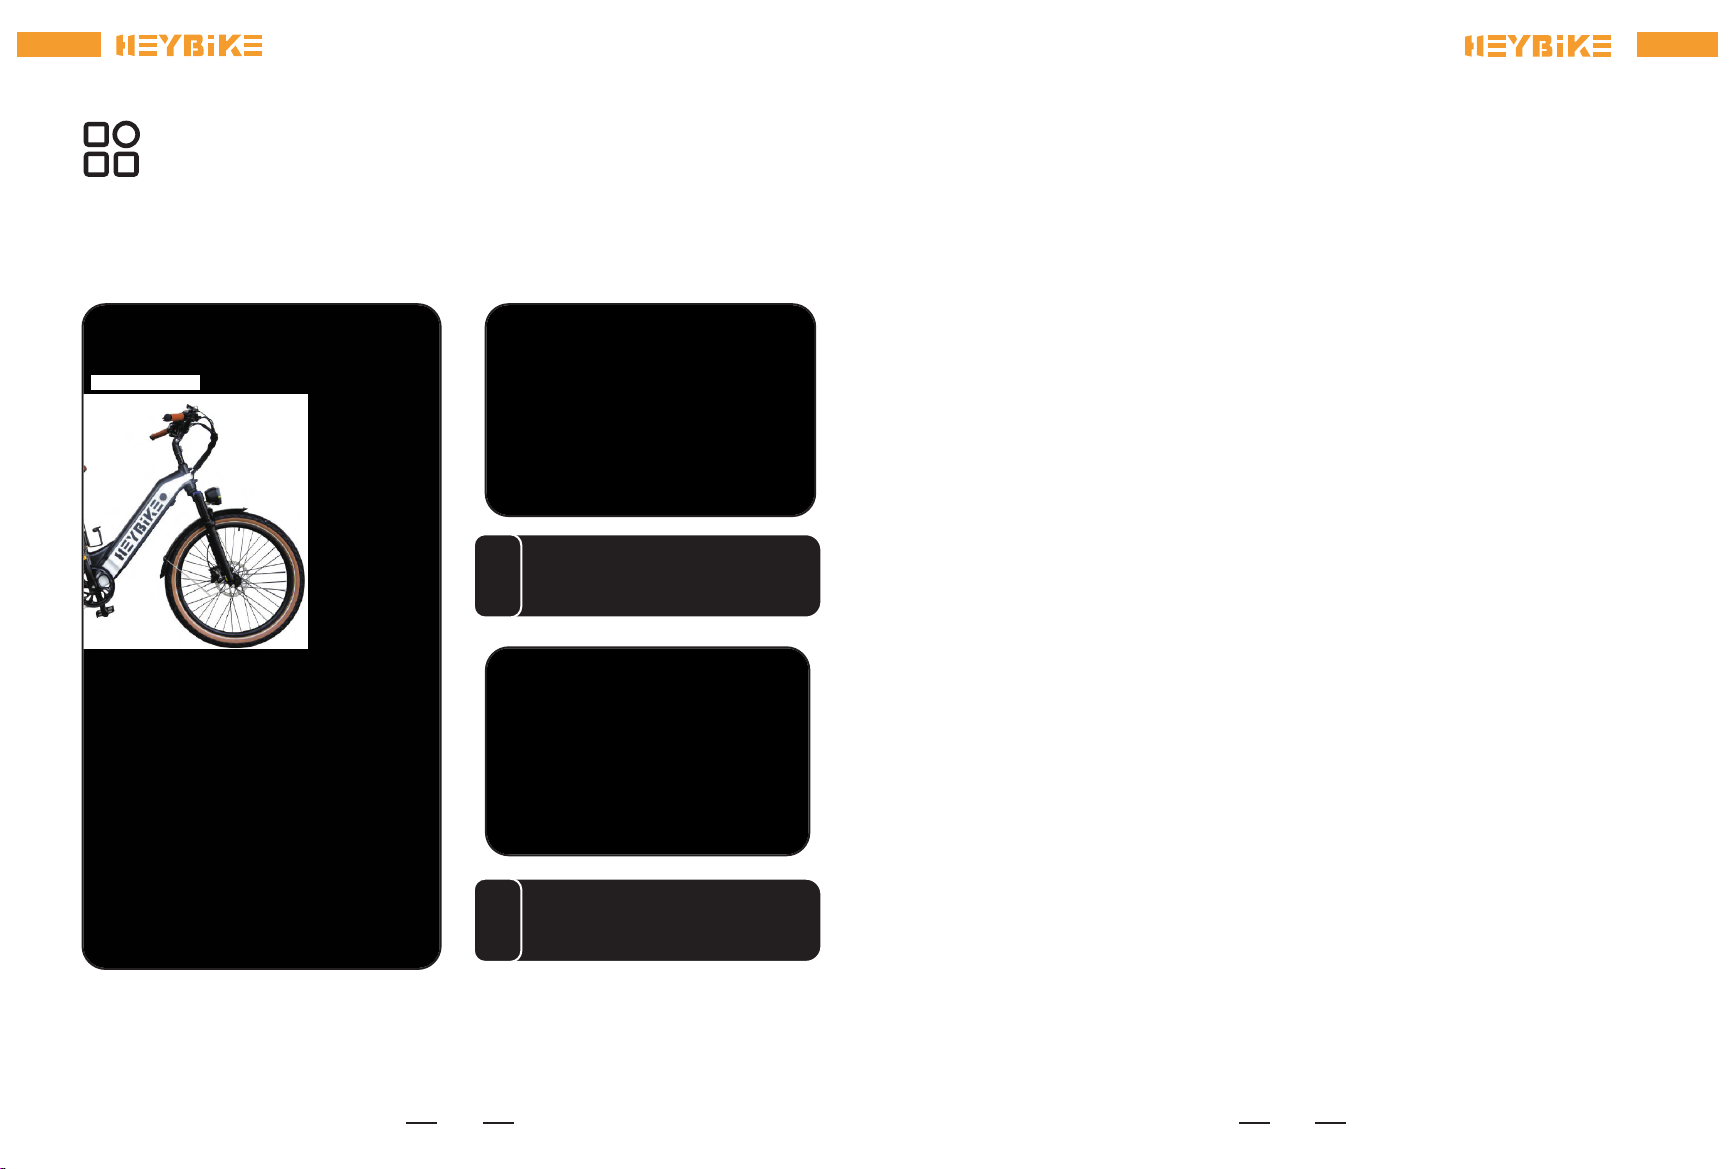
APP Operation
Heybike APP will update continually and the phone display inteace is subject to
the latest version. Note: APP is only available for models released after September,
2022.
Please download the Genuine APP from Google Play Store or IOS App Store.(Search
heybike) Heybike
After login, click the Connect button
to enter the Bluetooth search page.
1Turn on the Bluetooth on your phone
rst. Use your email to register an
account for the rst use and log in.
APP Operation
3 4
Find your device, click Connect on the
right side, then click Conrm to bind your
bike.
The Bluetooth icon on the main page will
stay rm green which means the APP is
connected successfully with the bike. (Note:
the blinking blue Bluetooth icon means the
APP doesn't connect with the bike)
23
22
Daily Care and Maintenance
Batte Maintenance
Storage and Disposal
Cleaning and Storage
If you see stains on the bike body, wipe them o with a damp cloth. If the stains won't scrub o, put on
some toothpaste, and brush them with a tooth brush, then wipe them o with a damp cloth.
Notes: do not clean the bike with alcohol, gasoline, kerosene or other corrosive and volatile chemical
solvents to prevent dire damage. Do not wash the bike with a high-pressure water spray. During clean-
ing, make sure that the bike turned o, the charging cable is unplugged, and the rubber ap is closed as
water leakage may result in electric shock or other major problems. When the bike not in use, keep it
indoors where it is d and cool. Do not put it outdoors for along time. Excessive sunlight, overheating
and over cooling accelerate the batte pack's life span.
1. Use original batte packs, use of other models or brands may bring about safety issues;
2. Do not touch the contacts. Do not dismantle or puncture the casing. Keep the contacts away from
metal objects to prevent sho circuit which may result in batte damage or even injuries and deaths;
3. Use original power adapter to avoid potential damage or re;
4. Mishandling of used batteries may do tremendous harm to the environment. To protect natural
environment, please follow local regulations to properly dispose used batteries.
5. After eve use, fully charge the batte to prolong its life span.
1. Please t to store the bike in a cool and d place between 50 °F – 77 °F (10 °C – 25 °C). In extremely
humid environments the interior of the bike may suer condensation or even water accumulation, which
may damage the batte rapidly. Devices are not intended for use at elevations greater than 2000m
above sea level prolonged exposure to UV rays, rain and the elements may damage the enclosure
materials, store indoors when no tin use.
2. In daily use, t to avoid recharging the bike after completely exhausting the batte. If the
batte is low, charge it as soon as possible.
3. Please charge the bike eve other month to presee the batte.
25
1
2
APP Operation
Close to unlock
Need to open the APP and connect to Bluetooth,
while close to the bike 3-5 meters, the bike will
turn on automatically.
Auto lock
The bike will be turned o automatically after the
Bluetooth is disconnected and reaches the setting
time.
24
Log in and Connect your Bike
Notice: Before eve ride, and after eve 25-45 miles(40-72 km), we advise following the pre-ride
safety checklist.
Pre-Ride Safety Checklist
1.Brakes
2.Wheels and Tires
3.Steering
4. Chain
Ensure front and rear brakes work properly.
Check brake pads for wear and ensure they are not overworn.
Ensure brake pads are correctly positioned in relation to the rims.
Ensure brake cables are lubricated, correctly adjusted, and display no obvious wear.
Ensure brake levers are lubricated and tightly secured to the handlebar.
Test that the brake levers are rm and that the brake, and the brake light
are functioning properly.
Ensure tires are inated within the recommended limits posted on the tire sidewalls and hold air.
Ensure tires have good tread, have no bulges or excessive wear, and are free from any other
damage.
Ensure rims run true and have no obvious wobbles, dents, or kinks.
Ensure all wheel spokes are tight and not broken.
Check axle nuts and front wheel quick-release to ensure they are tight. Ensure the locking lever on
the quick-release skewer is correctly tensioned, fully closed, and secured.
Ensure the handlebar and stem are correctly adjusted, tightened, and allow proper steering.
Peorm a handlebar twist test (see assembly step 4) to ensure the stem clamp bolt security.
Ensure the handlebar is set correctly in relation to the fork and the direction of travel.
Ensure the chain is clean, oiled, and runs smoothly.
Extra care is required in wet, salty/otherwise corrosive, or dusty conditions.
5. Bearings Ensure all bearings are lubricated, run freely, and display no excess movement, grinding, or rattling.
Check headset, wheel bearings, pedal bearings, and bottom bracket bearings.
6. Cranks and Pedals Ensure pedals are securely tightened to the cranks.
Ensure the cranks are securely tightened and are not bent.
7. Derailleur and
Mechanical Cables
Check that the derailleur is adjusted and functioning properly.
Ensure shifter and brake levers are attached to the handlebar securely.
Ensure all shifter and brake cables are properly lubricated.
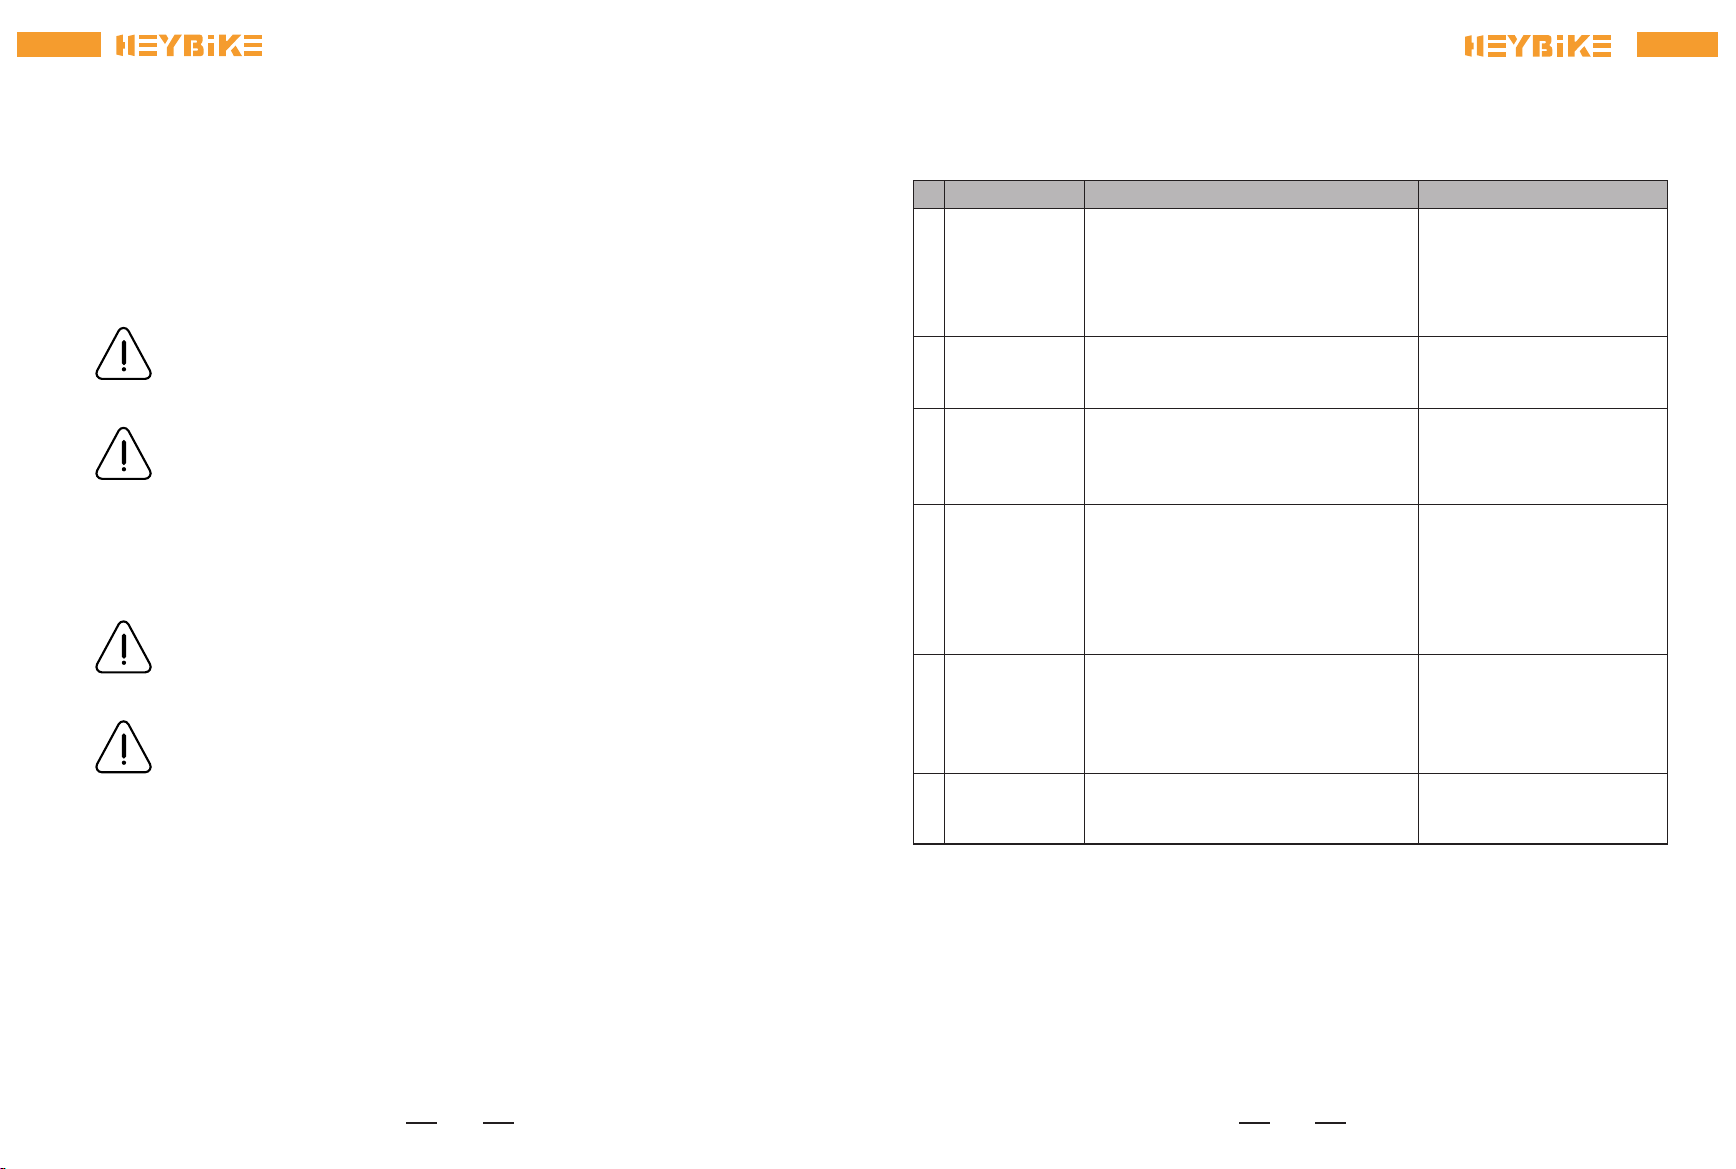
SafetyCheck
8. Frame, Fork, and
Seat
9. Motor Drive
Assembly and
Throttle
10. Batte
11. Electrical Cables
Check that the frame and fork are not bent or broken.
If either frame or fork are bent or broken, they should be replaced.
Check that the seat is adjusted properly, and seatpost quick-release lever is securely tightened.
Ensure hub motor is spinning smoothly and motor bearings are in good working order.
Ensure all power cables running to hub motor are secured and undamaged.
Make sure the hub motor axle bolts are secured and the torque arm, torque arm bolt, and torque
washers are in place.
Ensure batte is charged before use.
Ensure there is no damage to batte.
Lock batte to frame and ensure that it is secured.
Charge and store bike and batte in a d location, between 50 °F – 77 °F (10 °C – 25 °C).
Let bike d completely before using again.
Look over connectors to make sure they are fully seated and free from debris or moisture.
Check cables and cable housing for obvious signs of damage.
Ensure headlight, taillight, and brake light are functioning, adjusted properly, and unobstructed.
12. Accessories
Ensure all reectors are properly tted and not obscured.
Ensure all other ttings on bike are properly secured and functioning.
Inspect helmet and other safety gear for signs of damage.
Ensure rider is wearing a helmet and other required riding safety gear.
Ensure mounting hardware is properly secured if tted with a front rack, rear rack, basket, etc.
Ensure the taillight and taillight power wire are properly secured if tted with rear rack.
Ensure the fender mounting hardware is properly secured if tted with fenders.
Ensure there are no cracks or holes in fenders.
If installed, ensure the optional rear wheel lock is secured in the unlocked position and the key is
removed before eve ride.
Your cables, spokes, and chain will stretch after an initial break-in period of 50-100 mi (80-160 km), and bolted
connections can loosen. Always have a ceied, reputable bike mechanic peorm a tune-up on your bike after your
initial break-in period of 50-100 mi (80-160 km) (depending on riding conditions such as total weight, riding
characteristics, and terrain). Regular inspections and tune-ups are paicularly impoant for ensuring that your bike
remains safe and fun to ride.
27
Regular inspection and maintenance are key to ensure bikes from heybike function as intended, and to
reduce wear and tear on their systems. Recommended seice inteals are meant to be used as guide-
lines. Real world wear and tear, and the need for seice, will va with conditions of use. We generally
recommend inspections, seice, and necessa replacements be peormed at the time or mileage
inteal that comes rst in the following table.
Recommended Seice Inteals
Monthly,
250-750 mi
(402-1207km)
- Clean frame by wiping frame
down with damp cloth.
- Use barrel adjuster(s) to tension
derailleur/brake cables if needed.
- Replace any components
conrmed by heybike
Product Suppo or a ceied,
reputable bike mechanic to be
damaged beyond repair or
broken.
- Replace brake and shift
cables if necessa.
- Replace brake pads if
necessa.
- Clean and lubricate drivetrain.
- Check crankset and pedal torque.
- Clean brake and shift cables.
- True and tension wheels if any
loose spokes are discovered.
- Balance the batte.
Eve 6
Months,
750-1250mi
(1207-2011km)
- Standard tune-up by ceied,
reputable bike mechanic is
recommended.
- Grease bottom bracket.
- Replace brake pads.
- Replace tires if necessa.
- Replace cables and housings
if necessa.
Inteal
Inspect Seice Replace
Weekly,
100-200 mi
(160-321km)
- Check drivetrain for proper alignment and
function (including the chain, freewheel,
chainring,
and derailleur).
- Check wheel trueness and for quiet wheel
operation (without spoke noise).
- Check condition of frame for any damage.
- Inspect drivetrain (chain, chainring,
freewheel, and derailleur).
- Inspect all cables and housings.
- Check brake pad alignment, brake cable
tension.
- Check bike is shifting properly, proper
derailleur cable tension.
- Check chain stretch.
- Check brake and shifter cables for corrosion
or fraying.
- Check spoke tension.
- Check accesso mounting (rack mounting
bolts, fender hardware, and alignment).
26
1
2
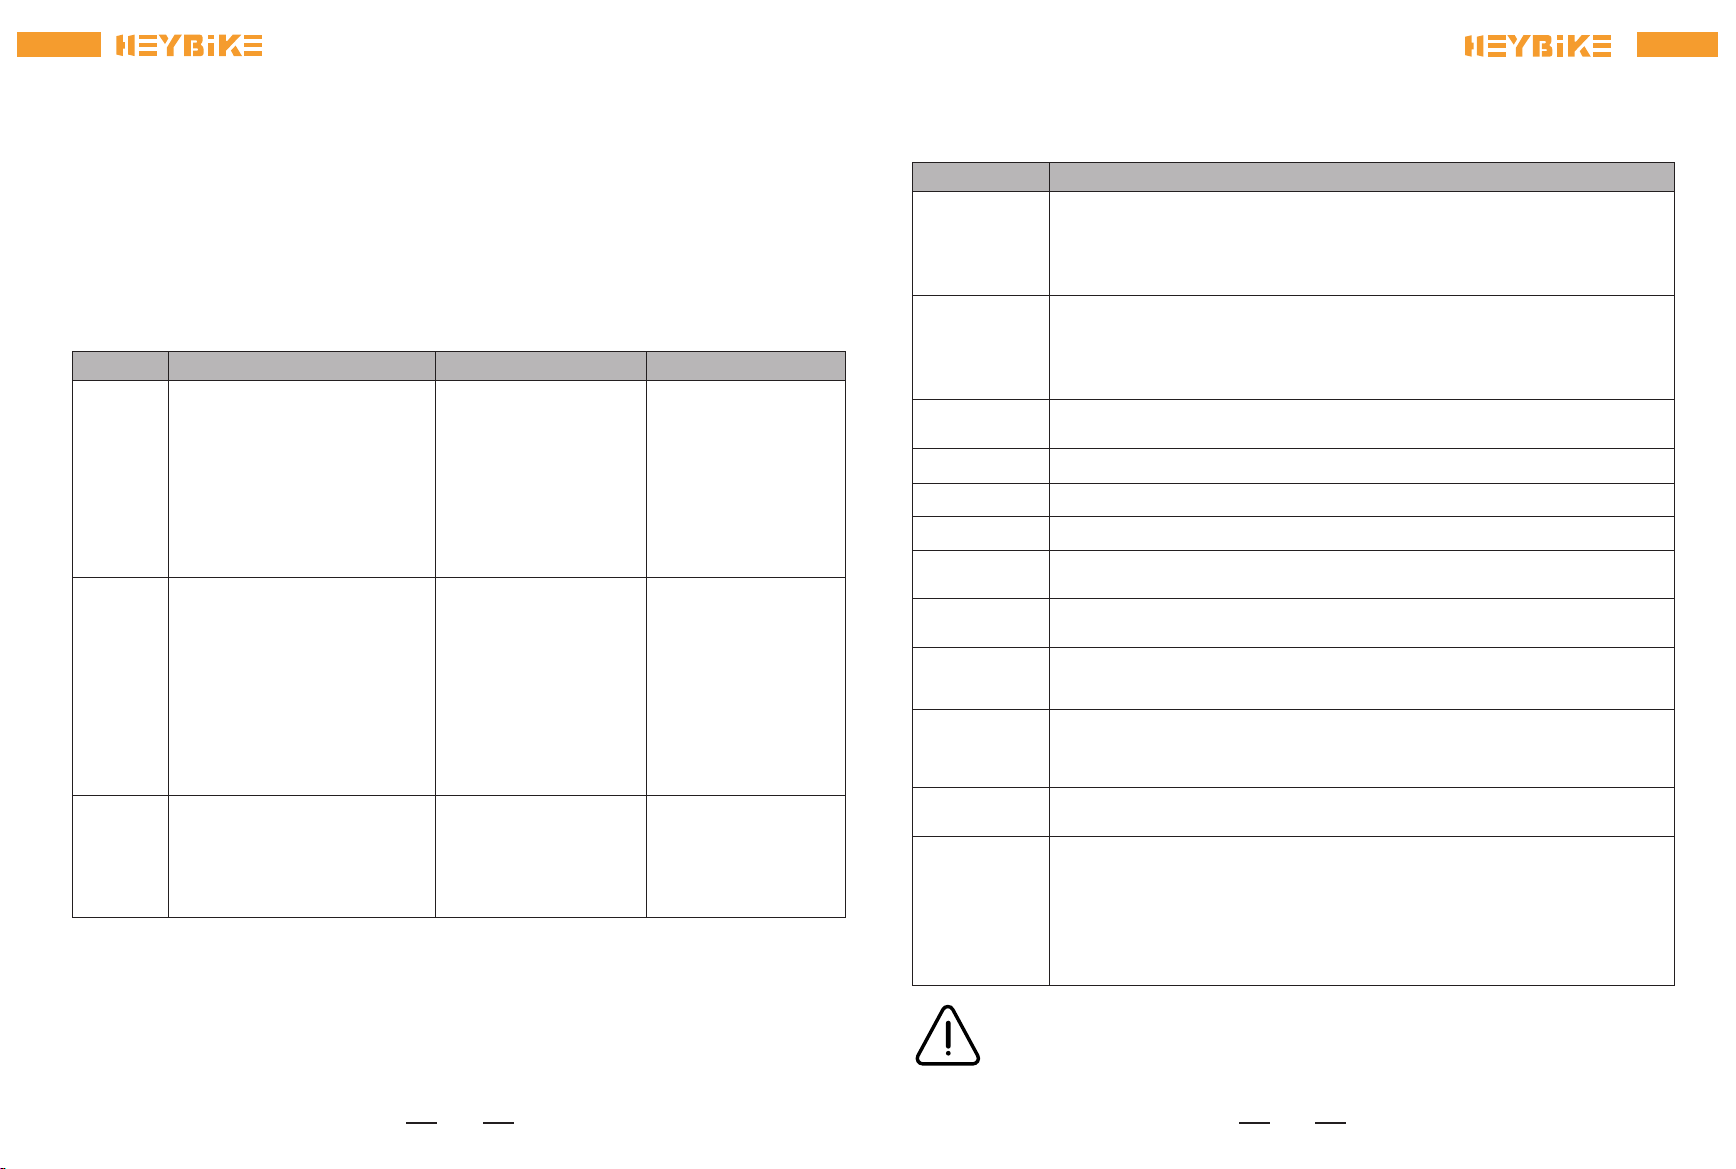
The bike does
not work
Irregular acceleration
and/or reduced top
speed
1. Insucient batte power
2. Loose or damaged throttle
3. Misaligned or damaged magnet ring
The motor does not
respond when the
bike is powered on
Reduced range
The batte will not
charge
Wheel or motor
makes strange noises
1. Insucient batte power
2. Faulty connections
3. Batte not fully seated in tray
4. Improper turn on sequence
5. Brakes are applied
6. Blown discharge fuse
1. Charge the batte
2. Clean and repair connectors
3. Install batte correctly
4. Turn on bike with proper sequence
5. Disengage brakes
6. Replace discharge fuse
1. Charge or replace batte
2. Replace throttle
3. Align or replace magnet ring
1. Repair and or reconnect
2. Tighten or replace
3. Secure or replace
4. Repair or replace
1. Adjust tire pressure
2. Check connections or charge batte
3. Assist with pedals or adjust route
4. Balance the batte; contact tech
suppo if range decline persists
5. Adjust the brakes
1. Adjust the connections
2. Replace
3. Replace
4. Repair or replace
5. Replace charge fuse
1. Tighten, repair, or replace
2. Reconnect or replace motor.
1. Loose wiring
2. Loose or damaged throttle
3. Loose or damaged motor plug wire
4. Damaged motor
1. Low tire pressure
2. Low or faulty batte
3. Driving with too many hills, headwind, braking, and/or
excessive load
4. Batte discharged for long period of time without
regular charges, aged, damaged, or unbalanced
5. Brakes rubbing
1. Charger not well connected
2. Charger damaged
3. Batte damaged
4. Wiring damaged
5. Blown charge fuse
1. Loose or damaged wheel spokes or rim
2. Loose or damaged motor wiring
3
4
5
6
Troubleshooting
Symptoms Possible Causes Most Common Solutions
29
The Cityrun employs 26"*2.5"rubber tires with inner tubes. The tires are designed for durability and safety
for regular cycling activities and need to be checked before each use for proper ination and condition.
Proper ination, care, and timely replacement will help ensure that your bike’s operational characteristics
will be maintained, and unsafe conditions avoided.
Even tires equipped with built-in, at-preventative tire liners, like those that come with bikes from
heybike, can and do get ats from punctures, pinches, impact, and other causes. When tire wear
becomes evident or a at tire is discovered, tires and/or tubes must be replaced before operating the
bike or inju to operators and/or damage to your bike from heybike could occur.
For more information on tire or tube replacement procedures, or questions about tire ination, visit
heybike.com/pages/help-center or contact Heybike Suppo.
heybike recommends 35-65 P.S.I for the stock tires on the heybike. Always stay within the manufactur-
er’s recommended air pressure range as listed on the tire sidewall.
It is critically impoant that proper air pressure is always maintained in pneumatic
tires. Do not underinate or overinate your tires. Low pressure may result in loss of
control, and overinated tires may burst. Failure to always maintain the air pressure
rating indicated on pneumatic tires may result in tire and/or wheel failure.
Inate your tires from a regulated air source with an available pressure gauge.Inat-
ing your tires from an unregulated air source could overinate them, resulting in a
burst tire.
Tire Ination and Replacement
When changing a tire or tube, ensure that all air pressure has been removed from
the inner tube prior to removing the tire from the rim. Failure to remove all air
pressure from the inner tube could result in serious inju.
Using aftermarket tires or inner tubes, not provided by heybike may void your
warranty, create an unsafe riding condition, or damage to your bike. If required by
law, ensure replacement aftermarket tires have sucient reective sidewall
striping.
28
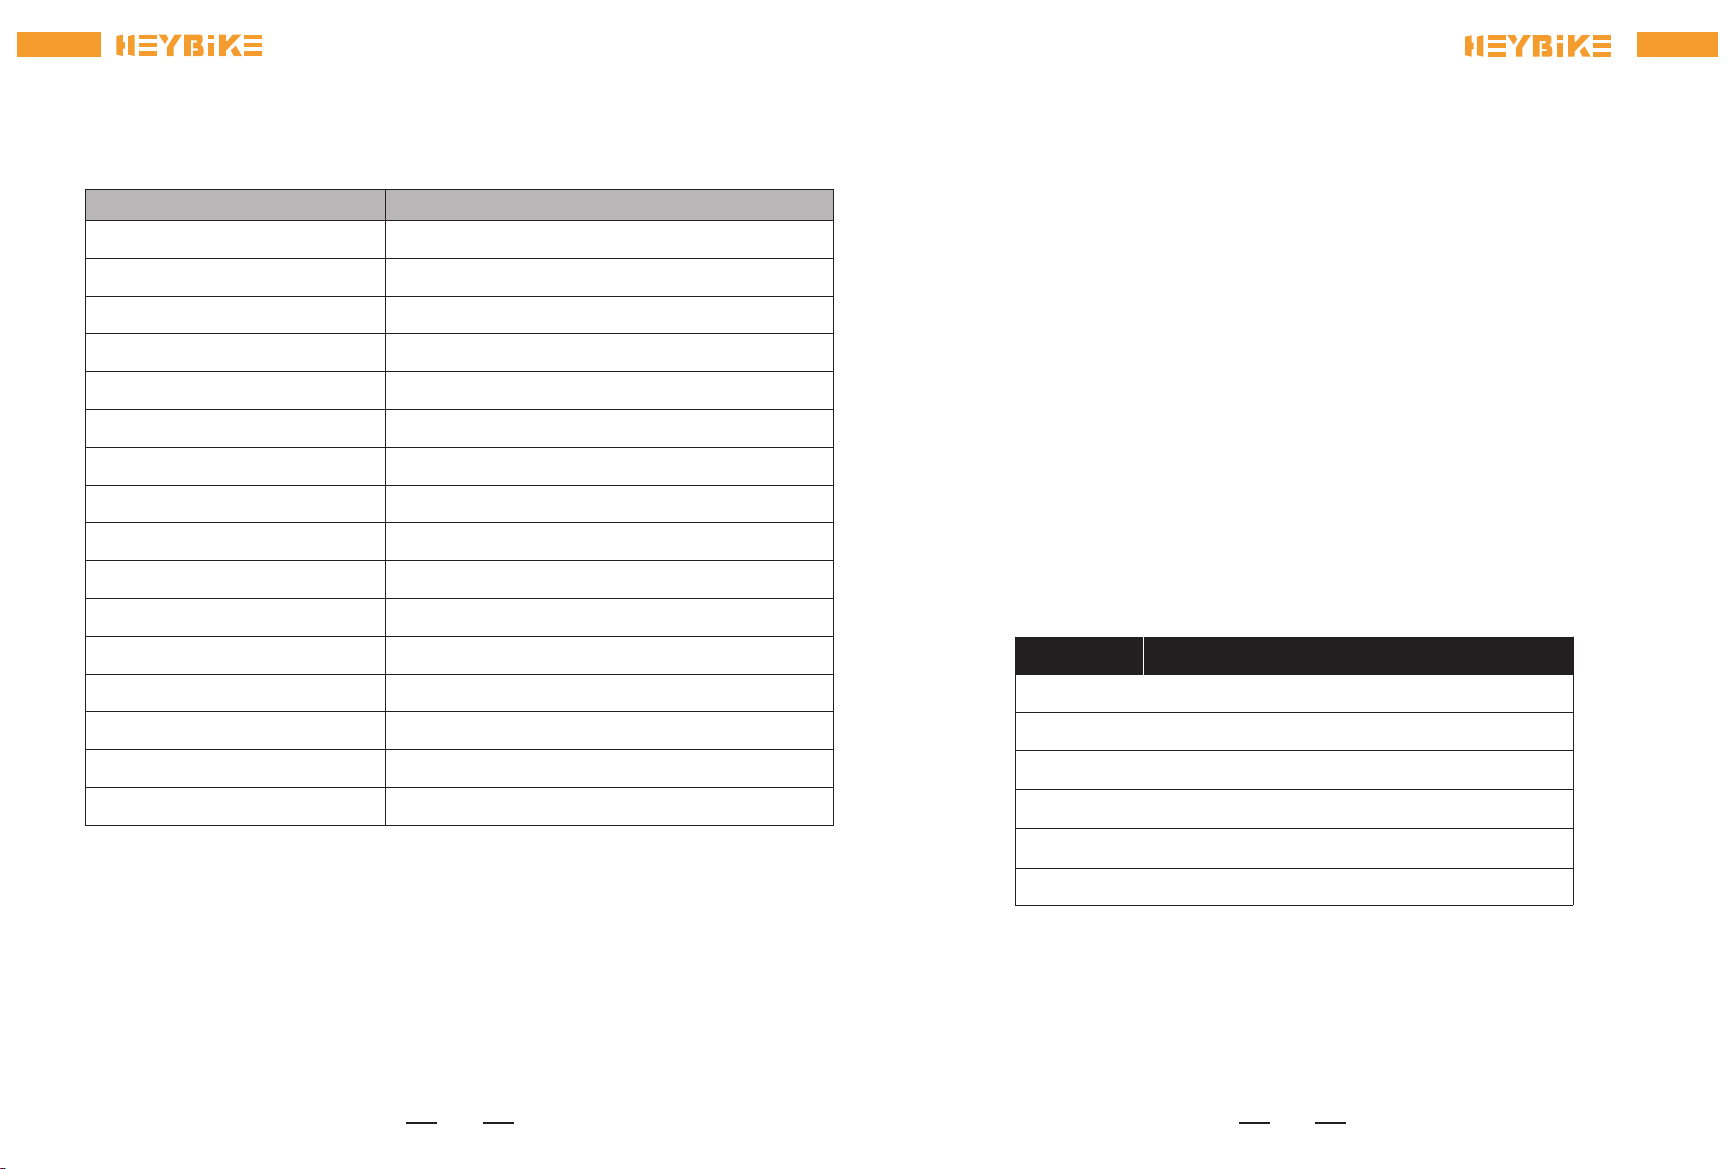
Model
Motor
Batte Capacity
Product Dimensions
Package Dimensions
Product Weight
Package Weight
Max Load
Max Speed
Batte/Charger
Pedal-Assist Mode
Pure Electric Mode
Max Angle of Climb
Charging Time
IP Level
Tire Pressure
Cityrun
500W
48V 15Ah
72.8x25.9x46.8inch/1850x660x1190mm
58.3x9.8x29.9inch/1480x250x760mm
61.7lb/28kg
78.2lb/35.5kg
300 lb
21MPH/35KM/H
Input 100-240V 50/60HZ AC Plug; Output 54.6V4A
40-55 miles
34-40 miles
15 degrees
3-4 hours
IPX4
35-65 P.S.I
ITEM SPECIFICATIONS
Specications FAQS
Q1: What if the e-bike arrived missing accesso or broken pa?
A1: A1: Please take a photo and contact Heybike Suppo, then Heybike Suppo Team will
reply you soon and send correct accesso or pa replacement.
Q2. Will my bike arrive assembled?
A2: Your bike will arrive mostly assembled. We' ll also provide the tools and a comprehensive
assembly video for the rest pa.
Q3. What can I do if something goes wrong with my e-bike during the warranty?
A3: We believe that communication is the best way to solve the problem. Please contact
us in time. To help you solve the problem as quickly as possible, please describe the problem
in detail and provide photos/videos with your order ID.
Error Code
Error Code
Current issue
Power motor issue
Power motor signal issue
21
22
23
24
25
30
31
30

Heybike warrants the original purchaser that your Heybike product shall be free from defects inmaterials
and workmanship under normal use for a period aforementioned.Heybike does not warrant the opera-
tion of the product will be uninterrupted or error-free.
Only the original owner of an ebike purchased from Heybike online or physical storefront is covered
by this Limited Warranty. The Warranty Period begins upon your receipt of the ebike and shall end
immediately upon the earlier of the end of the Warranty Period or any sale or transfer of the ebike
to another person, and under no circumstances shall the Limited Warranty apply to any subsequent
owner or other transferee of the ebike.
The Limited Warranty is expressly limited to the replacement of a defective lithium ion batte (the
“Batte”), frame, forks, stem, handlebar, headset, seat post, saddle, brakes, lights, bottom bracket,
crank set, pedals, rims, wheel hub, freewheel, cassette, derailleur, shifter, motor, throttle, controller,
wiring harness, LCD display, kickstand, reectors and hardware (each a “Covered Component”).
The Covered Components are warranted to be free of defects in materials and/or workmanship
during the Warranty Period.
Normal wear and tear of any Covered Component.
Consumables or normal wear and tear pas (including without limitation tires, tubes, brake pads,
cables and housing, grips, chain and spokes).
For the avoidance of doubt, Heybike will not be liable and/or responsible for any damage, failure or
loss caused by any unauthorized seice or use of unauthorized pas.
DETERMINING WHETHER DAMAGE OR DEFECT TO AN EBIKE OR COVERED COMPONENT IS
PROTECTED BY THIS LIMITED WARRANTY SHALL BE IN THE SOLE DISCRETION OF RPB.
The Batte is not warranted from damage resulting from power surges, use of an improper charger,
improper maintenance or other such misuse, normal wear or water damage.
Any products sold by Heybike that is not an ebike
Any damage or defects to Covered Components resulting from failure to follow instructions in the
ebike owner’s manual, acts of God, accident, misuse, neglect, abuse, commercial use, alterations,
modication, improper assembly, installation of pas or accessories not originally intended or
compatible with the ebike as sold, operator error, water damage, extreme riding, stunt riding, or
improper follow-up maintenance.
LIMITED PRODUCT WARRANTY
Limited Warranty Does Not Cover:
33
If you are unsatised with your purchase, Heybike's return policy allows you to return the product
purchased on the authorization Channel within 30 days counting from the date of receipt of shipment,
and request are fund from the authorization Channel.
Note: Express shipping cost is non-refundable.
To be eligible for a return, your item must be in the same condition that you received it, unworn,
unused, and the bike must have less than ten (10) miles on the odometer, be free of any wear and tear,
di, dust, fragrance, or any other signs of use and must include all items that were inside the box
(charger, keys, hardware, etc.).
We will deduct the shipping fee or restocking$150/pc when we are making a refund for non-defective
products and non-longer needed products.
For the return request, Heybike is not responsible for lost packages due to the carrier, or products
received that can not be veried.
Received products that have damage determined to have been caused by the end-user maybe subject
to denial of the return request.
Over 30 days: Return is not acceptable; Accept exchange new product or paial refund
Limited Warranty
30 DAYS SATISFACTION GUARANTEED RETURN POLICY
1. A Return Merchandise Authorization(RMA) must be requested from Heybike within 30 days from the
date of receipt of shipment. To request an RMA, please contact Heybike Suppo.
2. The cost of return shipping will be paid by the customer.
3. For warranty seice, please keep your receipt and/or invoice to validate proof of
purchase.
4. Returned product must be in good physical condition(not physically broken or damaged).
5. All accessories originally included with your purchase must be included with your return.
6. If you return a product to Hey bike, (a) without an RMA from Heybike(b) without all pas
included in the original package, Heybike retains the right to refuse delive of such return.
TO QUALIFY FORARE FUND, ALL THE FOLLOWING CONDITIONS MUST BE MET:
32

Contact Us
HEYBIKE LTD
100N HOWARD ST STER, SPOKANE, WA, UNITED STATES
www.heybike.com
Contact us if you experience issues relating to riding,
maintenance and safety, or errors/faults with your
HEYBIKE.
34
Table of contents


