SPEX SamplePrep 6875D User manual

6875D Freezer/Mill
1300-87052-1A, REV 1 SPEX SamplePrep LLC Page 2 of 36
Copyright 2015 by SPEX SamplePrep LLC
All rights reserved. No part of the work may be reproduced or transmitted in any form or by
any means, electronic or mechanical; including photocopying and recording, except as may be
expressly permitted by the 1976 Copyright Act or in writing from the publisher. Requests for
permission should be addressed in writing to SPEX SamplePrep LLC, 65 Liberty Street,
Metuchen, NJ 08840.

6875D Freezer/Mill
1300-87052-1A, REV 1 SPEX SamplePrep LLC Page 3 of 36
TABLE OF CONTENTS
SECTION
DESCRIPTION
PAGE
1.0 Introduction ........................................................................................................................4
2.0 Specifications ......................................................................................................................5
3.0 Unpacking ...........................................................................................................................6
4.0 Setting Up............................................................................................................................7
4.1 Electrical Connection.........................................................................................................7
4.2 Power Switch and Controller ............................................................................................8
4.3 Liquid Nitrogen Connection………………………………………………………………………………………….9
4.4 Lid, Coil Assembly and Gate, LN Sensor ...........................................................................10
4.5 Grinding Vial Sizes, Adapters, and Vial Openers............................................................11
5.0 Touchscreen Display.........................................................................................................12
5.1 Logo Screen.......................................................................................................................12
5.2 Control Panel.....................................................................................................................13
5.3 Changing Settings..............................................................................................................17
5.4 Saved Protocols.................................................................................................................18
6.0 Operation..........................................................................................................................20
6.1 Standard Auto Fill………………………………………………………………………………………………………20
6.2 Manually Adding Liquid Nitrogen.....................................................................................21
6.3 Loading Vials into the Freezer/Mill...................................................................................24
6.4 Removing Vials from the Freezer/Mill..............................................................................24
6.5 Opening, Emptying, and Cleaning Freezer/Mill Vials.......................................................24
6.6 Checking the Liquid Nitrogen Level..................................................................................27
7.0 Resources..........................................................................................................................27
7.1 Run History………………………………………………………………………………………………………………..27
7.2 Accessories (Electronic Version)…………………………………………………………………………………28
7.3 Training………….………………………………………………………………………………………………………….29
7.4 System Settings…………………….…………………………………………………………………………………..30
7.5 Technical Support………….…………………………………………………………………………………………..30
8.0 Maintenance……………………………………………………………………………………………………………..31
9.0 Trouble-Shooting Guide....................................................................................................32
10.0 Warranty...........................................................................................................................34
10.1 Product Specifications ......................................................................................................34
10.2 To Arrange a Return Shipment.........................................................................................34
11.0 Instrument Disposal..........................................................................................................35
12.0 Contact Us.........................................................................................................................36

6875D Freezer/Mill
1300-87052-1A, REV 1 SPEX SamplePrep LLC Page 4 of 36
1.0 INTRODUCTION
SPEX SamplePrep Freezer/Mills are laboratory mills that cool unconventional materials to
cryogenic temperatures and pulverize them to a powder form without thermal degradation.
Our proven technology uses a dual electromagnetic, grinding chamber that rapidly drives a
steel impactor back and forth against the two end plugs of the sample vial. Since the vial is
securely closed the integrity of its contents is maintained, hazardous or critical samples are
easily controlled, and cross-sample contamination is eliminated. The sample chemical
composition is preserved as a result of the vials being immersed in liquid nitrogen at cryogenic
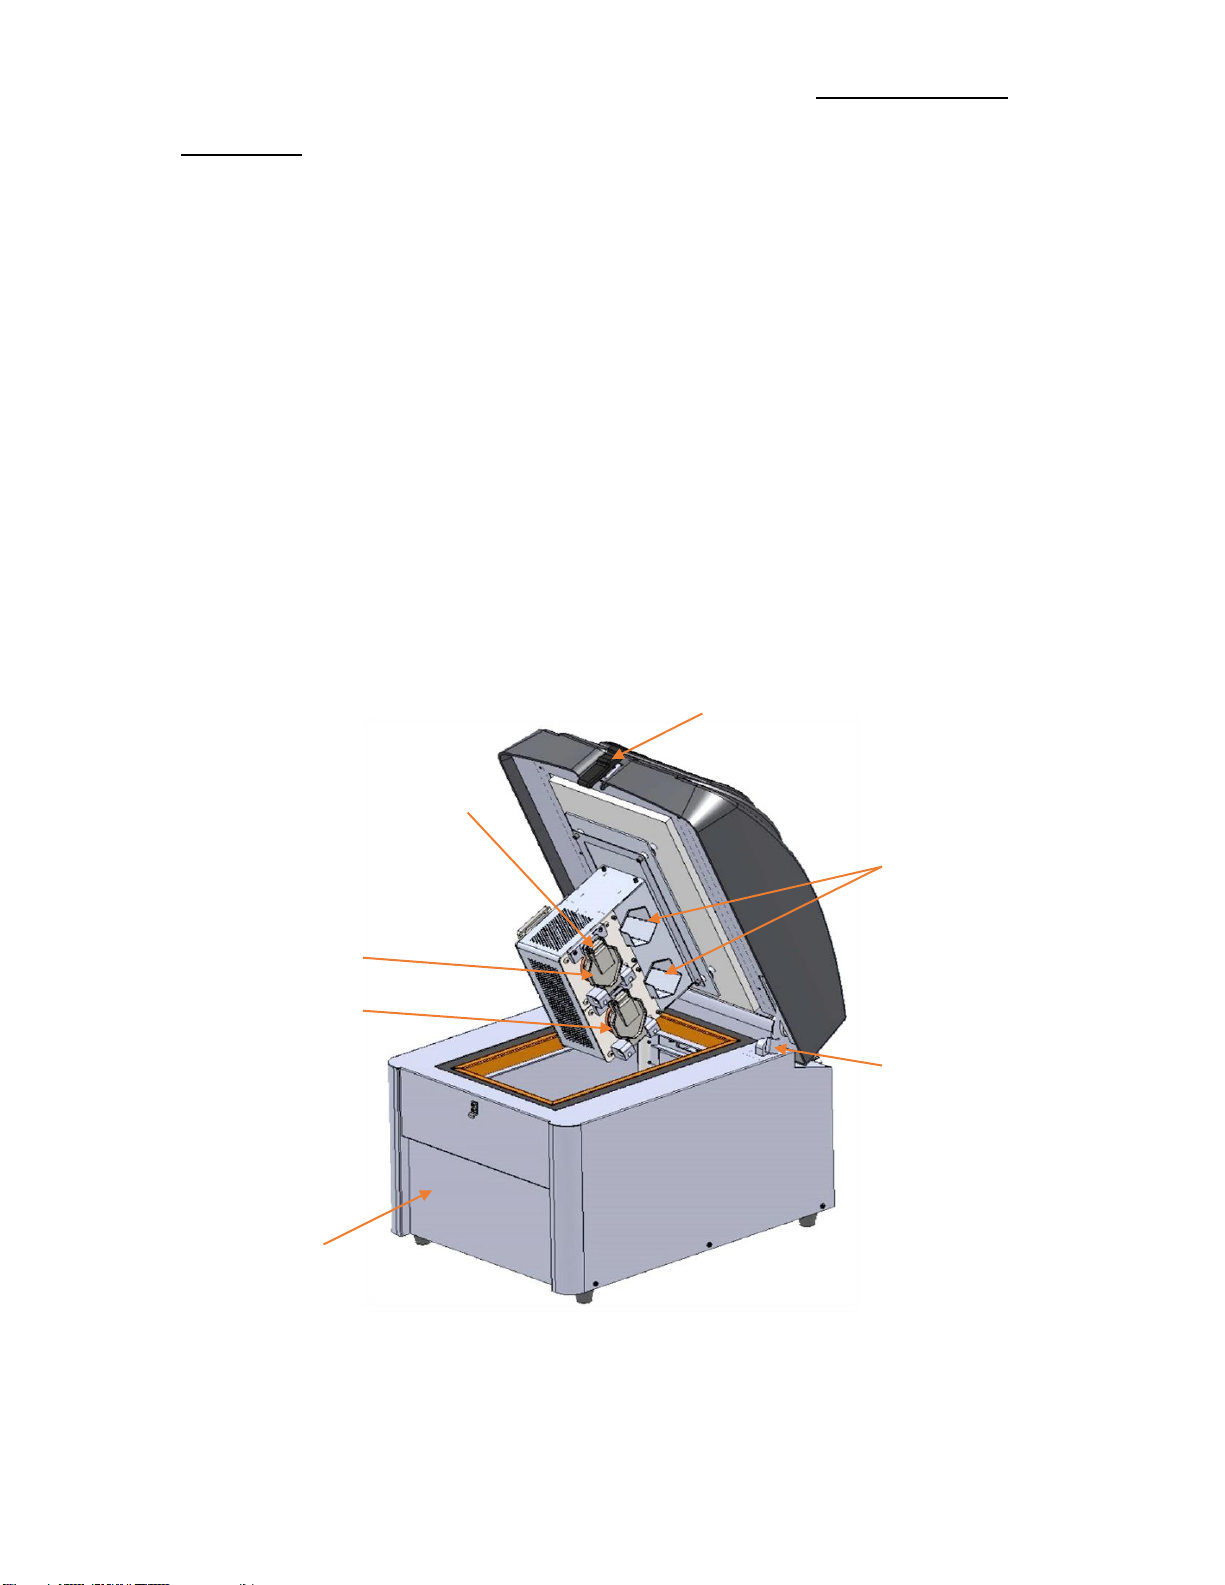
temperatures throughout the grinding process. The 6875D Freezer/Mill expands on this
technology utilizing dual grinding chambers and two additional precooling chambers for
increased sample throughput. The 6875D Freezer/Mill has been re-engineered with a liquid
nitrogen Auto Fill feature which comes standard in every unit. The preference to Manual Fill
the unit with liquid nitrogen is optional. These unique aspects have made SPEX SamplePrep
Freezer/Mills the most effective cryogenic mills in the world. They are the “mills of first choice”
for many abnormal materials, or samples whose composition or structure cannot be ground
using conventional grinding methods.
NOTE: Do not operate the 6875D Freezer/Mill until you have read the Operating Manual and
are familiar with the controls and operation.
OPERATING CONDITIONS: Do not set up the 6875D Freezer/Mill in an insulated or confined
space. The Freezer/Mill should be run on an open countertop, in ambient air, with
recommended maximum relative room humidity 70% from 5°C - 31°C (40°F - 88°F). If the entire
mill is chilled during operation, components such as the gas springs, controller, and display
screen can fail. This damage is not covered by the Freezer/Mill warranty. During operation,
water vapor in the air will condense on parts of the unit. For this reason, it is important not to
place any moisture-sensitive equipment near the Freezer/Mill.
VERY IMPORTANT: Liquid nitrogen(LN) not only makes samples brittle through severe chilling
and making them “grindable,” but it also cools the magnetic coils which powers the 6875D
Freezer/Mill. If the unit is operated in the optional Manual Fill mode the liquid nitrogen level
should be visually checked during extended runs as well as topped off before every run.
Operating the unit without liquid nitrogen for a period of one minute will cause the coils to
become very hot and may sustain permanent damage. The 6875D Freezer/Mill has a LN sensor
that will shut down the unit when the liquid nitrogen gets too low to cool the coils. The
Freezer/Mill warranty does not cover damage to the coils caused by operating the mill with
little or no liquid nitrogen. We recommend operating the unit in Auto Fill mode with LN Tank.
SAFETY: Liquid nitrogen (LN) can be hazardous. Its boiling point is -195.8°C (-320.4°F). When
working with liquid nitrogen directly or indirectly, the LN Tank valve or hose, or chilled
Freezer/Mill components, cryogenic gloves must be worn to protect hands. A face Shield is also
recommended to protect eyes from possible splashing. Wear the proper protection equipment
PPE).

6875D Freezer/Mill
1300-87052-1A, REV 1 SPEX SamplePrep LLC Page 5 of 36
2.0 6875D FREEZER/MILL SPECIFICATIONS
Type of Mill: Dual Chamber Cryogenic impact mill
Controller: Touchscreen
Data Transfer: USB Port (back of controller)
Grinding Mechanism: Steel impactor driven by magnetic coil
Coolant: Liquid nitrogen (LN)
Dimensions: 20 in. (50.8 cm) x 21½ in. (53.34 cm) x 25½ in. (64.77 cm)
Weight: (empty, without vial or coolant) approx. 78 lbs. (35.38 Kg)
Grinding Vials: One Large Vial (6801, 6803, 6871), one Mid-Size Vial (6881, 6883,
6885), one to four Small Vials (6751, 6752, 6761, 6771) or one to four
Microvial set (6757). (Per Chamber)
Typical Vial Capacity: Small Vial:actual volume with impactor, approx. 25 ml. Typical
sample weights: 2 grams for biological samples, 1 gram for polymers.
Microvial Set:100 - 500 mg per individual Microvial, depending on
sample.
Mid-Size Vial:up to 5 times the sample capacity of Small Vial.
Large Vial:Approximately twice the sample capacity of Mid-Size Vial,
or up to 10 times that of Small Vial.
Actual performance of any vial/sample combination depends on
sample properties, cooling time, grinding time, desired outcome, etc.
Effective capacity for a given sample is determined by experiment.
Overfilling a vial greatly reduces its efficiency.
Typical Liquid Nitrogen 15-19 liters for initial cool-down and filling of the tub.
Consumption: 4-6 liters for each hour of operation.
Actual liquid nitrogen consumption can vary.
Electrical Specifications: CE Approved. Available as 115V/60HZ or 230/50HZ.
Circuit Breaker: Same as ON/OFF Switch.
Power Cord: 115V/60HZ version: 3-prong grounded plug supplied.
230V/50HZ version: 2-prong European plug supplied.
Operator is responsible for supplying alternate line cord/plug.
Safety Features: Lid Interlock prevents mill from running if lid is not securely latched.
If manually filling, the unit will sound a series of “Beeps” when the
proper operating LN level is reached to prevent over filling the tub.
Liquid nitrogen sensor shuts down the mill if LN level is too low.
NOTE: The liquid nitrogen sensor can shut down the mill during a run if LN level is low.
The Freezer/Mill warranty does not cover damage to the magnetic coils caused by
operating the mill with little or no liquid nitrogen.

6875D Freezer/Mill
1300-87052-1A, REV 1 SPEX SamplePrep LLC Page 6 of 36
3.0 UNPACKING
Inspect the exterior of the packing box and report any visible damage to the carrier. Remove all
packing documents from the exterior of the box, and save them for your records. Open the top
of the shipping box. Remove the packing material and accessories, and gently remove the
6875D Freezer/Mill. Visually check the mill for any damage that may have occurred during
shipping. Unlatch the lid and inspect the interior of the tub, ensuring that it is free of any
packing material. Check the packing list to see that there are no parts missing, and inspect the
accessories. We recommend storing the packaging materials in the event there is a need to
return the unit for warranty service or repairs.
Grinding vials must be purchased separately and are available in four sizes: large, mid-size,
small, and micro. An Accessory Package is available to match your choice of vials for each new
6875D Freezer/Mill. The 6870L for large vials, the 6870M for mid-size vials, the 6870S for small
vials or 6757 for microvials. The 6870S also includes a vial holder for running up to four small
vials per 6875D grinding chamber. The full range of grinding vials and accessories for the 6875D
Freezer/Mill is described in our catalog, The Handbook of Sample Preparation and Handling,
and at www.spexsampleprep.com.
Figure 1 –6875D Freezer/Mill, Front View
PRECOOLING CHAMBER
GAS SPRING
FRONT OF UNIT
GATE HANDLE
LATCH
CHAMBER 1
CHAMBER 2

6875D Freezer/Mill
1300-87052-1A, REV 1 SPEX SamplePrep LLC Page 7 of 36
3.0 UNPACKING (Cont’d)
Figure 2 –6875D Freezer/Mill, Rear View
4.0 SETTING UP
The 6875D Freezer/Mill weighs 78 pounds (35.38 Kg) empty. The lid opens from the front with
the lid latch in the center. The AC Input module and the ON/OFF switch (which also serves as a
circuit breaker) are on the back of the cabinet. The vent for the liquid nitrogen tub is on the
back of the cabinet where the vent hose assembly is attached. There are gas springs on both
sides of the cabinet to control the movement of the lid. The touchscreen, controller is affixed
to the top of the lid and linked to the unit by a RJ45 Ethernet cable connector. At the back of
the controller is an USB Port to download run data, or to upgrade software.
Caution:
4.1 Electrical Connection
Plug the electrical cord into the AC Inlet on the back of the Freezer/Mill cabinet, and then into a
standard 3-prong grounded electrical outlet. The 230V/50HZ 6875D Freezer/Mill is supplied
with a standard European 2-prong plug with cord. For the 230V/50HZ version, make sure the
cord and plug conform to local electrical codes.
TOUCHSCREEN/CONTROLLER
[USB PORT BACK OF CONTROLLER]
BACK OF UNIT
ON/OFF SWITCH (Circuit Breaker)
VENT HOSE
ASSEMBLY
AC INLET
AUTO FILL
Do not tip the Freezer/Mill on its side to drain liquid nitrogen
out of the tub. Damage can occur to the mill preventing it from
operating. In a well vented room, raise the lid to its full upright
position and allow the liquid nitrogen to evaporate.

6875D Freezer/Mill
1300-87052-1A, REV 1 SPEX SamplePrep LLC Page 8 of 36
4.2 Power Switch and Controller
Electric power to the Freezer/Mill is controlled by a rocker switch on the inlet module. It is
marked with two numerical symbols (0 for OFF and l for ON). Press the “l” side of the switch to
turn the power ON, or press the “0”side of the switch to turn the power OFF. When power to
the mill is turned ON, the controller display will light up followed by a beep.
The controller is a touchscreen that can be activated by a fingertip or stylus. Run data is
transferred to other computer devices via USB Port, located in back of the controller. The
6875D Freezer/Mill can be programmed to operate Chamber 1 only, or Chamber 1 and
Chamber 2 simultaneously through the control panel by successive screens which are described
and illustrated in Section 5.2.The programmable parameters include Cycles (number of
grinding periods), Precool Time (initial chilling of sample), Run Time (grinding period), Cool Time
(time between grinding periods), and Rate (speed of the impactor in cycles per second). The
control panel also displays a warning if the lid is not fully closed, or if there is not enough liquid
nitrogen in the tub.
The viewing angle of the controller on the 6875D Freezer/Mill can be adjusted to minimize
glare. To adjust the viewing angle, simply grasp the back of the controller box and gently pull it
forward until the desired angle is reached, as shown in Figure 3. If it is necessary to send the
unit back to SPEX SamplePrep for service, be sure to return the controller to its horizontal
position before packing the unit for shipping.
Grasp controller from the rear and
gently pull forward to adjust viewing
angle from the horizontal position.
USB Port
(back of controller)
Figure 3 –Adjust the Viewing Angle of the Controller

6875D Freezer/Mill
1300-87052-1A, REV 1 SPEX SamplePrep LLC Page 9 of 36
4.3 Liquid Nitrogen Connection
The 6875D Freezer/Mill was re-engineered with an Auto Fill feature that comes standard with
every unit. The Auto Fill transfers liquid nitrogen to the tub during operation, making hand-
filling the LN tub optional. The Auto Fill mechanism includes a cryogenic valve linked to LN
sensors in the tub. When the LN Level is Low, the valve opens during Precool or Re-Cool stages
to let liquid nitrogen into the tub. The liquid nitrogen connection, as supplied also includes a
safety valve for the liquid nitrogen transfer hose.
Liquid nitrogen transfer hoses can vary with LN Tanks or LN lines and is therefore not included
with the Liquid Nitrogen Connection. Four-foot and six-foot transfer hoses of standard design
(part numbers 6906 and 6907) can be purchased separately from SPEX SamplePrep, or custom
transfer hoses can be designed specifically for the user. The liquid nitrogen inlet is a male 1/2
inch JIC fitting placed low on the right (facing) side of the Freezer/Mill, the outlet of the hose
requires a female CGA295 fitting. The 160 liter and 240 liter LN Tanks used by many of our
customers typically have a male 3/8 inch (9.5 mm) NPT outlet, SPEX transfer hoses come with a
matching female 3/8 inch NPT fitting. Excessively long transfer hoses are not recommended.
LN Tanks come in two types, high-pressure and low-pressure. Some LN Tanks have valve
systems to switch from low pressure to high pressure. Always use a low-pressure liquid
nitrogen supply, with a delivery pressure of 20-22 psi.
Install the safety valve on the outlet of the LN Tank or LN line, with the gooseneck tilted up and
the valve outlet down (Figure 4). Then attach the LN transfer hose to the safety valve, and the
other end to the inlet on the 6875D Freezer/Mill. The safety valve should be higher than the LN
inlet on the Freezer/Mill. The purpose of the safety valve is to provide an exit for liquid
nitrogen vapor in case the mill and LN Tank valves are both closed, and pressure builds up
inside the hose. Caution: When the lid is closed and latched, nitrogen vapor which vents from
the Freezer/Mill can displace the oxygen in a closed room and cause asphyxiation.
When installing the safety valve and transfer hose, use Teflon plumber’s tape on all threaded
fittings, and tighten the nuts with a wrench. If the fittings leak, tighten them further and/or use
more Teflon plumber’s tape.
Caution: Safety goggles should be worn at all times to protect eyes from accidental splashes
or liquid nitrogen vapor. Cryogenic gloves must be worn to protect hands.

6875D Freezer/Mill
1300-87052-1A, REV 1 SPEX SamplePrep LLC Page 10 of 36
4.3 Liquid Nitrogen Connection (Cont’d)
4.4 Lid, Coil Assembly and Gate, LN Sensor
The lid of the 6875D Freezer/Mill supports the coils (dual electromagnet assembly), two
precooling chambers, and grinding Chamber 1 and Chamber 2 enclosure. To open the lid, hold
the lid down with one hand, and with the other hand pull the upper end of the latch toward
you. Then pull the lower end of the latch to detach it from the cabinet. Release the lid and it
will raise up by the gas spring arms. The gas spring arms will keep the lid in the upright
position. The lid must be open for insertion and removal of vials.
A vial can be inserted into either precooling chambers, or Chamber 1 and Chamber 2 of the
assembly. The Gate keeps the vial(s) in place during grinding for Chambers 1 and 2 only. The
vials in the precooling chambers will remain secure and unaffected by the magnetic coils in
Chamber 1 or Chamber 2. Do not run the 6875D Freezer/Mill without a loaded sample vial in
the grinding Chamber(s) that is active (programmed to grind).
The Gate (Figure 1) holds the vial(s) in Chambers 1 and 2 during grinding. To lock a vial in place,
turn Gate Handle to the left, and position it to pass through the slot in the open Gate. Now
close Gate and turn Gate Handle to the right against the Gate, then fold down Gate Handle to
Safety Valve
1/2” female JIC
connects to LN Tank or
LN line
1/2” female JIC
LN Transfer Hose
3/8” female NPT
3/8” male NPT
1/2” female JIC
1/2” male JIC
on 6875D
Swivel Joint
Adapter
Apply Teflon tape here
Figure 4 - Liquid Nitrogen Connection (included
with 6875D, except for LN Transfer Hose)

6875D Freezer/Mill
1300-87052-1A, REV 1 SPEX SamplePrep LLC Page 11 of 36
4.4 Lid, Coil Assembly and Gate, LN Sensor (Cont’d)
lock the Gate during grinding. Always use the proper adapters for mid-size, small vials and
microvials (Section 4.5).
The lid must be completely closed and latched for the 6875D Freezer/Mill to operate. Push the
lid down and hold it down while engaging the bottom part of the latch, and then lock the latch
by pushing its top end toward the cabinet.
The liquid nitrogen (LN) sensor is located behind a shield on the back wall of the LN tub. While
in Auto Fill mode, with the 6875D Freezer/Mill connected to the LN Tank, the unit will add
liquid nitrogen automatically to maintain the proper LN level. In the optional Manual Fill mode,
to prevent overfilling the tub, the unit will sound with a series of “Beeps”when the proper
operating LN Level is reached (approximately 2 inches (5.1cm) below rim). If the unit is started
and the LN Level is low, the screen will display status as LOW LN LEVEL (Figure 8). If the LN runs
low during a grinding program the same message will appear “LOW LN LEVEL” and the program
will stop. Open lid and fill the tub with liquid nitrogen until the unit “Beeps” indicating the tub
has been filled to the proper operating LN level. Close the lid, “TOUCH RESUME BUTTON”, and
the grinding program will begin where it left off.
NOTE: To keep a Run from being interrupted by low liquid nitrogen levels, use the Auto Fill
mode with LN Tank connected. In the optional Manual Fill mode the unit will not run if
the proper LN level is not maintained. The liquid nitrogen should be topped off when
needed. The Freezer/Mill warranty does not cover damage to the magnetic coils
caused by operating the mill with little or no liquid nitrogen.
4.5 Grinding Vial Sizes, Adapters, and Vial Openers
Large vials (6801, 6871, 6803) are run one per chamber in the 6875D Freezer/Mill, without any
adapter. Large vials can be opened using the 6804 Extractor/Vial Opener, which is part of the
6870L Accessory Package. (Or the optional 6808 Extractor/Vial Opener, available for purchase)
Mid-Size vials are run one per chamber, but the 6887 Mid-Size Adapter must be used with the
6881 and 6883 vials, and the 6888 Adapter must be used with the 6885 vial. The 6887 Adapter
included in the 6870M Accessory Package (6888 Adapter is sold separately). Mid-Size vials can
be opened by the 6804 Extractor/Vial Opener, but only by first installing the 6884 Mid-Size Vial
Adapter. (The 6808 Extractor/Vial Opener with 6808M Mid-Size Vial Adapter Kit, is available for
purchase)
Small vials (6751, 6761, 6771, 6781S) can be run one, two, three, or four per chamber in the
6875D Freezer/Mill. However, the small vials must be used in conjunction with the 6807 Vial
Holder insert for the grinding chamber. The vial holder keeps the vials parallel to each other
and parallel with the chamber, so each impactor moves back and forth in line with the magnetic
field during grinding.

6875D Freezer/Mill
1300-87052-1A, REV 1 SPEX SamplePrep LLC Page 12 of 36
4.5 Grinding Vial Sizes, Adapters, and Vial Openers (Cont’d)
The vial holder is needed to create a good tight fit against the Gate, and to hold the vials in the
correct orientation during grinding.
Microvial 6757 set can be run one to four at a time with the 6807 Vial Holder. Each 6757 set
includes three 6757V Microvials. Microvials can be opened using the 6758 Extractor.
5.0 TOUCHSCREEN DISPLAY
The 6875D Freezer/Mill is programmed and operated through a series of touchscreen displays.
Transitioning between screens, and all programming and operating commands, are done by
touching the screen with a fingertip or stylus. Do not use a sharp point as this can damage or
deface the screen.
5.1 Logo Screen
When the power is switched ON at the back of the mill, “Please Wait” appears during start-up
as the software loads. Then the SPEX SamplePrep logo is displayed,with a web address and a
brief animated representation of the Freezer/Mill. After the animation has finished, the screen
will switch to the Home Screen, as shown in Figure 5. From the Home Screen the Control
Panel, Saved Protocols, and Resources (Run History, Tech Support, Accessories, Training
material) can be accessed by touching the buttons displayed.
The Home Screen icon can be found on the following screens (e.g. Control Panel, Resources,
Saved Protocols) positioned to the bottom right of screen. Touching the Home Icon allows the
users to return to Home Screen.
Figure 5 - Home Screen

6875D Freezer/Mill
1300-87052-1A, REV 1 SPEX SamplePrep LLC Page 13 of 36
5.2 Control Panel
The Control Panel displays the programmed run parameters, as shown in Figure 6. Changes to
the run settings, and to activate Mono or Dual grinding modes are made from this screen. In
Mono mode the programmed run parameters will Only operate Chamber 1. If Dual mode is
selected the run parameters (Figure 6), will operate Chamber 1 and Chamber 2 simultaneously.
To recall stored run protocols, touch the button located at the bottom right of the
screen. (See section 5.4 for more information on Saved Protocols)
To return to the Home Screen touch the Home Icon.
The following sequence of events will occur from the current settings in Figure 6: Only Grinding
Chamber 1 will run, as indicated by the MONO button color highlighted blue.
1. Precool - the coil is inactive while the vial cools in liquid nitrogen for 1 minute. Samples
must be precooled before grinding (10 minutes is recommended).
2. Cycle 1 - the coil is activated and the impactor grinds for 2 minutes at a rate of 10
cycles per second (20 impacts per second).
3. Cool Time - the coil is inactive for 1 minute between grinding cycles allowing coil and
sample vial to cool down.
4. Cycle 2 - the coil is activated and the sample is ground for another 2 minutes.
5. Cool Time - the coil is inactive for 1 minute, as in step 3.
6. Cycle 3 - the coil is activated and the sample is ground for another 2 minutes.
7. Cool Time - the coil is inactive for 1 minute, as in step 5.
8. Cycle 4 –the coil is activated for the final 2 minute cycle. At the end of the final cycle
the program is complete and the sample has been ground for a total of 8 minutes.
Figure 6 –Control Panel

6875D Freezer/Mill
1300-87052-1A, REV 1 SPEX SamplePrep LLC Page 14 of 36
5.2 CONTROL PANEL (Cont’d)
In the CONTROL PANEL, Mono or Dual sample mode can be selected as well as to Auto Fill or to
Manual Fill the 6875D Freezer/Mill with liquid nitrogen. The STATUS BAR (top of screen) counts
down the time remaining for a run. Before a run starts, the STATUS BAR will display STANDBY,
as shown in Figure 6.
To change the settings of a selected field, press the arrow buttons on the CONTROL PANEL
screen. The left arrow buttons decrease the number displayed and the right arrow buttons
increase the number displayed.
5.2.1 Starting a Programmed Run
When the Mono mode is selected the button is displayed as a blue button indicating Mono or
the first grinding chamber is be active. To change from Mono mode to Dual mode, touch the
Dual mode button and the button will turn blue indicating Dual or both grinding chambers is
active. Only the Button that is blue (Mono or Dual) will execute the programmed settings
(Figure 6), when button is touched. The button is displayed as a gray button (Mono
or Dual) indicating it is inactive. The Freezer/Mill can be started, stopped, or paused in the
middle of a grinding program from the button selections to the right of the screen.
The Auto Fill or Manual Fill buttons are also displayed on Control Panel. When a button is
selected the button displayed as blue, indicating it is active. In Figure 6, Auto-Fill or Manual Fill
mode has not been selected (note the buttons are gray). The 6875D Freezer/Mill must be
connected to a LN Tank or LN Line to run in Auto Fill mode. To change from Auto Fill mode to
Manual Fill mode, touch the Manual button, the button will change from gray to blue indicating
the unit will now be filled manually. The Auto-Fill will turn gray indicating it is inactive or no
longer in Auto-Fill mode.
Open the lid and place the loaded sample vials in Chamber 1 and Chamber 2 (Dual mode), then
lock the Chamber Gate Handle (Section 6.3). Additional loaded sample vials can be placed in
the precool chambers while running samples in Chambers 1 and 2 (Figure 1). By precooling the
additional loaded sample vials, the PRECOOL time for these samples can be decreased or
eliminated during the next run. After all vials have been loaded, lower the lid and secure the
latch. The Auto Fill LN System will fill the tub with liquid nitrogen to the correct operating level.
LN Filling will be displayed on screen as the LN fills the tub, as shown in Figure 7.
Figure 7 –LN Filling screen

6875D Freezer/Mill
1300-87052-1A, REV 1 SPEX SamplePrep LLC Page 15 of 36
5.2 CONTROL PANEL (Cont’d)
If the LN Tank is empty and unable to fill the tub with liquid nitrogen change the LN Tank and
touch RESUME to begin operation.
If the lid is not completely closed and latched, the screen will display LID OPEN, as shown in
Figure 8. To abort the program touch the button. To continue with the program
touch the RESUME button after the lid has been completely closed. When the tub is filled with
liquid nitrogen to the correct level, and the lid is securely latched, the STATUS BAR will turn
green and begin counting down. The PRECOOL sequence will start indicating the beginning of
the grinding program.
During the PRECOOL stage the TIME REMAINING line counts down the time for that stage in
1-second increments for Mono or Dual mode. To pause the program touch the
button. To continue the program, touch the RESUME button. To abort the program, touch the
button. To start a new program, touch the button.
When the programmed stage (e.g. PRECOOL) is complete a green check mark will appear next
to that field. (Samples must be precooled)
Figure 8 –Lid Open screen

6875D Freezer/Mill
1300-87052-1A, REV 1 SPEX SamplePrep LLC Page 16 of 36
5.2 CONTROL PANEL (Cont’d)
Following the PRECOOL stage is the first GRINDING cycle stage. The RUN TIME line will display
the time remaining in that cycle of the grinding stage. At the end of each grinding period a
green check mark is placed next to that field. If there are 4 total grinding periods, the CYCLES
line will countdown to “0”.
As shown in Figure 9, the RUN TIME line indicates the 2 minute grinding period has been
completed for the 1st grinding Cycle out of 4 grinding Cycles. Between any two grinding periods
is the COOL DOWN stage. The COOL TIME line display, the time remaining in the COOL DOWN
stage. The Cool Time for 1 minute is set to start as indicating by the yellow symbol. At the end
of each Cool Time period a green check mark is placed next to that field. The Rate is 10 cps
(cycles per second).
The STATUS BAR (top of screen) counts down the time remaining for the programmed run. The
time remaining to complete the programmed run is 11 minutes and 58 seconds, as displayed in
Figure 9. The bottom of the screen displays the Protocol Name for the run.
If no Protocol Name is assigned to the run as a Saved Protocol (Section 5.4) then the default
name will be displayed as COUNTDOWN. When the grinding program has ended, the screen
will display RUN COMPLETE (Figure 10). Touch screen to return to the Control Panel.
Figure 9 –Run screen during grinding
Figure 10 –Run Complete screen
NOTE: Touching and
holding the Run screen,
during a programmed run
displays the current run
settings in an
orange color
font
.
The protocol description
located bottom of screen
will change to SETTINGS.

6875D Freezer/Mill
1300-87052-1A, REV 1 SPEX SamplePrep LLC Page 17 of 36
5.2.2 Adjusting the Grinding Rate
While in the CONTROL PANEL screen, the only parameter that can be modified during grinding
is the RATE. It is adjusted by touching the right and left arrow buttons next to the Rate field.
Touching the right arrow increases the rate by 1 cps at a time, while touching the left arrow
decreases the rate by 1 cps. Tap or hold the right or left arrow buttons until the desired rate is
reached.
Rate is the number of back-and-forth cycles per second (cps) completed by the impactor.
During one cycle the impactor strikes both end plugs of the vial, therefore a rate of 10 cps is
equivalent to 20 impacts per second. The factory default setting for the rate is 10 cps. The
maximum grinding rate is 15 cps and the minimum is 5 cps.
5.2.3 Stopping or Pausing a Run
To stop a program, touch the button on the CONTROL PANEL screen and the program
will end. If the button is touched after the program has stopped then the entire
program will start over.
To pause during a grinding program, touch the button. The RUN will hold the settings
at that moment (elapsed time, cycle, etc.). To resume the program, touch the Resume button.
This will restart the program at the point at which it was paused. Alternatively, pressing STOP
will end the program.
5.3 Changing Settings
To change parameters (precool time, grinding time, cool down time, cycles and rate), touch the
arrow buttons on the CONTROL PANEL screen. The changes will appear in the blue area
between the arrows, as shown in Figure 11.
The CONTROL PANEL allows the user to change the parameters by touching the right and left
arrows next to the field. Touching the right arrow increases the parameter, while touching the
left arrow decreases the parameter. Tap or hold the right or left arrow buttons until the
desired number is reached. The arrow key will turn blue when the maximum or minimum
number is exceeded. To run a program with the new settings, touch the button.
Left Arrow Decreases
the Parameter
Right Arrow Increases
the Parameter
Figure 11 –Changing Settings
Store and Recall
Protocols
Home Screen Icon

6875D Freezer/Mill
1300-87052-1A, REV 1 SPEX SamplePrep LLC Page 18 of 36
5.4 Saved Protocols
The SAVED PROTOCOLS screen is shown in Figure 12. In this example, three saved protocols
have been stored and named (e.g. Hair, Bone, Soft Tissue). Up to 20 Protocols can be stored.
Only 10 protocols at one-time are visible on the Saved Protocols screen. To access or make
visible additional protocols, or vacant protocol spaces (e.g. User Protocol) swipe up or down the
touchscreen. This brings up vacant protocol slots on the SAVED PROTOCOLS screen.
A saved program retains the settings for number of cycles, precool time, run time, and cool
time between cycles. Be sure to adjust the rate to the desired setting after recalling a stored
program.
The Default protocol recalls the last programed run setting that was not saved. The Default
protocol can be changed without saving the new settings, as described in section 5.4.
5.4.1 Storing a new program
To store the new program or to recall a stored program, touch the button on the
Control Panel screen (Figure 11). In the SAVED PROTOCOLS screen touch inside the Label Box,
as shown in Figure 12.
This will bring up the KEYBOARD screen, a simplified version of the standard keyboard for a
computer. In addition to number and letter keys, this keyboard has standard symbol keys (#, %)
and four function keys (SPACE, BACK, DONE, and CLEAR).
As the letters/numbers are touched, they appear above the keyboard in the Label Box with a
centered cursor. To access the number and symbol keys touch the 12# button located bottom
left on the KEYBOARD screen. To switch back to letter keys touch the ABC button (same
button) bottom left on the KEYBOARD screen.
Figure 12 –Saved Protocols
Touch inside
the Label Box

6875D Freezer/Mill
1300-87052-1A, REV 1 SPEX SamplePrep LLC Page 19 of 36
5.4 Saved Protocols (Cont’d)
The Up/Down yellow arrow key on KEYBOARD allows the user to shift back and forth from
upper case to lower case (the default is upper case). Touch Down arrow to switch to lower
case. Or touch Up arrow to revert to upper case.
Touching the SPACE key advances the cursor one space. Touching the BACK key deletes one
space. The CLEAR key deletes whatever has been entered in the Label Box.
Touch DONE button to save the name shown in Label Box. The label will appear as the name of
the program in the SAVED PROTOCOLS screen (Figure 12).
The CANCEL key does not change anything on the screen, but returns the display to the SAVED
PROTOCOLS screen.
To run the newly saved protocol, touch the protocol to highlight (BLUE) the name. Then touch
the LOAD button to send protocol to the CONTROL PANEL screen. Review the parameters and
touch the button to initiate the protocol.
5.4.2 Delete Protocol
To delete a saved protocol, touch the protocol to highlight (BLUE) the name. Then touch the
EDIT button. From the Edit Protocol screen touch the CLEAR button. A pop-up window opens
confirming to delete this protocol, as displayed in Figure 14. Touch YES to clear or touch NO to
keep the saved protocol.
To rescind this action touch CANCEL button. To retain the action, touch SAVE button. Saving
the clear protocol returns the parameters to the default setting (i.e. User Protocol).
Figure 13 –Edit Protocol
Touch inside the
Label Box to
change name

6875D Freezer/Mill
1300-87052-1A, REV 1 SPEX SamplePrep LLC Page 20 of 36
5.4 Saved Protocols (Cont’d)
5.4.3 Edit Saved Protocols
To edit a saved protocol, touch the protocol to highlight the name (BLUE). Then touch the EDIT
button. From the Edit Protocol screen change parameters and/or name, then touch the DONE
button.
5.4.4 Recalling a program
In the SAVED PROTOCOLS screen, touch the protocol to highlight the name (BLUE). Then touch
the LOAD button to send protocol to the CONTROL PANEL screen. Review the parameters. To
RUN the protocol touch the button to initiate the protocol.
6.0 OPERATION
CAUTION: Be sure that the vent on the back of the 6875D Freezer/Mill (Figure 2) is not
blocked in any way. During operation, liquid nitrogen vaporizes in the Freezer/Mill
and pressure is relieved through this vent.
6.1 Standard Auto Fill
When the 6875D Freezer/Mill is set up for the first run of the day, with a loaded vial(s) in the
grinding Chamber(s), make sure the unit is connected to a LN Tank or LN line and the LN valve is
open. Choose Mono or Dual sample mode and Auto Fill, then go to the CONTROL PANEL screen
and touch the button. The Auto Fill valve will open and let liquid nitrogen into the
tub. It is normal for the valve to close and open several times before the tub is full and the
Precool timing starts. Liquid nitrogen boils and splashes as it enters the tub and this splashing
may temporary interfere with the upper LN sensor. The Auto Fill System has a built-in pause for
the liquid nitrogen to stabilize before measuring the LN level again. The Precool countdown will
not begin until the tub is full of liquid nitrogen to the proper operating level.
Figure 14 –Clear Protocol
Other manuals for 6875D
1
This manual suits for next models
2
Table of contents