SPIDER FARMER SF 1000 User manual

SPIDER FARMER GROW LIGHTS
USER MANUAL
S03

TECHNICAL SPECIFICATIONS
Model
SF 1000
Energy Efficiency (PAR/Watt)
Dimensions & Weight
SF 2000
SF 4000
SF 1000 2.50 µmol/J SE 3000 2.75 µmol/J
SF 2000 2.70 µmol/J
SE 5000 2.75 µmol/J
SF 4000 2.70 µmol/J
SE 7000 2.80 µmol/J
SF 7000 2.70 µmol/J
SE 1000W 2.90 µmol/J SF G1000W 2.90 µmol/J
SF 1000 12.8” x 11.4” x 2.3” | 2.77 lbs
325 x 290 x 59 mm | 1.26 kg
SF 2000
25.5” x 10.5” x 2.3” | 6.76 lbs
648 x 268 x 59 mm | 3.07 kg
SF 4000
25.5” x 21.1” x 2.3” | 14.51 lbs
648 x 536 x 59 mm | 6.58 kg
SF 7000 29" x 22" x 4.07" | 24.47 lbs
736.8 x 558 x 103.5 mm | 11.10 kg
SE 3000 24”x 24”x 2.7”
610 x 610 x 70mm
| 11.2 lbs
| 5.1 kg
SE 7000
45.3”x 45.3”x 3.0”
1151 x 1151 x 77mm
| 26.4 lbs
| 12 kg
SE 5000
33.8”x 33.8”x 3.0”
860 x 860 x 77mm
| 20.7 lbs
| 9.4 kg
SE 1000W
SF G1000W
45.3”x 45.3”x 3.0”
1151 x 1151 x 77mm
| 33.0 lbs
| 15 kg
Footprint
Veg 3 x 3 FT
Flower 2 x 2 FT
Veg 3 x 4 FT
Flower 2 x 4 FT
Personal Flower: 6 x 6 FT
Commercial Flower: 5 x 5 FT
Personal Flower: 4 x 4 FT
Commercial Flower: 3 x 3 FT
Personal Flower: 5 x 5 FT
Commercial Flower: 4 x 4 FT
Personal Flower: 3 x 3 FT
Commercial Flower: 2 x 2 FT
Personal Flower: 6 x 6 FT
Commercial Flower: 5 x 5 FT
SF 7000
Spectrum
660-665nm, 3000K,
5000K, IR 730nm
660-665nm, 3000K,
5000K, IR 730nm
660-665nm, 3000K,
5000K, IR 730nm
660-665nm, 3000K,
5000K
Power Draw
101W±5% @AC120V
99W±5% @AC240V
98W±5% @AC277V
202W±5% @AC120V
197W±5% @AC240V
197W±5% @AC277V
457W±5% @AC120V
438W±5% @AC240V
440W±5% @AC277V
650W±5% @AC120V
623W±5% @AC240V
619W±5% @AC277V
Amps
0.82A @AC120V
0.42A @AC240V
0.37A @AC277V
1.67A @AC120V
0.84A @AC240V
0.73A @AC277V
3.78A @AC120V
1.86A @AC240V
1.64A @AC277V
5.407A@AC120V
2.611A@AC240V
2.265A@AC277V
Frequency
50/60HZ
50/60HZ
50/60HZ
50/60HZ
Diodes Brand
SAMSUNG
SAMSUNG
SAMSUNG
SAMSUNG
SE 3000
SE 5000
SE 7000
380-410nm, 660-665nm,
730nm,3200-4200K,
4800-5000K
380-410nm, 660-665nm,
730nm,3200-4200K,
4800-5000K
650-665nm,3200-4200K,
4800-5000K
300W±5%@AC120-277V
480W±5%@AC120-277V
730W±5%@AC120-277V
2.455A@AC120V
1.249A@AC240V
1.1A@AC277V
4.017A@AC120V
2.052A@AC240V
1.805A@AC277V
5.95A@AC120V
2.906A@AC240V
2.521A@AC277V
50/60HZ
50/60HZ
50/60HZ
SAMSUNG
SAMSUNG
SAMSUNG
Personal Flower: 5 x 5 FT
Commercial Flower: 4 x 4 FT
SE 1000W 660nm,3200-4200K,
4800-5000K
1000W±5%@AC200-277V
4.351A@AC230V 50/60HZ SAMSUNG
Personal Flower: 5 x 5 FT
Commercial Flower: 4 x 4 FT
SF G1000W 660nm, 3200-4200K,
4800-5000K
1000W±5%@AC200-277V
4.351A@AC230V 50/60HZ BRIDGELUX
1

22
FULL SPECTRUM
SF 1000 SF 2000 SF 4000 SF 7000 SE 3000
SE 5000 SE 7000
SE1000W SF G1000W

3
ASSEMBLY INSTRUCTIONS
Unbox metal hanging kits, attach 4 metal hanging kits to 4 holes on model slots.
Connect with adjustable rope ratchets. Hang the light above the plants at appropriate height.
Plug the power cord to the socket.
2
1
3
Turn on light switch.
4
Unbox metal hanger kits, attach 4 small hooks to 4 holes on back side of the light;
Connect with adjustable rope ratchets. Hang the light above the plants at appropriate height
Open the folded light board
Install the dimmer box and driver on the light board by manually tightening the screws
(Or don't install, the extension cable supports placing the driver and dimmer box outside the tent)
Plug the power cord to the socket.
2
1
3
Turn on light switch
4
5
6
1
2
3
4
1 2 3
4 5 6
SF7000 ASSEMBLY INSTRUCTIONS
SF1000/SF2000/SF4000 ASSEMBLY INSTRUCTIONS
60
80
20
40
MIN OFF MAN
CH2CH1
DIM
EXT
60
80
20
40
MIN OFF MAN
CH2CH1
DIM
EXT DIM
60
80
20
40
MIN OFF MAN
CH2CH1
DIM
EXT
60
80
20
40
MIN OFF MAN
CH2CH1
DIM
EXT
DIM

4
A.
Aluminum Bar Bracket with Wire
B.
Aluminum Bar Bracket
C.
Light Bars(SE3000 : 4pcs; SE5000: 6pcs; SE7000: 8pcs;SE1000W: 10pcs;SF G1000W: 10pcs;)
D.
Butterfly Screw
E.
Hook Screw
F.
Driver
G.
Circlip Nut
H.
White Screws
J1.
Bracket Legs(SE3000:4pcs)
J2.
Bracket Legs(SE5000 SE70000 SE1000W SF G1000W:4pcs)
1
Each aluminum bar bracket have triangle marks(a1-a8) and circle marks(b1,b2)
The light bar is installed according to the triangle marks.
The hook hole is installed according to the circle marks.
Please install according to the above marked points to achieve the best planting effect.
2
6.1”
10.4”
a1 a2
b1 b2
a3 a4 a5 a6 a7 a8
10.4”
6.1” 6.1” 6.1” 6.1” 6.1” 6.1”
3.1”
6.6”
a1 a2
b1 b2
a3 a4 a5 a6 a7 a8 a9 a10
6.6”
4.5” 4.9” 5.5” 6.5” 5.5” 3.1”4.5”4.9”
3.4”
4.6”
3.4”
a1 a2
b1 b2
a3 a4 a5 a6
7.5” 7.2” 7.5” 4.6”
4.0”
6.1”
4.0”
a1 a2
b1 b2
a3 a4
9.3” 6.1”
SE3000 & SE5000 & SE7000 & SE1000W SF G1000W ASSEMBLY INSTRUCTIONS
A
D
C
F
G
H
B
J1J2
SE 3000
SE 5000
SE 7000
SE 1000W SF G1000W

Step 1:
Screw the hook screw with gaskets on b1,b2 of the aluminum trough of the bracket in turn
5
OR
Step 2 :
As shown in the picture, align the light bar with the circlip nut of the bracket.
Install the light bar on the bracket in turn, align the screw holes with the circlip nut,
and lock the butterfly screw in turn on both sides(A and B).

6
Step 3 :
Connect the power cord of each light bar.
lnstall the dimmer box and driver on the light board.
(lf you don't need to fix the driver on the light, you could directly plug and use.)
Step 4 :
Install the driver bracket:
SE3000: If you need to fix the driver on the light, please take 4 bracket legs(accessory:J1) and
adjust the scales of the 4 bracket legs according to the spacing of the light bars, slide the bracket
legs into the desired place, tighten up the 4 white screws(accessory:H) underneath the driver
bracket to fix the bracket legs, mount the driver on the light.
SE5000, SE7000, SE1000W SF G1000W: If you need to fix the driver on the light, please adjust the
scales of the 4 bracket legs(accessory:J2) according to the spacing of the light bars, slide the bracket
legs into the desired place, mount the driver on the light.
Step 5 :
Connect with adjustable rope ratchets. Hang the light above the plants at appropriate height.
Plug the power cord to the socket.
Turn on light switch.
7
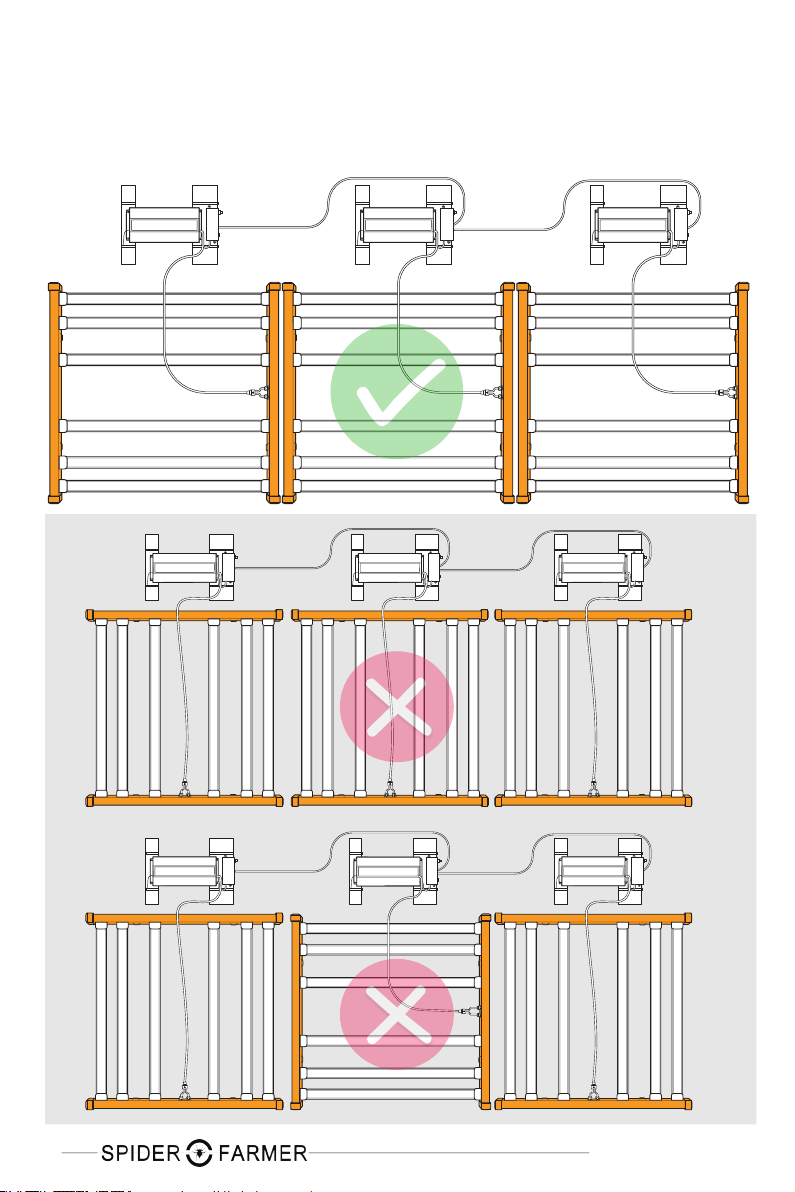
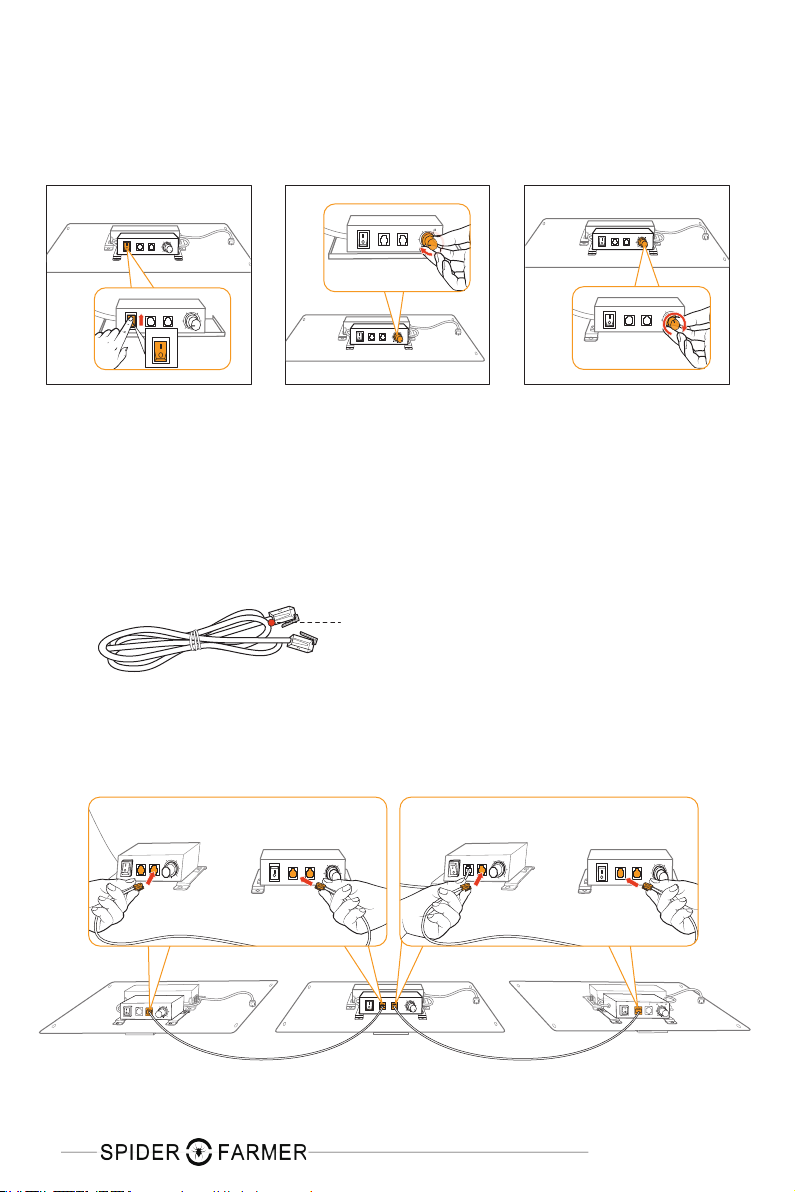
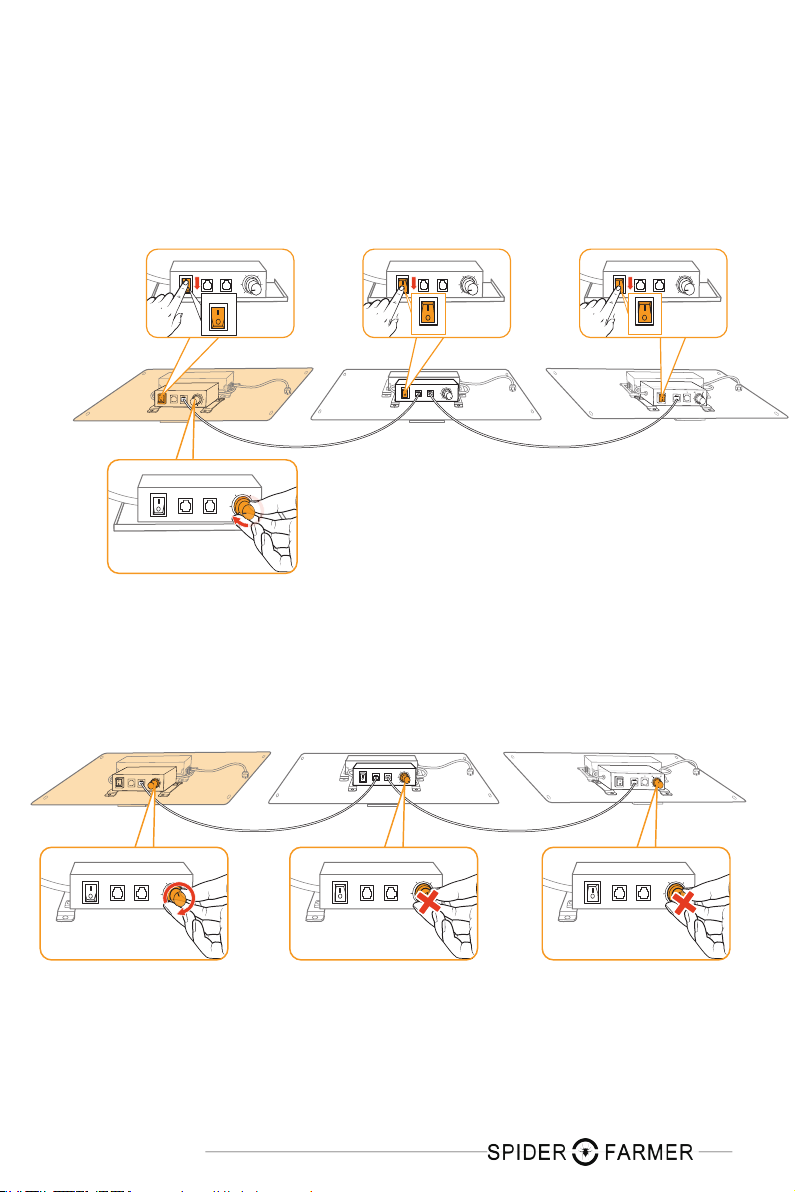
MULTI-LIGHT CONNECTION TIPS:
TO ENSURE UNIFORM LIGHT DISTRIBUTION, WHEN CONNECTING MORE LIGHTS,
PLEASE ENSURE THAT EACH LIGHT IS MODEL SLOTS TO MODEL SLOTS,
NOT LIGHT BARS TO LIGHT BARS.
8
FUNCTION OVERVIEW
60
80
20
40
MIN OFF MAN
CH2CH1
DIM
EXT
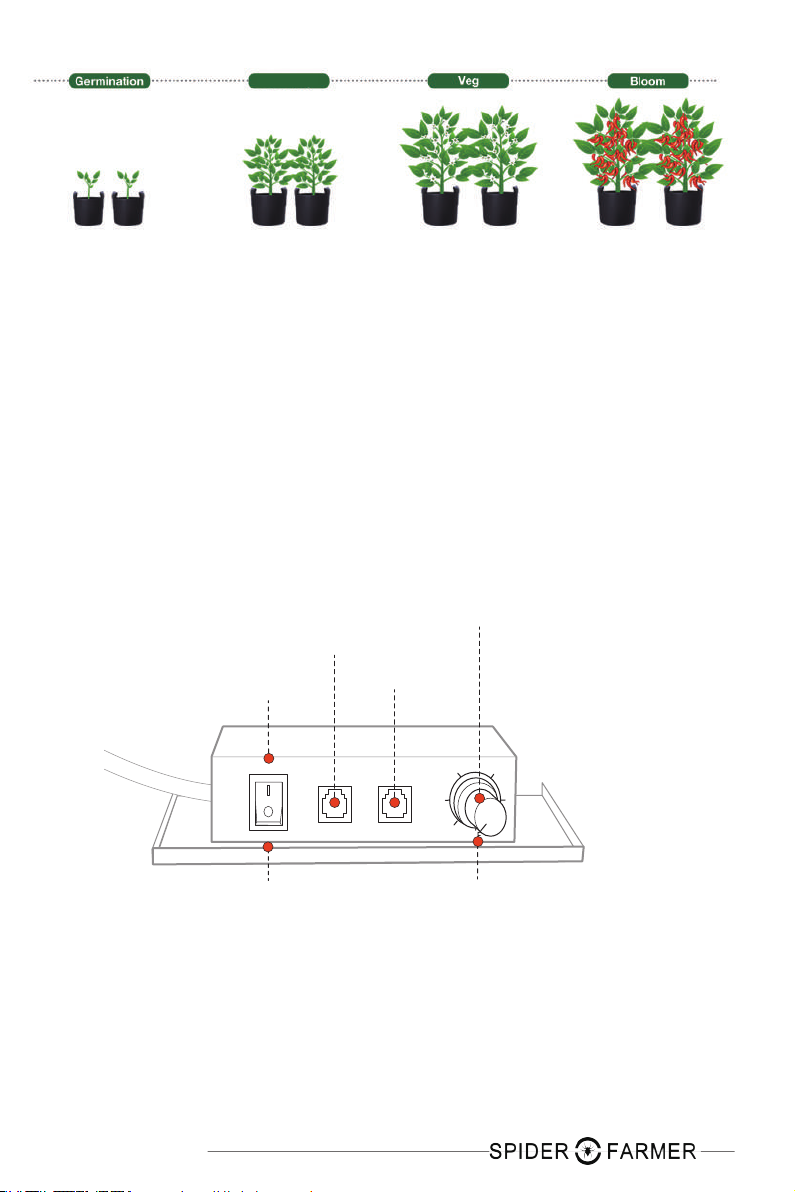
CH1: RJ11 Port
DIM:
Enter Dimming
EXT: Exit Dimming OFF: Light Switch
Dimming Knob
CH2: RJ11 Port
All lights of SF series can be dimming daisy-chained, up to 20 lights
All lights of SE series can be dimming daisy-chained, up to 30 lights
Seeding
Germination:
22" 18/6 (on/off)
Seedling:
16-22" 18/6 (on/off)
Veg:
14-16" 18/6 (on/off)
Flower:
12-14" 12/12 (on/off)
Veg:
Room Temperature≤28℃(82.4℉):Hang at 8''
Room Temperature≥28℃(82.4℉):Hang at 12''
Tips: When adjusting to the recommended height, make sure your indoor temperature is within the recommended range
Seeding 40%-60%, Veg 60%-90%, Flower 90%-100%
Flower:
Room Temperature≤28℃(82.4℉):Hang at 6''
Room Temperature≥28℃(82.4℉):Hang at 8''
SF Series Hanging Recommendations
SE Series Hanging Recommendations
Recommended Dimming For SF Series & SE Series:
60
80
20
40
MIN OFF MAN
CH2CH1
ON
OFF
60
80
20
40
MIN OFF MAN
CH2CH1
DIM
EXT
DIM
60
80
20
40
MIN OFF MAN
CH2CH1
DIM
EXT
60
80
20
40
MIN OFF MAN
CH2CH1
DIM
EXT
50
75
25
MIN MAN
CH2CH1
ON
OFF
60
80
20
40
MIN OFF MAN
CH2CH1
DIM
EXT
60
80
20
40
MIN OFF MAN
CH2CH1
DIM
EXT
Step1.
Turn on the DIM switch
NOTE:1. When the dimming switch is "EXT", the dimming knob will not work,
but the light will keep in a 100% brightness to run.
2. Only when the dimming switch is "DIM", the light switch and dimming knob can work.
If you choose this operation, all lights output (brightness) are same.
Only used for multi-lights connection,if single light dimming
operation,please unplug the cable.
Step2.
Turn the dimmer knob to “MIN”
Step3.
Adjust light intensity
RJ11 Cable
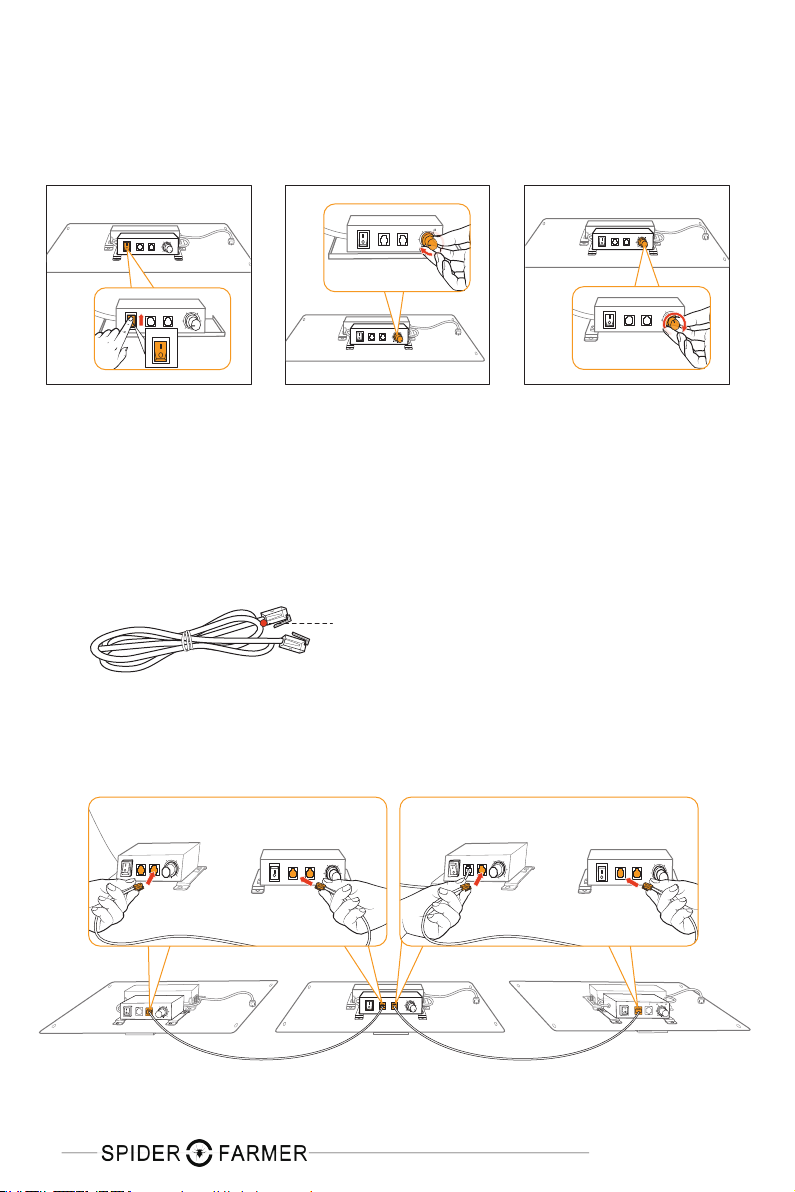
OPTION 1: SINGLE LIGHT DIMMING OPERATION
OPTION 2: MULTI-LIGHTS CONNECTION DIMMING OPERATION
9
60
80
20
40
MIN OFF MAN
CH2
CH1
ON
OFF
60
80
20
40
MIN OFF MAN
CH2
CH1
ON
OFF
50
75
25
MIN MAN
CH2CH1
ON
OFF
60
80
20
40
MIN OFF MAN
CH2CH1
ON
OFF
60
80
20
40
MIN OFF MAN
CH2CH1
DIM
EXT
60
80
20
40
MIN OFF MAN
CH2
CH1
DIM
EXT
60
80
20
40
MIN OFF MAN
CH2CH1
DIM
EXT
60
80
20
40
MIN OFF MAN
CH2
CH1
DIM
EXT
RJ11 Cable RJ11 Cable
Step1. Connect multiple lights with RJ11 cable (support up to 30 lights)
Step
3.
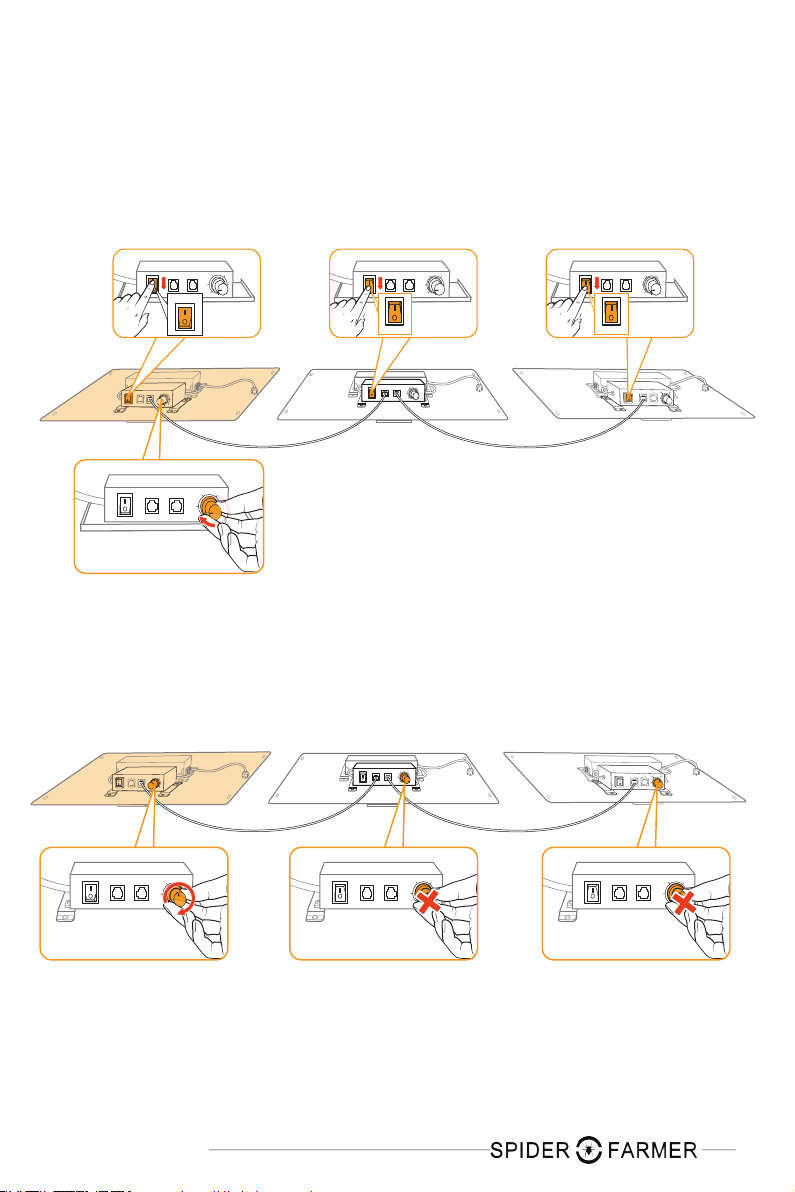
After completing step 1 and step 2,turn dimming knob of A controls the brightness of
B&C. The larger the scale value, the intenser the brightness
NOTE: If you don't want to use a multi-light connection, but dimming each of your lights, please
refer to option 1. It shows how to adjust the brightness of a single light.
Step
2.
Choose one as main-light, others as sub-lights
(eg: A as main-light, B&C as sub-lights)
(1)Turn on the DIM switch of A, and the EXT switch of B&C,
A controls the brightness of B&C
(2)Make sure only turn on the DIM switch of main-light
10
Step1. Connect multiple lights with RJ11 cable (support up to 30 lights)
60
80
20
40
MIN OFF MAN
CH2
CH1
ON
OFF
60
80
20
40
MIN OFF MAN
CH2
CH1
ON
OFF
50
75
25
MIN MAN
CH2CH1
ON
OFF
60
80
20
40
MIN OFF MAN
CH2CH1
DIM
EXT
A B C
60
80
20
40
MIN OFF MAN
CH2CH1
DIM
EXT
60
80
20
40
MIN OFF MAN
CH2CH1
DIM
EXT
60
80
20
40
MIN OFF MAN
CH2CH1
DIM
EXT
60
80
20
40
MIN OFF MAN
CH2
CH1
ON
OFF
60
80
20
40
MIN OFF MAN
CH2
CH1
ON
OFF
50
75
25
MIN MAN
CH2CH1
ON
OFF
60
80
20
40
MIN OFF MAN
CH2CH1
DIM
EXT
60
80
20
40
MIN OFF MAN
CH2CH1
DIM
EXT
DIM
60
80
20
40
MIN OFF MAN
CH2CH1
DIM
EXT
EXT
60
80
20
40
MIN OFF MAN
CH2CH1
DIM
EXT
EXT
Light Switch
DIM Switch
A B C
60
80
20
40
MIN OFF MAN
CH2CH1
DIM
EXT

Deutsche
60
80
20
40
MIN OFF MAN
CH2CH1
DIM
EXT
60
80
20
40
MIN OFF MAN
CH2CH1
DIM
EXT DIM
60
80
20
40
MIN OFF MAN
CH2CH1
DIM
EXT
1
2
3
4
60
80
20
40
MIN OFF MAN
CH2CH1
DIM
EXT
DIM
1 2 3
4 5 6
MONTAGEANLEITUNG SF7000
MONTAGEANLEITUNG SF1000 / SF2000 / SF4000
Entpacken Sie die Metallbügel-Kits und befestigen Sie 4 kleine Haken an 4 Löchern auf der
Rückseite der Leuchte
Mit einem verstellbaren schwarzen Seil verbinden und die Lampe in der richtigen Höhe über
der Pflanze aufhängen
Stecken Sie das Netzkabel in die Steckdose
Lichtschalter einschalten
4
3
Öffnen Sie das gefaltete Lichtbrett
Installieren Sie die Dimmerbox und den Treiber auf der Lichtplatine, indem Sie die Schrauben
manuell festziehen (oder nicht installieren, das Verlängerungskabel unterstützt
die Platzierung
des Treibers und der Dimmerbox außerhalb des Zeltes).
2
1
5
6
Entpacken Sie die Metallbügel-Kits und befestigen Sie 4 kleine Haken an 4 Löchern auf der
Rückseite der Leuchte
Mit einem verstellbaren schwarzen Seil verbinden und die Lampe in der richtigen Höhe über
der Pflanze aufhängen
Stecken Sie das Netzkabel in die Steckdose
Lichtschalter einschalten
4
3
2
1
MONTAGEANLEITUNGEN
11

12
A.
Aluminiumstangenhalterung Bar mit Draht
B.
Aluminiumstangenhalterung Bar
C.
Lichtleiste (SE3000: 4 Stück, SE5000: 6 Stück, SE7000: 8 Stück SE1000W & SF G1000W: 10 Stück)
D.
Schmetterling Schraube
E.
Haken Schraube
F.
Driver
G.
Sicherungsring Nuss
H.
Weißen Schrauben
J1.
Halterungsbeine (SE3000: 4 Stück)
J2.
Halterungsbeine (SE5000 SE70000 SE1000W SF G1000W: 4 Stück)
1
SE3000 & SE5000 & SE7000 & SE1000W SF G1000W MONTAGEANLEITUNG
Jede Aluminiumstangenhalterung hat eine Dreiecksmarkierung (a1-a8)
und eine Kreismarkierung ((b1,b2)
Die Lichtleiste wird entsprechend der Dreiecksmarkierung installiert.
Das Hakenloch wird entsprechend der Kreismarkierung installiert.
Bitte installieren Sie gemäß den oben markierten Punkten,
um den besten Pflanzeffekt zu erzielen.
2
155mm
264mm
a1 a2
b1 b2
a3 a4 a5 a6 a7 a8
264mm
155mm 155mm 155mm 155mm 155mm 155mm
80mm
169mm
a1 a2
b1 b2
a3 a4 a5 a6 a7 a8 a9 a10
169mm
115mm 125mm 140mm 165mm 140mm 80mm115mm125mm
87.5mm
117mm
87.5mm
a1 a2
b1 b2
a3 a4 a5 a6
190mm 183mm 190mm 117mm
101.5mm
155mm
101.5mm
a1 a2
b1 b2
a3 a4
237mm 155mm
SE 3000
SE 5000
SE 7000
SE 1000W SF G1000W
A
D
C
F
G
H
B
J1J2

13
Schritt 1:
Hakenschraube mit Dichtungen nacheinander an b1,b2 der Aluwanne der Halterung schrauben
OR
Schritt 2:
Richten Sie die Lichtleiste wie in der Abbildung gezeigt an der Sicherungsringmutter
der Halterung aus.Bringen Sie die Lichtleiste nacheinander an der Halterung an,
richten Sie die Schraubenlöcher mit der Sicherungsringmutter aus und verriegeln Sie die
Schmetterling Schraube auf beiden Seiten (A und B).

14
Schritt 3:
Schließen Sie das Netzkabel jeder Lichtleiste an.
Installieren Sie die Dimmerbox und den Treiber auf der Lichtplatine.
(Wenn Sie den Treiber nicht am Licht befestigen müssen,
können Sie ihn direkt anschließen und verwenden.)
Schritt 4:
Installieren Sie die Treiberhalterung:
SE3000: Wenn Sie den Treiber am Licht befestigen müssen, nehmen Sie bitte 4 Halterungsbeine
(Zubehör: J1) und stellen Sie die Skalen der 4 Halterungsbeine entsprechend dem Abstand der
Lichtleisten ein, schieben Sie die Halterungsbeine an die gewünschte Stelle, Ziehen Sie die 4
weißen Schrauben (Zubehör: H) unter der Treiberhalterung fest, um die Halterungsbeine zu
befestigen, montieren Sie den Treiber an der Leuchte.
SE5000, SE7000, SE1000W SF G1000W: Wenn Sie den Treiber an der Leuchte befestigen müssen,
passen Sie bitte die Skalen der 4 Halterungsbeine (Zubehör: J2) entsprechend dem Abstand der
Lichtleisten an, schieben Sie die Halterungsbeine an die gewünschte Stelle, montieren der Fahrer
am Licht.
Schritt 4:
Mit verstellbaren Seilratschen verbinden. Hängen Sie die Leuchte in entsprechender Höhe über
die Pflanzen.
Stecken Sie das Netzkabel in die Steckdose.
Lichtschalter einschalten.

15
TIPPS ZUM MULTI-LICHT-VERBINDUNG
UM EINE GLEICHMÄßIGE LICHTVERTEILUNG ZU GEWÄHRLEISTEN,WENN MEHR LEUCHTEN
MITEINANDER VERBUNDEN SIND, STELLEN SIE BITTE SICHER, DASS ES SICH BEI JEDER LEUCHTE
UM MODELLSTECKPLÄTZE HANDELT ZU MODELLSTECKPLÄTZE, NICHT LICHTBALKEN ZU LICHTBALKEN.

16
FUNKTIONSÜBERSICHT
Alle Leuchten der SF-Serie können in Reihe geschaltet werden, bis zu 20 Lichter
Alle Leuchten der SE-Serie können in Reihe geschaltet werden, bis zu 30 Lichter
Seeding
Keimung:
55CM 18/6 (ein/aus)
Sämling:
40-55CM 18/6 (ein/aus)
Gemüse:
35-40CM 18/6 (ein/aus)
Blume:
30-35CM 12/12 (ein/aus)
Gemüse:
Raumtemperatur≤28℃(82,4℉): Hängen Sie bei 20CM
Raumtemperatur ≥28℃(82,4 ℉): Hängen Sie bei 30CM
Tipps: Stellen Sie bei der Anpassung an die empfohlene Höhe sicher, dass Ihre Innentemperatur innerhalb des empfohlenen Bereichs liegt
Aussaat 40%-60%, Gemüse 60%-90%, Blumen 90%-100%
Blume:
Raumtemperatur≤28℃(82,4℉):Hänge bei 15CM
Raumtemperatur≥28℃(82,4℉):Hänge bei 20CM
Empfehlungen zum Aufhängen der SF-Series
Empfehlungen zum Aufhängen der SE-Series
Empfohlenes Dimmen für die SF-Series und SE-Series:
60
80
20
40
MIN OFF MAN
CH2CH1
DIM
EXT
CH1: RJ11 Port
DIM:
Dimmen eingeben
EXT: Ausfahrt Dimmen OFF: Lichtschalter
Dimmknopf
CH2: RJ11 Port
Keimung Sämling Gemüse Blume
17
OPTION 1: EINZELLICHT-DIMMVORGANG
OPTION 2: DIMMVORGANG FÜR MEHRLICHTVERBINDUNGEN
Schritt 1. Schalten Sie den
DIM-Schalter ein Schritt 2. Drehen Sie den
Dimmknopf auf "MIN" Schritt
3. Passen Sie die
Lichtintensität an
Wenn Sie diesen Vorgang wählen, sind alle Lichtausgänge (Helligkeit) gleich.
Wird nur für den Anschluss mit mehreren Lichtern verwendet. Wenn
Sie nur ein Licht dimmen möchten, ziehen Sie bitte das Kabel ab.
RJ11-Kabel
RJ11-Kabel RJ11-Kabel
Schritt 1.Verbinden Sie mehrere Leuchten mit einem RJ11-Kabel
(unterstützen Sie bis zu 30 Leuchten).
60
80
20
40
MIN OFF MAN
CH2
CH1
ON
OFF
60
80
20
40
MIN OFF MAN
CH2
CH1
ON
OFF
50
75
25
MIN MAN
CH2CH1
ON
OFF
60
80
20
40
MIN OFF MAN
CH2CH1
ON
OFF
60
80
20
40
MIN OFF MAN
CH2CH1
DIM
EXT
60
80
20
40
MIN OFF MAN
CH2
CH1
DIM
EXT
60
80
20
40
MIN OFF MAN
CH2CH1
DIM
EXT
60
80
20
40
MIN OFF MAN
CH2
CH1
DIM
EXT
HINWEIS: 1. Wenn der Dimmschalter auf "EXT" steht, funktionieren der Lichtschalter und der
Dimmknopf nicht, aber das Licht behält eine Helligkeit von 100%, um zu laufen;
2. Nur wenn der Dimmschalter auf "DIM" steht, können der Lichtschalter und die
Dimmknopf funktionieren.
60
80
20
40
MIN OFF MAN
CH2CH1
ON
OFF
60
80
20
40
MIN OFF MAN
CH2CH1
DIM
EXT
DIM
60
80
20
40
MIN OFF MAN
CH2CH1
DIM
EXT
60
80
20
40
MIN OFF MAN
CH2CH1
DIM
EXT
50
75
25
MIN MAN
CH2CH1
ON
OFF
60
80
20
40
MIN OFF MAN
CH2CH1
DIM
EXT
60
80
20
40
MIN OFF MAN
CH2CH1
DIM
EXT
18
Schritt 3. Nach Abschluss von Schritt 1 und Schritt 2 steuert der Dimmknopf von A die
Helligkeit von B & C. Je größer der Skalenwert, desto intensiver die Helligkeit.
HINWEIS: Wenn Sie keine Mehrlichtverbindung verwenden möchten, sondern jedes Ihrer
Lichter dimmen möchten, lesen Sie bitte Option eins. Hier erfahren Sie, wie Sie die
Schritt 2.Wählen Sie eine als Hauptlicht, andere als Sekundäre Lichtquelle
(z. B. A als Hauptlicht, B & C als Sekundäre Lichtquelle).
((1)Schalten Sie den DIM-Schalter von A und den EXT-Schalter von B&C ein,
A steuert die Helligkeit von B&C
(2) Stellen Sie sicher, dass Sie nur den DIM-Schalter des Hauptlichts einschalten.
Lichtschalter
Dimmschalter
60
80
20
40
MIN OFF MAN
CH2
CH1
ON
OFF
60
80
20
40
MIN OFF MAN
CH2
CH1
ON
OFF
50
75
25
MIN MAN
CH2CH1
ON
OFF
60
80
20
40
MIN OFF MAN
CH2CH1
DIM
EXT
60
80
20
40
MIN OFF MAN
CH2CH1
DIM
EXT
DIM
60
80
20
40
MIN OFF MAN
CH2CH1
DIM
EXT
EXT
60
80
20
40
MIN OFF MAN
CH2CH1
DIM
EXT
EXT
A B C
60
80
20
40
MIN OFF MAN
CH2CH1
DIM
EXT
60
80
20
40
MIN OFF MAN
CH2
CH1
ON
OFF
60
80
20
40
MIN OFF MAN
CH2
CH1
ON
OFF
50
75
25
MIN MAN
CH2CH1
ON
OFF
60
80
20
40
MIN OFF MAN
CH2CH1
DIM
EXT
A B C
60
80
20
40
MIN OFF MAN
CH2CH1
DIM
EXT
60
80
20
40
MIN OFF MAN
CH2CH1
DIM
EXT
60
80
20
40
MIN OFF MAN
CH2CH1
DIM
EXT

GROW TIPS
The rate of photosynthesis and transpiration are directly
affected by temperature, humidity and air flow.
The perfect temperature and humidity for your plants are found between -4℉~ 95℉
and 50% ~ 70% humidity, with plenty of airflow to replenish CO2. PH is 6 - 6.5.
You may add more calcium and magnesium than normally needed.
•
•
•
•
•
•
•
The light can be returned or replaced within 30 days after delivery,
in the precondition of non-artificial damage.
90 days ALL FREE warranty. Free components, repairing and service
can be provided within 3 months after delivery.
3 years of free components can be provided.
3 months -1 year : Free components, buyers only have to pay one-way freight
and repairing fees.
1 year - 3 years : Free components. Buyers bear the freight back and forth
and repairing fees.
WARRANTY TERMS
In summer or other hot environment, please use a cooling fan to
keep a suitable temperature for your plants.
CAUTION
Do NOT touch while in operation.
To prevent eye damage, avoid looking directly at the LEDs.
To reduce the risk of overheating or fire, always allow for adequate
ventilation of fixtures and power supplies.
•
•
•
WARNING
IMPORTANT SAFETY PRECAUTIONS
Please read the manual thoroughly before attempting to install or operate Spider
Farmer Grow Light and keep it for future reference.
Connect the light only to the power sources of the appropriate voltage using the
plug received. Protect power cables from being pinched or damaged, especially where
the power cable enters the power outlet and the unit.
If the provided plug does not fit your socket, please contact us for help by email
immediately. Please do not replace the power cord or plug by yourself, otherwise
we are not responsible for man-made damages.
The system should only be cleaned as directed in the manual. You should seek service
by qualified service personnel if any of the following occur
1. The power-supply cord or the plug has been damaged;
2. The unit has been exposed to rain;
•
•
•
•
19
This manual suits for next models
8
Table of contents
Languages:
Popular Lighting Equipment manuals by other brands


AZURO
AZURO AQUA JET 100 Instructions for assembly and use

Chauvet
Chauvet COLORbar SMD user manual

Cooper Lighting
Cooper Lighting Halo TGS3S401DSRB instruction manual

Electronics Diversified
Electronics Diversified SCRimmer STIK user manual

Griven
Griven GOBOCLIP MK3 owner's manual

Excelitas Technologies
Excelitas Technologies X-Cite 110LED quick start guide