SGM IDEA BEAM 300 User manual

00.1.LERLAUNAMS’RES
U
GB
I
D
F
E
P
M O VINGHEAD S
IDEA BEAM 300

Vi ringraziamo per aver acquistato un prodotto SGM.
Per ottenere i migliori risultati dal suo utilizzo, vi preghiamo di leggere attentamente questo manuale di istruzioni.
Al suo interno troverete le informazioni tecniche e le specifiche d’uso del prodotto. Nelle pagine in appendice tro-
verete inoltre schemi e diagrammi destinati all’assistenza tecnica.
Nell’ottica di qualità SGM, è possibile che l’Azienda apporti migliorie ai suoi prodotti, per cui consigliamo di alle-
gare il manuale al prodotto stesso e di trascrivere il numero di serie nell’ultima pagina della copertina: utilizzando
il presente manuale con un apparecchio fabbricato prima o dopo la sua stampa, potrebbero esserci discrepanze
fra l’apparecchio e quanto riportato nel manuale stesso.
Thank you for buying an SGM product.
To obtain the best results, please carefully read this instruction manual in which you will find technical information
and specifications for use of the product, as well as diagrams for technical service in the appendix.
In light of SGM quality, the company may make improvements to its products. Therefore, we recommend that the
manual be attached to the product and the serial number copied onto the back cover: using this manual with
equipment manufactured before or after its printing, might show discrepancies between the equipment and the
information listed in the manual.
Wir danken Ihnen für den Kauf eines Produkts von SGM.
Zur Erzielung der besten Resultate bei der Benutzung bitten wir Sie, die vorliegende Bedienungsanleitung aufmerk-
sam zu lesen. Darin finden Sie die technischen Informationen sowie die Anweisungen für die Benutzung des
Produkts. Im Anhang befinden sich auBerdem die Schaltpläne undv Diagramme für den Kundendienst.
SGM behält sich das Recht vor, Verbesserungen an den Produkten vorzunehmen und deshalb empfehlen wir, die
Bedienungsanleitung dem Produkt stets beizulegen und die Seriennummer auf der letzten Seite des Umschlags
einzutragen. Bei der Verwendung dieses Handbuches mit einem Gerät, das vor oder nach der Drucklegung produ-
ziert wurde, können sich Abweichungen zwischen Gerät und dem Inhalt des Handbuches ergeben.
Nous vous remercions d’avoir acheté un produit SGM.
Pour optimiser son utilisation, nous vous prions de bien vouloir lire attentivement cette notice où vous trouverez
les informations techniques et les caractéristiques d’utilisation du produit. En outre, vous trouverez également,
dans les pages en appendice, les schémas et les diagrammes concernant l’assistance technique.
Le concept de qualité SGM, lui permet d’améliorer continuellement ses produits et c’est pourquoi nous vous con-
seillons de joindre la notice au produit et d’inscrire le numéro de sèrie sur la page de couverture. En effet, si on
l’utilise avec un appareil fabriqué avant ou après son impression, il peut y avoir des différences entre l’appareil et
ce qui figure dans la notice.
Les estamos sumamente agradecidos por haber elegido un producto SGM.
Para obtener los mejores resultados, les rogamos leer detenidamente el presente manual de instrucciones. El
mismo contiene las informaciones técnicas y las indicaciones de uso del producto. Las páginas anexas contienen
además los esquemas y diagramas necesarios para la asistencia técnica.
Para mantener la calidad SGM, es posible que la Empresa aporte mejoras sus productos, por ello les aconsejamos
conservar el manual junto con el aparato correspondiente y escribir su número de serie en la última página del
manual; si en cambio se utiliza el presente manual con un aparato frabicado antes o después de su impresión, es
probable que existan discrepancias entre el aparato y las indicaciones del mismo.

GB SGM
Idea Beam 300 XM350 V1.0 NR
1
Table of Contents:
INTRODUCTION: ............................................................................................................................................... 2
Features: ...................................................................................................................................................... 2
OVERVIE ........................................................................................................................................................... 3
SAFETY INSTRUCTIONS ................................................................................................................................. 4
GENERAL GUIDELINES.................................................................................................................................... 5
INSTALLATION INSTRUCTIONS................................................................................................................... 5
Installing or replacing the lamp .......................................................................................................... 5
Mounting the device................................................................................................................................. 7
Installation method via clamp.............................................................................................................. 8
DMX-512 control connection................................................................................................................. 8
Control Board.......................................................................................................................................... 11
FUNCTION MODE .......................................................................................................................................... 13
DMX address setting............................................................................................................................ 13
Slave setting ........................................................................................................................................... 13
Auto Program.......................................................................................................................................... 13
Music control........................................................................................................................................... 13
INFORMATION................................................................................................................................................ 13
Time information................................................................................................................................... 13
Temp. Info. .............................................................................................................................................. 14
Software version ................................................................................................................................... 14
LAMP CONTROL.............................................................................................................................................. 14
PERSONALITY ................................................................................................................................................. 15
RESET-FUNCTIONS ...................................................................................................................................... 16
EFFECT ADJUST ............................................................................................................................................. 16
USERS MODE SET......................................................................................................................................... 16
EDIT PROGRAM.............................................................................................................................................. 16
INSTRUCTIONS ON USE............................................................................................................................. 19
ERROR MESSAGE .......................................................................................................................................... 23
CLEANING AND MAINTENANCE............................................................................................................... 23
TECHNICAL SPECIFICATIONS.................................................................................................................. 24

SGM GB
XM350 V1.0 NR Idea Beam 300
2
KEEP THIS MANUAL FOR FUTURE NEEDS
Thank you for your patronage. e are confident that our excellent products and service can satisfy you.
For your own safety, please read this user manual carefully before installing the device.
CAUTION !
Keep this device away from rain and moisture!
Unplug mains lead before opening the housing
In order to install , operate, and maintain the lighting safety and correctly. e suggest that the installation
and operation should be done by the verified technician and follow the instruction strictly.
INTRODUCTION:
Thank you for having chosen this professional moving head.
You will see you have acquired a powerful and versatile device.
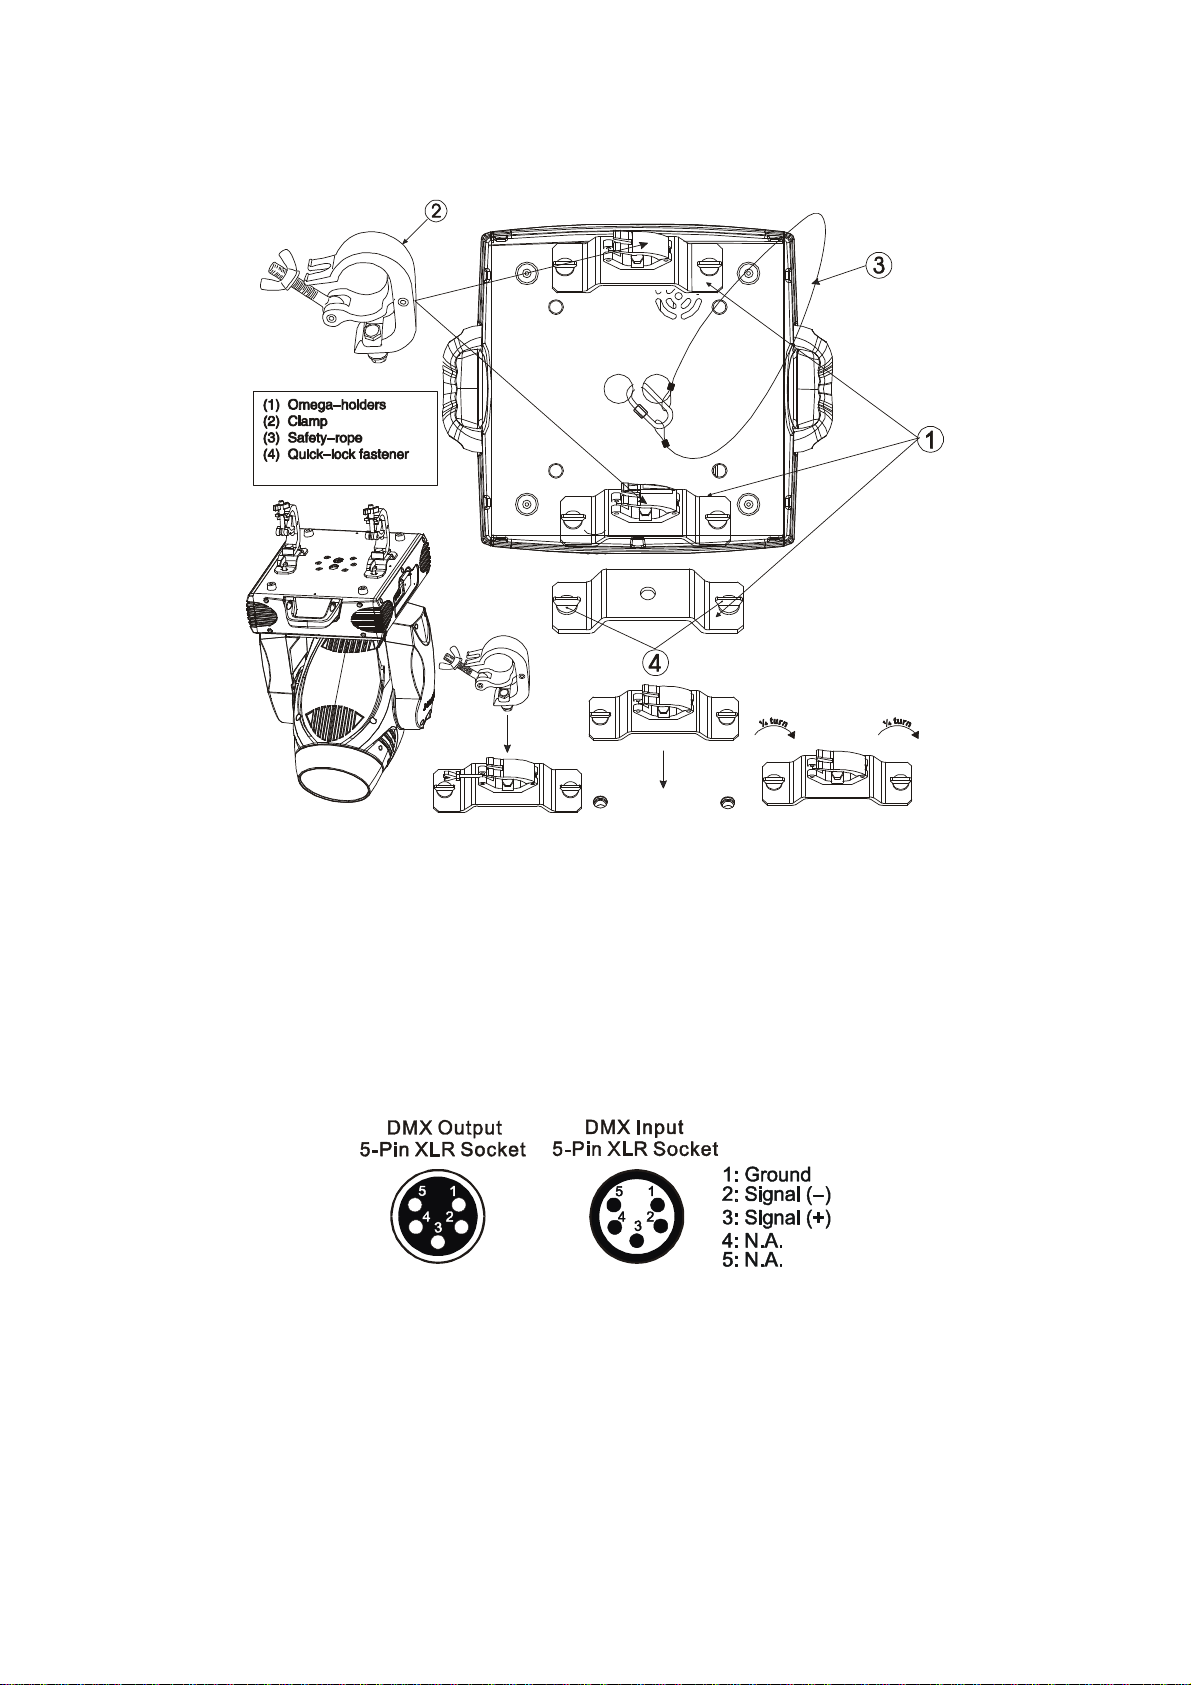
Unpack the device. Inside the box you should find: the fixture device, an XLR connection cable, two omega
clamps and a safety rope and this manual. Please check carefully that there is no damage caused by
transportation. Should there be any, consult your dealer and don’t install this device.
Feat res:
Lamp: Philips MSR GOLD 300 FASTFIT
3 Control channel modes: 16/18/26 channels
Pan/tilt movement: - 8 bit and 16 bit resolution
-For smooth and precise resolution
-Pan: 540°/630° optional, Tilt: 246°movement
-High speed of pan/tilt movement, speed of pan/tilt movement is adjustable
-Scan position memory, auto reposition after unexpected movement
CMY color mixture to get indefinite color effects
30 CMY and clolr wheel MACROS and Random CMY
Motorized color wheel with 8 dichroic filters and open, rainbow-effect with adjustable speed in both
directions
One gobo rotation wheel with 6 rotating gobos plus open each, with different speed of gobo shaking and
rainbow effect, and gobo indexing
Linear dimmer in precise speed from 0~100%
Stepless frost, 0%~100% linear change frost
Strobe effect with 13 flashes per second or random strobe via shutter
Friendly blue LCD display
Local and remote lamp on/off
GB SGM
Idea Beam 300 XM350 V1.0 NR
3
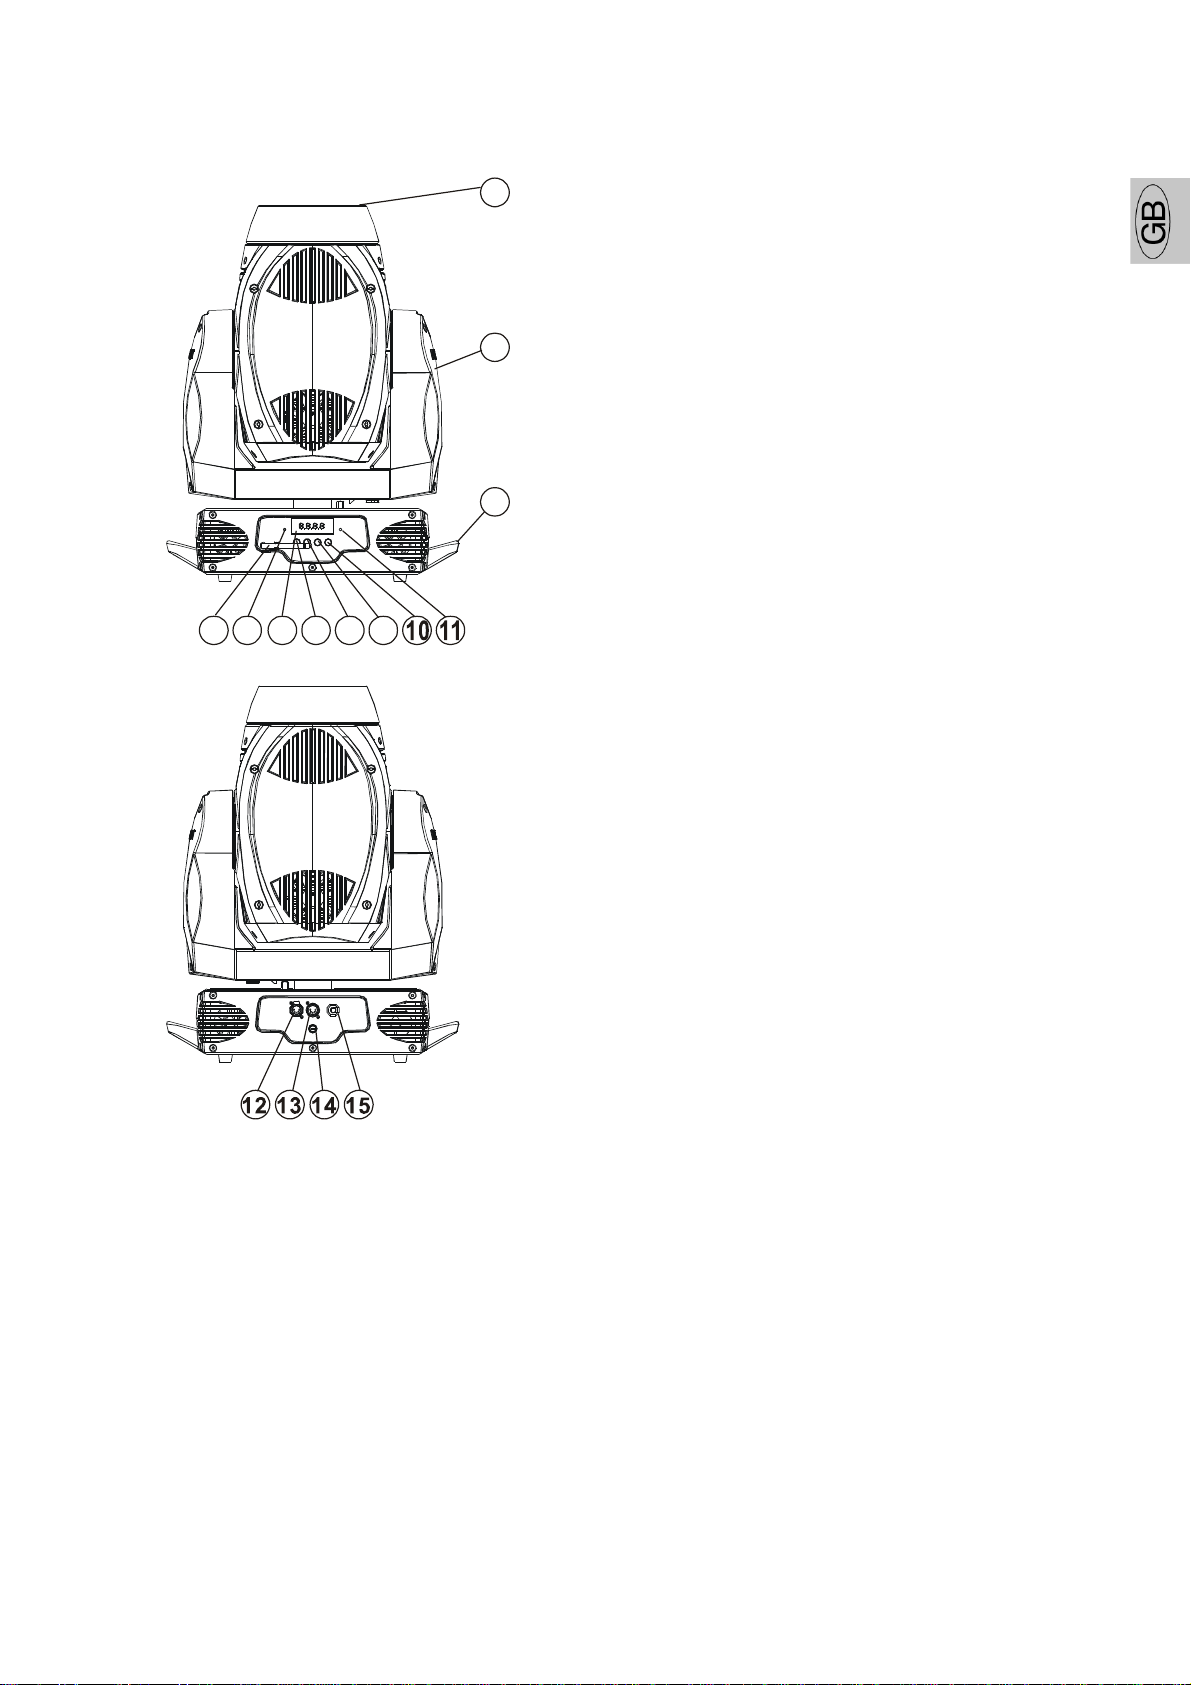
OVERVIEW
1
2
3
5
6 7 8 94
1. Lens
2. Yoke
3. Carrying handle
4. Antenna – ireless DMX
5. ireless indicator
6. LCD-Display
7. Mode/esc-button
8. Up-button
9. Down-button
10. Enter-button
11. Microphone
12. 5-PIN DMX output socket
13. 5-PIN DMX input socket
14. Fuse
15. Power supply
SGM GB
XM350 V1.0 NR Idea Beam 300
4
SAFETY INSTRUCTIONS
CAUTION
Be careful with your operations. ith a dangerous voltage you can Suffer a
dangerous electric shock when touching wires!
This device has left the factory in perfect condition. In order to maintain this condition and to ensure a safe
operation, it is absolutely necessary for the user to follow the safety instructions and warning notes written
in this user manual.
IMPORTANT
Damages caused by the disgregard of this user manual are not subject to warrenty.
The dealer will not accept liability for any resulting defects or problems.
If the device has been exposed to temperature changes due to environmental changes, do not switch it on
immediately. The arising condensation could damage the device. Leave the device switched off until it has
reached room temperature.
This device falls under protection-class I. Therefore it is essential that the device be earthed.
The electric connection must carry out by qualified person.
The device shall only be used with rate voltage and frequency.
Make sure that the available voltage is not higher than stated at the end of this manual.
Make sure the power cord is never crimped or damaged by sharp edges. If this would be the case,
replacement of the cable must be done by an authorized dealer.
Always disconnect from the mains, when the device is not in use or before cleaning it. Only handle the power
cord by the plug. Never pull out the plug by tugging the power cord.
During initial start-up some smoke or smell may arise. This is a normal process and does not necessarily
mean that the device is defective, it should decrease gradually.
Please don't project the beam onto combustible substances.
Fixtures cannot be installed on combustible substances, keep more than 50cm distance with wall for smooth
air flow, so there should be no shelter for fans and ventilation for heat radiation.
CAUTION
Never touch device during operation!
The housing may heat up.
Never look directly into the light source,
as sensitive persons may suffer an epileptic shock.
Please be aware that damages caused by manual modifications to the device are not subject to warranty.
Keep away from children and non-professionals.
GB SGM
Idea Beam 300 XM350 V1.0 NR
5
GENERAL GUIDELINES
This device is a lighting effect for professional use on stages, in discotheques, theatres, etc.
This fixture is only allowed to be operated with the max alternating current which stated in the technical
specifications in the last page of this manual, the device was designed for indoor use only.
Lighting effects are not designed for permanent operation. Consistent operational breaks may ensure that
the device will fanction properly for a long time.
Do not shake the device.Avoid brute force when installing or operating the device.
The device shall only be used complete with its protective shield.
hile choosing the installation-spot, please make sure that the device is not exposed to extreme heat,
moisture or dust. The minimum distance between light-output from the projector and the illuminated
surface must be more than 0.5 meter.
Always fix the fixture with an appropriate safety cable if you use the quick lock cam in hanging up the fixture,
please make sure the 4 quick lock fasteners turned in the quick lock holes correctly.
If you use the quick lock cam in hanging up the fixture, please make sure the 4 quick lock fasteners turned
in the quick lock holes correctly.
Lighting can not be installed where there is combustible. Keeping 50cm or above away from the wall. Ensure
a good ventilation. No barrier in the radiator fan and vent.
Operate the device only after having familiarized with its functions. Do not permit operation by persons not
qualified for operating the device. Most damages are the result of unprofessional operation.
Please use the original packaging if the device is to be transported.
For safety reasons, please be aware that all modifications on the device are forbidden.
If the external flexible cable or cord of this luminaire is damaged, it shall be exclusively replaced by the
manufacturer or his service agent or a similar qualified person in order to avoid a hazard.
If this device will be operated in any way different to the one described in this manual, the product may
suffer damages and the guarantee becomes void. Furthermore, any other operation may lead to
short-circuit, burns, electric shock, lamp explosion, crash, etc.
INSTALLATION INSTRUCTIONS
Installing or replacing the lamp
CAUTION
Only install the lamp with the device unplugged from the mains.
The lamp has to be replaced when it is damaged or deformed.
Before replacing the lamp let the lamp cool down, because during operation, the lamp can reach very high
temperature.
During the installation of halogen lamps do not touch the glass bulbs bare handed. Always use a cloth to
handle the lamps during insertion and removal.
Do not install lamps with a higher wattage. They generate higher temperatures than which the device was
designed for.

SGM GB
XM350 V1.0 NR Idea Beam 300
6
For the installation, you need one Philips MSR GOLD 300 FASTFIT
Proced re:
1
11
1
4
44
4
2
22
2
3
33
3
1. Center the hot-spot (the brightest part of the beam) using the 3 adjustment screws located under the
lamp cover labeled A, B, and C as illustrated on the next page. Turn one screw at a time to drag the
hot-spot diagonally across the projected image. If you cannot detect a hot-spot, adjust the lamp until the
light is even.
2. To reduce a hot-spot, pull the lamp in by turning all three screws clockwise a 1/4-turn at a time until the
light is evenly distributed.
Please remember the lamp is not a hot-restrike type, you must wait for approximately 15 minutes after
having turned off the lamp before you can turn it back on again.
CAUTION
Do not operate this device with open cover.
GB SGM
Idea Beam 300 XM350 V1.0 NR
7
Mo nting the device
CAUTION
Pleas consider the EN 60598-2-17 and the other respective national norms
during the installation. The installation must only be carried out by a
qualified person.
The applicable temperature for the lignting is between-25°C~45°C Do not use the lighting under or above
the temperature.
The installation of the effect has to be built and constructed in a way that it can hold 10 times the weight for
1 hour without any harming deformation.
The installation must always be secured with a secondary safety attachment, e.g. an appropriate safety
cable.
Never stand directly below the device when mounting, removing or servicing the fixture.
The operator has to make sure the safety relating and machine technical installations are approved by an
expert before taking the device into operation for the first time.
These installations have to be approved by a skilled person once a year.
CAUTION
Before taking into operation for the first time, the installation has to be
approved by an expert.
Ca tions:
The effect should be installed outside areas where persons may reach it, walk by or be seated.
CAUTION
hen installing the device, make sure there in no highly inflammable
material within a distance of min. 0,5m
Overhead mounting requires extensive experience, including amongst others calculating working load limits,
installation material being used, and periodic safety inspection of all installation material and the device. If
you lack these qualifications, do not attempt the installation yourself. Improper installation can result in
bodily injury.
CAUTION
The electric connection must only be carried out by a qualified electrician.
Before mounting make sure that the installation area can hold a minimum point load of 10 times the device’s
weight.
Connect the fixture to the mains with the power plug.
SGM GB
XM350 V1.0 NR Idea Beam 300
8
Installation method via clamp
Please refer to the picture below:
Screw one clamp each via a M12 screw and nut onto the Omega holders.
Insert the quick-lock fasteners of the first Omega holder into the respective holes on the bottom of the
device. Tighten the quick-lock fasteners fully clockwise. Install the second Omega holder.
P ll the safety-rope thro gh the holes on the bottom of the base and over the tr ssing system or
a safe fixation spot. Insert the end in the carabine and tighten the safety screw.
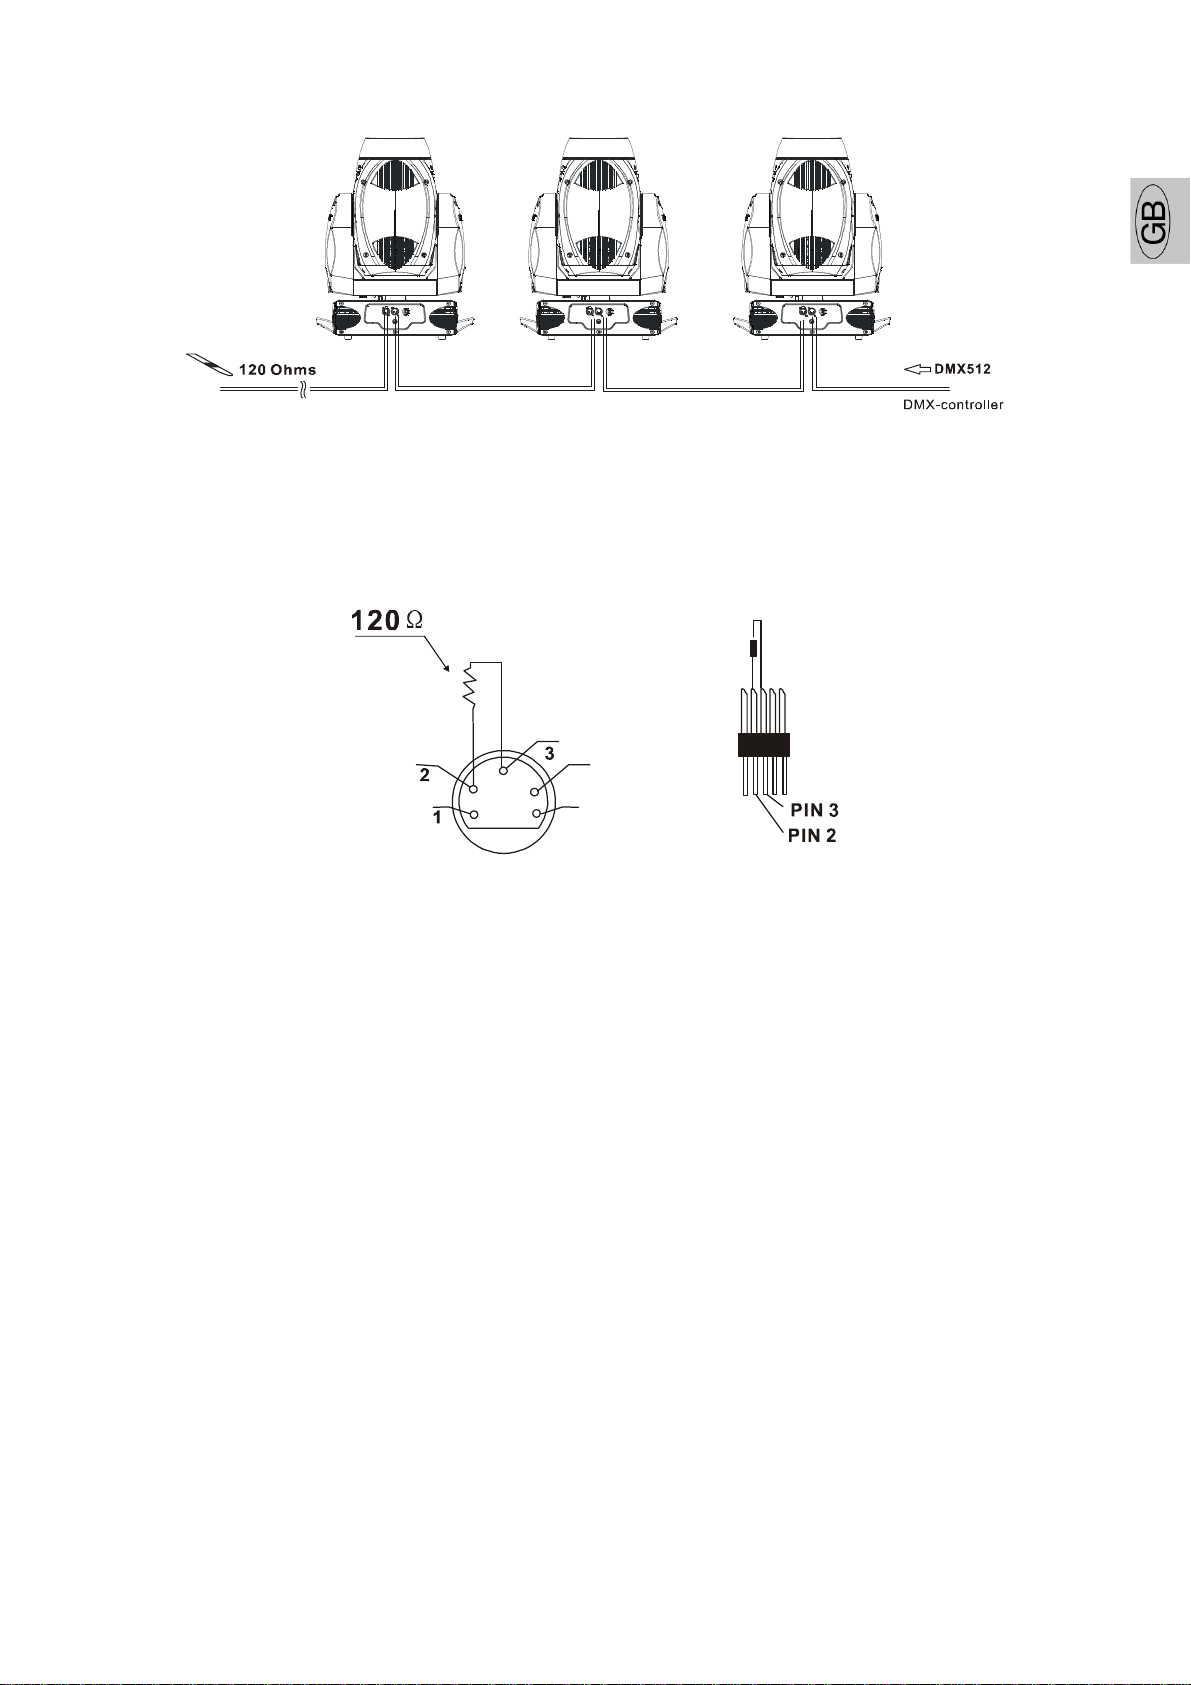
DMX-512 control connection
Connect the provided XLR cable to the female 3-pin XLR output of your controller and the other side to the
male 3-pin XLR input of the moving head. You can chain multiple
Moving head together through serial linking. The cable needed should be two core, screened cable with XLR
input and output connectors. Please refer to the diagram below.
GB SGM
Idea Beam 300 XM350 V1.0 NR
9
Address 53 Address27 Address 1
DMX-512 connection with DMX terminator
For installations where the DMX cable has to run a long distance or is in an electrically noisy environment,
such as in a discotheque, it is recommended to use a DMX terminator. This helps in preventing corruption of
the digital control signal by electrical noise. The DMX terminator is simply an XLR plug with a 120 Ω resistor
connected between pins 2 and 3,which is then plugged into the output XLR socket of the last fixture in the
chain. Please see illustrations below.
4
5
Projector DMX starting address selection
All fixtures should be given a DMX starting address when using a DMX signal, so that the correct fixture
responds to the correct control signals. This digital starting address is the channel number from which the
fixture starts to “listen” to the digital control information sent out from the DMX controller. The allocation of
this starting address is achieved by setting the correct number on the display located on the base of the
device.
You can set the same starting address for all fixtures or a group of fixtures, or make different address for
each fixture individually.
If you set the same address, all the units will start to “listen” to the same control signal from the same
channel number. In other words, changing the settings of one channel will affect all the fixtures
simultaneously.
If you set a different address, each unit will start to “listen” to the channel number you have set, based on
the quantity of control channels of the unit. That means changing the settings of one channel will affect only
the selected fixture.
In the case of the moving head, which is 26 channels fixture when you select the standard channel mode,
you should set the starting address of the first unit to 1, the second unit to 27(26 + 1), the third unit to 53
(27+ 26), and so on.

SGM GB
XM350 V1.0 NR Idea Beam 300
10
Operting instr ctions of the internal DMX wireless system
1. Equipments:
DMX 512 controller, wireless transmitter, and the fixtures with wireless receiver.
2. Message from the LED indicator:
1. Rapid flashing red/Green: logging in to a transmitter
2. Slow flashing Red/Green: Logged on a transmitter and the DMX line is idle (No DMX is connected to
transmitter).
3. Solid Green: Logged on to a transmitter and receiving DMX data.
4. Solid Red: Not logged on to a transmitter (free)
3. DMX in the menu of the fixture:
On a fixture installed with wireless system, in order to switch between wireless control system and
traditional DMX control (with cable), a new menu DMX is added to the display board.
ON: (Activate DMX)
1. hen the fixture is on power,and the DMX is activated to ON status, but did not connect to the
controller and did not log in to the transmitter, the fixture will search for the DMX signal source. If the
fixture is connected to the DMX controller it can be controlled by DMX controller; if it is log in to the
wireless transmitter, it can be controlled by the Transmitter
2. hen the fixture is power off, and the DMX is in ON status, if the fixture is connected to DMX
controller. After the fixture is power on, it can be controlled only by the DMX controller which
connected. The fixture can log in the wireless transmitter, and receive only radio signal from
transmitter, but not DMX from the transmitter.
OFF: (De-activate DMX)
In this status, wireless system is not activated, so the fixture can not log in the transmitter.
REST: (reset DMX memory);
Can remove the fixture from the connection with the transmitter, the fixture become free and ready
to log in any transmitter.
4. Setup the wireless system:
1. Connect the transmitter with the DMX controller
2. To make the fixture installed with wireless receiver log in to the transmitter
a) Initially, the indicator on the receiver fixture should be in Solid red
b) Press and hold the configuration button on transmitter for less than 3 seconds the red/green
LEDs on the transmitter and the receiver fixture will flash rapidly for about 5~ 10 seconds while
the system goes through its setup procedure.
c) Once the receiver fixture is logged in to the transmitter (T1), the fixture with wireless receiver
will keep the memory, even if restart the power, this unit will log in the transmitter (T1)
automatically.
3. Use the DMX 512 to control the fixture
5. Remove the receivers from transmitter (T1) and to log in to another transmitter (T2)
Case 1: Remove a receiver:
a) On the control board of the fixture, enter menu to activated the function of REST;
b) The LED for wireless on the fixture should turn to Solid red; the receiver can log out from the
transmitter (T1);
c) press the configuration button on transmitter(T2) for less than 3 second, then the fixture will start to
connect with the transmitter(T2)
Case 2: Remove all receivers from a transmitter (T1) to log in to T2;
a) Press and hold the configuration button on the T1 as least 5 seconds, can clear the connection with
all the fixtures.
b) All the red/green LEDs on the receiver fixtures will turn to Solid red to indicate that the receivers are
unassigned and removed from the transmitter ( T1);
c) Press and hold the configuration button on the T2 less then less than 3 second , the fixtures will
connect with the T2
PS:
1. Please log the receivers out from the transmitter after every job, so that the receivers are in free un
assigned state and ready to be assigned to a transmitter.
2. Do not connect the fixture which is under the communication of wireless system to the DMX controller,
otherwise it will cause interference from the DMX controller.
GB SGM
Idea Beam 300 XM350 V1.0 NR
11
Control Board
The Control Board offers several features: you can simply set the starting address, switch on and off the
lamp, run the pre-programmed program or make a reset.
The main menu is accessed by pressing the Mode/esc-button until the display starts flashing. Browse
through the menu by pressing the Up-button or Down-button. Press the Enter-button in order to select the
desired menu. You can change the selection by pressing the Up-button or Down-button. Confirm every
selection by pressing the Enter-button. You can leave every mode by pressing the Mode/esc-button. The
functions provided are described in the following sections.
To access display Men via the internal battery, press the UP & DOWN b ttons sim ltaneo sly.
Display will a tomatically switch off after abo t 10 seconds from last b tton press.
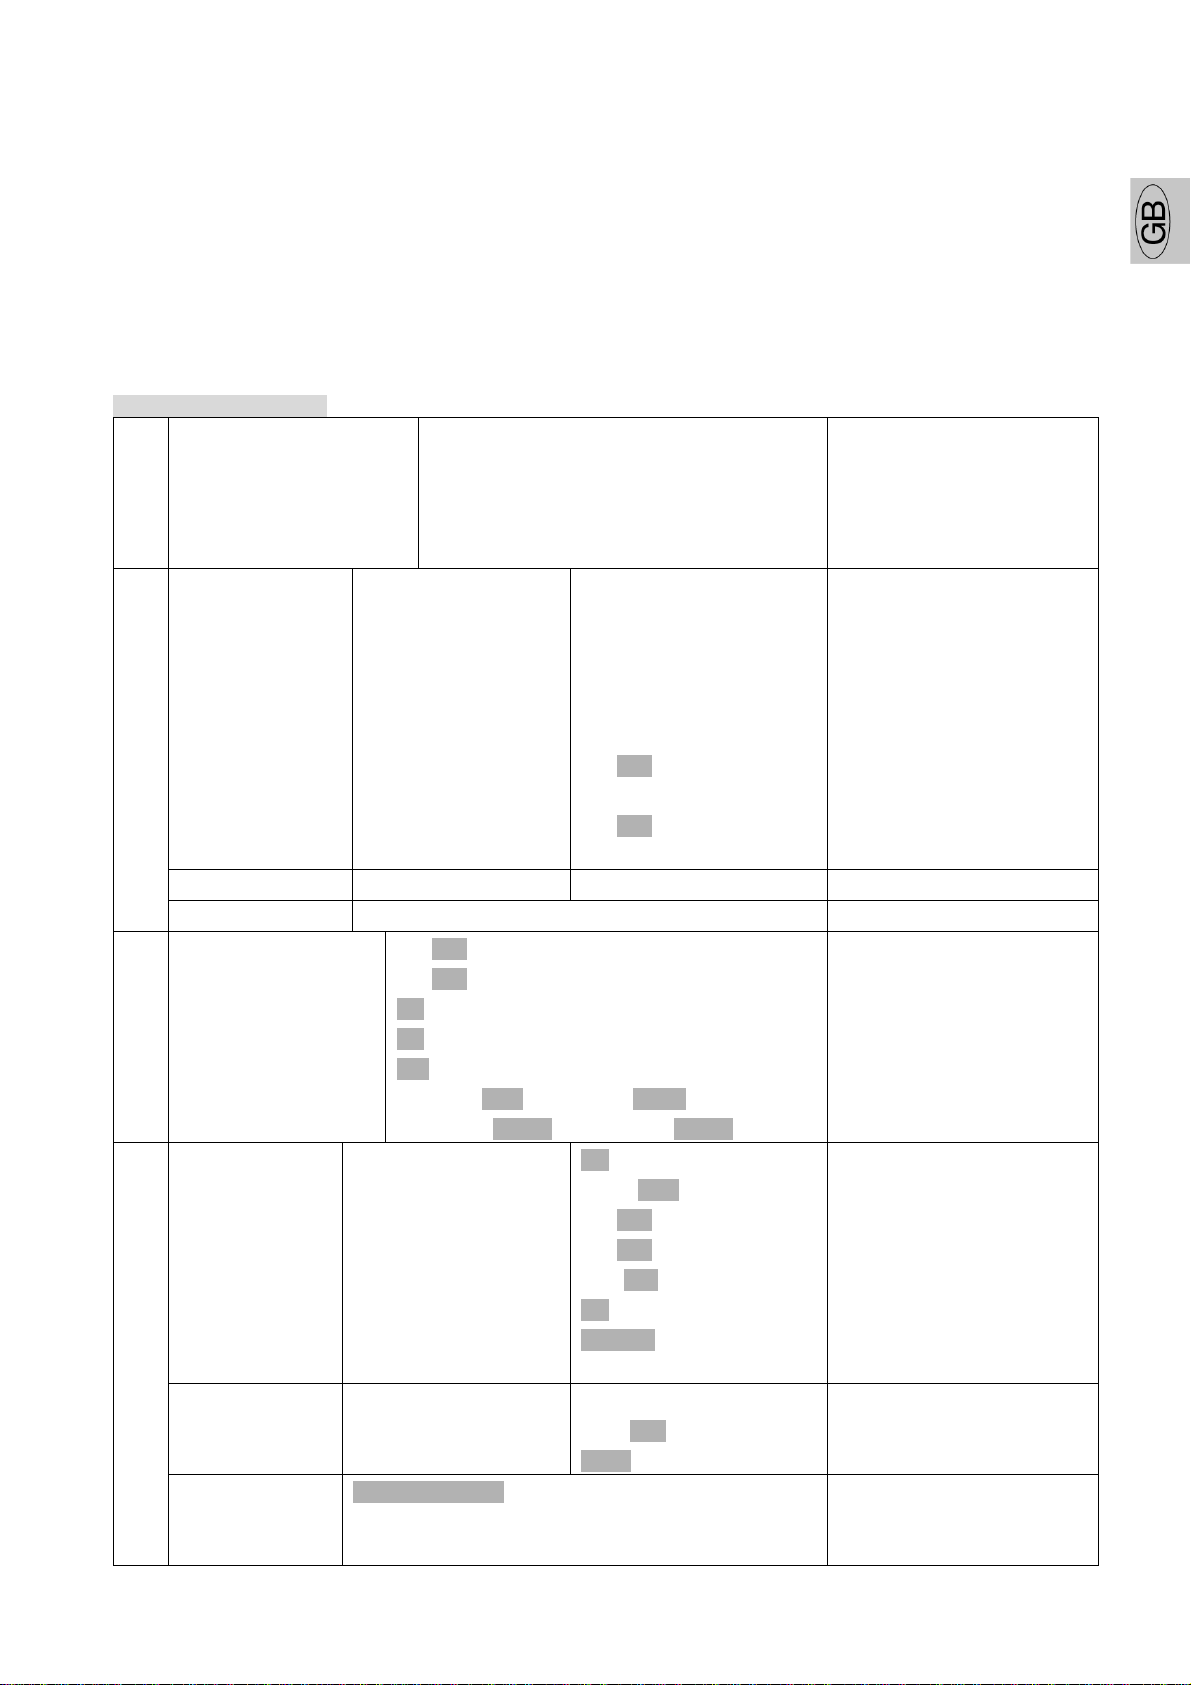
Default settings shaded
Function
Mode
Set Dmx Address
Value Display
Set To Slave
Auto Program
Music Control
A001~AXXX
PAN……
Slave1,Slave2,Slave3
Master / Alone
Master / Alone
DMX address setting
DMX value display
Slave setting
Auto program
Music control
Time Information Current Time
Total Life Hours
Last Run Hours
Lamp Hours
Lamp Off Time
Timer Password
Clear Last Run
L-Timer Password
Clear Lamp Time
XXXX(Hours)
XXXX(Hours)
XXXX(Hours)
XXXX(Hours)
XXXX(Minute)
Password=XXX
ON/OFF
Password=XXX
ON/OFF
Power on running time
Fixture running time
Fixture Last times clear
Lamp running time
Lamp off time
Timer Password 038
Clear Fixture Last time
Lamp Password
Code=”038”
Clear lamp time
Temperature Info Head Temperature XXX℃/℃ Temperature in the head
Information
Software Version Ver1.0…… Software version of each IC
Lamp Control
Lamp On or Off
Automatic La-On
Lamp On Via DMX
Lamp Off Via DMX
Lamp Off No DMX
Lamp On at Temp.
Lamp Off at Temp.
ON/OFF
ON/OFF
ON/OFF
ON/OFF
OFF, 0FF~19M
20~79℃,45℃ /68~174℃ 113℃
80~139℃, 130℃ /176~282℃, 266℃
Lamp on/off
Lamp on/off when Power on
Lamp on via DMX
Lamp off via DMX
Lamp off if no DMX
Lamp restart at temp.
Lamp off at temp.
Status Settings Address via DMX
No DMX Status
Pan Reverse
Tilt Reverse
Pan Degree
Feedback
Movement Speed
Mic Sensitivity
ON/OFF
Close/Hold/Auto/Music
ON/OFF
ON/OFF
630/540
ON/OFF
Speed 1~ 4
0~99%
Add. via DMX
Auto run if no DMX
Pan Reverse movement
Tilt Reverse movement
Pan Degree Select
Movement Feedback switch
Movement Mode Select
Sensitivity of Mic.
Service Setting Service Password
Fan Voltage
Gobo Speed
Password=XXX
High/Low
Quick/Slow
Service Code“=050”
Fan Voltage Select
Gobo Change Speed
Personality
Fans Control Auto Fans Speed
High Fans Speed
Low Fans Speed
Fans Speed Mode Select
SGM GB
XM350 V1.0 NR Idea Beam 300
12
Display Setting Shutoff Time Display shutoff time
Temperature C/F
Celsius
Fahrenheit
Temperature switch
between ℃/℃
Initial Effect PAN…… PAN =XXX Initial effect position
ireless DMX De-Act DMX
Activate DMX
Act & Data Out
Rest DMX Mem
De-activate DMX
Activate DMX
Act & Data Out
Reset ireless DMX Mem
Reset Default ON/OFF Restore factory set.
Reset Function
Reset All
Reset Pan&Tilt
Reset Colors
Reset Gobos
Reset Shutter
Reset Others
Reset all motors
Reset Pan/Tilt
Reset color wheel
Reset gobos
Reset shutter and/or
dimmer
Reset other motors
Test Channel PAN …… Test function
Manual Control PAN
:
PAN =XXX
:
Fine adjustment of the lamp
Effect Adjust
Calibrate Values --Password--
Color wheel
:
Password=XXX
Color wheel=XXX
:
Calbrate and adjust the
effects to standard/right
position Password “050”
User Mode Standard Mode
Basic Mode
Extended Mode
User Mode A
User Mode B
User Mode C
User’s mode to change
channel numbers
Users Mode Set
Edit User Mode Max Channel
PAN
:
Max Channel = XX
PAN = CH01
:
Preset User modes
Select Programs Auto Pro Part 1
Auto Pro Part 2
Auto Pro Part 3
Program 1 ~ 10 Program 1
Program 1 ~ 10 Program 2
Program 1 ~ 10 Program 3
Select programs to be run
Edit Program Program 1
:
Program 10
Program Test
Step 01=SCxxx
Step 64=SCxxx
(“STEP XX”)
Testing program
Program in loop
Save and exit
Edit Scenes Edit Scene 001
~ Edit Scene
250
Pan,Tilt,……
--Secne Time--
Input By
Outside
Pan=xxx……
TIME=xx.xs
Save and automatically
return
manual scenes edit
Edit Program
Rec. Controller XX~XX Automat. scenes rec

GB SGM
Idea Beam 300 XM350 V1.0 NR
13
FUNCTION MODE
DMX address setting
ith this function, you can adjust the desired DMX-address via the Control Board.
Select “Set DMX address” via the encoder.
Press the encoder, adjust the DMX address by turning the encoder.
Press the encoder to confirm.
Press the Mode/Esc-button in order return to the main menu.
Display the DMX 512 val e of each channel
ith this function you can display the DMX 512 value of each channel. The display automatically shows the
channel with a value changing.
Slave setting
ith this function, you can define the device as slave.
A to Program
ith this function, you can run the internal program. You can select the desired program under “Select
program”. You can set the number of steps under “Edit program”. You can edit the individual scenes
under “Edit scenes”. ith this function, you can run the individual scenes either automatically, i.e. with the
adjusted Step-Time.
M sic control
ith this function, you can run the internal program sound-controlled.
INFORMATION
Time information
C rrent Time
ith this function, you can display the temporary running time of the device from the last power on. The
display shows “XXXX”, “XXXX” stands for the number of hours. The counter is resetted after turning the
device off.
Total life Ho rs
ith this function, you can display the running time of the device. The display shows “XXXX”, “XXXX” stands
for the number of hours.
Last R n Ho rs
ith this function, you can display last the running time of the lamp. The display shows “XXXX”, “XXXX”
stands for the number of hours.
Lamp Ho rs
ith this function, you can display the running time of the lamp. The display shows “XXXX”, “XXXX” stands
for the number of hours.
Lamp off time
ith this function, you can display the temporary running time of the lamp from the last lamp on. The
display
Shows “XXXX”, “XXXX” stands for the number of hours. The counter is resetted after turning the lamp off.
Time Password
ith this function, you can display the timer password. The time password is 038.
Clear Last R n
ith this function, you can clear last run time of the fixture. The display shows “ON” or “OFF”, Press “Enter”
to confirm.
L-Time Password
ith this function, you can display the timer password. The time password is 038.

SGM GB
XM350 V1.0 NR Idea Beam 300
14
Clear lamp time
ith this function you can clear the running time of the lamp. Please clear the lamp time every time you
replace the lamp.
Select “Clear lamp time” by turning the encoder.
Press the encoder, the display shows “ON” or “OFF”.
Press the encoder to confirm.
Press the Mode/Esc-button in order to return to the main menu.
Temp. Info.
Head Temp
ith this function you can display the temperature on the display board of the base (near CMY-filter) in
Celsius.
Software version
ith this function, you can display the software version of the device.
Select “Software version” by turning the encoder.
Press the encoder, the display shows “V-X.X”, “X.X” stands for the version number, e.g. “V-1.0”,
“V-2.6”.
Turn the encoder in order to read the version of every individual IC.
Press the Mode/Esc-button in order to return to the main menu.
LAMP CONTROL
hen the real temperature around the lamp is higher than the preset value, the lamp will be shut down in
5 minutes automatically.
hen the LCD display shows “Off”, it means the lamp must be turned on again manually;
hen the LCD display shows “Hot”, it means the actual temperature around the lamp is still higher than the
preset value, so even the lamp can not be striked even the menu Lamp is turned to ON, as the lamp switch
is compelled to turned off.
hen the temperature unit after the temperature value come to lowercase letter “c” or “f”, it means menu
Lamp is turned to ON, but the lamp is not full dimming up.
hen the temperature unit after the temperature value come to capital letter “C” or “F”, it menu Lamp is
turned to ON, and the lamp is full intensity.
Lamp on/off
ith this function you can switch the lamp on or off via the Control Board.
Select "Lamp on/off" by turning the encoder.
Press the encoder, the display shows “ON” or “OFF”.
Turn the encoder to select “ON” if you wish to strike the lamp or “OFF” in order to switch it off.
Press the encoder to confirm.
Press the Mode/Esc-button in order to return to the main menu.
Remark: The menu Lamp On/Off is the software command only, the lamp can be striked successfully only
when the menu Lamp is set to ON and the actual temperature is lower than the limited value.
Lamp on/off when power on
ith this function you can select if the lamp will be switched on when switching the power on. Select “ON”
by turning the encoder if you wish to enable this function or “OFF” if you don’t.
Lamp on via external controller
ith this function you can select if you can switch the lamp on via an external controller (DMX-channel of
internal programs, value 64-79). Select “ON” by turning the encoder if you wish to enable this function or
“OFF” if you don’t.
Lamp off via external controller
ith this function you can select if you can switch the lamp off via an external controller (DMX-channel of
internal programs, value 224-239). Select “ON” by turning the encoder if you wish to enable this function
or “OFF” if you don’t.
Lamp Off if no DMX
ith this function you can select to switch off the lamp off automatically if there is no DMX signal). Select
“OFF” by turning the encoder if you wish to switch off the lamp automatically at once, Select “19M” by
turning the encoder if you wish to postpone to 19 minutes switch off the lamp automatically.
Lamp on at temp.
ith this function you can set the inside temperature from which the projector will restrike the lamp after
automatic lamp shut off.

GB SGM
Idea Beam 300 XM350 V1.0 NR
15
Lamp off at temp.
ith this function you can set the inside temperature at which the projector will automatically switch the
lamp off. Turn the encoder to select the maximum inside temperature between 60° C and 159° C. Inside
temperatures below 90° C are not critical. 90° C and more should lead to the lamp being switched off. Please
note that the outside temperature should not exceed 45° C.
When the temperat re aro nd the lamp is higher than the preset val e contin o sly p to 5
min tes, the lamp will be sh t off a tomatically.
If the lamp be sh t off a tomatically d e to over heat, it can not be striked again a tomatically,
it m st be t rned on again by man ally.
PERSONALITY
Stat s Settings
Address via DMX
ith this function, you can adjust the desired DMX-address via an external controller.
Select “Address via DMX” by turning the encoder.
Press the encoder, the display shows “ON” or “OFF”.
Turn the encoder to select “ON” if you wish to enable this function or “OFF” if you don’t.
Press the encoder to confirm.
Press the Mode/Esc-button in order to return to the main menu.
On the controller, set the DMX-value of channel 1 to "7".
Set the DMX-value of channel 2 to "7"or "8". hen set to "7" you can adjust the starting address between
1 and 255. hen set to "8" you can adjust the starting address between 256 and 511.
Set the DMX-value of channel 3 to the desired starting address. If you want to set the starting address
to 57, set channel 1 to "7", channel 2 to "7" and channel 3 to "57". If you want to set the starting address
to 420,set channel 1 to "7", channel 2 to "8" and channel 3 to "164" (256+164=420).
ait for approx. 20 seconds and the unit will carry out a reset. After that, the new starting address is set.
No DMX Stat s
ith this function, when the drive is not DMX signal, it runs automatism, close, hold and music, the default
is hold.
Pan Reverse
ith this function you can reverse the Pan-movement.
Tilt Reverse
ith this function you can reverse the Tilt-movement.
Pan Degree
ith this function, you can select pan degree for 630 or 540.
Feedback
ith this function, you can feedback switch of pan movement or tilt movement.
Movement Speed
ith this function, you can select scan mode from 1 to 4.
Mic Sensitivity
ith this function, the default is 70%, you can select the desired microphone sensitivity from 0 % to 99 %.
Service setting
Service Password
ith this function, you can set the service password.
Fan Voltage
ith this function, you can select fan voltage for high or low, the default is low
Attention: The model is not recommended when ambient temperat re is higher than 15 Celsi s
degree.
Gobo speed
ith this function, you can select GOBO speed for quick or slow, the default is slow.
Fans Control
ith this function, you can set the speed of the running fans. The selections have Auto、high and low.

SGM GB
XM350 V1.0 NR Idea Beam 300
16
Display Setting
Sh t off time
ith this function you can shut off the LCD display after 2 to 59 minutes. Turn the encoder in order to select
the desired shut off time.
Temperat re C/F
ith this function, Display the temperature for Celsius or Fahrenheit.
Initial effect
ith this function, Display initial effect position.
Wireless DMX
From factory, this projector is prepared for wireless data transmission ( -DMX). If you wish to de-activate
-DMX control, you can select the function “De-activate DMX” by turning the encoder. ith the function
“rest”, you can log out the projector from the wireless sender.
Reset Defa lt
ith this function, you can select restore factory set for ON or OFF, the default is OFF.
RESET-FUNCTIONS
ith this function you can reset the device via the Control Board. You can select the different reset functions
by turning the encoder.
EFFECT ADJUST
Test f nction of each channel
ith this function you can test each channel on its (correct) function.
Lamp adj stment
ith this function, you can adjust the lamp more easily. All effects will be canceled, the shutter opens and
the dimmer intensity will be set to 100 %. ith the individual functions, you can focus the light on a flat
surface (wall) and erform the fine lamp adjustment.
Calibrate val es
ith this function, you can calibrate and adjust the effect wheels to their correct positions. The password of
calibrate values is 050.
USERS MODE SET
In this menu, user can select different channels list by different sequence:
For example, after the user enter this manual, if select Auto Program = CH 22, means in this User’s mode,
the “Dimmer” is in Channel 16.
User mode
ith this function, you can create user defined channel orders.
Preset User mode
ith this function, you can adjust the rest user defined channel order.
EDIT PROGRAM
Select program
ith this function, you can select the program for the Program Run.
Edit program
ith this function, you can edit the internal programs.
Edit scenes
ith this function, you can edit the scenes of the internal programs.
A to scenes rec.
The moving head features an integrated DMX-recorder by which you can transmit the programmed scenes
from your DMX-controller to the moving head. Adjust the desired scene numbers via the encoder (from – to).
hen you call up the scenes at your controller, they will automatically be transmitted to the moving head.

GB SGM
Idea Beam 300 XM350 V1.0 NR
17
Exc rsion:
A Master unit can send up to 3 different data groups to the Slave units, i.e. a Master unit can start 3 different
Slave units, which run 3 different programs. The Master unit sends the 3 program parts in a continuous loop.
The Slave unit receives data from the Master unit according to the group which the Slave unit was assigned
to. If e.g. a Slave unit is set to “Slave 1” in the menu “Set to Slave”, the Master unit sends “Auto Program
Part 1” to the Slave unit. If set to “Slave 2”, the Slave unit receives “Auto Program Part 2”.
To start a Auto Program please proceed as follows:
1. Slave-Setting
Select “Function Mode” by turning the encoder.
Press the Enter button to confirm.
Select “Set to slave” by turning the encoder.
Press the Enter button to confirm.
Turn the encoder to select “Slave 1”, “Slave 2” or “Slave 3”.
Press the Enter button to confirm.
Press the Mode/Esc button in order to return to the main menu.
2. A tomatic Program R n
Select “Function Mode” by turning the encoder.
Press the Enter button to confirm.
Select “Auto Program” by turning the encoder.
Press the Enter button to confirm.
Turn the encoder to select “Master” or “Alone”. The selection "Alone" means Stand Alone-mode and
"Master" that the device is defined as master.
Press the Enter button to confirm.
Press the Mode/Esc button in order to return to the main menu.
3. Program selection for A to Pro Part
Select “Edit program” by turning the encoder.
Press the Enter button to confirm.
Select “Select programs” by turning the encoder.
Press the Enter button to confirm.
Turn the encoder to select “Auto Pro Part 1”, “Auto Pro Part 2” or “Auto Pro Part 3”, and thus select which
Slave program is to be sent. Selection “Part 1” means, that the Slave unit runs the same program as the
master units.
Press the Enter button to confirm.
Press the Mode/Esc button in order to return to the main menu.
4. Program selection for Edit Program
Select “Edit program” by turning the encoder.
Press the Enter button to confirm.
Select “Edit program” by turning the encoder.
Press the Enter button to confirm.
Turn the encoder to select the desired program. ith this function you can edit specific scenes into a
specific program.
Press the Enter button to confirm.
Press the Mode/Esc button in order to return to the main menu.
SGM GB
XM350 V1.0 NR Idea Beam 300
18
5. A tomatic Scene Recording
Select “Edit program” by turning the encoder.
Press the Enter button to confirm.
Select “Edit scenes” by turning the encoder.
Turn the encoder to select the desired scene numbers. You can program a maximum number of 250 •
Turn the encoder to select the desired scene numbers. You can program a maximum number of 250
scenes.
Press the Enter button to confirm.
Press the Mode/Esc button in order to return to the main menu.
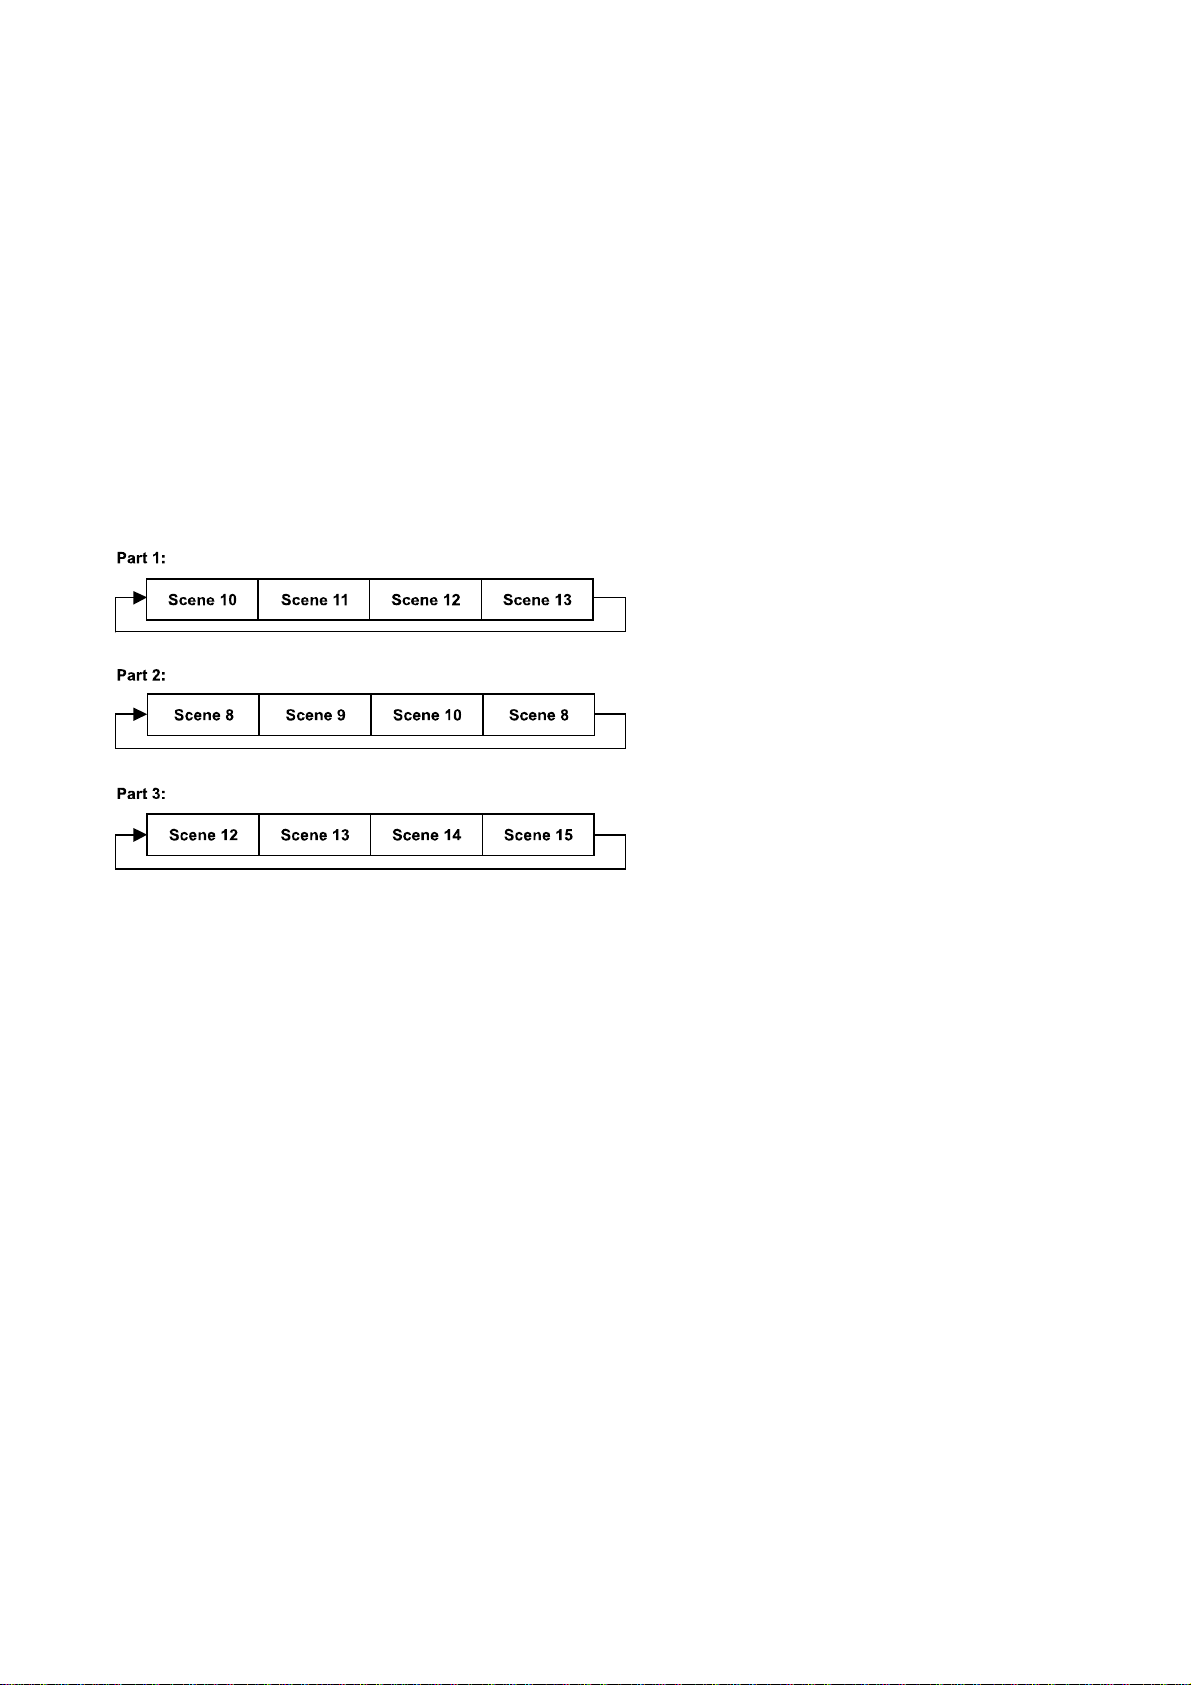
Example:
Program 2 includes scenes: 10, 11, 12, 13
Program 4 includes scenes: 8, 9, 10
Program 6 includes scenes: 12, 13, 14, 15, 16
Auto Pro Part 1 is Program 2;
Auto Pro Part 2 is Program 3;
Auto Pro Part 3 is Program 6
The 3 Slave groups run the Auto Program in certain time segments, as shown in the following picture:
Table of contents
Other SGM Lighting Equipment manuals

SGM
SGM X Line IDEA WASH 575 User manual

SGM
SGM Q?2 White User manual

SGM
SGM P Series User manual

SGM
SGM Flasher DMX 1.5 User manual

SGM
SGM G-4 RGBAM WASH User manual

SGM
SGM PALCO 3 User manual

SGM
SGM P-6 User manual

SGM
SGM Giotto spot 400 User manual

SGM
SGM Q-10 User manual

SGM
SGM Pilot 2000 Operator's manual


Popular Lighting Equipment manuals by other brands


Ignition
Ignition Gawan 200 user manual

&Tradition
&Tradition Tripod HM8 Hvidt & Molgaard 1953 instructions

Briteq
Briteq BT-LASER2000 RGB quick start guide

Associated Controls
Associated Controls AsconPool C1070 Installation

Lumio
Lumio INNOVAPLAS AQUARIUS DECK 5000 manual

EuroLite
EuroLite LED ML-56 RGB user manual


