spok T52 User manual

two-way pager
T52
USER GUIDE

2
TABLE OF CONTENTS
Control Buttons..........................................3
Getting Started..........................................4
Turning Device On .....................................5
Replacing Battery ......................................5
Turning Device Off.....................................6
Using the Main Menu ...............................6
Backlight....................................................7
Setting the Time and Date ........................7
Sending a Message...................................8
Reading a Message.................................10
Replying to Messages.............................11
Deleting All Read Messages...................13
Deleting All Messages............................13
Deleting Sent Messages.........................13
Contacts...................................................14
Setting an Alert .......................................16
Setting the Alarm ....................................18
Quiet Mode..............................................18
Turning the Transmitter Off .....................19
Setting Quick Text ...................................19
Setting Private Time................................20
Setting the Screen Saver ........................20
Setting Passcode ....................................21
Message Zoom........................................22
Setting Owner Info ..................................22
Creating a Signature ...............................23
Setting the Contrast ................................23
About .......................................................24
Care and Maintenance............................25
Safety Information.................................. 26
UL Warning and Caution .........................27
2 3
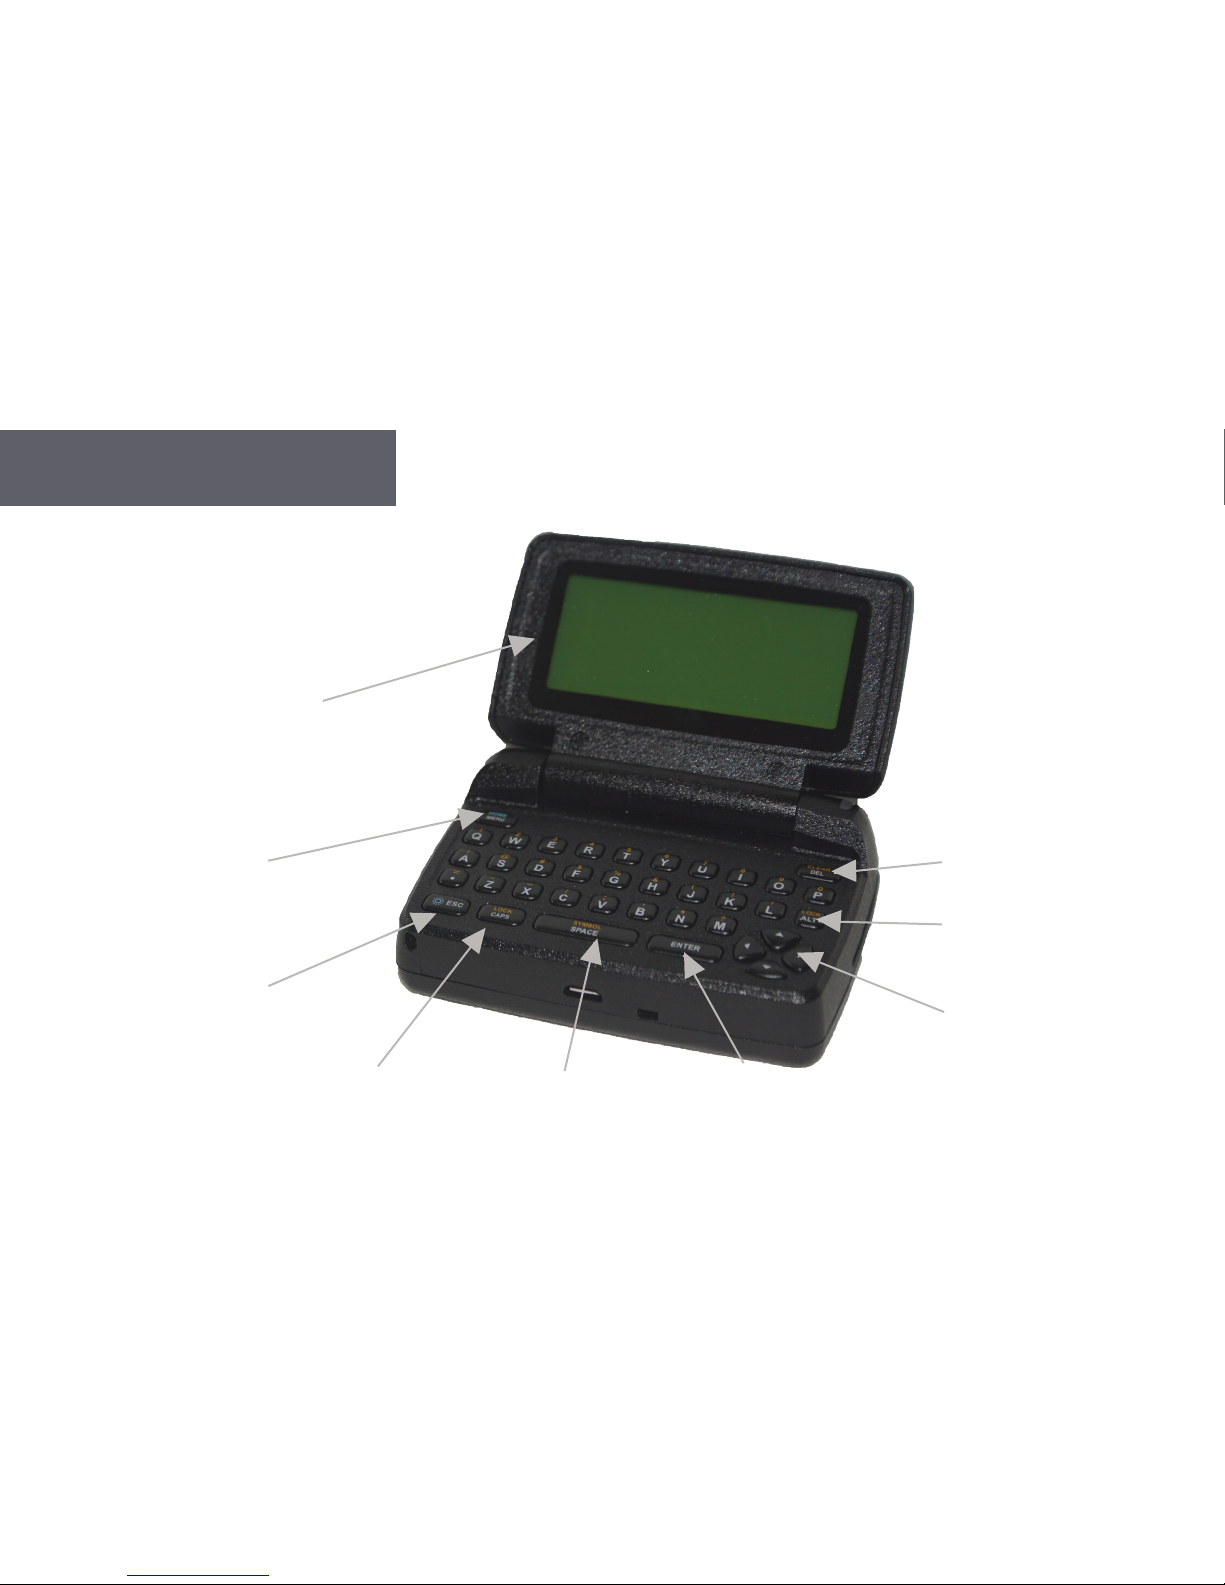
CONTROL BUTTONS
Flip
Home
Menu
Escape/
Backlight
CAPS Symbol Menu/Space Enter
Navigation
Buttons
ALT
Clear/Delete

4
GETTING STARTED
Flip Houses and protects the LCD screen. Opening the ip awakens the device display and
acknowledges a new message alert. Closing the ip puts the screen into sleep mode.
Escape/
Backlight Used to return to the preceding screen. Also used to turn the backlight on and off.
CAPS When pressed, the next character typed is capitalized. The status icon displays on the right
of the screen. Pressing twice locks the capitalization function until it is pressed again.
Space Used to insert a space in text while composing a message. Alt-Symbol brings up
additional symbol characters when entering text.
Enter Used to select the highlighted option, to save settings or to enter a carriage return into
composed text.
Navigation
Buttons Used for moving between menu options and within message text.
ALT
Activates the Alt-mode control keys. The status icon displays on the right of the screen.
The next key pressed indicates the Alt-mode function. Pressing twice locks this function
until pressed again.
Delete When pressed the character to the left of the cursor is deleted. Alt-Clear deletes the entire
text.
LOCK
CAPS
CLEAR
DEL
ENTER
ESC
LOCK
ALT
SYMBOL
SPACE

4 5
TURNING DEVICE ON
• Ensure that a AA alkaline battery is properly installed.
• Open the lid and press the ENTER key to power on the device. Upon powering on, the T52 will take several seconds to
initialize before displaying the Home Screen.
• From the Home Screen, press any key (except ESC key) to display the Main Menu.
• If a menu item is not selected, the device reverts to Standby mode after a predened amount of time (congurable in
the Display/Keyboard/Screen Saver section of Preferences)
• If the device contains one or more unread messages, a circle indicator icon on the left side of the screen will ash
(while in Standby mode).
REPLACING BATTERY
• Remove the old battery
• Wait 10 seconds for the device to clear its “Low Battery” condition
• Insert a new alkaline AA battery
If your device does not register with “Full Service” or you experience issues with sending messages or replies it may be
necessary to insert a new AA battery in the device and wait up to 4 hours for the internal battery to fully charge.

6
TURNING DEVICE OFF
• From the Main Menu, press the Navigation button to scroll down to Power Off and press ENTER.
• Highlight Yes and press Enter.
USING THE MAIN MENU
Use the Main Menu for the following features:
Press navigation keys to highlight the desired feature and then press Enter.
• Read the received or sent messages
• Send messages
• Access contact information
• Change preferences
• Set the alarm
• Access quiet mode
• Turn the transmitter off and on
• Turn the device off

6 7
SETTING THE TIME AND DATE
• From the Main menu, press the navigation keys to highlight Preferences and press Enter.
• Press navigation keys to highlight Setup and press Enter.
• Press navigation keys to highlight Set Time & Date and press Enter.
• Use Left/Right keys to select the desired Network Sync type. They are:
• Yes : The minutes value of the time is automatically set.
• No : Allows complete manual setting of the time and date.
• Use Up/Down keys to move the cursor up and down.
• Use Left/Right keys to select the desired date format while the cursor is on the Format.
• Use Left/Right keys to move the cursor eld to eld while the cursor is on the Time and Date setting.
• Use Enter key to increase the time and date while the cursor is on the Time and Date setting
BACKLIGHT
• In low-light conditions, press and hold ESC to turn on the backlight.
• The backlight remains illuminated until the T52 times out and returns to the Standby screen.
• To manually turn the backlight off, close and open the ip lid.

8
SENDING A MESSAGE
This section discusses how to compose a message, select addresses and send a message with the device.
Composing a Message
From the Main Menu, press the navigation keys, highlight Write and then press Enter.
Enter a message. After composing the message, press the Menu key (located at the upper left corner of the keyboard).
Menu Options
The device will display six menu items. Menu items include: Select Address, Send, Add-replies, Quick-
Text, Back and Cancel. Use the navigation key to highlight the desired item and then press Enter to
execute.
• Select Address: The user can select addresses to send the message to.
• Send: The device sends the message. The Send icon will only be highlighted after an address has been selected.
• Quick-Text: The user can insert pre-dened text into the message being composed.
• Back: Exits the Write menu.
• Cancel: Removes the menu items from the bottom of the screen.

8 9
Selecting Addresses
Up to twenty addresses from existing contacts can be selected for sending a single message to.
• Use Navigation Keys to move the cursor and highlight the desired address.
• Press Enter and then use navigation key to select the desired address type.
• Press Enter to select the address.
• A wireless address or email can be manually entered by selecting Enter Address and then selecting One Time Wireless
or One Time Email from the list.
• Use Navigation Keys to move the cursor to highlight “Done Selecting” when you have nished adding all desired
recipients. This will return you to the Write Menu to send the message.
Sending a Message
Once message composition is completed and the addresses selected, the cursor can be moved to the Send item. Pressing
Enter sends the message.
‘Message Transmitting’ is displayed to conrm that the message is being sent to the selected addresses.

10
READING A MESSAGE
• When a Personal message is received, the device displays a pop-up window and alerts according to the InBox Alert
setting. (Please see the Setting Alert section of this manual for details on how to set the InBox Alert and the “Setting
News/Info InBox” section of this manual for adjusting the alert for News/Info messages)
• To Stop the alert press any key, or open the ip cover. The InBox or News/Info icon will ash until all received messages
have been read.
• If reminder alerts were preset from Preferences, the device periodically alerts as a reminder of any unread InBox
messages.
Previewing Message
• From the Main menu, press navigation keys to highlight Read and press Enter to display InBox, OutBox, News/Info
InBox and Message Folder.
• Use the navigation keys to move the cursor and press Enter to open the InBox, OutBox, News/Info InBox or Message
Folder.
• The screen will display rst six messages.
Reading Messages
• To read a message, (while previewing) press navigation keys to highlight the desired message and press Enter.
• Press up/down navigation keys to scroll through the text of a message or press Enter to page through the message.
• At the end of the message, a highlighted menu bar is displayed. Press Menu or Enter to Reply, Forward, Move, or Delete
the message.
• Note: At any time, while previewing or reading a message, press Menu to access the Message Options menu.

10 11
REPLYING TO MESSAGES
For convenience, the device has several pre-programmed reply messages. To reply to a message using one of the
pre-programmed replies, proceed as follows.
Sending a Pre-Programmed Reply
• While previewing or reading a message, press Menu to access the Message Options menu.
• Press navigation keys to highlight Reply and press Enter. The device displays the list of pre-programmed reply messages
from which to choose.
• Press navigation keys to highlight the desired reply and press Enter. The device displays ‘Message Transmitting’ to
conrm that the reply has been sent.
Sending a Custom Reply
• While viewing a message, press Menu to display the Message Options menu.
• Press navigation keys to highlight Reply and press Enter.
• Press navigation keys to highlight Custom Reply and press Enter.
• Type the message reply and press Menu.
• To send the reply, press navigation keys to highlight Send and press Enter. The device displays ‘Message Transmitting’
to conrm that the reply has been sent.

12
Forwarding Messages
• Received messages can be appended to and forwarded from the device. To do so, proceed as follows.
• While viewing a message, press Menu to display the Message Options menu.
• Press navigation keys to highlight Forward and press Enter. Add text to the message if desired.
• To send the message, follow Sending a Message routine.
Resending Messages from the OutBox
• Messages sometimes cannot be sent initially or fail to be sent due to coverage problems. This can be corrected by
resending the message
• From the OutBox, press navigation keys to highlight the message to be resent and press Menu.
• Press navigation keys to highlight Resend and press Enter.
Deleting Messages
• Any or all messages on the device can be deleted.
• To delete the message currently being viewed, proceed as follows.
• While viewing a message, press Menu to display the Message Options menu.
• Press navigation keys to highlight Delete and press Enter.

12 13
DELETING ALL READ MESSAGES
All read messages in the InBox can be deleted.
• While previewing messages, press Menu To display the Message Options Menu.
• Press navigation keys to highlight Delete Read and press Enter.
DELETING ALL MESSAGES
All messages in the InBox can be deleted.
• While previewing messages, press Menu to display the Message Options menu.
• Press navigation keys to highlight Delete All and press Enter.
DELETING SENT MESSAGES
All sent Message in the OutBox can be deleted.
• While previewing messages in the OutBox, press Menu to display the Message Option menu.
• Press navigation keys to highlight Delete Sent and press Enter.

14
CONTACTS
An individual contact entry may include First Name, Last Name, Wireless Address, Work Email, Home Email, Company,
Home Phone, Work Phone, Mobile, Fax, Street, City, State, Zip and Note. In addition, address groups can be dened.
Creating a Contact
• From the Main menu, press navigation keys to highlight Contacts and press Enter.
• Press navigation keys to highlight New Contact and press Enter.
• Type the appropriate text in each eld and use navigation keys to move the cursor from one eld to the next. Note that
some elds will limit the characters that can be entered into them.
• Press ESC or move the cursor to Save Entry to save the record.
Creating a Group
• From the Main menu, press navigation keys to highlight Contacts and press Enter.
• Press navigation keys to highlight New Group and press Enter.
• Type the desired Group Name. Cursor down to Select Addresses and press Enter. Select the desired addresses.
• Use Enter key to select the desired contact.
• Press ESC to return to the previous screen.
• Press ESC or move the cursor to Save Entry and press Enter to save the record.

14 15
Searching the Contacts
• Use the Search feature to search the list of Contacts.
• Type the rst few characters of the Contact’s name to begin the search.
• To select the desired Contact, press Enter.
Editing a Contact
• From the Contacts menu, press navigation keys to highlight the desired Contact and press Enter.
• Press Enter to select the Contact.
• Press Menu to display the Options menu.
• Use navigation keys to highlight Edit and press Enter.
Deleting a Contact
• From the Contacts menu, press navigation keys to highlight the desired Contact.
• Press Enter to select the Contact.
• Press Menu to display the Options menu.
• Use navigation keys to highlight Delete and press Enter.

16
SETTING AN ALERT
InBox Alert
• From the Main menu, press navigation keys to highlight Preferences and press Enter.
• Press navigation keys to highlight Alert Setting and press Enter.
• Press navigation keys to highlight InBox Alert and press Enter.
• Press Enter to select the desired type.
• Press ESC to exit.
Alert Volume
• From the Main menu, press navigation key to highlight Preferences and press Enter.
• Press navigation keys to highlight Alert Setting and press Enter.
• Press navigation keys to highlight Alert Volume and press Enter.
• Use navigation key to select the desired alert volume. Press Menu to listen the alert.
• Press enter or ESC to save and exit.
Reminder Alert
When this feature is enabled, the device will periodically emit a reminder alert if there are any unread personal messages.
(The device does not emit reminder alerts for News/Info messages)

16 17
To enable or disable the Reminder Alert feature, proceed as follows.
• From the Main menu, press navigation keys to highlight Preferences and press Enter.
• Press navigation keys to highlight Alert Setting and press Enter.
• Press navigation keys to highlight Reminder Alert and press Enter.
• Press Left/Right keys to select the desired Mode (Enable/Disable/Endless).
• NOTE: The Endless mode will have the device alert continuously without a Repeat or Interval selection.
• Press Up/Down keys to move the cursor up and down.
• Press Left/Right keys to select the desired alerts while the cursor is on the Alert.
• Press Left/Right keys to select the desired number of repeats while the cursor is on the Repeat.
• Press Left/Right keys to select the desired interval while the cursor is on the Interval.
• Press Enter or ESC to save and exit.
NOTE: The reminder alert is intended to remind the user to attend to their device due to a new message. It
does not require the user to read the new message. If the user selects “No” when prompted on their device
display screen to “Read New Msg?” or enters the Inbox without reading the message, the Reminder Alert stops.
However both the Read icon on the Main menu and the Inbox icon on the Read function menu will continue to
ash as long as there are unread messages and the device is on.

18
SETTING THE ALARM
The alarm can be set for either a specic time and date, or it can be used as a daily alarm.
• From the Main menu, press navigation keys to highlight Set Alarm and press Enter.
• Use Left/Right keys to select the desired mode (Disable, Once, or Daily).
• Use Up/Down keys to move the cursor up and down.
• Press Enter to increase the time and date while the cursor is on Time and Date option.
• Press Left/Right keys to select the desired Snooze (Disable, 5 Min, 10 Min, or 15 Min) while the cursor is on Snooze
option.
• Press Left/Right to select the desired alert type while cursor is on Alert option. Press Menu to listen the alert.
• Use ESC to save and exit.
QUIET MODE
When active, Quiet Mode allows the audible alerts to be temporarily changed to Silent or Vibrator alerts.
• From the Main menu, press navigation keys to highlight Quiet Mode and press Enter.
• Press navigation keys to select the desired type (Disable, Silent, or Vibrate).
• Press Enter to select the desired type.
• Press ESC to exit.

18 19
TURNING THE TRANSMITTER OFF
Note: When the transmitter is turned off, the device cannot send messages or replies. However, it may still receive
messages.
• From the Main menu, press navigation keys to highlight Transmitter and press Enter.
• Press navigation keys to highlight On or Off as desired.
• Press Enter to select the desired option.
• Press ESC to exit.
SETTING QUICK TEXT
Up to 10 Quick Texts entries can be created for use with composing a message. To edit Quick Text, proceed as follows.
• From the Main menu, press navigation keys to highlight Preferences and press Enter.
• Press navigation keys to highlight Quick Text and press Enter.
• Use navigation keys to highlight the desired quick text and press Enter.
• Edit the text.
• Press ESC to save and exit.

20
SETTING PRIVATE TIME
Private Time mode allows a time period to be specied during which the device receives messages and performs all
functions without an audible or vibrate alert.
• From the Main menu, press navigation keys to highlight Preferences and press Enter.
• Press navigation keys to highlight Private Time and press Enter.
• Press Left/Right keys to select the mode (Disable/Enable).
• Press Up/Down keys to move the cursor up and down.
• Press Left/Right keys to move the cursor from eld to eld while the cursor is on Time setting.
• Press Enter to increase the time while the cursor is on Time Setting.
• Press Left/Right keys to enable or disable the alert at the end of the private time, if a message was received during
this time.
• Use ESC to save and exit.
SETTING THE SCREEN SAVER
• From the Main menu, press navigation keys to highlight Preferences and press Enter.
• Press navigation keys to highlight Setup and press Enter.
• Press navigation keys to highlight Display / KeyBD and press Enter.
• Press navigation keys to highlight Screen Saver and press Enter.
• Press Left/right keys to select the desired Timeout period.
• Press ESC or Enter to save and exit.
Other manuals for T52
1
Table of contents
Other spok Pager manuals


