Spot-on GPS FENCE User manual

1
SPOTON USER GUIDE
User Guide

2SPOTON USER GUIDE
Freedom for your dog. And you.
Congratulations—to you and your dog! You’ll both have a more carefree
life, now that you can easily create custom fences of almost any size
and shape.
Don’t want to read this booklet? Use our app.
All of the instructions and tips are there, too.
Warnings:
There is no containment system, including a residential fence or the SpotOn
GPS Fence, that can contain all dogs 100% of the time. Some dogs are very
smart and can escape any containment. All containment systems can break or
malfunction. Please monitor your dog regularly while using the system. If your
dog is dangerous to others, do not rely on a containment system where they
are unmonitored. In addition, this containment system cannot prevent predators
from entering your fence area.
When creating fences, it is important to pay attention to your surroundings and
watch where you are walking. Avoid staring at the SpotOn collar or app while
walking a fence. Avoid dangerous areas that could result in serious injury or
death.

3
SPOTON USER GUIDE
Table of Contents
Getting Started . . . . . . . . . . . . . . . . . . . . . . . . . . . . . . . . . . . 4
How SpotOn works . . . . . . . . . . . . . . . . . . . . . . . . . . . . . 4
What’s in the box . . . . . . . . . . . . . . . . . . . . . . . . . . . . . 6
Fit the collar . . . . . . . . . . . . . . . . . . . . . . . . . . . . . . . . . . 7
Set Up . . . . . . . . . . . . . . . . . . . . . . . . . . . . . . . . . . . . . . . . . . 8
Step 1: Set up the collar and app . . . . . . . . . . . . . . . . . 8
Step 2: Create and test a fence . . . . . . . . . . . . . . . . . . 10
A. Important fence guidelines . . . . . . . . . . . . . . . . . . .10
B. Create the fence . . . . . . . . . . . . . . . . . . . . . . . . . . . 16
C. Complete and save the fence . . . . . . . . . . . . . . . . 17
D. Test the fence . . . . . . . . . . . . . . . . . . . . . . . . . . . . . 18
Step 3: Train your dog . . . . . . . . . . . . . . . . . . . . . . . . . 20
A. Set and test static correction . . . . . . . . . . . . . . 21
B. Set vibration feedback . . . . . . . . . . . . . . . . . . . 21
Using SpotOn . . . . . . . . . . . . . . . . . . . . . . . . . . . . . . . . . . . 22
Check collar status . . . . . . . . . . . . . . . . . . . . . . 22
Battery information . . . . . . . . . . . . . . . . . . . . . . . . . . 24
Turn on/off . . . . . . . . . . . . . . . . . . . . . . . . . . . . . . . 24
Keep tabs on your dog - cellular plan and tracking. . . . 25
Tree coverage (Forest Mode) . . . . . . . . . . . . . . . . . . . . 26
Friends and family . . . . . . . . . . . . . . . . . . . . . . . . . . . . . 26
Care and maintenance . . . . . . . . . . . . . . . . . . . . . . . . . 26
Troubleshooting . . . . . . . . . . . . . . . . . . . . . . . . . . . . . . .27
Have a question? We’ll fetch the answer! . . . . . . . . . . 29
4SPOTON USER GUIDE
GPS
Satellites
SpotOn
GPS Collar
LTE-M Cellular
Network
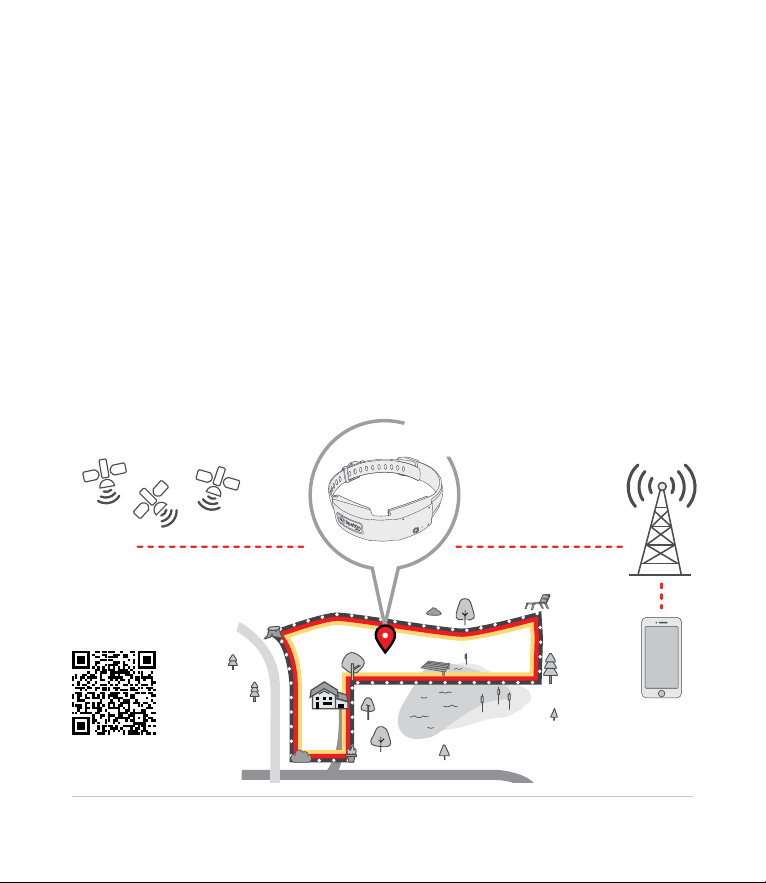
Getting Started
How SpotOn works
With the SpotOn GPS Fence your dog can roam free within a designated
area.
Our ingenious SpotOn System is the key. Put it on your dog when he’s
outside, and its patented True Location™ GPS technology helps keep him
within a custom GPS fence that you create. Build custom fences anywhere
you wish—in your yard and beyond. You’ll use the app to set up SpotOn and
create your rst fence. Simply walk the boundary with the collar in hand
and SpotOn automatically creates the fence.
Watch
the video
5
SPOTON USER GUIDE
Then you’ll teach your dog to know that the collar’s dog-friendly tones
mean he is near the boundary. This, coupled with vibration and static
correction feedback will help him stay inside the GPS fence.
Plus, see your dog’s location—any time, from anywhere—in the SpotOn app
when you have a cellular signal.* And if your dog ever leaves the GPS fence
area, you’ll get notied on your phone.
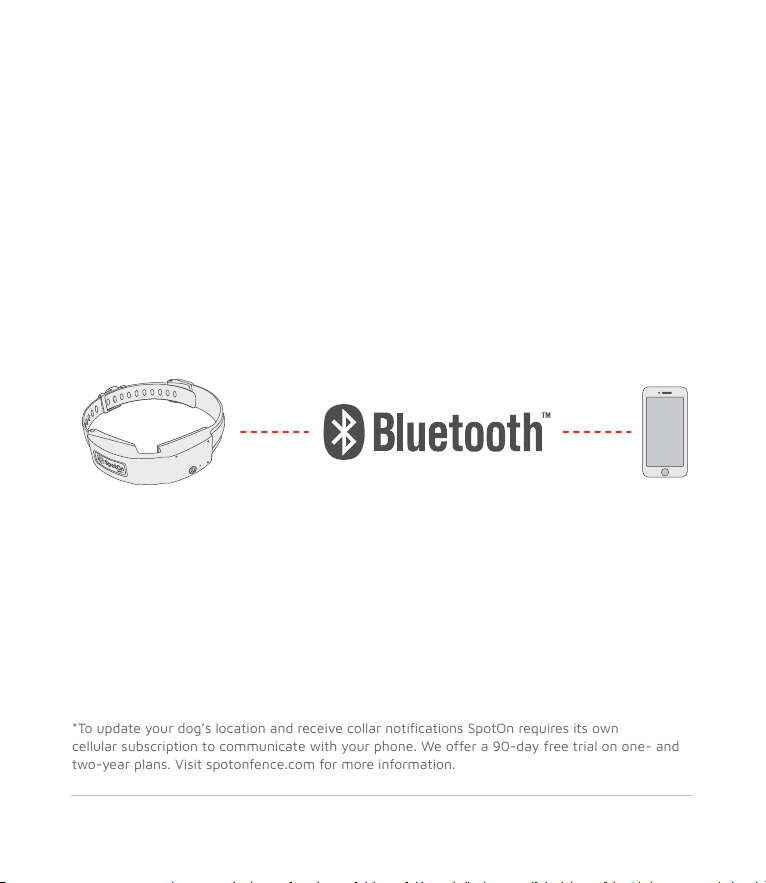
Collar setup is easy. Use your phone to connect to the collar using
Bluetooth. The app will lead you through the steps to connect SpotOn
to your phone, just make sure your collar is within a few feet of your
phone when you connect.
*To update your dog’s location and receive collar notications SpotOn requires its own
cellular subscription to communicate with your phone. We offer a 90-day free trial on one- and
two-year plans. Visit spotonfence.com for more information.

6SPOTON USER GUIDE
What’s in the box
7
SPOTON USER GUIDE
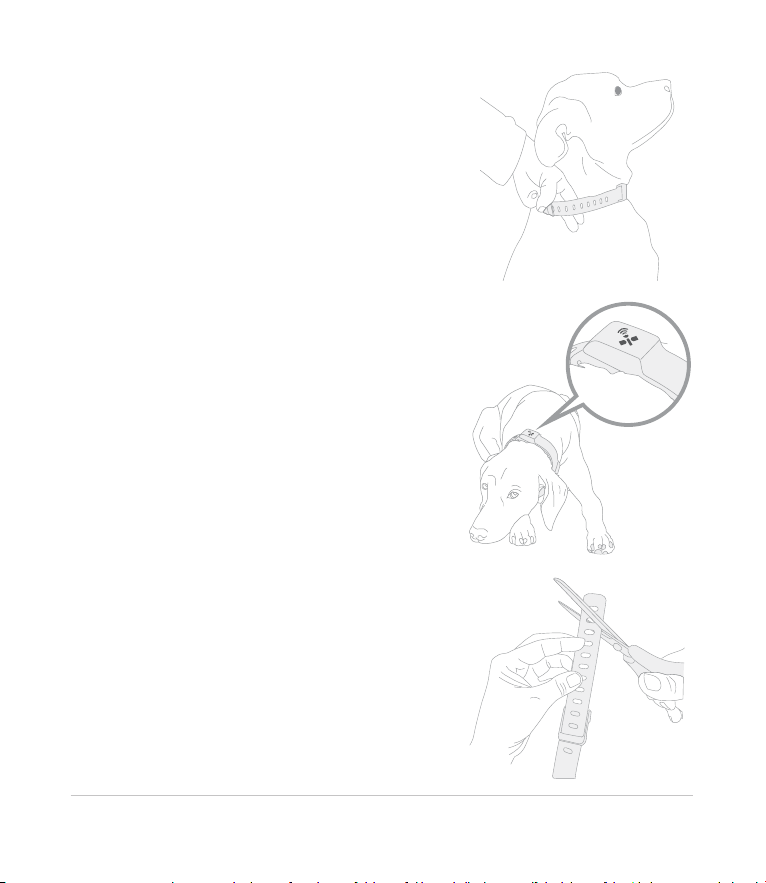
Fit the collar
SpotOn—available in S, M, and L—will t
most dogs that weigh 15 pounds or more
and have a neck size between
10 inches and 26 inches.
Fit SpotOn to your dog like a regular
collar. Use the adjustable strap so it ts
snugly but lets you comfortably t two
ngers between the collar and your dog’s
neck. For more information on adjusting
the strap, see page 29.
If you are planning to use static
correction, install the static contact
points before tting the collar, see
page 21.
When properly tted, the GPS antenna
should sit on the back of the dog’s neck
so the GPS icon is facing the sky.
Tuck any excess strap underneath the
collar to prevent it from catching and
pulling. Once you’ve found the proper
t for your dog (and dog is fully grown),
you can trim the excess collar strap.
If it doesn’t t, please email us
exchange for a different size collar.
8SPOTON USER GUIDE
Setup
STEP 1: Set up the collar and app
A. Gather the items you’ll need
• SpotOn collar
• Wall charger
• Charger cable
• Charging base
Set aside the other accessories for now.
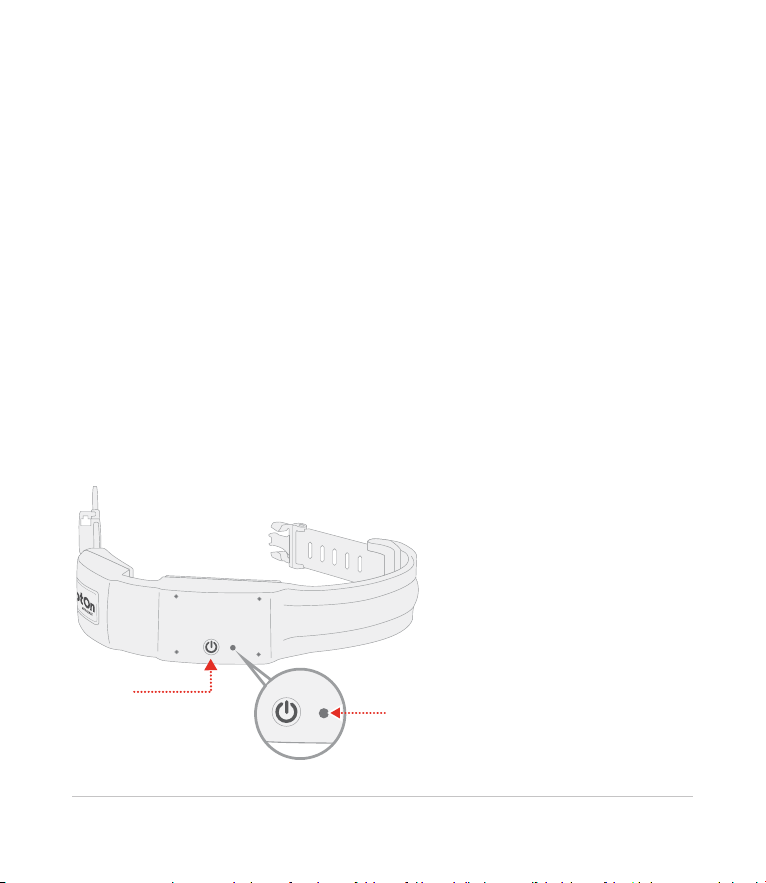
B. Turn the collar on
Press and hold the Power Button until the LED starts ashing white.
Then, the LED will turn to solid red and turn off after a few seconds.
Power
Button LED Status
Indicator

9
SPOTON USER GUIDE
C. Charge the collar
• Connect the charger cable
to the charging base and the
wall charger, then plug in
the wall charger.
• Put the collar in the
charging base.
Once connected, the LED status
indicator will slowly ash green,
telling you that the battery is
charging. It will take 90-120
minutes to fully charge the collar.
If the LED doesn’t ash green, wait
ve minutes, and press the power
button for three seconds.
You can check the charge status by
quickly pressing the power button
while SpotOn is in the charger.
• Flashing green = charging
• Solid green = fully charged
D. Download our app
While SpotOn is charging,
download the SpotOn GPS Fence
app, then follow the steps to create
an account and register your collar.
10 SPOTON USER GUIDE
FENCE
BOUNDARY
ALERT ZONE
WARNING ZONE
!
STEP 2: Create and test a fence
To build a virtual fence, you’ll rst plan the boundary and then walk
your collar along the boundary (without your dog). As you walk, SpotOn
automatically creates the fence.
A. Fence Guidelines
Before you create a fence, know these crucial guidelines.
Scan the QR code to watch the video. (The guidelines are
in the app, too, if you’d rather follow along there.) Watch
the video
Allow for the fence alert/warning zone
When you create a fence, SpotOn builds in an alert and warning zone about
10 feet inside the boundary that you walk. As your dog enters this zone,
SpotOn makes a series of tones. You’ll train your dog to understand these
tones are the fence boundary.

11
SPOTON USER GUIDE
Allow for fence boundary drift
SpotOn is more accurate than the
GPS on your smartphone, but like
all GPS systems, it can be affected
by buildings, hills, heavy tree cover,
the number of satellites detected,
and other factors. This means your
fence boundary will typically shift
by less than 10 feet throughout the
day. Since your dog will be trained
to respond to the tones, not visual
landmarks, drift will not confuse
him or affect his ability to stay in
the fence.
Minimum property size 1/2 acre
Because of the warning zone and fence boundary drift, fences built on
properties that are less than 1/2 acre typically do not provide enough
open space for your dog to roam.
12 SPOTON USER GUIDE
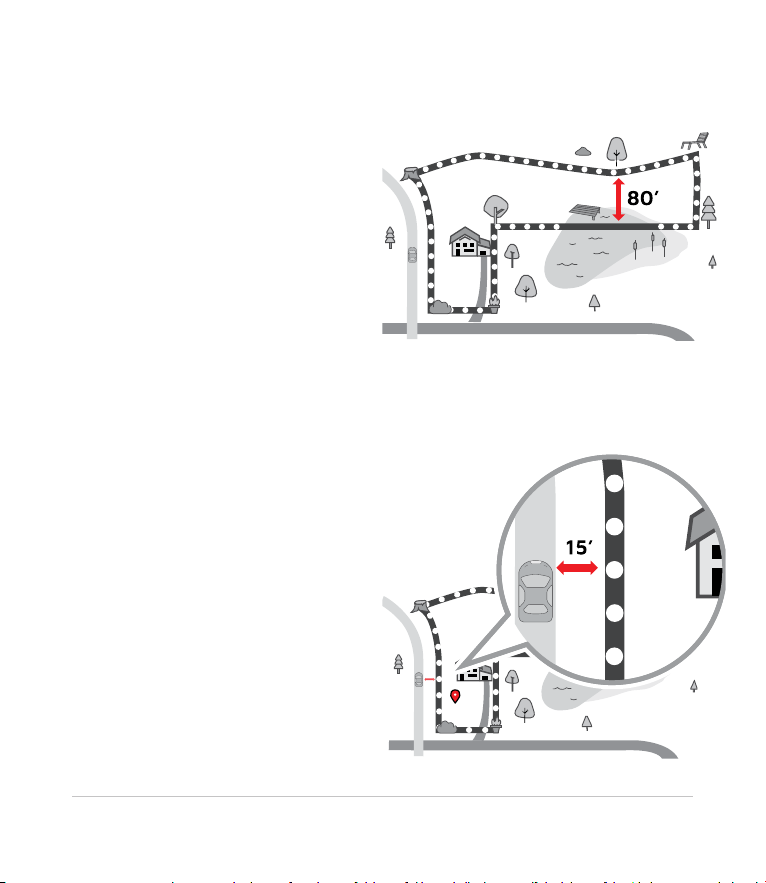
Minimum width for fence area
To provide enough space for your
dog to roam keep the distance
between fence boundaries at
least 80 feet wide at the
narrowest point.
Minimum distance from roads and hazards
Set boundaries at least 15 feet
away from roads or any other
hazardous areas.
13
SPOTON USER GUIDE
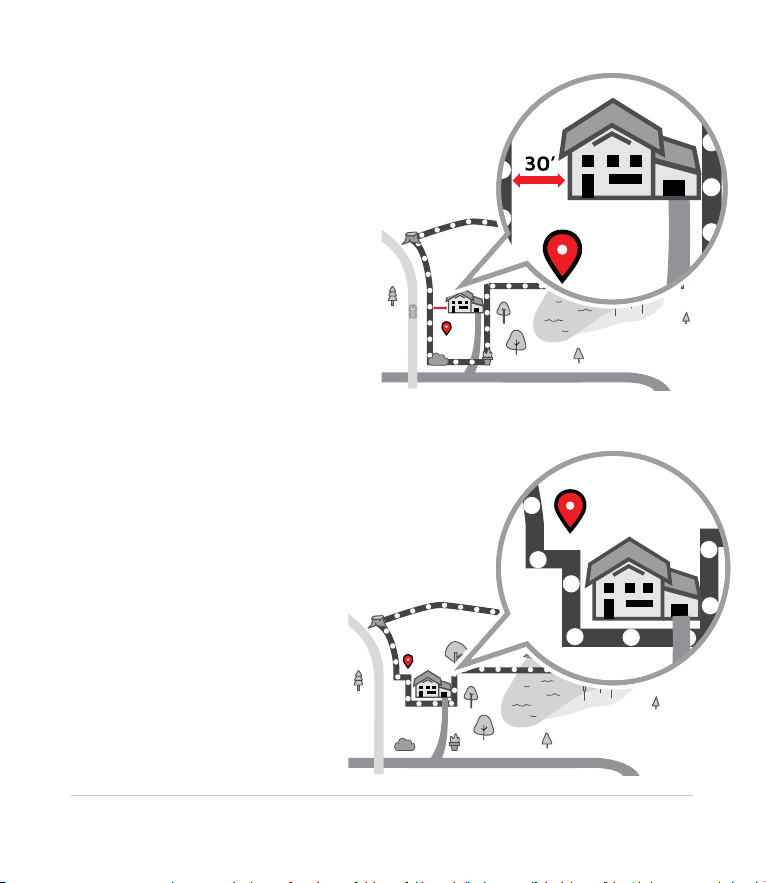
Minimum width for a passageway
Buildings can interfere with GPS
signals. To create a passageway
between front and backyard
along a house, make sure there
is at least 30 feet between the
fence and your home or any other
structure.
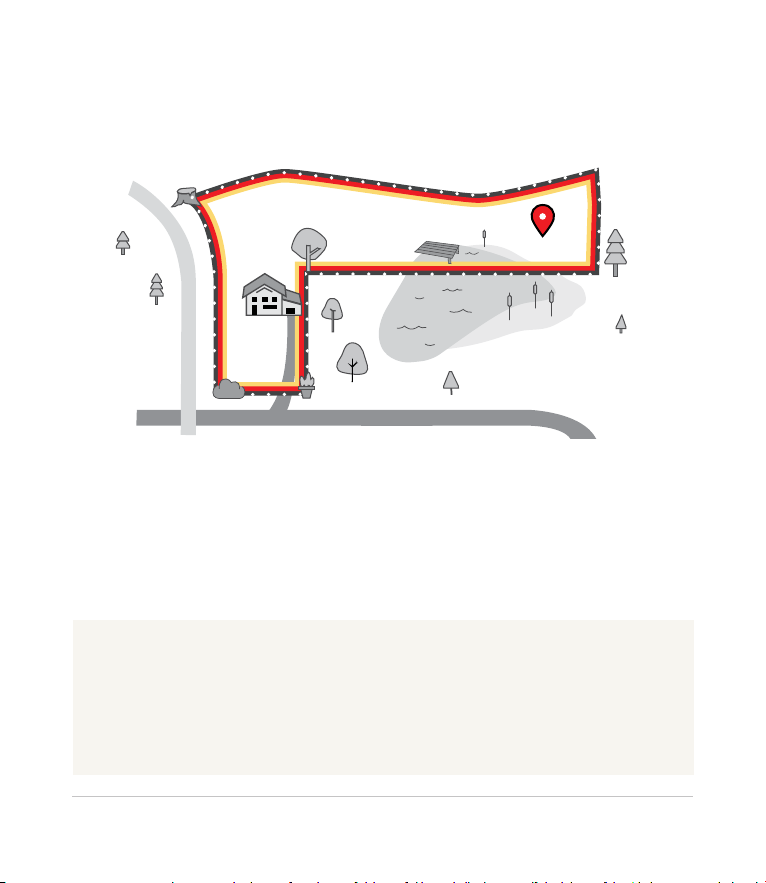
Keep the house inside the fence
To allow your dog to enter your
home without being corrected,
make sure the house is inside
the fence area. For a fence that
only covers the backyard be
sure to run the fence boundary
along the front and sides of
the house. This allows your
dog to enter the house through
the back door without being
corrected.

14 SPOTON USER GUIDE
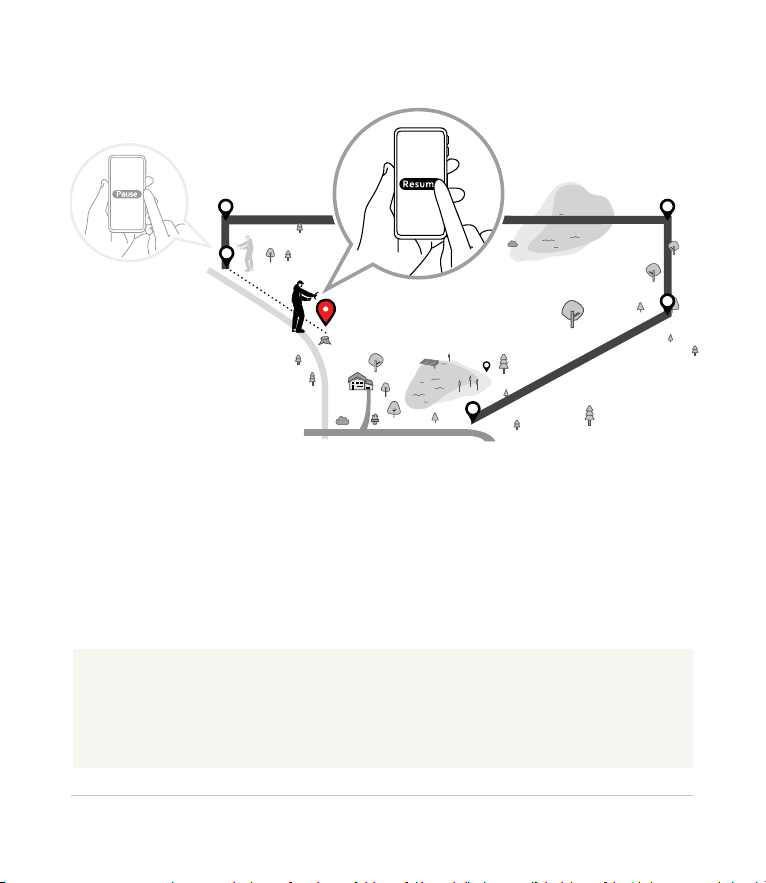
Use Pause to fence through obstacles
Hit an obstacle you can’t walk through, like a pond or thick brush? Using
the app press Pause to manually drop your next fence post, go around the
obstacle and then press Resume. SpotOn will snap a fence line between
fence posts.
Pause
Resume
15
SPOTON USER GUIDE
Use Pause for Fences larger than 5 acres
For large fences of 5 acres or more, use the Pause function to manually
control the number of fence posts, so you don’t run out. This will also
reduce the fence le size and help the fence load faster.
Using the app start at one boundary point, press Pause and then walk (or
drive) to the next point. Tap Resume and the system will snap a fence line
between fence posts.
TIP:
The app will automatically inform you when you have used half of
your fence posts.

16 SPOTON USER GUIDE
As you walk SpotOn automatically places one virtual fence post about
every 5 feet. You don’t need to walk in straight lines—the boundary can be
curved if needed. And if you stand still for a moment SpotOn will wait until
you move.
B. Create the fence
Start
Move to a
starting
landmark
Tap Start
on the app
Hold the collar with
the GPS antenna
facing the sky
Walk the
boundary
You’ll need a fully-charged collar and your phone to create a fence. Go
outside with the collar and the app. Follow the instructions in the app to
connect your phone to the collar, wait until your collar has acquired a GPS
signal, and you’re ready to create the fence.

17
SPOTON USER GUIDE
TIP:
Need a fence larger than 5 acres?
First create a smaller fence to get
familiar with the way your fence
works.
C. Complete and save the fence
When you approach the starting point the app will automatically inform
you to tap Finish. SpotOn will complete the fence and then ask you to
name it.
Create additional fences
Tap the Fence section in the app and tap Add Fence.
You can save up to 10 separate fences at any time. Using the app, select
and upload the desired fence to the collar.
You can also create an instant fences that can be edited. Refer to the app
for more information.
NOTE:
It’s important to tap Finish before
you reach the starting point. If
you don’t your fence may not
properly save.
18 SPOTON USER GUIDE
D. Test the fence
Once you’ve saved a fence, you’ll need to conrm the boundaries.
NOTE:
When testing, if you exit the fence and then return, you’ll notice the collar
doesn’t vibrate or issue the warning tone because SpotOn never corrects a dog
for coming home. You will hear the alert tone upon re-entry. You’ll train your dog
to understand the alert tone means he’s within his boundary.
1. Hold the collar and stand well inside the fence area, at least 20 feet
from the boundary.

19
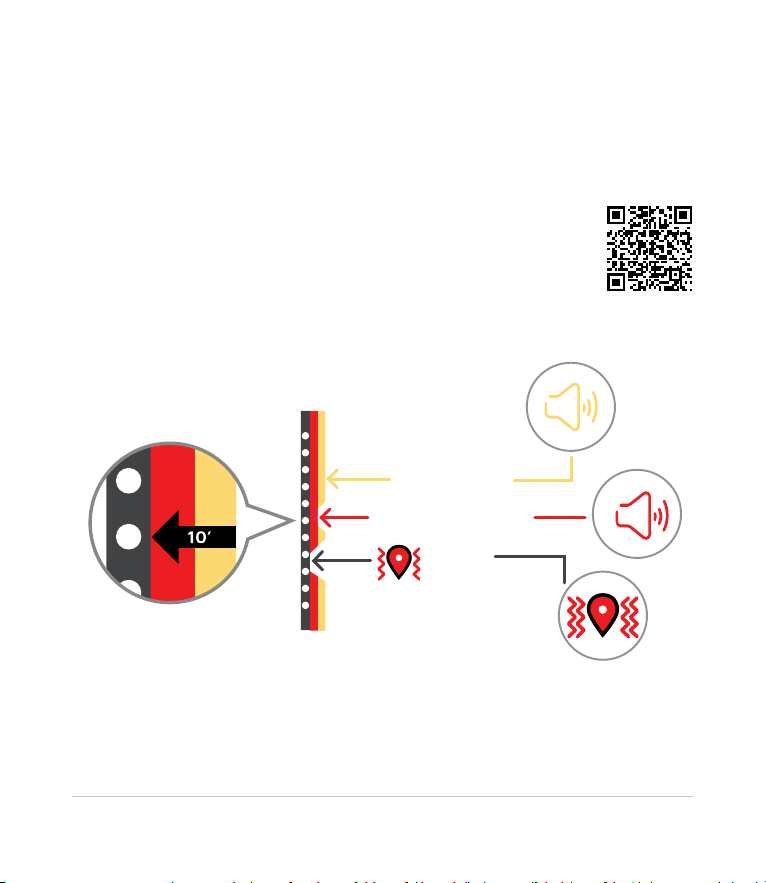
SPOTON USER GUIDE
2. Walk toward the
boundary and when
you’re about 10 feet
away, you will hear
the alert tone.
NOTE:
If you choose to use static correction for your dog, it will also be applied at the
boundary. You can use the static contact tester to verify static correction is
working. Place the tester over the static contact points and walk across your
fence boundary. The tester will glow when static correction is applied.
ALERT TONE WARNING TONE VIBRATION/STATIC
CORRECTION
3. Then at about 5 feet
from the boundary,
you’ll hear the
warning tone.
4. Finally, the collar
will vibrate once you
reach the boundary.

20 SPOTON USER GUIDE
Now it’s time to get your dog ready for a life unleashed!
That means training him to recognize alert and warning
tones.
It’ll take a little commitment and consistency. Stick with it
and you’ll have success like so many SpotOn owners
before you.
Recommended training schedule:15 minutes a day, for a
week or 2. That’s how long it takes a dog, on average, to learn.
All dogs are different, so don’t worry if your dog takes a little longer. Keep
training sessions quick and fun to lessen stress on your dog—and you.
Check out the app for more training information.
STEP 3: Train your dog
TIP:
Need some extra training support? Contact training@spotonfence.com
to learn more about a remote training session with one of our SpotOn
expert trainers.
View
training plan
Table of contents
Other Spot-on Pet Care Product manuals


