Spring Swings Fun Ride Super Z Assembly instructions

FUN RIDE SUPER Z
PRODUCT #30-05000
FUN RIDE SUPER Z INSTALLATION, OPERATING AND MAINTENANCE INSTRUCTIONS
Thank you for purchasing our exciting new FUN RIDE SUPER Z. The warnings and instructions that
follow are important to the enjoyment and safe play of all FUN RIDERS. Please review these with
them and save for future reference.
WARNING
All of the following precautions should be included in the ON SITE supervision of children using FUN
RIDE SUPER Z.
FUN RIDE SUPER Z has been designed for fun. It has been thoroughly tested to insure its safety
and where applicable conforms to ASTM F1148 Standard Consumer Safety Performance Specifica-
tion for Home Playground Equipment, and European Toy Safely Standard EN-71. However, as with
all playground equipment and accessories, all users of FUN RIDE SUPER Z will need proper instruc-
tion and supervision. FUN RIDE SUPER Z is intended to be used as a cable ride between two
points.
Please Note: Observing the following statements and warnings reduces the likelihood of serious or
fatal injury.
ALL USERS SHOULD BE INSTRUCTED
1. TO use FUN RIDE SUPER Z ONLY after it is properly installed by an adult.
2. TO get off FUN RIDE SUPER Z ONLY after it has completely stopped and to drop gently to the
ground.
3. THAT FUN RIDE SUPER Z is designed to be used by one rider at a time, 5 to 12 years old,
weighing up to 45 kilograms.
4. TO use FUN RIDE SUPER Z ONLY as it is intended.
5. NOT TO walk close to, in front of, behind, or between a moving FUN RIDE SUPER Z or any other
moving object.
6. NOT TO use FUN RIDE SUPER Z without adult supervision.
7. TO always begin the ride from a stable platform.
8. TO grip the handles firmly with both hands before beginning the ride.
9. NOT TO attach ropes or other objects to the FUN RIDE SUPER Z.
10. TO dress appropriately with well fitting shoes and no ponchos, scarves or other loose fitting cloth-
ing which is potentially hazardous.
11. NOT TO use FUN RIDE SUPER Z when the equipment is wet.
http://www.aerial-runway.co.uk Fun Ride Super Z (Page 1)
PARENTS PLEASE NOTE:
1. DO NOT allow the use of FUN RIDE SUPER Z by children without adult supervision.
2. DO NOT attach FUN RIDE SUPER Z to a tree or other upright without first determining if the tree
or other upright, at the point of attachment, will support at least 570 kilograms.
3. ALWAYS check the support structure, attachments, trolley, cable clamps, and cable for integrity
before allowing the use of FUN RIDE SUPER Z.
4. DO NOT attach FUN RIDE SUPER Z closer than 2 metres to any other playground equipment.
5. ALWAYS use a stable platform to stand on before beginning the ride.
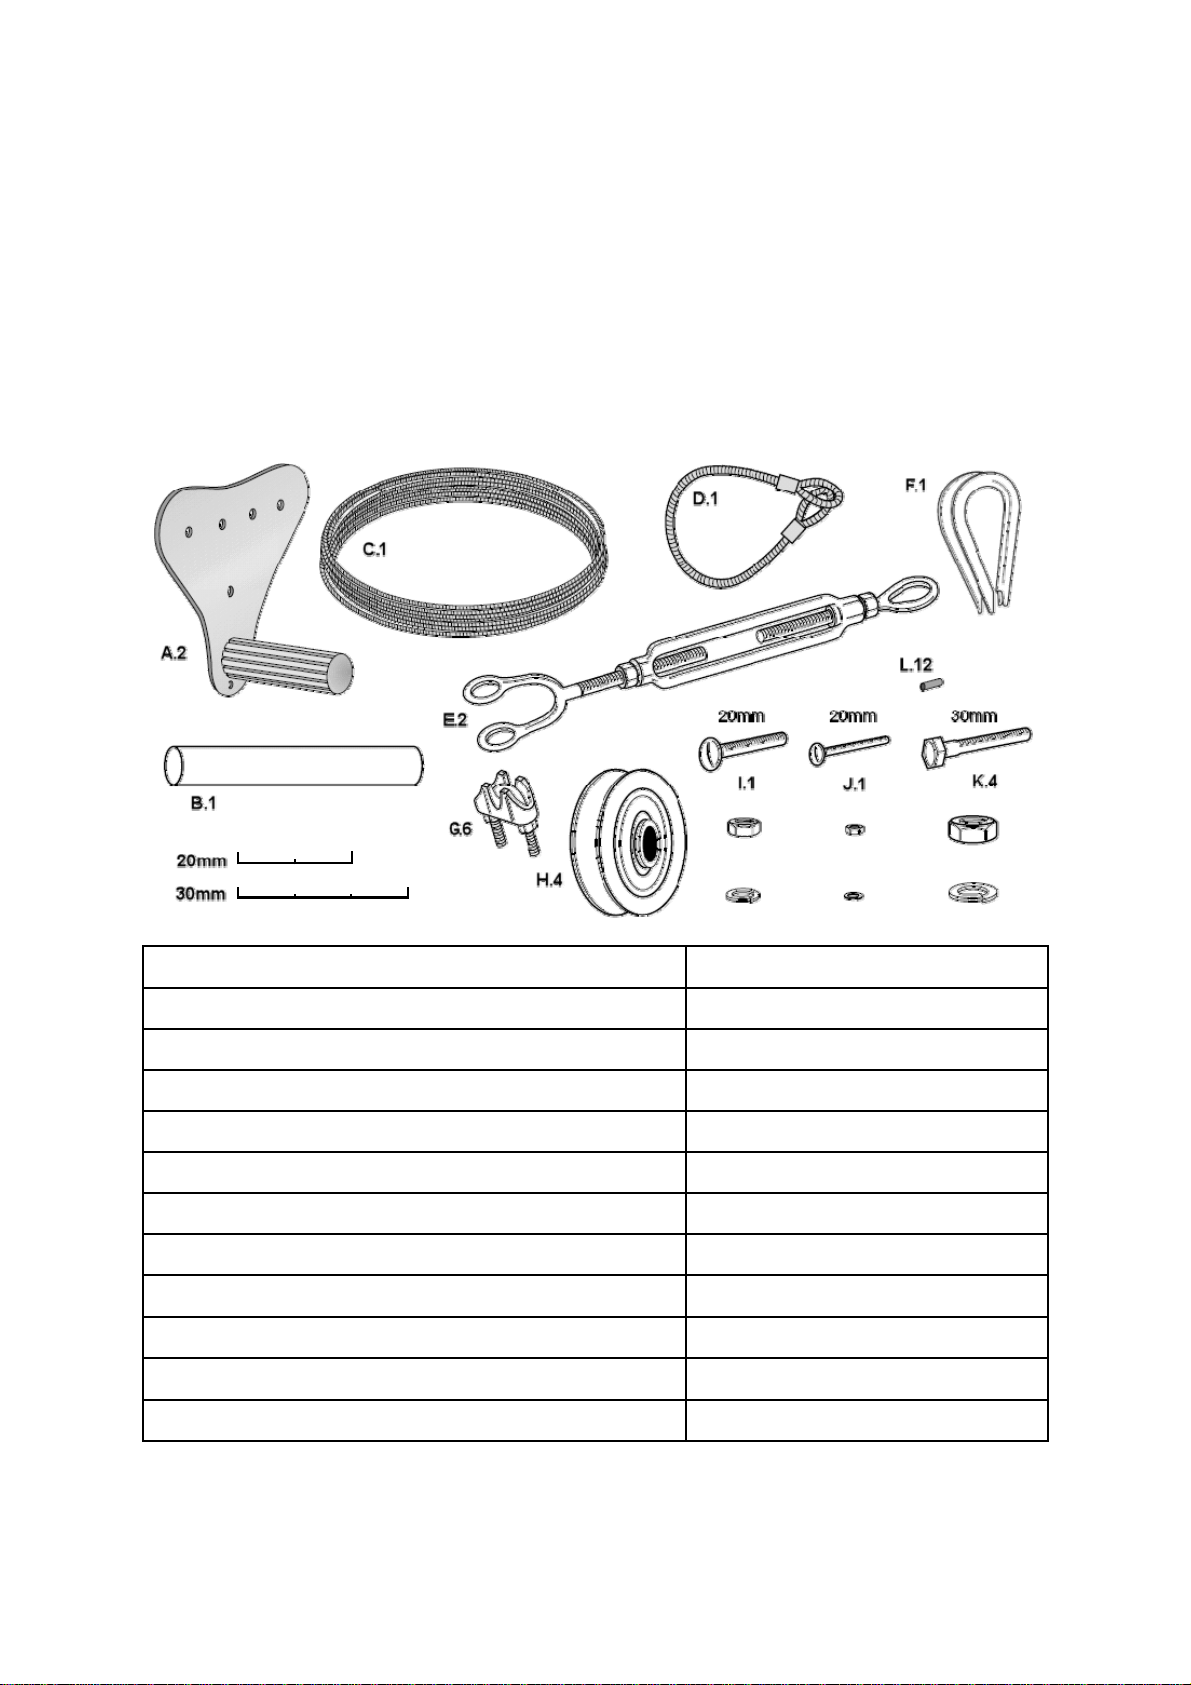
PARTS LIST
Please check all parts against this list immediately. In case of discrepancy call 561-845-6966.
DO NOT SUBSTITUTE PARTS! The parts provided have been safety tested to exceed the maxi-
mum stresses expected to be encountered when using this product. If a part becomes damaged in
any way call 561-845-6966.
a. Trolley handle 2 pieces
b. Steel pipe 1 piece
c. Steel cable 1 coil (approx. 28m)
g. Cable clamps with lock washers, nuts 6 sets
h. Wheels 4 pieces
i. Large round head screw with lock washer and nut 1 set
j. Small round head screw with lock washer and nut 1 set
k. Hex head bolts with lock washers and nuts 4 sets
d. Steel cable sling 1 piece with a loop at each end
e. Turnbuckle 2 pieces
f. Thimble 1 piece
l. Thread caps 12 pieces
http://www.aerial-runway.co.uk Fun Ride Super Z (Page 2)

TOOLS REQUIRED
1. SCREWDRIVER (SLOT HEAD)
2. PLIERS OR VISE-GRIPS
3. SOCKET WRENCH
OPERATING INSTRUCTIONS
FUN RIDE SUPER Z has been designed to provide children and adults with all of the enjoyment and
traditional fun of a smooth, safe and exhilarating ride through the air from one point to another.
1. Follow the installation instructions carefully.
2. Follow the rules of safe use.
3. Stand on a stable platform and grip the handles of the trolley with both hands.
4. Lift your feet off the platform and FUN RIDE SUPER Z will do the rest.
5. FUN RIDE SUPER Z will slow and stop before reaching the other end of the ride. Drop gently to
the ground onto both feet and using a pole, such as a broomstick, return the trolley to the starting
point for the next rider.
INSTALLATION
1. Be sure that the supporting trees or uprights are secure and will support at least 570 kilograms. If
you are using uprights other than trees, please call 561-845-6966 for important safety information.
2. Be sure that the area between the trees or uprights is level and at a distance of not less than 2
metres from any structure or obstruction such as a fence, garage, house, tree trunk, interfering
branches, laundry line or electrical wire.
3. The maximum fall height for this product is determined by measuring from the handles to the
ground at the highest point of attachment to the tree or upright. This will vary depending upon the
height of the user and the distance between the trees or uprights. (see assembly instructions).
4. Do not install FUN RIDE SUPER Z over concrete, asphalt, packed earth or any other hard surface.
A fall onto a hard surface can result in a serious injury to the equipment user.
5. Cable height: For FUN RIDE SUPER Z to operate properly and safely, it is necessary to follow the
mounting instructions carefully and observe the height recommendations. One end of the cable must
be mounted at a lower level than the other end and depending upon the height of the user and the
distance between the trees or uprights, these levels can be easily determined as follows.
A.Measure the height of the user. If there is more than one user, and less than 15cm in differ-
ence between their heights, then for this purpose use the height of the tallest user. If
heights of the users differ by more than 15cm, it is recommended that the height of the cable
be adjusted to accommodate a user whose height is outside the range and that user not be
permitted to ride until adjustment is made. Add 75cm to the height of the user determined
and mark this point on the upright intended to be the end point of the ride (i.e., if the user is
160cm, then 160cm plus 75cm equals 235cm). See Table.
B.Measure the distance between the uprights. For the full 27 metres add 120cm to the height
of the mark made on the end point upright and mark this point on the upright intended to be
the starting point of the ride (i.e. 235cm + 120cm = 355cm). For each 3m less distance be-
tween uprights reduce the add-on to the starting point by 15cm (i.e. 21 metres distance
equals 90cm of add on at starting point. See Table.
Warning! Do not add additional slope to the cable. This will not improve the ride and may create a
danger to the user!
http://www.aerial-runway.co.uk Fun Ride Super Z (Page 3)
User Height Low End Cable High End Cable Height At Distance Between Uprights Of
Height 27 Metres 24 Metres 21 Metres 18 Metres
122cm ( 4’ ) 197cm 317cm 302cm 287cm 272cm
130cm ( 4’ 6” ) 205cm 325cm 310cm 295cm 280cm
152cm ( 5’ ) 227cm 347cm 332cm 317cm 302cm
168cm ( 5’ 6” ) 243cm 363cm 348cm 333cm 318cm
183cm ( 6’ ) 258cm 378cm 363cm 348cm 333cm

ASSEMBLY
NEVER USE EYEBOLTS OR SIMILAR HARDWARE IN CONNECTION WITH THIS PRODUCT.
a. Carefully uncoil the braided steel cable. Wrap one end around the starting point (high end)
upright at the height marked in table.
b. Using three (3) of the cable clamps provided with lock washers and nuts, secure the cable
at the starting point as illustrated on the side panel of the FUN RIDE SUPER Z box.
Tighten the nuts carefully with a socket wrench and push the thread caps over the exposed
threads.
c. Wrap the cable sling provided around the other upright at the terminating point or low end
at the height determined in the table and, using the turnbuckle provided, place the loops at
the end of the sling over the bolt inside the jaw end of the turnbuckle as illustrated on the
box panel and carefully re-tighten the bolt. If sling does not fit completely around the tree,
an additional extension sling, which provides an additional 120cm of circumference, may be
ordered from the company.
d. Assemble the trolley as illustrated on the box panel.
e. Stretch out the cable and thread the loose end through the trolley just bellow the wheels
and then through the eye end of the 2nd turnbuckle. Make sure that the turnbuckle is in the
fully open position with the threads of each end only slightly visible on the inside of the
frame. Please note that the turnbuckle has both left and right hand threading, do not force.
Attach this turnbuckle to the other turnbuckle by opening the other turnbuckle to the fully
open position with the threads of each end only slightly visible on the inside of the frame
and place the eye of the turnbuckle over the bolt inside the jaw end of the second turn-
buckle as illustrated on the box panel and carefully re-tighten the bolt.
f. Place one of the remaining cable clamps on the cable as if to secure this end as illustrated
on the box panel and hand tighten the nuts. Using pliers or vise grips, grip the free end of
the cable and pull as tight as possible. Slide the cable clamp toward the turnbuckle to se-
cure and pull as tight as possible again. Repeat this process until you feel that you have
pulled the cable as tight as possible. Tighten the nuts on the cable clamp carefully with a
socket wrench and fully secure the cable with the other two cable clamp. Push the thread
caps over the exposed threads on the cable clamps.
g. Depending upon the length of your ride, you may now have extra cable. This excess should
be removed. Using a wire cutter or pliers remove any excess wire protruding beyond 15
cms from the last cable clamp. Wrap both protruding cable ends with electrical or duct tape
to cover any sharp or pointed edge.
h. Tighten the turnbuckles by turning the frame while holding the ends. This will increase the
tension in the cable. Do not tighten all the way, but only until the cable appears to be a
straight line. The ideal tension is approximately 90 kilograms. You can test this as follows:
Obtain a shopping bag with handles and place in it a 225 gram weight such as a bag of
sugar or flour. Move the trolley to the approximate centre of the cable and measure the
distance from the cable to the ground. Hang the bag from the handles of the trolley and re-
measure the distance from the cable to the ground. At 90 kilograms tension the cable
should be 10cm closer to the ground. If this distance is more than 10cm, then you must
tighten the turnbuckle(s). If this distance is less than 10cm, you must loosen the turn-
buckle(s). After achieving the proper tension tighten the locknuts on each end of the turn-
buckles tight to the frame of the turnbuckles.
i. Now, while standing erect, test the connections by placing your full weight (as close to 100
kilogram / 16 stone as possible) on the trolley at approximately the centre point of the ride.
If you feel any slippage you must adjust the tension again and tighten the cable clamps fur-
ther. Repeat this process until there is no slippage.
j. Obtain a secure platform to place at the starting point of the ride as illustrated. Place it at
the start of the ride and make sure that it cannot tip in any direction.
k. Now test the ride. You should stop a short distance before reaching the other end. If you
stop considerably short, then you probably have too much tension in the cable and should
loosen the turnbuckle slightly. If you come too close to the ground, then you may have too
little tension and should tighten the turnbuckle slightly, or you should recheck your meas-
urements.
Your FUN RIDE SUPER Z is now ready for use and enjoyment.
http://www.aerial-runway.co.uk Fun Ride Super Z (Page 4)

Please Note: Observing the following statements and warnings reduces the likelihood of serious or
fatal injury.
MAINTENANCE
1. After the first use, you may expect a small amount of stretch in the cable due to its construction.
This is normal and can be adjusted by following the installation instructions beginning at step h.
2. Before each use, check the trolley, cable, cable sling, cable clamps and turnbuckles for evidence
of deterioration, excessive wear, fractures, breaks or sharp edges.
Replace as necessary.
3. Check all bolt coverings and sharp edges twice monthly during the usage season, replace when
necessary and check again at the beginning of the new usage season.
4. Take the FUN RIDE SUPER Z trolley indoors when the temperature drops below freezing, 32 de-
grees Fahrenheit.
5. When done at prescribed intervals, these precautions will provide for long lasting and safe use of
FUN RIDE SUPER Z.
WARNING: Failure to carry out these checks and inspections could result in a fall and injury!
DISASSEMBLY
1. Follow the steps backwards beginning with the release of tension at the turnbuckle.
DISPOSAL
1. Disassemble and dispose of all playground equipment in such a way that no unreasonable haz-
ards will exist at the time it is discarded.
LIMITED WARRANTY
Spring Swings, LLC. warrants to the first consumer purchaser, for a period of one (1) year from the
date of purchase, that the Fun Ride will be free from defective workmanship and materials, and
agrees that it will, at its option, either repair the defect or replace the defective product or part thereof
at no charge to the purchaser for parts or for labour.
This warranty does not apply to any product which has been damaged or defaced, which has been
subject to misuse, abnormal service or handling, or which has been altered or modified in design,
construction, assembly, installation or operation.
In order to enforce the rights under this limited warranty, the purchaser should return the warranty
registration card enclosed in the product package and contact Spring Swings, LLC. if a problem oc-
curs. In the alternative, the purchaser should have available and submit a proof of purchase to
Spring Swings, Inc.
This limited warranty described above is in addition to whatever implied warranties may be granted to
purchasers by law.
The warranties described above shall be the sole and exclusive remedy available to the purchaser.
http://www.aerial-runway.co.uk Fun Ride Super Z (Page 5)
This manual suits for next models
1
Table of contents


