Sprint SLATE 10 User manual

Available applications and services are subject to change at any time.

i
Table of Contents
Introduction 1
GetStarted 2
PartsandFunctions 2
NanoSIMCard 3
microSDCard 4
InsertmicroSDCard 5
UnmountthemicroSDCard 5
RemovethemicroSDCard 6
FormatthemicroSDCard 7
ChargetheBattery 7
TurnYourTabletOnandOff 9
UsetheTouchscreen 9
ActivateYourTablet 13
CompletetheSetupScreens 14
BasicOperations 19
Basics 19
HomeScreenandApplications(Apps)List 19
TabletSettingsMenu 20
PortraitandLandscapeScreenOrientation 21
CaptureScreenshots 21
Applications 21
LaunchApplications 22
AppsList 22
TabletNumber 24
AirplaneMode 25
EnterText 26
TouchscreenKeyboards 26
GoogleKeyboard 26
GoogleVoiceTyping 28
TipsforEditingText 28
GoogleAccount 30
CreateaGoogleAccount 30
SignIntoYourGoogleAccount 32

ii
GooglePlayStore 32
FindandInstallanApp 33
RequestaRefundforaPaidApp 34
UpdateanApp 34
OpenanInstalledApp 36
UninstallanApp 37
GetHelpwithGooglePlay 38
LockandUnlockYourScreen 39
UpdateYourTablet 39
UpdateYourTabletSoftware 40
UpdateYourProfile 41
UpdateYourPRL 42
UICCUnlock 43
YourTabletInterface 44
HomeScreenBasics 44
HomeScreenLayout 44
ExtendedHomeScreens 45
StatusBarandNotificationPanel 46
StatusBar 46
NotificationPanel 48
CustomizetheHomeScreen 48
ChangetheWallpaper 49
AddShortcutstotheHomeScreen 49
AddWidgetstotheHomeScreen 50
AddFolderstotheHomeScreen 51
Contacts 53
AddaContact 53
ViewContacts 54
ContactsScreenLayout 55
EditaContact 56
DeleteaContact 56
ShareaContact 57
ImportContacts 58
BackUpContacts 59
MessagingandInternet 60
Gmail 60
CreateandSendaGmailMessage 60

iii
CheckReceivedGmailMessages 61
UseGmailLabels 63
ArchiveGmailThreads 64
MuteGmailThreads 64
DeleteGmailThreads 65
SearchGmailMessages 65
ReportSpamGmail 66
AddAnotherGoogle(Gmail)Account 67
SwitchingbetweenGmailAccounts 67
GmailSettings 68
Email 69
SetUpanEmailAccount 69
AddanEmailAccount 70
AddanExchangeActiveSyncAccount 71
ComposeandSendEmail 72
OpenEmailMessages 73
ManageYourEmailInbox 74
ConfigureEmailSettings 76
DataServicesGeneralInformation(4GLTE) 77
4GLTE 77
DataConnectionStatusandIndicators 78
ChromeBrowser 78
UsetheBrowser 78
AddaBookmark 79
ViewBrowserHistory 80
OpenNewBrowserTabs 81
LearntoNavigatetheBrowser 82
BrowserSettings 82
CameraandVideo 84
CameraOverview 84
TakePicturesandRecordVideos 84
TakeaPicture 84
TakeaPicturewiththeTimer 85
RecordaPictureUsingLensBlur 86
RecordVideos 87
ViewPicturesandVideos 87
ViewPicturesandVideosUsingPhotos 88

iv
ViewPicturesandVideos 88
EditPictures 89
SharePicturesorVideos 90
DeletePicturesorVideos 90
CameraSettings 91
ChangetheResolution,QualityandViewfinderAspectRatio 91
ChangePictureLocationSettings 92
AppsandFeatures 93
NASCARMOBILE 93
NavigationApps 94
GoogleMaps 94
Scout 95
Hangouts 96
GoogleSearch 96
UseGoogleSearch 96
UseGoogleVoiceSearch 98
Calculator 98
Calendar 99
ChangeCalendarView 99
AddanEventtotheCalendar 100
ViewCalendarEvents 101
ChangeCalendarSettings 101
Clock 102
SetAlarms 102
AdditionalClockFeatures 103
Facebook 106
SignintoYourFacebookAccount 106
UseFacebook 106
YouTube 107
ViewYouTubeVideos 107
PostaVideotoYouTube 108
GooglePlayMusicApp 109
PlayMusicwithGooglePlay 109
GooglePlayMusicScreenLayout 110
CreatePlaylistsinGooglePlayMusic 111
SprintMusicPlus 113
Connectivity 118

v
TransferFilesbetweenYourTabletandaComputer 118
Wi-Fi 120
TurnWi-FiOnandConnecttoaWirelessNetwork 120
Wi-FiSettings 122
DisconnectWi-Fi 122
Wi-FiDirect 123
Hotspot 124
Tethering 125
Bluetooth 126
BluetoothInformation 126
EnabletheBluetoothFeature 126
PairBluetoothDevices 127
ConnecttoaPairedBluetoothDevice 128
SendInformationUsingBluetooth 129
ReceiveDataviaBluetooth 130
Settings 132
BasicSettings 132
Wi-FiSettingsMenu 133
BluetoothSettings 135
DataUsageSettings 136
MoreSettings 138
VirtualPrivateNetworks(VPN) 138
PrepareYourTabletforVPNConnection 139
SetUpSecureCredentialStorage 139
AddaVPNConnection 140
ConnecttoorDisconnectfromaVPN 141
DisplaySettings 143
SoundandNotificationSettings 144
StorageSettings 145
BatterySettings 146
ApplicationsSettings 147
LocationAccessSettings 148
SecuritySettings 150
LockScreenSettings 151
ScreenLock 151
DisabletheScreenLock 154
LockScreenOptions 155

vi
AccountsSettings 156
LanguageandInputSettings 157
BackupandReset 159
DateandTimeSettings 161
AccessibilitySettings 162
PrintingSettings 164
ActivateThisDevice 165
AboutTablet 165
SystemUpdate 166
ForAssistance 168
Troubleshooting 168
Specifications 169
SprintAccountInformationandHelp 170
SprintAccountPasswords 170
ManageYourAccount 171
CopyrightInformation 171
Index 172

Introduction 1
Introduction
Thefollowingtopicsdescribethebasicsofusingthisguideandyournewtablet.
About the User Guide
ThankyouforpurchasingyournewSlate10"Tablet.Thefollowingtopicsexplainhowbesttouse
thisguidetogetthemostoutofyourtablet.
Before Using Your Tablet
ReadtheGetStartedguideandImportantInformationbookletthatwerepackagedwithyourtablet
thoroughlyforproperusage.
Accessibleservicesmaybelimitedbysubscriptioncontractconditions.
Descriptions in the User Guide
Notethatmostdescriptionsinthisguidearebasedonyourtablet'ssetupatthetimeofpurchase.
Unlessotherwisenoted,instructionsbeginfromthetablet'shomescreen,whichisdisplayedby
tapping .Someoperationdescriptionsmaybesimplified.
Screenshots and Key Labels
Screenshotsandotherillustrationsinthisuserguidemayappeardifferentlyonyourtablet.Key
labelsintheuserguidearesimplifiedfordescriptionpurposesanddifferfromyourtablet.
Other Notations
Intheuserguide,thetabletmaybereferredtoeitheras"tablet"or"device".AmicroSD™or
microSDHC™cardisreferredtoasan"SDCard"ora"memorycard."

Get Started 2
Get Started
ThefollowingtopicsgiveyoualltheinformationyouneedtosetupyourtabletandSprintservicethe
firsttime.
Parts and Functions
Thesetopicsillustrateyourtablet’sprimarypartsandkeyfunctions.
Note:Yourtablet'sscreensandappslayoutsaresubjecttochange.Thisuserguideusessample
imagesonly.
Tablet Layout
Thefollowingillustrationoutlinesyourtablet'sprimaryexternalfeaturesandkeys.
Part Description
LED indicator Displaysatabletnotification,chargingstatus,oralert.
Light sensor Automaticallyadjuststhedisplaybrightnessbasedontheambient
lighting.
Front camera Takespicturesandrecordsvideoswhilefacingthescreenandallows
youtovideoconference.
Touchscreen Displaysalltheinformationneededtooperateyourtablet,suchasthe
applications,theContactslist,thedateandtime,andthesignaland
batterystrength.
Back keyLetsyoureturntothepreviousscreen,orcloseadialogbox,options
menu,thenotificationpanel,oronscreenkeyboard.

Get Started 3
Part Description
Home keyReturnsyoutothehomescreen.TouchandholdtoaccessGoogle
Now.
Recent apps keyDisplaysalistofrecentlyusedapplications.
3.5mm Headset jack Allowsyoutoplugineitherastereoheadsetoranoptionalheadsetfor
convenient,hands-freeconversations.
Volumebuttons Allowsyoutoadjusttheringtoneormediavolumes.
Power/lock button Letsyouturnthetabletonorofforturnthescreenonoroff,orrestart
thesystem.
Charger/accessory jack AllowsyoutoconnectthetabletchargeroranoptionalUSBcable.
Nano SIM
card/microSD card
slots
AllowsyoutoinsertyournanoSIMandamicroSDcard.
Rear camera Letsyoutakepicturesandvideos.
Speaker Letsyouhearthedifferentringtonesandsounds.
CAUTION!Insertinganaccessoryintotheincorrectjackmaydamagethetablet.
Nano SIM Card
ThenanoSIMcardisanICcardcontainingthetabletnumberandothercustomerinformation.
Handling a Nano SIM Card
KeepthefollowinginmindwhenhandlingananoSIMcard.
n CustomerisresponsibleforanydamagecausedbyinsertingnanoSIMcardinanother-brandIC
cardreader,etc.Thecompanyisnotresponsibleinsuchcase.
n AlwayskeeptheICchipclean.
n Wipecleanwithadry,softcloth.
n Avoidapplyinglabels.MaydamagethenanoSIMcard.
n SeeinstructionsincludedwiththenanoSIMcardforhandling.
n ThenanoSIMcardisthepropertyofthecompany.
n ThenanoSIMcardisreplaceable(atcost)incaseofloss/damage.
n ReturnthenanoSIMcardtothecompanywhencancelingsubscription.
n ReturnednanoSIMcardsarerecycledforenvironmentalpurposes.
n NotethatthenanoSIMcardspecificationsandperformancemaychangewithoutnotice.

Get Started 4
n ItisrecommendedthatyoukeepaseparatecopyofinformationthatisstoredonthenanoSIM
card.Thecompanyisnotresponsiblefordamagesfromstoredinformationthatislost.
n AlwaysfollowemergencyprocedurestosuspendserviceifyournanoSIMcardortablet(nano
SIMcardinserted)islost/stolen.Fordetails,contactCustomerService.
n Alwayspowerofftabletbeforeinserting/removingananoSIMcard.
Insert a Nano SIM Card
FollowtheseinstructionstoinsertananoSIMcard.Remembertopoweroffyourtabletbefore
insertingananoSIMcard.
Note:Yourtablet’snanoSIMcardispreinstalled.Theseinstructionsareforreferenceonly.
1. OpenthecoverofthenanoSIM/microSDcardslots.
l Liftupwardgentlyasshown.
2. InsertthenanoSIMcard.
l InsertgentlywithgoldICchipfacingdownward.
3. ClosethecoverofthenanoSIM/microSDcardslots.
o Makesureallthetabsaresecureandtherearenogapsaroundthecover.
microSD Card
YourtabletsupportstheuseofanoptionalmicroSDcard(notincluded)toexpanditsstorage
capacity.Somecardsmaynotoperateproperlywithyourtablet.
microSD Card Cautions
Data:InformationstoredonthemicroSDcardcanbecomelostorchangedaccidentlyorasa
resultofdamage.Itisrecommendedthatyoukeepaseparatecopyofimportantdata.The
companyisnotresponsiblefordamagesfromdatathatislostorchanged.

Get Started 5
Reading/Writing Data:Neverpoweroffwhilereadingorwritingdata.
Battery Level:Alowbatterychargemaypreventreading/writingtothemicroSDcard.
Handling SD Card:Use/storemicroSDcardsawayfromthereachofinfants.Maycause
chokingifswallowed.
Insert microSD Card
FollowthesestepstoinsertanoptionalmicroSDcard(notincluded).Makesuretopoweryourtablet
offbeforeinsertingorremovingamicroSDcard.
1. OpenthecoverofthenanoSIM/microSDcardslots.
l Opengentlyinthedirectionshown.
2. InsertthemicroSDcard.
l InsertthemicroSDcardallthewaygentlywithoutbendingandwithterminalsfacingupward.
l InsertonlymicroSDcards.
3. ClosethecoverofthenanoSIM/microSDcardslots.
l Makesureallthetabsaresecureandtherearenogapsaroundthecover.
Unmount the microSD Card
AlwaysunmountthemicroSDcardbeforeremovingitfromyourtablet.
1. Fromthehomescreen,tapApps >Settings .
2. TapStorage .
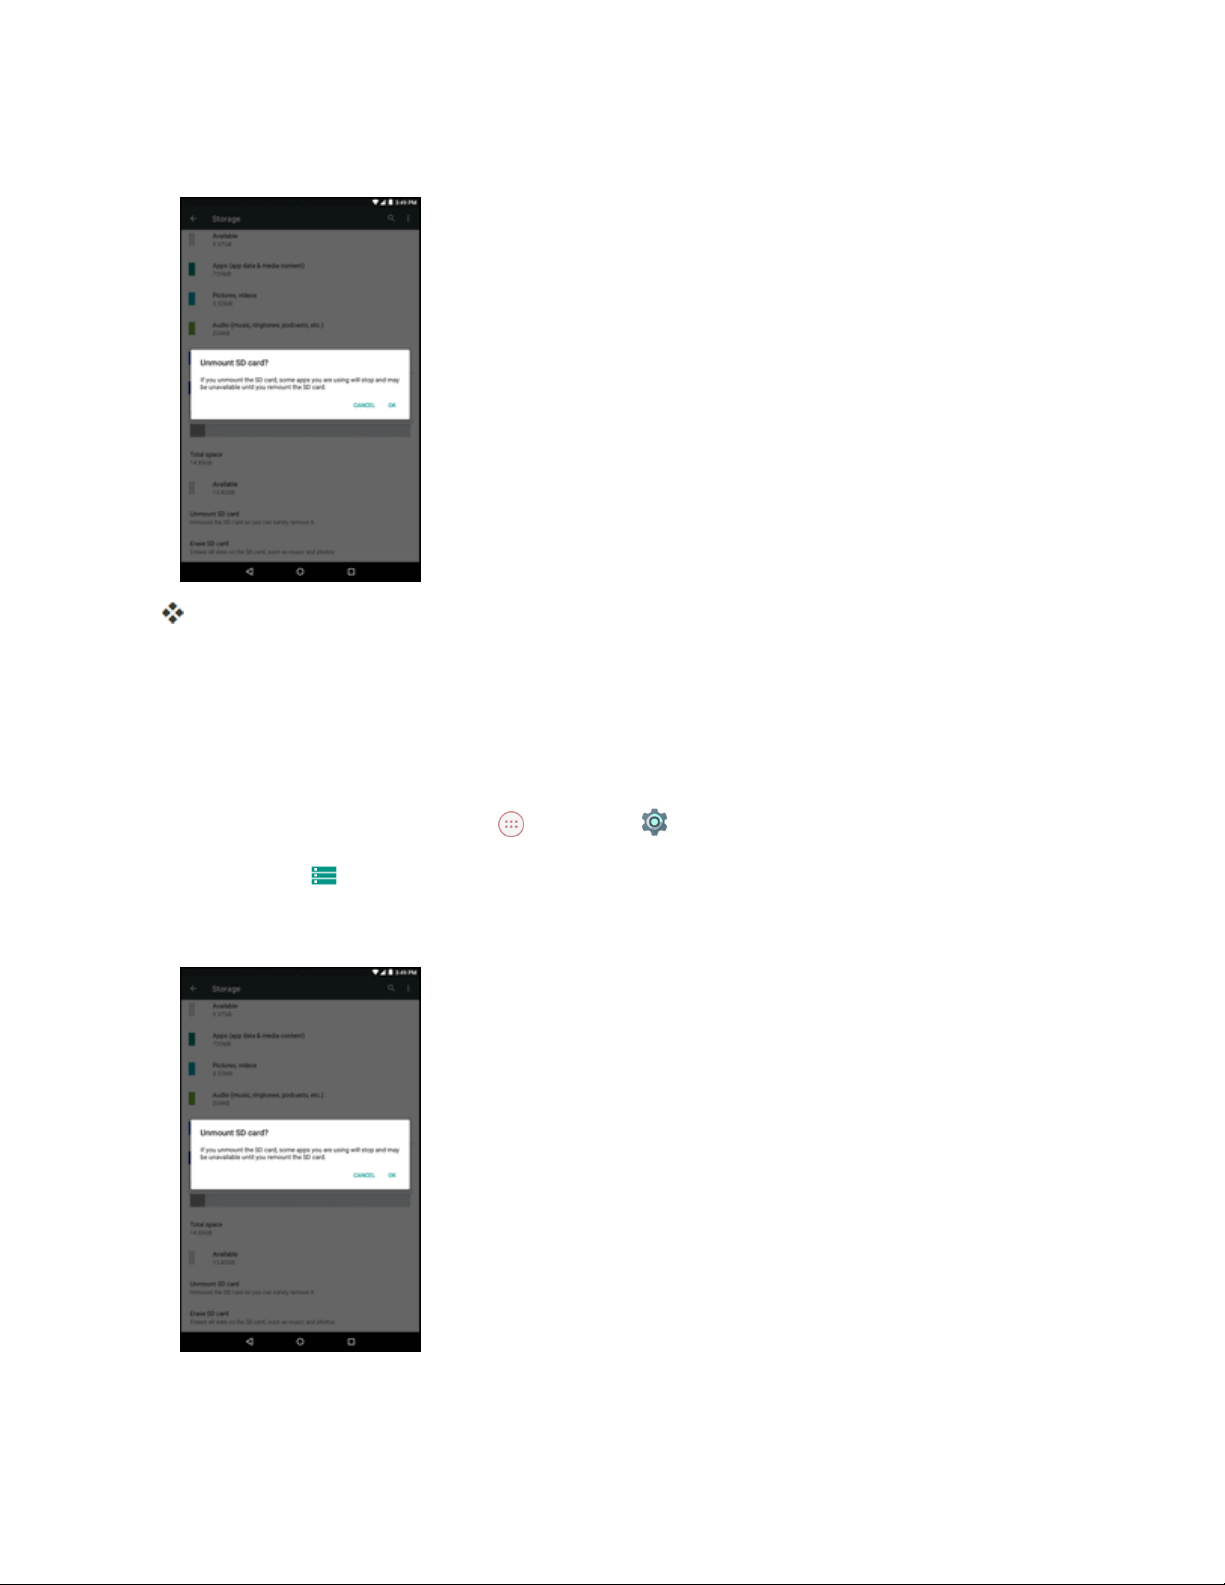
Get Started 6
3. TapUnmountSD card>OK.
ThemenuoptionnamechangesfromUnmount SD cardtoMount SD card.Thememory
cardisnowunmounted.
Remove the microSD Card
FollowtheseinstructionstoremoveamicroSDcard.Alwayspowerthetabletoffbeforeinsertingor
removingamicroSDcard.
1. Fromthehomescreen,tapApps >Settings .
2. TapStorage .
3. TapUnmountSD card>OK.
4. OpenthecoverofthenanoSIM/microSDcardslots.

Get Started 7
5. SlidethemicroSDcardoutoftheslottoremoveit.
6. ClosethecoverofthenanoSIM/microSDcardslots.
Format the microSD Card
WhenyouinsertanoptionalmicroSDcardforthefirsttime,itisrecommendedthatyouformatiton
yourtablet.
1. Fromthehomescreen,tapApps >Settings .
2. TapStorage .
3. TapErase SD card.
4. TapERASE SD CARDagain,andthentapERASE EVERYTHINGtoconfirm.
Alldataonthememorycardiserased,andthecardisformattedforuseonyourtablet.
Charge the Battery
Followtheseinstructionstochargeyourtablet’sbatteryusingeithertheincludedACadapterorviaa
USBconnectiononyourcomputer.
Charge Using the AC Adapter
1. PlugtheUSBconnectorintothecharger/accessoryjackatthetopofyourtablet.
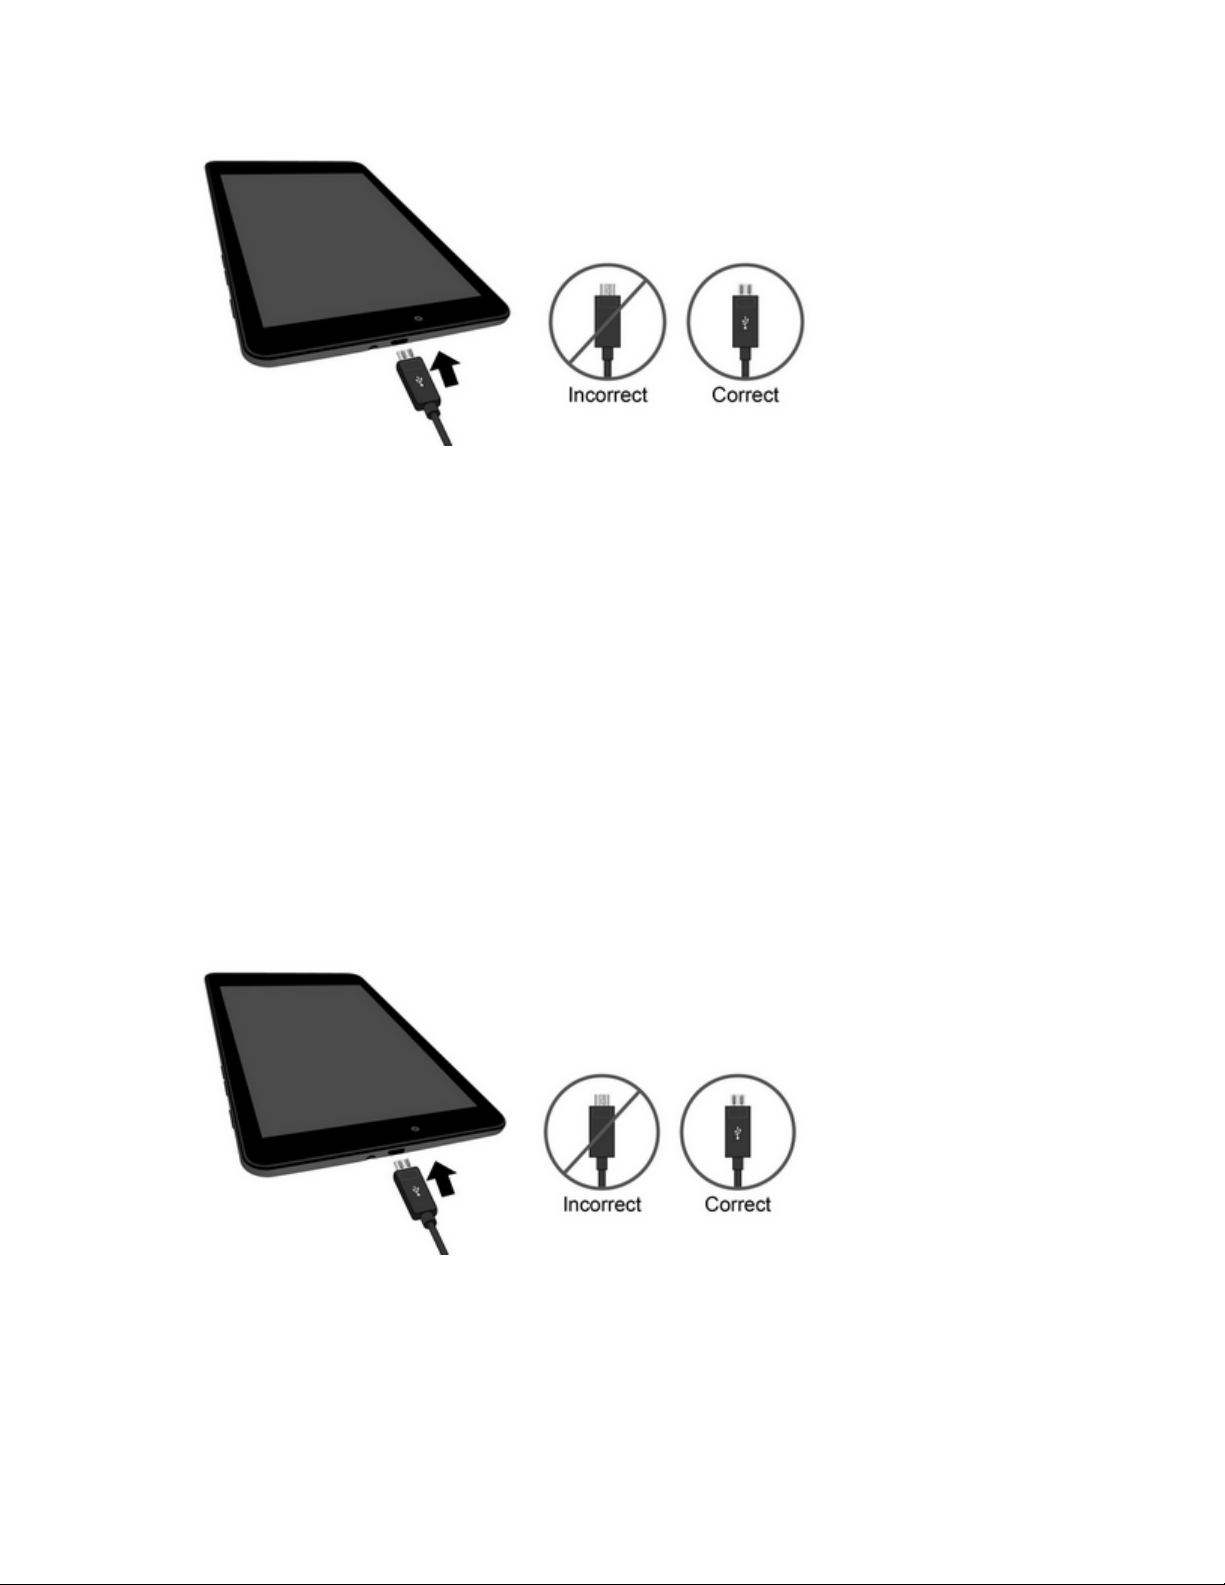
Get Started 8
2. PlugtheotherendoftheUSBcableintotheACadapter.
3. PlugtheACadapterintoanelectricaloutlet.
4. Aftercharging,disconnectthetabletfromthecharger.
l UnplugtheACadapterfromtheoutlet,andremovethemicroUSBcordfromthetabletand
theACadapter.
Note:Alwaysunplugthechargerfromthewallsocketafterthetabletisfullychargedtosave
unnecessarypowerconsumptionofthecharger.
Charge Using a PC Connection
BeforeusingaPCconnectiontochargeyourtablet,ensurethatthecomputeristurnedon.
Dependingonthetypeofconnection,yourtablet’sbatterymaynotcharge.
1. InsertthesmallendofthemicroUSBcordintothecharger/accessoryjackonthetopofyour
tablet.
2. InsertthelargeendofthemicroUSBcordintoanexternalUSBportonyourcomputer.
3. Aftercharging,safelyremovethemicroUSBcordfromboththetabletandthecomputer.

Get Started 9
Turn Your Tablet On and Off
Theinstructionsbelowexplainhowtoturnyourtabletonandoff.
Turn Your Tablet On
n PressandholdthePower/lockbutton.
Yourtabletwillpoweron.Dependingonthesettings,youmayseethelockscreen.
l SeeLockandUnlockYourScreenandScreenLockforinformationaboutusingthescreen
lock.
l Thefirsttimeyouturnthetableton,youwillseethestartupscreens.SeeCompletethe
SetupScreensfordetails.
l Ifyourtabletisnotyetactivated,seeActivateYourTabletformoreinformation.
Turn Your Tablet Off
1. PressandholdthePower/lockbuttontodisplaythedeviceoptionsmenu.
2. TapPower offtoturnthetabletoff.
Yourtabletwillpoweroff.
Yourscreenremainsblankwhileyourtabletisoff(unlessthebatteryischarging).
Use the Touchscreen
Yourtablet’stouchscreenletsyoucontrolactionsthroughavarietyoftouchgestures.

Get Started 10
Tap or Touch
Whenyouwanttotypeusingtheonscreenkeyboard,selectitemsonscreensuchasapplicationand
settingsicons,orpressonscreenbuttons,simplytaportouchthemwithyourfinger.
Touch and Hold
Toopentheavailableoptionsforanitem(forexample,acontactorlinkinaWebpage),touchand
holdtheitem.

Get Started 11
Swipe or Slide
Toswipeorslidemeanstoquicklydragyourfingerverticallyorhorizontallyacrossthescreen.
Drag
Todrag,pressandholdyourfingerwithsomepressurebeforeyoustarttomoveyourfinger.While
dragging,donotreleaseyourfingeruntilyouhavereachedthetargetposition.

Get Started 12
Flick
Flickingthescreenissimilartoswiping,exceptthatyouneedtoswipeyourfingerinlight,quick
strokes.Thisfingergestureisalwaysinaverticaldirection,suchaswhenflickingthecontactsor
messagelist.
Rotate
Formostscreens,youcanautomaticallychangethescreenorientationfromportraittolandscapeby
turningthetabletsideways.Whenenteringtext,youcanturnthetabletsidewaystobringupabigger
keyboard.SeeTouchscreenKeyboardsformoredetails.
Note:TheAuto-rotatecheckboxneedstobeselectedforthescreenorientationtoautomatically
change.Fromthehomescreen,tapApps >Settings >Display >When device is
rotated>Rotate the contents of the screen.
Tip:Youcanalsoaccessthescreenrotationsettingfromthenotificationpanel.Pulldownthestatus
barandtapAuto-rotateorPortraittoselectordeselecttheoption.

Get Started 13
Pinch and Spread
“Pinch”thescreenusingyourthumbandforefingertozoomoutor“spread”thescreentozoomin
whenviewingapictureoraWebpage.(Movefingersinwardtozoomoutandoutwardtozoomin.)
Activate Your Tablet
Followtheinstructionsbelowtoactivateyourtabletifithasnotalreadybeenactivated.Depending
onyouraccountorhowandwhereyoupurchasedyourtablet,itmaybereadytouseoryoumay
needtoactivateitonyourSprintaccount.
n IfyoupurchasedyourtabletataSprintStore,itisprobablyactivatedandreadytouse.
n IfyoureceivedyourtabletinthemailanditisforanewSprintaccountoranewlineofservice,it
isdesignedtoactivateautomatically.
l Whenyouturnthetabletonforthefirsttime,youshouldseeaHands Free Activation
screen,whichmaybefollowedbyaPRL UpdatescreenandaFirmware Updatescreen.
Followtheonscreeninstructionstocontinue.
n Ifyoureceivedyourtabletinthemailandyouareactivatinganewtabletforanexistingnumber
onyouraccount,youcanactivateonyourcomputeronlineordirectlyonyourtablet.
l Activate on your computer:
o Gotosprint.com/activateandcompletetheonlineinstructionstoactivateyourtablet.
Table of contents
Other Sprint Tablet manuals


