SSR SR150 User manual

authorized Dealer
GokartsUSA.com
2442 Estand Way
Pleasant Hill, CA
(800) 603-1437
(925) 691-0330
Sales, Parts, Service

On the covers: SR150R at Milestone Ranch MX Park (Riverside, CA), ridden by professional racer Jeff Willoh,
a member of the SSR Motorsports competition team
(800) 603-1437

Congratulations on choosing an SSR Motorsports pit bike, and welcome to our powersports family. Your
new SSR Motorsports pit bike is designed, engineered and manufactured to be the best in its class.
We have prepared this manual to acquaint you with the proper procedures for operating, caring for and
maintaining, and, if necessary, troubleshooting your new pit bike. This manual also contains important
safety information. We recommend you follow these instructions and recommendations to obtain maximum
performance from your SSR pit bike and to maximize your enjoyment and biking safety.
Thoroughly read this manual before riding your SSR pit bike for the rst time. Be certain that you under-
stand how to operate the bike and that you are familiar with the locations of each control, what it does
and how it operates. This Owner’s Manual contains operations and minor maintenance instructions. Major
repairs may require the attention of a skilled technician and/or special tools and equipment.
While enjoying your SSR Motorsports pit bike please be sure to ride safely and defensively. Always wear
an approved helmet, proper safety eyewear and protective clothing appropriate for the conditions and ter-
rain. Never ride under the inuence of alcohol or drugs.
Thank you for selecting an SSR Motorsports pit bike. We wish you fun miles and years of enjoyable riding.
PLEASE NOTE! SSR Motorsports offers over 30 distinct models of pit bikes, from entry level to full race.
Photographs in this manual are of representative examples and show various levels of equipment.
Photographs of a specic component may differ from the component on your bike, but will function the
same way. In instances where certain components on various models operate differently, we show the
different types of components.
SSR MOTORSPORTS PIT BIKE OWNER’S MANUAL
3

FORWARD................................................................................................................................................3
TABLE OF CONTENTS.............................................................................................................................4
COMPONENT LOCATIONS......................................................................................................................8
CONTROLS, BRAKES
Front Brake Lever, Rear Brake Pedal...................................................................................................10
CONTROLS, CLUTCH AND TRANSMISSION
Clutch Lever, Gearshift Lever................................................................................................................11
CONTROLS, MISCELLANEOUS AND HANDLEBAR
Kick-Starter...........................................................................................................................................13
Manual Choke and Fuel Petcock..........................................................................................................13
Throttle. ................................................................................................................................................14
Engine On/Off Switches ......................................................................................................................15
Side Stand............................................................................................................................................16
OPERATION
Before Riding, Riding Safely.................................................................................................................17
Pre-Ride Inspection..............................................................................................................................19
Tires, Wheels and Spokes....................................................................................................................19
Leaks...................................................................................................................................................20
CONTENTS
4

Engine Oil.............................................................................................................................................21
Fuel......................................................................................................................................................22
Drive Chain..........................................................................................................................................23
Cables..................................................................................................................................................24
Nuts and Bolts......................................................................................................................................25
Spark Plug and Ignition Wire................................................................................................................25
Throttle.................................................................................................................................................26
Brakes..................................................................................................................................................27
Starting and Riding...............................................................................................................................28
Starting the Engine...............................................................................................................................28
Shifting Gears.......................................................................................................................................30
Braking.................................................................................................................................................30
Stopping and Parking...........................................................................................................................32
Post-Ride Inspection............................................................................................................................32
SERVICE MAINTENANCE, LUBRICATION AND ADJUSTMENTS
Why Proper Maintenance Is Important.................................................................................................33
Breaking-in the Engine.........................................................................................................................33
Safety Precautions...............................................................................................................................34
Recommended Service and Maintenance Schedule...........................................................................35
Fuel Recommendations.......................................................................................................................37
Engine Oil, Checking and Adding, Changing, Recommendations.......................................................38
Throttle Control Free Play....................................................................................................................41
Engine Idle Speed................................................................................................................................42
Air Filter................................................................................................................................................43
Spark Plug; Specications, Removing and Replacing.........................................................................44
5

CONTENTS (cont.)
Suspension Inspection, Front and Rear...............................................................................................46
Suspension Adjustments, Front and Rear............................................................................................48
Brakes, Front and Rear........................................................................................................................50
Brakes, Wear, Inspections and Lubrication..........................................................................................51
Wheels, Inspection...............................................................................................................................52
Wheel Removal, Front.........................................................................................................................53
Tires and Tubes, Air Pressure, Inspection, Replacing..........................................................................53
Side Stand............................................................................................................................................56
Drive Chain, Inspection and Adjustment...............................................................................................57
Drive Chain, Lubrication, Removal, Cleaning and Re-installing, and Replacement.............................60
Cleaning Your Pit Bike...........................................................................................................................63
Transporting Your Pit Bike.....................................................................................................................65
Storing Your Pit Bike..............................................................................................................................66
TROUBLESHOOTING
Engine Does Not Start, Is Hard to Start................................................................................................68
Engine Starts, Runs Erratically or Misses, Spark Plug Fouled..............................................................68
Engine Detonates (Pings or Knocks), Overheats..................................................................................69
Engine Vibrates Excessively, Leaks Oil.................................................................................................69
Transmission Shifts Hard or Jumps Out of Gear, Clutch Slips..............................................................70
Clutch Drags or Does Not Release, Chatters.......................................................................................70
Brakes Do Not Stop or Hold Properly....................................................................................................70
YOU AND THE ENVIRONMENT..............................................................................................................71
6

BEING PREPARED FOR THE UNEXPECTED
General Guidelines................................................................................................................................72
If Your Engine Quits or Won’t Start........................................................................................................73
If You Get a Flat Tire..............................................................................................................................73
If You Crash...........................................................................................................................................74
If a Part Fails.........................................................................................................................................74
TECHNICAL INFORMATION
Vehicle Identication Numbers...............................................................................................................75
High Altitude Carburetor Adjustment.....................................................................................................76
Emission Control Systems....................................................................................................................76
Warranty Compliance............................................................................................................................76
Sources of Emissions............................................................................................................................77
Exhaust Emission Control System.........................................................................................................77
Crankcase Emission Control System....................................................................................................77
Noise Emission Control System.............................................................................................................77
Problems That May Affect Motorcycle Emissions..................................................................................78
Oxygenated Fuels and Your SSR Pit Bike.............................................................................................79
7

(1) Clutch Lever
(2) Carburetor
(3) Fuel Petcock
(4) Air Filter
(5) Drive Chain
(6) Rear Sprocket
(7) Chain Adjuster Block
(8) Chain Guide
(9) Chain Slider
(10) Chain Roller
(11) Foot Peg
(12) Engine and Stator Cover
(13) Gearshift Lever
(14) Engine Skidplate
(15) Front Brake Caliper
(16) Front Brake Rotor
COMPOMENT LOCATIONS
LEFT SIDE
8

(1) Rear Brake Rotor
(2) Rear Brake Caliper
(3) Mufer
(4) Fuel Filler Cap
(5) Breather Tube and Breather Cap
(6) Throttle
(7) Front Brake Lever
(8) Front Brake Master Cylinder
(9) Auxiliary Oil Cooler
(10) Exhaust Pipe
(11) Rear Brake Pedal and Lever
(12) Foot Peg
(13) Oil Filler Cap and Dipstick
(14) Kick Starter
(15) Rear Swing Arm
COMPOMENT LOCATIONS
RIGHT SIDE
9
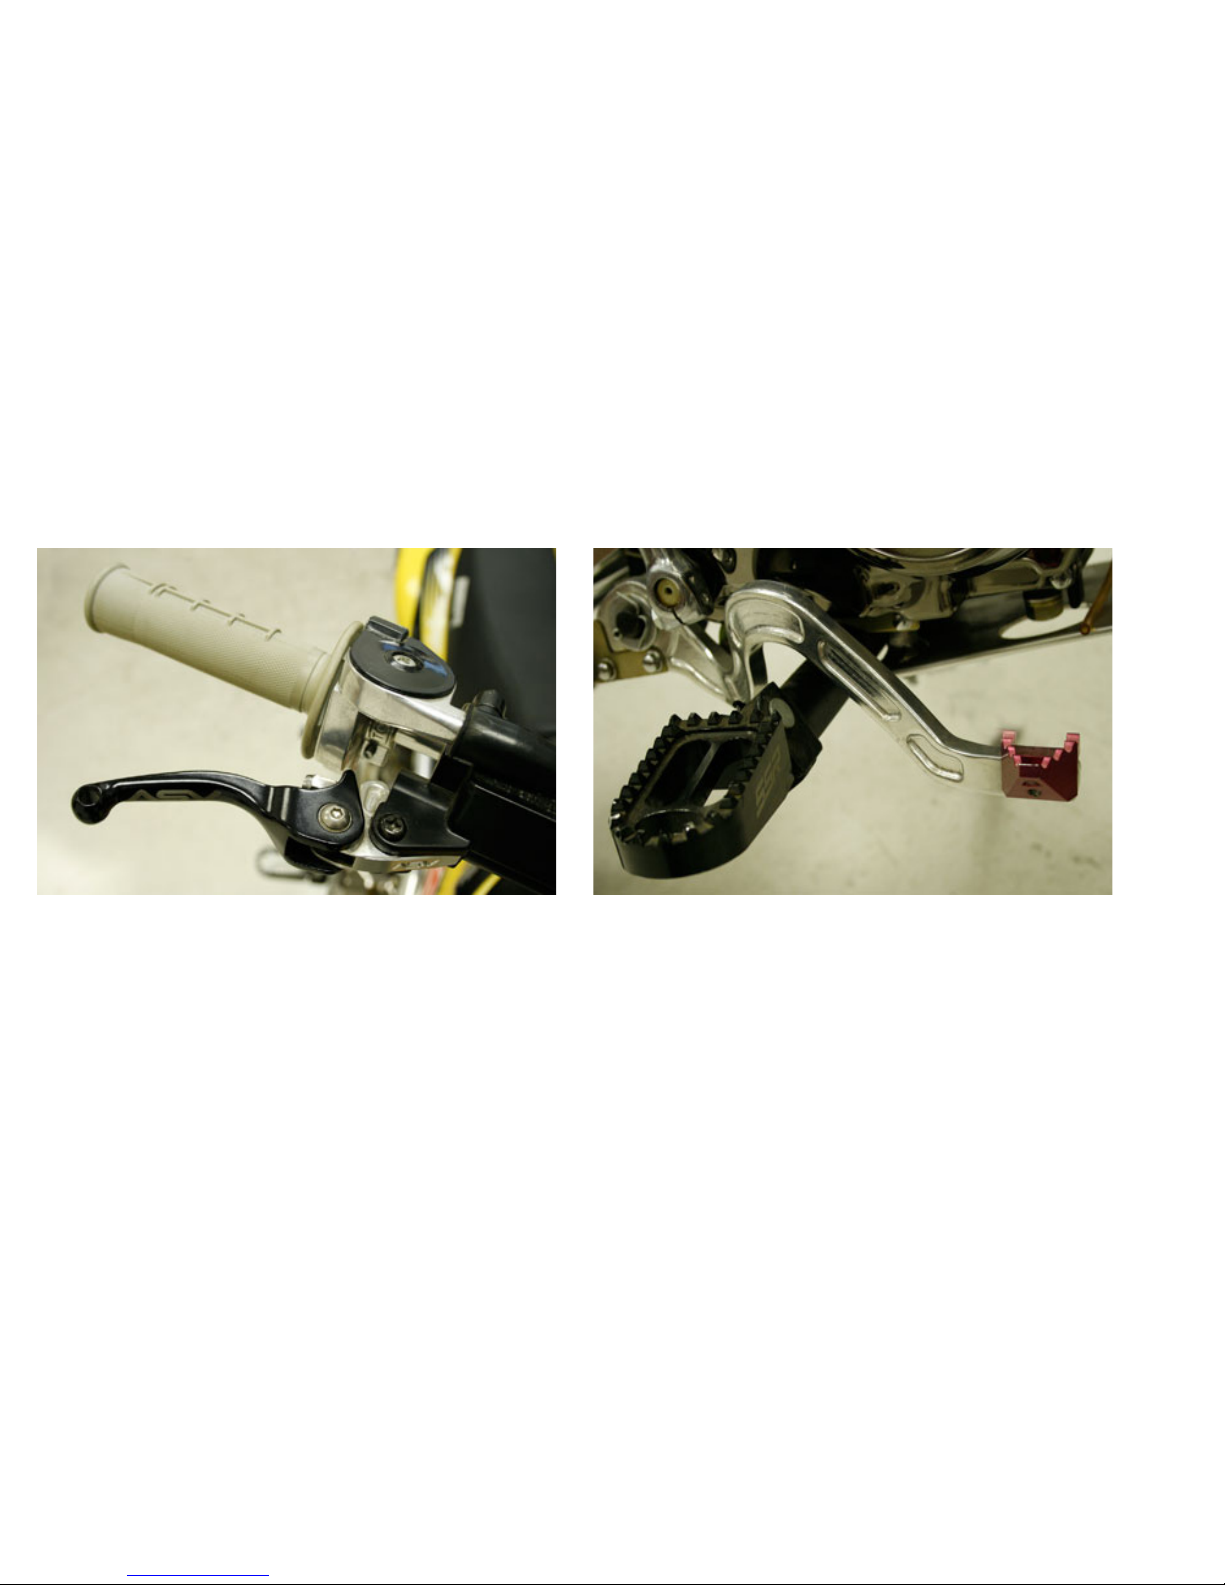
Front Brake Lever Rear Brake Pedal
The front brake lever is located on the right side of
the handlebar and operates the front brake only. It
is operated by the ngers of the right hand, by pull-
ing the lever to the rear.
The brake pedal, which is located on the right side
a few inches forward and slightly inboard of the
right foot peg, operates the rear brake only, by
pressing downward with the right foot. Apply the
front and rear brakes smoothly to prevent locking
up a wheel.
CONTROLS, BRAKES
10

The clutch lever is located on the left end of the
handlebar and is operated by the ngers of the
rider’s left hand. The clutch is disengaged by pull-
ing the lever in against the handlebar grip. After
shifting gears the clutch is re-engaged by slowly
releasing the lever and allowing it to return to the
outward position.
The gearshift lever is located on the left side of the
bike, ahead and inboard of the left foot peg, and is
operated with the toe of the left foot. The gear shift
pattern on nearly all SSR models is “one down/
three up” and neutral is between 1st and 2nd gears;
a select few models feature a “four-up” gear shift
pattern with neutral below 1st gear. >>>
CONTROLS, CLUTCH AND
TRANSMISSION
Clutch Lever Gearshift Lever
11

To start any “one down/three up” bike from a full
stop, pull the clutch lever in against the grip and
push the gearshift lever rmly all the way down. To
upshift from 1st to 2nd, 2nd to 3rd, or 3rd to 4th,
pull the clutch lever back against the grip, place the
toe of the left boot beneath the shifter peg and lift
rmly upward until it stops, then release the gear-
shift lever, and re-engage the clutch while gradually
opening the throttle. Repeat this for each upshift. To
downshift, from 4th to 3rd, 3rd to 2nd, or 2nd to 1st,
place the toe of the left boot on top of the shifter
peg disengage the clutch by pulling the clutch
lever against the grip, press the gearshift lever
rmly downward, release the gearshift lever and
re-engage the clutch. Do not fully close the throttle
between downshifts; this will help eliminate engine
drag and smooth the transition to lower gears. Re-
peat this procedure for each downshift. Remember,
lifting the gearshift lever upward always engages a
higher gear and pushing the gearshift lever down
engages a lower gear. Neutral is ½ stroke up from
CONTROLS, CLUTCH AND
TRANSMISSION (cont.)
1st or down from 2nd.
Bikes with a “four up” gear shift pattern are operat-
ed the same as “one down/three up” models except
for the 1st gear location being above neutral in the
shift pattern.
WARNING! Always fully disengage the clutch be-
fore shifting gears. Shifting gears without the clutch
fully disengaged can cause severe clutch and/or
transmission damage. When shifting to lower gears
with the bike in motion, do not downshift with the
engine running at high speeds; doing so can cause
severe damage to the transmission and/or engine,
and can cause the rear wheel to lock up, lose trac-
tion and lead to loss of control which could cause
serious injury or death.
12
CONTROLS, HANDLEBAR &
MISCELLANEOUS
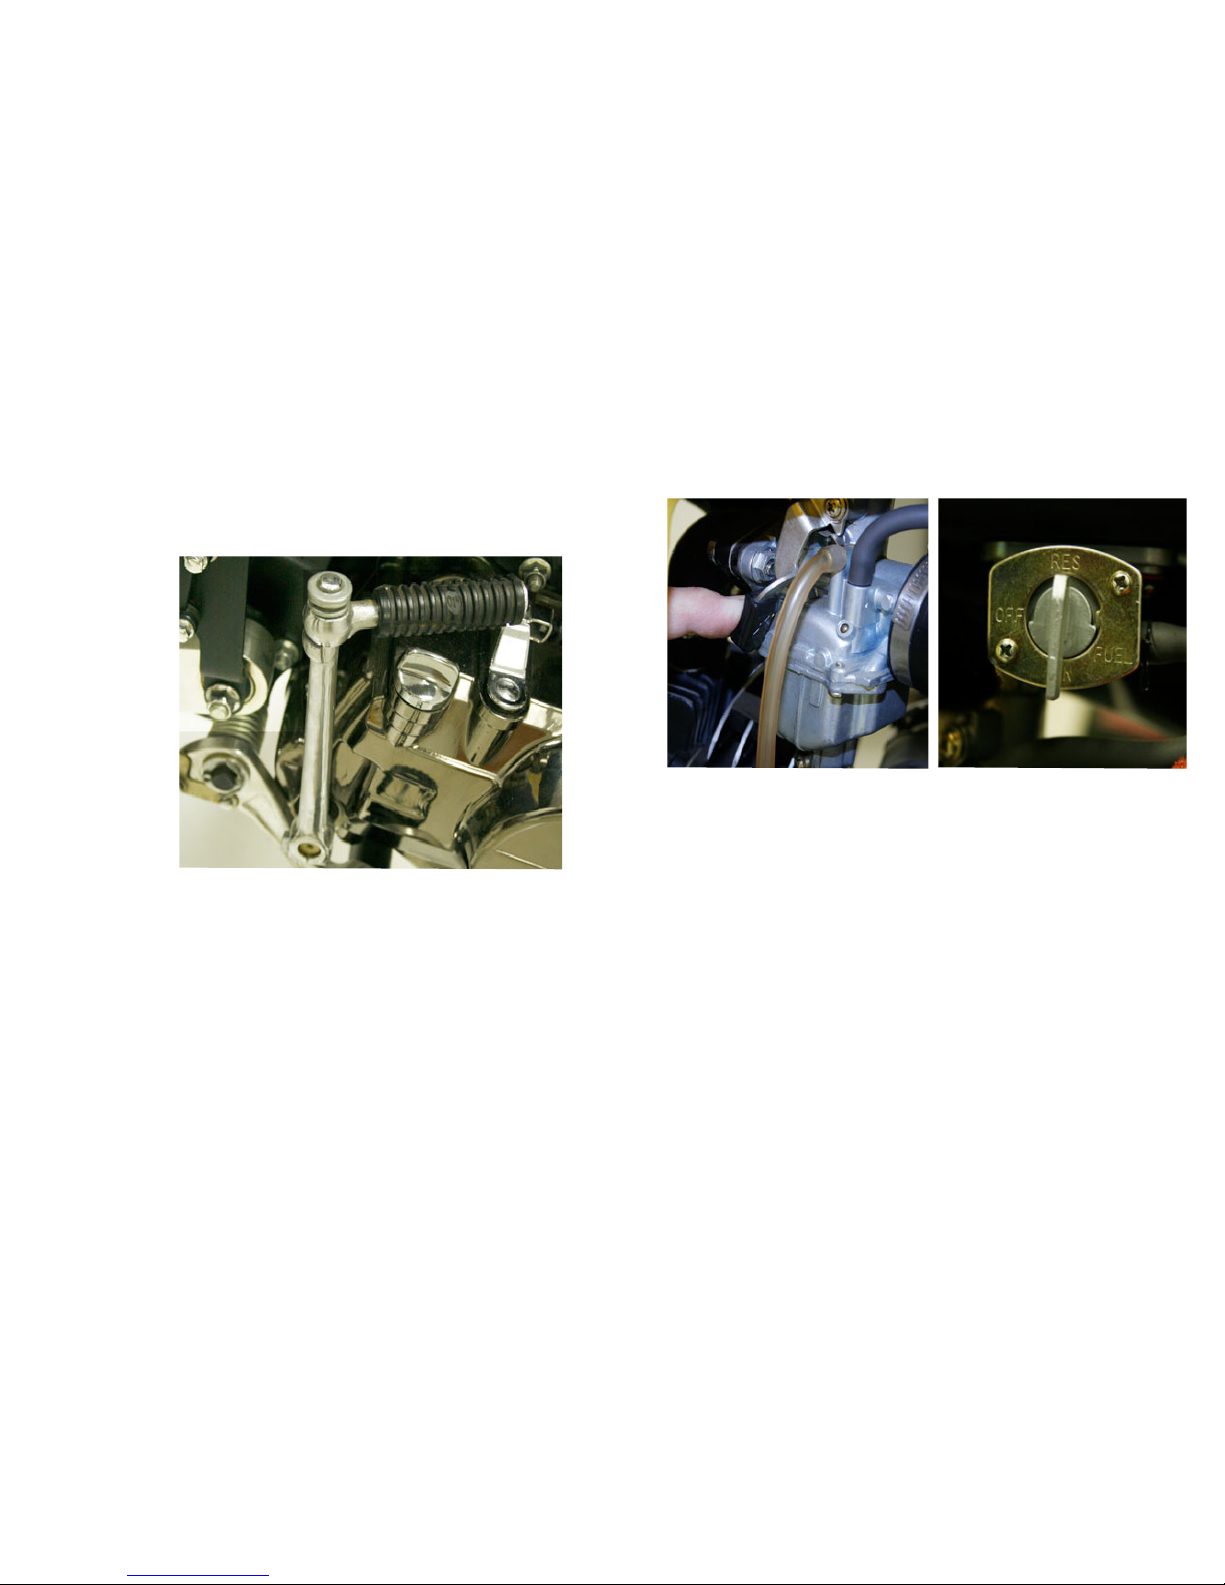
Kick-Starter
Manual Choke and Fuel Petcock
All SSR pit bikes are kick-start only, with the excep-
tion of the SR125-AUTO model, which is equipped
with an electric start and continuously variable au-
tomatic transmission. The kick-start lever is located
on the right side of the engine case, just to the rear
of the right foot peg. The kick-start lever features a
peg that rotates 90-degrees, from a front-to-back
position when the bike is running or at rest to point-
ing outward to the right for kick-starting the bike.
All SSR pit bikes utilize carburetors with manual
chokes to assist cold starts. On most models the
choke lever is attached to the left side of the
carburetor and has two-positions (fully “ON” or fully
“OFF”), the choke on several models is attached to
the right side of the carburetor and features three
positions (fully “ON,” “DETENT,” a halfway position,
and fully “OFF”). Fuel feed to the carburetor from
the fuel tank is controlled by use of a manually-
operated, three-position petcock, or regulator valve,
that is located on the left side. The three positions
are “ON,” “OFF” AND “RES” (reserve).
13

CONTROLS, HANDLEBAR &
MISCELLANEOUS (cont.)
Throttle
Throttle Closed Throttle Open
The throttle controls the engine speed (RPM) and is
operated by rotating the hand grip on the right side
of the handlebar. To increase engine speed, the
grip is rotated rearward toward the rider;
to reduce engine (and vehicle) speed rotate the grip
forward away from the rider. The throttle is spring-
loaded and will, unless improperly adjusted, return
to the closed (engine idle) position when released.
14

Engine ON/OFF Switches
Engine OFF (Kill) Switch Two Position ON/OFF Switch
SSR pit bikes are equipped with one of two types
of on/off or engine-off switches. The rst is a simple
momentary-style engine stop (ignition kill) switch, a
button that is pressed to stop the engine.
The second type of switch is a two-position ON/
OFF rocker-style switch; the engine can be started
only in the “run” position and to shut off the engine,
the switch is pushed into the “off” position.
15

CONTROLS, HANDLEBAR &
MISCELLANEOUS (cont.)
Side Stand
The side stand is used to support the bike in an
upright, slightly leaning position while parked. The
side stand is located on the left side of the bike
either directly behind or, on select models,
below the left foot peg. The side stand is raised or
lowered with the left foot.
NOTE: Some competition models are not equipped
with a side stand.
Side Stand Up Side Stand Down
16

OPERATION
Before Riding
Before each ride be certain that both you and your
SSR pit bike are ready to ride. Make sure that you
are in good physical and mental condition, that you
are not under the inuence of alcohol or drugs,
and that you are wearing proper safety gear. We
want to keep you as a customer so for your safety
we strongly urge you to wear an approved helmet,
high-quality eye protection, and protective clothing
that includes, at a minimum, motorcycle gloves and
boots, durable long pants and a long-sleeved shirt.
adjustable chinstrap that can be tightened
securely.
To maximize your safety when riding you
should wear a face shield or, preferably, high
quality goggles designed for off-road use. Off-
road motorcycle boots will provide better pro-
tect your feet, ankles and lower legs than boots
intended for street riding. The same holds true
for gloves. For the utmost protection also wear
riding pants with knee and hip pads, a riding
shirt or jersey with padded elbows, and a chest
or shoulder protector.
Before each ride, thoroughly inspect your bike
and if you discover any problems, correct them.
Off-road riding is very tough on any vehicle
and you don’t want to experience a mechanical
problem miles from help. Using an improperly
maintained bike or failing to correct a problem
can cause a crash in which the rider could be
seriously injured or killed. Always perform a
pre-ride inspection!
A helmet reduces the possibility of serious
head injury or death in a crash. An open-face
helmet offers good protection, but a full-face
helmet offers much more. Always be certain
that any helmet has a DOT (Department of
Transportation) certication sticker. For even
better protection get a helmet that is both DOT
and Snell (Snell Memorial Foundation, which
has more rigorous standards than the DOT)
certied. A helmet should t your head
comfortably but snuggly and have an
17

OPERATION (cont.)
A safe and enjoyable ride begins with good plan-
ning and preparation. It’s safest – and usually the
most fun – to ride with at least one other person.
If one of you has a problem the other person can
help. Always let someone know where you’re going
and when you expect to return. Before riding in an
unfamiliar area nd out if any permits are needed,
get maps so you can familiarize yourself with the
terrain, and talk to other riders who may know the
area. The U.S. Forest Service, Bureau of Land
Management, state and regional natural resources
and parks departments, riding clubs and off-road
magazines are all good sources of information.
It’s a good idea to take some tools, spare parts
(including a drive chain and master link, control
levers, cables, a spark plug, wire, duct tape and
rope) and supplies along with your pit bike and rid-
ing gear. See “Troubleshooting” for tips about what
sorts of difculties you might encounter. You should
always take lots of water, food, a rst aid kit and
this owner’s manual. Other items you should take
include a tool kit, tire repair material and tools, and
spare front and rear tire and tubes. Naturally, bring
along an extra, approved can or two of gasoline.
What you take along on the ride depends on the
kind of terrain, how long you expect to ride, how
far you might go from your starting point, and how
experienced you and/or your companions are at
making repairs. If you do decide to take some tools,
spare parts and other supplies on the ride, plan
ahead of time on how you will carry them safely,
and know how to use them. Do not exceed the
bike’s maximum weight capacity and pack your
load carefully so it doesn’t negatively affect riding
safely.
Before Riding (cont.)
18

Tires. Use a quality tire pressure gauge to check
the air pressure when the tires are cold (before
riding) and add or remove air as necessary to meet
the manufacturer’s recommended cold tire air pres-
sure. Also inspect both tires for any sign of exces-
sive wear or damage. If a tire is damaged or
excessively worn, replace it with a new tire of the
correct size and type.
Wheels and spokes. Inspect the wheel rims for
damage. Do not use if the rim is cracked or bent.
With the bike on a stand rotate each wheel; if a
wheel appears to wobble it is either out of round
or not “true.” If the wheel wobble is noticeable see
your dealer. Also make sure the spokes are tight.
Check the following items before every ride:
Pre-Ride Inspection
19

OPERATION (cont.)
Pre-Ride Inspection (cont.)
Engine Oil Drain Plug
Auxiliary Oil Cooler
Leaks. Inspect the engine/transmission case and
the fuel tank for leaks. Look beneath the bike for
signs of leaking uids. If the bike has an auxiliary oil
cooler check lines and ttings to be sure that there
is no leakage. If there is any leakage, clean and
tighten ttings as necessary.
20
Table of contents


