ISLABIKES elcons eJanis User manual

www.islabikes.co.uk
eIcons - eJanis
Owner’s Manual

www.islabikes.co.ukeIcons - eJanis
1. Brake Levers
2. Brake Calipers
3. Rotors
4. Saddle
5. Seatpost
6. Seatpost Clamp
7. Saddle Clamp
8. Stem
9. Stem Bolts
10. Headset
11. Headset Spacers
12. Headset Adjuster Bolt
13. Handlebars
14. Grip Shift
15. Rim
16. Spokes
17. Tyres
18. Chain
19. Rear Derailleur
20. Cassette
21. Frame
22. Forks
23. Cranks
24. Mudguards
25. Luggage Rack
26. Charging Port
27. Motor
28. Motor Cable (Non-Driveside Chainstay)
29. PAS Sensor
30. PAS Cable (Driveside Chainstay)
31. iWoc TRIO Controller
Introducing your new eIcons
The iWoc ControllerThe Bicycle
Up Button
Short Press: Increase Assist
Indicator LED
First Colour: Assist Level
Second Colour: Battery Level
Middle Button
Long Press: On/O
Down Button
Short Press: Decrease assist
Long Press: Walk mode
1
2
3
4
5
6 7
8
9
10
11
12 13
14
15
16
17
19
18
20
27 21
22
24
23
26
29 30
31
28

eIcons - eJanis www.islabikes.co.uk
Step 2 of 12
Install quick release and secure front
wheel in fork
Step 1 of 12
Remove front wheel and fork packaging
1. Remove front wheel
protection packaging.
2. Remove fork protector
DO NOT PULL BRAKE
when caliper spacer
is removed. Please
keep caliper spacer for
transportation when wheel
is removed
3. Remove brake caliper spacer
1. Install front quick release (QR)
skewer from pedal box
Ensure QR skewer springs
orientation is correct
2. Put front wheel into the fork.
Ensure (QR) lever is not on
gear side.
Check this matches the
rear wheel

eIcons - eJanis www.islabikes.co.uk
Step 3 of 12
Handlebar set up
Step 2 of 12
Install quick release and secure front
wheel in fork continued
3. Hold QR lever in fully ‘open’
position and turn nut
clockwise. Do not fully
tighten nut.
4. Clamp the QR to fully closed
position in line with the fork.
Tighten
The QR lever should start to feel tight at 90 degrees as you close –
if it is too tight or too loose you can adjust by holding lever ‘open’
again and turning nut.
Check front wheel is correctly installed. Firstly, lift the front end of
the bike o the ground by the handlebars and strike the top of the
wheel rmly with the palm of your hand. Secondly, push and pull
the wheel from side to side. If there is no movement from either of
these actions the wheel is installed correctly.
Clamp 1. Turn handlebars clockwise and align with front wheel
2. Tighten the two stem clamp bolts Max. 7Nm
Caution: The fork steerer tube is carbon bre construction, which
can be seriously damaged by over tightening.
Failure to correctly tighten stem clamp bolt may result in serious
injury or death. If in doubt, please consult our technical support
Before riding check front brake operation is correct. To check this,
apply both the front and rear brake, they should feel the same.
Secondly, push the bike forward whilst holding the front brake to
ensure it is working.
Turn
Do Not Over
Tighten
Tighten

eIcons - eJanis www.islabikes.co.uk
Step 5 of 12
Adjust saddle height
Step 4 of 12
Pedal installation
1. Left pedal: Rotate pedal axle clockwise towards front of bike
2. Right pedal: Rotate pedal axle anti-clockwise towards front of bike
Tighten max. 30Nm
Please ensure you identify the left and right pedals before installing.
Tighten
Tighten
a. Left pedal
b. Right pedal
1. Loosen seatpost-clamp
2. Move to desired height
3. Tighten clockwise max. 4Nm
Seatposts are clearly marked with minimum insertion mark.
Please do not raise saddle above this line.
Tighten
Saddle height is very much a personal preference amongst adult cyclists.
If you are unsure of the most appropriate saddle height for you then we
would be delighted to help. You can contact our technical support team on

eIcons - eJanis www.islabikes.co.uk
Step 6 of 12
Installing the ebikemotion App
continued
Step 6 of 12
Installing the ebikemotion App
To make the most of your new eIcons bicycle we would strongly recommend
downloading and installing the ebikemotion App.
This app will allow you to use the following features available on your ebike:
Cycle Computer Dashboard
Use your phone as a display for your eIcon to show real-time speed, distance
covered, assist level, remaining battery life and power consumption.
Post-Ride Analysis
Record your activity and then use the app to review an analysis of how you
and the ebike performed throughout the ride.
Satellite Navigation
Use your eIcon’s inbuilt GPS to navigate from your current location to any
destination with the option to choose routes based on how busy the roads
are; the speed of the journey, or the total distance.
Heart Rate Based Assistance Control
Pair your eIcon with a Bluetooth/Ant+ enabled heart rate monitor to allow
automatic adjustment of the motor assistance based on your heart rate.
Fault Diagnosis
Connect your eIcon to the app to allow our Customer Service team to help
remotely diagnose and rectify any issues that you might be experiencing
with your eIcon.
To install the app, simply follow these steps:
1. Navigate to either the App Store or the Google Play Store depending on
whether your phone is an Android or Apple platform.
2. Enter ‘ebikemotion’ into the search bar and locate the following app:
3. Install the app.
4. Open the app and follow the prompts to setup a new ebikemotion
user account.
Please ensure that you read through the Privacy Notice shown during the setup
process and only accept if you are happy with the terms of the agreement.
Note: There are two ebikemotion apps. The app that you will need
has the teal background; not the ‘Dealer’ app.

eIcons - eJanis www.islabikes.co.uk
Step 7 of 12
Charging the battery continued
Step 7 of 12
Charging the battery
1. First, connect the charger to the charging port on your bicycle.
Both the connector and the charging point have arrows moulded
into them to show the correct alignment. Failure to correctly align
the arrows may damage the pins in the connector and prevent you
from being able to charge the bike.
2. Then connect the charger to the power outlet.
3. The light on the iWoc Trio handlebar controller will light up automatically.
4. During the charging process the light will change colour to indicate the
level of battery charge:
White = >75%
Green = 75>50%
Amber = 50>25%
Red = 25>15%
Slow Flashing Red = 15-10%
Fast Flashing Red = <10%
Please do not leave the charger plugged in to the mains for more
than 5 hours.
The battery charger is suitable for indoor use only.
Never attempt to tamper with either the charging plug or connector.
Always re-t the charging port cap once the bike is charged.
Never attempt to remove the battery from the downtube of your
eIcons.

eIcons - eJanis www.islabikes.co.uk
Step 9 of 12
Pairing your bike to your smart device
Step 8 of 12
Turning the bikes electrical system
on and o
Your new eIcon will not provide any form of assistance unless the
electronic portion of the bike is switched on. This not only acts as a safety
feature but also makes it possible for you to use the bicycle normally
should you run out of battery charge.
To turn on the bicycle, follow these steps:
1. A long press of the middle button will turn the motor assist on.
When the system is turned on, the controller goes through the following
sequence:
i) Vibrate for a short period to conrm the device is powering up.
ii) Vibrate for a shorter period and display a coloured LED to show the
level of battery charge remaining. At this point the bike is ready to use.
2. A long press of the middle button will then turn the device o.
Long Press: On / O
4. Press the menu symbol in the
top left of the screen.
5. Press the ‘Settings’
button. And click the ‘Bike’
dropdown box to select ‘EBM
compatible’.
1. Open the ebikemotion app on your smart device.
2. Login using the username and password that you created in step 6.
3. Ensure that the ebike is turned on.

eIcons - eJanis www.islabikes.co.uk
Step 10 of 12
Changing the level of motor assistance
Step 9 of 12
Pairing your bike to your smart device
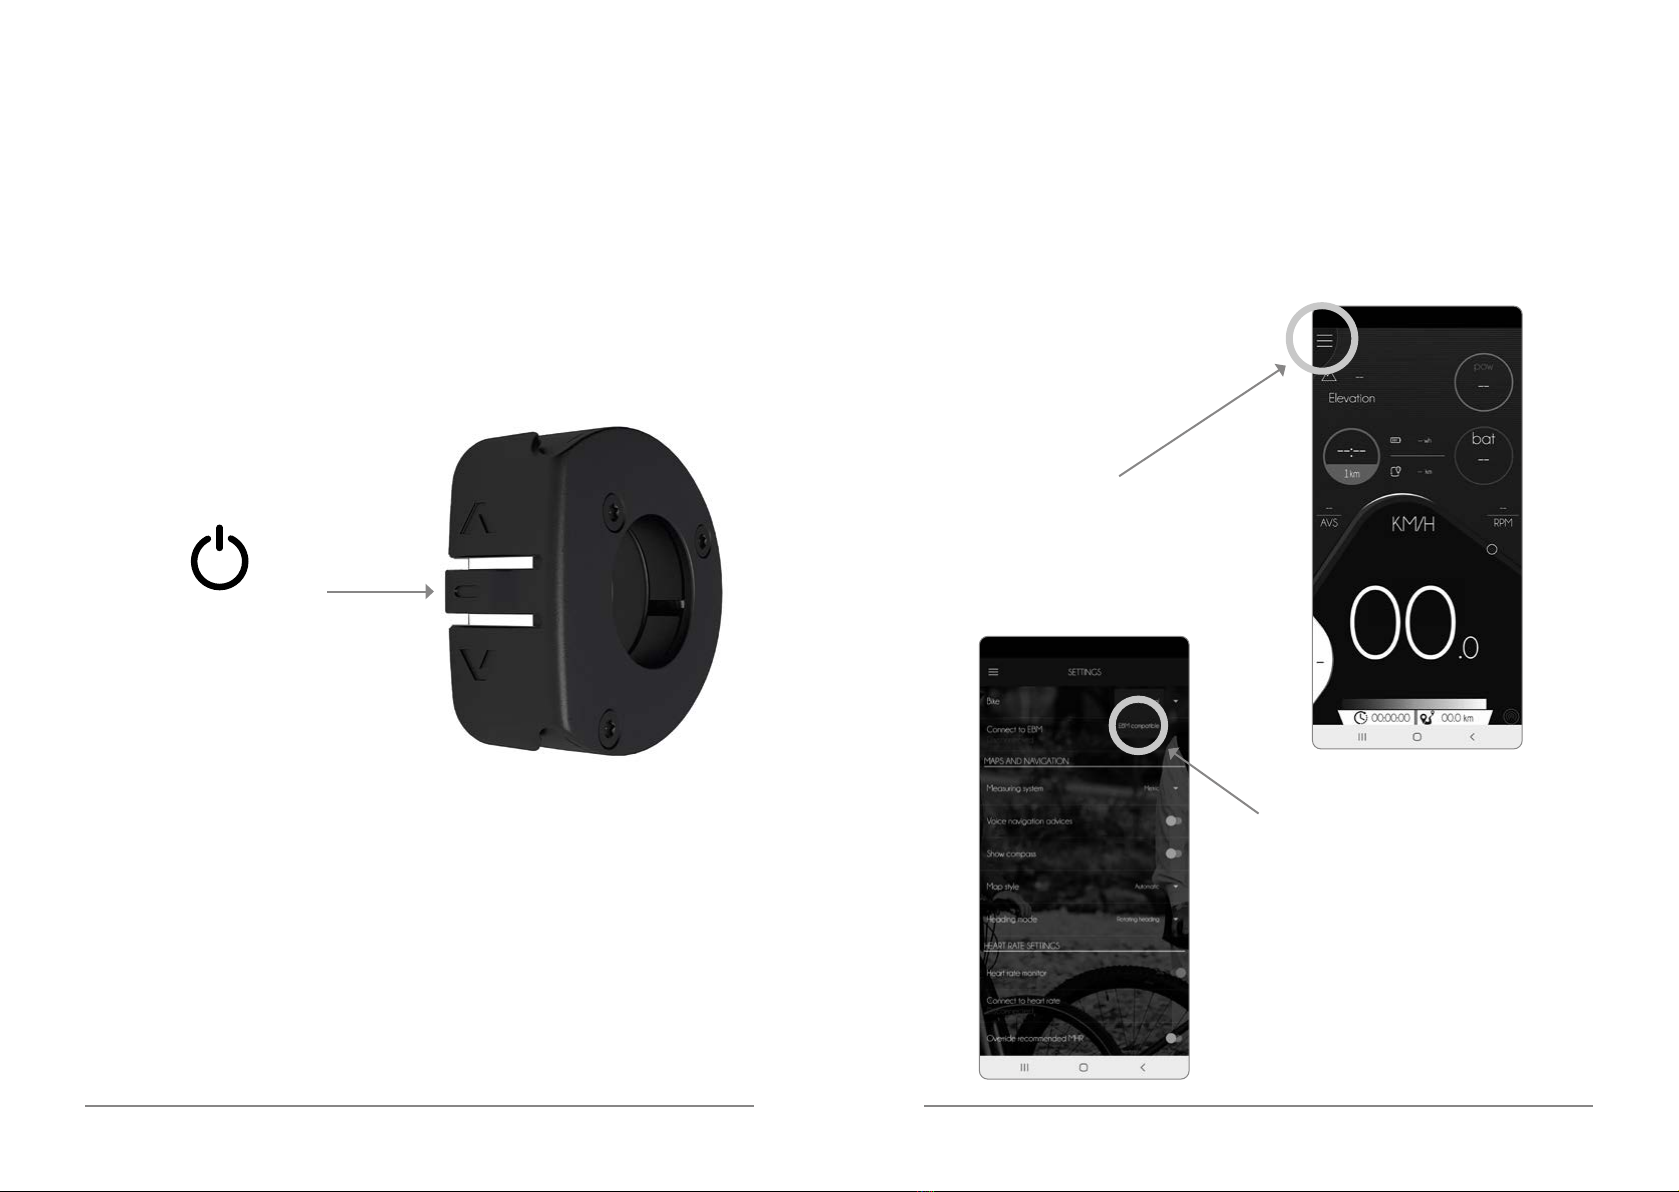
6. Press the ‘Connect to EBM’
option. The app will then display
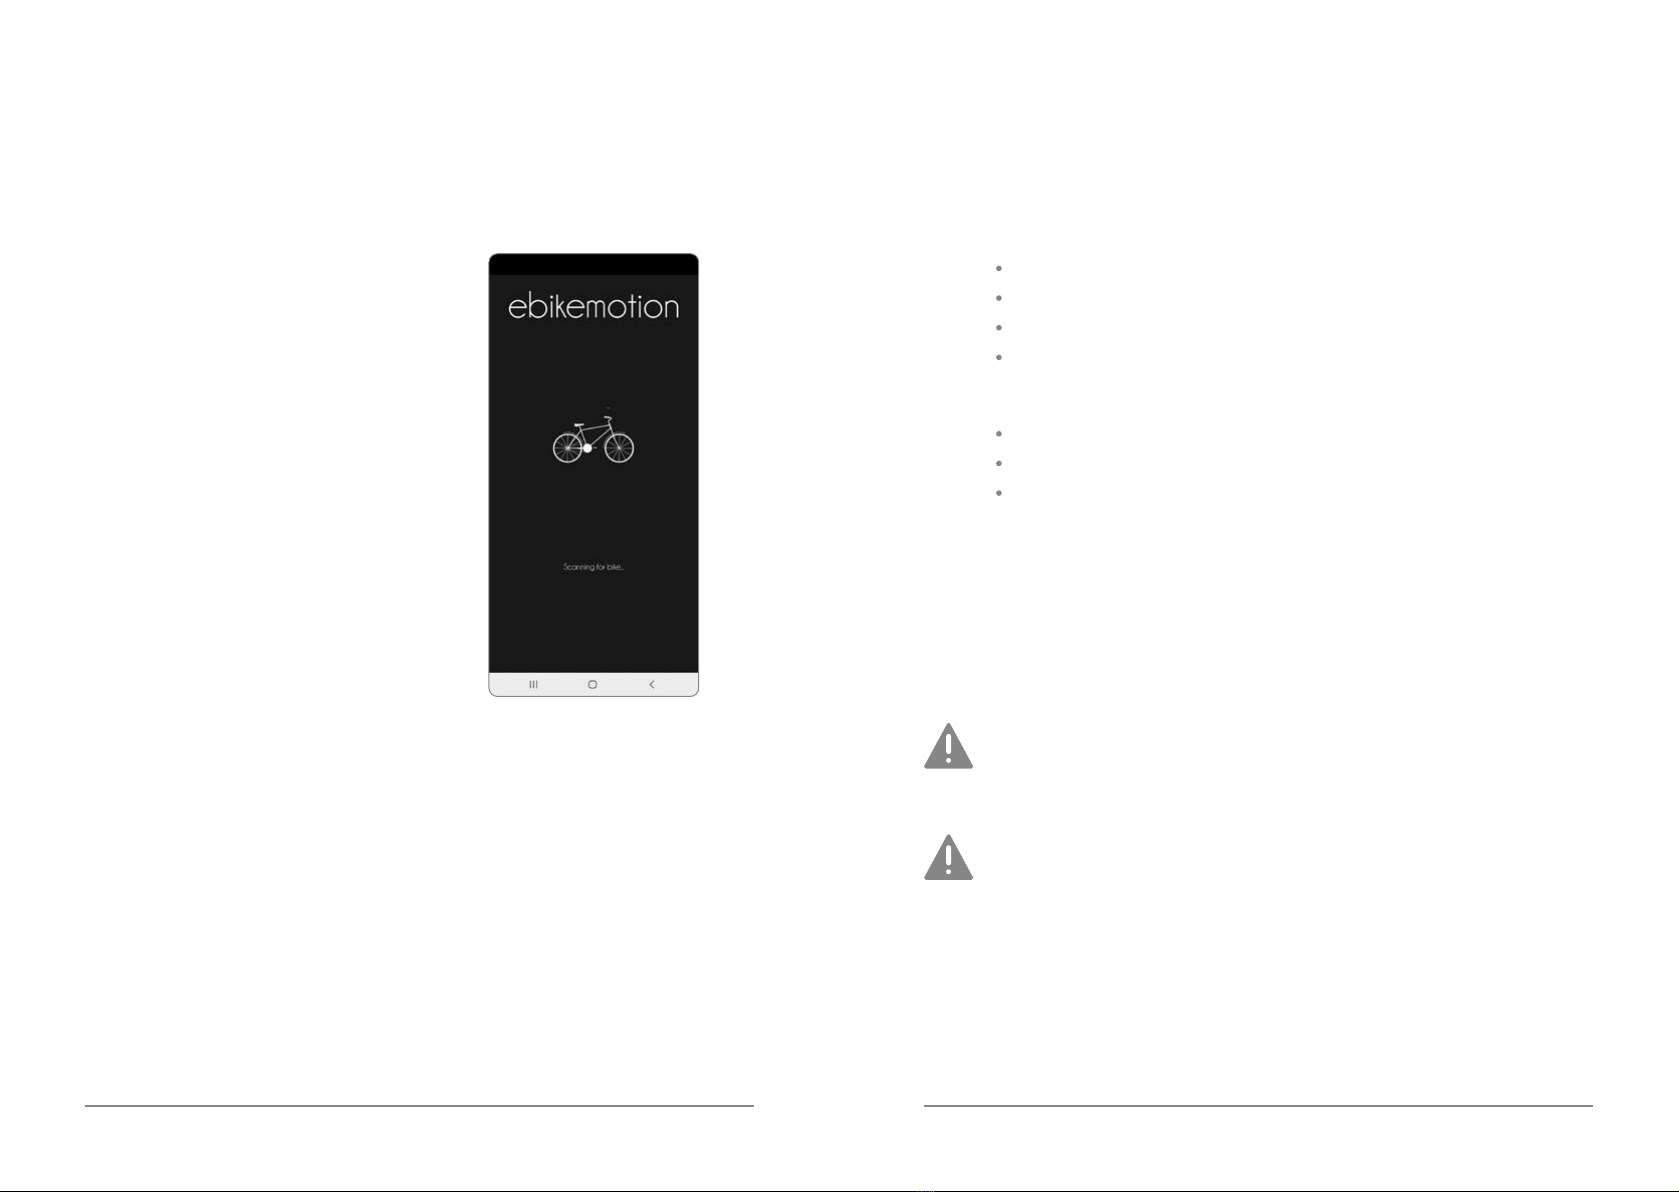
the following loading screen
before showing your eIcon as
a bike in range. Click on the
identied bike.
7. Once successfully paired, a notication banner will appear at the top of
the screen and the iWoc Trio remote will ash blue. You are then ready
to make the most of the features on oer within the app. If you need
further assistance with this step then please don’t hesitate to contact
us on +44(0)800 008 6297.
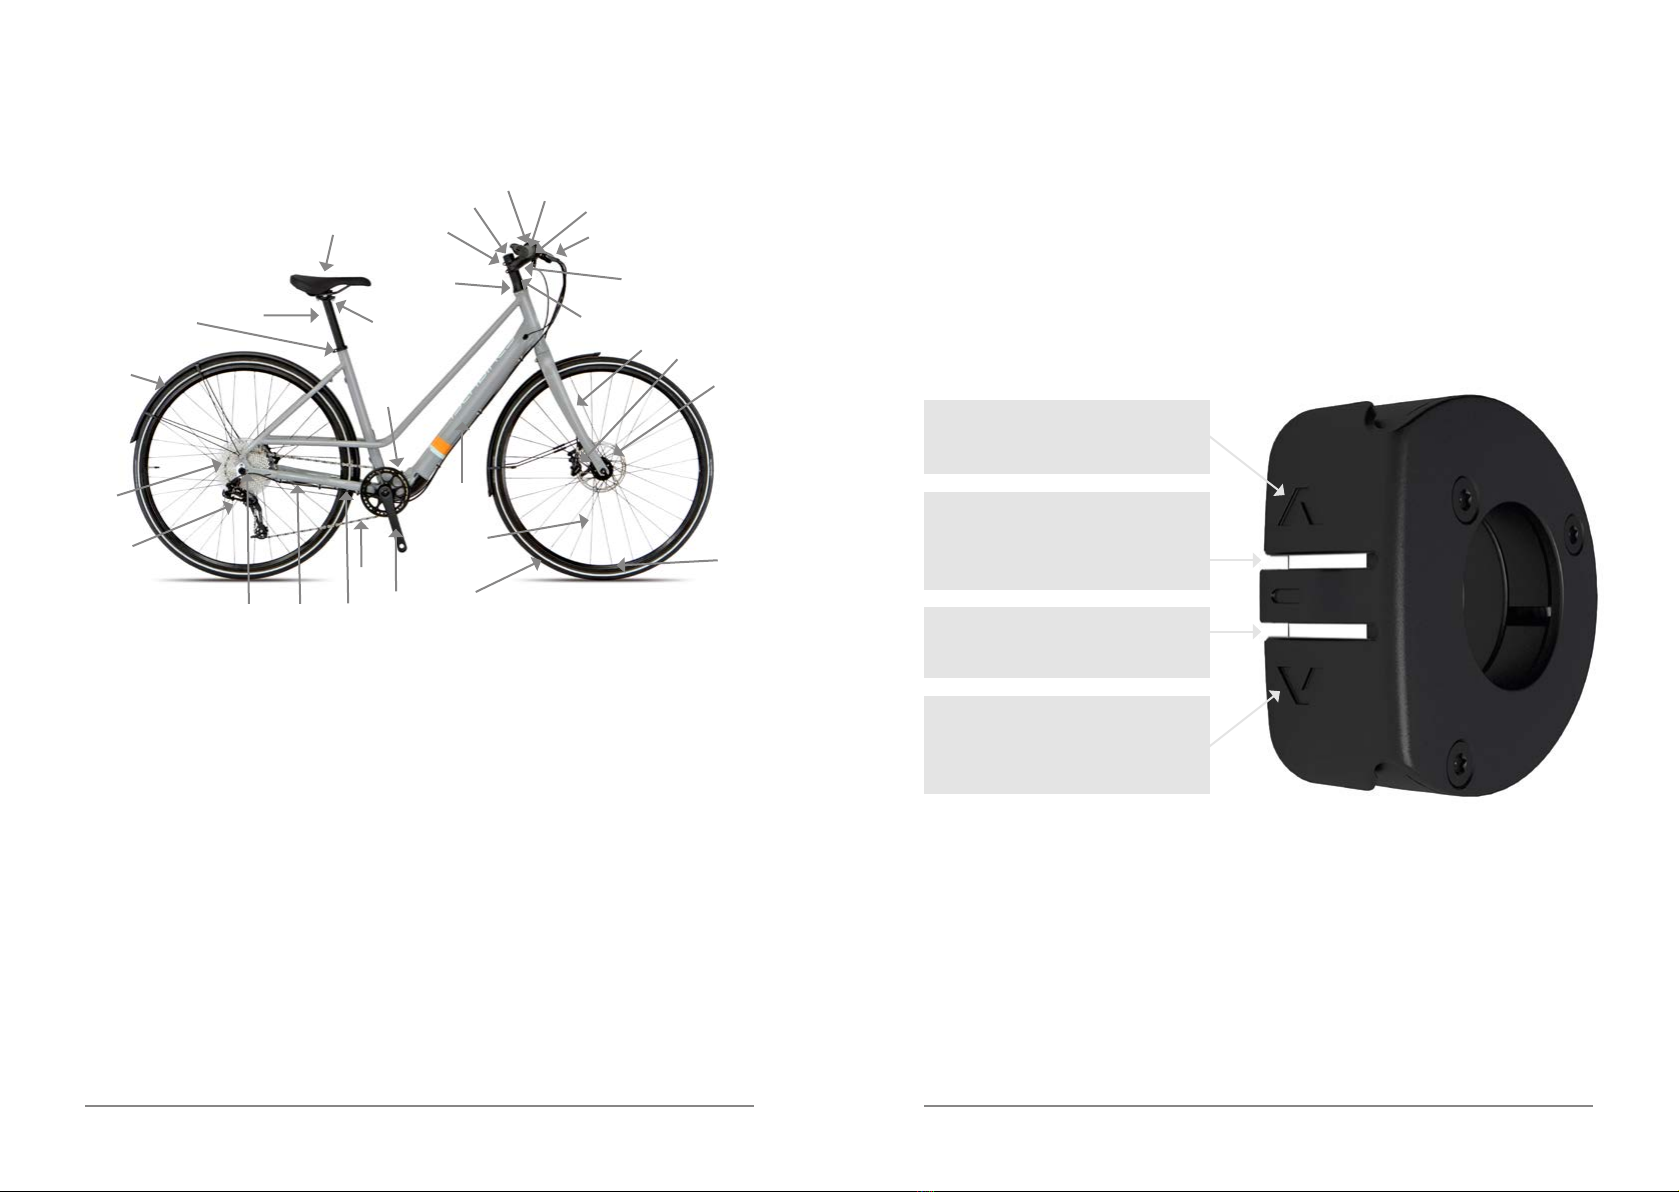
Your Islabikes eIcons EPAC is equipped with four levels of motor assistance:
Level 0 (White Light) = No Assist
Level 1 (Green Light) = Low Assist
Level 2 (Orange Light) = Moderate Assist
Level 3 (Red Light) = Maximum Assist
As a guideline we would recommend the following applications for each level:
Level 1 = General riding or light assist
Level 2 = Moderate climbs
Level 3 = Steep climbs
To change the assistance level, follow these steps:
1. A short press on the up button and the RGB LED will blink to show the
current level of assistance.
2. Whilst the LED is ashing, you will be able to cycle through the four
available levels of assistance using the up and down buttons.
The EPAC system is only a form of power assist and will not totally
replace the need for physical input from the user. The amount
of assistance that you receive is managed by the EPAC and will
gradually reduce as you approach the system’s 25km/h limit.
The range of the system is directly linked to the amount of power
that you consume. For example, a rider cycling with Level 1 will
experience a signicantly longer range than a user with Level 3.
As a result, we would encourage you to adjust the level of assist
throughout your ride in order to maximise the time before your
battery runs out of charge.
The power assist levels can be adjusted in the ‘Engine Settings’ tab within
the ebikemotion app.

eIcons - eJanis www.islabikes.co.uk
Step 11 of 12
Walk mode
1. Press and hold button until the LED ashes white. The bicycle will
advance at a constant 5km/h as long as the button is depressed.
Long Press: Walk Mode
It is important to bed-in your new brake pads to achieve optimal
performance, increase pad longevity and reduce the likelihood of brake
fade and noise.
To safely achieve optimal results, remain seated on the bike during the
entire bed-in procedure. Accelerate the bike to a moderate speed (12mph /
20kph), then rmly apply the brakes until you are at walking speed. Repeat
approximately twenty times. Next, accelerate the bike to a faster speed,
then rmly apply the brakes until you are at a walking speed. Repeat
approximately ten times.
Important: Do not lock up the wheels at any point during the bed-in
procedure. Allow the brakes to cool prior to any additional riding. If you
require further information about your brakes, contact our technical support
team on +44 (0)800 008 6297 or email techsupport@islabikes.co.uk.
Step 12 of 12
Brake pad bed-in

eIcons - eJanis www.islabikes.co.uk
Before you head off please read our advice for safe cycling.
1. Ensure that your helmet is adjusted correctly in accordance with the
manufacturer’s instructions.
2. Ensure you are wearing sturdy footwear and nothing can become
entangled in the pedal or drivetrain.
3. Ensure that you familiarise yourself with your new bicycle in a safe
environment. We pride ourselves on light action brakes. Check you can
come to a stop safely using the brakes.
4. Your Islabike is set up so that the right-hand brake lever operates the
front brake. Where the destination country drive on the right the right
hand brake lever will operate the rear brake.
5. Be aware braking performance and grip will be drastically reduced in
wet conditions.
6. Ride carefully on busy streets or highways.
7. Always observe national legal requirements if riding on public roads.
If you are cycling anywhere outside of the UK, please check the local
legal requirements.
8. It is important that your bike is regularly maintained. It should be
inspected if an accident occurs.
9. We do not recommend that a bicycle trailer or trailer bicycle is tted to
this bicycle.
10. Your bike is tted with mounting points for a luggage rack, but we do
not recommend tting a child seat.
11.The moving parts on your bike present a danger of entrapment.
Particular care should be taken with the chain when riding and
maintaining your bicycle.
12.It is not possible to connect external devices such as lights to the
power source on your ebike.
Handlebar ends can become exposed from repeated contact
with the ground or heavy fall. Never ride a bike with an unplugged
handlebar end. You can buy replacement handlebar grips on our
website www.islabikes.co.uk or call +44 (0)800 008 6297.
Ready to ride
Safety rst
Ready to ride
Safety rst
Your eJanis weighs approximately 14Kg with no rider or luggage.
Your eJanis has been designed to be ridden on paved roads for
means of transportation or leisure where the tyres remain in contact
with the ground. The maximum safe combined rider and luggage
weight limits are as follows:
• eJanis XS/S/M/L = 125Kg
Nothing lasts forever, including your ebike. When the useful life of
your bike or its components are over, continued use is hazardous.
Materials and components may react to wear or stress fatigue in
different ways. If the design life of a component has been exceeded
it may suddenly fail, possibly causing injuries to the rider. Every bike
and its components parts have a nite life. The length of that life
will vary with the construction and materials used in the frame and
components. Your bike and its components are subject to fatigue.
With enough use at high enough loads cracks can develop that
could lead to failure. Cracks, scratches or a change of colour could
indicate that the design life of the component has been reached and
it should be replaced. Extra care should be taken when inspecting
parts that are subject to high levels of stress. The science of fatigue
is not predictable.
For composite components impact damage may be invisible to the
user, the manufacturer shall explain the consequences of impact
damage and that in the event of an impact; composite components
should either be returned to the manufacturer for inspection or
destroyed and replaced.
Please note your bike is not intended for the following types of riding:
Dirt jumping BMX Four Cross
Downhill Slalom O road riding

eIcons - eJanis www.islabikes.co.uk
Factors that can reduce product lifespan include:
Impacts to the bike from crashes, bumps or jumps.
Exceeding the maximum weight limit for the bike.
High mileage/usage.
Environmental conditions (unusually damp/saline atmosphere,
muddy or sandy conditions).
Poor maintenance and use out of correct adjustment.
Unsympathetic riding style.
Factors that can increase product lifespan include:
It is not possible to make a bike that is never going to be damaged.
If you use the bike beyond its limitations, there is a high risk of
failure which could result in serious injury or death. Bikes that are
used competitively should be subject to more frequent and rigorous
checks. Take particular care to check the frame tube junctions and
welds as well as all the components for damage or excessive wear.
If in any doubt, please contact our technical support team on +44
a qualied cycle mechanic for inspection.
Never use your eIcon as a method of towing any other person,
vehicle or object.
Usage guidelines Rear wheel removal
Your eIcons bicycle uses a rear hub motor which consequently requires a
slightly dierent procedure for removing the rear wheel:
Ensure that the electronic system is switched o via the iWoc
Trio controller.
You must always disconnect the motor cable before doing any
maintenance or servicing work on the rear of the bicycle. Failure to
do so is highly likely to result in serious injury!
1. Shift into the 10th gear of the cassette. This is the smallest ring on
the cassette.
2. Undo the rear axle nuts using an 8mm allen key and remove the
location washers.
3. Pull wheel down from dropouts.
OK

eIcons - eJanis www.islabikes.co.uk
Retting the rear wheel
1. Check that the motor wire shield is still tted.
OK
3. Line up outer sprocket from the cassette with the chain and push the
axle up into the dropouts.
4. Align shaped washers correctly and torque up wheel nuts to 35Nm.
2. Always ensure that the motor
cable is correctly attached
to the rear wheel axle and is
facing downwards.
OK
5. Re-attach the motor cable.
You must ensure that the orientation arrows on the plug and socket
are aligned whilst doing this to ensure that the cable is not damaged.
OK

eIcons - eJanis www.islabikes.co.uk
Retting the rear wheel continued
7. Re-attach the cable guide clips.
You must complete this nal step in order to prevent the cable
from getting trapped in the rear wheel. Failure to do so may result in
serious injury or even, in severe circumstances, death.
OK
Troubleshooting
1. If you turn the bike on after a full charge and nd that it has not
charged at all:
Use the App to nd and clear the error code.
Re-start your bike and it should now be ready to use.
If not, please contact Islabikes.
2. If you turn the bike on after a full charge and it is showing fully charged
but will not go:
Press and hold the power button for 15 seconds.
Your bike should be now ready for use.
If not, please contact Islabikes.
3. If you turn the bike on after a full charge and it is still showing a low charge:
Please contact Islabikes.
4. If your bike does not seem to be charging at all:
Check the plug connection at the wall.
Check the connection to the charging port on your bike.
If the bike still does not begin to charge, please contact Islabikes.
5. If the motor assist does not work:
Check the PAS sensor (on the drive side of the rear hub) is in position.
Check the PAS sensor is correctly oriented.
Check the PAS sensor plug is correctly attached.
Check the motor cable (on the non-drive side of the rear hub) is
correctly attached.
Check visually for any damage to the cables.
If the motor assist still does not work, please contact Islabikes.
6. If the iWoc Trio shows a steady pink LED:
Your eIcons is in ‘Safe Mode’. Please contact Islabikes for assistance.

eIcons - eJanis www.islabikes.co.uk
Troubleshooting continued
7. If the RGB LED ashes pink constantly:
There is an error in the system.
Connect your smartphone by Bluetooth to see a detailed description
of the error.
Alternatively contact Islabikes for assistance.
Please note that if the issue is serious enough it could stop the
motor from working.
8. If the RGB LED ashes pink alternating with a combination of amber
and green and red and white:
The bike is in DEMO MODE. It can only be ridden for a
maximum of 50km.
Please contact Islabikes for assistance.
Using the ebikemotion
web dashboard
The ebikemotion web dashboard also provides you with the opportunity
to get more from the technology inside your eIcons bicycle. To access the
dashboard, follow these steps:
1. Log onto www.ebikemotion.com.
2. Enter the username and password that you chose when setting up the
ebikemotion smart device app for the rst time.
From here you will be able to:
View information based on your activities with your bike.
See the current status of your ebike.
Analyse your activities.
Share activities with other users of the ebikemotion system.
See the location of your eIcon’s last use (when paired with a
smart device)
Download the online manuals.

eIcons - eJanis www.islabikes.co.uk
Guarantee
Your Islabike comes with a 5-year guarantee on frame and forks and a
2-year guarantee on parts including the battery and motor. This covers faulty
manufacturing but not normal wear and tear. This guarantee only applies to the
original purchaser of the bike.
Your statutory rights are not affected by the guarantee.
Our clearance bikes have the following guarantees, these apply to the original
purchaser and are only valid within the UK.
Ex-display / Demo: 5-years frame and forks / 2-years suspension forks and parts
Second hand: 12-months frame, forks, batteries & motors
Our bikes are not guaranteed for racing in sanctioned or competitive
events. The use of a bicycle in hazardous conditions including
changeable and uneven surfaces can put high, unpredictable loads
on the bicycle and its components. Lack of rider skill and experience
can further increase these loads leading to the possibility of serious
damage to the bicycle and/or injury to the rider. If you choose to
participate in these events then please carry out more frequent and
thorough maintenance and checks, including regularly inspecting
the frame, fork, stem, cranks and handlebars for signs of damage.
Discontinue use immediately if anything untoward is spotted and
contact our technical support team on +44 (0)800 008 6297 or email
techsupport@islabikes.co.uk.
Storage
In order to safely store and maintain your eIcon bike, please observe the
following instructions:
Do not store or leave your eIcon in direct sunlight for prolonged
periods of time.
Do not leave your eIcon parked outside in extreme weather conditions.
Do not leave for prolonged periods of time in rain or snow showers.
Do not expose to temperatures higher than 40°C. Prolongued
exposure to temperatues lower than 10°C may degrade the battery’s
performance.
Ensure that your eIcons battery is recharged to 100% at least once
every two calendar months.
Keep the iWoc Trio handlebar remote control free of dust or
standing water.

eIcons - eJanis www.islabikes.co.uk
Cleaning & maintenance
Keeping your bike clean and maintained comes with many benets. Not
only will your Islabike perform better but it will be safer, last longer and look
great. To do this we have listed some regular checks to help you along the
way. Of course, if you are unsure of anything we strongly recommend you
seek professional advice or contact our technical support team on +44
(0)800 008 6297 or email techsupport@islabikes.co.uk.
Avoid turning your bike upside down and resting on the handlebar/
saddle as this may crush the iWoc Trio controller and cause
irreversible damage to the unit.
Your eIcon bicycle contains electrical parts that could be sensitive to
damage if cleaned incorrectly. Only clean your bicycle by hand using
a wet cloth and do not attempt to shower or submerge the unit.
DO NOT use a pressure washer to clean your bike; particularly on
the surface of the motor, remote control, downtube cable port or
charging port. Use of a pressure washer may damage the seals
protecting electrical equipment inside of your eIcons bike beyond
repair and will void the terms of your warranty.
Moving parts on your bicycle will need lubricating from time to time.
Weather conditions are generally the biggest factor that determine
frequency of maintenance and lubrication. However, it is also heavily
dependent on the frequency, type and duration of riding.
Component Lubricant Frequency
Chain Oil Weekly or after washing / rain
Headset n/a Sealed bearings
Pedals n/a Sealed bearings
Brake uid DOT 5.1 12 months - Service
Bottom bracket n/a Sealed bearings
Disc brakes
One of the most important safety features of your Islabike. It is a good habit
to check the brakes on a regular basis. This should be done depending on
the type, frequency or duration of riding. If your bike has not been used for
a period of time, we recommend a quick check before riding.
Surfaces in or around the brake components will become very hot
to touch during brake operation and pose a very high risk of burning
skin when touched. Always ensure that you leave plenty of time for
the components to cool before touching them.
Brake operation – Pull on one brake at a time and look at the brake pads.
Check to see if they are touching the discs evenly when applied. If the
pads are not contacting the discs correctly, they are uneven, rubbing or
feel spongy to apply please contact our technical support team on
Brake pad wear and replacement – Brake pads do not last forever.
Eventually they will need replacing. This will depend on the type, frequency
and duration of riding. Brake pads must be replaced if the total thickness
of the backing plate and pad friction material is less than 3mm.
Riding with backing plate and pad friction material less than 3mm
can result in reduced braking performance, crash, and/or death.
Pads tted as standard are organic compound. We recommend
replacing with the same compound to maintain performance.
Brake uid and replacement – The brakes tted to your bike contain
DOT 5.1 hydraulic uid. Your uid will need replacing annually to maintain
performance. Always seek professional advice – specialist tools are
required for this maintenance.
DO NOT ALLOW brake uid to contact skin or eyes. If uid comes
into contact with skin or eyes seek to dilute with plenty water and
seek medical advice.
The X35 rear hub motor tted to your eIcons is only compatible with
rotor sizes from Ø160-180mm.

eIcons - eJanis www.islabikes.co.uk
Disc brakes continued
YOU MUST only use Islabikes genuine replacement disc rotor bolts
and washers. Failure to use the correct bolts and washers will void your
warranty and damage the motor beyond repair.
OK
Wheels
Rim trueness – Depending on the type of riding you do your Islabikes
bikes wheels may become untrue or damaged when riding. This means
they will not spin straight and will wobble. If for any reason they are untrue
our wheels can be easily repaired, please contact our technical support
Front Hub – Your front hub is tted with cup and cone bearings. Although
they are sealed water and grit can enter your hubs and cause premature
wear. To prolong the life of the hub and keep it running smoothly we
recommend annual maintenance and re-greasing of hub bearings.
Rear Hub – This is a non-serviceable part. If you experience any
problems with the bearings or freehub then please contact our technical
support team for further advice on +44 (0)800 008 6297 or email

eIcons - eJanis www.islabikes.co.uk
Tyres and tubes
Tyre wear – Regularly check tyres for general wear and tear. Overtime
your tyres will become more worn and can become more susceptible
to punctures.
Tyre pressure – Regularly check your Islabike tyre pressure as they
slowly go down over time. To check, use a pressure gauge tted to most
quality bicycle track pumps. The minimum tyre pressure that we would
recommend for eJanis is 30PSI (2Bar).
You should not exceed the maximum tyre pressure printed on the
sidewall of the tyre. We recommend approx. 70% of the maximum
tyre pressure illustrated on your tyre. To inate presta valves you
must rst open the valve by unscrewing and tapping the valve end
to relieve it if stuck. Inate to correct pressure and then carefully re-
tighten to close the valve.
Use our guide to inate your tyres, https://www.islabikes.co.uk/knowledge/
technical-support/maintaining-your-islabike/
Valve closed Valve open
Drivetrain
The drivetrain is a category of components made up of the chain, cranks,
cassette and pedals. These components work together to drive your Islabike
forward and are crucial in maintaining the optimum performance and life of
your Islabike. To keep these running smoothly we advise the following.
Chain cleaning and lubricating – We recommend cleaning & lubricating your
chain weekly or after washing/rain. Simply use soapy water to wipe over your
chain and rear derailleur then dry with a cloth. Then gently apply any general
bicycle oil directly whilst simultaneously turning the cranks backwards to
ensure full chain coverage. Wipe o any surplus oil with a cloth.
Gears
Your Islabike has had its gears adjusted prior to delivery. These should be
checked periodically or after a fall to ensure they are operating correctly.
Quick check:
Ensure your rear derailleur hanger is not twisted or bent. Place your
Islabike in gear 1 or the biggest sprocket and look from the rear. Look
out to see if the rear derailleur is fouling the spokes or looks twisted.
If the gears are not working correctly contact our technical support team

eIcons - eJanis www.islabikes.co.uk
Recommended torque settings
All stem bolts 7Nm
Saddle clamp bolts 7Nm
Seatpost collar bolt 4Nm
Crank bolts 35Nm
Pedals 30Nm
Caliper bolts 9Nm
Rotor bolts 6Nm
Rear derailleur 6Nm
M12 Rear axle nuts 35Nm
Spares and replacement parts
We carry stock of replacement parts for your Islabike including inner tubes,
tyres and grips. Please visit our website for a list of readily available spares.
We only recommend using genuine parts for safety critical components e.g.
brake cables, brake blocks and bolts.
Your eIcon is tted with a rear hub motor which makes the
specication, quality and correct installation of all wheelset
components critically important. If you should experience any issues
with either the rim, spoke, nipples or hub then we would strongly
recommend contact our Technical Support team for advice on how
best to proceed.
If you can’t nd what you are looking for or are unsure of any compatibility for
older models, please contact our technical support team by phone or email.
techsupport@islabikes.co.uk
+44 (0)800 008 6297
For technical support and cycling advise please see the knowledge area of our
website. www.islabikes.co.uk/knowledge/
Frame number
Please make a record of your frame number. This is a combination of
letters and numbers unique to your bike stamped to the underside of the
frame. This is required by police and insurance companies in case of loss.
Islabikes do not keep a record of this.
Frame
number
Table of contents
Other ISLABIKES Bicycle manuals

ISLABIKES
ISLABIKES Beinn User manual

ISLABIKES
ISLABIKES Icons Janis User manual

ISLABIKES
ISLABIKES Beinn 20 Pro Series User manual

ISLABIKES
ISLABIKES luath pro series User manual

ISLABIKES
ISLABIKES Creig User manual

ISLABIKES
ISLABIKES Icons Joni User manual

ISLABIKES
ISLABIKES Beinn 29 User manual

ISLABIKES
ISLABIKES Rothan User manual

ISLABIKES
ISLABIKES Cnoc User manual

ISLABIKES
ISLABIKES elcons eJimi User manual