St George 5667100 Installation guide

Gas Cooktops
Model No’s
5667100 700mm Gas Cooktop
5669100 900mm Gas Cooktop
Operating and Care Instructions

2
Contents
Safety Notes 3
Knowing Your Cooktop 4
Important Points
Installation Checks
FeaturesAndBenets
Using The Appliance For The First Time 5
Control Panel Operation 5
Gas Burner Controls
Cooking Instructions 6
Cleaning And Maintenance 7-8
Recommended Cleaners
Routine Cleaning
Spills, Spatters And Accidents
Troubleshooting Guide 9
Installation Instructions 10-11
Measurements
Required Clearances
Securing The Cooktop
Gas Connection Instructions 12
Gas Supply Connection
Gas Consumption 13
Electrical Connection Instructions 13
Wiring Rules And Warnings
Servicing And Minor Adjustments 14-15
Setting Gas Pressure
Gas Simmer Flame Adjustment
Conversion From Natural Gas To LPG
Lubricating Gas Valves
Recipes 16-18
Spaghetti With Clams
Pea And Ham Soup
Paella Valenciana
Part Numbers 19

3
Safety Notes
DON’T USE THE APPLIANCE AS A SPACE HEATER.• The appliance must never be used for
warming or heating the surrounding room or for drying clothes or textiles or other items not
specicallyrecommendedintheoperationmanual.Combustiblematerialsorproductsmust
neverbeplacedonorneartheappliance.
DO NOT LEAVE CHILDREN ALONE.• Children must not be left unsupervised in the area where
theapplianceisinuse.Theappliancegetshotduringuseandretainsheatforsometime
afterbeingturnedoff.Childrenmustneverbeallowedtositorstandonanypartofthe
appliance.
DO NOT SPRAY AEROSOLS IN THE VICINITY OF THE APPLIANCE WHILST IT IS IN OPERATION.•
WEAR PROPER APPAREL WHEN USING THE APPLIANCE.• Loosetting,hangingorhighly
ammablegarments(suchassynthetics)shouldneverbewornwhileusingtheappliance.
USE ONLY DRY POT HOLDERS.• Moist or damp pot holders on hot surfaces may result in burns
fromsteam.Donotallowpotholderstotouchhotheatingelements.Donotuseatowelor
bulkyclothwhenhandlinghotcookingutensils.
DON’T STORE FLAMMABLE ITEMS NEAR THE APPLIANCE.• Items,particularlyammablematerials,
mustneverbestoredonornearsurfaceunits.
DO NOT USE OVERSIZE COOKWARE OR PLACE COOKWARE OFF-CENTRE OVER BURNERS.•
Oversizecookwarewilldeectheattowardsthecooktopandbenchtopsurfaces.
Cookware with large bases, especially if placed off-centre over the burners, may cause
deteriorationofthecooktopandbenchtopsurfaces.Suchdamageisnotcoveredunder
theprovisionsofthewarranty.FollowtheillustrationsandexamplesintheCooktopCooking
instructions.
NEVER USE AN ASBESTOS MAT BETWEEN COOKWARE AND COOKTOP.• Use of an asbestos mat is
bothhazardousandwillcausedamagetotheunit.
ONLY PLACE COOKWARE ON PAN SUPPORTS.• Other surfaces of the appliance, for example
trims, are not totally resistant to hard or sharp materials or direct heat and may be damaged
bysuchuse.
Ifthesurfaceisdamaged,switchofftheappliancetoavoidthepossibilityofelectricshock.•
Theapplianceisnotintendedforusebyyoungchildrenorinrmpersonswithoutsupervision.•
Youngchildrenshouldbesupervisedtoensurethattheydonotplaywiththeappliance.•
VENTILATION SLOTS AND AIR VENTS MUST NOT BE COVERED OR OBSTRUCTED IN ANY WAY.•
!
Recipesonpages16-18areall©TheMargaretFultonCookbook.
Colour photographs are © Geoff Lung, 2004

4
Knowing Your Cooktop
Thank you for purchasing an excellent product that we are sure will provide many years of great
cookingexperiences.Ifyouhaven’thadthepleasureofcookingwithoneofourappliances
previously,youmayndthatithasdifferentfeaturesandcharacteristicstoyourlastappliance.
It is essential you read this operation manual thoroughly to fully understand all of the various
functionsandoperations.Theaimistoencourageyoutoexperimentwithyourcookingand
takefulladvantageofthefeaturesofyourappliance.Thekeytoachievingresultsthatbestsuit
yourpersonaltasteisexperimentation.
Thismanualshouldberetainedforfuturereference.Shouldownershipoftheappliancebe
transferred,pleaseensurethatthemanualisalsopassedontothenewowner.
Important Points
In the interests of your safety and the care of your new appliance, please take time to carefully
readthismanualbeforeinstallingandusingit.Inparticularyourattentionisdrawntothe
following:
Alicensedelectricianandlicensedgastterwithrelevantqualicationsmustperformall
electricalandgasworkwheninstallingorservicingtheappliance.Thesupplycableandfuse
ratingmustbesuitablefortheappliance.Youmustneverrepairorreplaceanypartofthe
applianceunlessspecicallyrecommendedintheoperationmanual.Forinstallationdetails,
please refer to Gas Connection Instructions, and Electrical Connection Instructions.
Incorrect installation of the appliance as a result of not following the detailed instructions can
affect performance and pose a safety hazard. Appliances incorrectly installed may invalidate
the warranty and we strongly recommend that the cavity, venting, wiring and gas connection
be prepared as described in the instructions. This is critical to appearance, performance and
safety. For installation details, please refer to Installation Instructions.
Installation Checks
Features And Benets
Gas cooktop models incorporate electronic ignition and fast take-off gas burners for effective
lightingandheatproduction.BothgasmodelshaveFlameFailureDevicecontrolforcomplete
safety.Allpansupportsareremovableanddishwashersafe.
Cleaningthecooktopismadesimplewithhighqualityvitreousenamelandstainlesssteel(refer
to Cleaning and Maintenanceforcompletecareinstructions).
5667100 5669100

5
Using The Appliance For The First Time
Afterinstallationremoveallnoticationlabels(notgasorelectricalwarninglabels),advertising,
tape,packaging,etc.Aquickwashwithdilutedsoapywatershouldrinseawayanyadhesive
residue.Eucalyptusoil(smallamounts)isalsogoodforremovingadhesiveresidue.Thoroughly
rinsecleanedsurfacesandwipethemdryusingaclean,softcloth.
NOTE: Peoplewithsensitivitytocleaningchemicalsmusttakethenecessaryprecautions.Itis
recommendedthatprotectiveglovesbewornwhilecleaningtheappliance.
INITIAL HEAT UP
Somesmokeandsmellmaybenoticedduringtheinitialheatupcycle(seeUsingthe
AppliancefortheFirstTime).Thisshouldquicklydissipate.Ifabnormallevelsofsmokeare
observed(i.e.itisnotfoodthatisburning)havetheappliancethoroughlychecked.
Control Panel Operation
Gas Burner Controls
The cooktop burners are ignited by the in-built electronic ignition
controls.Thecontrolsmustbeturnedanti-clockwisetooperate
andcanonlybeturnedclockwisetotheoffposition.Alternatively,
the burner may be ignited manually using matches, cooktop gas
lightersorsimilardevices,beingcarefulnottoriskinjuryordamage.
To operate the controls ensure the burners are correctly assembled
and positioned over the gas burner outlets and the pan supports
are correctly positioned then:
Startthegasowbypressingdownandturningthecontrol1.
knob corresponding to the burner you wish to use anti-
clockwise.Pressingdownonthecontrolknobcausestheigniters
tospark.
NOTE: TheseunitsarettedwithFlameFailureSafetyDevices.Theserequirethecontrolsto
befullydepressedduringignitiontoensurecorrectoperation.Thecontrolsshouldbeheld
fullydownforatleast10secondsduringtheignitionandameestablishmentperiodto
ensurethevalveremainsopenaftertheknobisreleased.
Oncetheameisestablishedtheknobneednolongerbepressedandmaybeturnedto2.
yourrequiredsetting.
Theamecanthenbeturneddownbyturningthecontrolknobfurtheranti-clockwise.3.
For Wok Burner:4.
Oncetheameisestablishedusingthenormalproceduredescribedabove,itcanbe
turneddownbyturningthecontrolknobfurtheranti-clockwise.
Press the control knob again and continue turning anti-clockwise to extinguish the outer ring
ameandprovideafullcontrolhigh-to-lowinnerringameforsimmeringapplications.
Checkforaclearblueamewithoutexcessiveyellowtipping.Ifburnersshowanyabnormal
combustionchecktheyarecorrectlylocatedontheburnerbase.
NOTE: Sometimes burners may not ignite immediately and may seem to “blow” slightly when
theydoignite.Thisisusuallyduetoairinthegasline,whichshouldclearitself.
For minor adjustments see Servicing and Minor Adjustments.
A 2 yearly inspection of the appliance by an authorised service agent will ensure many years of
trouble-freeservice.(NOTE:Thisisnotprovidedunderwarranty).
Low
High

6
To achieve the best possible cooking results, the following points are recommended:
Make sure that both the cooktop surface and the bottom of your cookware are clean and•
drybeforecooking.Cleananddrysurfaceswillhelppreventscratchesandstainsonyour
cooktopandcookware.
Usegoodqualitysaucepanswiththickgroundbases(preferably5mmthick)thateffectively•
covertheheatingarea.Panswhichhavesmooth,slightlyconcaveoratbaseswhencold
willexpandandbecomeatwhenhot.Thin,warped,dentedorridgedbasescancause
irregularheatdistributionresultinginunevenheatingoffood.Qualitystainlesssteelpansare
recommended.
The size of the pan should closely match the size of the cooking zone to be used – not much•
widerornarrower.Ifthediameterofthebaseofthecookwareismuchsmallerthanthe
diameterofthecookingzone,youwillwasteenergyandincreasetheriskofburningspills.If
thecookwareistoolargefortheburner,timetoboilwillbelonger.
WhenusingtheWokburner,usepanswithbaseslargerthanthediameteroftheburner.•
When using the Wok burner at full power, it is recommended to use only Wok pans or frying
pansontheburner.Smallerpansmaynotprovideenoughclearancefromtheamemaking
thehandle/stoohotandunsafetohold.Forgreaterstability,usethesuppliedWokring.
Use a set of twin or triple saucepans with dividers when individually cooking several•
vegetablesatthesametimeusingonlyoneburner.
Whensteaming,usesaucepanswithclosettinglids.•
When cooking food such as cut vegetables or fruit, cut the food into pieces of uniform size to•
obtainevencooking.
When cooking vegetables use a minimum amount of hot water to obtain a crisp texture and•
preventovercooking.Thequantityofwaterwilldependonthetype,quantityandqualityof
thevegetablesbeingcooked.Withtheexceptionoffrying,etc.,alwayscookwiththelidon
thesaucepanatthecorrectheatleveltopreventboilovers.
When cooking in woks or convex-bottom vessels, it is strongly recommended to use the Wok•
ringsuppliedwiththeappliance.
WARNING:Oversizecookwarewilldeectheattowardsthecooktopandbenchtopsurfaces.
Cookware with large bases, especially if placed off-centre over the burners, may cause
deteriorationofthecooktopandbenchtopsurfaces.Suchdamageisnotcoveredunderthe
provisionsofthewarranty.
Cooking Instructions
!
HEAT EXTENDED
BEYOND BASE
OF PAN
HEAT DEFLECTED
TOWARDS
BENCHTOP Match size of pan
to appropriate burner

7
Cleaning And Maintenance
Proper cleaning and maintenance of your appliance will provide you with years of pleasant
use.Tomaintaintheappearanceanddurabilityofyourapplianceweencourageyoutoread
andfollowtheinstructions,hintsandwarningsincludedthroughoutthismanual.Caremust
alwaysbetakentopreventscratchesonyourappliancefromhardorsharpobjects.
NOTE:Peoplewithsensitivitytocleaningchemicalsmusttakethenecessaryprecautions.Itis
recommendedthatprotectiveglovesbewornwhilecleaningtheappliance.Routinecleaning
oftheapplianceshouldonlybeperformedwhentheapplianceisatroomtemperature.
DO NOT USE ANY ACIDIC OR CAUSTIC CLEANERS, ABRASIVE POWDERS OR SCOURERS ON ANY
SURFACES OF THE APPLIANCE.Substancesoritemswiththesepropertiesmaydiscolouror
damagethenishesofyourappliance.Ifanyabrasive,acidicorcausticsubstanceorcleaning
agent should come into contact with the appliance, rinse off immediately with water, taking
specialcaretoavoidinjuryifsurfacesarehot.
Recommended Cleaners
Mild detergents and warm water together with a clean, soft, non-abrasive cloth achieve good
resultsfornormalcleaning.
Washing with diluted soapy water should rinse away any adhesive residue or gummy deposits
ontheappliancesurfaces.Eucalyptusoil(smallamounts)isalsogoodforremovingadhesive
residues.Alcoholbasedproducts(e.g.methylatedspirit,etc.)arenotrecommended.
Brand name cream cleansers and concentrates, without abrasive qualities, can be used in
smallamountstobreakdowngreasydepositsanddirt.
Aggressive chemical cleaners such as bleach or caustic oven cleaners may etch or discolour
surfacesorliftpaintfromtrimsandarespecicallynotrecommended.
After cleaning, make sure cleaned surfaces are thoroughly rinsed to prevent any risk of baked-
oncleanerresidues,andwipedrywithaclean,softcloth.
NOTE: When cleaning stainless steel surfaces, St George recommends using dedicated stainless
steel cleaning agents such as SteelPower by Hillmark, or any other reputable brand cleaners
speciallyformulatedforcleaningstainlesssteel.Whencleaningsurfaceswhichhaveabrushed
stainlesssteelnish,takecaretowipeinthesamedirectionasthegrain.Donotusesteelsoap
padsorabrasivescourersofanykind.Theabrasivequalitiesofthesepadswillruintheeven
brushednishofthestainlesssteelandanyresidualmetalbresmaycorrodecausingarusty/
dullappearance.Metalpolisheswithabrasivequalitiesarealsonotrecommended.
8
Cleaning And Maintenance (Continued)
DO NOT USE ANY ACID OR CAUSTIC CLEANSERS OR ABRASIVE POWDERS OR SCOURERS
ON THE INTERIOR OR EXTERIOR OF THE APPLIANCE
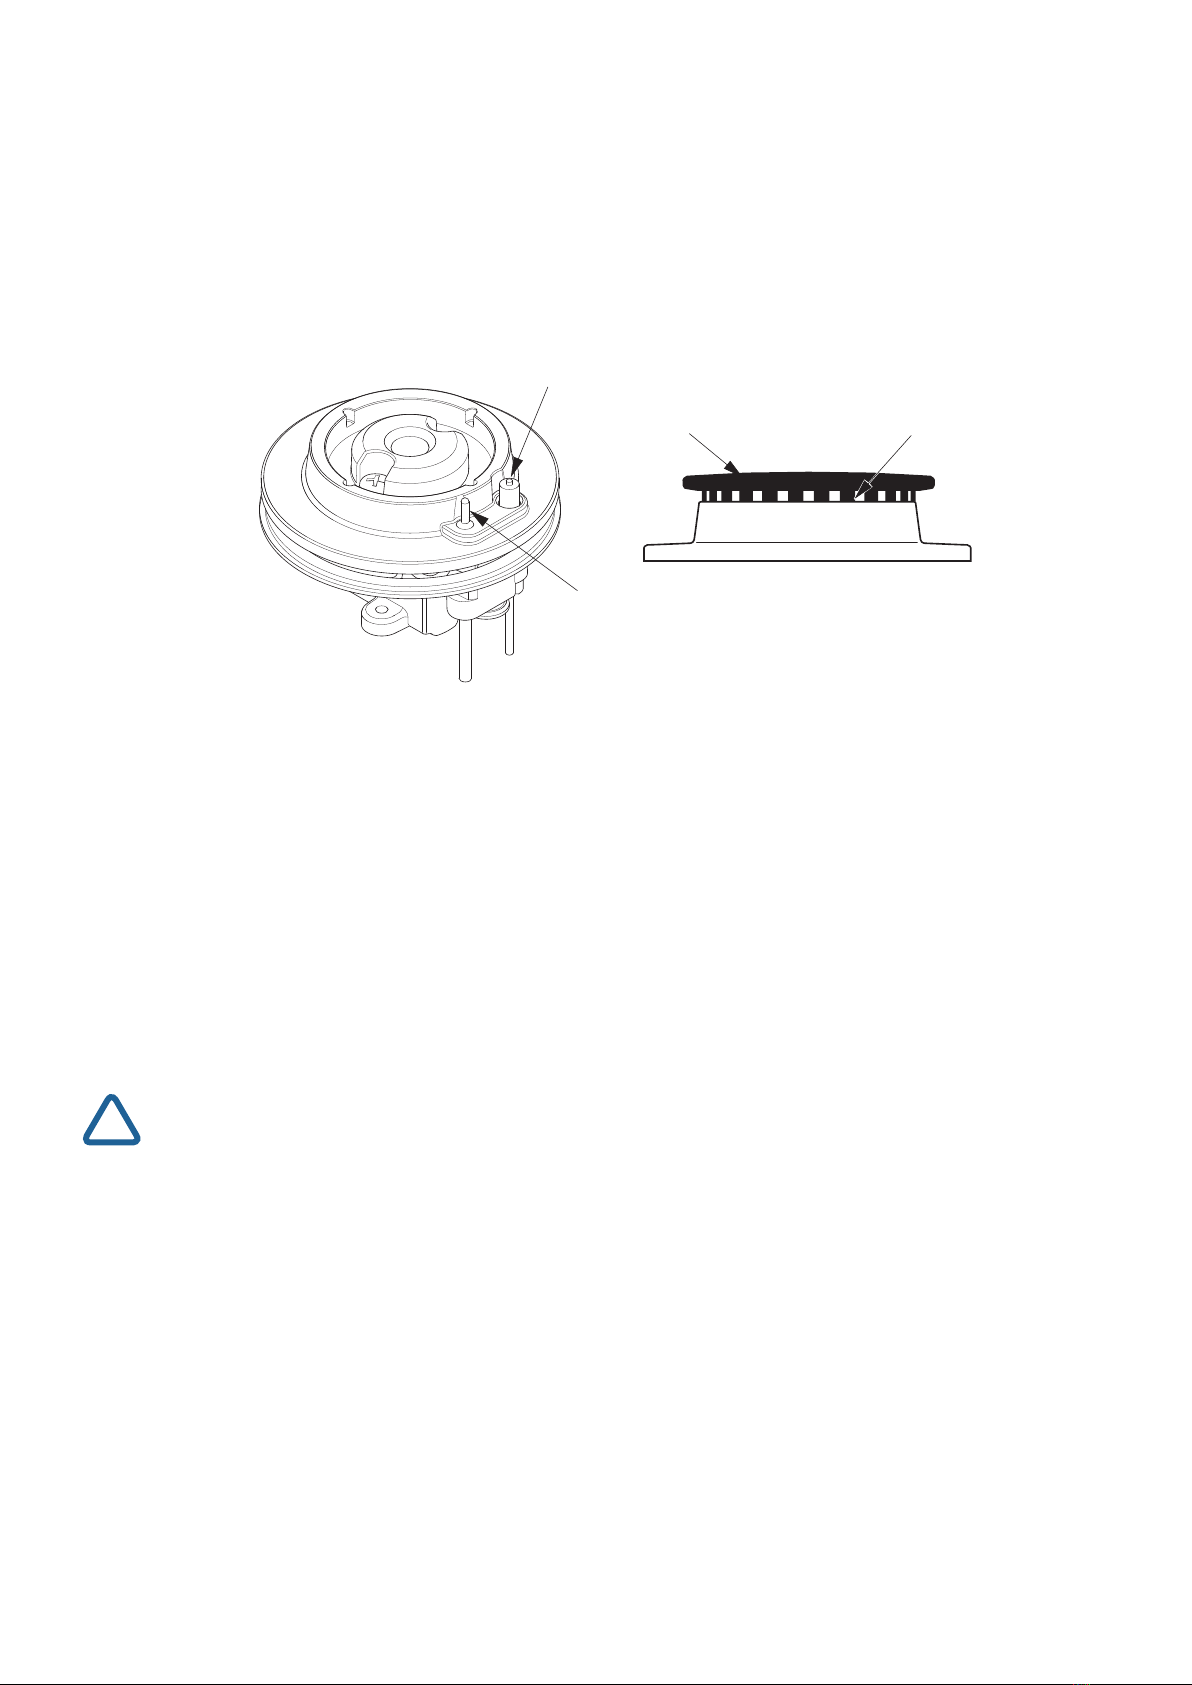
Gas outlets should
be free of obstructionsBurner Cap
Flame Failure
Spark Probe
Routine Cleaning
If possible, the cooktop should be wiped down after each use to prevent dirt and grease build
up.Ensureallcontrolsareoffandtheapplianceiscoolbeforecleaning.Tocleantheexterior,
wipe the knobs, stainless steel and enamel surfaces regularly using a warm, damp, non-abrasive
cloth.Milddetergentsmaybesafelyusedonallofthesesurfaces.Whenwipingstainlesssteel
surfaceswhichhaveabrushednish,wipeinthesamedirectionasthebrushing.Thepan
supportseasilyliftoffandaredishwashersafe.Thegasburnerpartscanbesimplyliftedofffor
cleaning.Aftercleaning,checkthatthegasholesareclearbeforedryingandcorrectlyre-
positioningthem.
After cleaning make sure all surface are thoroughly rinsed and then wiped dry with a clean, soft
cloth.
WARNING: Unclean surfaces, especially if allowed to build up, may in time damage or discolour
theapplianceandsuchstainsmaynotberemovable.
!
Spills, Spatters And Accidents
When using the appliance, it may become soiled by food spills and spatters or foreign items such as
plasticsaccidentallycomingintocontactwithwarmorhotsurfaces.Somefoods,suchasfruit
juices(especiallycitrusjuiceslikelemonjuice)andvinegars(i.e.acidicsubstances)orsugar(or
foodscontainingsugar)candiscolourordamageenamelnishes.
Thesurfacesofyourappliancehavedurablenisheswhichareresistanttowearand
discolouration.However,tomaintaintheappearanceanddurabilityofthenishanyspillsmust
bewipedoffimmediately.Thisshouldbedoneassoonaspossibleandnecessaryprecautions
mustbetakentoavoidinjuryfromhotsurfaces.Oncecool,theaffectedareashouldbe
thoroughlycleanedandrinsedusingnon-abrasive,mildcleaningdetergentsandwater.

9
Troubleshooting Guide
Problem Possible Cause Action
No ignition No spark See next Problem
No gas Check gas is not turned off or empty
Spark “escaping” Clean around electrode and burner cap
No spark No electric power Check that the cooktop is plugged into the
power, and that power is available
Switch not pressed Press the knob a bit harder, then try other
knobs
Flame not holding Didnotpressknoblong
enough
Hold the knob down a bit longer
Thermocouplenotiname Check the thermocouple is in place, is
clean and unobstructed
Not enough air entering Check that air entry inlets are clean and
free of obstructions
Flame falters Draughtaroundappliance Ensurethatthereisnottoomuchair
draught around the cooktop
Air in gas Keep running for a while to see if it clears
itself, or contact your gas supplier
Flame irregularity Burners not assembled
properly
Check that the burner is assembled
properly
For any other problems, or if the guidelines in this table could not resolve your problem, please
contactaqualiedservicetechniciantocheckyourcooktop.

10
Installation Instructions
Your safety and the proper care of your appliance is extremely important. Incorrect installation
of the appliance as a result of not following these detailed instructions can affect the
appliance’s performance. Appliances incorrectly installed will invalidate the warranty and
we strongly recommend that the cavity, venting, wiring and gas connections be prepared as
described in the instructions. This is critical to appearance, performance and safety.
WARNING:InstallationmustcomplywithStandardsAustraliaWiringRules(withinAustralia)as
well as your local electrical and building codes and regulations and any other applicable
requirements.
Yourappliancemustbeproperlyinstalledandgroundedbyaqualiedperson.
This appliance must be installed according to the installation requirements of the local gas
authorityandtheappropriateinstallationcodeissuedbyStandards Australia (Ref. Code
AS5601)andthebuildingauthorities’requirementsandanyotherapplicablerequirements.
!
Measurements
Unlessotherwisenoted,alldimensionsprovidedareinmillimetres(mm).Thesizesallowforonlya
smalldegreeoferror,soallcut-outsmustbepreciseandsquare.Toensurethecabinetryiswell
nishedthecutedgesmustalsobesquareandcaretakentoensurethecutedgesarefreeof
chips.
Note:Cutoutistohavesquarecorners.
52
520 700
488
77
560
52
520
900
488
77
875
5667100 5669100
The duplicate rating plate must be attached to an adjacent surface for
easyviewing,withoutthenecessityofremovaloftheappliance.
11
Installation Instructions (Continued)
Required Clearances
(RequiredClearancesAroundDomesticCookingAppliances–ExtractfromAS5601)
All cooktops, rangehoods and/or exhaust fans shall be installed in accordance with the
manufacturer’sinstructions.However,innocaseshalltheclearancebetweenthetopofthe
highestburneronthecooktoptothelowestextrudingpartofarangehoodbelessthan650mm.
Minimumclearanceforanexhaustfanis750mm.(Clause5.12.1.5)
Any other combustible materials less than 600mm above the top of the highest burner shall be
protectedforthefullwidthanddepthofthecookingsurface.However,innocaseshallthis
clearancebelessthan450mm.
There shall be a clearance of at least 250mm between the closest edge of any burner and a
walltotheleft,rightorrearofthecooktop.
Overheadclearanceshallbeatleast650mm,measuredfromthetopoftheburners.
Securing The Cooktop
Thenalgasconnectionshallbemadeusingaexiblehoseorannealedcoppertubingof
sufcientlengthtopermittheinsertionandremovaloftheappliance.Forgasappliances
connectedusingexiblehose,thehosemust conform to AS/NZS 1869 Class B or Class D..
Forappliancesttedwithaexibleelectricleadandplug,thegeneralpurposeoutletand
switch must not be installed within the appliance recess and must be readily accessible without
havingtoremovetheappliance.
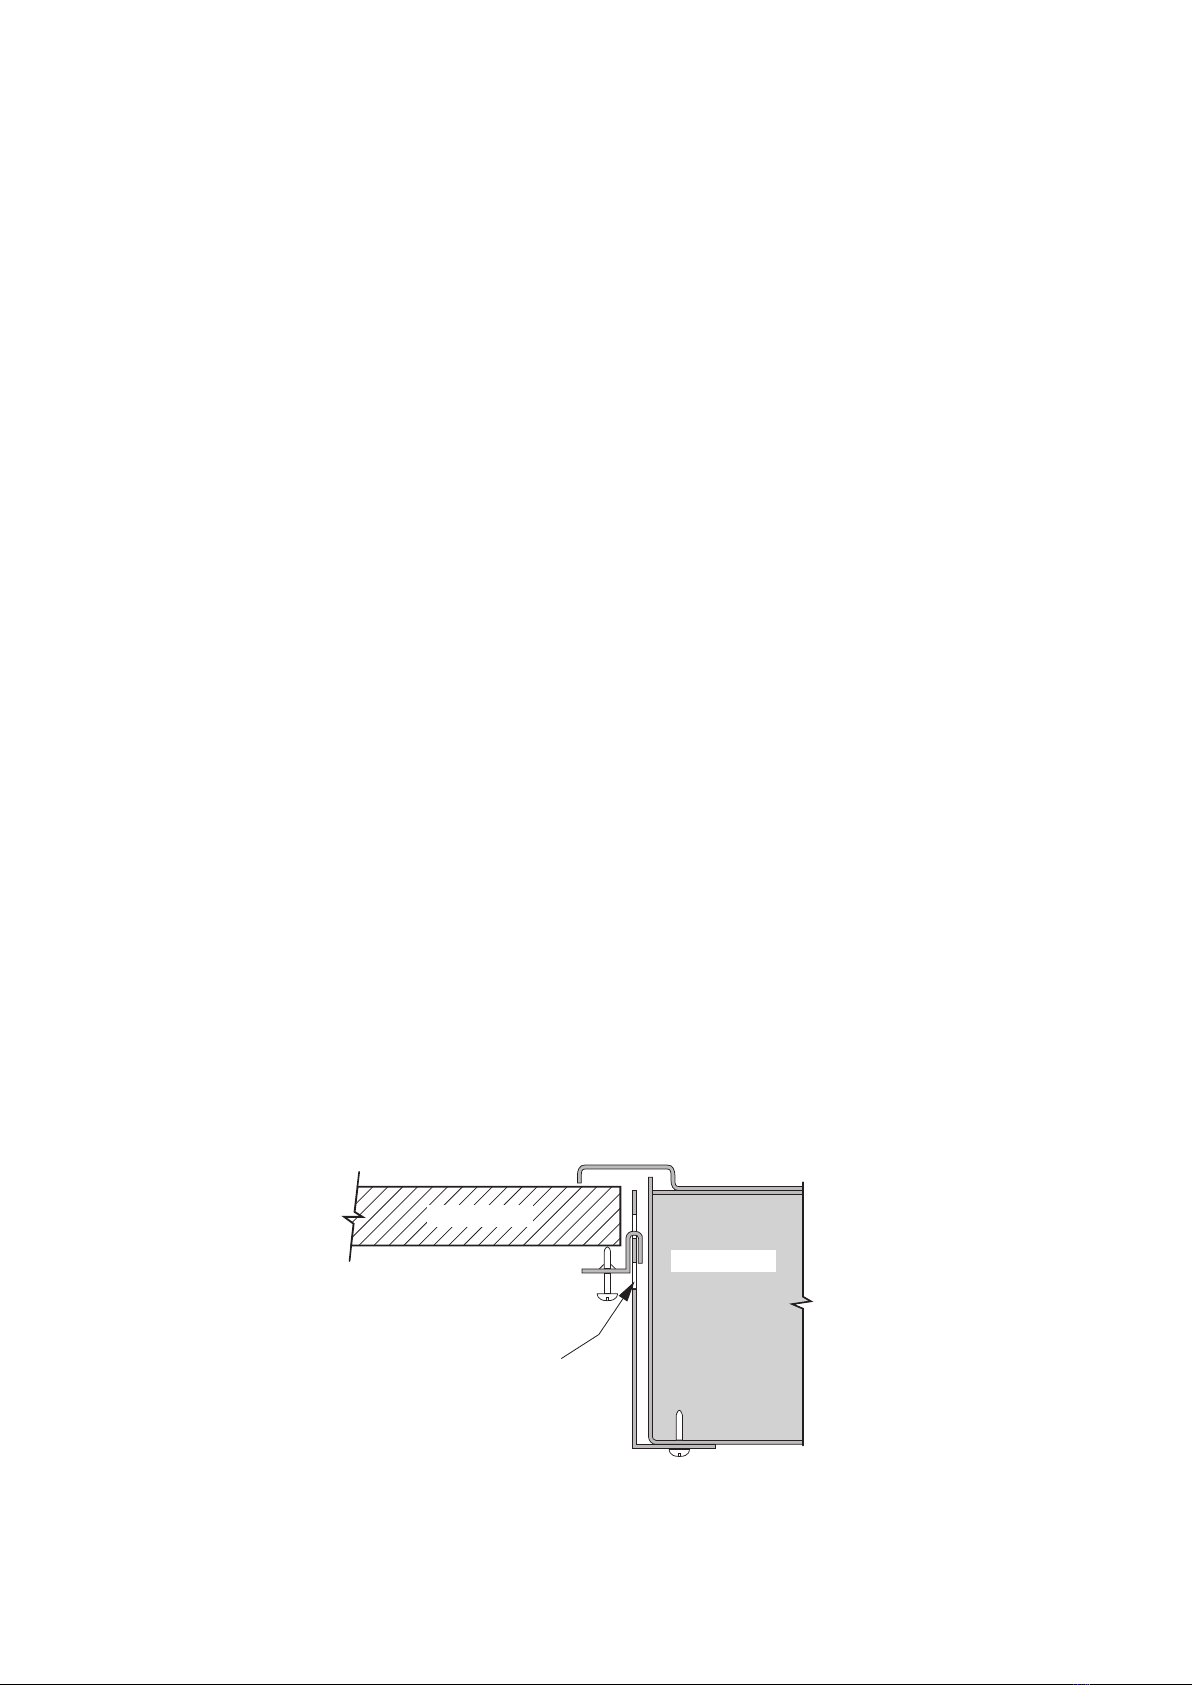
The unit must be securely clamped to the benchtop, using the clamps supplied, once correctly
positioned.Refertothediagrambelowforclamparrangement.
Clamping cooktop to benchtop surface
UNIT SHOWN CLAMPED TO
24mm BENCHTOP
USE SECOND SLOT IN
BRACKET FOR THICKER TOPS
BENCHTOP
COOKTOP

12
Gas Connection Instructions
Gas Supply Connection
WARNING: Thisappliancemustbeinstalledbyanauthorisedandqualiedperson,according
to the installation requirements of the local gas authority and the appropriate installation code
issued(withinAustralia)byStandards Australia (referencecodeAS5601)andthebuilding
authorities’requirementsandanyotherapplicablerequirements.
Checkthegastypeoftheappliancewhichisidentiedbyastickerattachedtothe1.
appliance.
Ensurethelocationofthegassupplyandroutingofthegaslineisappropriateforthe2.
appliance(seeinstallationdiagramsforgasconnectionlocationdetails).
Ensurethatthesupplyconnectionpointwillbeaccessiblewhentheapplianceisinstalled.3.
UseofahoseassemblymustcomplywithAS5601.4.
Arestrainingwireorchainofadequatestrengthistobexedtotheapplianceandthewall5.
within50mmofeachconnectionpoint.Thelengthofthechainorwireisnottoexceed80%
ofthelengthofthehoseassembly.
It is recommended that a manual shut-off valve be installed in the gas supply line, in an6.
accessible position external to the appliance, such that the gas supply to the appliance
can be shut off in the event of an emergency or for servicing without having to remove the
appliance.
ForLPGmodels,thegassupplyfortheappliancemustberegulatedtoapressureof2.75kPa7.
(11”W.G.).Thegasinletisttedwithanadaptorincorporatingapressuretestpointandhas
a½”femaleBSPthread.
For Natural Gas models, the gas supply is connected to the regulator supplied with the
appliance,whichhasa½”femaleBSPthread.IT IS ESSENTIAL THAT THE REGULATOR ON
THE APPLIANCE BE HELD FIRMLY WITH A SPANNER WHEN CONNECTING THE SUPPLY. DO NOT
OVERTIGHTEN. THE REGULATOR MUST NOT BE CONNECTED TO THE APPLIANCE OR THE GAS
SUPPLY WITHOUT THREAD SEALANT/LUBRICATION AS DRY CONNECTION MAY PERMANENTLY
BIND THREADS.
TheregulatedpressureforNaturalGasis1.0kPa(4”W.G.).
After installing the gas supply and making all connections, the supply line connections must8.
becheckedforpossibleleaks.Withallcontrolsoftheapplianceintheoffposition,openthe
gas supply valve and using a soap and water solution check each gas connection one at a
timebybrushingthesolutionovertheconnection.Theformationofbubblesindicatesaleak.
Tightenthettingandrecheckforleaks.Ifitisnotpossibletocorrecttheleakbytightening,
replacethetting.Matches and lighters must never be used to check for leaks.
Turnoneachburnercontrolandlightinturn.Checkforaclearblueamewithoutexcessive9.
yellowtipping.Ifburnersshowanyabnormalcombustionchecktheyarecorrectlytted.
Sometimes burners may not ignite immediately and may seem to “blow” slightly when they
doignite.Thisisusuallyduetoairinthegasline,whichshouldclearitself.
If, after following the instructions, satisfactory performance cannot be obtained, contact the10.
localgasauthorityforadviceandassistance.
For minor adjustments see11. Servicing and Minor Adjustments.
Atwo(2)yearlyinspectionoftheappliancebyanauthorisedserviceagentwillensuremany12.
yearsoftroublefreeservice(Note:Thisisnotprovidedunderwarranty).
!

13
Gas Consumption
Burner Natural Gas (1.00 kPa) LPG Propane (2.75 kPa)
Injector Diameter
(mm)
Nominal Gas
Consumption
(MJ/hr)
Injector
Diameter (mm)
Nominal Gas
Consumption
(MJ/hr)
Small 0.90 4.0 0.55 4.0
Medium 1.25 6.9 0.70 6.9
Large 1.45 10.2 0.88 10.2
Wok(Outer+Inner) 2.20+0.75 22.0 1.20+0.53 22.0
Wok(Inner) 0.75 2.6 0.53 3.2
Total: Model 5667100 = 43.1 MJ/hr
Total: Model 5669100 = 53.3 MJ/hr
Wiring Rules And Warnings
WARNING: All aspects of the installation must conform with the requirements of the Standards
AustraliaWiringRules(withinAustralia)aswellasyourlocalelectricalandbuildingcodesand
regulations and any other applicable requirements and conditions of your Local Power Supply
Authority.
NOTE:TotheElectrician–pleaseensuresufcientsupplycableisprovidedtoallowthe
appliancetoberemovedfromthecavityshouldanyservicingbenecessary.Thiswillalsoallow
easyconnectionofthesupply.
Thesecooktopsaresuppliedwithaexiblelead(approx1minlength).Pleaseensurethepower
connectioniswithinreachofthecable.
Gasappliancesreferredtointhismanualhaveamaximumelectricalloadof5W.
Electrical Connection Instructions
!

14
All service work, minor or not, must be performed by a suitably qualied and licensed person.
Servicing And Minor Adjustments
Setting Gas Pressure
Apressuretestpointisprovidedonthepressureregulator(forNaturalGasmodels)oronthe
inletadapter(forLPGmodels)atthegasconnectionpointoftheappliance.Thepressure
shouldbesetwithoneburnerfullyon.Thesetpressureshouldbe1kPaforNaturalGasor
2.75kPaforLPG Propan.
Gas Simmer Flame Adjustment
Theminimumgasowforeachburnerisfactorysetbutcanbeadjustedifnecessary.The
minimumowcanbeincreasedordecreasedbyremoving the control knob and hob to gain
access to the adjustment screw on the valve body, and then turning the adjustment screw
usingasmallatbladedscrewdriver.Takecaretonotdamagetheheadofthescrew.
NOTE:TheWokburnervalvehastwoadjustingscrews,oneforeachoftheburnerames.
Conversion From Natural Gas To LPG
The following must be carried out by an authorised person.
General Information
If the hob is supplied pre-adjusted for Natural Gas:
The injectors required for adapting this appliance to LPG are supplied in the conversion kit1.
(seesizesinthetableunderGas Consumption).
When the appliance has been converted to LPG tick the box on the injector information2.
label.
ChangetheblackNaturalGaslabelstotheredLPGlabels.3.
Conversion
Remove the pan-support locating pins, pan supports, burner caps, burner ring/dress rings1.
andknobs.
Removethehob.2.
RemovethettedinjectorsonebyoneandreplacewiththeLPGinjectorsizedasthelabel3.
attachedtotheapplianceandalsointheusersmanual.
NOTE: Wokinjectorsareinthetubesleadingtotheburner.
FittheTestPointAdaptoratthegasinlet.4.
After fully leak testing and working on each burner in turn, light each burner and then adjust5.
theminimumameviatheadjustmentscrewinthegascock.Withthegascocksetinthe
lowameposition,turntheadjustmentscrewclockwisetoreducetheowtotherequired
level.Twoburnersshouldbeoperatingonfullwhileadjustingeachburner.
Replacethehobusingallspacerrings.6.
Replacealltheburnerpartsensuringthattheyarecorrectlykeyedtothematingpart.7.
Replacethecontrolknobs,pansupportpinsandpansupports.8.
15
Thegasvalvesmayrequireperiodiclubricationdependingontheirfrequencyofuse.To
lubricate the valves:
Turnoffthegasandelectricitysupplytotheappliance.1.
Removethepansupports,controlknobsandburnerassemblies.2.
Disassemblethepansupportlocatingpinsandthenremovethehob.3.
Dismantlethevalvebodybyremovingthescrewsretainingthecontrolshaftassembly(refer4.
todiagramifnecessary).
Removeandcleantheconewithaclothandsuitabledilutant.5.
EnsuretheconeiscleananddryandslightlygreasetheoutsidewithRagosineMolyLMor6.
approvedalternativegraphitelubricant.
Replacethecone,rotateitandremoveit.Wipeoffanyexcessgreaseensuringthatthegas7.
holesareclear.
Replacetheconeandre-assemblethevalvebody.Re-assemblethehobandother8.
components.
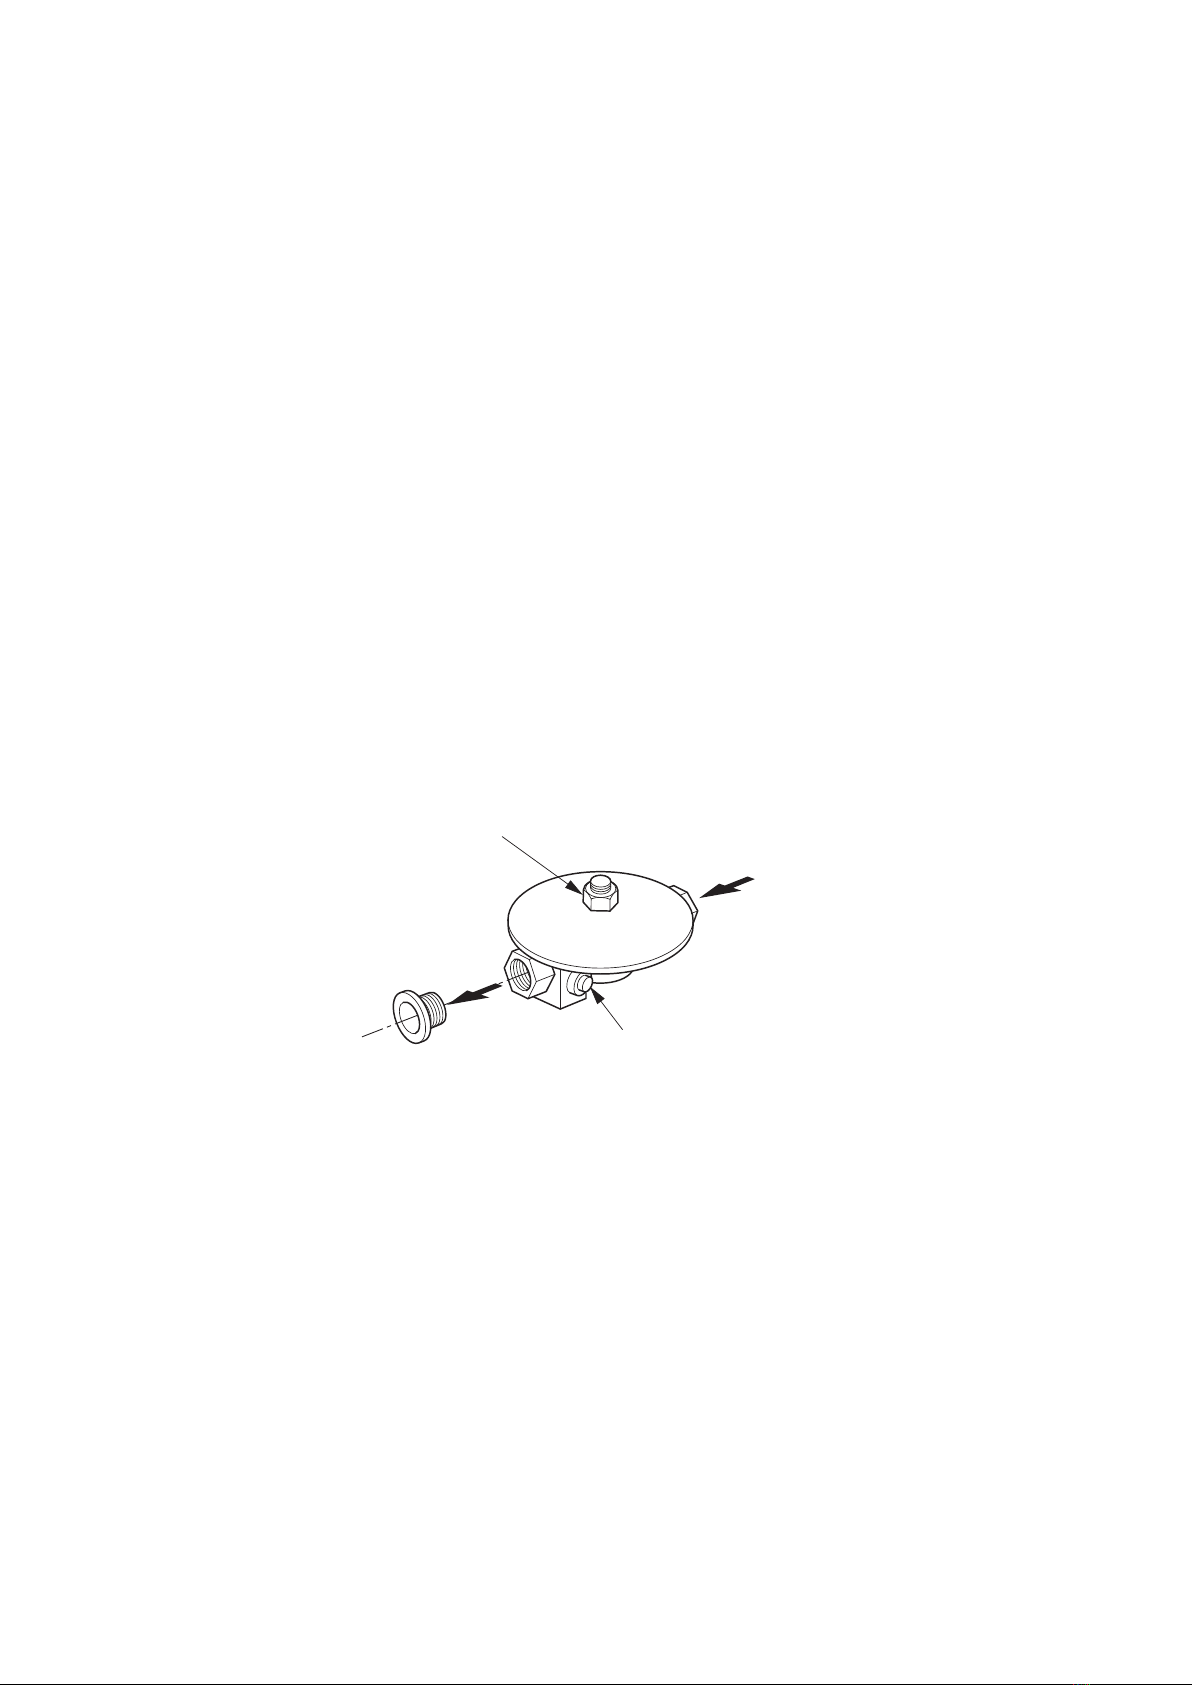
Pressure adjustment
screw
Pressure test
point
Servicing And Minor Adjustments (Continued)
Lubricating Gas Valves

16
Recipes
1.5kgclams
1 cup white wine
5 small ripe tomatoes, cut into large dice
½smallchilli,seededandnelysliced
1largeclovegarlic,nelychopped
2 tbsp extra virgin olive oil
¼ cup chopped parsley
salt and freshly ground pepper
375g spaghetti
Washtheclamsthoroughlyinseveralchangesofwater.Discardanythatdonotshutwhen
tapped.Soakthemincoldwaterfor1hour,thendrainthemtoremovethesand,rinsingthem
thoroughlyagain.
Heatthewineinalargesaucepan.Addone-thirdoftheclams,coverandcookuntilallare
open.Makesureyoushakethepantomixtheclamsseveraltimesduringcooking.Repeatwith
remainingclamsin2morelots.Whencoolenoughtohandle,removetheclamsfromtheshells,
leavingjustahandfulintactforthegarnish.Discardtheshells,reservingtheesh.
Meanwhile,combinethetomatoes,chilliandgarlicinabowlwiththeoliveoil.Addtheclams
andseasonwellwithsaltandpepper.Stirintheparsley.
Boilthespaghettiinalargesaucepanofboiling,saltedwateruntildonetothebite,aldente.
Drainthoroughly,returntothesaucepanandtosswiththeclamsauceoveramoderateheat,
untilheatedthrough.
Serves4–6.
Spaghetti With Clams
The recipes on these pages are provided to help you enjoy your cooktop.
All recipes are © The Margaret Fulton Cookbook.

17
Recipes
500g split peas
2 rashers bacon, diced
2 onions, sliced
2.5litres(10cups)water
½tspfreshlygroundblackpepper
1 sprig fresh thyme
1 bay leaf
1 ham bone
2 carrots, diced
1 cup sliced celery
2 tsp salt or to taste
2 tbsp lemon juice
croutons(optional)
Coverthepeaswithcoldwaterandsoakovernight.
Inalargesaucepan,sautéthebacon,thenaddtheonionsandsautéuntiltheyaregolden.
Addthedrainedpeas,water,pepper,thymeandbayleaf.Addthehambone.Bringslowlyto
theboil,reducetheheatandsimmer,half-covered,for1hour.Addthecarrotandceleryand
continuetocookforanotherhour.
Removethethymeandbayleafanddiscard.Takeoutthehambone,cutallmeatfromthe
bone,removingexcessfatandanyskin,diceandreturnthemeattothesoup.Addthesaltand
lemonjuicejustbeforeserving.Servewithcroutons,ifliked.
Serves6–8.
NOTE:Slicedfrankfurtsorspicysmokedsausagemaybeheatedinthepeaandhamsoup.Itis
thensuitableasamaincourseforlunch.
Pea And Ham Soup

18
½tspsaffronthreads
5 cups chicken stock
½cupoliveoil
4 half chicken breasts
2 onions, chopped
2 cloves garlic, chopped
1 red capsicum, seeded and cut into strips
2½cupsrice,washedanddrained
2 tomatoes, peeled and cut into eights
1 cup shelled green peas
500g seafood such as scallops, prawns, calamari or mussels
Bringthesaffronandstocktotheboilandsetaside,untilreadytouse.
Heathalftheoilinapaellapanorfryingpan.Sautéthechickenbreastsuntilgolden.Remove
andcuteachoneinto3.Addtheonion,garlicandcapsicumstrips,withmoreoilifnecessary,
andcookgentlyuntilsoft.Removethecapsicumandsetaside.Addthericeandfrygentlyfor
3–4minutes.Addthestock.
Whenbubbling,reducetheheatandstartthedecorationofthepaella.Addthechicken,
capsicum,tomatoesandpeasinapattern,andtheremainingfoodsaround.Ifusingseafood,
additforthelast10minutesofthecookingtime.
Add more stock if necessary, cover with foil, and cook gently until the rice is cooked, for about
20–25minutes.
Serves8.
Paella Valenciana
Recipes

19
Part Numbers
Item No Part No Description Quantity
5669100
Quantity
5667100
1 52243 Trivet Left 1 1
2 52478 Trivet Mid Large 1 -
3 52244 Trivet Right 1 1
4 52479 Wok Ring 1 1
5 Hob 52249 52242
6 52480 Wok Burner GG-503 1 1
7 52482 Medium Burner GG-535A 1 1
8 52481 Large Burner GG-535B 2 1
9 52483 Small Burner GG-535H 1 1
10 52491 Fix Stud 12 8
11 52490 AirEntryInserts 3 2
12 52489 Cooktop Knob 5 4
13 Drop-inBody 52476 52477
14 52492 Burner Bracket - Long 4 3
15 52493 Burner Bracket - Wok 1 1
16 Manifold Pipe 52318 52317
17 52485 LP Burner Valve 4 3
18 52484 Wok Burner Valve 1 1
1
2
3
4
10
9
13
18
15
16
6
8
5
7
12
14
17
11

52596V0.1
This manual suits for next models
1
Table of contents
Other St George Cooktop manuals


Popular Cooktop manuals by other brands

DCS
DCS RGU-484GG installation instructions

KitchenAid
KitchenAid 30" Freestanding Range installation instructions

Frigidaire
Frigidaire FFEC3025UB installation instructions

Frigidaire
Frigidaire FEC36S8HSB Factory parts catalog

Fisher & Paykel
Fisher & Paykel CG301D installation instructions

Klugmann
Klugmann KGWK380TCX instruction manual

Whirlpool
Whirlpool CERAN GJC3034RC04 parts manual

Electrolux
Electrolux Libero Line 601610 Specification sheet

Kenmore
Kenmore 22-41053 Specifications

Electrolux
Electrolux EW36IC60IB - 36" Induction Cooktop Wiring diagram

GE
GE CGP350SETSS installation instructions

Miele
Miele CS 1212 Operating and installation instructions


