ST CUDA SURGICAL ELITE 9000-II User manual

LIT-224 CUDA
®
(English)
LED Headlight System
Operation
EC
(English)
Date of Revision:
ELITE 9000-II
LED Headlight System
Operation
Manual
LLS-9000-
II
ST Technologies
®
6018 Bowdendale Avenue
Jacksonville, FL 32216 USA
Customer Service: 904 208 2290
Toll Free 877 814 2237
EC
|REP RMS UK, Ltd.
28 Trinity Road
Nailsea, Somerset BS48 4NU
United Kingdom
TEL: 01275 858891
Rev. A
Date of Revision:
02/01/18
Page 1 of 35

LIT-224 CUDA
®
Rev. A
(English) Date of Revision: 02/01/18
Page 2 of 35
TABLE OF CONTENTS
1.
INTENDED
USE
2.
GENERAL WARNINGS
3.
ASSEMBLY
4.
MAINTENANCE
5.
CLEANING
6
DESKTOP SMART CHARGER AND CALIBRATOR
7.
REPLACEMENT PARTS
8.
USER SERVICE
9.
WARRANTY AND REPAIR
10.
END OF PRODUCT LIFE
11.
CHA
RT OF MEDICAL DEVICE SYMBOLS USED

LIT-224 CUDA
®
Rev. A
(English) Date of Revision: 02/01/18
Page 3 of 35
1. INTENDED USE
This LEDELITE 9000-II Headlight system is designed to deliver illumination from a high
intensity LED for surgical site illumination.
Congratulations on the purchase of your new LED Headlight system.
The LED Headlight ELITE 9000-II is a battery powered portable headlight with an
adjustable spot and uses encrypted battery technology that requires the use of
approved batteries obtained from the manufacturer or authorized distributors.
Additionally, a low battery alarm is offered in this system and will beep when power is
low. Decreasing the output may extend battery life and therefore the amount of warning
time before power down. This alarm is a convenience and the user should plan for
backup lighting for any application using this system; see General Warnings.
2. GENERAL WARNINGS
Note: You must charge the batteries fully before using the headlight for the first
time.
The user of this product should be thoroughly familiar with theuse and care of
this product.
The user should carefully study the manual before making any attempt to use
this product clinically.
Before each procedure, carefully check the batteries state of charge (Fuel
Gauge) to assure optimal duration for the procedure.
LED High Intensity Light sources using high intensity LEDs that will produce
some heat as well as light. The high output of such LEDs can cause the
headlamp to feel warm to the touch during operation, this is normal.
The battery charger and the battery chargers power supply are not to be used
in the operating room theater or the patient area.
Use care not to point the light directly at the eyes during operation, the brilliant
light can cause severe eye discomfort.
Users are responsible for providing backup lighting systems for your application
when using this device.

LIT-224 CUDA
®
(English)
3. ASSEMBLING THE HEADLIGHT SYSTEM
Before continuing remove the protective lens cap.
Insert a fully charged encrypted battery into the Battery Holster and ensure it is fully seated
down on the connector at the bottom of the battery cavity.
Should a non-
encrypted battery be installed, two beeps will be heard upon insertion
indicating that
an incorrect battery is being used and the unit will not power up. Insert and
encrypted battery and the unit will power up.
To attach the power cable from the LED Module to the Battery Holster, insert the push
quick connector of the LED Module into the receptacle on the lead from the Battery Holster
until it clicks in place as shown here. This connection will not come off
engaged. You can rotate the connectors to find the keyway and then press together and
not damage the pins.
The On/Off switch is also the LED intensity control. Simply rotate the knob clockwise or
counter-
clockwise to produce the desire
The headlight
has an iris to allow adjustment of the beam spot diameter. Rotate the fluted
iris adjustment ring on the headlight clockwise or counterclockwise for the appropriate spot
diameter.
The battery holster is worn on a belt; on th
slips over and secures to a belt. The power cable secures into the cable clips on the side
and rear of the headband.
To remove the LED Module from the Battery Holster, press the small raised button on t
quick disconnect device located between the LED Module and the Battery Holster and pull
straight out without twisting.
(English)
Date of Revision:
3. ASSEMBLING THE HEADLIGHT SYSTEM
Before continuing remove the protective lens cap.
Insert a fully charged encrypted battery into the Battery Holster and ensure it is fully seated
down on the connector at the bottom of the battery cavity.
encrypted battery be installed, two beeps will be heard upon insertion
an incorrect battery is being used and the unit will not power up. Insert and
encrypted battery and the unit will power up.
To attach the power cable from the LED Module to the Battery Holster, insert the push
quick connector of the LED Module into the receptacle on the lead from the Battery Holster
until it clicks in place as shown here. This connection will not come off
when positively
engaged. You can rotate the connectors to find the keyway and then press together and
The On/Off switch is also the LED intensity control. Simply rotate the knob clockwise or
clockwise to produce the desire
d light output.
has an iris to allow adjustment of the beam spot diameter. Rotate the fluted
iris adjustment ring on the headlight clockwise or counterclockwise for the appropriate spot
The battery holster is worn on a belt; on th
e rear side of the holster is a metal belt clip that
slips over and secures to a belt. The power cable secures into the cable clips on the side
To remove the LED Module from the Battery Holster, press the small raised button on t
quick disconnect device located between the LED Module and the Battery Holster and pull
straight out without twisting.
Rev. A
Date of Revision:
02/01/18
Page 4 of 35
Insert a fully charged encrypted battery into the Battery Holster and ensure it is fully seated
encrypted battery be installed, two beeps will be heard upon insertion
an incorrect battery is being used and the unit will not power up. Insert and
To attach the power cable from the LED Module to the Battery Holster, insert the push
-pull
quick connector of the LED Module into the receptacle on the lead from the Battery Holster
when positively
engaged. You can rotate the connectors to find the keyway and then press together and
The On/Off switch is also the LED intensity control. Simply rotate the knob clockwise or
has an iris to allow adjustment of the beam spot diameter. Rotate the fluted
iris adjustment ring on the headlight clockwise or counterclockwise for the appropriate spot
e rear side of the holster is a metal belt clip that
slips over and secures to a belt. The power cable secures into the cable clips on the side
To remove the LED Module from the Battery Holster, press the small raised button on t
he
quick disconnect device located between the LED Module and the Battery Holster and pull

LIT-224 CUDA
®
Rev. A
(English) Date of Revision: 02/01/18
Page 5 of 35
Next, place the headband on your head; you can make size adjustments by turning the
knob on the rear of the headband until it feels comfortable. For more comfort you can
adjust the cross band.
Once the headlight module and cable are connected, the unit is ready for use.
The system comes with gown clips to relieve the weight of the cable from the headband.
One gown clip is attached below the shoulder.
Once the battery is depleted into the last shown “block” on the power gauge, the unit may
beep once to indicate low battery levels. The unit may beep twice to indicate further
reductions in power before shut-down.
4. MAINTENANCE
Storing the headlight system in a safe place will prolong the life of the unit.
The following guidelines will help in sustaining the headlight system useful life:
•Keep the optical faces of the LED Headlight lens from touching hard surfaces,
which may cause scratches on the surface. Scratches on the surface will
diminish the light output. Using the lens cap during transport will help protect the
lens.
5. CLEANING
The headlight module can be wiped down with alcohol. The lens should be cleaned only
with lens tissue, available in any camera store; follow the directions on the package.
Follow all applicable bloodborne pathogen procedures as required by OSHA and/or your
hospital, when cleaning and disinfecting the product.
The headband can be cleaned with a alcohol wipe down or washed with a
lukewarm solution of water and mild detergent. Rinse thoroughly.
Do not autoclave the LED Headlight module, headband, cable, battery or
battery holster.
6. DESKTOP SMART CHARGER AND CALIBRATOR
Please refer to the separate battery and charger IFUs for detailed instructions on how to
safely operate these devices.
7. REPLACEMENT PARTS
For replacement parts, additional or optional equipment :
Please call Customer Service @ 877 814 2237

LIT-224 CUDA
®
Rev. A
(English) Date of Revision: 02/01/18
Page 6 of 35
8. USER SERVICE
The LED Headlight has no user or field serviceable components. It can only be serviced
at the factory by factory trained technicians.
9. LIMITED WARRANTY
Your LED Headlight and battery holster carry a three year warranty from the date
ofshipment on workmanship and all defects of material.
Your batteries and charger carry a one year warranty from the date of shipment on
workmanship and all defects of material. Should your product prove to have such
defects ST Technologieswill repair or replace the product or component part without
charge. Please contact ST Technologiesfor return authorization documentation.
You should carefully pack unit in a sturdy carton and ship it to the factory. Please
include a note describing the defects, your name, telephone number and a return
address. Warranty does not cover equipment subject to misuse, accidental damage,
normal wear and tear or if transferred to a new owner without authorization from ST
Technologies. This warranty gives you specific legal rights and you may also have
other rights that vary from state to state.
POST WARRANTY REPAIRS: You may return your product(s) for repair, shipping prepaid
to the factory. Your product will be inspected and an estimate of repair charges will be
submitted to you for approval. Payment must be received before repairs are completed.
•In the U.S call: 877 814-2237 (toll free)
•Customer Service 904 208-2290
10. END OF PRODUCT LIFE
In accordance with the European Waste from Electrical and Electronic Equipment
(WEEE) directive, we encourage our customers to recycle this product whenever
possible. Disposal of this unit must be performed in accordance with the applicable local
environmental regulations.
In the US a list of recyclers in your area can be found at: http:/www.eiae.org/.
Please contact customer service to issue a return authorization to return product to
manufacturer at the end of product life.

LIT-224 CUDA
®
Rev. A
(English) Date of Revision: 02/01/18
Page 7 of 35
11. CHART OF MEDICAL DEVICE SYMBOLS USED
Chart of medical device symbols used
CE mark
Manufacturer
“Authorized Representative in the
European Community.”
Caution, consult accompanying
documents
Do not dispose of in ordinary
municipal waste, Recycle.

LIT-224 CUDA
®
(Français)
Système de lampe frontale chirurgicale
Headlight à LED
EC
Date de revision:
ELITE 9000-II
Système de lampe frontale chirurgicale
Headlight à LED
Guide de l’utilisateur
LLS-9000- II
ST Technologies
®
6018 Bowdendale Avenue
Jacksonville, FL 32216 USA
S.A.V. : +1 904 208 2290
Numéro vert (États-Unis) + 1 877 814 2237
EC
|REP RMS UK, Ltd.
28 Trinity Road
Nailsea, Somerset BS48 4NU
Royaume-Uni
TÉL. : +44 (0)1275 858891
Rev. A
Date de revision:
02/01/18
Page 8 de 35
Système de lampe frontale chirurgicale
Guide de l’utilisateur

LIT-224 CUDA
®
Rev. A
(Français) Date de revision:02/01/18
Page 9 de 35
TABLE DES MATIÈRES
1.
UTILISATION PRÉVUE
2.
INSTRUCTIONS GÉNÉRALES DE SÉCURITÉ
3.
MONTAGE
4.
ENTRETIEN
5.
NETTOYAGE
6
CHARGEUR DE BUREAU INTELLIGENT ET CALIBREUR
7.
PIÈCES DE RECHANGE
8.
SERVICE À LA CLIENTÈLE
9.
GARANTIE ET RÉPARATIONS
10.
FIN DE VIE DU PRODUIT
11.
TABLEAU DES SYMBOLES DES ÉQUIPEMENTS MÉDICAUX
UTILISÉS

LIT-224 CUDA
®
Rev. A
(Français) Date de revision:02/01/18
Page 10 de 35
1. UTILISATION PRÉVUE
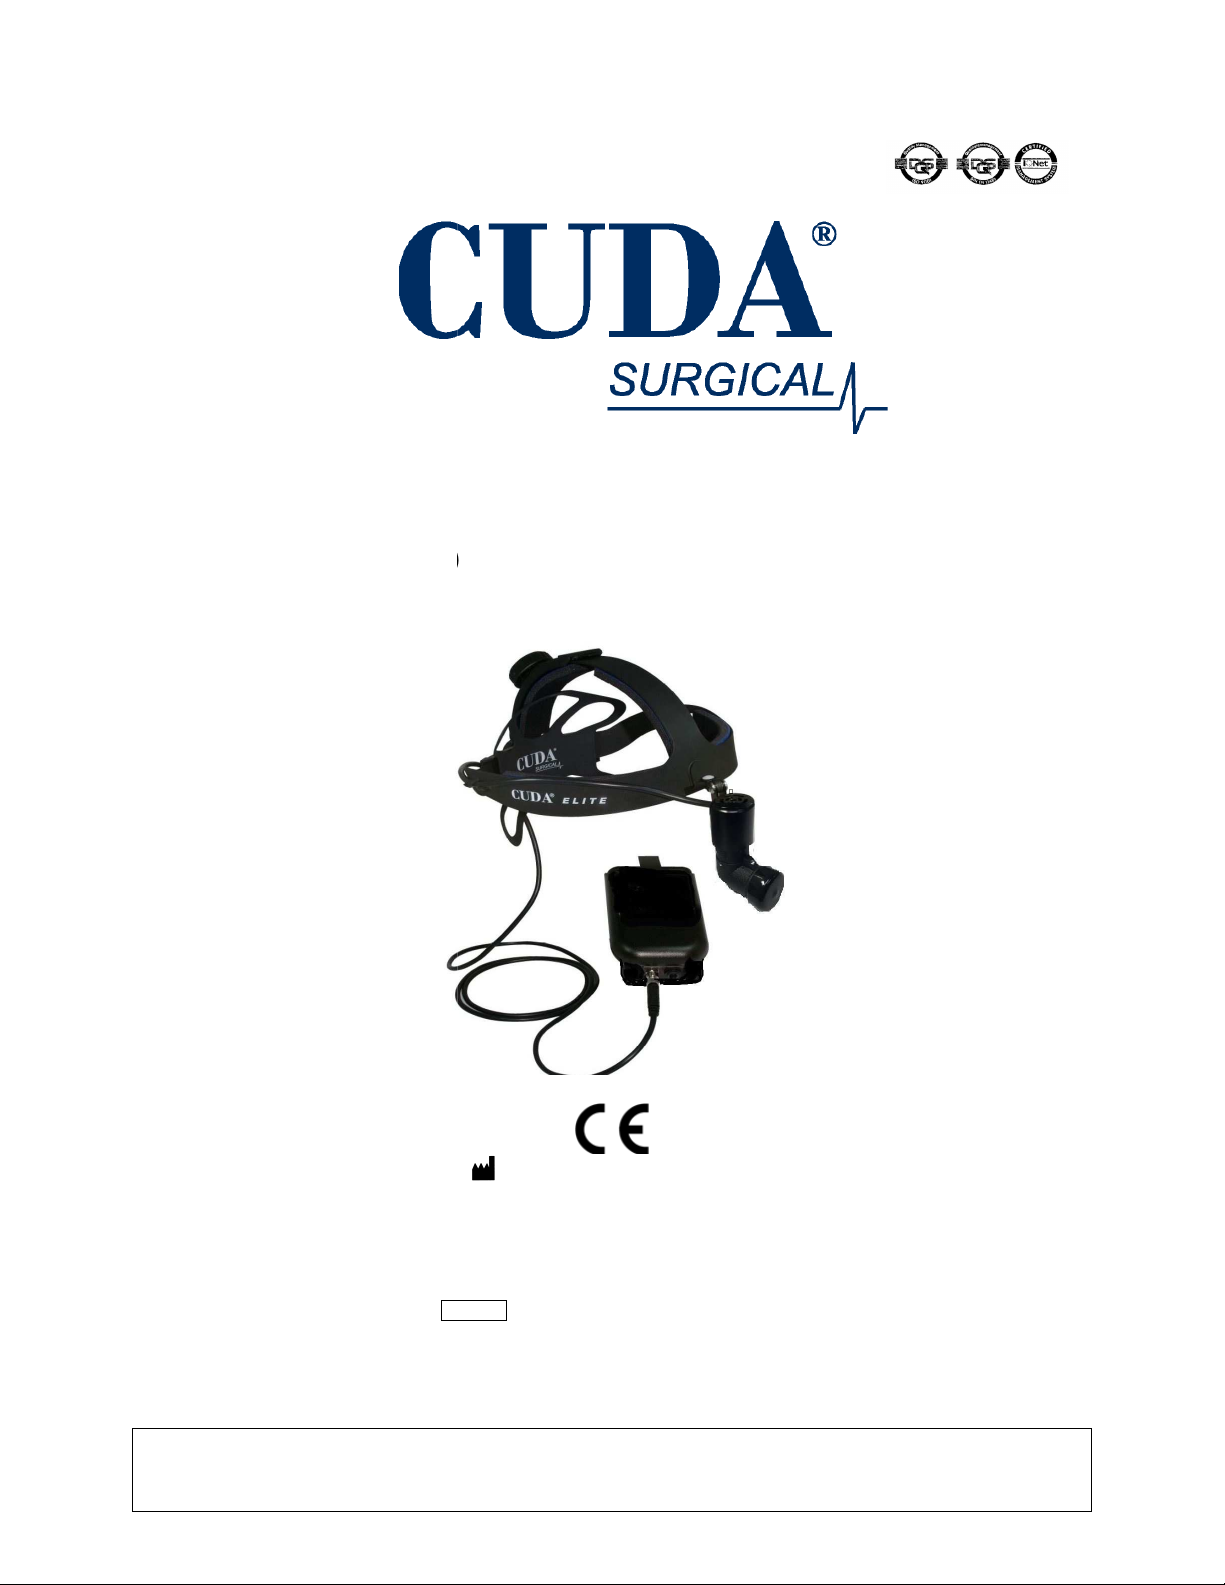
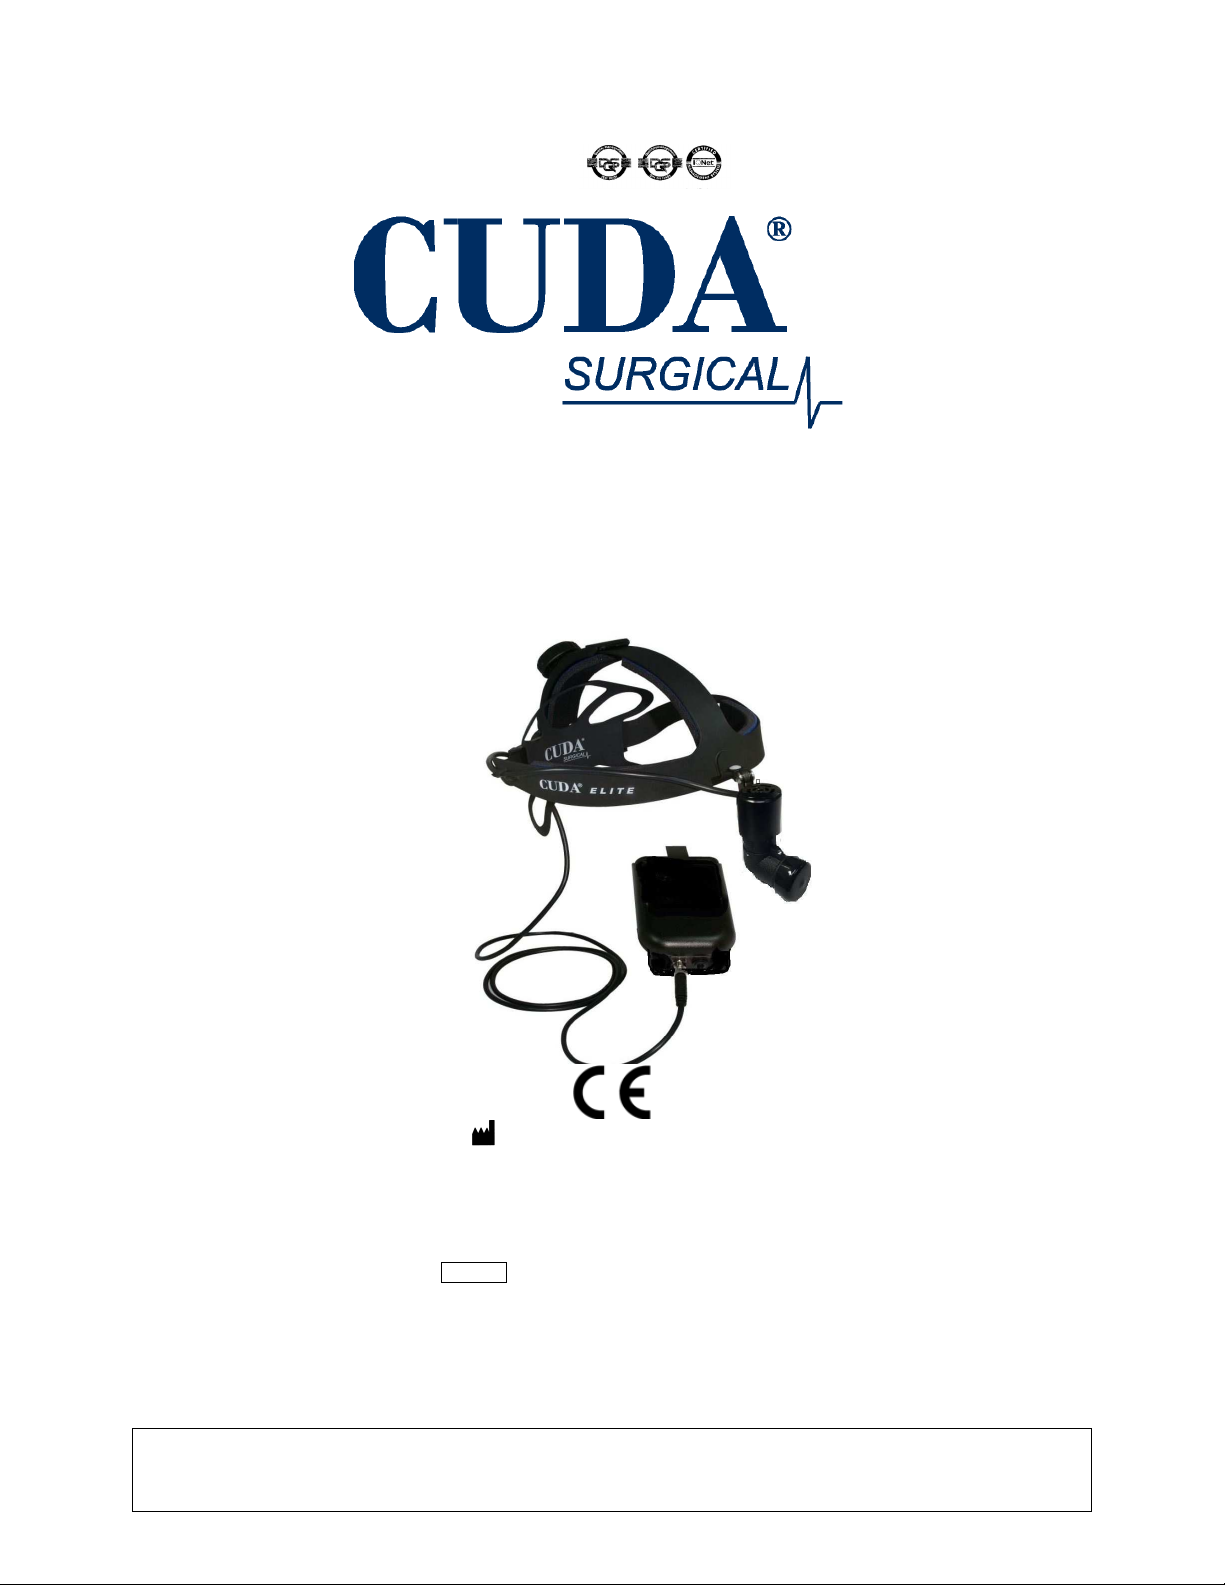
Ce système de lampe frontale chirurgicale Headlight ELITE 9000-IIà LED est conçu
pour fournir la lumière d’une DEL à haute intensité pour éclairer un site chirurgical.
Félicitations pour l’achat de votre nouveau système Headlight à LED.
Le Headlight ELITE 9000-II à LED est une lampe frontale portable à batterie avec point
réglable qui utilise une technologie de batterie cryptée nécessitant l’utilisation de
batteries approuvées auprès du fabricant ou des revendeurs agréés.
De plus, ce système est équipé d’une alarme de faible niveau de batterie qui retentit
lorsque le niveau d’énergie est faible. Diminuer la sortie peut prolonger la durée de vie
de la batterie et, par conséquent, le délai d'avertissement avant la mise hors tension.
Cette alarme est pratique et l’utilisateur doit prévoir un éclairage de secours pour toute
application utilisant ce système ; reportez-vous au chapitre Instructions générales de
sécurité.
2. INSTRUCTIONS GÉNÉRALES DE SÉCURITÉ
Remarque :
Vous devez charger complètement les batteries avant d’utiliser la lampe
frontale pour la première fois.
L’utilisateur doit être familiarisé au mieux avec l’emploi et l’entretien du dispositif
à lampe frontale.
Veuillez lire ce mode d’emploi attentivement et intégralement avant d’utiliser cet
appareil à des fins cliniques.
Avant chaque intervention, vérifiez soigneusement l’état de charge des batteries
(indicateur du niveau de charge) pour garantir la durée optimale de l’intervention.
Sources lumineuses LED à haute intensité utilisant des LED à haute intensité qui
produisent un peu de chaleur et de la lumière. La haute intensité de ces LED
peut provoquer une sensation de chaleur au toucher de la lampe, ce qui est
normal.
Le chargeur de batterie et l’alimentation du chargeur ne doivent pas être utilisés
au bloc opératoire ou sur des zones de contact avec les patients.
Veillez à ce que la lampe ne brille pas directement dans les yeux de qui que ce
soit au cours de l’opération : la lumière brillante peut provoquer une forte irritation
des yeux.
Les utilisateurs sont responsables de fournir des systèmes d’appoint pour
l’application lorsque vous utilisez cette lampe.

LIT-224 CUDA
®
(Français)
3. MONTAGE DU DISPOSITIF À LAMPE FRONTALE
Avant de continuer, retirez le capuchon de protection de la lentille.
Insérez une batterie cryptée complètement chargée dans le boîtier et assurez
est bien insérée dans le raccord au fond de la cavité de la batterie.
Si une batterie non cryptée est utilisée, deux tonalités seront émises lors de l’insertion
indi
quant l’utilisation d’une batterie incorrecte et l’unité ne fonctionnera pas. Insérez une
batterie cryptée et l’unité fonctionnera.
Pour raccorder le câble d’alimentation du module à LED au porte
raccord rapide « pousser-
tirer
jusqu’à ce qu’il clique en position comme montré ici. Ce branchement ne se déconnecte
pas quand il est bien raccordé. Vous pouvez tourner les raccords pour trouver la rainure
puis appuyer et ne pas endommager
L’interrupteur Marche/Arrêt est aussi le contrôleur d’intensité de la LED. Tournez
simplement la molette vers la droite ou vers la gauche pour produire l’intensité lumineuse
dont vous avez besoin.
La lampe frontale est pourvue d’un iris afin de permettre le réglage du diamètre du point de
focalisation. Tournez vers la droite ou vers la gauche la bague de réglage cannelée de l’iris
de la lampe frontale pour obtenir le diamètre de point approprié.
L
e boîtier se porte sur une ceinture
métallique qui s’attache à une ceinture.Le câble d’alimentation se loge dans les serre
câbles sur le côté et à l’arrière du support de tête
Pour retirer le module LED du
dispositif de débranchement rapide entre le module LED et le boîtier et en tirant dessus
sans tourner.
Date de revision:
3. MONTAGE DU DISPOSITIF À LAMPE FRONTALE
Avant de continuer, retirez le capuchon de protection de la lentille.
Insérez une batterie cryptée complètement chargée dans le boîtier et assurez
est bien insérée dans le raccord au fond de la cavité de la batterie.
Si une batterie non cryptée est utilisée, deux tonalités seront émises lors de l’insertion
quant l’utilisation d’une batterie incorrecte et l’unité ne fonctionnera pas. Insérez une
batterie cryptée et l’unité fonctionnera.
Pour raccorder le câble d’alimentation du module à LED au porte
-
batterie, insérez le
tirer
» du mo
dule à LED dans le raccord du câble du boîtier
jusqu’à ce qu’il clique en position comme montré ici. Ce branchement ne se déconnecte
pas quand il est bien raccordé. Vous pouvez tourner les raccords pour trouver la rainure
puis appuyer et ne pas endommager
les goupilles.
L’interrupteur Marche/Arrêt est aussi le contrôleur d’intensité de la LED. Tournez
simplement la molette vers la droite ou vers la gauche pour produire l’intensité lumineuse
La lampe frontale est pourvue d’un iris afin de permettre le réglage du diamètre du point de
focalisation. Tournez vers la droite ou vers la gauche la bague de réglage cannelée de l’iris
de la lampe frontale pour obtenir le diamètre de point approprié.
e boîtier se porte sur une ceinture
; à l’arrière du boîtier se trouve un mousqueton
métallique qui s’attache à une ceinture.Le câble d’alimentation se loge dans les serre
câbles sur le côté et à l’arrière du support de tête
Pour retirer le module LED du
boîtier, appuyez sur le petit bouton saillant situé sur le
dispositif de débranchement rapide entre le module LED et le boîtier et en tirant dessus
Rev. A
Date de revision:
02/01/18
Page 11 de 35
Insérez une batterie cryptée complètement chargée dans le boîtier et assurez
-vous qu’elle
Si une batterie non cryptée est utilisée, deux tonalités seront émises lors de l’insertion
quant l’utilisation d’une batterie incorrecte et l’unité ne fonctionnera pas. Insérez une
batterie, insérez le
dule à LED dans le raccord du câble du boîtier
jusqu’à ce qu’il clique en position comme montré ici. Ce branchement ne se déconnecte
pas quand il est bien raccordé. Vous pouvez tourner les raccords pour trouver la rainure
L’interrupteur Marche/Arrêt est aussi le contrôleur d’intensité de la LED. Tournez
simplement la molette vers la droite ou vers la gauche pour produire l’intensité lumineuse
La lampe frontale est pourvue d’un iris afin de permettre le réglage du diamètre du point de
focalisation. Tournez vers la droite ou vers la gauche la bague de réglage cannelée de l’iris
; à l’arrière du boîtier se trouve un mousqueton
métallique qui s’attache à une ceinture.Le câble d’alimentation se loge dans les serre
-
boîtier, appuyez sur le petit bouton saillant situé sur le
dispositif de débranchement rapide entre le module LED et le boîtier et en tirant dessus

LIT-224 CUDA
®
Rev. A
(Français) Date de revision:02/01/18
Page 12 de 35
Mettez maintenant le support de tête sur votre tête et adaptez-le à votre tête en tournant le
bouton situé à l’arrière jusqu’à ce qu’il tienne confortablement en place. Pour davantage de
confort encore, vous pouvez adapter également la bande transversale.
Quand le module de la lampe frontale et le câble sont raccordés, le module est prêt à
l’emploi.
Le système comprend en outre des clips de fixation pour les vêtements qui empêchent
l’ensemble du poids du câble de porter sur le support de tête. Un clip de fixation se trouve
en dessous de l’épaule.
Une fois la cellule vidée jusqu’au dernier segment visible sur l’indicateur de niveau de
charge, le module peut sonner une fois pour indiquer le faible niveau de charge de la
batterie. Le module peut sonner deux fois pour indiquer une baisse supplémentaire de
charge avant de s’éteindre.
4. ENTRETIEN
Veuillez conserver le dispositif à lampe frontale en lieu sûr pour en garantir la longévité.
Veuillez tenir compte des instructions suivantes afin que votre lampe frontale puisse
fonctionner correctement aussi longtemps que possible :
•Éloignez les surfaces optiques de la lentille du système Headlight à LED de tout
contact avec des surfaces dures. Ceci pourrait en rayer la surface, et de telles
rayures influent négativement sur l’éclairage. Remettez le capuchon pour
protéger la lentille lors du transport.
5. NETTOYAGE
Le module de lampe frontale peut être nettoyé à l’alcool. La lentille ne doit être nettoyée
qu’avec un chiffon en microfibre disponible dans n’importe quel magasin spécialisé dans la
photographie. Suivez le mode d’emploi du chiffon de nettoyage.
Pour le nettoyage, la désinfection et la stérilisation, suivez la procédure standard prescrite
par l’OSHA ou votre hôpital afin d’éviter les infections transmissibles par le sang.
Nettoyez le support de tête avec un chiffon de nettoyage imbibé d’alcool ou une lessive
tiède constituée d’eau et d’un savon doux. Bien rincer.
Le module Headlight à LED, le serre-tête, le câble ou le boîtier ne doivent
pas être stérilisés à haute pression.
6. CHARGEUR DE BUREAU INTELLIGENT ET CALIBREUR
Veuillez vous reporter aux instructions d'utilisation de la batterie et du chargeur pour
obtenir des instructions détaillées sur la manière d'utiliser ces appareils en toute
sécurité.
7. PIÈCES DE RECHANGE
Pour des pièces de rechange ou des accessoires en option ou supplémentaires :
Veuillez appeler le S.A.V. au +1 877 814 2237

LIT-224 CUDA
®
Rev. A
(Français) Date de revision:02/01/18
Page 13 de 35
8. SERVICE À LA CLIENTÈLE
Le Headlight à LED ne possède aucune composante réparable sur le terrain ou par
l’utilisateur. Il ne peut être réparé qu’à l’usine par des techniciens spécialement formés.
9. GARANTIE LIMITÉE
Votre Headlight à LED et le boîtier sont livrés avec une garantie de trois ans à partir de
la date d’expédition sur la fabrication et les défauts de matériaux.
Vos batteries et leur chargeur sont livrés avec une garantie de un ansà partir de la date
d’expédition sur la fabrication et les défauts de matériaux. Si votre produit s’avérait avoir
un tel défaut, ST TECHNOLOGIES
®
réparera ou remplacera le produit ou les
composants sans frais. Veuillez contacter ST TECHNOLOGIES
®
pour obtenir la
documentation d’autorisation de retour.
Vous devez emballer l’appareil dans une boîte en carton épais et l’expédier à l’usine.
Veuillez inclure une note décrivant le problème, avec votre nom, votre numéro de
téléphone et une adresse de l’expéditeur. La garantie ne couvre pas l’équipement
soumis à une mauvaise utilisation, des dégâts accidentels, une usure normale ou un
transfert sans autorisation de ST TECHNOLOGIES
®
à un nouveau propriétaire. Cette
garantie vous accorde des droits juridiques spécifiques et vous pouvez disposer d’autres
droits qui varient d’un état à l’autre.
RÉPARATION APRÈS LA PÉRIODE DE GARANTIE : Vous pouvez retourner votre ou vos
produits à fins de réparation, en les expédiant prépayés à l’usine. Votre produit sera
inspecté et une estimation des frais de réparation sera soumise à votre approbation. Le
paiement doit être reçu avant que les réparations ne soient effectuées.
•Téléphone : Numéro vert (États-Unis) + 1 877-814-2237
•S.A.V. : +1 904 208-2290
10. FIN DE VIE DU PRODUIT
Conformément à la Directive européenne en matière de Déchets d’Équipements
Électriques et Électroniques (DEEE), nous encourageons nos clients à recycler ce
produit autant que possible. La mise au rebut de cet appareil doit être faite en conformité
avec les réglementations locales en vigueur en matière de protection de
l’environnement.
Aux États-Unis, une liste des recycleurs de votre région est disponible sur :
http:/www.eiae.org/.
Veuillez contacter le S.A.V. pour recevoir une autorisation de retour du produit au
fabricant à la fin de son cycle de vie.

LIT-224 CUDA
®
Rev. A
(Français) Date de revision:02/01/18
Page 14 de 35
11. TABLEAU DES SYMBOLES DES ÉQUIPEMENTS MÉDICAUX UTILISÉS
Tableau des symboles des équipements médicaux utilisés
marque CE
Fabricant
« Représentant autorisé dans la communauté
européenne. »
Attention. Consulter les documents d’accompagnement
Ne pas jeter dans une poubelle municipale ordinaire.
Recycler.

LIT-224 CUDA
®
(Deutsch)
LED Kopfleuchten
Bedienungsanleitung
EC|REP
Datum der Revision:
ELITE 9000-II
LED Kopfleuchten
-System
Bedienungsanleitung
LLS-9000-II
ST Technologies®
6018 Bowdendale Avenue
Jacksonville, FL 32216 USA
Kundendienst: 904 208 2290
Gebührenfrei: 877 814 2237
EC|REP
RMS UK, Ltd
.
28 Trinity Road
Nailsea, Somerset BS48 4NU
Vereinigtes Königreich
TEL: 01275 858891
Rev. A
Datum der Revision:
02/01/18
Seite 15 von35

LIT-224 CUDA
®
Rev. A
(Deutsch) Datum der Revision:02/01/18
Seite 16 von35
INHALTSVERZEICHNIS
1.
VERWENDUNGSZWECK
2.
ALLGEMEINE WARNHINWEISE
3.
MONTAGE
4.
WARTUNG
5.
REINIGUNG
6
DESKTOP SMART
-
LADEGERÄT UND KALIBRATOR
7.
ERSATZTEILE
8.
BENUTZERSERVICE
9.
GARANTIE UND REPARATUR
10.
PRODUKTLEBENSDAUER
11.
TABELLE DER SYMBOLE DES MEDIZINISCHEN GERÄTS

LIT-224 CUDA
®
Rev. A
(Deutsch) Datum der Revision:02/01/18
Seite 17 von35
1. VERWENDUNGSZWECK
Dieses LED ELITE 9000-II Kopfleuchtensystem wurde entwickelt, um
Operationsstellen mit hochintensivem LED-Licht zu erhellen.
Wir beglückwünschen Sie zum Kauf Ihres neuen LED-Kopfleuchtensystems!
Das LED Headlight ELITE 9000-II ist eine akkubetriebene, tragbare Leuchte mit
einstellbarem Scheinwerfer. Wir verwenden eine verschlüsselte Akkutechnologie, die mit
zulässigen Akkus vom Hersteller oder autorisierten Fachhandel betrieben wird.
Außerdem ist das Gerät mit einem Alarmsystem ausgestattet, das bei geringer
Akkuleistung ein akustisches Signal abgibt. Verringert die ausgabe kann die
lebensdauer der batterie zu verlängern und damit die höhe der Hinweiszeit vor
stromversorgung nach unten. Dieser praktische Alarm gibt dem Benutzer Zeit, eine
Reservebeleuchtung für jede Anwendung dieses Systems bereitzustellen. Siehe
allgemeine Warnhinweise.
2. ALLGEMEINE WARNHINWEISE
Hinweis: Sie müssen den Akku zuerst vollständig aufladen, bevor Sie die
Kopfleuchte das erstemal einsetzen.
Der Benutzer sollte mit der Nutzung und Pflege dieses Produkts vertraut sein.
Er sollte die Anleitung genau durchlesen, bevor die Kopfleuchte klinisch
eingesetzt wird.
Prüfen Sie den Ladezustand des Akkus sorgfältig vor jedem Eingriff
(Leistungsmesser), um optimale Leistungsdauer zu gewährleisten.
LED-Hochleistungslichtquellen verwenden lichtstarke LEDs, die Hitze und Licht
erzeugen. Die starke Leistung dieser LEDs kann verursachen, dass der
Scheinwerfer beim Betrieb heiß wird, was normal ist.
Das Ladegerät und Netzteil dürfen nicht im OP oder in der Nähe des Patienten
verwendet werden.
Scheinen Sie das Licht während der Operation niemals direkt in die Augen, da
dies extremes Unbehagen verursachen kann.
Benutzer sind bei der Verwendung dieses Geräts für die Bereitstellung einer
Reservebeleuchtung verantwortlich.

LIT-224 CUDA
®
(Deutsch)
3. KOPFLEUCHTENSYSTEM MONTAGE
Entfernen Sie vor dem Fortfahren die Schutzkappe von der Linse.
Setzen Sie einen vollständig geladenen, verschlüsselten Akku in die Akkutasche ein und
stellen
Sie sicher, dass er fest am Boden in der Akkuaussparung sitzt.
Sollten Sie einen unverschlüsselten Akku installieren, werden Sie durch zwei Signaltöne
gewarnt, dass ein falscher Akku verwendet wird. Das Gerät wird nicht geladen. Nur wenn
Sie einen verschl
üsselten Akku einlegen, kann das Gerät geladen werden.
Um das LED-
Modul über das Ladekabel mit der Akkutasche zu verbinden, lassen Sie den
Schnellanschluss des LED
gezeigt. Wenn er richtig eingerast
Anschlüsse drehen, bis Sie die Nut finden, und sie dann zusammendrücken, ohne die Stifte
zu beschädigen.
Der Ein-
/Ausschalter dient auch zur LED
einfach im oder gegen den Uhrzeigersinn, um die gewünschte Helligkeit zu erreichen.
Die Kopfleuchte verfügt über eine Blende, um den Strahldurchmesser einzustellen. Drehen
Sie den geriffelten Blendeneinstellring an der Kopfleuchte
gewünschten Lichtkegeldurchmesser einzustellen.
Die Akkutasche wird an einem Gurt getragen. Auf ihrer Rückseite befindet sich ein
Metallklipp, den man über einen Gurt streifen kann. Das Stromkabel wird an den
Kabelklemmen a
uf der Seite und Rückseite des Kopfbandes befestigt.
Um das LED Modul von der Akkutasche zu entfernen, drücken Sie auf den kleinen,
erhöhten Knopf am Schnellanschluss zwischen dem LED
ziehen sie ohne es zu drehen gerade herau
Datum der Revision:
3. KOPFLEUCHTENSYSTEM MONTAGE
Entfernen Sie vor dem Fortfahren die Schutzkappe von der Linse.
Setzen Sie einen vollständig geladenen, verschlüsselten Akku in die Akkutasche ein und
Sie sicher, dass er fest am Boden in der Akkuaussparung sitzt.
Sollten Sie einen unverschlüsselten Akku installieren, werden Sie durch zwei Signaltöne
gewarnt, dass ein falscher Akku verwendet wird. Das Gerät wird nicht geladen. Nur wenn
üsselten Akku einlegen, kann das Gerät geladen werden.
Modul über das Ladekabel mit der Akkutasche zu verbinden, lassen Sie den
Schnellanschluss des LED
-
Moduls in die Aufnahme an der Tasche einrasten, wie hier
gezeigt. Wenn er richtig eingerast
et ist, löst sich diese Verbindung nicht. Sie können die
Anschlüsse drehen, bis Sie die Nut finden, und sie dann zusammendrücken, ohne die Stifte
/Ausschalter dient auch zur LED
-Leistungssteuerung.
Drehen Sie den Schalter
einfach im oder gegen den Uhrzeigersinn, um die gewünschte Helligkeit zu erreichen.
Die Kopfleuchte verfügt über eine Blende, um den Strahldurchmesser einzustellen. Drehen
Sie den geriffelten Blendeneinstellring an der Kopfleuchte
nach links oder rechts, um den
gewünschten Lichtkegeldurchmesser einzustellen.
Die Akkutasche wird an einem Gurt getragen. Auf ihrer Rückseite befindet sich ein
Metallklipp, den man über einen Gurt streifen kann. Das Stromkabel wird an den
uf der Seite und Rückseite des Kopfbandes befestigt.
Um das LED Modul von der Akkutasche zu entfernen, drücken Sie auf den kleinen,
erhöhten Knopf am Schnellanschluss zwischen dem LED
-
Modul und der Akkutasche, und
ziehen sie ohne es zu drehen gerade herau
s.
Rev. A
Datum der Revision:
02/01/18
Seite 18 von35
Setzen Sie einen vollständig geladenen, verschlüsselten Akku in die Akkutasche ein und
Sollten Sie einen unverschlüsselten Akku installieren, werden Sie durch zwei Signaltöne
gewarnt, dass ein falscher Akku verwendet wird. Das Gerät wird nicht geladen. Nur wenn
Modul über das Ladekabel mit der Akkutasche zu verbinden, lassen Sie den
Moduls in die Aufnahme an der Tasche einrasten, wie hier
et ist, löst sich diese Verbindung nicht. Sie können die
Anschlüsse drehen, bis Sie die Nut finden, und sie dann zusammendrücken, ohne die Stifte
Drehen Sie den Schalter
einfach im oder gegen den Uhrzeigersinn, um die gewünschte Helligkeit zu erreichen.
Die Kopfleuchte verfügt über eine Blende, um den Strahldurchmesser einzustellen. Drehen
nach links oder rechts, um den
Die Akkutasche wird an einem Gurt getragen. Auf ihrer Rückseite befindet sich ein
Metallklipp, den man über einen Gurt streifen kann. Das Stromkabel wird an den
Um das LED Modul von der Akkutasche zu entfernen, drücken Sie auf den kleinen,
Modul und der Akkutasche, und

LIT-224 CUDA
®
Rev. A
(Deutsch) Datum der Revision:02/01/18
Seite 19 von35
Dann setzen Sie das Kopfband auf. Sie können die Größe einstellen, indem Sie den Knopf
hinten am Kopfband drehen, bis es bequem sitzt. Für mehr Komfort lässt sich das
Kreuzband auch verstellen.
Wenn Kopfleuchtenmodul und Kabel verbunden sind, ist die Einheit einsatzbereit.
Das System kommt mit Klipsen, um das Gewicht des Kabels vom Kopfband zu entlasten.
Ein Klipp wird unter der Schulter befestigt.
Wenn der Akku bis auf den letzten “Block” auf der Stromanzeige geleert ist, kann das Gerät
einmal piepsen, um niedrige Akkuleistung anzuzeigen. Hören Sie zwei Töne, dann ist die
Leistung kurz vor dem Abschalten.
1. WARTUNG
Die sichere Lagerung des Kopfleuchtensystems verlängert seine Lebensdauer.
Folgende Richtlinien erhalten die Lebensdauer des Systems:
•Halten Sie die optischen Flächen der LED-Kopfleuchtenlinse von harten
Oberflächen fern, die sie zerkratzen könnten. Kratzer auf der Oberfläche
verringern die Lichtausgabe. Die Linsenkappe schützt die Linse beim Transport.
5. REINIGUNG
Das Kopfleuchtenmodul kann mit Alkhol abgerieben werden. Die Linse sollte nur mit
Linsentüchern gereinigt werden, die Sie in jedem Kamerageschäft kaufen können.
Befolgen Sie die Anleitungen auf der Verpackung.
Befolgen Sie die Verfahren für Erreger im Blut gemäß OSHA und/oder
Krankenhausvorschriften, wenn Sie das Produkt reinigen und desinfizieren.
Das Kopfband kann mit einem Alkoholtupfer abgerieben oder mit lauwarmer
Seifenlösung gewaschen werden. Gründlich abspülen.
LED-Kopfleuchtenmodul, Kopfband, Kabel, Akku und Akkutasche
dürfen nicht autoklaviert werden.
6. DESKTOP-SMART-AUFLADE- UND KALIBRIERGERÄT
Detaillierte Anweisungen zum sicheren Betrieb dieser Geräte finden Sie in den
separaten Batterie- und Ladegerät-IFUs.
7. ERSATZTEILE
Wenn Sie Ersatzteile oder Zusatz- oder optionale Teile benötigen:
Rufen Sie unseren Kundendienst an unter 877 814 2237.
8. BENUTZERSERVICE
Die LED-Kopfleuchte enthält keine Benutzer- oder vor Ort wartbaren Teile. Sie kann nur
im Werk oder von werksgeschulten Technikern repariert werden

LIT-224 CUDA
®
Rev. A
(Deutsch) Datum der Revision:02/01/18
Seite 20 von35
9. BESCHRÄNKTE GARANTIE
Ihre LED Kopfleuchte und Akkutasche verfügen über eine ein JahrGarantie ab
Versanddatum für Verarbeitungsfehler und Materialschäden.
Für den Akku und das Aufladegerät gilt eine einjährige Garantie auf Arbeits- und
Materialmängel, die ab dem Versanddatum gilt. Sollte Ihr Produkt solche Fehler
aufweisen, repariert oder ersetzt ST TECHNOLOGIES
®
Produkt oder Komponente
kostenlos. Bitte kontaktieren Sie ST TECHNOLOGIES
®
, um die Rücksendeberechtigung
zu erhalten.
Sie sollten das Gerät sorgfältig in einen stabilen Karton einpacken und ans Werk
zurücksenden. Bitte legen Sie eine Notiz mit Ihrem Namen, einer Telefonnummer und
Rücksendeadresse bei, auf der der Fehler beschrieben wird. Die Garantie deckte keine
Schäden ab, die durch Missbrauch, Unfall, normale Abnutzung entstehen, und sie
erlischt, wenn das Gerät ohne Genehmigung von ST TECHNOLOGIES
®
an einen neuen
Benutzer übertragen wird. Diese Garantie gewährt Ihnen gewisse Rechte, Sie können
jedoch je nach Gerichtsbezirk noch andere Rechte haben.
REPARATUREN NACH ABLAUF DER GARANTIE: Sie können das Gerät mit Rückporto zur
Reparatur einsenden. Ihr Produkt wird geprüft und Sie erhalten einen Kostenvoranschlag der
Reparaturkosten zur Genehmigung. Die Zahlung muss vor Ausfertigung der Reparatur
eingehen.
•Telefon:gebührenfrei 877-814-2237
•Kundendienst: 904- 208-2290
10. PRODUKTLEBENSDAUER
In Übereinstimmung mit der WEEE-Richtlinie (Richtlinie über Elektro- und Elektronik-
Altgeräte) möchten wir Sie bitten, dieses Produkt sofern möglich zu recyceln. Dieses
Produkt muss gemäß der örtlich geltenden Umweltschutzbestimmungen entsorgt
werden.
In den USA ist eine Liste der Recycler in Ihrer Region verfügbar unter:
http:/www.eiae.org/.
Bitten Sie den Kundendienst um eine Warenrücksendegenehmigung, um das Produkt
am Ende seiner Lebenszeit an den Hersteller zurückzusenden.
This manual suits for next models
1
Table of contents
Languages:
Popular Medical Equipment manuals by other brands

Orthofix
Orthofix External Fixation System Instructions for use

Koba Vision
Koba Vision EasyReader 2012 user manual

Heal Force
Heal Force Prince-100D user manual

Stryker
Stryker nGenius Universal Tracker Instructions for use

ErgoCentric
ErgoCentric Multi Tilt user guide

Nasco Healthcare
Nasco Healthcare LF00980 instruction manual