STA-RITE PoolShark GW7500 User manual

PoolShark®Vacuum
O W N E R’ S M A N U A L
INSTALLATION, OPERATION & PARTS
Sta-Rite Pool/Spa Group
293 Wright Street, Delavan, WI 53115
International: 262-728-5551, FAX: 262-728-7550
www.starite.com
Union City, TN • Delavan, WI • Mississauga, Ont. • Murrieta, CA
©2004, Sta-Rite Industries Printed in U.S.A. S582 (Rev. 8/5/04)

2
PLEASE READ THE FOLLOWING
BEFORE INSTALLING YOUR NEW
AUTOMATIC POOL CLEANER!
About Safety:
This is the safety alert symbol. When you see this
symbol on your system or in this manual, look for one of
the following signal words and be alert to the potential for
personal injury.
warns about hazards that will cause death,
serious personal injury, or major property damage if
ignored.
warns about hazards that can cause death,
serious personal injury, or major property damage if
ignored.
warns about hazards that will or can cause
minor personal injury or property damage if ignored.
Carefully read and follow all safety instructions in this
manual and on equipment. Keep safety labels in good con-
dition; replace if missing or damaged.
ABOUT YOUR POOL
AND FILTER SYSTEM:
Before installing your cleaner, review and under-
stand all warnings and safety information on the inside
front cover of this manual.
Pre-installation check list
Before installing the cleaner in a vinyl liner pool:
Check liner closely for signs of deterioration or damage
from age, chemicals, pool wall damage, etc. If any damage
is found, have a qualified pool professional make all nec-
essary repairs. Also, if there are stones, roots, etc., under
the liner, remove them before installing the cleaner.
Before installing the cleaner in a gunite pool or a pool
that is partially or completely tiled:
Repair loose tiles and tighten any loose light rings.
Before installing the cleaner, clean your filter system:
Make sure you have cleaned the filter, including back-
washing, rinsing, and emptying all baskets. A clean system
is necessary for proper cleaner operation and coverage.
Before installing the cleaner, fill the hose with water:
Always make sure the cleaner head is submerged and the
hose is full of water before connecting the hose to the fil-
tration system (whether through a skimmer or dedicated
wall fitting). Air in the system can damage the pump
through dry running and overheating.
Before installing the cleaner, understand cleaner
coverage:
The cleaner is designed to rid your pool of debris in ap-
proximately 4-6 hours. Less time could be needed, de-
pending on the pool size.
The cleaner was not designed to automatically clean steps
or swimouts or to work under a solar cover. It was also not
designed to do initial cleanup for a new pool or when
opening your pool for the season.
Suction entrapment, injury, and drowning
hazard. If your pool has a dedicated suction port (“vac
port”) for vacuuming or for an automatic pool cleaner, it
must be covered when not in use. A spring loaded safety
cover (a “vac port fitting”) is included with your cleaner.
Install it on the suction port to prevent entrapment and in-
jury. If the cover provided does not fit, purchase one that
does from your local pool store and install it instead. The
cover should conform to IAPMO SPS4-99A.
Hazardous suction.
Can trap and tear
hair or body parts.
Can cause drowning.
Do not play with cleaner
or hose or apply to body.
Do not let children use or
play with pool cleaner.
Stop pump before
attempting to clean unit.
Do not allow swimmers in
pool while pool cleaner is
operating.
Oscillator
may injure hands or fin-
gers. Stop pump before at-
tempting to clean out pool
cleaner head.
Hose can trip
or entangle swimmers.
Do not allow swimmers in
pool while pool cleaner is
operating.

3
CONTENTS:
Safety................................................................................2
Assembly ..........................................................................3
Installation........................................................................3
Initial Adjustments and Operational Checks ....................4
Maintenance ....................................................................6
Troubleshooting................................................................6
About “Fine-tuning” Vacuum
Adjustments and Connections..........................................7
Disassembly .....................................................................8
Repair Parts.....................................................................11
Warranty.........................................................................12
ASSEMBLY
1. Remove the PoolShark®and all of its parts from the box
and check to make sure that all the parts and compo-
nents were included (see Figure 1).
2. Dampen the female end of the short leader hose sec-
tion with water and connect it to the swivel of your
PoolShark.
3. Connect together as many hose sections as are needed
to reach from your selected vacuum source (dedicated
vacuum line or skimmer) to the far side of the pool,
plus one section (see Figure 2). Save any extra sections
for future use as replacements.
4. Attach one end of the hose assembly to the short leader
hose, which is already connected to the PoolShark.
5. Attach one hose weight to the third cuff from the
cleaner head. If your pool depth is over six and one-
half feet it may be necessary to add a second hose
weight to the fifth cuff from the PoolShark.
NOTICE: Clean your filtration system and empty out all
leaf baskets BEFORE you begin installation.
INSTALLATION
The PoolShark is designed to work in a wide variety of
swimming pools. Both standard in-skimmer installations
and dedicated vacuum line installations are covered in this
manual. Check to see which installation most closely fits
your pool configuration and follow those instructions.
Standard Skimmer Installation (See Figure 3)
NOTICE: Do not use the Regulator Valve cover when in-
stalling the PoolShark in a skimmer. The cover can clog
with leaves and debris which may damage the pump.
1. Close the main drain and all suction lines except the
line from the skimmer to which you are connecting the
PoolShark.
2. Turn off the main circulation pump.
3894 0201
ABC
DE
F
G
HJK
A. Pool Cleaner
B. Short Leader Hose (1 Length, 0.36 Meter)
C. Hose (10 Lengths, 1 Meter Each)
D. Hose Weights (2)
E. Eyeball diverters (2)
F. Reducer Cone
G. Hose Connector (male/male)
H. Automatic Regulator Valve #1 (Medium Blue)
H. Automatic Regulator Valve #2 (Pale Blue)
J . Regulator Valve Cover (Protective Basket)
K. Vac Port Fitting
•Short Extension Hose (not illustrated)
Figure 1
Hose must equal longest stretch — — plus one length.
Add one hose weight to the third cuff from the PoolShark
Figure 2: Measure hose against pool length.

4
3. Remove the skimmer basket.
4. Install the reducer cone in the skimmer.
5. Place the PoolShark (with the Hose Assembly attached)
in the pool with the bumper facing downward. Tilt it
from front to back and from side to side to purge all the
air from the inside of the cleaner body.
6. Allow the PoolShark to sink to the pool floor. While
holding the free end of the hose, feed the hose down
into the pool until it is completely filled with water and
purged of air.
7. Attach Regulator Valve #1 (without the Regulator Valve
Cover) to the hose end. Insert Regulator Valve #1 (with
hose attached) into the skimmer throat and push it into
the Reducer Cone.
Dedicated Vacuum Line Installation
(See Figure 4)
1. Close the main drain and all suction lines except the
one to which you are connecting the PoolShark.
2. Turn off the main circulation pump.
3. If necessary, insert the Reducer Cone into the dedi-
cated vacuum line port.
4. Place the PoolShark (with the Hose Asembly attached)
in the pool with the bumper facing downward. Tilt it
from front to back and from side to side to purge all the
air from the inside of the cleaner body.
5. Allow the PoolShark to sink to the pool floor. While
holding the free end of the hose, feed the hose down
into the pool until it is completely filled with water and
purged of air.
6. Attach Regulator Valve #1 (with the Regulator Valve
Cover) to the hose end. Insert Regulator Valve #1 (with
hose attached) into the short extension hose. Insert the
short extension hose into the male-male adapter and
the entire assembly into the dedicated vacuum line
port.
Initial Adjustments and Operational Checks
1. Purge remaining air:
After completing the installation turn the main circula-
tion pump on. Allow it to run for a couple of minutes
to purge any remaining air from the system.
2. Check/Adjust Suction:
1. If you have not already done so, clean the filtration
system (including backwashing, if that is appropri-
ate to your system).
2. If you have not already done so, close the valve
controlling the flow through the main drain in the
floor of the pool.
3. Adjust the pool circulation system valves to provide
a sufficient flow of water to your Skimmer or
Dedicated Vacuum Line (whichever you have de-
cided to use).
4. To determine whether or not you have the suction
correctly adjusted, look at the Regulator Valve and
make sure that the Yellow Band is half covered by
the edge of the sleeve (See Figure 5). Operation
within the Yellow Band indicates the best suction
adjustment for good cleaner performance.
Hose
End
Regulator
Valve
Protective
Cover
Short
Extension
Hose
Male-male
Adapter Vac Port
Fitting
Figure 4: Use Protective Cover to prevent entrapment when the
Regulator Valve is connected to a Dedicated Vacuum Port.
Figure 3: Do not install protective cover when the Regulator
Valve is connected to a Skimmer.
Low or No
Suction
Correct
Suction
Suction too
High
3897 0201
Figure 5: Suction Regulator Sleeve positions.

5
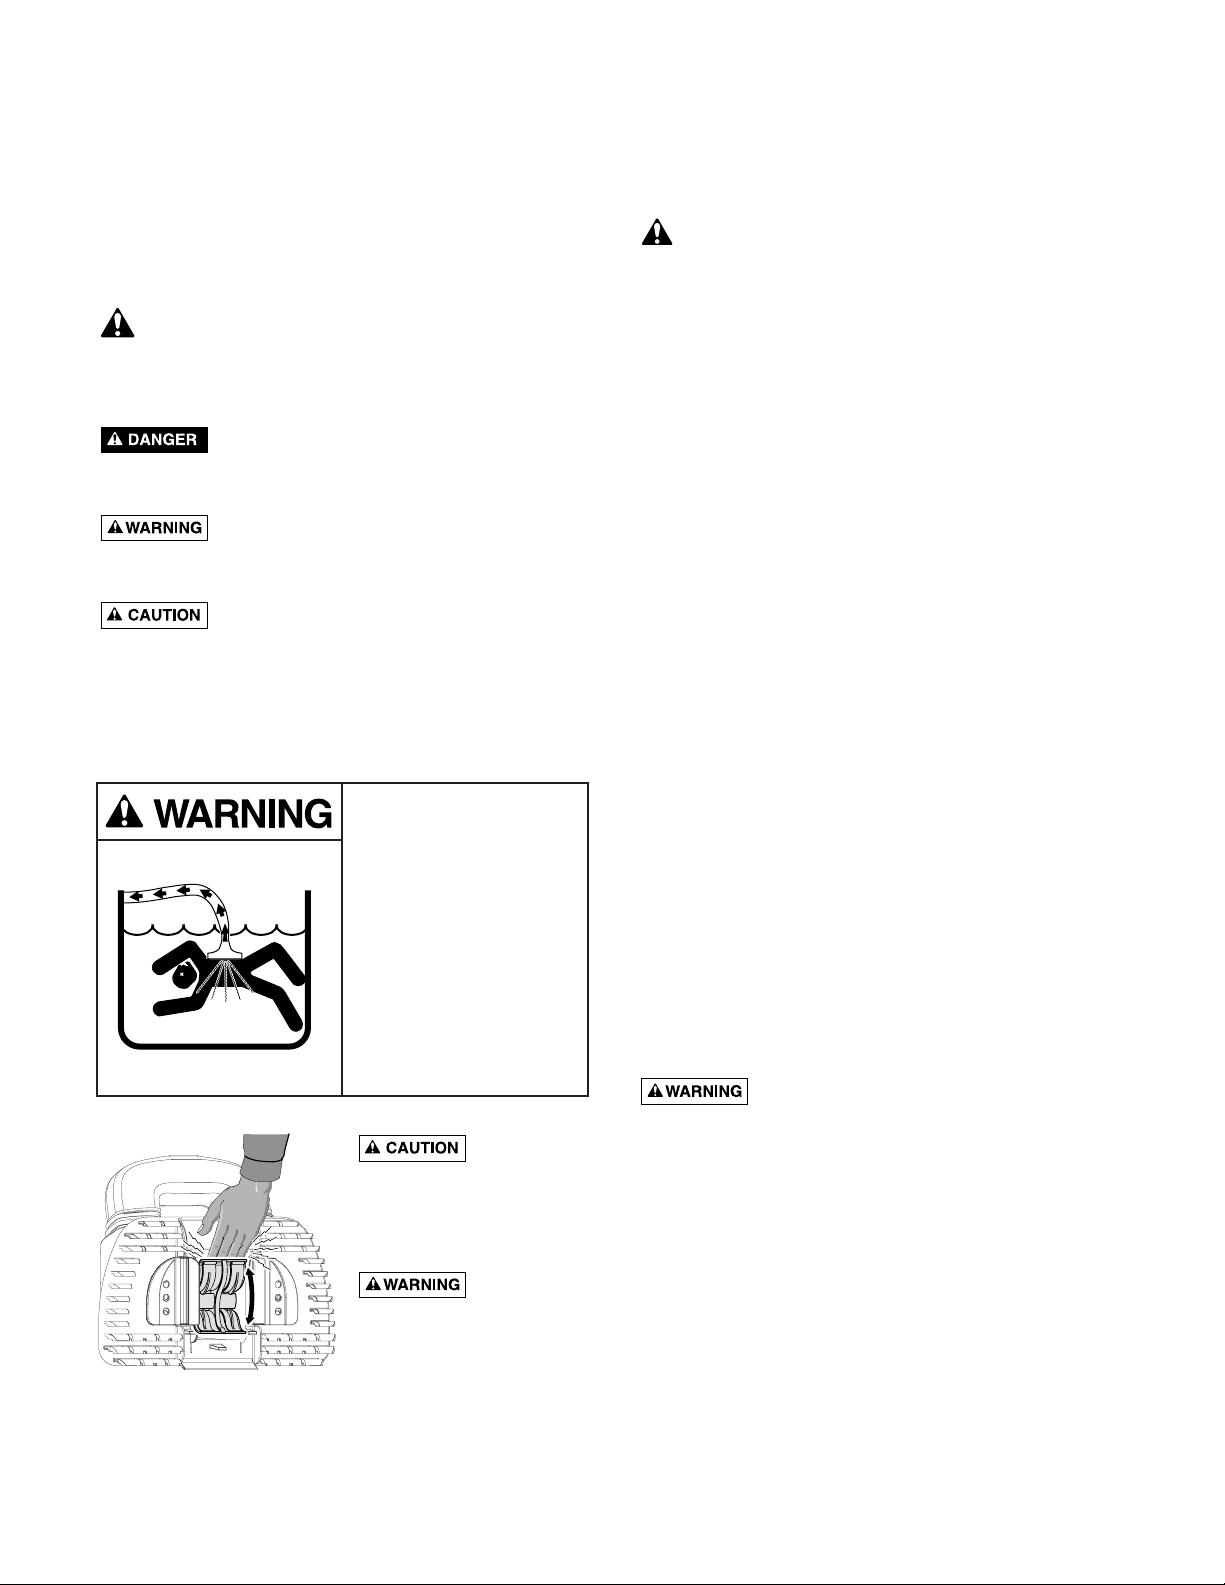
NOTICE: If the skimmer does not allow you to see the
Yellow Band on the Regulator, the following TEMPORARY
procedure will let you check the suction:
A. Turn off the Pump.
B. Detach the Regulator Valve from the skimmer’s suction
inlet.
C. Insert the Regulator Valve in the joint between the last
and the next to the last sections of hose.
D. Reconnect the hose to the skimmer.
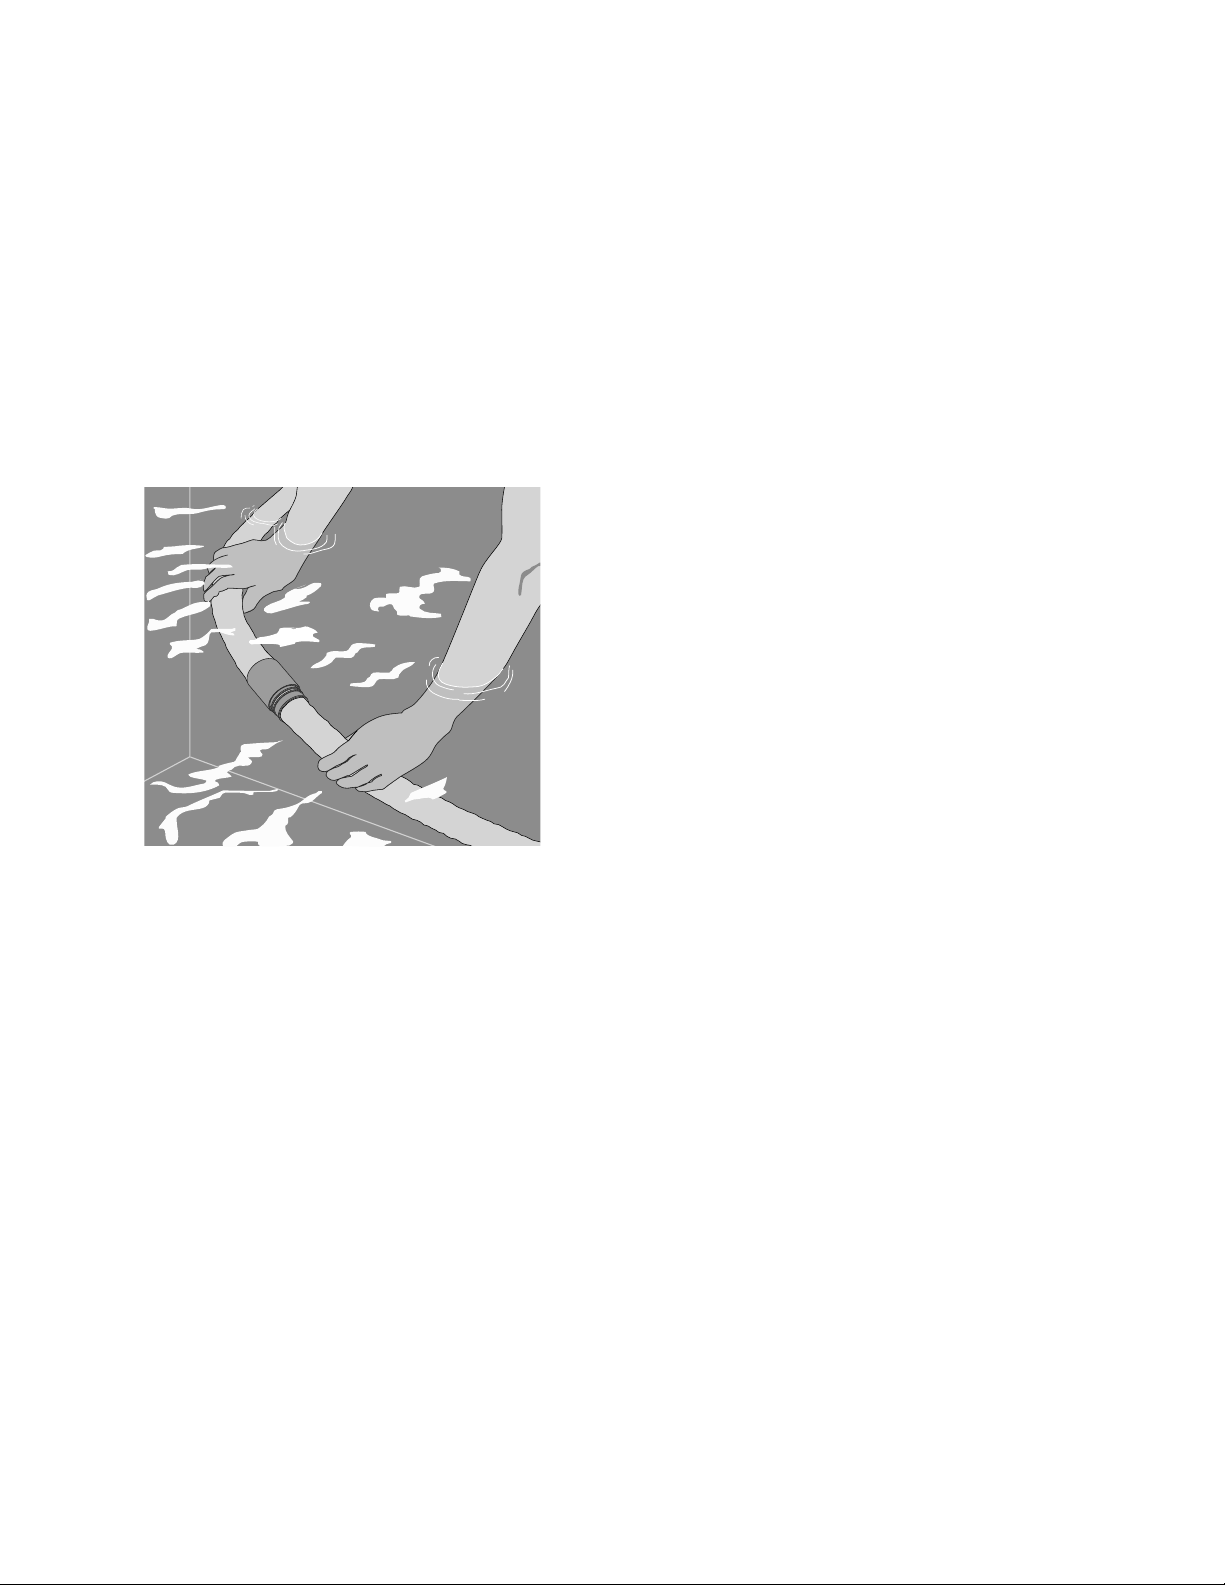
E. While a helper holds the regulator under water (so that
it won’t suck air – see Figure 6), Turn the pump on and
make the valve adjustments described in Steps 2 and 3
(Page 4).
F. When you have finished the valve adjustments, stop
the Pump, reconnect the hoses, and replace the
Regulator in the skimmer.
Do you have enough vacuum on the system for good
operation?
1. If you have not already done so, clean the filtration sys-
tem (including backwashing, if that is appropriate to
your system).
2. If your system is clean and the cleaner still performs
sluggishly, try inserting Regulator Valve #2, which is
designed for use with weaker pumps, longer hose
lengths, or low suction situations.
The installation of Regulator Valve #2 is the same as the
installation of Regulator Valve #1. See “Installation”,
Page 3.
NOTICE: After you have installed Regulator Valve #2, ad-
just the circulation system valves as described in Steps 3
and 4 (Page 4).
Do you have too much vacuum?
You have too much vacuum if the PoolShark sucks air
when it climbs up to the water line. Check to be sure that
you have installed Suction Regulator Valve #1. If not, in-
stall it now. If the PoolShark still climbs out and sucks air,
do the following:
1. If you are connecting the PoolShark to the Skimmer,
slightly open the main drain valve.
2. If you are connecting the PoolShark to the Dedicated
Vacuum Line, slightly open the skimmer intake valve.
3. Check the hose length:
The main circulation pump must be running when you
check the hose length. The hose contracts when the
pump is on and will look longer when the circulation
pump is off or the hose is disconnected from the sys-
tem. Position the PoolShark at the furthest point of the
pool from the skimmer or dedicated suction port. The
hose should be long enough to reach this distance,
with one hose section over.
If your hose is more than one section longer than the
distance to the furthest point of the pool, remove the
extra section(s) from the end of the hose at the vacuum
port or skimmer. Save these extra sections for future use
as replacements.
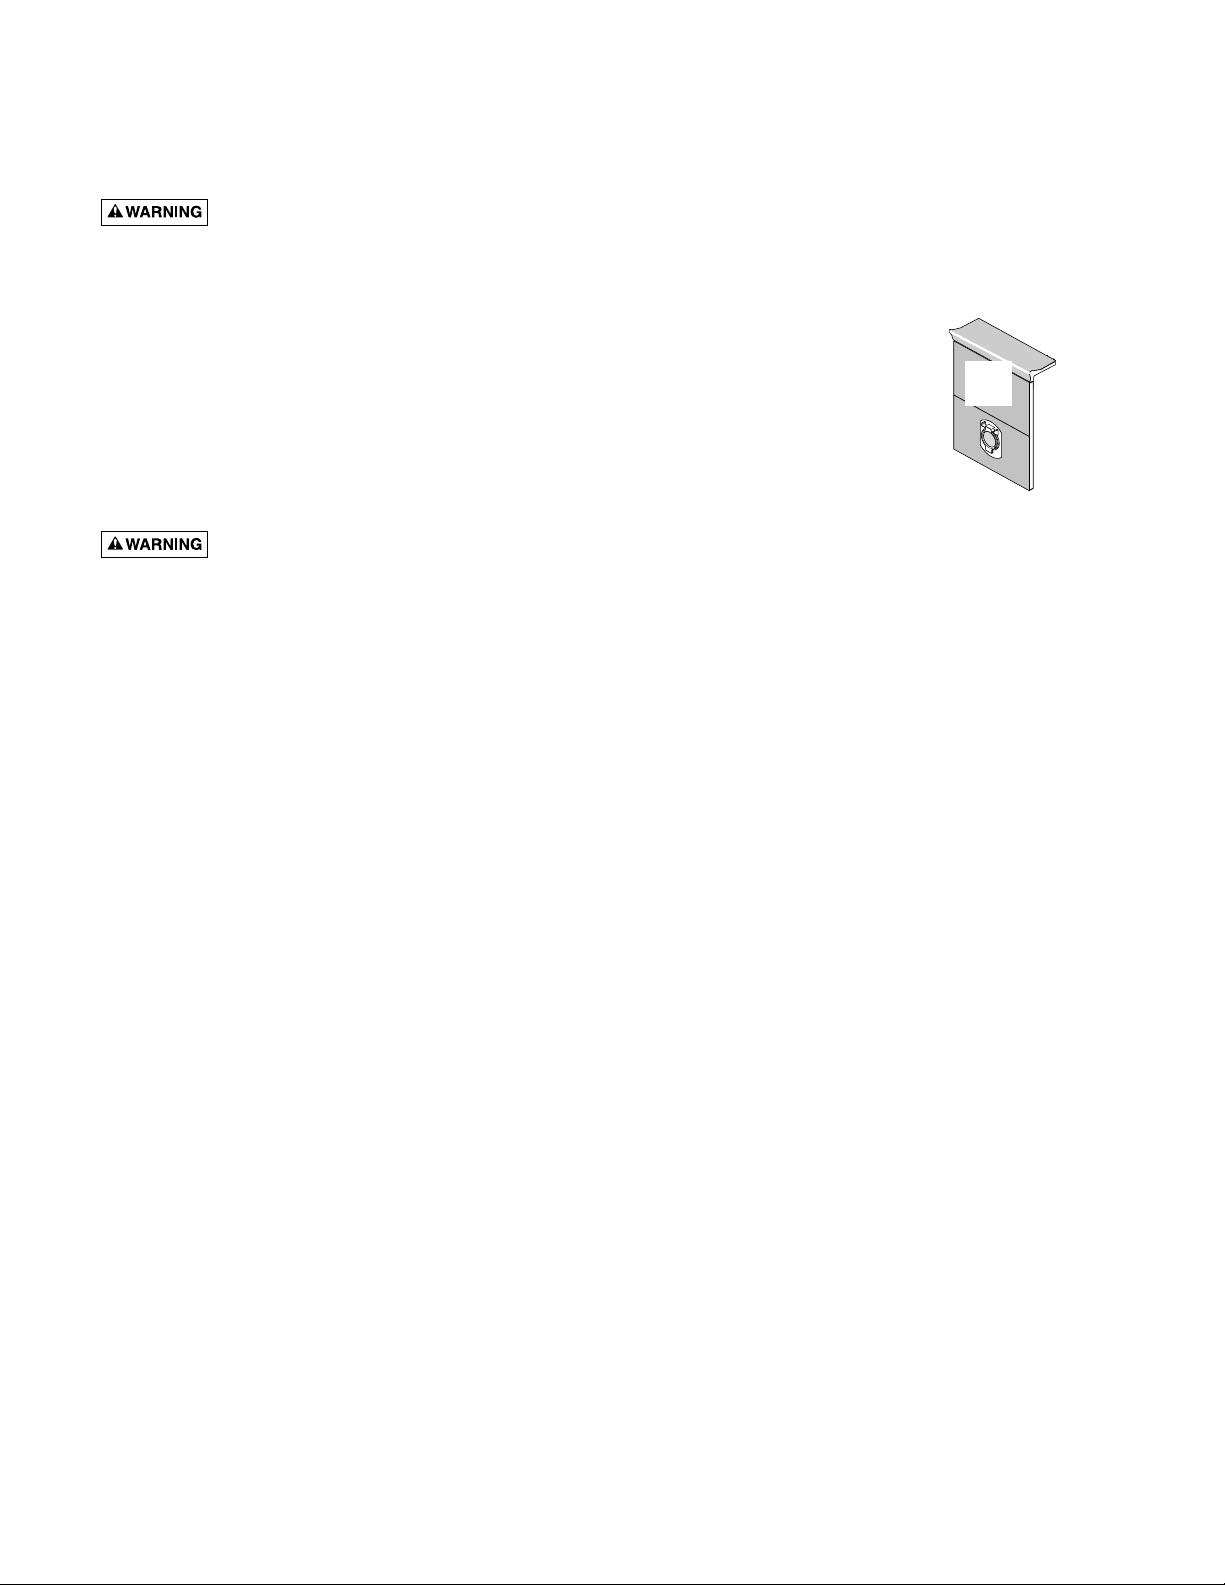
4. To install the eyeball diverter:
The water flow from the return line can push the
PoolShark’s hose, causing the PoolShark to steer away
from the return line or to remain in one area of the
pool. To correct this, adjust your existing return line di-
verters or install the eyeball diverters supplied with the
PoolShark as follows:
A. Turn off the main circulation pump.
B. Unscrew the lock rings from the pool’s return line
fittings and remove the original eyeball diverters.
C. Replace them with the PoolShark’s eyeball diverters.
D. Replace the lock rings and tighten them. Be sure
that the openings of the eyeball diverters point
down or to the side (9:00 O’clock position), before
fully tightening the rings.
Usually, directing the return line water flow against
the side of the pool (as described above) works
best. However, you may want to try pointing the
flow downward or in different positions to see
which works best in the pool.
After installing the eyeball diverter, turn the circula-
tion pump on. The PoolShark should begin moving
across the pool floor, vacuuming up the debris in its
path.
E. If the PoolShark’s eyeball diverters do not fit your
existing return line fittings, adjust your existing fit-
tings as best you can as described above.
Figure 6: Hold regulator under water to observe sleeve
position.

6
MAINTENANCE
Hazardous suction. Suction through the
PoolShark can entrap bathers, causing severe injuries or
drowning. Do not operate the PoolShark cleaner while
people are using the swimming pool. Do not allow any-
one to play with the PoolShark or its hoses.
Your PoolShark can stay in the pool at all times except dur-
ing chemical shock treatments. However, when people are
using the pool, disconnect the PoolShark and pull it to one
side of the pool.
The PoolShark requires almost no maintenance. Manually
open and close the regulator valve from time to time to
flush away accumulated dirt and debris and ensure smooth
operation. Also, from time to time, visually inspect the
PoolShark to be sure that:
•The oscillator moves freely and is not obstructed by
debris.
•The vacuum pad is not excessively worn. When the
traction pads on the bottom have worn down, it’s time
for replacement.
NOTICE: When storing the PoolShark, do not coil the
hose. Instead, lay it out straight and flat in an area pro-
tected from direct sunlight. Use only a genuine PoolShark
hose. The warranty is void if the cleaner is operated with
other than a genuine PoolShark hose.
TROUBLESHOOTING
Common Causes of Cleaner Problems:
•Dirty filter Clean the filter
•Dirty basket in pump Clean the basket
hair and lint strainer
•Debris blocking the Remove the Debris
bottom of the PoolShark
•Leaks in the hose Remove the leaky section
•Debris in the regulator Clean the regulator valve
valve
•Low vacuum through Close the main drain
the cleaner
PoolShark doesn’t move or pulsates slowly:
•Make sure that the main drain and all other suction
lines are closed except the suction line to which the
PoolShark is attached.
•Check for debris in the filter or the pump strainer
basket.
•Check for debris in the PoolShark’s oscillator. Debris
may prevent oscillator movement or restrict the flow
through the cleaner.
•Check the oscillator for: damage; lost seals (there
should be 4 seals): obstructed seals (seals should slide
freely on the oscillator).
•Be sure that the short, soft leader hose section is the
first section in the hose assembly (next to the cleaner).
If the PoolShark tracks in a repetitive pattern:
•Check the pool return line water flow and redirect it as
necessary with a return line eyeball diverter (see No. 4,
“To install the eyeball diverter”, under Initial
Adjustments and Operational Checks, Pages 4 and 5).
•Check the PoolShark’s hose to be sure that it has not
become bent or kinked. Do not coil the hose, as it will
retain the coiled shape and reduce the cleaning cover-
age. To check the hose, lay each hose section flat on
the pool deck (or another flat surface) and look down
the length of the hose. It should be perfectly flat and
straight. Replace any sections which are bent or
kinked.
•Check the oscillator for: damage; lost seals (there
should be 4 seals): obstructed seals (seals should slide
freely on the oscillator).
•Be sure that the short, soft leader hose section is the
first section in the hose assembly (next to the cleaner).
Square Bottom Pools Only:
If the transition radius between your pool’s floor and wall
is small and the PoolShark will not climb the pool walls,
then you have a square bottom pool. If so, remove the
cleaner from the pool and drill two holes in the indenta-
tions in the bumper (see Figure 7). This will provide an out-
let for air which would otherwise accumulate in the
hollow bumper. This air, from microscopic bubbles sus-
pended in the pool water, is normally able to escape when
the PoolShark climbs the pool walls.
3899 0201
Figure 7: Drill Bumper if you have a square-bottom pool.

7
NOTICE: DO NOT drill the holes if your PoolShark CAN
climb the pool walls!
Pool pump suction is hazardous and can
cause entrapment with severe personal injury or drown-
ing. Use vacuum regulator (see instructions below) in pool
cleaner system at all times.
NOTICE: Each pool’s hydraulic system and vacuum con-
nections are different. Be sure you have installed the vac-
uum regulator valve before you “fine-tune” the system.
This not only regulates vacuum, but also acts as a safety
device.
About “Fine-Tuning” Vacuum
Adjustments and Connections
Suction entrapment, injury, and drowning
hazard. If your pool has a dedicated suction port (“vac
port”) for vacuuming or for an automatic pool cleaner, it
must be covered when not in use. Purchase a spring
loaded safety cover from your local pool store and install it
on the suction port to prevent entrapment and injury.
For the “NOVICE POOL OWNER” where vacuuming is a
new experience, please read all of the following points, the
installation instructions, and the trouble shooting guide
carefully. Please note the following:
•“Vacuum” and “suction” are two words meaning the
same thing.
•“Dedicated suction line”, “vac port”, and “vac fitting”
are different terms for a hole in the side wall of pool;
this hole is connected to the pump suction and is dedi-
cated to vacuuming.
•Some pools do not have a vac port. If your pool does
have one, please read the “Suction Entrapment” warn-
ing, above.
For the “SEASONED POOL OWNER”: The automatic pool
cleaner connection and vacuum adjustments can be simi-
lar to using your manual pool vacuum. Please read on.
Valves (pump, skimmer, and main drain) and
vacuum adjustments
You may need to spend some time adjusting the skimmer
and main drain valves in order to obtain the best vacuum
setting for good cleaner operation. Once you have found
the correct valve settings for best operation, we suggest
you mark the valves to ensure repeated success.
In-Line leaf canisters
If your pool is exposed to large quantities of leaves, we
suggest purchasing and installing an in-line leaf canister. A
leaf canister will provide more debris-loading capacity and
also provides a water by-pass when the canister is full. It is
very important that the pump not starve for water!
Dedicated suction
line/vac port/vac
fitting
Some pools have a dedi-
cated wall fitting just for vac-
uuming. If the wall fitting
connection is used, you may
notice that the clear pump
lid shows signs of bubbles or
what appears to be the pres-
ence of air. To eliminate this,
slightly open the main drain valve to supplement the water
intake. The cleaner may slow down a bit when you
change the suction.
Skimmer vac plates
Some pool owners connect the hose to a skimmer vac
plate, which allows the skimmer basket to remain in the
skimmer. If this method is used, empty the basket fre-
quently. Also make sure that the vacuum regulator pro-
vided is completely submerged so that it will not suck air
and damage the pump.
Skimmer vac plate vacuum control adjusters
Some pool owners use one of a variety of manufacturer’s
skimmer vac plates. Some have a vacuum control adjuster,
and some do not. The adjuster could be a screw-type, a
spring loaded apparatus, or a dial design. For those vac
plates with adjusters, it is important to adjust them when
fine tuning the vacuum for the cleaner.
Vac
Port
Figure 8: Typical Dedicated
Vacuum Port.

8
3900 0201
3901 0201
Step 1: With a screwdriver, carefully work the rubber vac-
uum pad down over the lip of the Outer Housing.
Step 2: Lift the Outer Housing straight up off of the chas-
sis. Squeeze the tabs on the Bumper Clips (inside the
housing) to remove the Bumper. The Bumper, Bumper
Boots, and Bumper Clips pull apart.
Step 3: Squeeze and pull the Sprocket Clips to release the
Drive Shaft Assembly and Center Sprocket.
3904 0201
Step 5: Squeeze the latching tabs and pull up on the
Swivel Housing and Swivel. The assembly will come up,
releasing the Swivel Sprocket. Squeeze the latching tabs to
remove the Clutch Clip.
Step 6: Remove the Shaft Plug with the stainless steel shaft
and the Large Steering Drive Assembly.
Step 4: Pull the Oscillator Straight out from the bottom of
the Outer Housing. Be careful not to lose the Sliding Seals.
Disassembly

9
3906 0201
Step 7: Remove the Oscillator Sleeve, releasing the
Oscillator Sleeve Bushing and the Clutch assembly.
3907 0201
Reassembly: To reassemble the PoolShark, reverse the
steps above. NOTE: The notch on the center disk of the
Large Steering Drive Assembly must be down (as shown)
for assembly.
Disassembly (continued)

10
1
2
3
46
7
8
9
10
11
12
13
12
14
14
15
17
19
18
20
10
21
23
24
25
26
27
28
5
16
3908 0201
PoolShark Exploded View

11
Key Part Model Model
No. Description Qty. GW7500 GW7700
•Steering Kit (Incl. Key Nos. 2,3,4) 1 GW7505 GW7515
2Swivel Housing 1
3Swivel 1
4Swivel Sprocket 1
23 Clutch Clip 1
•Clutch Kit (Incl. Key Nos. 5,8,21,23) GW7503 GW7503
5Oscillator Sleeve Bushing 1
8Oscillator Sleeve 1
21 Clutch Assembly 1
•Gear Kit (Incl. Key Nos. 6,10,11,17,19,20) GW7504 GW7504
6Large Steering Drive Assembly 1
10 Shaft Plug 2
11 Long Sprocket Clip 1
17 Drive Shaft Assembly 1
19 Center Sprocket 1
20 Short Sprocket Clip 1
•Oscillator Kit (Incl. Key Nos. 12, 13,14) 1 GW7502 GW7502
12 Small Sliding Seal 2
13 Oscillator 1
14 Large Sliding Seal 2
•Seal Flap Kit (Incl. Key Nos. 15,16) 1 GW7506 GW7506
15 Right Seal Flap 1
16 Left Seal Flap 1
18 Chassis with Pad 1 41201-0242 41201-0242C
•Bumper Kit (Incl. Key Nos. 24,25, 26,27,28) 1 GW7501 GW7511
24 Right Bumper Clip 1
25 Right Bumper Boot 1
26 Bumper 1
27 Left Bumper Boot 1
28 Left Bumper Boot Clip 1
•Accessory Kit 1 77705-0400 77705-0400
Includes: Regulator Valve #1 1
Regulator Valve #2 1
Regulator Valve Cover 1
Hose Connector Male/Male 1
Hose Weight 2
Short Extension Hose 1
Reducer Cone 1
Eyeball Diverter 2
Vac Port Fitting 1
•Short Leader Hose 1 GW9540 GW9540
Parts Not Available Separately:
1Outer Housing 1
7Support Brace 1
9Stainless Steel Axle 1
PoolShark Repair Parts List
• Not Illustrated.

CREATE A RECORD OF YOUR WARRANTY AT STA-RITE:
• Complete a warranty registration at www.staritepool.com by clicking on “Register Products” and selecting Sta-Rite Pool OR
• Complete bottom portion completely and mail within 10 days of installation to Sta-Rite, Attn.: Pool Warranty Dept., 293 Wright St., Delavan , WI 53115
Warranty Registration Card
Name
Address
City State Zip
Installation (or Purchase) Date
Product Purchased
Model Number
■■New installation ■■Replacement
Years pool has been in service ■■less than 1 ■■1-3 ■■3-5 ■■5-10
This product was purchased from:
Company name
Address
City State Zip
STA-RITE LIMITED WARRANTY
For technical information about this product, contact the installer or call Sta-Rite at 262-728-9181.
Visit www.staritepool.com
• for more information about Sta-Rite products listed above
• to locate a Sta-Rite dealer near you
Product Specific Warranties (from date of installation)
Product Limited
Family Warranty Exceptions
Filters 1 Year System 3 Tank Bodies - 10 Yrs
Filter Valves 1 Year
Pumps 1 Year
Heaters 2 Years *Commercial Application - 1 Yr
Controls 1 Year
Above Ground Systems 1 Year
Lights and Niches 1 Year Lamps and Bulbs - 90 Days
White Goods 1 Year
Maintenance Equipment 90 Days
Drainer/Utility Pumps 90 Days
Replacement Parts 90 Days
Cleaners: Lil Shark 1 Year
Cleaners: Calypso 1 Year
Cleaners: Pool Shark 2 Years Footpad and Seal Flaps - 1 Yr
Cleaners: Great White 2 Years
* Commercial and multi-family application.
Retain this warranty certificate in a
safe and convenient location for your records.
Pumps, filters, skimmers, underwater lights (excluding bulbs), ac-
cessories and fittings manufactured by Sta-Rite are warranted to
be free of defects in material and/or workmanship for one (1) year
from the original date of installation.
The foregoing warranties relate to the original consumer purchaser
(“Purchaser”) only. Sta-Rite Industries shall have the option to re-
pair or replace the defective product, at its sole discretion.
Purchasers must pay all labor and shipping charges necessary to
replace the product covered by this warranty. Requests for war-
ranty service must be made through the installing dealer. This war-
ranty shall not apply to any product that has been subject to
negligence, misapplication, improper installation or maintenance,
or other circumstances which are not in Sta-Rite’s direct control.
Failure to have product installed by a professional in compliance
with local codes will void any and all manufacturers warranty.
This warranty sets forth Sta-Rite’s obligation and Purchaser’s ex-
clusive remedy for defective products.
STA-RITE SHALL NOT BE LIABLE FOR ANY CONSEQUENTIAL,
INCIDENTAL OR CONTINGENT DAMAGES WHATSOEVER.
THE FOREGOING WARRANTIES ARE EXCLUSIVE AND IN
LIEU OF ALL OTHER EXPRESS WARRANTIES. IMPLIED WAR-
RANTIES, INCLUDING BUT NOT LIMITED TO THE IMPLIED
WARRANTIES OF MERCHANTABILITY AND FITNESS FOR A
PARTICULAR PURPOSE, SHALL NOT EXTEND BEYOND THE
DURATION OF THE APPLICABLE EXPRESS WARRANTIES
PROVIDED HEREIN.
Some states do not allow the exclusion or limitation of incidental or
consequential damages or limitations on how long an implied war-
ranty lasts, so the above limitations or exclusion may not apply to
you. This warranty gives you specific legal rights and you may also
have other rights which vary from state to state.
Supersedes all previous publications.
S4877PS (Rev. 7/21/04)
This manual suits for next models
1
Table of contents
Other STA-RITE Swimming Pool Vacuum manuals
Popular Swimming Pool Vacuum manuals by other brands

Del ozone
Del ozone Big Dipper EC-AG1U Installation & operation manual

ROBO-TEK
ROBO-TEK Robo-Plus V2 user manual

CRYSTALLIC
CRYSTALLIC NEW GALEON FI 100 quick start guide

Polaris
Polaris Vac-Sweep 165 owner's manual

Dolphin
Dolphin 2x2 Gyro operating instructions

Pool Pro
Pool Pro Acrobat GT Operating and troubleshooting guide