Stadium PARTYMAKER 3 User manual

PARTYMAKER 3 USER MANUAL
stadiumsound.com.au
PORTABLE PA SYSTEMPORTABLE PA SYSTEM
Manual Version 1.0
Rechargeable
Up to 6 Hrs Playtime
Bluetooth
Connectivity
USB & SD Card Player
Peak Power
Mic/Instrument
Input 6.5MM
AUX Input 3.5MM
AM/FM Radio
Illuminated display
Microphone Included
Castor Wheels
Party LED Light
8”
Bass Driver
stadium

Speaker Unit………………………………………………………….........…1x8” Woofer+1x1” Tweeter
RMS Power Ouput…………………...………………………………………..........…………….80 Watts
S/N Ratio………………………………………………………………………….………………..…≥70dB
Frequency Response……………………………..…………………………….……20Hz~20KHz ±2dB
Distortion at rated Power………………………....…………………………..………………..…….≤10%
Charge time……………….…………….……………………………………...........……..…..…..7 hours
Battery life (at 2/3 of Max Output)……....…..……………………….....................………up to 6 hours
Dimensions (WxDxH)…………………………………………………….……W300 x D490 x H525 MM
Weight……………………………………………………………………………………..….....……13 Kgs
Note: Music compatible formats are WAVE, MP3 for USB and SD card inputs.
Caution: Do not connect external portable hard drives to the USB port this can result in damage
to the unit.
1. Partymaker 3
2. User manual
3. Microphone with cable
4. Power cord
SPECIFICATIONS
BOX CONTENTS
2
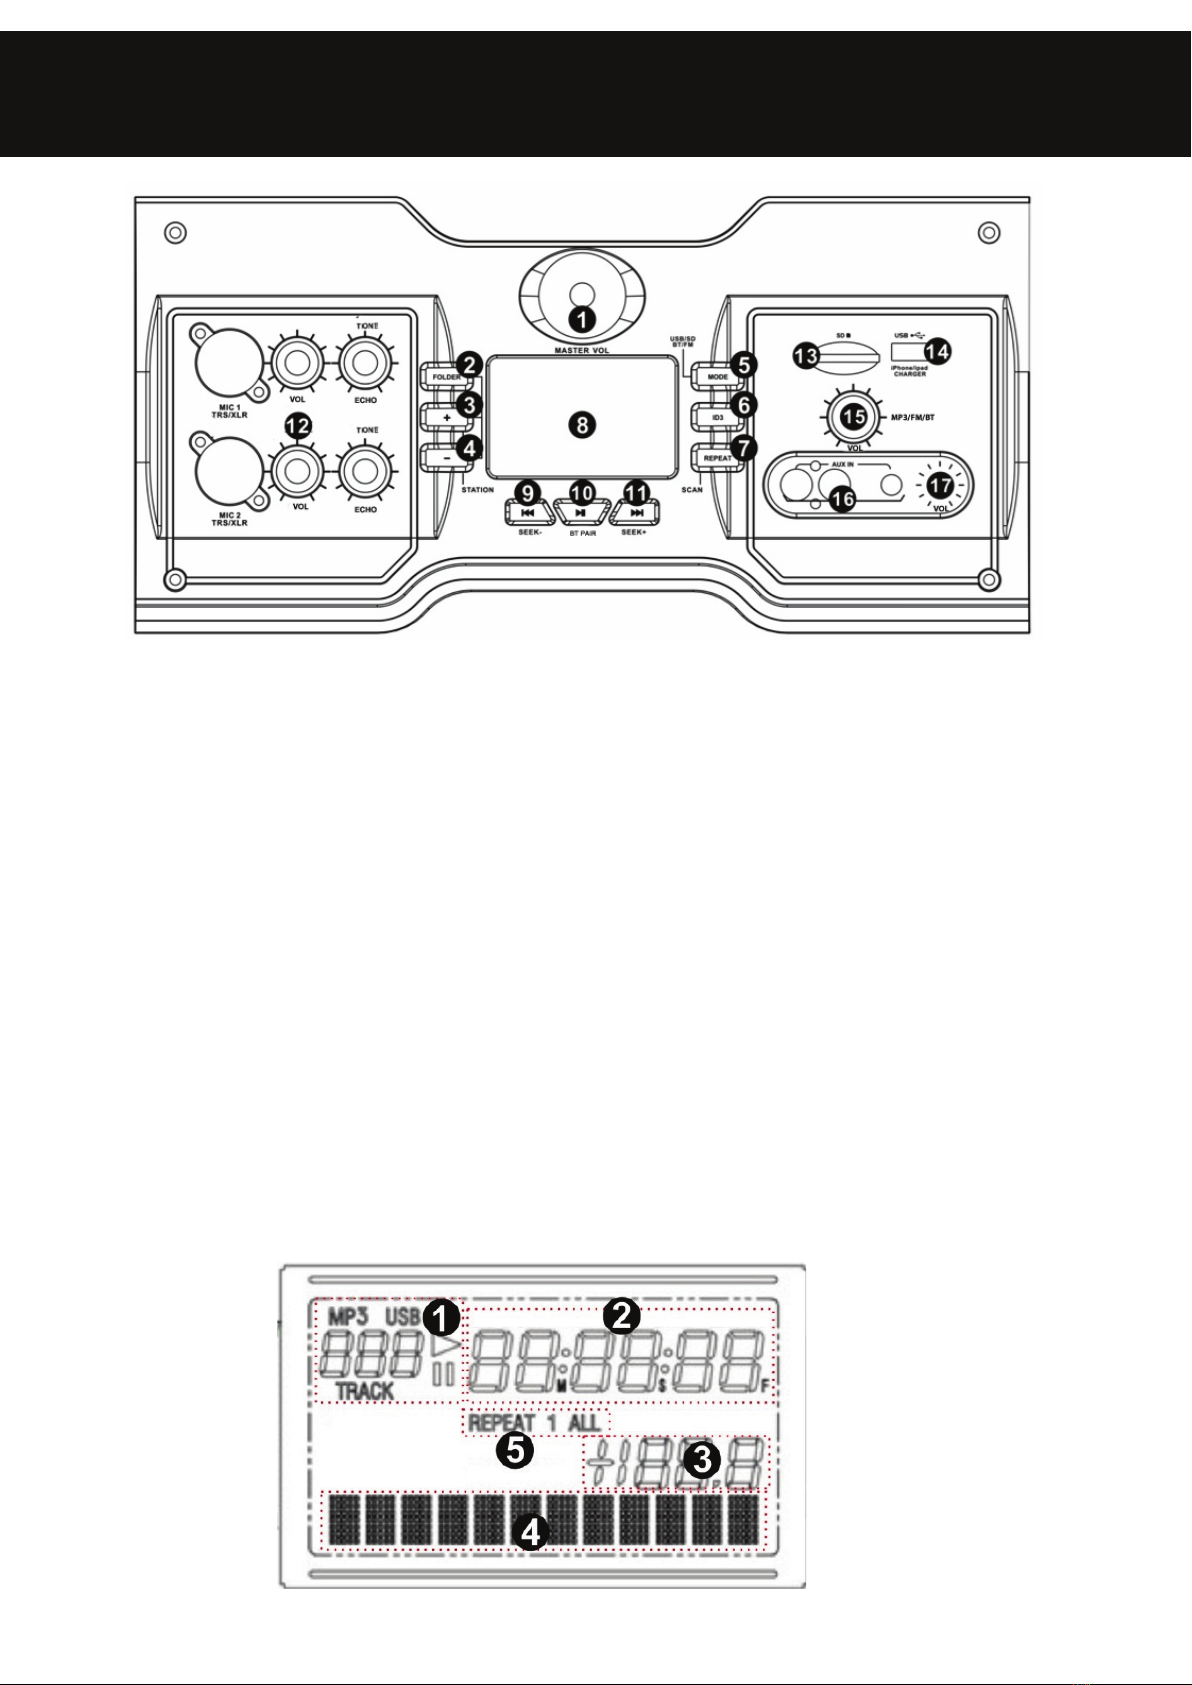
1. MASTER VOL : This knob controls the master volume of the Stadium Partymaker 3
2. FOLDER : PressthisbuttontoenterFOLDERselection,thecharacterintheLCDdisplaywill ash,
press again to engage the selection.
3. FOLDER + (STATION) : Press this button to advance the folder selection in USB/SD mode. Press
to jump to the next available Radio station in Radio mode.
4. FOLDER – (STATION) : Press this button to reverse the folder selection in USB/SD mode. Press to jump
to the previous available Radio station in Radio mode.
5. MODE(USB/SD/BT/FM) : Toggle the audio source among the USB port, the SD card slot, FM radio and
Bluetooth.
6. ID3 : Pressing the ID3 button scrolls the Title, Artist, Album on the LCD display.
7. REPEAT(SCAN) : The REPEAT function allows you to REPEAT one track or the entire track list when in
USB/SD mode. Press and hold this button 2 seconds to search for a radio station.
8. DISPLAY : The LCD display indicates the Track/Numbers/Time/Continue/Battery Level/Radio
Station/Song Name.
Area#1 shows the Track and Folder number.
Area#2 shows the Track elapsed time.
Area#3 shows the Battery Level (Percentage).
Area#4 shows the ID3 when in USB/SD mode and the radio station when in Radio mode.
Area#5 shows the REPEAT function.
PANEL DESCRIPTION
3

9. SEEK : Pressing this button to go to the previous track. Press and hold to scan backward
within tracks.
10. SYNCING to BLUETOOTH DEVICES : Turn power on Stadium Partymaker 3 and
(Search for “Partymaker3” on your device).
Short press 1 second to turn off Bluetooth and reconnect to the stored paired device.
PLAY/PAUSE Pressing this button will alternate between PLAY mode and PAUSE mode.
11. SEEK + : Pressing this button to go to the next track. Press and hold to scan forward within
tracks.
12. Microphone XLR/TRS COMBO Jack with Volume, Tone and Echo control : This
jack can either take a 6.5mm balanced TRS or an XLR balanced Plug.
13. SD Card slot : Used to insert a SD card.
14. USB Port : Used to connect a USB memory stick and also you can connect your
USB charging device (e.g. smart phone, iPod/iPhone/iPad) to this port for charging (Note:
for charging you must be in USB mode). This port is not suited to Portable hard drives unless the
hard drive has its own power source.
15. MP3 / FM ‐TUNER / BT VOLUME : This knob controls the volume level of the USB/SD
FM Tuner/Bluetooth.
16. AUX IN : This stereo RCA input and 3.5mm (Stereo) mini jack can be used to connect a CD,
MP3, or other audio source. (You cannot use both simultaneously. Doing so may cause damage
to the input devices)
17. AUX IN VOLUME : This knob controls the volume level of the aux‐in input.
18. POWER CONNECTOR : Insert the included power cord here to charge the unit. Note that the
Partymaker 3 can run off the power adapter while it simultaneously charges the battery.
When the green light is on it indicates charging. When fully charged the green light turns off.
19. LIGHT ON/OFF : Turn to Mode 1 (Beat program) /OFF/ Mode 2 (Party program)
20. POWER ON/OFF : Turn the Stadium Partymaker 3 ON or OFF.
PANEL DESCRIPTION CONT....
18
19 20
4

When used in the directed manner, this unit has been designed and manufactured to
ensure your personal safety. However, improper use can result in potential electrical
shock or fire hazards. Please read all safety and operating instructions carefully before
installation and use, and keep these instructions handy for future reference. Take special
note of all warnings listed in these instructions and on the unit.
1. Water and Moisture : The unit should not be used near water. For example: near a bathtub,
washbowl, kitchen sink, laundry tub, swimming pool or in a wet basement.
2. Ventilation : The unit should be situated so that its location or position does not interfere with
its proper ventilation. For example, it should not be situated on a bed, sofa, rug or similar surface
that may block ventilation openings. Also, it should not be placed in a built-‐in installation, such as
a bookcase or cabinet, which may impede the flow of air through the ventilation openings.
3. Heat : The unit should be situated away from heat sources such as radiators, heat registers,
stoves or other appliances (including amplifiers) that produce heat. It should also be kept out of
direct sunlight on hot days.
4. Power Sources : The unit should be connected to a power supply of the type described in the
operating instructions or as marked on the appliance.
5. Power Cable Protection : Power supply cables should be routed so that they are not likely to
be walked on or pinched by items placed upon or against them. It is always best to have a clear
area from where the cable exits the unit to where it is plugged into an AC socket.
6. Cleaning : The unit should be cleaned only using a warm damp cloth. Do not use solvents, etc.
7. Objects and Liquid Entry : Care should be taken so that objects do not fall and liquids are not
spilled into any openings or vents located on the product.
8. Attachments : Do not use attachments not recommended by the product manufacturer.
9. Lightning and Power Surge Protection : Unplug the unit from the wall socket and disconnect
the antenna or cable system during a lightning storm or when it is left unattended and unused for
long periods of time. This will prevent damage to the product due to lightning and power-‐line
surges.
10. Overloading : Do not overload wall sockets, extension cords, or integral convenience recep-
tacles as this can result in a risk of fire or electric shock.
11. Damage Requiring Service : The unit should be serviced by qualified service personnel only.
For service contact our technical service department
12. Servicing : The user should not attempt to service the unit beyond those methods described
in the user’s operating instructions. Service methods not covered in the operating instructions
should be referred to qualified service personnel.
IMPORTANT SAFETY INSTRUCTIONS
5

This unit is equipped with a Rechargeable Lithium Ion battery. It does not need to be
charged when not in use. When the charge light is on the unit is charging. When the unit is
connected to power and charge light is off the unit is fully charged. When charging do not
leave the unit unattended, do not overcharge or charge overnight. Once fully charged
unplug the power cable, especially If the unit is to be left unused for an extended period to
prevent damage.
TAKING CARE OF THE INTERNAL BATTERY
(Q) Why does my Stadium Partymaker 3 Disco light make a grinding noise?
(A) When you first turn your light on it needs to find it's home position so it can start the sequence
that allows the light to emulate the music beats when it detects sound. This is normal, and is the
way the device behaves.
(Q) Why does my Stadium Partymaker 3 fail to pair with my phone?
(A) If your phone fails to pair, we suggest you restart you phone, try to pair with the unit again
making sure your phone is in search mode. The Stadium Partymaker 3 will show up on your
phone as (Partymaker3) and all you need to do is click on this line and you will be connected. If
you phone fails to connect it is a problem with your process or your phone. If it fails then redo the
above steps, as it is unlikely to be the Stadium Partymaker 3 unit at fault.
(Q) Can I PLAY music through the USB port?
(A) Yes with your Stadium Partymaker 3 you can play music from the USB post. The Stadium
Partymaker 3 unit has an AUX, Bluetooth, SD card and USB inputs to take care of all your input
needs. The USB port is designed to for charging your devices and playing music from your USB
port.
NOTE: You can only play MP3 files through the SD and USB ports no other medium will work.
Be aware you must not plug an external hard drive into the USB port as damage will result and
the warranty will be void.
FREQUENTLY ASKED QUESTIONS
Attention
6

(Q) Why is the Aux input volume lower than the Microphone input volume?
(A) Turn the volume up on your phone or device, then adjust volume on the Stadium Partymaker 3
(Q) Why will my unit not charge?
(A) Check the power cable is correctly inserted and is not faulty. Internal battery is completely flat
and requires to be returned to manufacturer for assessment and possible repair.
If you need assistance setting up or using your Stadium product now or in the future, call Stadium
support Australia
TEL: 03 – 8587 8898 FAX: 03 – 8587 8866 Mon-Fri 9am – 5pm AEST
Please retain this user guide for future reference.
Manual Version 1.0
This manual is considered correct at time of printing but is subject to change. For latest manuals
and updates refer to the website.
Copyright © 2017 by TDJ Australia
All rights reserved. No part of this publication may be reproduced, distributed, or transmitted in
any form or by any means, including photocopying, recording, copying or other electronic or
mechanical methods, without the prior written permission of the author.
FREQUENTLY ASKED QUESTIONS CONT...
TECHNICAL ASSISTANCE
stadiumsound.com.au
7

stadium
Table of contents
Other Stadium Speakers manuals


