Trevi XF 1850KB User manual

ALTOPARLANTE AMPLIFICATO ALTA POTENZA CON TROLLEY
Manuale d'uso e collegamento
POWER PORTABLE SPEAKER WITH TROLLEY
Connection and Operation Manual
HAUT-PARLEUR PORTABLE AMPLIFIE AVEC TROLLEY
Mode d'emploi et branchement
BEWEGLICHER LAUTSPRECHER MIT TROLLEY
Gebrauchs- und Anschlusshandbuch
ALTAVOZ AMPLIFICADO PORTATIL CON TROLLEY
Manual para el uso y la conexión
LED
DISPLAY
USB
PLAYER
XF 1850KB
Guida d’uso
User guide
DISCO
LIGHT
140 W
MAX
BT
BLUETOOTH
Per informazioni integrative ed aggiornamenti su questo prodotto visita www.trevi.it
For additional information and updates of this product see www.trevi.it

2
XF 1850KB
WARNING!
ATTENZIONE
RISCHIO DI SCOSSE ELET-
TRICHE!
NON ESPORRE A PIOGGIA E
UMIDITÀ
ATTENZIONE: NON APRITE L'APPARECCHIO. ALL'INTERNO NON VI SONO
COMANDI MANIPOLABILI DALL'UTENTE NE PARTI DI RICAMBIO. PER TUTTE
LE OPERAZIONI DI SERVIZIO RIVOLGERSI AD UN CENTRO DI ASSISTENZA
AUTORIZZATO TREVI
WARNING!
WARNING: DO NOT OPEN THE SET. NEITHER CONTROLS OR SPARE PARTS TO
BE USED BY THE USER ARE TO BE FOUND INSIDE IT. APPLY TO AUTHORISED
TREVI CENTERS FOR SERVICE OPERATIONS.
DANGER OF ELECTRIC SHOCK!
DO NOT EXPOSE TO
RAIN OR HUMIDITY
ATTENTION
ATTENTION: NE PAS OUVRIR L’APPAREIL, A L’INTERIEUR IL N’Y A PAS DE
COMMANDESAMANIPULERPAR L’UTILISATEUR OU DE PIECES DE RECHANGE.
POUR TOUTES LES OPERATIONS DE SERVICE IL FAUT S’ADRESSER A UN
SERVICE D’ASSISTANCE AUTORISE TREVI.
RISQUE DE DECHARGES ELEC-
TRIQUES
NE PAS EXPOSER A LA PLUIE ET A
L’HUMIDITE
ACHTUNG
ACHTUNG: DAS GERÄT NICHT ÖFFNEN. IM INNERN BEFINDEN SICH KEINE VOM
BENUTZERSELBSTINSTANDSETZBARENTEILEUNDAUCHKEINEERSATZTEILE.
FÜR JEGLICHE SERVICEARBEITEN, WENDEN SIE SICH BITTE AN EINE TREVI
AUTORISIERTEN KUNDENDIENSTSTELLE.
GEFAHR ELEKTRISCHER SCHLÄGE
NICHT DER FEUCHTIGKEIT UND
DEM REGEN AUSSETZEN
ATENCION
ATENCION: NO ABRIR EL APARATO, EN SU INTERIOR NO HAY MANDOS QUE
PUEDAN SER MANIPULADOS POR EL USUARIO NI PARTES DE REPUESTO.
PARA TODAS LAS OPERACIONES DE SERVICIO DIRIGIRSE A UN CENTRO DE
ASISTENCIA AUTORIZADO TREVI.
PELIGRO DE CHOQUES
ELECTRICOS
NO EXPONER A LLUVIA Y
HUMEDAD
UK PLUG ONLY
WIRES CONNECTIONS TO A UK THREE-PIN PLUG
The wires in this mains lead are coloured in accordance with the following wiring codes:
Blue:............................................................Neutral
Brown:.........................................................Live
The wires in this mains lead must be connected to the terminals in the plug as follows:
Blue wire:.....................................................N or Black
Brown wire: .................................................L or Red
Neither wire is to be connected to the earth (E or W) terminal of three-pin plug.
Should the fuse fail in the plug remove the plug form the wall socket and replace the fuse
with a 3 Amp. ASTA approved BS 1362 fuse.
If you will not find your language on the instruction manual, please go on our website www.trevi.it to find it

3
XF 1850KB
NOTE D'USO
Ascoltare a volume alto per lungo tempo, potrebbe danneggiare il vostro udito.
Questo apparecchio è uno strumento elettronico di alta precisione, evitate quindi di utilizzarlo nei seguenti casi:
• Vicino a campi magnetici.
• Vicino a fonti di calore come caloriferi e stufe.
• In luoghi molto umidi come stanze da bagno, piscine, ecc...
• In luoghi molto polverosi.
• In luoghi soggetti a forti vibrazioni.
• Non avvicinare l’orecchio all’altoparlante durante le fasi di messa punto e regolazioni del volume, e in particolare di tenere il
volume al minimo nella fase di accensione.
• Posizionare l’apparecchio in modo che ai suoi lati ci sia sempre abbastanza spazio per la libera circolazione di aria (almeno 5
cm).
• Se dei liquidi penetrano all’interno dell’apparecchio scollegare immediatamente la spina dalla presa e portare l’apparecchio al
più vicino centro assistenza autorizato TREVI.
• Controllare sempre prima di ricaricare l’apparecchio, che i cavi di alimentazione e di collegamento siano installati correttamente.
• Nessuna sorgente di fiamma nuda, quali candele accese, dovrebbe essere posta sull’apparecchio.
• L’apparecchio non deve essere esposto a stillicidio o a spruzzi d’acqua e nessun oggetto pieno di liquido, quali vasi, deve essere
posto sull’apparecchio.
• Conservare il presente manuale per futuri riferimenti.
CURA E MANUTENZIONE
Per la pulizia si consiglia l’ uso di un panno morbido, leggermente inumidito. Evitate solventi o sostanze abrasive.
IMPORTANTE
Questo dispositivo e' progettato per uso domestico non professionale. La buona costruzione di questo apparecchio ne garantisce
per lungo tempo il perfetto funzionamento. Se tuttavia dovesse presentarsi qualche inconveniente, sarà opportuno consultare il più
vicino Centro Assistenza autorizzato TREVI.
TREVI persegue una politica di continua ricerca e sviluppo. Pertanto i prodotti possono presentare caratteristiche diverse da
quelle descritte.
ITALIANO
DESCRIZIONE COMANDI

4
XF 1850KB
ITALIANO
TRASPORTO
Premere il pulsante presente sulla maniglia del trolley, alzare il manico fino al blocco (si udira' uno scatto metallico). Per il trasporto,
agendo sulla maniglia del trolley, piegare leggermente l'apparecchio e sfruttare le due ruote posteriori.
Per lo sblocco e chiusura del trolley, premere di nuovo il pulsante sulla maniglia ed abbassare completamente il manico.
ALIMENTAZIONE
Questa unità funziona con batteria ricaricabile al piombo 12V 7Ah e caricabatterie esterno con alimentazione di rete 110-240V
50/60Hz.
Quando la batteria e' in fase di esaurimento o l'apparecchio non si accende, collegare il caricabatterie nella presa(18) sul dispositivo
per effettuare la ricarica.
Stati della spia Led di Carica:
- Spia Led(17) ROSSA: il dispositivo e' collegato con il cavo di alimentazione e la batteria e' in carica.
- Spia Led(17) VERDE: operazione di ricarica terminata, la batteria e' carica.
Nota: Non collegare l'apparecchio a prese con tensione diversa da quella indicata.
ACCENSIONE/SPEGNIMENTO
Premere l'interruttore POWER (10) per accendere l'apparecchio.
Premere l'interruttore POWER (10) per spegnere l'apparecchio.
STAND-BY
E' possibile portare l'apparecchio in modalità Stand-by utilizzando il tasto (1) del telecomando.
Per riattivare l'apparecchio premere di nuovo il tasto (1) del telecomando oppure spegnere e accendere l'unità tramite l'inter-
ruttore POWER (10).
Nota: il modo Standby non agisce sulle luci Disco Light e sull'illuminazione della manopola centrale. Se si desidera lo spegnimento
totale dell'apparecchio agire sull'interruttore POWER (10).
1. Tasto , accensione/spegnimento standby
2. Tasto MUTE, silenziamento altoparlante
3. Tasto VOL+, per aumentare il volume
4. Tasto 9, selezione traccia precedente
5. Tasto VOL -, per diminuire il volume
6. Tasto FL-, selezione cartella precedente
7. Tasto FL.REP
8. Tasto 5+
9. Tasto REPEAT
10. Tasto EQ, attivazione equalizzazioni audio preimpostate
11. Tasto REC, registrazione
12. Tasto , attivazione lettura/pausa di un brano
13. Tasto :, selezione traccia successiva
14. Tasto FL+, selezione cartella successiva
15. Tasto 10+
16. Tasto MODE, selezione ingresso attivo
Installazione batterie:
Rimuovere il coperchio nella parte posteriore del telecomando, inserire 2 batterie formato “AAA” (non fornite) facendo attenzione
alla polarità indicata e richiudere il coperchio.
1. Tasto LED, attivazione/disattivazione Led frontali (Disco Light)
2. Tasto MIC, attivazione regolazione volume microfono
3. Tasto MODE, selezione modo di funzionamento
4. Tasto ECHO, attivazione regolazione funzione echo
5. GT VOL, regolazione volume ingresso Guitar
6. Tasto REC, registrazione
7. Tasto PREV (Precedente)
8. Tasto PLAY/PAUSA/disattivazione voce guida
9. Tasto NEXT (Successivo)
10. Interruttore POWER, accensione/spegnimento
11. Tasto MIC.PRI, controllo priorità microfono
12. Tasto TWS, attivazione funzione TWS
13. Ingresso USB
14. Ingresso microfonico MIC
15. Ingresso GUITAR
16. Ingresso AUX
17. Indicatore led di ricarica
18. Presa di alimentazione
TELECOMANDO

5
XF 1850KB
SELEZIONE DELLA FUNZIONE
Per cambiare la modalità di funzionamento, premere piu' volte il tasto MODE(3) sull'unità o premere il tasto(16) sul telecomando
per selezionare: BLUETOOTH(sul display compare "BLUE"), USB (solo se sulla presa USB vi è collegata una memoria, sul display
compare "USB"), AUX (sul display compare "AUX").
REGOLAZIONE DEL VOLUME/VOLUME MICROFONO
1. Ruotare la manopola centrale per aumentare o diminuire il volume generale di riproduzione oppure utilizzare i tasti (3) e (5) sul
telecomando.
2. Premere il tasto MIC ed agire sulla manopola centrale per regolare il volume del segnale sull'ingresso MIC e sul microfono
wireless. La regolazione agisce contemporaneamente su entrambi i dispositivi se utilizzati.
EQUALIZZATORE
Questa unità ha un sistema di pre-equalizzazione audio integrato. Premere più volte il tasto EQ(10) sul telecomando per selezionare
una delle 2 impostazioni audio disponibili.
EFFETTO ECHO
Premere il tasto ECHO(4) ed agire sulla manopola centrale per aumentare o diminuire l'effetto eco sull' ingresso MIC e sul microfono
wireless.
EFFETTO DISCO-LIGHT
Per attivare gli effetti Disco-Light sugli altoparlanti premere il tasto LED(1).
Per disattivare l'effetto Disco-Light, premere nuovamente il tasto LED(1).
FUNZIONAMENTO BLUETOOTH
1. Accendere l'apparecchio e premere il tasto MODE(3) sull'unità o il tasto MODE(16) sul telecomando e selezionare la funzione
bluetooth, sul display compare la scritta "BLUE".
2. Nella modalità Bluetooth, il display comincerà a lampeggiare, il sistema entra automaticamente in ricerca.
3. Attivare la funzionalità Bluetooth sul dispositivo esterno da accoppiare.
4. Avviare la ricerca dei dispositivi. Al termine selezionare il dispositivo "XF 1850 KB".
5. Inserire la password "0000" se richiesto.
6. Premere il tasto
(8) sull'unità oppure il tasto
(12) sul telecomando
per avviare la riproduzione e utilizzare i tasti 9(7)
e :(9), oppure i tasti :(13) e 9(4) sul telecomando per la selezione dei brani.
RIPRODUZIONE SU INGRESSO USB
1. Accendere l'apparecchio.
2. Inserire una memoria USB nell' ingresso (13). La riproduzione viene avviata automaticamente.
3. Per mettere in pausa la riproduzione, premere il tasto
(8) sull'unità oppure il tasto
(12) del telecomando
, sul display
comparirà la scritta "PAUS".
4. Per riprendere la riproduzione, premere nuovamente il tasto
sull'unità oppure sul telecomando
.
5. Premere il tasto :(9) o il tasto :(13) sul telecomando durante l’ascolto per passare alla traccia successiva. Premere il tasto
9 (7) o 9(4) sul telecomando per passare ai brani precedenti.
6. Utilizzando i tasti 5+(8) e 10+(15) e' possibile passare all'ascolto del quinto o decimo brano successivo.
7. Premere una volta il tasto REPEAT(9) dal telecomando, sul display comparirà la scritta "ONE", per riprodurre continuamente
la stessa traccia; premerlo una seconda volta, sul display comparirà la scritta "ALL", per riprodurre continuamente tutti brani
contenuti nella USB.
Nota:
- Il lettore potrebbe non supportare alcuni dispositivi USB, questo è dovuto all'incompatibilità di alcuni processori.
- Per evitare interferenze dannose, collegare sempre le periferiche USB direttamente all'unità, non utilizzare cavi di prolunga.
- Dal computer formattare le memorie USB in FAT (16 o 32).
AUX-IN
1. Premere il tasto MODE(3) sull'unità, o il tasto MODE(16) sul telecomando e selezionare la funzione "AUX".
2. Collegare una qualsiasi unità provvista di uscita audio tramite apposito cavo Jack da 3,5mm (non incluso) all'ingresso AUX
IN(16).
3. Regolare il dispositivo esterno dai propri comandi.
ITALIANO

6
XF 1850KB
INGRESSO GUITAR
1. Collegare un qualsiasi strumento musicale dotato di preamplificatore all'ingresso (15), regolare il volume tramite il comando
GT VOL (5).
INGRESSO MICROFONO
1. Collegare un microfono con cavo (non fornito) all'ingresso (14), leggere i capitoli precedenti per le regolazioni di VOLUME MICROFONO ed EFFETTO
ECHO.
MICROFONO WIRELESS (SENZA FILI)
1. Rimuovere, svitandolo, il coperchio nella parte posteriore del microfono, inserire 2 batterie formato “AA” facendo attenzione alla
polarità indicata e richiudere il coperchio;
2. Accendere il microfono spostando l'interruttore verso l'alto. Se l'interruttore viene messo in posizione centrale il microfono entra
in "muting", non viene trasmesso nessun suono. Se l'interruttore viene messo in posizione bassa, il microfono e' spento.
3. Premere il tasto MIC ed agire sulla manopola centrale per regolare il volume del microfono wireless;
4. Se una volta acceso il microfono l'indicatore di accensione lampeggia o non si accende, le batterie sono scariche, sostituirle
immediatamente.
Note:
- La distanza di ricezione del microfono senza fili è di 15metri circa senza ostacoli, non utilizzare a distanze superiori.
- Se nello stesso ambiente vengono utilizzati più microfoni wireless contemporaneamente, questi devono essere impostati su
frequenze diverse e devono essere tenuti lontani almeno a 30m.
- Non mettere il dispositivo troppo vicino a lettori DVD/CD/VCD in quanto hanno frequenze che potrebbero influire sul microfono
POSSIBILI LIMITAZIONI D’USO
- Questo apparecchio potrebbe operare su frequenze non autorizzate nella regione in cui si trova l’utilizzatore. Si suggerisce
di rivolgersi alle autorità competenti e richiedere le informazioni necessarie relative alle frequenze autorizzate nella propria
regione per i sistemi radiomicrofonici. In alcuni casi potrebbe essere necessaria una licenza ministeriale per l’uso di questo
apparecchio. Per i possibili requisiti rivolgersi alle autorità competenti. L’utente si assume l’esclusiva responsabilità per
l’acquisizione della licenza per gli apparti radiomicrofonici e la licenziabilità dipende dalla classificazione e dall’applicazione
dell’utente e della frequenza selezionata. (D. Lgs. 269/2001 art.6 comma 3). Le frequenze utilizzate da questo prodotto sono
autorizzate solo sul territorio Italiano e potrebbero non essere utilizzabili in altri paesi. Si suggerisce di rivolgersi alle autorità
competenti e richiedere le relative informazioni.
FUNZIONE TWS (disponibile solo in BT)
Questa funzione permette di accoppiare due unità XF 1850 KB per la riproduzione musicale stereo da sorgente Bluetooth.
L'utilizzo della modalità TWS è semplice:
1. Accendere le due unità e selezionare la modalità BT in ricerca.
2. Premere il tasto "TWS" su uno degli altoparlanti: si sentirà un messaggio audio che indica l'avvenuta connessione con l'altro altoparlante.
3. Attivare la funzionalità Bluetooth sul dispositivo sorgente da accoppiare ed avviare la ricerca. Selezionare il dispositivo "XF 1850 KB". I due
altoparlanti sono pronti per la riproduzione.
REGISTRAZIONE
Questo apparecchio e' in grado di registrare sulla memoria USB l'audio del microfono wireless o dell'eventuale microfono presente
sull'ingresso MIC(14), non è possibile registrare dalle funzioni Bluetooth e Aux. All'interno della memoria USB l'apparecchio creerà
automaticamente una cartella chiamata "Record" dove memorizzerà tutti i file di registrazione.
1. Accendere l'apparecchio.
2. Inserire una memoria USB.
3. Premere a lungo il tasto REC(6) sull'unità o il tasto REC(11) sul telecomando per avviare la registrazione, sul display(20)
comparirà l'indicazione REC seguita dalla durata della registrazione.
4. Premere il tasto REC per arrestare la registrazione. L'apparecchio si porterà automaticamente nella funzione di lettura per
riprodurre immediatamente il brano registrato (indicazione REPLAY sul display).
Nota:
- Quando si attiva la funzione "Registrazione" alcuni comandi dell'apparecchio vengono inibiti, questi riprenderanno la loro
normale funzione quando la registrazione verrà arrestata.
- La funzione di registrazione potrebbe non supportare alcuni dispositivi USB, questo è dovuto all'incompatibilità di alcuni
processori.
ITALIANO

7
XF 1850KB
ITALIANO
FUNZIONE MICROPHONE PRIORITY
Attivandoquestafunzioneilvolumedell'audiomusicaleriprodottovieneabbassatoautomaticamenteinpresenzadivocalesulmicrofono.
1. Premere il tasto MIC.PRI (11) per attivare la funzione. Sul display compare la scritta OPEN.
2. Durante l'uso del microfono wireless o microfono con cavo, il volume dell'audio della musica riprodotta si abbassa automati-
camente per poi tornare al volume normale quando non si usa piu' ilmicrofono.
3. Premere il tasto MIC.PRI (11) per disattivare la funzione. Sul display compare la scritta OFF.
INFORMATIVA SULLA RIMOZIONE E LO SMALTIMENTO DELLE BATTERIE
Qualunque sia il tipo di batteria esaurita, essa non deve essere gettata tra i rifiuti domestici,nel fuoco o nell’acqua. Tenere la batteria al
riparo da fonti di calore. Ogni tipo di batteria esaurita deve essere riciclata oppure smaltita presso gli appositi centri raccolta dedicati.
Attenzione: Questa operazione è riservata esclusivamente al personale tecnico specializzato!
PROCEDURA PER LA RIMOZIONE DELLA BATTERIA DALL’ALTOPARLANTE AMPLIFICATO
Operare esclusivamente in assenza di collegamento dell’apparecchio alla rete elettrica!
1. Rimuovere il pannello superiore dei comandi svitando le viti presenti.
2. Rimuovere il pannello frontale svitando le viti presenti.
3. Rimuovere l'altoparlante woofer svitando le viti che lo sostengono.
4. Rimuovere le viti che serrano i sostegni della batteria, rimuovere i sostegni, scollegare la batteria e rimuoverla.
INFORMAZIONI AGLI UTENTI
ai sensi del Decreto Legislativo N° 49 del 14 Marzo 2014
“Attuazione della Direttiva 2012/19/UE sui rifiuti di apparecchiature elettriche ed elettroniche (RAEE)”
Il simbolo del cassonetto barrato riportato sull’apparecchiatura indica che il prodotto alla fine della propria vita utile deve essere
raccolto separatamente dagli altri rifiuti. L’utente dovrà, pertanto, conferire l’apparecchiatura integra dei componenti essenziali
giunta a fine vita agli idonei centri di raccolta differenziata dei rifiuti elettronici ed elettrotecnici, oppure riconsegnarla al rivenditore al
momento dell’acquisto di nuova apparecchiatura di tipo equivalente, in ragione di uno a uno, oppure 1 a zero per le apparecchiature
aventi lato maggiore inferiore a 25 cm. L’adeguata raccolta differenziata per l’avvio successivo dell’apparecchiatura dimessa al
riciclaggio, al trattamento e allo smaltimento ambientale compatibile contribuisce ad evitare possibili effetti negativi sull’ambiente
e sulla salute e favorisce il riciclo dei materiali di cui è composta l’apparecchiatura. Lo smaltimento abusivo del prodotto da parte
dell’utente comporta l’applicazione delle sanzioni amministrative di cui al D.Lgs n. Decreto Legislativo N° 49 del 14 Marzo 2014.
CARATTERISTICHE TECNICHE
Alimentazione: 15V 4A con alimentatore esterno 110-240V 50/60Hz
Batteria interna al piombo ricaricabile 12V 7Ah
Potenza di trasmissione Bluetooth: ................................................................................2,5mW
Banda di trasmissione Bluetooth:...................................................................................2,4GHz
Dimensioni: ...................................................................380x330x660mm
Peso: .....................................................................................15 Kg
MICROFONO WIRELESS
Frequenza di trasmissione: ............................................................................. 208.6MHz
Potenza di trasmissione: .......................................................................... 10mW (±1)
Corrente di funzionamento: ................................................................................. <30mA
Alimentazione: ................................................ 2x 1,5V (tipo “AA”) non incluse
Paesi Europei per i quali il prodotto potrebbe avere restrizioni:
- Regno Unito: IMPLEMENTED.
- Spagna: LIMITED IMPLEMENTATION.
- Francia: LIMITED IMPLEMENTATION, for professional users.
- Danimarca: LIMITED IMPLEMENTATION, tuning range.
- Malta: LIMITED IMPLEMENTATION, individual license required
- Irlanda: NOT IMPLEMENTED
UK ES FR
DK MT IE

8
XF 1850KB
ITALIANO
NOTES ON USE
This is a precision electronic appliance; avoid using it in the following cases:
• Near strong heat sources, such as central heating plants or stoves.
• Listening to high volume for a long time could damage your hearing.
• In very humid places such as bathrooms, swimming pools, etc.
• In very dusty places.
• In places subject to strong vibrations.
• Position the appliance in such a way that there is always enough room for free air circulation (at least 5 cm).
• Do not block the air inlets.
• Keep the ear speaker during the steps of focusing point and volume adjustments, and in particular to keep the volume to a
minimum in the ignition phase.
• If any liquid enters the appliance, unplug it immediately from the socket and take it to the nearest TREVI authorised service
centre.
• Before switching on the appliance, always check that the power cable and the connection cable are properly installed.
• The apparatus shall not be exposed to dripping or splashing water. No objects filled with liquid, such as vases, should be placed
on the unit.
• No naked flame sources, such as lighted candles, should be placed on.
• Keep this manual.
CARE AND MAINTENANCE
Use a slightly damp soft cloth for cleaning. Do not use solvents and abrasive substances.
IMPORTANT
This device is designed for home use (not professional use). This appliance has been carefully built to ensure long-lasting perfect
performance. However, should any inconvenience occur, please contact your local authorised TREVI Service Centre.
TREVI follows a policy of ongoing research and development. Therefore products may have different features from those described.
LOCATION OF CONTROL

9
XF 1850KBENGLISH
TROLLEY
Press the button on the trolley handle, raise the handle up to the stop (you will hear a metallic click). For transport, using the trolley handle, slightly
fold the device and use the two rear wheels.
To unlock and close the trolley, press the button on the handle again and lower the handle completely.
SUPPLY
This unit works with 12V 7Ah rechargeable lead acid battery and external charger with 110-240V 50 / 60Hz mains power supply.
When the battery is low or the device does not turn on, connect the charger to the socket (18) on the device to recharge.
Status of the Charging LED light:
- RED LED light (17): the device is connected to the power cable and the battery is charging.
- GREEN LED light (17): charging operation finished, the battery is charged.
Note: Do not connect the appliance to sockets with a voltage other than that indicated.
ON / OFF
Press the POWER switch (10) to turn the unit on.
Press the POWER switch (10) to turn off the set.
STAND-BY
It is possible to put the appliance in Stand-by mode using the button (1) on the remote control.
To reactivate the device, press the button (1) on the remote control again or switch the unit off and on with the POWER switch (10).
Note: Standby mode does not affect the Disco Light and the central knob illumination. If you want to turn off the unit completely, use the POWER
switch (10).
FUNCTION SELECTION
To change the operating mode, press the MODE button (3) on the unit several times or press the button (16) on the remote control to select: BLUE-
TOOTH ("BLUE" appears on the display), USB (only if there is a memory is connected, the display shows "USB"), AUX (the display shows "AUX").
1. Button , standby on / off
2. MUTE button, speaker mute
3. VOL + button, to increase the volume
4. 9Button, previous track selection
5. Button VOL -, to decrease the volume
6. FL- button, selection of previous folder
7. FL.REP button
8. 5+ Button
9. REPEAT button
10. EQ button, activation of preset audio equalizations
11. REC button, recording
12. Button , activation of reading / pausing of a song
13. Button:, selection of the next track
14. FL + Button, next folder selection
15. 10+ Button
16. MODE Button, active input selection
REMOTE CONTROL
1. LED button, front LED (Disco Light)
2. MIC key, microphone volume
3. MODE key, mode selection
4. ECHO key, echo volume
5. GT VOL, Guitar volume
6. REC button, recording
7. PREV (Previous) button
8. PLAY / PAUSE button
9. NEXT (Next) button
10. POWER switch, on / off
11. MIC.PRI key, microphone priority control
12. TWS button, TWS function activation
13. USB input
14. MIC microphone input
15. GUITAR input
16. AUX input
17. Charging LED indicator
18. Power socket
Battery installation:
Remove the cover on the back of the remote control, insert 2 “AAA” size batteries (not supplied) paying attention to the indicated polarity and close
the cover.

10
XF 1850KB
ENGLISH
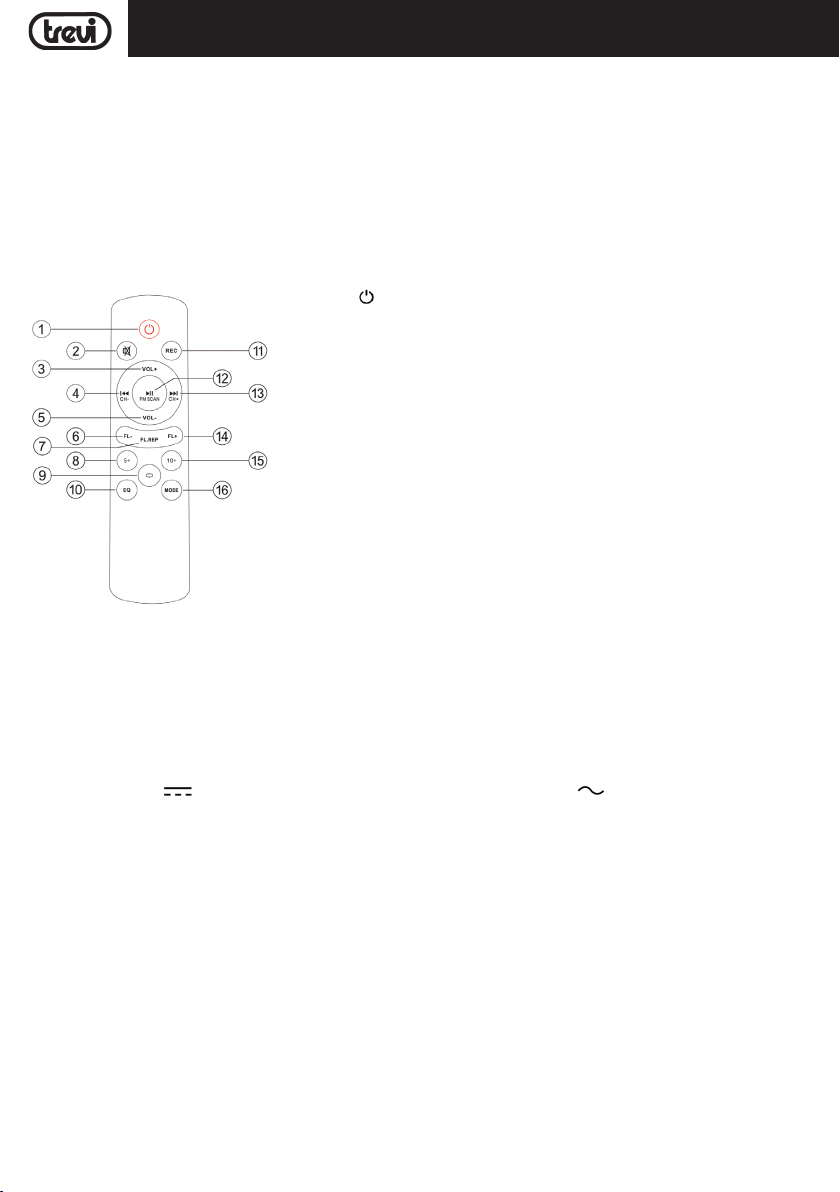
VOLUME / MICROPHONE VOLUME
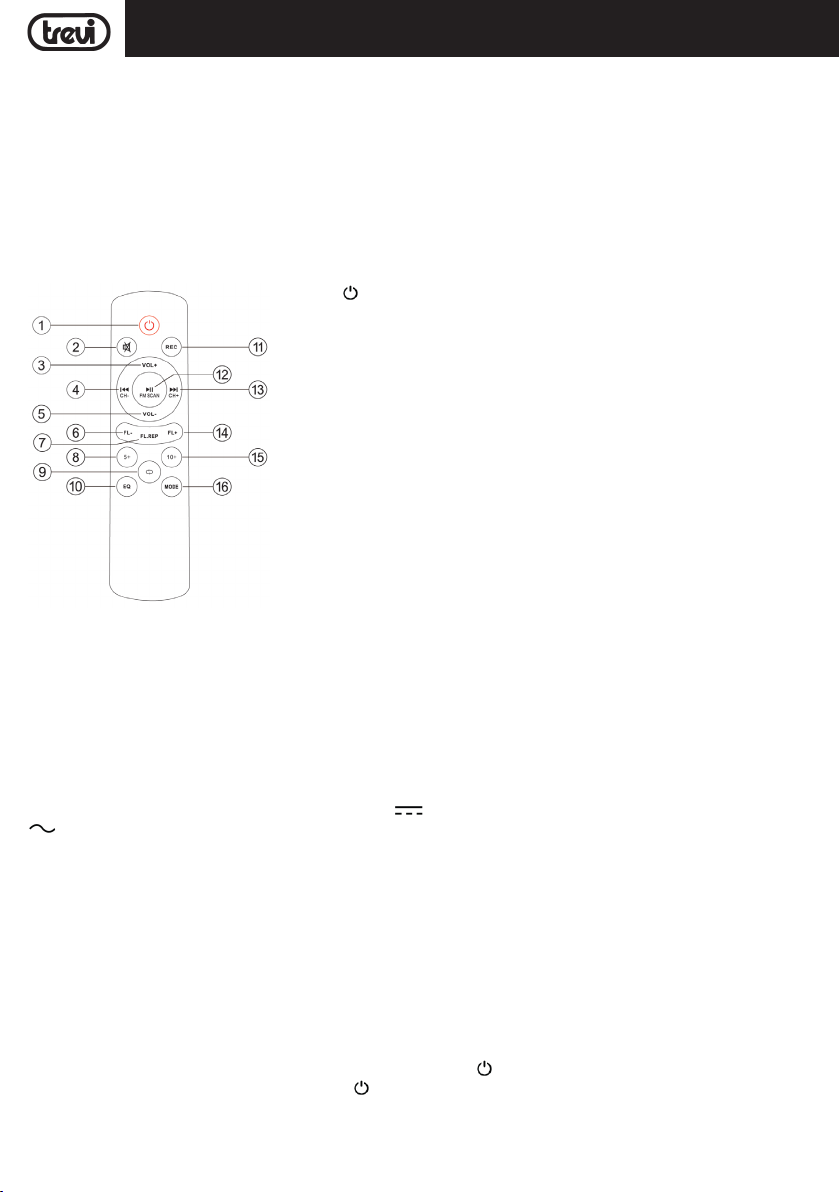
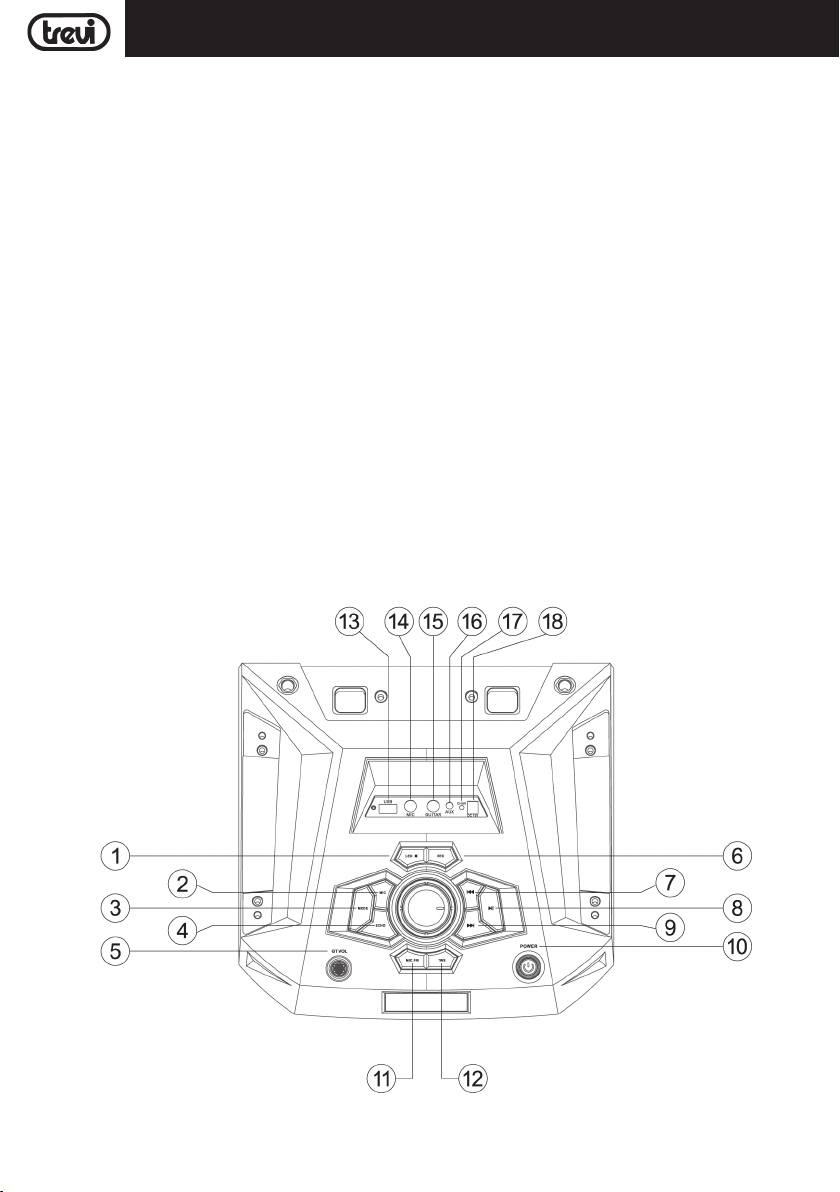
1. Turn the central knob to increase or decrease the overall playback volume or use the buttons (3) and (5) on the remote control.
2. Press the MIC button and turn the central knob to adjust the volume of the signal on the MIC input and on the wireless microphone. The regulation
acts simultaneously on both devices if used.
EQUALIZER
This unit has a built-in audio pre-equalizer system. Press the EQ button (10) on the remote control repeatedly to select one of the two available audio
settings.
ECHO
Press the ECHO button (4) and use the central knob to increase or decrease the echo effect on the MIC input and on the wireless microphone.
DISCO-LIGHT EFFECT
To activate the Disco-Light effects on the speakers, press the LED button (1).
To deactivate the Disco-Light effect, press the LED button (1) again.
BLUETOOTH OPERATION
1. Turn on the device and press the MODE button (3) on the unit or the MODE button (16) on the remote control and select the bluetooth function,
the display will show "BLUE".
2. In Bluetooth mode, the display will start flashing, the system will automatically enter search.
3. Activate the Bluetooth functionality on the external device to be paired.
4. Start searching for devices. When finished, select the "XF 1850 KB" device.
5. Enter the password "0000" if requested.
6. Press the key (8) on the unit or the key (12) on the remote control to start playback and use the 9(7) and :(9) keys, or the :(13)
and 9keys (4) on the remote control for track selection.
PLAYBACK ON USB INPUT
1. Switch on the appliance.
2. Insert a USB memory into the input (13). Playback starts automatically.
3. To pause playback, press the key (8) on the unit or the key (12) on the remote control, the display will show "PAUS".
4. To resume playback, press the button on the unit again or on the remote control.
5. Press key :(9) or key :(13) on the remote control while listening to go to the next track. Press the 9(7) or 9(4) button on the remote
control to skip to the previous tracks.
6. Using the 5+ (8) and 10+ (15) keys it is possible to move on to listening to the fifth or tenth track.
7. Press the REPEAT button (9) once on the remote control, the display will show "ONE" to play the same track continuously; press it a second time,
the display will show "ALL", to continuously play all the tracks contained in the USB.
Note:
- The player may not support some USB devices, this is due to the incompatibility of some processors.
- To avoid harmful interference, always connect USB devices directly to the unit, do not use extension cables.
- From the computer, format the USB memories in FAT (16 or 32).
AUX-IN
1. Press the MODE button (3) on the unit, or the MODE button (16) on the remote control and select the "AUX" function.
2. Connect any unit equipped with an audio output using a suitable 3.5mm Jack cable (not included) to the AUX IN input (16).
3. Adjust the external device by your own controls.
GUITAR ENTRANCE
Connect any musical instrument with a preamp circuit to the input (15), adjust the volume using the GT VOL control (5).
MIC IN
Connect a wired microphone (not supplied) to the input (14), read the previous chapters for the MIC VOLUME and ECHO EFFECT adjustments.
WIRELESS MICROPHONE (WIRELESS)
1. Remove the cover on the back of the microphone, insert 2 “AA” size batteries paying attention to the indicated polarity and close the cover;
2. Turn on the microphone by moving the switch up. If the switch is placed in the center position the microphone goes into "muting", no sound is
transmitted. If the switch is put in the low position, the microphone is turned off.
3. Press the MIC key and use the central knob to adjust the volume of the wireless microphone;
4. If the power indicator blinks or does not turn on after you turn on the microphone, the batteries are low, replace them immediately.
Note:
- The receiving distance of the wireless microphone is about 15 meters without obstacles, do not use at greater distances.
- If multiple wireless microphones are used in the same room at the same time, they must be set to different frequencies and must be kept at least
30m away.
- Do not place the device too close to DVD / CD / VCD players as they have frequencies that could affect the microphone

11
XF 1850KB
POSSIBLE LIMITATIONS OF USE
- This device may operate on unauthorized frequencies in the region where the user is located. It is advisable to contact the competent authorities and
request the necessary information regarding the frequencies authorized in your region for radio microphone systems. In some cases, a ministerial
license may be required for the use of this device. For possible requirements, contact the competent authorities. The user assumes sole respon-
sibility for the acquisition of the license for the radio-microphone equipment and the licensing depends on the classification and application of the
user and the selected frequency. (Legislative Decree 269/2001 art.6 paragraph 3). The frequencies used by this product are authorized only on the
Italian territory and may not be usable in other countries. It is advisable to contact the competent authorities and request the relevant information.
UK ES FR
DK MT IE
European countries for which the product may have restrictions:
- United Kingdom: IMPLEMENTED.
- Spain: LIMITED IMPLEMENTATION.
- France: LIMITED IMPLEMENTATION, for professional users.
- Denmark: LIMITED IMPLEMENTATION, tuning range.
- Malta: LIMITED IMPLEMENTATION, individual license required
- Ireland: NOT IMPLEMENTED
TWS FUNCTION (only available in BT)
This function allows you to pair two XF 1850 KB units for stereo music playback from a Bluetooth source.
Using TWS mode is simple:
1. Turn on the two units and select the BT search mode.
2. Press the "TWS" button on one of the speakers: you will hear an audio message indicating successful connection with the other speaker.
3. Activate the Bluetooth functionality on the source device to be paired and start the search. Select the "XF 1850 KB" device. The two speakers are
ready for playback.
MIC RECORDING
This device is able to record on the USB memory the audio of the wireless microphone or any microphone present on the MIC input (14), it is not
possible to record from the Bluetooth and Aux functions. Inside the USB memory the device will automatically create a folder called "Record" where
it will store all the recording files.
1. Switch on the appliance.
2. Insert a USB memory.
3. Long press the REC button (6) on the unit or the REC button (11) on the remote control to start recording, the REC indication will appear on the
display (20) followed by the duration of the recording.
4. Press the REC button to stop recording. The unit will automatically switch to the play function to immediately play the recorded song (REPLAY
indication on the display).
Note:
- When the "Recording" function is activated, some commands of the device are inhibited, they will resume their normal function when recording
is stopped.
- The recording function may not support some USB devices, this is due to the incompatibility of some processors.
MICROPHONE PRIORITY FUNCTION
By activating this function, the volume of the reproduced music sound is automatically lowered when there is a voice on the microphone.
1. Press the MIC.PRI button (11) to activate the function. OPEN appears on the display.
2. When using the wireless microphone or wired microphone, the audio volume of the music being played is automatically lowered and then returned
to normal volume when the microphone is no longer used.
3. Press the MIC.PRI button (11) to deactivate the function. OFF appears on the display.
ENGLISH

12
XF 1850KB
ENGLISH
NOTICE ON THE REMOVAL AND DISPOSAL OF BATTERIES
Whatever the type of exhausted battery, it must not be thrown away in household waste, in fire or water. Keep the battery away from heat sources.
Each type of exhausted battery must be recycled or disposed of at the appropriate dedicated collection centers.
Warning: This operation is reserved exclusively for specialized technical personnel!
PROCEDURE FOR REMOVING THE BATTERY FROM THE AMPLIFIED SPEAKER
Operate only in the absence of connection of the appliance to the mains!
1. Remove the upper control panel by unscrewing the screws present.
2. Remove the front panel by unscrewing the screws present.
3. Remove the woofer speaker by unscrewing the screws holding it.
4. Remove the screws that secure the battery holders, remove the holders, disconnect the battery and remove it.
TECHNICAL FEATURES
Power supply: 15V 4A with external power supply 110-240V 50 / 60Hz
Internal rechargeable lead battery 12V 7Ah
Bluetooth transmission power: 2.5mW
Bluetooth transmission band: 2.4GHz
Dimensions: 380x330x660mm
Weight: 15 Kg
WIRELESS MICROPHONE
Transmission frequency: 208.6MHz
Transmitting power: 10mW (± 1)
Operating current: <30mA
Power supply: 2x 1,5V (type “AA”) not included
INFORMATION TO USERS
Precautions for correct disposal of the product
The symbol shown on the equipment indicates that waste must be disposed of in “separate collection” and so the product must not be disposed of
together with urban waste.
The user must take the product to special “separate waste collection centres” provided by local government, or deliver it to the retailer against the
purchase of a new product.
Separate collection of waste and subsequent treatment, recycling and disposal operations promotes the production of equipment with recycled
materials and limits negative effects on the environment and on health caused by improper handling of waste.
Illegal disposal of the product leads to the enforcement of administrative penalties.

13
XF 1850KB
NOTES D’EMPLOI
Cet appareil est un instrument électronique de haute précision ; évitez donc de l’utiliser dans les cas suivants :
• Près de grosses sources de chaleur comme des radiateurs et des poêles.
• L'écoute d'un volume élevé pendant longtemps pourrait endommager votre audition.
• Dans des endroits très humides comme les salles de bains, les piscines, etc.
• Dans des endroits très poussiéreux.
• Dans des endroits exposés à de fortes vibrations.
• Placez l’appareil de sorte qu’il y ait toujours assez d’espace sur ses côtés pour laisser circuler librement l’air (au moins 5 cm).
• Ne bouchez pas les fentes d’aération.
• Gardez le haut-parleur de l'oreille pendant les étapes de mise au point des ajustements ponctuels et de volume, et en particulier
pour maintenir le volume à un minimum dans la phase d'allumage.
• Si des liquides pénètrent à l’intérieur de l’appareil, débranchez-le immédiatement et portez-le au centre d’assistance agréé TREVI
le plus proche.
• Contrôlez toujours, avant d’allumer l’appareil, que les câbles d’alimentation et les câbles de branchement sont correctement
installés.
• L'appareil ne doit pas être exposé à des éclaboussures d'eau. Aucun objet rempli de liquide, comme des vases, doivent être
placés sur l'appareil.
• Aucune source de flamme nue, telle que des bougies allumées, doivent être placés sur.
• Conservez ce manuel.
MANIEMENT ET ENTRETIEN
Pourlenettoyage,il estconseillé d’utiliserunchiffon douxlégèrementhumide. Évitezl’emploi desolvantsou desubstancesabrasives.
IMPORTANT
Cet appareil est conçu pour un usage domestique (usage non professionnel). La bonne fabrication de cet appareil garantit un fon-
ctionnement parfait pour une longue période. Si toutefois quelques inconvénients devaient se présenter, adressez-vous au Centre
d’Assistance agréé TREVI le plus proche.
TREVI observe une politique de recherche et de développement continus. C’est pourquoi ses produits peuvent présenter des
caractéristiques différentes par rapport à celles qui sont décrites.
DESCRIPTION DES CONNECTEURS ET DES COMMANDES
FRANCAIS

14
XF 1850KB
FRANCAIS
Appuyez sur le bouton de la poignée du chariot, soulevez la poignée jusqu'en butée (vous entendrez un clic métallique). Pour le transport, à l'aide de
la poignée du chariot, pliez légèrement l'appareil et utilisez les deux roues arrière.
Pour déverrouiller et fermer le chariot, appuyez à nouveau sur le bouton de la poignée et abaissez complètement la poignée.
LA FOURNITURE
Cet appareil fonctionne avec une batterie au plomb rechargeable 12V 7Ah et un chargeur externe avec une alimentation secteur
110-240V 50 / 60Hz.
Lorsque la batterie est faible ou que l'appareil ne s'allume pas, connectez le chargeur à la prise (18) de l'appareil pour le recharger.
État du voyant LED de chargement:
- Voyant LED ROUGE (17): l'appareil est connecté au câble d'alimentation et la batterie se recharge.
- Voyant DEL VERT (17): opération de charge terminée, la batterie est chargée.
Remarque: ne connectez pas l'appareil à des prises dont la tension est différente de celle indiquée.
ALLUMÉ ÉTEINT
Appuyez sur le commutateur POWER (10) pour mettre l'appareil sous tension.
Appuyez sur l'interrupteur POWER (10) pour éteindre l'appareil.
ETRE PRÊT
Il est possible de mettre l'appareil en mode veille à l'aide du bouton (1) de la télécommande.
Pour réactiver l'appareil, appuyez à nouveau sur le bouton (1) de la télécommande ou éteignez et rallumez l'appareil avec l'interrupteur POWER (10).
Remarque: le mode veille n'affecte pas la lumière disco et l'éclairage du bouton central. Si vous souhaitez éteindre complètement l'appareil, utilisez
le commutateur POWER (10).
SÉLECTION DES FONCTIONS
Pour changer le mode de fonctionnement, appuyez plusieurs fois sur le bouton MODE (3) de l'appareil ou appuyez sur le bouton (16) de la télécom-
mande pour sélectionner: BLUETOOTH ("BLUE" apparaît sur l'affichage), USB (uniquement s'il y a un la mémoire est connectée, l'écran affiche «USB»),
AUX (l'écran affiche «AUX»).
1. Bouton LED, LED avant (Disco Light)
2. Touche MIC, volume du microphone
3. Touche MODE, sélection du mode
4. Touche ECHO, volume d'écho
5. GT VOL, volume de la guitare
6. Touche REC, enregistrement
7. Bouton PREV (Précédent)
8. Bouton PLAY / PAUSE
9. Bouton SUIVANT (Suivant)
10. Interrupteur POWER, marche / arrêt
11. Touche MIC.PRI, contrôle de priorité du microphone
12. Bouton TWS, activation de la fonction TWS
13. Entrée USB
14. Entrée micro MIC
15. Entrée GUITAR
16. Entrée AUX
17. Indicateur LED de charge
18. Prise de courant
1. Bouton , veille marche / arrêt
2. Bouton MUTE, haut-parleur muet
3. Bouton VOL +, pour augmenter le volume
4. Bouton 9, sélection de piste précédente
5. Bouton VOL -, pour diminuer le volume
6. Bouton FL-, sélection du dossier précédent
7. Bouton FL.REP
8. Bouton 5+
9. Bouton REPEAT
10. Bouton EQ, activation des égalisations audio préréglées
11. Bouton REC, enregistrement
12. Bouton , activation de la lecture / pause d'un morceau
13. Bouton:, sélection de la piste suivante
14. Bouton FL +, sélection du dossier suivant
15. Bouton 10+
16. Bouton MODE, sélection d'entrée active
TELECOMMANDE
Installation de la batterie:
Retirez le couvercle à l'arrière de la télécommande, insérez 2 piles de taille «AAA» (non fournies) en respectant la polarité indiquée
et fermez le couvercle.

15
XF 1850KBFRANCAIS
VOLUME / VOLUME DU MICROPHONE
1. Tournez le bouton central pour augmenter ou diminuer le volume global de lecture ou utilisez les boutons (3) et (5) de la télécommande.
2. Appuyez sur le bouton MIC et tournez le bouton central pour régler le volume du signal sur l'entrée MIC et sur le microphone sans fil. Le règlement
agit simultanément sur les deux appareils s'il est utilisé.
ÉGALISEUR
Cet appareil possède un système de pré-égalisation audio intégré. Appuyez plusieurs fois sur le bouton EQ (10) de la télécommande pour sélectionner
l'un des deux réglages audio disponibles.
ÉCHO
Appuyez sur le bouton ECHO (4) et utilisez le bouton central pour augmenter ou diminuer l'effet d'écho sur l'entrée MIC et sur le microphone sans fil.
EFFET DISCO-LIGHT
Pour activer les effets Disco-Light sur les enceintes, appuyez sur le bouton LED (1).
Pour désactiver l'effet Disco-Light, appuyez à nouveau sur le bouton LED (1).
FONCTIONNEMENT BLUETOOTH
1. Allumez l'appareil et appuyez sur le bouton MODE (3) sur l'appareil ou sur le bouton MODE (16) sur la télécommande et sélectionnez la fonction
Bluetooth, l'écran affichera "BLEU".
2. En mode Bluetooth, l'affichage commencera à clignoter, le système entrera automatiquement en recherche.
3. Activez la fonctionnalité Bluetooth sur l'appareil externe à appairer.
4. Commencez à rechercher des appareils. Une fois terminé, sélectionnez l'appareil "XF 1850 KB".
5. Entrez le mot de passe "0000" si demandé.
6. Appuyez sur la touche (8) de l'appareil ou sur la touche (12) de la télécommande pour démarrer la lecture et utilisez les touches 9(7) et
:(9), ou les touches (13) et ( 4) sur la télécommande pour la sélection de piste.
LECTURE SUR ENTREE USB
1. Allumez l'appareil.
2. Insérez une clé USB dans l'entrée (13). La lecture démarre automatiquement.
3. Pour mettre la lecture en pause, appuyez sur la touche (8) de l'appareil ou sur la touche (12) de la télécommande, l'écran affichera "PAUS".
4. Pour reprendre la lecture, appuyez à nouveau sur la touche de l'appareil ou de la télécommande.
5. Appuyez sur la touche :(9) ou sur la touche (13) de la télécommande pendant l'écoute pour passer à la piste suivante. Appuyez sur la touche
9 (7) ou (4) de la télécommande pour passer aux pistes précédentes.
6. En utilisant les touches 5+ (8) et 10+ (15), il est possible de passer à l'écoute de la cinquième ou dixième piste.
7. Appuyez une fois sur le bouton REPEAT (9) de la télécommande, l'écran affichera "ONE" pour lire la même piste en continu; appuyez dessus une
seconde fois, l'écran affichera "ALL", pour lire en continu toutes les pistes contenues dans l'USB.
Remarque:
- Le lecteur peut ne pas prendre en charge certains périphériques USB, cela est dû à l'incompatibilité de certains processeurs.
- Pour éviter les interférences nuisibles, connectez toujours les périphériques USB directement à l'unité, n'utilisez pas de rallonges.
- Depuis l'ordinateur, formatez les clés USB en FAT (16 ou 32).
AUX-IN
1. Appuyez sur le bouton MODE (3) de l'appareil ou sur le bouton MODE (16) de la télécommande et sélectionnez la fonction "AUX".
2. Connectez toute unité équipée d'une sortie audio à l'aide d'un câble Jack 3,5 mm (non inclus) à l'entrée AUX IN (16).
3. Ajustez l'appareil externe par vos propres commandes.
ENTRÉE GUITARE
Connectez n'importe quel instrument de musique avec un circuit de préampli à l'entrée (15), réglez le volume à l'aide de la commande GT VOL (5).
MIC IN
Connectez un microphone filaire (non fourni) à l'entrée (14), lisez les chapitres précédents pour les réglages MIC VOLUME et ECHO EFFECT.
MICROPHONE SANS FIL (SANS FIL)
1. Retirez le couvercle à l'arrière du microphone, insérez 2 piles de taille «AA» en respectant la polarité indiquée et fermez le couvercle;
2. Allumez le microphone en déplaçant l'interrupteur vers le haut. Si le commutateur est placé en position centrale, le microphone passe en "sourdine",
aucun son n'est transmis. Si l'interrupteur est mis en position basse, le microphone est désactivé.
3. Appuyez sur la touche MIC et utilisez le bouton central pour régler le volume du microphone sans fil;
4. Si le voyant d'alimentation clignote ou ne s'allume pas après avoir allumé le microphone, les piles sont faibles, remplacez-les immédiatement.
Remarque:
- La distance de réception du microphone sans fil est d'environ 15 mètres sans obstacles, ne pas utiliser à des distances plus grandes.
- Si plusieurs microphones sans fil sont utilisés dans la même pièce en même temps, ils doivent être réglés sur des fréquences différentes et
doivent être éloignés d'au moins 30 m.
- Ne placez pas l'appareil trop près des lecteurs DVD / CD / VCD car ils ont des fréquences qui pourraient affecter le microphone

16
XF 1850KB
FRANCAIS
LIMITATIONS D'UTILISATION POSSIBLES
- Cet appareil peut fonctionner sur des fréquences non autorisées dans la région où se trouve l'utilisateur. Il est conseillé de contacter les autorités
compétentes et de demander les informations nécessaires concernant les fréquences autorisées dans votre région pour les systèmes de micropho-
nes radio. Dans certains cas, une licence ministérielle peut être requise pour l'utilisation de cet appareil. Pour connaître les éventuelles exigences,
contactez les autorités compétentes. L'utilisateur assume seul la responsabilité de l'acquisition de la licence pour l'équipement radio-microphone
et la licence dépend de la classification et de l'application de l'utilisateur et de la fréquence choisie. (Décret législatif 269/2001 article 6 paragraphe
3). Les fréquences utilisées par ce produit sont autorisées uniquement sur le territoire italien et peuvent ne pas être utilisables dans d'autres pays.
Il est conseillé de contacter les autorités compétentes et de demander les informations pertinentes.
UK ES FR
DK MT IE
Pays européens pour lesquels le produit peut avoir des restrictions:
- Royaume-Uni: MISE EN ŒUVRE.
- Espagne: MISE EN ŒUVRE LIMITÉE.
- France: MISE EN ŒUVRE LIMITÉE, pour les utilisateurs professionnels.
- Danemark: MISE EN ŒUVRE LIMITÉE, plage de réglage.
- Malte: MISE EN ŒUVRE LIMITÉE, licence individuelle requise
- Irlande: NON MIS EN ŒUVRE
FONCTION TWS (uniquement disponible en BT)
Cette fonction vous permet de coupler deux unités XF 1850 Ko pour la lecture de musique stéréo à partir d'une source Bluetooth.
L'utilisation du mode TWS est simple:
1. Allumez les deux appareils et sélectionnez le mode de recherche BT.
2. Appuyez sur le bouton "TWS" de l'une des enceintes: vous entendrez un message audio indiquant une connexion réussie avec l'autre enceinte.
3. Activez la fonctionnalité Bluetooth sur l'appareil source à coupler et lancez la recherche. Sélectionnez l'appareil "XF 1850 Ko". Les deux haut-parleurs
sont prêts pour la lecture.
ENREGISTREMENT
Cet appareil est capable d'enregistrer sur la clé USB l'audio du microphone sans fil ou de tout microphone présent sur l'entrée MIC (14), il n'est pas
possible d'enregistrer à partir des fonctions Bluetooth et Aux. À l'intérieur de la mémoire USB, l'appareil créera automatiquement un dossier appelé
«Record» où il stockera tous les fichiers d'enregistrement.
1. Allumez l'appareil.
2. Insérez une clé USB.
3. Appuyez longuement sur le bouton REC (6) de l'appareil ou sur le bouton REC (11) de la télécommande pour démarrer l'enregistrement, l'indication
REC apparaîtra sur l'affichage (20) suivi de la durée de l'enregistrement.
4. Appuyez sur le bouton REC pour arrêter l'enregistrement. L'appareil passera automatiquement en fonction de lecture pour lire immédiatement le
morceau enregistré (indication REPLAY sur l'affichage).
Remarque:
- Lorsque la fonction «Enregistrement» est activée, certaines commandes de l'appareil sont inhibées, elles reprendront leur fonction normale à
l'arrêt de l'enregistrement.
- La fonction d'enregistrement peut ne pas prendre en charge certains périphériques USB, cela est dû à l'incompatibilité de certains processeurs.
FONCTION DE PRIORITÉ MICROPHONE
En activant cette fonction, le volume du son de la musique reproduite est automatiquement réduit lorsqu'il y a une voix sur le microphone.
1. Appuyez sur le bouton MIC.PRI (11) pour activer la fonction. OPEN apparaît sur l'affichage.
2. Lorsque vous utilisez le microphone sans fil ou le microphone filaire, le volume audio de la musique en cours de lecture est automatiquement
abaissé, puis revient au volume normal lorsque le microphone n'est plus utilisé.
3. Appuyez sur le bouton MIC.PRI (11) pour désactiver la fonction. OFF apparaît sur l'affichage.

17
XF 1850KBFRANCAIS
AVIS SUR LE RETRAIT ET LA MISE AU REBUT DES BATTERIES
Quel que soit le type de batterie épuisée, elle ne doit pas être jetée avec les ordures ménagères, au feu ou dans l'eau. Tenez la batterie éloignée des
sources de chaleur. Chaque type de batterie épuisée doit être recyclé ou éliminé dans les centres de collecte dédiés appropriés.
Attention: Cette opération est réservée exclusivement au personnel technique spécialisé!
PROCÉDURE DE RETRAIT DE LA BATTERIE DE L'ENCEINTE AMPLIFIÉE
Ne faites fonctionner qu'en l'absence de raccordement de l'appareil au secteur!
1. Retirez le panneau de commande supérieur en dévissant les vis présentes.
2. Retirez le panneau avant en dévissant les vis présentes.
3. Retirez le haut-parleur de graves en dévissant les vis qui le maintiennent.
4. Retirez les vis qui fixent les supports de batterie, retirez les supports, déconnectez la batterie et retirez-la.
CARACTÉRISTIQUES TECHNIQUES
Alimentation: 15V 4A avec alimentation externe 110-240V 50 / 60Hz
Batterie> plomb rechargeable interne 12V 7Ah
Puissance de transmission Bluetooth: 2,5 mW
Bande de transmission Bluetooth: 2,4 GHz
Dimensions: 380x330x660mm
Poids: 15 Kg
MICROPHONE SANS FIL
Fréquence de transmission: 208,6 MHz
Puissance d'émission: 10 mW (± 1)
Courant de fonctionnement: <30mA
Alimentation: 2x 1,5V (type «AA») non inclus
INFORMATIONS AUX UTILISATEURS
Précautions pour l'élimination correcte du produit
Le symbole figurant sur l'équipement indique que les déchets doivent être éliminés dans une «collecte séparée» et que le produit ne doit donc pas
être éliminé avec les déchets urbains.
L'utilisateur doit apporter le produit aux «centres de collecte des déchets séparés» spéciaux fournis par le gouvernement local, ou le livrer au détaillant
contre l'achat d'un nouveau produit.
La collecte séparée des déchets et les opérations ultérieures de traitement, de recyclage et d'élimination favorisent la production d'équipements avec
des matériaux recyclés et limitent les effets négatifs sur l'environnement et la santé causés par une mauvaise manipulation des déchets.
L'élimination illégale du produit entraîne l'application de sanctions administratives.

18
XF 1850KB
DEUTSCH
GEBRAUCHSHINWEISE
Dieses Gerät ist ein elektronisches Instrument höchster Präzision. Die Inbetriebnahme des Geräts sollte daher in den folgenden
Fällen vermieden werden:
• In der Nähe von Wärmequellen wie Heizkörpern und Öfen.
• Das Hören einer hohen Lautstärke für eine lange Zeit kann Ihr Gehör schädigen.
• In sehr feuchten Räumen wie Badezimmern, Schwimmbädern usw.
• In sehr staubigen Räumen.
• An Orten, die starken Schwingungen ausgesetzt sind.
• Das Gerät sollte so aufgestellt werden, dass an den Seiten jeweils genügend Raum verbleibt, um eine freie Luftzirkulation zu
ermöglichen (mindestens 5 cm).
• Die Ventilationsöffnungen dürfen nicht abgedeckt werden.
• Halten Sie das Ohr Lautsprecher während der Schritte des Brennpunkts und Volumenanpassungen , insbesondere die Lautstärke
auf ein Minimum in der Zündungsphase zu halten.
• Sollten Flüssigkeiten ins Innere des Geräts eindringen, den Stecker von der Steckdose unmittelbar abziehen und sich an die
nächstgelegene autorisierte TREVI-Kundendienststelle wenden.
• Vor dem Einschalten des Geräts ist sicherzustellen, dass Netzkabel und Anschlusskabel korrekt installiert sind.
• Das Gerät darf nicht mit Wasser oder Spritzwasser ausgesetzt werden. Keine Gegenstände, die mit Flüssigkeit gefüllt ist, wie
Vasen, auf das Gerät gestellt werden.
• Keine offenen Flammen, wie brennende Kerzen, platziert werden.
• In diesem Handbuch halten.
PFLEGE UND WARTUNG
Für die Reinigung wird die Verwendung eines leicht angefeuchteten, weichen Tuchs empfohlen. Der Einsatz von Lösungsmitteln
oder scheuernden Substanzen sollte vermieden werden.
WICHTIG
Dieses Gerät ist für den Heimgebrauch (nicht professionellen Gebrauch). Der fachgemäße Bau dieses Geräts gewährleistet langfristig
einen einwandfreien Betrieb. Sollten dennoch Betriebsstörungen auftreten, wenden Sie sich bitte an nächstgelegene autorisierte
TREVI-Kundendienststelle.
Die Firma TREVI verfolgt eine Politik ständiger Forschung und Weiterentwicklung. Die Produkte können daher andere als die be-
schriebenen Eigenschaften aufweisen.
BESCHREIBUNG DER ANSCHLÜSSE/BEDIENELEMENTE

19
XF 1850KBDEUTSCH
WAGEN
Drücken Sie die Taste am Wagengriff und heben Sie den Griff bis zum Anschlag an (Sie hören ein metallisches Klicken). Klappen Sie das Gerät zum
Transport mit dem Wagengriff leicht zusammen und verwenden Sie die beiden Hinterräder.
Um den Wagen zu entriegeln und zu schließen, drücken Sie die Taste am Griff erneut und senken Sie den Griff vollständig ab.
LIEFERN
DiesesGerätarbeitetmiteinem wiederaufladbaren12V 7Ah-Blei-Säure-AkkuundeinemexternenLadegerätmit110-240 V 50/60-Hz-Netzteil.
Wenn der Akku fast leer ist oder sich das Gerät nicht einschalten lässt, schließen Sie das Ladegerät zum Aufladen an die Buchse (18) des Geräts an.
STATUS DER LADE-LED:
- ROTE LED-Anzeige (17): Das Gerät ist an das Netzkabel angeschlossen und der Akku wird geladen.
- GRÜNE LED-Leuchte (17): Ladevorgang beendet, Akku wird aufgeladen.
Hinweis: Schließen Sie das Gerät nicht an Steckdosen mit einer anderen als der angegebenen Spannung an.
AN AUS
Drücken Sie den POWER-Schalter (10), um das Gerät einzuschalten.
Drücken Sie den POWER-Schalter (10), um das Gerät auszuschalten.
BEREITHALTEN
Sie können das Gerät mit der Taste (1) auf der Fernbedienung in den Standby-Modus versetzen.
Um das Gerät wieder zu aktivieren, drücken Sie die Taste (1) auf der Fernbedienung erneut oder schalten Sie das Gerät mit dem POWER-Schalter
(10) aus und wieder ein.
Hinweis: Der Standby-Modus hat keinen Einfluss auf das Disco-Licht und die Beleuchtung des zentralen Knopfs. Wenn Sie das Gerät vollständig
ausschalten möchten, verwenden Sie den POWER-Schalter (10).
1. LED-Taste, vordere LED (Disco Light)
2. MIC-Taste, Mikrofonlautstärke
3. MODE-Taste, Modusauswahl
4. ECHO-Taste, Echo-Lautstärke
5. GT VOL, Gitarrenlautstärke
6. REC-Taste, Aufnahme
7. Taste PREV (Zurück)
8. PLAY / PAUSE-Taste
9. WEITER (Weiter)
10. POWER-Schalter ein / aus
11. MIC.PRI-Taste, Mikrofonprioritätssteuerung
12. TWS-Taste, Aktivierung der TWS-Funktion
13. USB-Eingang
14. MIC-Mikrofoneingang
15. GUITAR-Eingang
16. AUX-Eingang
17. Lade-LED-Anzeige
18. Steckdose
1. Taste , Standby ein / aus
2. MUTE-Taste, Lautsprecher stumm schalten
3. VOL + -Taste, um die Lautstärke zu erhöhen
4. 9-Taste, vorherige Titelauswahl
5. VOL - Taste, um die Lautstärke zu verringern
6. FL-Taste, Auswahl des vorherigen Ordners
7. FL.REP-Taste
8. 5+ Taste
9. REPEAT-Taste
10. EQ-Taste, Aktivierung voreingestellter Audio-Equalizer
11. REC-Taste, Aufnahme
12. Taste , Aktivierung des Lesens / Anhaltens eines Songs
13. Taste :, Auswahl des nächsten Titels
14. FL + Taste, nächste Ordnerauswahl
15. 10+ Taste
16. MODE-Taste, aktive Eingangsauswahl
FERNBEDIENUNG
Batterieeinbau:
Entfernen Sie die Abdeckung auf der Rückseite der Fernbedienung, legen Sie 2 AAA-Batterien (nicht im Lieferumfang enthalten) ein
und achten Sie dabei auf die angegebene Polarität. Schließen Sie die Abdeckung.

20
XF 1850KB
DEUTSCH
FUNKTIONSAUSWAHL
Um die Betriebsart zu ändern, drücken Sie mehrmals die MODE-Taste (3) am Gerät oder die Taste (16) auf der Fernbedienung, um Folgendes
auszuwählen: BLUETOOTH ("BLAU" erscheint auf dem Display), USB (nur wenn eine vorhanden ist) Speicher ist angeschlossen, das Display zeigt
"USB"), AUX (das Display zeigt "AUX").
VOLUME / MIKROFON VOLUME
1. Drehen Sie den zentralen Knopf, um die Gesamtwiedergabelautstärke zu erhöhen oder zu verringern, oder verwenden Sie die Tasten (3) und (5)
auf der Fernbedienung.
2. Drücken Sie die MIC-Taste und drehen Sie den zentralen Knopf, um die Lautstärke des Signals am MIC-Eingang und am Funkmikrofon einzustellen.
Die Regelung wirkt bei Verwendung gleichzeitig auf beide Geräte.
EQUALIZER
Dieses Gerät verfügt über ein eingebautes Audio-Pre-Equalizer-System. Drücken Sie wiederholt die EQ-Taste (10) auf der Fernbedienung, um eine der
beiden verfügbaren Audioeinstellungen auszuwählen.
ECHO
Drücken Sie die ECHO-Taste (4) und erhöhen oder verringern Sie mit dem zentralen Knopf den Echoeffekt am MIC-Eingang und am Funkmikrofon.
DISCO-LIGHT-EFFEKT
Drücken Sie die LED-Taste (1), um die Disco-Light-Effekte an den Lautsprechern zu aktivieren.
Drücken Sie die LED-Taste (1) erneut, um den Disco-Light-Effekt zu deaktivieren.
BLUETOOTH-BETRIEB
1. Schalten Sie das Gerät ein und drücken Sie die MODE-Taste (3) am Gerät oder die MODE-Taste (16) auf der Fernbedienung. Wählen Sie die
Bluetooth-Funktion. Auf dem Display wird "BLAU" angezeigt.
2. Im Bluetooth-Modus beginnt die Anzeige zu blinken und das System ruft automatisch die Suche auf.
3. Aktivieren Sie die Bluetooth-Funktion auf dem externen Gerät, das gekoppelt werden soll.
4. Beginnen Sie mit der Suche nach Geräten. Wenn Sie fertig sind, wählen Sie das Gerät "XF 1850 KB".
5. Geben Sie auf Anfrage das Passwort "0000" ein.
6. Drücken Sie die Taste (8) am Gerät oder die Taste (12) auf der Fernbedienung, um die Wiedergabe zu starten, und verwenden Sie die Tasten
(7) und (9) oder (13) und ( 4) auf der Fernbedienung zur Titelauswahl.
WIEDERGABE AUF USB-EINGANG
1. Schalten Sie das Gerät ein.
2. Stecken Sie einen USB-Speicher in den Eingang (13). Die Wiedergabe startet automatisch.
3. Um die Wiedergabe anzuhalten, drücken Sie die Taste (8) am Gerät oder die Taste (12) auf der Fernbedienung. Auf dem Display wird "PAUS"
angezeigt.
4. Um die Wiedergabe fortzusetzen, drücken Sie erneut die Taste am Gerät oder auf der Fernbedienung.
5. Drücken Sie die Taste (9) oder die Taste (13) auf der Fernbedienung, während Sie den nächsten Titel hören. Drücken Sie die Taste (7) oder (4)
auf der Fernbedienung, um zu den vorherigen Titeln zu springen.
6. Mit den Tasten 5+ (8) und 10+ (15) können Sie den fünften oder zehnten Titel anhören.
7. Drücken Sie die REPEAT-Taste (9) einmal auf der Fernbedienung. Auf dem Display wird "ONE" angezeigt, um denselben Titel kontinuierlich abzu-
spielen. Wenn Sie es ein zweites Mal drücken, wird auf dem Display "ALL" angezeigt, um alle im USB enthaltenen Titel fortlaufend abzuspielen.
Hinweis:
- Der Player unterstützt möglicherweise einige USB-Geräte nicht. Dies liegt an der Inkompatibilität einiger Prozessoren.
- Um schädliche Interferenzen zu vermeiden, schließen Sie USB-Geräte immer direkt an das Gerät an und verwenden Sie keine Verlängerungskabel.
- Formatieren Sie die USB-Speicher vom Computer aus in FAT (16 oder 32).
AUX-IN
1. Drücken Sie die MODE-Taste (3) am Gerät oder die MODE-Taste (16) auf der Fernbedienung und wählen Sie die Funktion "AUX".
2. Schließen Sie jedes Gerät, das mit einem Audioausgang ausgestattet ist, mit einem geeigneten 3,5-mm-Buchsenkabel (nicht im Lieferumfang
enthalten) an den AUX IN-Eingang (16) an.
3. Stellen Sie das externe Gerät selbst ein.
Gitarreneingang
SchließenSieeinbeliebigesMusikinstrumentmiteinem Vorverstärkeran den Eingang(15)an und stellenSiedie Lautstärke mitdemGTVOL-Regler(5)ein.
MIC IN
Schließen Sie ein kabelgebundenes Mikrofon (nicht im Lieferumfang enthalten) an den Eingang (14) an. Lesen Sie die vorherigen Kapitel für die
Einstellungen für MIC VOLUME und ECHO EFFECT.
Table of contents
Languages:
Other Trevi Speakers manuals

Trevi
Trevi MPV 1710 SB User manual

Trevi
Trevi XR 74 BT User manual

Trevi
Trevi XF 750 KB User manual

Trevi
Trevi AVX 570 BT User manual

Trevi
Trevi XR 180 BT User manual

Trevi
Trevi XR 90 BT User manual

Trevi
Trevi AVX 575 BT User manual

Trevi
Trevi XR 84 PLUS User manual

Trevi
Trevi XR 200 BT User manual

Trevi
Trevi XR 8A18 User manual

Trevi
Trevi XR 190 BT User manual

Trevi
Trevi XF 4500 DJ User manual

Trevi
Trevi SB 8312 TV User manual

Trevi
Trevi XR 82 BT User manual

Trevi
Trevi AVX 575USB User manual

Trevi
Trevi XT 10A8 BT User manual

Trevi
Trevi XF 460 User manual

Trevi
Trevi XR 8A15 User manual

Trevi
Trevi SB 8320TV User manual

Trevi
Trevi XT 104 BT User manual