Stagg SLI-FLATPAR2 User manual

!
User Manual
FLATPAR 2
SLI-FLATPAR2

!
Unpacking: Thank you for purchasing this product. Every model has been
thoroughly tested and has been shipped in perfect operating condition.
Carefully check the shipping carton for damage that may have occurred during
shipping. If the packaging appears to be damaged, carefully inspect your product
for any damage and be sure all equipment necessary to operate the unit has
arrived intact.
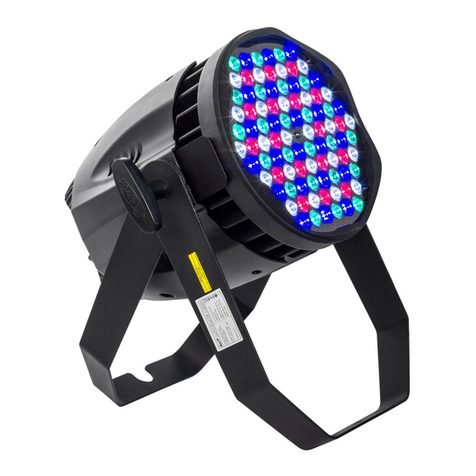
Introduction: This product has 4 and 7 DMX channels. It can operate in 4
different modes: automatic, DMX control, sound-active, or in a master/slave
configuration. This product comes with several built-in programs that can be
used, while operating as a dimmer unit or when used in multiples linked in a
master/slave configuration. For best results, use in conjunction with fog or
special effects machines to enhance the beam projections.
Warning! To prevent or reduce the risk of electrical shock or fire, do not expose
this unit to rain or moisture.
Warning! Avoid looking directly into the light source at all times! This may
cause severe eye damage.
Installation
1. The light can be installed anywhere, but the light must be at a distance of 1m
minimum from people or other objects at all times. Please make sure the light is
fixed steadily; moreover, the product should be earthed.
2. Please make sure the rated voltage and frequency suit your local voltage.
3. DMX512 connection:The DMX512 signal of the controller is connected
through the Input and Output 3pins XLR light sockets. (1 Earth, 2 Negative,
3 Positive)
The length of the signal cable should be less than 100m in order to avoid
interference. The light will work according to the IP Code which you selected
when you are using the DMX512 controller control equipment. Please refer to
the pictures below.

!
Features
• RGBWColour Mixing
•Colour Strobe Effect
• Colour Mix Effect
• LED Chases (Adjustable Speeds)
• Electronic Dimming 0-100%
• Built in Microphone
• DMX-512 protocol
• 4 and 7 DMX Channels
• 4Operating Modes –Automatic, Sound Active, Master/Slave
Mode and DMX Control
•DMX-512 Protocol Compatible (Uses seven DMX Channels)
•Digital Display for Address and Function Setting

!
Display Functions
Addr -DMX Address Setting via
control board
1. Tap the MENU button and UP or
DOWN button until “Addr” is displayed,
then press ENTER.
2. “Axxx” will now be displayed, “x”
represents the displayed address.
Press the UP or DOWN buttonsto find
your desired address.
Auto -This menu will let you select
your desired auto mode
1. Tap the MENU button and UP button
or DOWN button until “Auto” is
displayed, then press ENTER.
2. “Autx” will now be displayed. You
can confirm two modes by pressing UP
or DOWN for auto mode.
3. Again press ENTER, appear SPx.
By using UP and DOWN adjust the
auto speed (SP1-SP9)
Colo -This menu will let you select your desired fixed colour
1. Tap the MENU button and UP or DOWN button until “CoLo” is displayed,
press ENTER.
2. Either “CoL X” (“X” representing a number between 1-9) or “AtF” will be
displayed. Press the UP or DOWN button to select either a static colour or “AtF”
mode. If you select a static colour, press ENTER and it will be confirmed.
3. “AtF” Make your own colour by mixing and adjusting the red, blue, green and

!
white manually. Select “AtF”, press ENTER; “rxxx” “Gxxx”“bxxx” or “Uxxx” will be
displayed. You can then adjust it between 1-255, press ENTER; you can mix
other coloursby pressing UP or DOWN to adjust it.
Chan -This menu will let you select your desired DMX Channel mode.
1. Tap the MENU button and UP button or DOWN button until “Chan”
is displayed, press ENTER.
2. “X Ch” will now be displayed, “X” represents the displayed DMX channel
mode. Press the UP or DOWN button to choose your desired Channel mode.
Soun -This menu will let you select your desired sound mode
1. Tap the MENU button until “Soun” is displayed, then press ENTER.
2. “Soux” will now be displayed. You can confirm two modes by pressing UP or
DOWN for sound mode.
3.Tap “ENTER” again, the display will show “SL-XX”, then you can adjust sound
sensitivity from 0-9 by pressing “UP” and “DOWN”
SLav-This menu will let you select your desired Master/slave mode
1. Tap the MENU button until “SLav” is displayed, then press ENTER.
2. “Sla ” will now be displayed; Slave mode is confirmed. It will be slaved by auto
mode,sound mode and colour mode.
VER -This will display the software version
1. Tap the MENU button until “VER” is displayed. Press the ENTER button and
the software version will be displayed.
2. Press the MENU button to leave this function.
DMX control
This will allow you to control each individual fixture trait with a standard DMX-512
controller such as the Stagg Commandor series.
Creating unique programs tailored to your individual needs.

!
DMX Channels & Value
DMX Channels & Value : 4 Channel Mode
Channel
Value
Function
ch1
0--255
red (0%--100%)
ch2
0--255
green (0%--100%)
ch3
0--255
blue (0%--100%)
ch4
0--255
white (0%--100%)
DMX Channels & Value : 7 Channel Mode
Channel
Value
Function
Ch1
0 –255
Dimmer ( 0% -- 100% )
Ch2
0 –255
Red ( 0% -- 100% )
Ch3
0 –255
Green ( 0% -- 100% )
Ch4
0 –255
Blue ( 0% -- 100% )
Ch5
0 –255
White ( 0% -- 100% )
Ch6
0 –255
Strobe/auto speed ( slow –fast )
Ch7
0 –15
No function
16 –37
Colour fade
38 –60
Colour slow appear and slow
disappear
61 –83
Colour change
84 –106
Colour slow appear and fast
disappear
107 –129
Colour slow in and fast out
130 –152
Colour strobe in and slow out
153 –175
Colour fast and slow out
176 –198
Colour strobe and fade out
199 –221
Colour change and strobe
222 –244
Sound Active 1
245 –255
Sound Active 2

!
Specifications
•Light Source: 7 pcs, 8W 4-in-1 LED
•Beam angle: 25°
•Life Expectancy: 80000 hours
•Dimming 0-100% with regulated constant colour control
•Strobe: 0~20Hz (any colour)
•Power consumption:82,5 W
•Brightness (1m): 6,100 Lux at 1m
•DMX control: 4 and 7 CH
•Control panel: Digital 4 characters (alphanumeric)
•Input voltage: AC100-240V, 50-60HZ (Power supply switch)
•Maximum Ambient Temperature:40°C
•Packing size: 300 x325 x 150mm
•Net weight: 2.66kg

!
!
IMPORTANT SAFETY INSTRUCTIONS
READ AND KEEP THESE INSTRUCTIONS. HEED ALL WARNINGS.
• If, after you have followed the instructions outlined above, this device fails to function, please
contact your dealer. Under no circumstances should this device be opened. Leave all servicing to
qualified personnel.
• Electrical appliances must never be used in conditions of high humidity or heat. To prevent any risk
of fire or electric shock, never spill or splash liquids on this device. Should this happen, unplug the
power cable from the mains outlet and switch off the mixer immediately.
MARKING & CONFORMITY
1. The CE mark on this product means it conforms to the EMC Directive (2004/108/CE), CE marking
Directive (93/68/EEC) and Low Voltage Directive (2006/95/EC).
2. The «Crossed-out Wheeled Bin» is to draw your attention to the WEEE (Waste Electric &
Electronic Equipment) Directive (2002/96/EC). It means this apparatus must be collected separately
for recycling.
3. «RoHS compliant» means this device conforms to the Directive (2002/95EC) on the restriction of
the use of certain hazardous substances in electrical and electronic equipments, such as: Mercury,
Lead, Cadmium, Hexavalent Chromium, Polybrominated Buphenyl (PBB) and Polybrominated
Diphenyl Ethers (PBDE).
09-10-2012 –15.43
Table of contents

