Stahl-Tek A.B.C. User manual

A.B.C.
User Manual
Stahl~Tek

Stahl~Tek A.B.C. Page 2
Safety Instructions
The lightning ash with the arrowhead symbol within an equilateral triangle is intended to alert the user to the
presence of “dangerous voltage” inside the product that may constitute a risk of electric shock.
The exclamation point within an equilateral triangle is intended to alert the user to the presence of important
operating and maintenance instructions in the literature accompanying the product.
TO REDUCE THE RISK OF ELECTRIC SHOCK, AND/OR DAMAGE TO THE UNIT DO NOT REMOVE
COVER. NO USER-SERVICEABLE PARTS INSIDE. REFER SERVICING TO QUALIFIED SERVICE
PERSONNEL
Read Instructions: Read all the safety and operating instructions before operating this
Retain Instructions: Retain safety and operating instructions for future reference.
Heed Warnings: Adhere to all warnings on the product and in the operating instructions.
Follow Instructions: Follow all operating and use instructions.
Cleaning: Unplug this product from the wall outlet before cleaning. Use a damp cloth for cleaning. Clean the
outside of the product only.
Attachments: Do not use attachments that are not recommended by the product manufacturer; they may be
hazardous.
Water and Moisture: Do not use this product near water.
Accessories: Do not place this product on an unstable cart or stand. The product may fall, causing bodily injury
and damage to the product. A product and cart combination should be moved with care. Quick stops, excessive
force, and uneven surfaces may cause the product and cart to overturn.
Ventilation: Slots and openings in the cabinet are provided for ventilation to ensure reliable operation of the
product and to protect it from overheating. These openings must not be blocked or covered. This product should
not be placed in a built-in installation such as a bookcase or rack unless proper ventilation is provided.
Power Sources: Operate this product only from the type of power source indicated on the label. If you are not
sure of the type of power supply to your home, consult your dealer or local power company. This product is
equipped with a three-prong grounding plug. This plug will only t into a grounding power outlet. If you are
unable to insert the plug into the outlet, contact your electrician to replace your obsolete outlet. Do not defeat
the safety purpose of the grounding plug.
Power Cord Protection: Power supply cords should be routed so that they are not likely to be walked on or
pinched by items placed upon or against them.
Lightning: Unplug the unit from the wall outlet for added protection during a lightning storm and when it is left
unattended and unused for long periods of time. This will prevent damage to the product due to lightning and
power line surges.
Overloading: Do not overload wall outlets or extension cords. This can result in a re or electric shock.
Inserting Objects into Unit: Never push objects of any kind into this product through any openings; they may
touch dangerous voltage points or short out parts that could result in re or electric shock.
Servicing: Do not attempt to repair or service this product yourself. Opening or removing covers may expose
you to dangerous voltage and other hazards. Refer all servicing to qualied service personnel.
Stahl~Tek A.B.C. Page 3
The lighning ash with arrowhead
symbol, within an equilateral triangle, is
intended to alert the user to the presence
of uninsulated “dangerous volage” within
the product’s enclosure that may be of
sufcient magnitude to constitute a risk of
electric shock to persons.
Damage Requiring Service: Unplug this product from the wall outlet and refer servicing to qualied service
personnel under the following conditions: a) If the power-supply cord or plug is damaged. b) If liquid has been
spilled into the product. c) If the product has been exposed to rain or water. d) If the product does not operate
normally by following the operating instructions. e) If the product has been dropped or damaged in any way. f)
If the product exhibits a distinct change in performance.
Replacement Parts: When replacement parts are required, be sure the service technician has used replacement
parts specied by the manufacturer. Unauthorized substitutions may result in re, electric shock, and other
hazards.
Safety Check: Upon completion of any service or repairs to this product, ask the service technician to per- form
safety checks to determine that the product is in proper operating condition.
Wall or Ceiling Mounting: Mount the product to a wall or ceiling only as recommended.
Heat: The product should be situated away from heat sources such as radiators, heat registers, stoves, and other
products (including ampliers) that produce heat.
Compliance Information
This device complies with part 15 of the FCC rules. Operation is subject to the following two conditions;
This device may not cause harmful interference, and►
This device must accept any interference received, including interference that may cause undesired ►
operation.
Additional Safety Information
CAUTION
RISKOFELECTRIC SHOCK
DONOTOPEN
Caution
To reduce the risk of electric shock, do not remove
cover (or back). No user-servicable parts inside. Refer
servicing to qualied service personnel.
Warning
To reduce the risk of re or electric shock, do not
expose this appliance to rain or moisture.
Marking by the “CE” symbol (shown
left) indicates compliance of this device
with the standards of the European
Community.
The exclamation point within an
equlateral triangle is intended to alert
the user to the rpesence of important
operating and maintenance (servicing)
instructions in the literature accompanying
the appliance.

Stahl~Tek A.B.C. Page 4
Introduction
Your Expectations of Sound Quality...
When approaching digital audio, approach it as you would a connoisseur of ne wine. At Stahl~Tek,
we approach the A.B.C. in a similar way: as a nely grown and cared-for vintage. Our expectations
are high, as yours should be. The A.B.C. streams bit perfect audio data up to 24-bit @ 192kHz,
providing a signal clear, and true to its source. The A.B.C. will output true, 24-bit audio les and supports a
variety of sample rates: 44.1kHz, 48kHz, 88.2kHz, 96kHz, 176.4kHz, and 192kHz.
Digital processes may represent a sound exactly. Just as a professional taster might select the exact vintage after
careful inspection, so the computer will read, and re-read a disc as many times as it needs to, to ensure it has the
“exact” sound. This process is more accurate than a CD player may achieve: the player will read through only
once. It does not have the benet, as the taster does, to go back and resample.
The A.B.C. is nely designed to t effortlessly within your digital system. Your digital system will function
together as parts of an instrument. Your A.B.C. is built to match to your system, becoming a “bridge” between
your computer and your DAC.
Please ll in the information below for your records (The serial number is located on the back of the unit.):
Ownership Information: Stahl~Tek A.B.C.
Stahl~Tek Dealer:
Date of Purchase: / / Dealer Phone: ( ) -
Mailing P.O. Box 125
Address: Clute, TX 77531
Phone: (979) 265-5114
Fax: (979) 265-1211
Website: www.stahltek.com
Email: [email protected]
Keep for Your Records
If You Want to Contact Us

Stahl~Tek A.B.C. Page 5
Contents
Safety Instructions .............................................................................................................................................2
Compliance Information ...........................................................................................................................3
Additional Safety Information..................................................................................................................3
Caution.........................................................................................................................................3
Warning........................................................................................................................................3
Introduction........................................................................................................................................................4
Keep for Your Records ..............................................................................................................................4
If You Want to Contact Us.........................................................................................................................4
Unpacking the Unit............................................................................................................................................6
Directions ....................................................................................................................................................6
Contents ......................................................................................................................................................6
Setting Up Your Digital Music Collection .......................................................................................................7
What are the Goals of a Digital Music Collection? .............................................................................7
How do I Rip Archival Quality? ..........................................................................................................7
What File Format Should I Use? .................................................................................................7
Is My Ripping Software Up to the Job?.......................................................................................8
Do I have a secure place to store the les when I am done? ......................................................8
Do I have enough space to store the les? ..................................................................................9
Getting to Know Your A.B.C...........................................................................................................................10
Putting It Together........................................................................................................................................... 11
Set Up Your Storage........................................................................................................................... 11
Set Up Your A.B.C.............................................................................................................................12
Connect Your A.B.C...........................................................................................................................14
Connecting the A.B.C. to the DAC............................................................................................14
Option: Using Passthrough Mode..............................................................................................14
Set Up Your Computer.......................................................................................................................15
Select Your Audio Output ..................................................................................................................15
Technical Specications...................................................................................................................................17
Minimum Computer Hardware Requirements.....................................................................................17
A.B.C. Specications................................................................................................................................17
A.B.C. Features ........................................................................................................................................17
A.B.C. Supported Protocols ....................................................................................................................18
Maintenance and Repairs................................................................................................................................19
Cleaning the A.B.C...................................................................................................................................19
Repairing the A.B.C.................................................................................................................................19
Troubleshooting................................................................................................................................................20
Glossary ............................................................................................................................................................21
Warranty...........................................................................................................................................................22

Unpacking the Unit
Directions
Please remove all jewelry to keep from scratching the unit. 1.
Make sure the box is positioned with the “This Side Up” label.2.
Carefully lift the front ap to open the box.3.
Remove the top foam piece.4.
Remove the package containing the Quick Start Guide and the Driver Disks, and set aside.5.
Remove the small white box containing the charger.6.
Remove side foam.7.
Remove back foam.8.
Lift the unit carefully from the box. 9.
Save all boxes and pieces of foam for transport.10.
Remember to note the Serial Number (located on the back bottom right of the unit) in the front of this manual.11.
Contents
Stahl~Tek A.B.C.►
DC Power Adapter►
Quick Start Guide►
Windows Drivers CD►

Stahl~Tek A.B.C. Page 7
Setting Up Your Digital Music
Collection
What are the Goals of a Digital Music Collection?
A wine may be perfected over generations; the equipment an audiophile employs should be as nely tuned. A
well-built interface, such as possessed by the A.B.C., does not interfere with the rened quality of the audio, yet
passes it along faithfully to its destination.
Care is given to the preservation of wine, from the angle it is stored at to the proper temperature of the room.
When dening goals for a digital audio collection, so too must the audiophile pay attention to such details.
When storing music, the music should be transferred from analog to digital in a precise manner. And just as the
wine connoisseur has a carefully crafted storage, so should the digital audio system’s hard disks be well-kept
and operated.
The music should be reproduced faithfully to its source, and stored in a safe, secure manner for years to come.
Because so much depends on the quality of the le, in addition to the quality of the equipment, part of the goal
should be to “do it right the rst time.”
How do I Rip Archival Quality?
When ripping to an archival collection, your motto should be, “Do it right the rst time.” As this is a relatively
new technology for many, this manual will seek to cover its basics, and to direct you to places where you may
nd additional resources.
When ripping, there are a number of important considerations. These are:
Consideration Why It’s Important
What le format should
I use?
Different le formats have different benets. We will get into these in
a moment.
Is my ripping software
up to the job?
A computer is able to read a disc multiple times when ripping. Ripping
software with good error-checking can check yet more often, and
potentially recover music from partially damaged discs. In addition,
some ripping software only rip at a lower rate, or only into certain
formats.
Do I have a secure
place to store the les
when I am done?
By secure we mean, will it last, and is it protected against such things
as hard drive failure?
Do I have enough space
to store the les? Audio les can be quite large, so ensure you have plenty of space.
What File Format Should I Use?
Ripping at rst may seem as though it is a simple thing. That is, most computers will rip a disc with a fair
amount of ease. The concerns of an audiophile, however, are different than the average computer user.
Audiophile seeks to preserve and appreciate a higher-quality sound. The goal when ripping and storing the
music then, should be approached with care and art.

Stahl~Tek A.B.C. Page 8
The audiophile will choose le formats and software best suited to this goal.
When choosing a le format, many audiophiles go with AIFF, WAV, or FLAC for long-term storage. The below
table summarizes some benets of each.
In addition to a “working copy,” Stahl~Tek recommends having an “archival copy.” That is, a master set of les
preserved carefully in the highest quality digital format. All working copies then, will be made from this digital
master, which is to be set aside and preserved.
File
Format Some Benets Some Potential Issues
AIFF
AIFF works well with Macintosh computers,
devices, and iTunes. It is a non-compressed
and lossless format.
Subtle differences introduced into the
format over time can cause a risk of
loss of metadata (that is, information
such as title tracks, album names, and
so forth).
WAV
WAV has been with Windows for years and is
well-supported throughout a number of devices
aside from Windows, although it will not
always work on Apple products. It is typically
(though not always) non-compressed.
Subtle differences introduced into the
format over time can cause a risk of
loss of metadata (that is, information
such as title tracks, album names, and
so forth).
FLAC
FLAC is an open source audio format. It stores
metadata very well, and can be converted
easily into WAV or AIFF without altering the
original data. It is also more standardized than
the other two formats.
While supported on many devices,
it is less prevalent than AIFF or
WAV. In addition, it uses lossless
compression, which may be a turnoff
for some users.
Is My Ripping Software Up to the Job?
When you begin to rip, there are a number of software packages available to you. Some of them have a better
interface, others offer more features. As you explore the digital side of audio, you will try different software and
develop favorites, preferences. Here are a few you might begin your journey with.
Operating System Ripping Software Why We Like It
Mac Max Good overall features, easy to use
Mac iTunes Nice integration over a number of devices
PC dBpoweramp Strong features, easy to use
PC Jriver Media
Center
Nice interface, works across a multitude
of devices; runs on your PC with
“controller” software for a Mac portable
device, such as an iPad
Do I have a secure place to store the les when I am done?
Because preservation of one’s collection must be approached as an art, storage must be approached similarly.
When preparing your collection, you will want at least two copies, an Archival (or “master” copy), and a
Working copy. The Archival copy will be invaluable should an experimental edit go awry, or should you wish to
convert to a different format for use on different devises.
Other guides suggest as many as three, though two should be considered the minimum.
Many guides will also point you towards the use of RAID systems. RAID stands for Redundant Array of

Stahl~Tek A.B.C. Page 9
Independent Disks. What this means is, when data is written to one disk, it is simultaneously written to other
disks as well. If one drive fails, you still have your data.
RAID systems should be combined with automated backups for data security. They should not be considered
the same as a backup.
Do I have enough space to store the les?
Audio les, especially high quality ones, can be large. The higher the quality, the larger the le. File type and
codec play a role as well. A lossless compression format such as FLAC will result in a smaller size than WAV
or AIFF. A lossy compression format such as MP3 takes up the least amount of space, though obviously, an
audiophile is not ripping to MP3. Obviously, longer albums will require more space.
Stahl~Tek A.B.C. Page 10
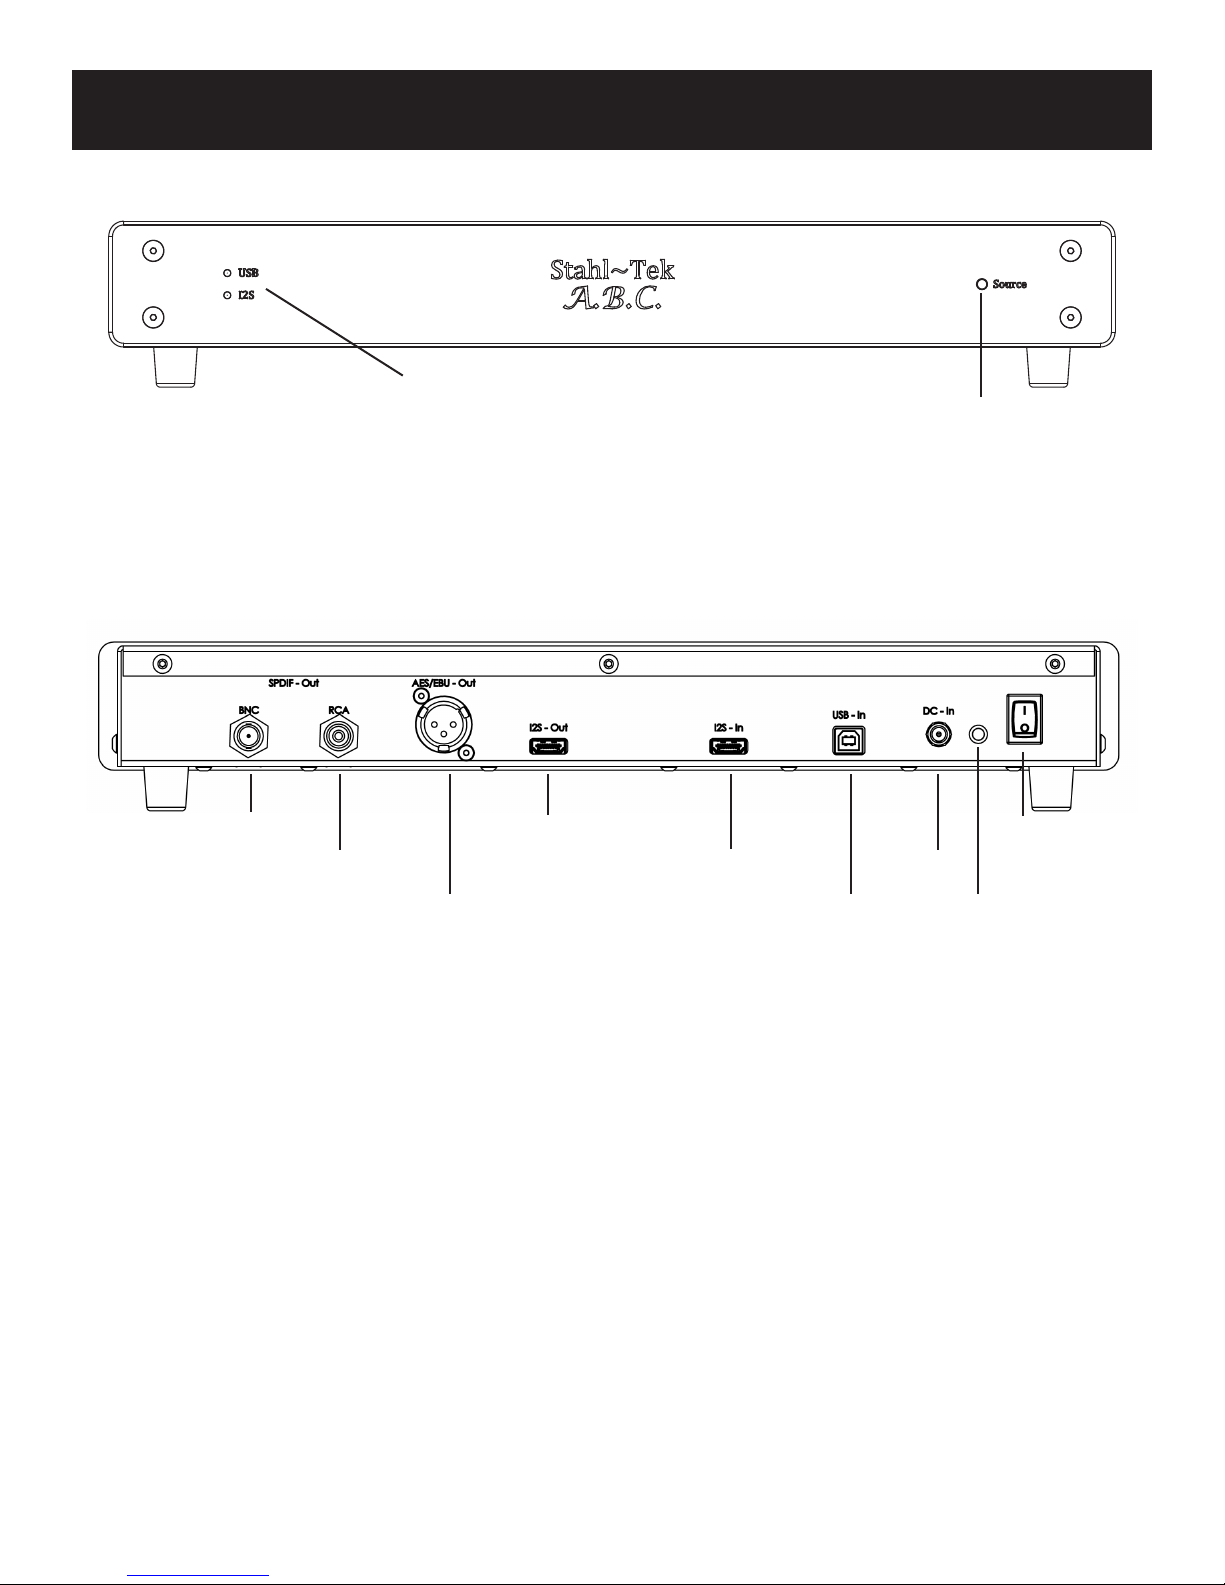
5
Source Selector
Using this, you may select
either a USB or an I2S
Source.
Source Indicators
When lit, this indicates that the
A.B.C. is receiving data from
either USB or I2S.
BNC Out I2S Out Power .
RCA Out I2S In DC In
AES/EBU
Out
USB In
Getting to Know Your A.B.C.
Charge
Indicator

Stahl~Tek A.B.C. Page 11
Putting It Together
Computer
A.B.C. DAC
Music File
Storage
Software
1 4 2 3
1Set Up Your Storage
Most storage devices are in the form of a RAID or external hard drive. The manufacturer’s instructions
will show you how to properly attach your storage device to your computer.
Charge Your A.B.C.
Attach the power cord to the A.B.C., then plug the A.B.C. into an outlet. Note, this will also begin to
charge the unit’s battery.* The Charge Indicator light at the back will indicate when the charge is full.
Green indicates full, while orange indicates charging. The rst time this is done, the process will take
approximately 15 hours. However, you may use the A.B.C. while charging, so continue on to step 3.
DC PLUG
DC PLUG
DC Plug
2
* The wall charger comes with several different adapters for use in various countries or regions.
Stahl~Tek A.B.C. Page 12
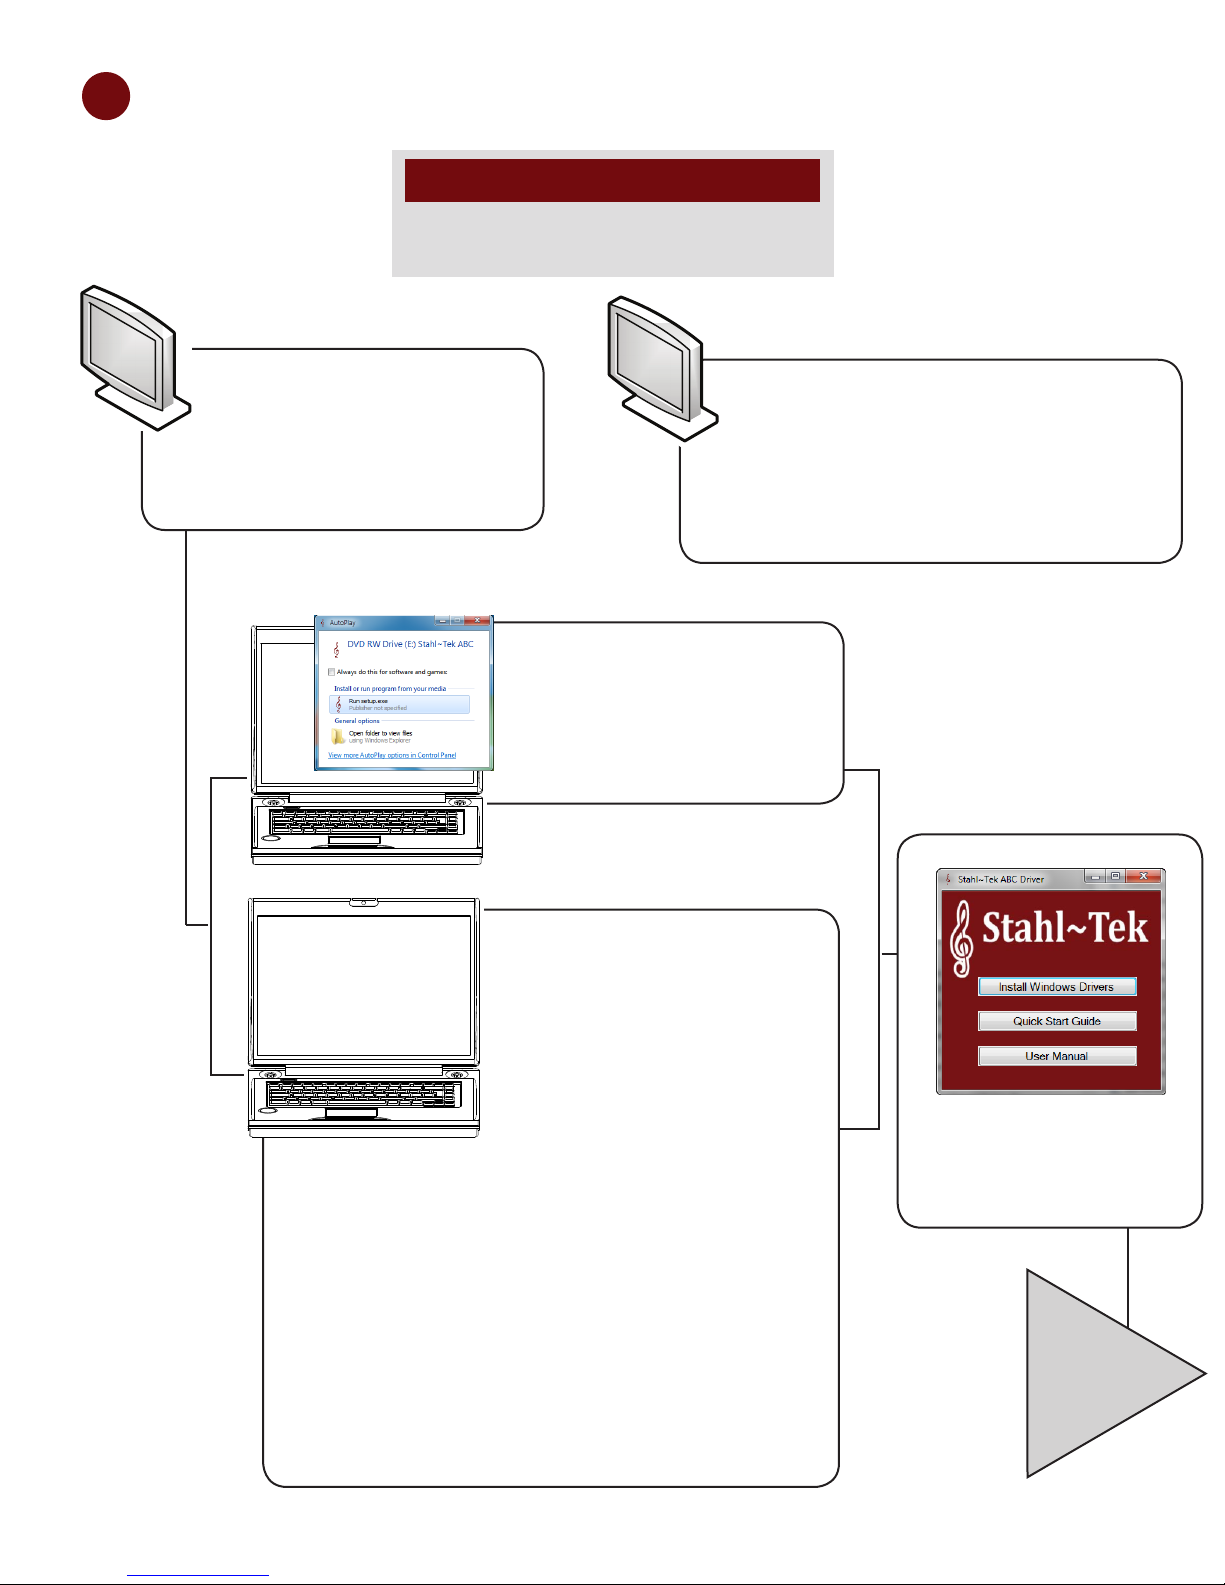
3Set Up Your A.B.C.
Do not connect the A.B.C. until prompted by the
installation software.
NOTICE
If you’ve a Macintosh, the Stahl~Tek ABC
is supported out of the box. .
Hook up the unit to your computer, and
proceed to Step 5: Attaching Your A.B.C. to
the DAC.
Then...
If Windows asks you what to
do, select the option to Launch
Stahltek_Setup.exe.
Select Install Windows
Drivers.
If nothing appears to happen
when you inserted the CD,
navigate to Start
If nothing appears to happen
when you inserted the CD,
navigate to Start > My
Computer (Win XP) or Start
> Computer (Vista/Win 7).
Then, double-click on the CD-
ROM’s icon to open it.
Find the le Stahltek_Setup.
exe and double-click on it. If
Windows asks if you would
like to allow this program
to make changes to your
computer, click Yes. This will
cause the setup window to
appear.
Mac
?
...
If you’ve a PC, insert the
Stahl~Tek ABC USB 2.0 Driver
CD into your computer’s CD-
ROM.
PC

Stahl~Tek A.B.C. Page 13
...
Click Next on the setup window. Select an Install Location.
The install process may take some time.
Select Install This Driver Anyway when
prompted. This will occur twice
Connect the A.B.C. unit to the computer.
Click Finish to complete the install.
Hook up the unit to your computer, and
proceed to Step 5: Attaching Your A.B.C.
to the DAC.
Stahl~Tek A.B.C. Page 14
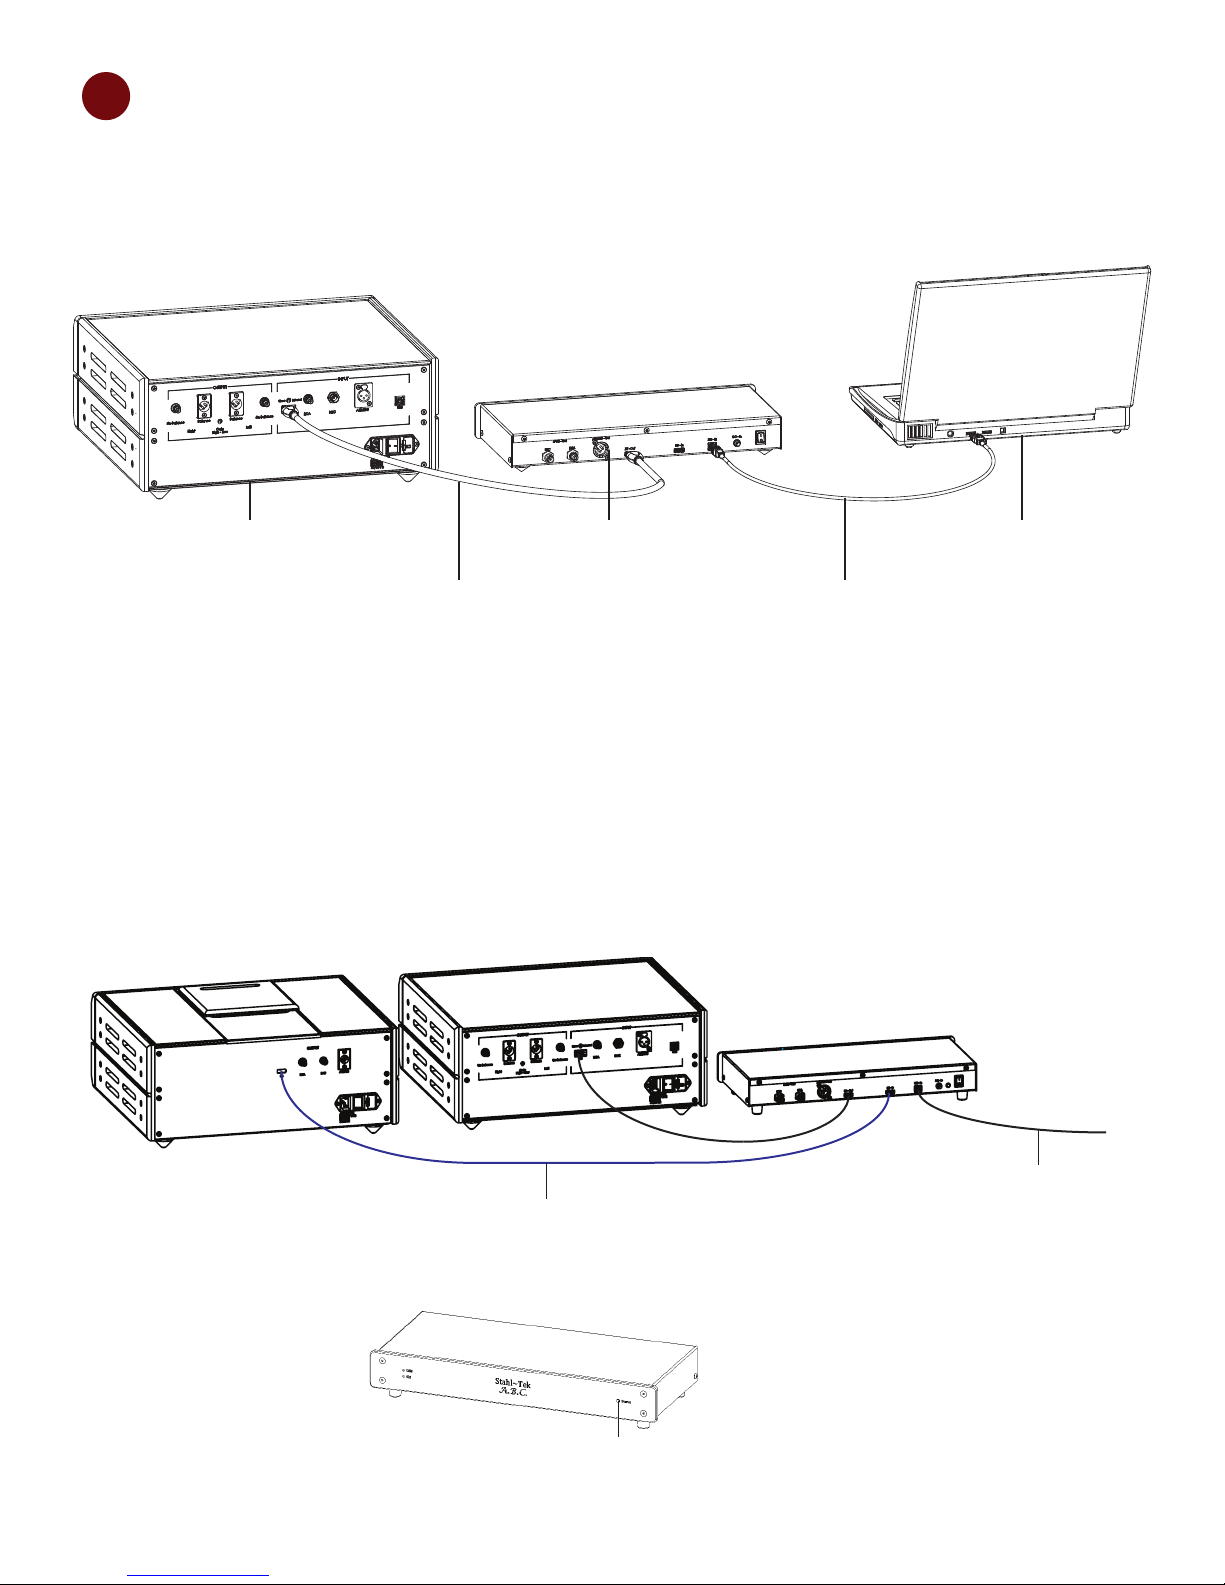
USB from PC to ABC
I2S Cable from CD Transport to I2S-In on ABC
Press Source to select I2S
4Connect Your A.B.C.
DAC A.B.C. Computer
1. Attach the A.B.C. to the DAC.
I2S Stahl~Tek
HDMI
USB
2. Turn the A.B.C. on by putting the switch in the “On” position.
1. Connect your transport to the A.B.C. using the I2S In.
2. Connect the DAC to the A.B.C. using the I2S Out.
3. Press Source to select I2S.
Connecting the A.B.C. to the DAC
Option: Using Passthrough Mode

Stahl~Tek A.B.C. Page 15
5Set Up Your Computer
Select Your Audio Output
Windows
You will need to set the A.B.C. as your computer’s
default audio playback device. To do this:
Nagivate to 1. Start.
From 2. Start, go to Control Panel. This brings up
the Control Panel window.
In the upper right of the 3. Control Panel window,
type Sound.
Select 4. Manage Audio Devices.
Select the Stahl~Tek Device.5.
With the Stahl~Tek device selected, click on Set 6.
Default, then Default Device.
Stahl~Tek A.B.C. Page 16
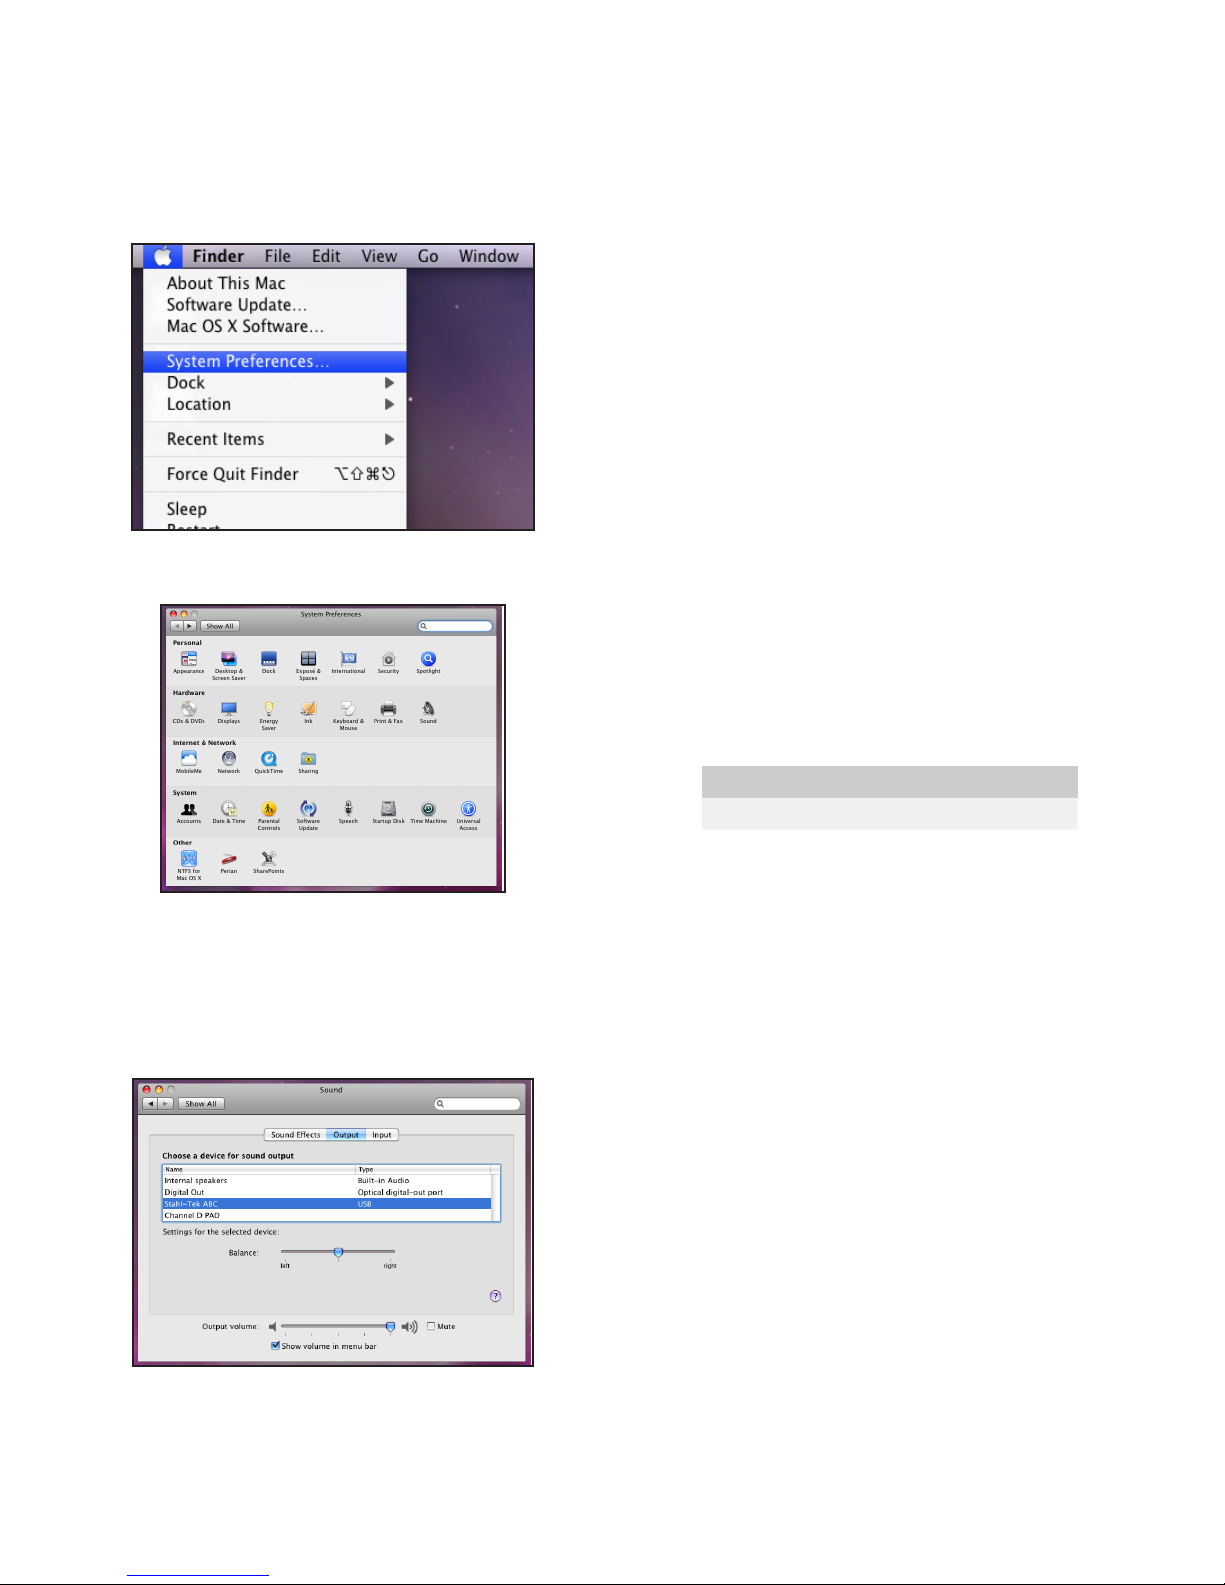
Macintosh
You will need to set the A.B.C. as your computer’s
default audio playback device. To do this:
Navigate to the Apple symbol in the upper left of 1.
your screen.
Select 2. System Preferences. This launches the
System Preferences window.
Select 3. Sound. This opens the Sound Preferences
window.
Within the Sound Preferences window, select 4.
Output.
Select the Stahl~Tek A.B.C.5.
Close the Sound Preferences window.6.
Special Note...
Note In some programs, for example JRiver Media
Center, you are able to set the program tio use a
separate playbcke device. That is, you can congure
JRiver to use the A.B.C, but Youtube videos are still
played through your computer’s normal sound card.
To accomplish this, you will need to refer to the
manual for your choice of software. Be careful when
doing so however, that you select an Output Mode
that is compatible with your Operating System and
Sound Card. For example, Windows 7 users will
likely wish to select ASAPI. Windows XP users will
likely want to select DS. A list of supported modes for
the A.B.C. is included under Technical Specications,
in the next chapter.
Select Your Software
Windows and Macintosh
In addition, you will need software capable of playing
high-denition audio. Although the A.B.C. places
no limit on quality, some software, such as Windows
Media Player, can only play up to 96 kHz. Here are
some suggestions to get you started.
Digital Audio Playback Software
Platform Name
Mac iTunes
Mac Amarra
Mac Pure Music
PC JRiver
PC MediaMonkey

Stahl~Tek A.B.C. Page 17
Technical Specications
Minimum Computer Hardware Requirements
PC or laptop manufactured after January 2006►
Intel Core 2 @1.6 GHz, or AMD equivalent►
1 GB main memory►
USB 2.0 Cable, maximum length 2.0 meters►
A.B.C. Specications
Power Supply 5.0V DC
Digital Inputs I2S Stahl~Tek HDMI (also works with PS Audio)
Asynchronous USB 2.0 (480 Mb/s, Backwards
compatible to 1.0)
Sampling Input/Output Frequencies 44.1kHz, 48kHz, 88.2kHz, 96kHz, 176.4kHz, 192kHz
Analog Outputs BNC
RCA
AES/BU
I2S
Dimensions Size: 17" x 7.25" x 2.75"
Weight: 4 lbs.
A.B.C. Features
Streams bit-perfect audio data up to 24-bit @ 192kHz►
Lithium-ion battery for up to 14hrs max run time►
Internal master clock circuitry is provided for lower jitter operation of USB endpoint and serves as a ►
master clock signal through the I2S/HDMI output port to a DACs
I2S Stahl~Tek HDMI input provides an addition signal input for the optional Stahl~Tek Opus/Vekian ►
CD Transport, thus allowing the ABC Bridge to serve as a convenient digital source selection to any
Stahl~Tek DAC (PS Audio also supports this unique, high-end interface)
Switch between USB and I2S intputs►
Outputs galvanized for isolation►
SPDIF via RCA, BNC, and AES/EBUvia XLR►
Modied I2S Format via HDMI►
May be played via charger or battery (16-20 hours typical battery life)►

Stahl~Tek A.B.C. Page 18
A.B.C. Supported Protocols
ABC Supported Protocols
Audio Output Windows XP (32) Windows Vista Windows 7 (32) Windows 7 (64)
ASIO Yes Yes Yes Yes
KS No Yes Yes Yes
WASAPI No Yes Yes Yes
DS Yes No No No
* In Foobar Media Player, the maximum buffer size is 2000 msec.

Stahl~Tek A.B.C. Page 19
Maintenance and Repairs
Cleaning the A.B.C.
Wipe the unit down with a micro-ber cloth to remove dust.1.
Apply a non-solvent glass cleaner (i.e. Windex) to a soft cotton cloth to remove smudges from the front, sides, 2.
and, top of the unit.
Repairing the A.B.C.
DO NOT attempt any repairs yourself.►
Any unauthorized service or repairs will void the warranty.►
In the event repairs are needed, contact Stahl~Tek.►
Please Note: Any attempt to open and/or alter the unit will void the warranty.►
Stahl~Tek A.B.C. Page 20
Troubleshooting
My DAC shows the same output no matter the sample rate (for example, 44.1kHz is displayed as
192kHz).
Your software may be upgrading (or downgrading) your source. For example, Windows Media Player will
downgrade any source over 96 kHz. Another program, such as JRiver, may be set to upgrade a source that is
below a certain sample rate. Software does through use of DSP, or Digital Signal Processing. You will need to
refer to your software’s documentation.
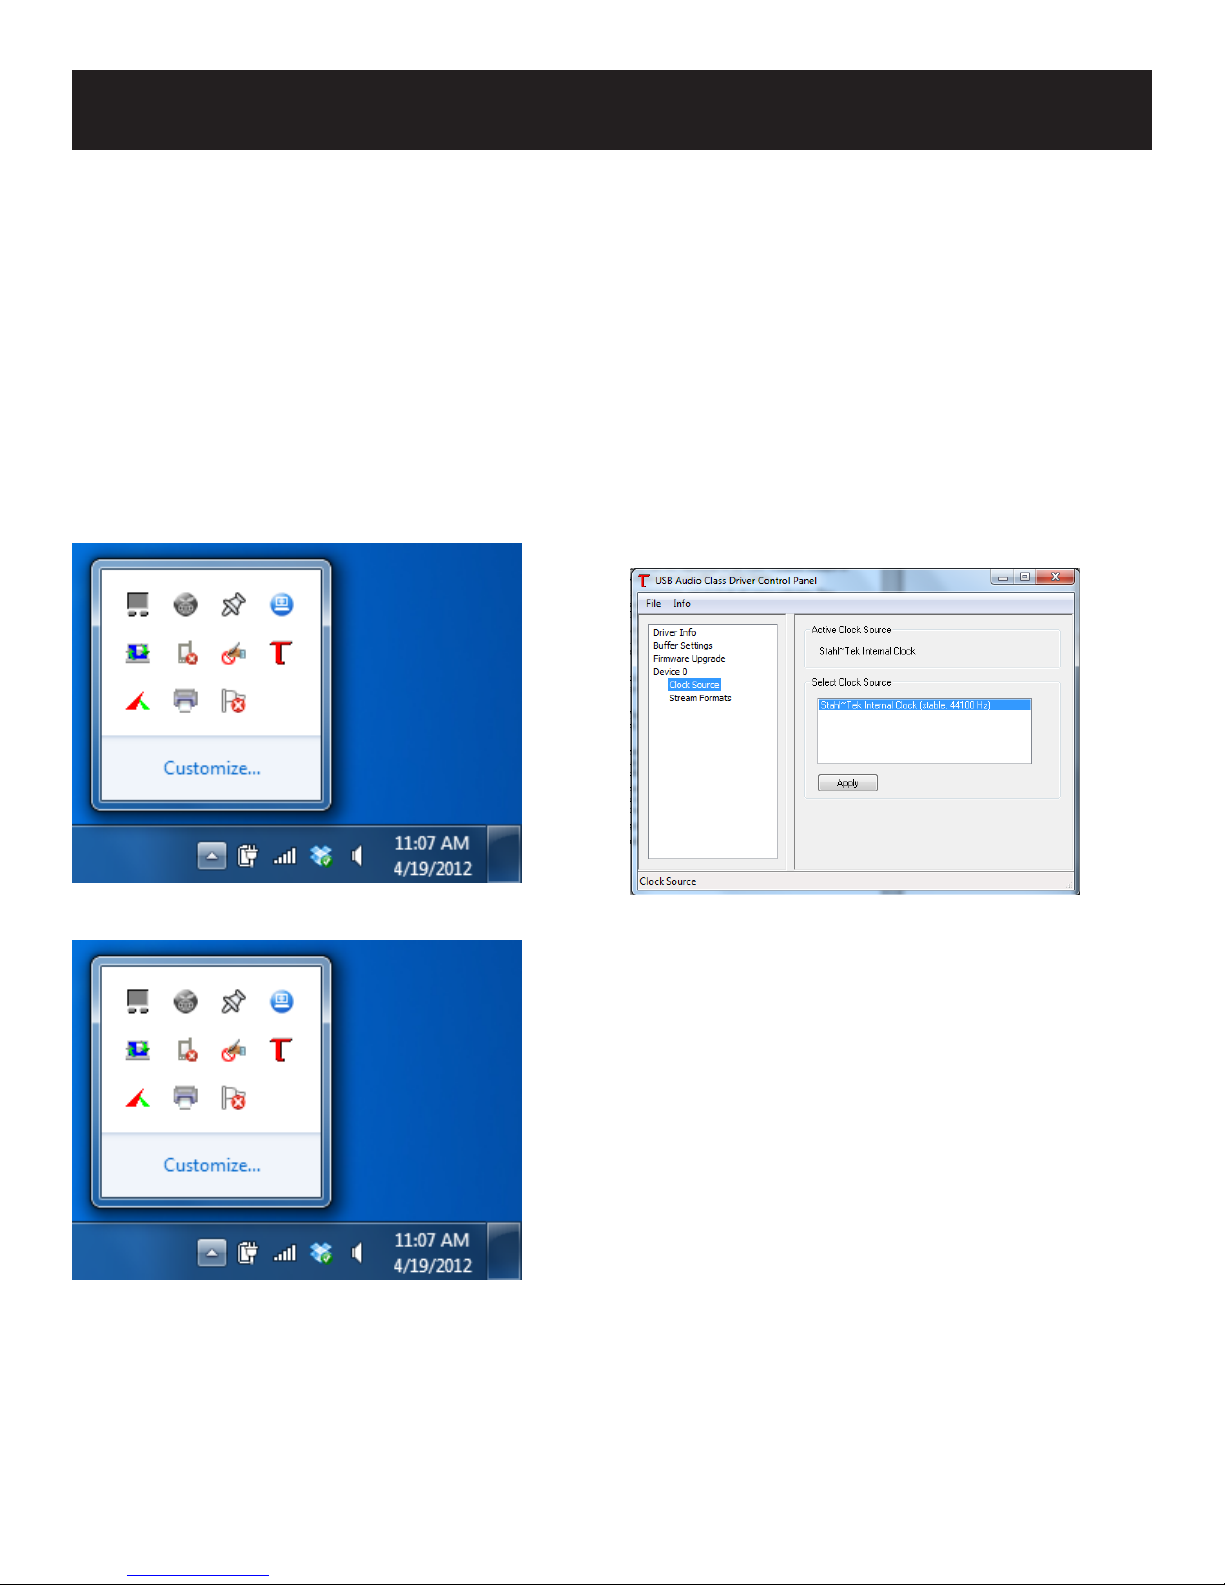
How can I tell what my output frequency is in Windows?
The Stahl~Tek custom A.B.C. driver comes with tools to measure your output frequency. To use these tools, do
the following:
1. Click on the small button to the left of the clock.
2. Click on the red “T.”
3. Select Device. Under Device is “Clock Source.”
Your current output frequency is listed here.
When connecting to my Mac via USB, once I connect my DAC or another audio device, the Stahl~Tek
A.B.C. dissapears or fails to appear.
This is an issue resulting from Mac’s USB specications. To resovle the issue, plug the A.B.C. into a different
port on your Mac.
For more information, visit: http://support.apple.com/kb/HT4049.
Table of contents
Other Stahl-Tek Media Converter manuals


