Starburst Technologies SB-3770UST User manual

Installation Manual
Tilt TV Wall Mount
Model: SB-3770UST
CONTACT:
a division of PDI Communications Inc.
6353 W Rogers Circle #6, Boca Raton, FL 33487
TF: 800-242-1606
Email: [email protected]
Web: www.starburstmounts.com
©2019 Starburst Technologies All rights reserved.
If you have any question, please contact us at 800-242-1606, or send an email to [email protected].
Please visit our Starburst
Mounts YouTube channel
for installation videos.
CAUTION:
This mount is intended for use only
with a maximum weight of 77 lbs. Use with
products heavier than the maximum weight
indicated may result in collapse of the mount
and its accessories, causing possible injury.
ATTENTION: Ce support est conçu pour être utilisé
uniquement avec un poids maximal de 77 lb. L'utilisation
avec des produits plus lourds que les poids maximaux
indiqués peut entraîner l'affaissement de la monture et
de ses accessoires, pouvant entraîner des blessures.

• Use with products heavier than the rated weights indicated may result in instability
causing possible injury.
• Please closely follow the assembly instructions. Improper installation may result in
damage or serious personal injury.
• Safety gear and proper tools must be used.
• This product is designed to be installed on solid concrete walls or wood stud walls.
• Make sure that the supporting surface will safely support the combined weight of the
equipment and all attached hardware and components.
• Use the mounting screws provided and DO NOT OVER TIGHTEN mounting screws.
• This product contains small items that could be a choking hazard if swallowed. Keep
these items away from children.
• This product is intended for indoor use only. Using this product outdoors could lead
to product failure and personal injury.
• Save these instructions for future use.
IMPORTANT SAFETY INSTRUCTIONS
PREPARATION:
Please make sure the mount is appropriate for the TV before installation.
What’s your wall frame?
Wood stud walls Drywall alone
Solid concrete walls
√√ ×
3
Thank you for purchasing our Starburst SB-3770UST mount. With a distance
of 1.2" to the wall, this SB-3770UST (TILT) wall mount nearly turns your TV
into a picture on the wall. Features 0°~-12° tilt adjustment and precise level
alignment.
Measure the hole pattern found on the back of your TV. If the horizontal distance is 400mm and
the vertical distance is 300mm, the VESA size of your TV is 400x300. Refer to the corresponding
VESA size on the instruction manual. If the mount is not compatible, contact your local Starburst
dealer or visit starburstmounts.com to find a right mount.
200x200/300x200/300x300/400x200
400x300/400x400/600x400
Does your TV match the stated VESA?
2
Does the weight of TV (including accessories)
exceed the maximum weight limitation? 77lbs
(35kg)
RATED
77lbs
(35kg)
RATED
1
If the mount is not compatible, contact your local Starburst dealer
or visit starburstmounts.com to find a right mount.
What tools are required for the installation?
4
Power Drill Phillips Screwdriver PencilTape Measure
Wood Stud Install
Φ 3/16 inch Drill Bit
Solid Concrete Install
Φ 3/8 inch Drill Bit
Tips:Tools are not included in the package.
Stud Finder Hammer
Read the entire instruction manual before you start the installation and
assembly. If you have questions regarding any of the instructions or
warnings, please contact your local Starburst dealer for assistance.
1

Ensure that you have received all parts according to the component checklist prior to installation.
If any parts are missing or faulty, contact us for a replacement.
PACKAGE LIST
Wall Plate
A (x1)
TV Bracket
C (x2)
Anchor
W-B (x4)
Lag Bolt
W-A (x4)
Allen Key
E (x1)
M8x30
M-G
(x4)
M6x30
M-F
(x4)
M5x14
M-C
(x4)M4x14
M-A
(x4)
M8x50
M-H
(x4) Spacer (x8)
M-K
Spacer
M-L
(x8)
M4x35
M-B
(x4) M5x35
M-D
(x4) M6x14
M-E
(x4)
INSTALLATION
1. Attach Brackets to the TV
1.1 Place TV Brackets as Shown
Position the TV brackets (C) as close as possible to the center of the display.
1.2a Attach TV Brackets to Flat Back Screen
Attach TV brackets using the shorter TV screws (M-A)/(M-C)/(M-E)
and washers (M-I)/(M-J) .
C
1.2b Attach TV Brackets to Irregular (Curved or Recessed) Back Screen
Attach TV brackets using the longer TV screws
(M-G)/(M-H) ,washers (M-I)/(M-J) and spacers (M-K)(M-L).
(M-B)/(M-D)/(M-F)/
Length: A screw that is too long can damage the display.
A screw that is too short will not hold the display.
Select appropriate TV screws
M4 M6 M8
Diameter: Inserts the screws into the hole on the back of your TV to determine which diameter to use.
CAUTION
Flat Washer
W-C (x4)
32
TV TV
D5 Washer (x4)
M-I
Mounting Template
B (x1)
D8 Washer (x4)
M-J
M-I
M-A
M-C
M-J
M-E
M-L
M-H M-H
M-L
M-K
M-L
M-K
M-J M-J
M-H
M-J
M-L
M-K
M-I
M-J
M-L
M-I
M-J
M-K
M-I
M-J
M-B/M-D
M-F/M-G
TV
TV
TV TV
Level
D (x1)
M-B/M-D
M-F/M-G
M-B/M-D
M-F/M-G
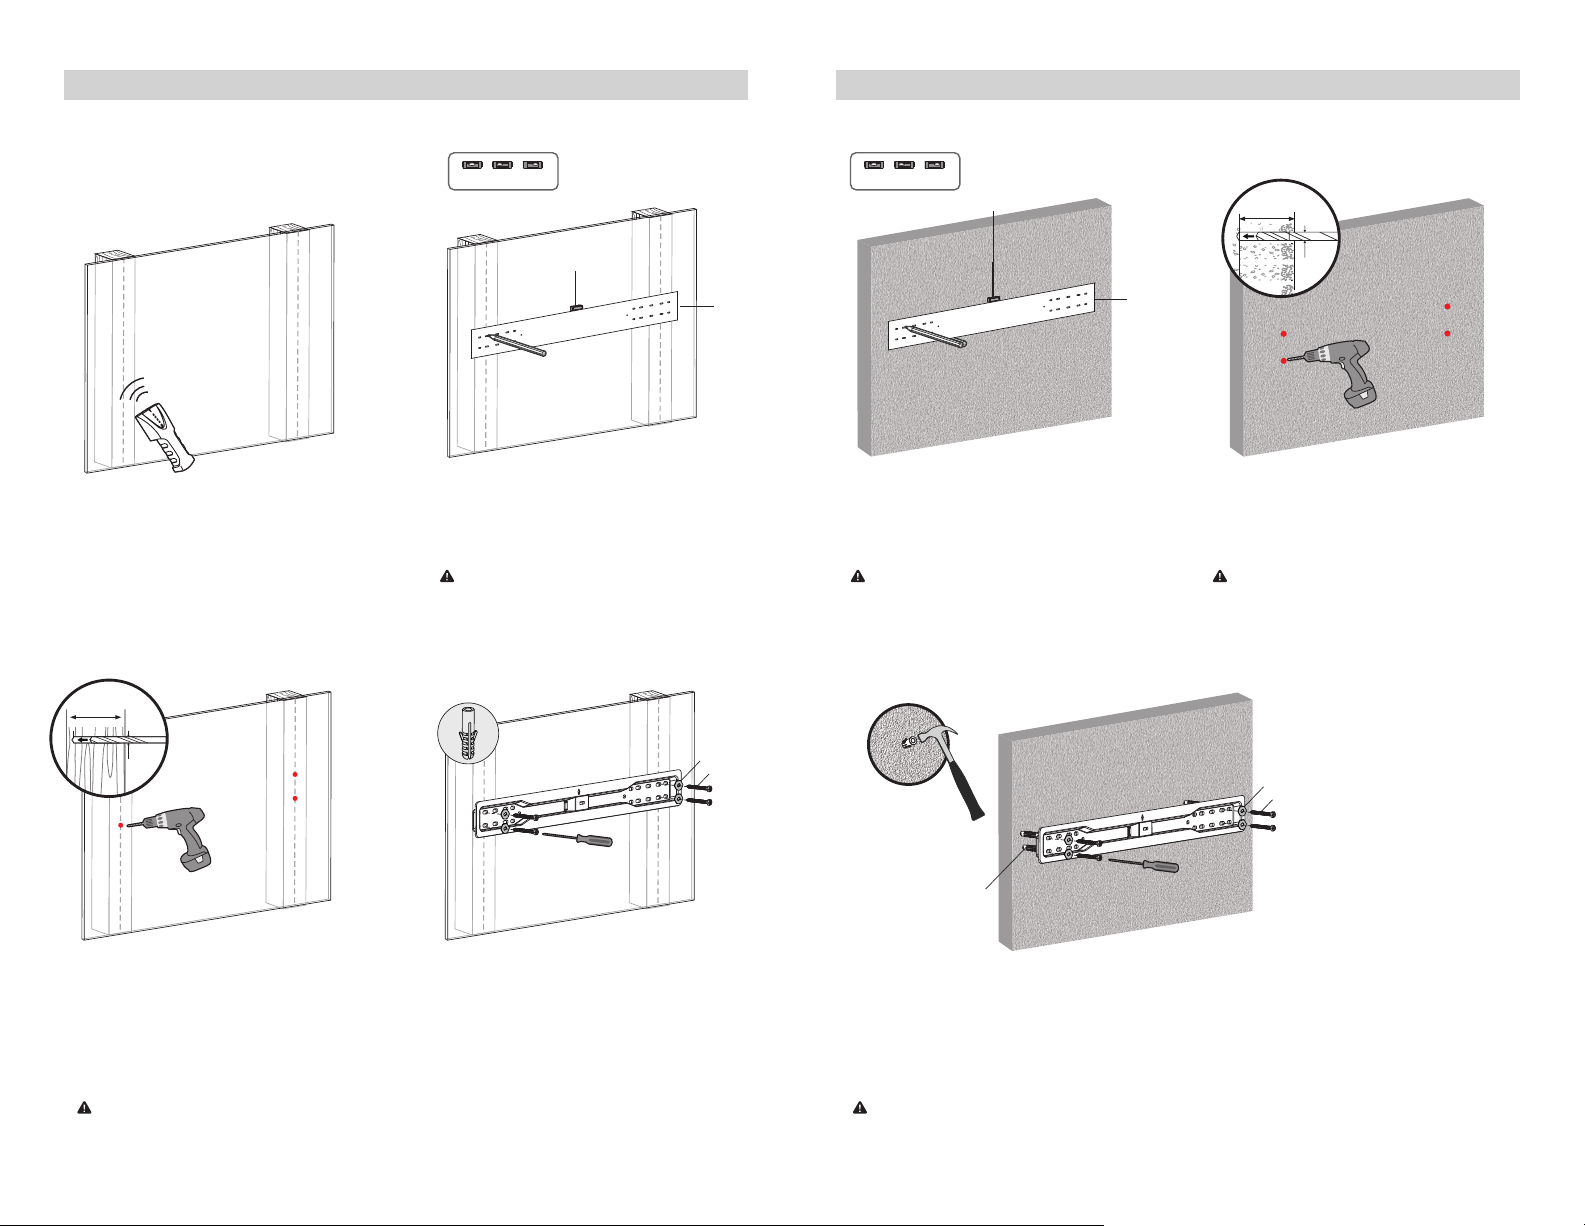
2a. Attach Wall Plate to Wood Stud
1.Verify the center of the studs using
a stud finder.
2. Level the template(B) and mark the hole
locations using pencil.
Note: Prior to installation, ensure the area behind the surface is free of electrical wiring,
pipes, or other objects.
2.2"
ø3 /16"
3. Drill pilot holes to the depth of 2.2 inch using a
3/16 inch diameter drill bit.
4.Attach the wall plate using 4 lag bolts (W-A)
and washers (W-C) with Phillips Screwdriver.
1. Level the template(B) and mark the hole
locations using pencil.
2. Drill pilot holes to the depth of 2.4 inch
3/8 inch diameter drill bit.
using a
Never drill into the mortar between blocks.
2b. Attach Wall Plate to Concrete Wall
D
CAUTION
Make sure to drill into the CENTER of the stud.
3. Insert anchors with hammer then
attach the wall plate using 4 lag bolts
(W-A) and washers (W-C) with Phillips
Screwdriver.
(W-B)
Be sure the anchors are flush with the surface.
CAUTION
CAUTION
Note: Prior to installation, ensure the area behind the surface is free of electrical wiring,
pipes, or other objects.
W-B
5
4
X X
√
Ensure alignment using a bubble level(D).
CAUTION
Ensure alignment using a bubble level .(D)
CAUTION
X X
√
B
D
B
W-A
W-C
X
W-A
W-C
2.4"2.4"
ø3 /8"

3. Hang the TV
Heavy! You will need assistance with this step.
Hold the TV with the top of the screen
tilted toward the wall, and then slide
the upper notches of the right and left
brackets (C) over the upper lip of
the wall plate (A).
Pull straps and press the bottom of the
TV to secure arm to the wall plate. Once
secured, conceal straps behind the TV.
4. Adjustment
Level Adjustment
Tilt Adjustment
76
-12°
0°
Top view
Lateral Shift
0.3"

The Warranty Period:
Starburst Technologies warrants the products to be free of defects in material and workmanship for the warranty
period of 5 years. The Warranty Period commences on the original purchase date of the product.
To Get Warranty Service:
For warranty claims made during the above Warranty Periods, Starburst will replace (or credit the amount of)
any defective product part free of charge. Should a part on your Starburst product fail, contact Starburst to make
a warranty claim. We will discuss the problem with you and once we confirm the product is under warranty, we
will ship replacement parts to you or issue credit based on the amount.
WARRANTY
To the maximum extent permitted by applicable law, Starburst disclaims any other warranties, express or implied,
including warranties of fitness for a particular purpose and warranties of merchantability. Starburst will not be
liable for any damages whatsoever arising out of the use or inability to use its products, even if Starburst has
been advised of the possibility of such damages. To the maximum extent permitted by applicable law, Starburst
disclaims any responsibility for incidental or consequential damages including damage caused to electronic
equipment or to the surroundings by the use of the product.
• The installation of other products to the mount / shelf not manufactured by Starburst.
• Product is modified in any way, improperly installed or taxed beyond its stated weight capacity or otherwise
misused or abused.
• Normal wear and tear, friction damages, breakage of plastic and glass, spring wearing, coating defects, or the
impact of using a product in an outdoor environment.
• Losses or damage due to fire, theft, vandalism, modifications, repairs, accidents, force majeure.
• The Warranty for wall and ceiling mounts is void if the mount is moved from its initial installation.
• This Warranty does not cover the costs of removing and replacing defective parts from your Starburst product.
So, if your problem requires a repair technician, you must pay any labor charges.
• Should a replacement part or product be discontinued or unavailable, Starburst reserves the right to substitute
a comparable replacement part or product for the defective part or product.
The Warranty extends only to the original purchaser, and it does not apply to:
Heavy! You will need assistance with this step.
1.Disconnect cables and turn off the power.
2. Pull down and hold both straps while gently
releasing the TV from the wall plate.
MAINTENANCE: Check that the product is secure and safe to use at regular intervals
(at least every three months).
5. Remove the TV
5 5
WARRANTY
YEARS
98
Table of contents
Other Starburst Technologies TV Mount manuals


