STARFRIT 024730 Assembly instructions


2 3
OPERATING AND SAFETY INSTRUCTIONS
Item no. Voltage (V) Wattage (W) Frequency (Hz)
024730 120 800 60
IMPORTANT SAFEGUARDS
READ THE INSTRUCTIONS BEFORE USE
WARNING: To reduce the risk of re, electrical shock, serious personal injury and/or
property damage:
A. Do not touch hot surfaces. Use protective oven mitts or gloves to avoid burns or
serious personal injury.
B. To protect against electric shock, do not immerse the power cord, plug or the base in
water or expose to other liquids.
C. Do not operate the appliance with the water reservoir empty as it could damage the
appliance.
D. Keep the product out of the reach of children and pets. This product is not intended
for use by children. Close adult supervision is necessary when appliance is used near
children.
E. Unplug appliance from electrical outlet before cleaning and when not in use. Allow to cool
down completely before assembling, disassembling, relocating, or cleaning the appliance.
F. Do not operate the product if it has a damaged power cord or plug, or after the
appliance malfunctions or has been damaged in any manner. Do not attempt to
examine or repair this product yourself. Please call the customer service number
provided in this user manual.
G. Do not leave the product unattended while it is in use. Always unplug the product
from the electrical outlet when not in use.
H. DO NOT attempt to move or relocate the appliance while it is in use.
I. To disconnect the appliance, pull directly on the plug – do not pull on the power cord.
J. Take proper precautions to prevent burns, re, or personal or property damage as this
appliance generates heat and steam during use.
K. Do not plug or unplug the product into/from the electrical outlet with a wet hand.
L. Use the product in a well-ventilated area.
M. Do not operate the appliance directly under kitchen cabinets as it generates steam.
N. Do not use attachments or accessories not recommended or sold by the product
manufacturer.
O. This product is intended for indoor, non-commercial. Do not use outdoors or for any
other purpose.
P. Do not allow the power cord to hang (e.g., over the edge of a table or counter) or
touch hot surfaces.
Q. Do not place the product on or near a hot gas or electric burner, or in heated oven or
microwave oven.
R. Always place the product on a at, level, stable surface – it is not recommended to
use the appliance on temperature sensitive surfaces.
S. This appliance generates heat and escaping steam during use. Please ensure that
proper precautions are taken to prevent the risk of burns, res or other injury to
persons or damage to property.
T. Connect the power plug to an easily accessible outlet so that the appliance can be
unplugged immediately in the event of an emergency.
U. Use extreme caution when opening the lid as hot steam will escape and may cause
scalding. Use protective oven mitts or gloves to avoid burns or serious personal
injury. Always use utensils to handle hot food.
V. Do not use appliance for anything other than its intended use.
W. All parts must be hand washed, DO NOT place in the dishwasher.
X. While in use, provide adequate space above and around the appliance for air
circulation. Do not operate this appliance while it is near or touching curtains, wall
coverings, dish towels, clothing or other ammable materials.
SAVE THESE INSTRUCTIONS FOR FUTURE REFERENCE
POLARIZED PLUG: This appliance is equipped with a polarized plug (one blade is wider
than the other). As a safety feature to reduce the risk of electrical shock, this plug is
intended to t in a polarized outlet only one way. If the plug does not t fully in the outlet,
reverse the plug. If it still does not t, contact a qualied electrician. Do not attempt to
defeat this feature or modify the plug in any way. If the plug ts loosely into the AC outlet
or if the AC outlet feels warm, do not use that outlet.
SPECIAL INSTRUCTIONS: A short power supply cord is provided to reduce the risk of
becoming entangled in or tripping over a longer cord.
AN EXTENSION CORD MAY BE USED IF CARE IS EXERCISED IN THEIR USE:
• Minimize the risk of overheating by using the shortest UL or ETL listed cord possible.
• The marked electrical rating must be at least as great as that of the product.
• Never use a single extension cord to operate more than one appliance.
• Arrange the longer cord so that it will not drape over a countertop or tabletop where it
can be tripped over, snagged, or pulled on unintentionally (especially by children).
DO NOT alter the plug. DO NOT attempt to defeat the safety purpose of the polarized plug.

4 5
BEFORE FIRST USE
A. Remove all parts. Dispose of packaging.
B. Thoroughly wash all parts (except the base) in hot soapy water and dry thoroughly.
WARNING: Do not place any parts in the dishwasher.
C. Rinse the steamer base with hot water and dry thoroughly.
WARNING: Do not immerse the steamer base, electrical cord or plug in water or any
other liquid.
D. Assemble the appliance. Refer to Fig. 2
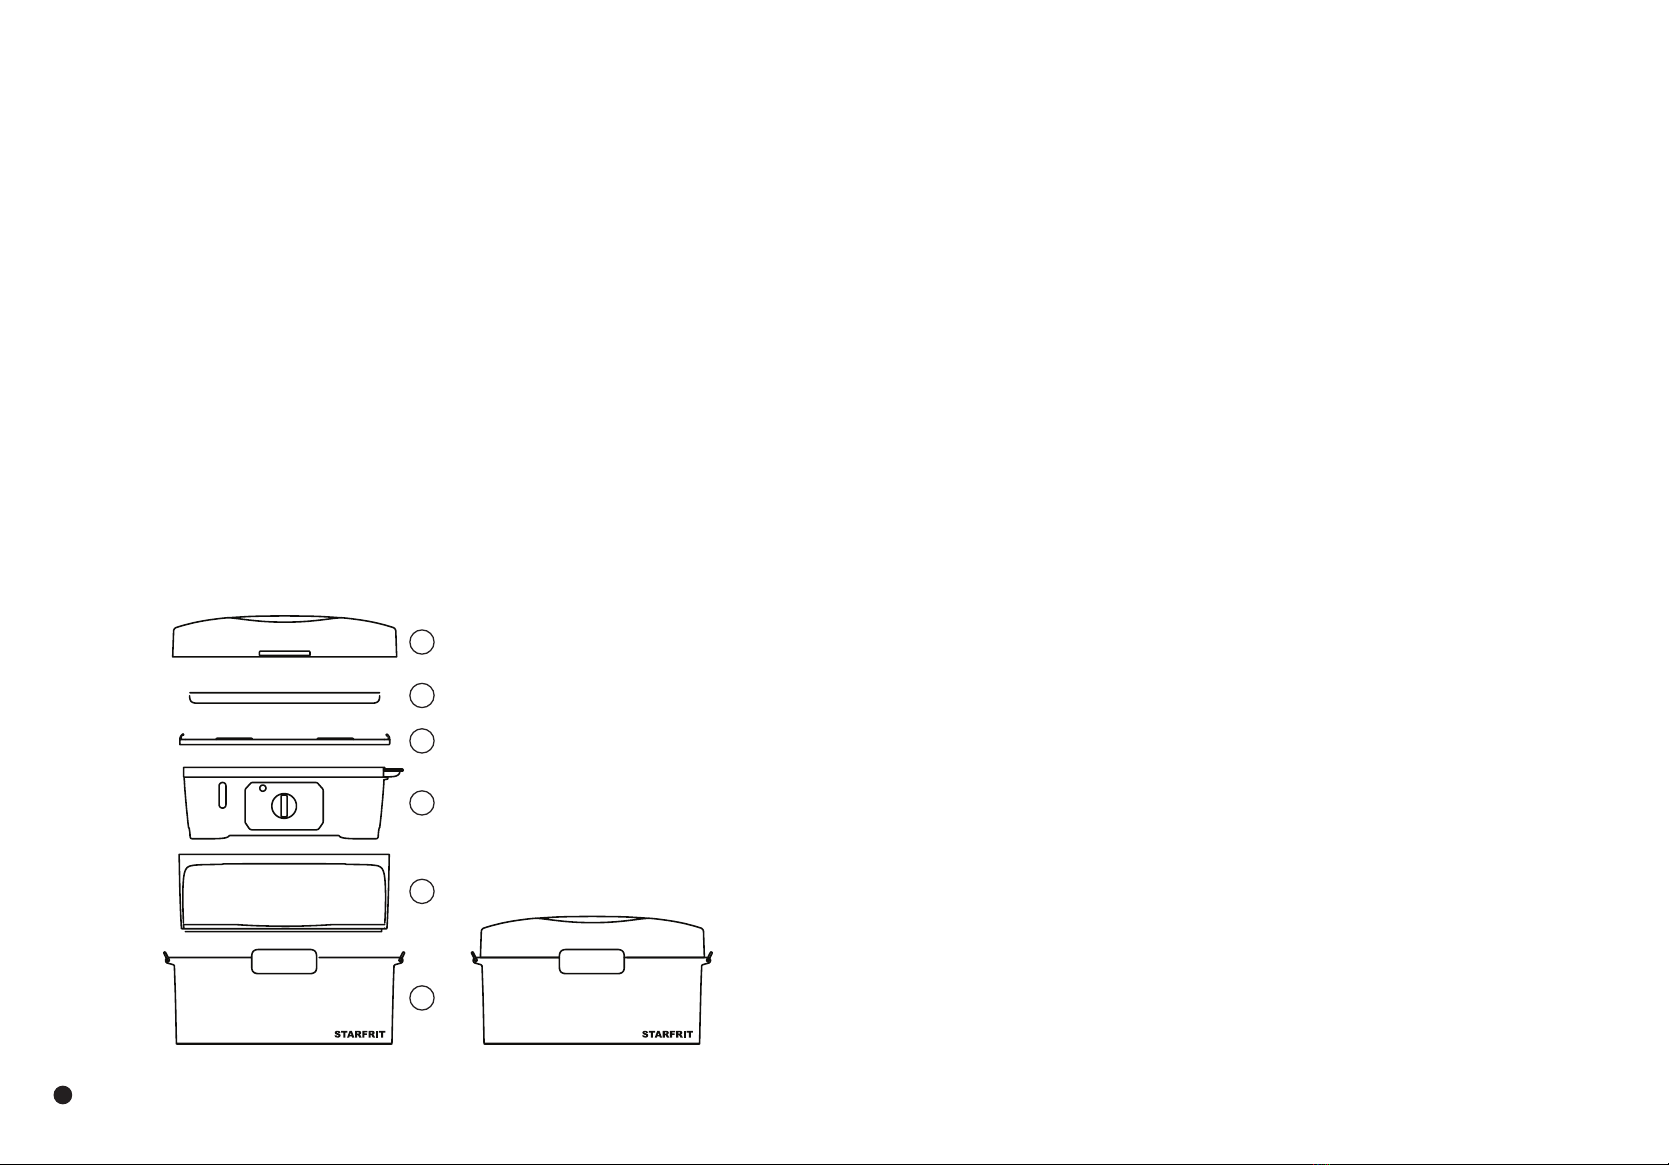
TO ASSEMBLE
NOTE: All parts are marked with a letter from A to F to indicate the order of assem-
bly. A quick-guide for assembly and storage could be found under the lid (Fig. 1).
A. First, place the steamer base (A) on a at level surface and place the drip tray on top
of the steamer base.
B. Place the sausage steamer (B) on top of the steamer base (A), make sure it sits at.
C. Insert the sausage tray (C) inside the sausage steamer (B).
D. Place the bread steamer (D) on top of sausage steamer (B), make sure it sits at.
E. Insert the bread tray (E) inside the bread steamer (D).
F. Place the lid (F) on top of the bread steamer (D). Use the side locking clips to securely
attach the lid.
Fig.1
Fig.2
Lid
Bread tray
Bread steamer
Metal rings to attach
shoulder strap
(not included)
Sausage tray
Sausage steamer
Retractable
water-ll spout
Water level
indicator
Drip tray
60-minute timer Base
F
E
D
C
B
A
6 7
TO USE
(READ THE INSTRUCTIONS BEFORE USE)
WARNING: Do not operate the appliance directly under kitchen cabinets.
WARNING: Never operate the appliance while it is empty as it will damage the appliance.
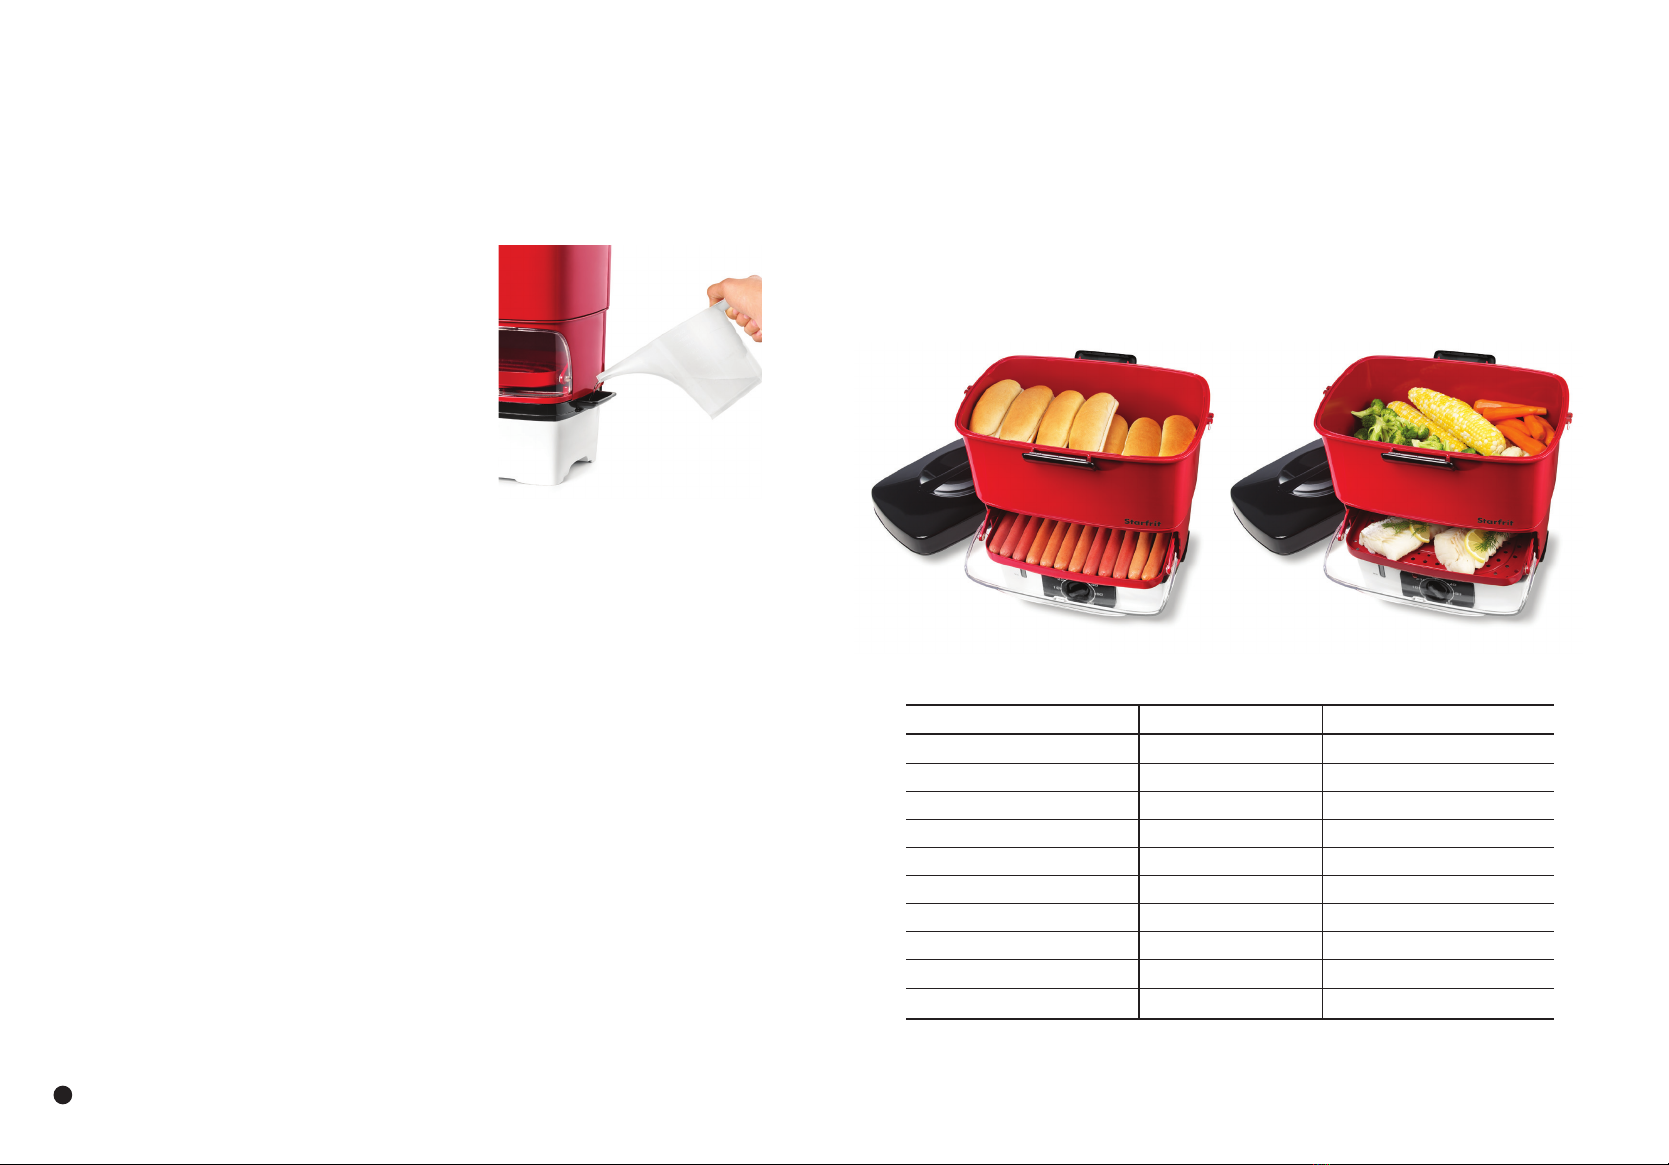
A. Place the appliance on a at, stable heat resistant
surface. Open the water-ll spout on the side of
the appliance and ll the steamer base with
water to the MAX line. Do not over-ll. (Fig. 3).
NOTE: Always ensure the water level is at MIN
level before operating the appliance.
Never use any liquids other than water.
B. Open the sliding door on the sausage steamer to access the sausage tray. Place up to
12 sausages on the tray and close the door.
C. Open the lid to access the bread steamer and place up to 12 buns. Use the markings
on the bread tray to avoid obstructing the steam vents located on each side of
the bread tray. Buns should be stacked on two rows.
D. Plug the power cord into a standard 120-volt AC.
E. Set the timer to the desired cooking time (maximum of 60 minutes). The LED indicator
will illuminate, indicating the product is heating.
NOTE: Due to the initial heating of the materials used in the manufacturing of
the product, some light smoke/vapors may be released when used initially.
This is normal.
F. When cooking time is up, the timer will ring and the light will go off; unplug the
power cord from the electrical outlet.
CAUTION: Use extreme caution when opening the lid or sausage steamer during
or after cooking. Hot steam will escape and may cause scalding. Use protective
oven mitts or gloves to avoid burns or serious personal injury. Always use tongs
utensils to handle hot food.
WARNING: Always unplug the product when not in use.
WARNING: Do not add salt or any other seasonings to the food while steaming.
Fig.3
STEAMING CHART
NOTE: the steaming chart is for reference only. Actual cooking time may vary.
FOOD QUANTITY STEAMING TIME
Fish llets ½ lb. 9 to 13 min
Lobster tails 2 tails 20 to 22 min
Scallops ½ lb. 10 to 12 min
Shrimp ½ lb. 10 to 15 min
Salmon ½ lb. 15 to 18 min
Broccoli 6 to 8 min
Carrots 11 to 13 min
Cauliower 7 to 9 min
Potatoes 28 to 33 min
Asparagus/ squash / Zucchini 9 to 11 min
NOTE: You may use the appliance to steam different foods. Use the bread steamer
to steam vegetables and the sausage steamer to steam sh or any other meats.
Bread tray must be removed in order to use bread steamer for anything other than
bread. To prevent drippings from the bread steamer falling into other foods, use a
small plate or tray to steam food.
8
CLEANING AND STORAGE
WARNING: Ensure the appliance is unplugged from the electrical outlet and allow it to
cool down completely before handling or cleaning.
NOTE: All parts are marked with a letter from A to F to indicate the order of disassembly.
A quick-guide for storage could be found under the lid (Fig. 1).
WARNING: DO NOT place any part in the dishwasher. ALL parts must be hand washed.
1. Disassemble all the parts.
2. Drain any remaining water from the steamer base and drip tray.
3. Thoroughly wash all parts (except the base) in hot soapy water and dry thoroughly. Wash
after each use.
WARNING: DO NOT wash any part in the dishwasher.
4. Rinse the steamer base with hot water and dry thoroughly.
WARNING: Do not immerse the base, electrical cord or plug in water or any other liquid.
5. Dry thoroughly. Rinse after each use.
6. The appliance is designed with a stackable feature for compact storage and transportation.
Refer to Fig. 4
NOTE: shoulder rings are included on each side of the appliance to be used with
any carrying strap to facilitate transport. CARRYING STRAP IS NOT INCLUDED.
TIPS & RECOMMENDATIONS
• Do not ll the steamer base passed the MAX line.
• Always ensure the water level is NOT lower than the MIN line.
• Never use salt or seasoning during the steaming process. You may season your food
once cooking is over.
• If you are steaming large quantities of food, stir the food halfway through the steaming process.
• Never steam frozen food.
• After several usages, scale deposits may build into the base. This is normal. Descale
your appliance regularly using water and vinegar. DO NOT use descaling products.
Fig. 4
Storage position
F
E
D
C
B
A
Learn more about RV small appliances we have.
Table of contents


HY-5EF Operator's manual")


