StarVedia IC722w User manual

10~30cm
Download the mCamView2 user manual here
http://www.starvedia.com/download.html
Requires iOS 6.0 or later
iOS iPhone、iPad
Requires Android 4.0 or Later
Android Smart phone、Tablet
STEP 1
STEP 2
mCamView2
Download the mCamView2 APP
STEP 4
Log in to the Camera
STEP 5
SD Card Recording
Scan the QR code to download the software “mCamView2”
from App Store for iPhone/iPad
or from Android Market for Android devices.
Power on the Camera
STEP 3-1
WiFi Setup
Connect the Power Adapter to the Camera
Do not connect the Ethernet cable.
Follow the steps and enter the
WiFi password to generate a QR code.
Generate QR Code
Mobile Connected to 2.4G Hz WiFi
Make sure your iPhone/Android
mobile is connected to a 2.4G Hz WiFi
router, this is the must.
Smart WiFi Setup
Open the App mCamView2, tap the “+”
icon to add the camera, choose “Smart
WiFi setup” to setup the camera with
WiFi connection.
My-Home
My Wi-Fi Network
Tap the Camera icon to log in to the camera.
The default administration account is “admin”,
the default administration password is empty (leave blank).
After logged in, tap the camera icon to play the live video.
Notice : there are two passwords for the camera, one is
the administration password, the other one is the video
play password. The default video-play password is “ipcam”
(lowercase).
My home
My home
aInsert the SD card into the camera, the yellow LED on the
camera will be blinking.
bThe SD card will start to do the recording once the alarm
notification is triggered. The camera will do 5 second
pre-recording to prevent the loss of the important starting
moment.
cTo enable the continuous SD card recording, please enable it
inside the camera settings.
dTo playback the recorded video, tap the on the App and
choose the “SD Card” and date/time to do the playback.
My home
* Class 10 micro SD is prerequisite
SSID: My Wi-Fi Network
Password
Supported Smart phone system version
Setup the camera from a Smartphone/Tablet
Press the WPS Button
Press the WPS Button on the Camera.
The LEDs will start flashing.
Scan the QR Code
Place your mobile about 10-30cm away
from the camera.
The camera will beep when the QR code
is successfully scanned. It will flash the
LEDs and start the WiFi connection.
WiFi Connection is Established
When the WiFi connection is established,
the blue LED will be flashing and the red
LED will remain on.
The new icon for this camera will be
created on the App.
My home
button
Quick Installation GuideFull HD IP Network Camera
STEP 1
STEP 2
Wired Connection
See The Video
Install CamView Software
STEP 4
STEP 3
Download the CamView user manual here
http://www.starvedia.com/download.html
Requires Windows XP or later
Windows
Requires Mac OS 10.7 or later
MAC OS
Computer system version
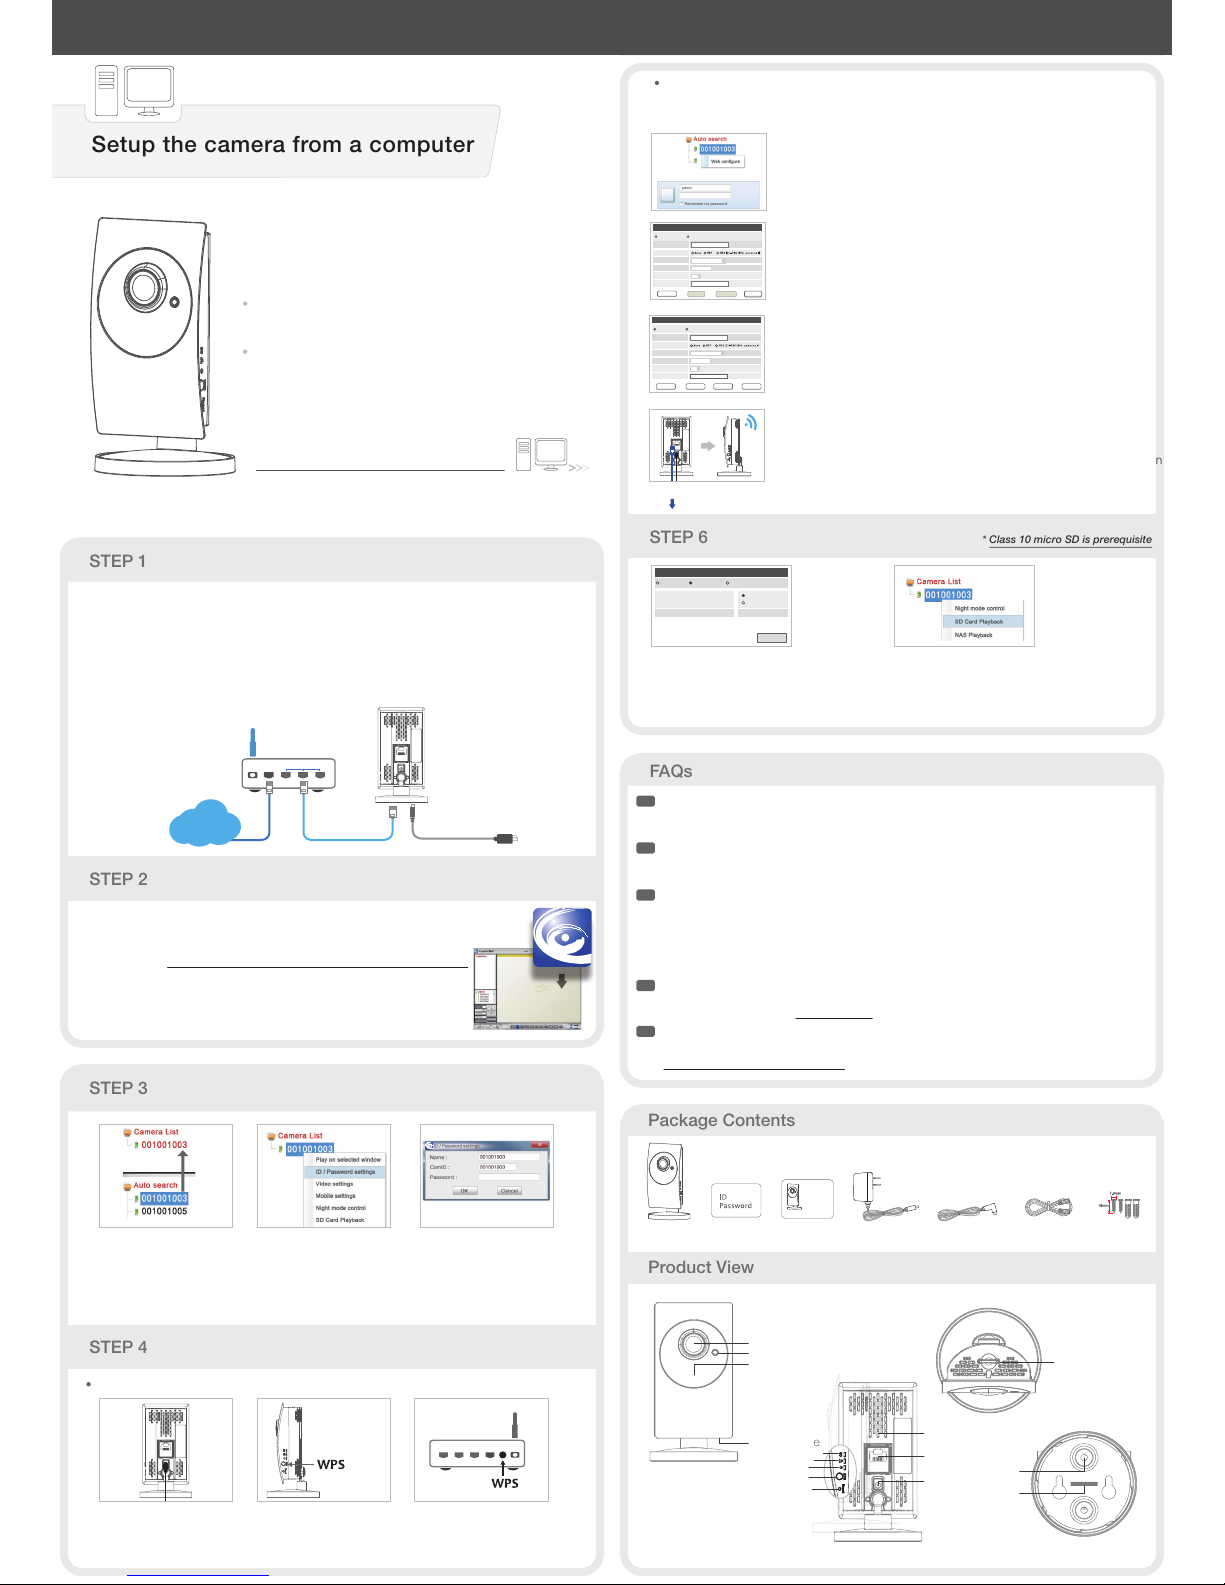
Setup the camera from a computer
AConnect the power adapter.
BConnect the Ethernet cable to the NAT/Router.
CThe IP Camera will get an IP address
from the NAT/Router (with DHCP enabled) automatically.
Check if the red LED of the IP camera is always on.
If it’s blinking, please check step A and step B again.
LANWAN
Power Adapter
Ethernet Cable
NAT or Router
Internet
Please download the latest
CamView software at this address :
http://www.starvedia.com/download.html
After the setup menu pops up, select
“Install Management Software” and follow
the instructions.
Press the WPS button
on the camera.
The CamView software will list
the searched camera on the
“Auto search” section
Drag the camera from the“Auto
Search” section to the “Camera
List” section.
Right click the camera on
the camera list and choose
the ID/Password Settings.
Key-in the password given on the
ID/Password Card and then you
will be able to see the video.
Unplug the Ethernet
cable from the camera.
Press the WPS button on the NAT/Router,
the LEDs on the IP Cam will start blinking.
If the LEDs stops blinking and remain on,
the wireless connection has been
established successfully.
Click the “Network” → “WiFi Security”.
Click on the “Wi-Fi Scan’’ button, Choose the wireless AP.
(If the scan failed, please check the antenna or the Wi-Fi Access Point.)
On the camview software, right click on the camera you want to setup
on the “Auto Search’’ area and click on
“Web Configure’’. Enter the admin username and password.
The default admin username: admin.
The default password is empty (leave blank)
5.2 Wireless Connection Settings
If the router has no WPS function, please follow STEP 1 and make sure the Ethernet cable is
connected to the Camera and then follow the steps below to setup the wireless connection.
5.4 Unplug the Ethernet Cable from the Camera
to start the Wireless Connection
If the Wi-Fi test has been successful, unplug the Ethernet cable from the
camera. The red and blue LEDs will remain on once the wireless connection
is operational.
The Wireless connection will not function if you do not remove the Ethernet
cable from the camera.
TKIP
1234567890
64 bits(10 hex digits)
Enable WiFi function
SSID wifi-test
Security mode
WEP Encryption
WEP Key
WEA Encryption
WPA-PSK KEY
Save & Apply WiFi ScanIP address WiFi test
Disable WiFi function
WiFi Security Settings
TKIP
1234567890
64 bits(10 hex digits)
Enable WiFi function
SSID
Security mode
WEP Encryption
WEP Key
WEA Encryption
WPA-PSK KEY
Save & Apply WiFi ScanIP address WiFi test
Disable WiFi function
12345678
WiFi Security Settings
wifi-test
Choose the wireless AP and key in the encryption key, click on the “Wi-Fi
test’’ button. If the test has succeeded, please press “Save & Apply’’ and
go to the next step.
Please do not unplug the Ethernet cable during the Wi-Fi test. If the test
has failed, please go back to the step 5.2.
5.1 Web Configure
5.3 Wireless Connection Settings
Remove the
Ethernet cable
Enable SD card recording.
Always Recording
When disk space full
SD-Card Status SD-Card Removed
Save & Apply
Schedule Recording
Circular recording
Stop recording
Standby
SD-Card Record Setting
→SD Card Record Settings on the Web
configuration page. Then select “schedule
recording” and the SD card recording will
be operational right after saving.
SD Card Playback. Right Click on the
selected camera on the camera list,
then choose the SD card playback.
What should I do if I have forgotten the password or the ID/Password card is missing?
Please press the Reset button for five seconds. The camera will reset to the factory default
settings. The default video-play password is ipcam (lowercase).
What should I do if I cannot see the video remotely?
The red LED of the camera should be remain on when the camera is connected to the Internet.
If the red LED is blinking, please double check the network connection and settings again.
I can see the video from a remote location, but the video quality is not satisfying and sometimes
the video disconnects and reconnects by itself.
It’s probably due to the poor Internet bandwidth (internet speed), which might be not good
enough.
You may try to apply for a better Internet connection from your Internet Service Provider or
reduce the bandwidth setting of the camera.
What is the default admin user name/password?
Default admin user name: admin
Default admin password: (leave blank)
Please refer to the following website to download the latest CamView software.
www.starvedia.com/download.html
Q1
Q2
Q3
Q4
Q5
Ans
Ans
Ans
Ans
Ans
Where to download the latest camView software?
[ FRONT ]
[ BACK ]
[ TOP ]
[ BOTTOM ]
Package Contents
Product View
STEP 6
FAQs
SD Card Recording
* Class 10 micro SD is prerequisite
WiFi Setup
button
Camera ID/Password Card QIG
Full HD IP Network Camera
Anchors
and Screws
Power Adapter Ethernet Cable
Light Detector
Lens
IR LED
Microphone
MicroSD Card Slot
Coin Slot
Bracket Screw Hole
Internal Speaker
Power Jack
Ethernet Jack
Reset Button
WPS Button
Micro-SD Card Indication LED
Status Indication LED
Ethernet Indication LED
Quick Installation GuideFull HD IP Network Camera
If Router Has WPS Button
If No WPS on Router
DC Cable Extender
Table of contents
Other StarVedia Security Camera manuals


Popular Security Camera manuals by other brands

HIK VISION
HIK VISION DS-2DF8C842IXS-AELW quick start guide

HIK VISION
HIK VISION DS-2XS6A25G0-I/CH20S40 quick start guide

Elmo
Elmo QNW4000 instruction manual

ICRealtime
ICRealtime F Series user manual

HIK VISION
HIK VISION TURBO HD DS-2CE56D5T user manual

HIK VISION
HIK VISION DS-K1T341BMWI-T quick start guide


