GE JT912 User manual

ge.com
©Safety Instructions ......... 2-4
Opera6ng Instructions
Clock and Timer . ........... 12
Control Lockout ............ 12
Controls .................... 5
Convection .............. 15-17
Oven .................. l 0, l l
Probe .................. 14, 17
Sabbath Feature ............. 9
Self-Cleaning Oven ....... 20, 21
Special Features ............ 6-8
Thermostat ................ 19
Timed Baking
and Roasting ............ 13, 18
Care and Cleaning
Broiler Pan and Grid ......... 24
Cleaning Oven Door . ........ 23
Control Panel .............. 25
Lift-Off Oven Door .......... 23
Light Bulb ................. 22
Oven Floor . ............... 23
Probe ..................... 24
Removing Packaging Tape .... 22
Shelves .................... 24
Stainless Steel Surfaces ....... 25
Troubleshooting Tips ..... 26-28
Consumer Support
Consumer Support . . .Back Cover
Product Registration ...... 29, 30
_'arranty .................. 31
JT912-30" Single }Dtll Oven
JT952-30" Double Wall (kJen
Writethemodelandserial
numbershere:
Model #
Serial #
You can find them on a label
on the fl'ont of the oven behind
the oven door on single oven
models, or the fl'ont of the lower
oven behind the oven door on
double oven models.
49-80333 11-05JR

iMPORTANTSAFETYiNFORMATiON.
READALLiNSTRUCTiONSBEFOREUSING.
WARNING!
For your safe_, the information in this manual must be followed to minimize the risk of fire or
explosion, electric shock, or to prevent property damage, personal injury, or loss of life.
IMPORTANTSAFETYNOTICE
The California Safe Drinking Water and ToxicEnforcement Act requires the Governor of California
to publish a list of substances known to the state to cause cancer, birth defects or other reproductive
harm, and requires businesses to warn customers ofpotential exposure to such substances.
The fiberglass insulation in self-clean ovens gives off a very small amount of carbon monoxide during
the cleaning cycle. Exposure can be minimized by venting with an open window or using a ventilation
fan or hood.
SAFETYPRECAUTIONS
When using electrical appliances, basic safety precautions should be followed, including the
foliowing:
_?{:;Use this appliance only fbr its intended
purpose as described m this )wner s
Manual.
_i_Be sure _our appliance is properly
installed and grounded by a qualified
mchnician in accordance wifl_ the
provided installation insuucuons.
Ji:,:Do not attempt to repair or replace any
part of your oven unless it is specifically
recommended in this manual. All other
servicing should be refexTed to a qualified
mchnician.
_?{:_Have the installer show you the location
of the cfivuit breaker or fl]se. Mark it fox
easy reference.
_?{:_Before performing any service, disconnect
the oxen power supply at the household
distribution panel by xemoving the flxse or
sx_,itching off the circuit breaken
Ji:,:Do not leaxe children alone----_'hildren
should not be left alone or unatmnded ira
an area where an appliance is in use. They
should never be allowed to sit or stand on
any part of the appliance.
_{;_Do not allow anyone to climb, stand or
hang on the doon They could damag> dxe
oven, or cause severe personal injm>
_i_Be sure the oxen is securely installed in
a cabinet flint is fil3nlv attached to file
house stx'HctHI'e. Never a]low arryone to
climb, sit, stand or hang on the oven doon
Ji:,:Ne_er leave the o_en door open when you
are not watching the oxen.
_:;Always kee I) combustible wall cox_ring,
curtains or drapes a sad distance flom
yOrXI" oxen,
_?{:_AlwWs kee I) dish towels, dishcloths, pot
holders and oflmr linens a sad distance
flom your ox>n.
ji:,iAlwWs kee I) wooden and plasuc umnsils
and canned food a sad distance away
flom your oven.
ji:,iTeach children not m p]W with the
controls or any other part of flxe ox>n.
_?{:_i,arge scratches or impacts m glass doors
can lead to broken or shatmxed glass.
2

ge.com
WARNING!
SAFETYPRECAUTIONS
{7_:Do not store flanm/able materials in
an oxen.
_i:,iCAUTION: Iten/s of interest to
children should not be stored in cabinets
aboxe an oxen; children clin/bing on tile
oxen to reach items could be seiionsly
ii_jnred.
_{::Never wear loose-fitting or hanging
garments while using file appliance. Be
careflll when reaching for items stored in
cabinets over file ox.en. Flamn/able mamfial
could be ignimd if brougtlt in contact with
hot surfaces or heating elements and mac
cause se\.ere 1)nT/ls.
_7{;:Use only di T pot holders--moist or damp
pot holders on hot sni/aaces may result in
b/nils flom steam. Do not let pot holders
touch hot heating elen/ents. Do not use a
towel or other bnlkv cloth.
i_i:i_For _our safety, nexer use your appliance
tbr wam/ing or heating tile room.
E:,:Do not let cooking grease or other
flammable materials accnnnllate in or
near tile oxen.
E:,IDo not use water on grease fires. Nexer pick
up a flaming pan. T/llrl tile controls off'.
Flame in the ox.en can be smodlered
completely by closing tile oven door and
turning tile oven off or by using a mnlti-
pnq)ose dUchemical or foam-type fii.e
extinguisher
_{;_Do not touch tile heating elements or tile
inmrior surPace of tile ox.en. These surPaces
may be hot enough to 1)nn_ e',.en thougtl
thev ai.e dark in colon Dining and after
use, do not much, or let clothing or oilier
flammable mamrials contact any interior
ai.ea of tile ox.en; allow snfficient tin/e for
cooling first.
Potentially hot surPaces inchlde oven \.ent
openings, snrPaces near tile openings,
crevices around the oven dooi, the edg.es
of the window and metal tIin/ parts abox.e
tile door.
REMEMBER:The inside surPace of tile o_en
may be hot when tile door is opened.
_;:Nexer lemejars or cans of/Cat diippings in
or Ileal vonr o_en.
_{;_Do not store or use combustible mamlials,
gasoline or other flammable vapors and
liquids in the vicinity of this or anv other
appliance.
_{;_Stand away flom tile oxen when opening
tile oxen door. Hot air or steam which
escapes can cause bums to hands, face
and/or eyes.
E:,IDo not heat unopened food containers.
Pressure could build up and tile container
could burst, cansing an iiIjn U.
_? Kee I) tile oven xent unobstructed.
'_!{i;Kee I) tile oxen flee fion/grease buildup.
q_{::Place the oxen shelf in tile desired position
while tile oxen is cool. If shelxes mnst be
handled when hot, do not let pot holder
contact tile heating elen/ents.
;f; When using cooking or roasting bags in the
oxen, follow tile mannfltctnrer's directions.
E:,IPulling out the shelf to file stop-lock is a
comenience in lifting heax T foods. It is also
a precantion against bnrlls fiom tonching
hot surfaces of tile door or oxen walls.
_{;_Do not use tile oxen to di T newspapers.
If oxerheated, they can catch on fire.
_{;;Do not use the oxen for a storage area.
Iten/s stored in an oxen can ignite.
E:,:Do not leme paper products, cooking
utensils or fbod in tile oxen when not
in use.
_{;:After broiling, always take tile broiler pan
out of tile oxen and clean it. ieftoxer
grease in tile 1)roller pan can catch fire
next tin/e you use the pan.
_{;:Clean only parts listed in this Owner's
Manual.
_;:Do not use aluminnn_ foil to line oxen
bottoms, except as sugg.ested in this n/annal.
In/proper installation of aluminnn/foil may
resuh in a risk of electric shock or fire.
3

IMPORTANTSAFETYINFORMATION.
READALLINSTRUCTIONSBEFOREUSING.
COOKMEATANDPOULTRYTHOROUGHLY.,.
Cookmeatandpoultry thoroughly--meat to at least anINTERNALtemperatureof 160°Fandpoultry
toat least an INTERNALtemperatureof 180%-Cookingto thesetemperaturesusuallyprotectsagainst
foodbomeillness.
SELF-CLEANINGOVEN
;fi:,iDo not clean the door g'asket. Tile door
gasket is essential tbr a good seal. Care
should be token not to rub, damag_ or
mow tile gasket.
_:_Do not use oven cleaners. No comme_via]
ox>n cleaner or oxen liner promctive
coating of aW kind should be used in or
around any part of the oxen. Residue flom
oxen cleaners will damage the inside of the
oxen when tile self-clean cycle is used.
_i:,:Be%re self-cleaning d_e oxen, remove die
broiler pan, giid and other cookware.
_?{:_Be snie tO wipe up excess spillage before
stardng tile self-cleaning operation.
;_i:,:If the self-cleaning mode malflmcuons,
um_ file oxen off and disconnect tile power
supply. Have it serviced by a qualified
mchnician.
READANDFOLLOWTHISSAFETYINFORMAtiONCAREFULLY.
SAVETHESEINSTRUCTIONS
4

Usingthe ovencontrols.
(Throughout this manual, features and appearance may vary from your modeL)
Doubleovencontrolshown.
]
ge.com
OVEN
LIGHT
OvenControl Clockand TimerFeaturesandSettings
BAKE Pad
Pl'ess to select tile bake function.
BROIL HI/LO Pad
}5"essto select file b_'oil fun(fion.
CONVECTIONBAKEPad
Press to select b'ddw, with tile convection
function.
CONVECTIONROASTPad
PIess to select l'oasting with tile convection
function.
SELFCLEANSTD/LOWPad
Press to select selfkleaning function. See
tile Using the self-cleaning oven section.
OVENLIGHT ON/OFFPad
Press to turn tile oven light on or off.
DELAYSTARTPad
[!se along *dth COOKING TIME or
SELFCLEANSTO/LOW pads to set tile
oven to stm't and stop automaticall} at a
time _ou set.
STARTPad 0
Must be pl'essed to start an> cooldng or
cleaning function.
Display
Shows tile time of day, oxen temperatm'e,
whether tile oven is ill tile bake, broil o_"
self'cleaning mode and tile times set for
tile til/lel" oF atltoi/latic oven opel';ttions.
ff "T- anda numberorletter"flashin thedisplayand
the ovencontrolsignals,thisindicatesa function
error code.PresstheCLEAR/OFFpad.Allowtheovento
coolforonehou_Puttheovenback/btooperation./fthe
functionerrorcoderepents,disconnectthepowertothe
ovenandcallforsefvl_e,
If your oven was set fora timed oven operation
and apower outage occurred, thedock andall
programmedfunctionsmust be reset
COOKTIME Pad
Press and then press tile numbel" pads to set
tile alllOtlnt of [illle yell want V(}[lI" _k)t)d to
cook. The oven will shut off automatically
when the cooldng time has run out, unless
the Cook and Hold ibature was set.
Thetimeofdaywill flashin thedisplaywhen there
hasbeena poweroutage.
CLEAR/OFFPad
Press to cancel ALL oxen operations except
tile clock and timer
0
CLOCKPad
Press befiwe setting tile clock.
Number Pads
Use to set any flmction requiting numbel_
such as the time of day on tile clock, tile
timeI; tile oven tempenlture, tile internal
fl)od temperature, tile staiqt time and
length of operation %r timed baldric
and seli_cleaning.
KITCHEN TIMER ON/OFFPad
Pl'ess to select tile timer ib;fftll'e,
PROBEPad
}q'esswhen usino,_tile pl'obe to cook fbod.
5

Special features of your oven control.
Your new touch pad control has additional features that you may choose to use. The following are the features
and how you may activate them.
The special feature modes can only be activated while the display is showing the time of day. They remain in
the control's memory until the steps are repeated.
When the display shows your choice, press the STARTpad. The special features will remain in memory after
a power failure, except for the Sabbath feature, which will have to be reset.
12-Hour Shutoff
VViththisfeatura,shouldyouforgetandleavethe
ovenon,thecontrolwillautomat/2allyturnoffthe
ovenafter 12hoursdunngbak/bgfunctionsor
after3 hoursdunbga broilfunction.
If )ou wish to turn OFF this feature,
fi)lh)w the steps below.
[] Press tile BAKE and BROIL HI/LO
pads (on double oven models, use
tile upper o_,ell controls) at tile same
• • Q •
tm_e fl)r ._seconds, until tile displa}
sho_s SE
[] Press tile BELAYSTART pad tmtil
no shdn (no shutoff) appem5 in
tile display.
[] Press tile START pad to activate tile
no shutoff and lem'e tile control set
in this special _eatures mode.
NOTE"Onfloub/eovenmodels, thisactivates this
specialfeature for both ovens.
I
12-Hour, 24-Hour or Clock Blackout
Yourcontrolissettousea 12-hourclock.
If you would prefer to have a 24-hour
military time clock or black out the clock
display, fi)llow the steps beh)w.
[] Press the BAKE and BROILHI/LO
pads (on double oven Inodels, use
the upper oven controls) at the same
time fi)r 3 seconds, tmfil the display
shows SE
[] Press the CLOCKpad once. The
display will show 12hr. If this is
the choice )ou want, press the
STARTpad.
Press the CLOCKpad again to
change to the 24-hour military time
clock. The display will show 24 hr.
If this is the choice you want, press
the START pad.
Press the CLOCKpad again to black
out the clock display: The display
will show OFF.If this is the choice
you want, press the STARTpad.
NOTE:If the dock is in the b/ack-outmode, you
wi// not be able touse the Delay Start function.
ii i
Fahrenheit or Celsius Temperature Selection
Yourovencontrol isset touse the Fahranheit
temperatureselections,but youmay changethis
touse the Celsiusselections.
[] Press the BAKE and BROIL HI/LO
pads (on double oven Inodels, use
the upper o_en controls) at the same
time fl)r 3 seconds, tmtil the (lispla._
shows SE
[] Press the BROILHI/LO and COOK
T/MEpads again at the same time.
The displa)will show C (Celsius).
[] Press the START pad,
NOTE"Ondoubleovenmodels,thenewsett/bg
wi//bedisplayedforbothovens.
[] Press the BROILHI/LOand COOK
TIMEpads at the same time. The
display will show F(Fahrenheit).

_.C_
Tonesat the End of a Timed Cycle
At the endofa timedcycle,3short beepswill
sound followedby one beepevery6secondsuntil
the CLEAR/OFFpadis pressecLThiscontlbuous
6-secondbeepmay be cancelecL
To cancel the G-second beep:
[] pads (onPress the BAKEdoubleandovenmodels useBROILHI/LO
tile uppero\'en rontrols) ;it tile s;m_e
time lk)r 3 seronds, until the display
shows SF.
(continuous beep). Press the
KITCHEN TIMER ON/OFF pad
again. The display shows BEER
(This cancels the one beep every
6 seconds.)
[] Press the START pad.
NOTE: Ondouble ovenmodels,thiscancels the
end-of-cycletoneforboth ovens.
Tone Volume
Thisfeatureallows youto adjust the tone
volumestoa moreacceptablevolume. Thereare
three possible volumelevels.
[] (on doublePress the BAKEandBROIL.eI_ models, useHI/LOpadSthe
upper oven rontrols) at the same
time for 3 seronds, until the display
shows SF.
[] ThePresSdisplaywill show 2 BEEP.This istlle OVENLIGHT ON/OFFpad.
the middle \'olt/me level.
Press the OVENLIGHT ON/OFFpad
again. The display will show 3 BEEP.
This is the loudest \'olt/me level.
Press the OVEN LIGHTON/OFFpnd
again. The display will show I BEEP.
This is the quietest \'oltune level.
For earh time the level is changed,
a tone will sound to p_>vide an
indiration of the volmHe le\'el.
[] (/Choose fl_e desiredsoundBEEP' 2BEEP, 3BEEP). levd
[] desired level shown,press the START pad to arfi\'nte the
NOTE:Ondoubleovenmodels, thisactivates this
special featurefor both ovens.
Auto Recipe TM Conversion (onsomemodels)
Whenus/bgconvectionbake,the Auto RecipeTM
Conversionfeaturewill automab_a/// convert
entered regularbaklbgtemperaturesto
convectionbaklbgtemperatures.
Thisfeatureis activatedso the d/spla/
will show the actual converted(reduced)
temperature,Forexample,if /ou enter a regular
recipe temperatureof350°Fandpressthe
STARTpad, the d/splay will show CON
and theconvertedtemperatureof 325°£
NOTE: Th/sfeaturedoes not convertconvection
bakecook/bgOknes,only regularbak/bg
temperatures.
Todeactivate the feature:
[] padsPressthe BAKE:u_Cl(o_doubleove_ models,BROIL i'll/LOuse
the upper oven controls) at the
same time ik_r 3 seconds, until the
displ:_,' shows SE
[] The dispE_ythegONVECTIONwillt'_'essBAKEpa_l.showCON ON. Press
the gONVEgTION BAKE pad :_g:_in.
The dispE_y will show CON OFF.
Press the START pad.
[]
T(>reartix;_te the tb:_ture, repeat steps 1-3
above but press the STARTpad whe_
CON ONis in the displa>

Special featuresofyourovencontrol
Cook and Hold
Yournewcontrolhasacookandholdfeaturethat
keepscookedfoodswarmforupto3hoursafter
tinnedBakingor Roastingishnished
NOTE."Thisfeaturecan onlybeprogrammed to
work with tinnedBakingor Roasting.(Seethe
Usingthe tlYnedbakingor roasting features
section.)After timed Bakingor Roastinghas
automaticallystopped,the progremmedcook
and hold will automatically start.
To acfi_ Ke this teatm'e ti)r use after
Timed Baking or Roasting, follow the
steps below.
[] Press the BAKEand BROILHI/LO
pads at the sanle finle fi)r 3 seconds
until the display shows SE
[] Press the COOKTIMEpad,
The displa_ xd}l show Hid OFF.
Press the COOK TIMEpad again
to actixate the teatm'e. The displa_
will show Hid ON.
[] Press the STARTpad to activate
the cook and hold teatm'e and
leave the control set in this special
teatm'es mode.

Usingthe SabbathFeature.
(DesignedforuseontheJewish SabbathandHolidays.)(onsomemodels) ge.com
TheSabbathfeature can be usedfor baking/roastingonlg It cannotbe usedfor convection,broiling,self-cleaningor
DelayStart cooking.
NOTE:Theovenlight comesonautomatically(on somemodels)when thedoor isopenedandgoes off whenthedoor is closed.
Thebulb maybe removed.SeetheOvenLightReplacementsection.Onmodelswith a light switch on the controlpanel,theoven
lightmaybe tumed on andleft on,
ODO 0 (i) @
@ @@
When the display shows Dthe
oven is set in Sabbath. When the
display shows D C the oven is
bakhTg/roasting.
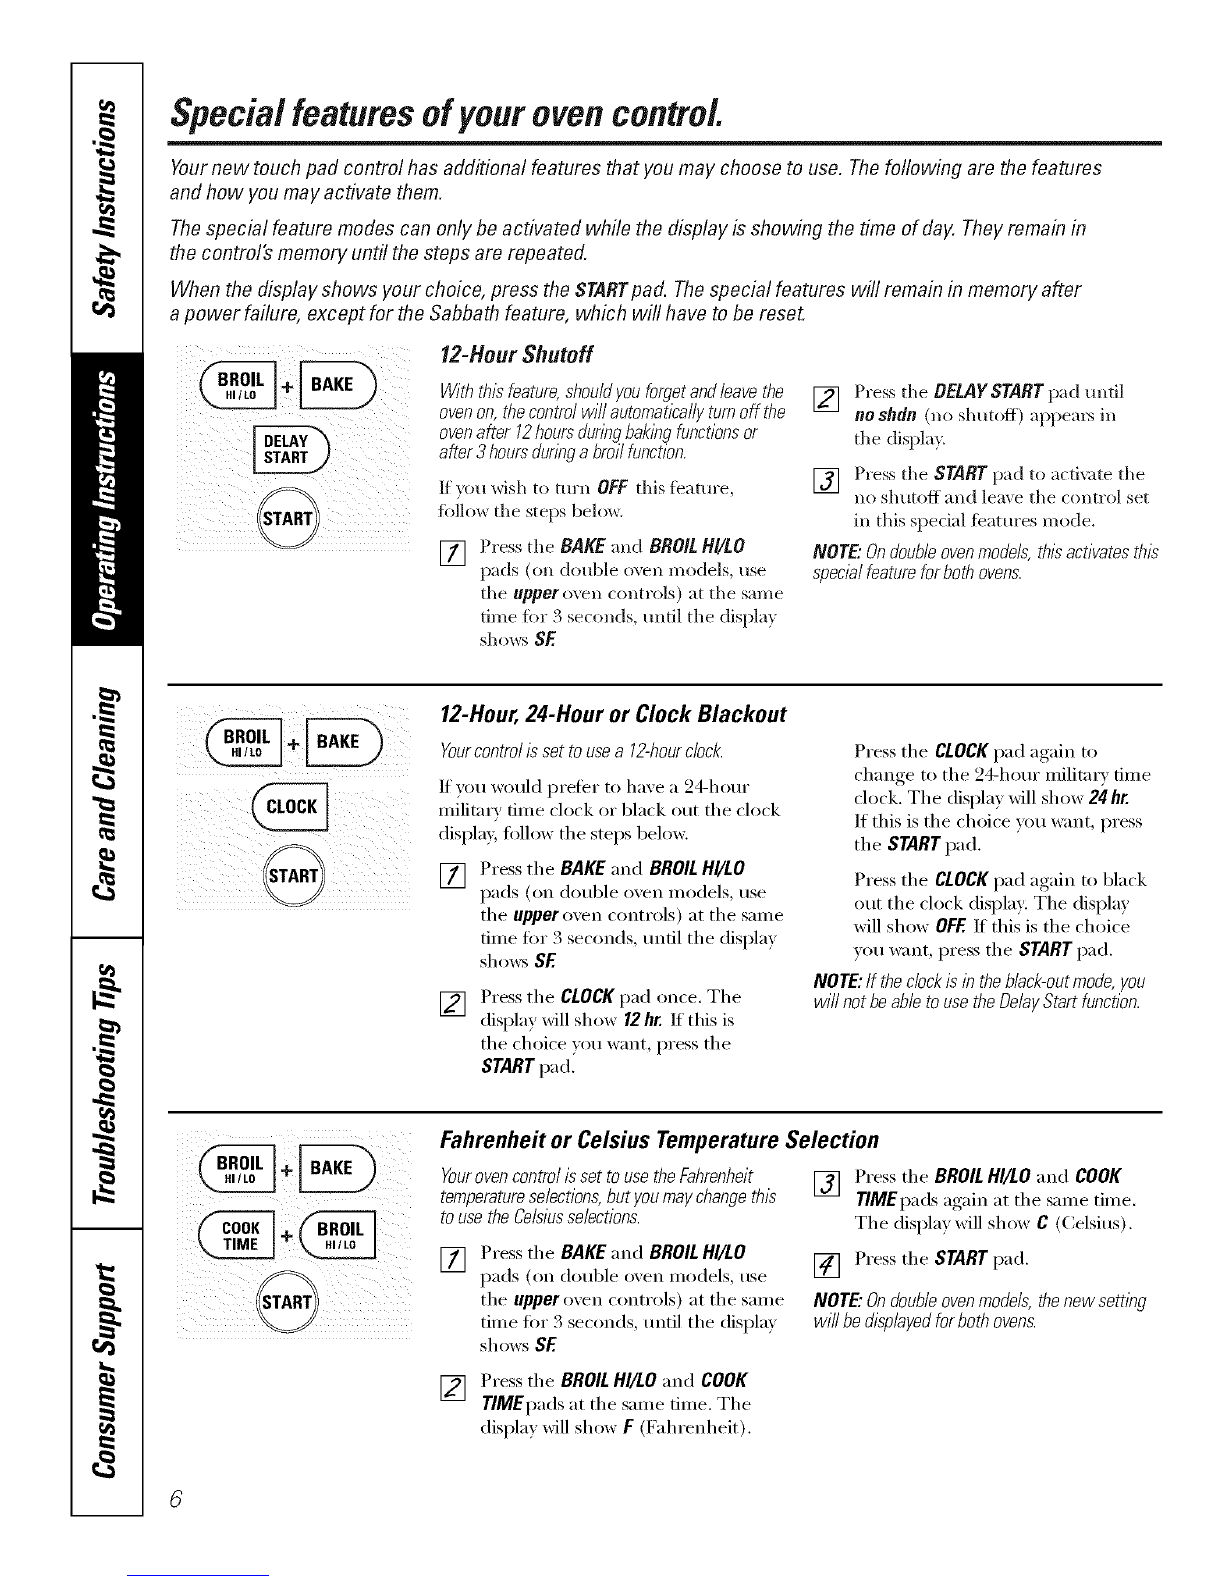
How to Set for Regular Baking/Roasting
Make sure theclock shows the correct timeof day and
the ovenis off
VTI Press and hold both th( BAKE and BROIL
Ill HI/LO t)_ds, at the same time, until the
disl)l m shows SE
NOTE: If bake or broil al)pears ill the
dist)h % the BAKEand BROIL HI/LOt)ads
were Hot touched at the same time.
Touch tile CLEAPJOFFt)ad and 1)egin
[_] "].q) the DELAYSTART t_(t mltil SAb bAtH
al)l)em:s in the dist)la" _
] Touch the START pad and D will at)l)ear
in the (tist)la)
] ]buch the BAKE pad. No signal will
1)e _Jvel/.
Llsing the nmnlxw t)ads, enter dm (lesired
] temt)el_dmre t)erween 170'q; mid 550°E
No sig_l_d or tel//t)el_dtllre will be gJx+ell.
]Tou(h the START t)ad.
[_ ?dter a random dela} t)eriod oI
at)l)1 oxim_tely 30 se((mds to 1 minute,
D C will appear in the dist)lay indi(_ting
that the oven is baking/roasting. If D C
doesn't _q)l)em: in the dist)lay, start
ag_dn al Step 4.
To a(!just the oven teml)erature , touch il/e
BAKEpad, emer die new teml)eramre using
the numt)er pads, alld touch the SrARrt)ad.
NOTE: The CLEAR/OFFmld COOKTIME l)ads are
a(tive during th(' Sabbath/('atm'e.
When the display shows Dthe
oven is set in Sabbath. When the
display shows D C the oven is
bakhTg/roasting.
How to Set for Timed Baking/Roasting -Immediate Start and Automatic Stop
Make sure theclock shows the correct timeof day and [] "lbu(h the BAKE t)ad. No signal will 1)e
the ovenis off. given.
[]
]I'ress and hold both the BAKE and BROIL
HI/LO pads, at the same time, mltil die
display shows SE
NOTE:Ill)ake or broil al)t)e;u_ ill the
dist)h% r,the BAKEand BROIL H//LOt)a(ls
were I/Or touched at the same time.
Touch the CLEAR/OEEt)ad mad begin
ag_ain.
I_] "lht) the DEMYSTART pad mltil SAb bAtH
al)l)ears ill the dist)l @
] "Ibuch the START pad and D will at)t)ear
in the dist)lay.
[_] "lbuch tlle COOKTIME pad.
] "Ibu(h the ntmfl)er t)ads to set the
desired length of cooking time t)etweell
1 minute and 9 hours mid 99 minutes.
The cooking thne that you entered will
be disl)layed.
Tollch the STARTpad.
[]
[]
[]
Using the ntmg)er pads, enter the
desired tenq)er_mn:e. No sig,m_dor
tel//l)e)7_tttllTe will 1)e gixen.
"lbuch the STARTt)ad.
Af{er a rm/(ton/delay t)eriod of
_q)l)roxhnatel'_ 30 seconds to 1 mintlte,
D C will al)t)ear in tile (tisl)la }indicating
that tile o\en is baking/roastiIlg. II D c
doesn't appear in the dist)lm', start
again at Step 7.
To a(!iust tile oven teml)eramre, touch the
BAKEI)ad, enter tile new teml)eramre using
tile tmmber pads and touch tile STARTpad.
When cooking is finished, the (lisl)h ff will
change fi'om D cto D and 0;00 will al)l)ear
ill(li(atillg that the o_.ell tills ttlrl/e(t OFFbut is
still set in Sat)bad/. Remo\e the cooked tood.
How to Exit the Sabbath Feature
] "lbu(h dw CLEAR/OFFp_d.
] lI the oxeH is cooking, wail tbr a rm/dom
dela} period of _q)l)roxinlately 30 se(onds
to 1 mira,e, m/til onh_ D is in the display.
[_] I)ress and hold both the BAKE and BROIL
iJi HI/LO t)_l(ts, at the same time, tmtil the
disl)l @S] _( )_rs SE
I_ "]hp die OELAYSTART p_,d umil 12shdn
i/i or no shdn ap1)em:sill the dist)la _, 12shdn
in(li(_tes that the oxell will m.omaticalh
turn off _fft(r 12 hours, no shdn indicates
that the oxen '+*,rillnot at_tomaticallv
Hlrll ( )_[['.
] "lbu(h the START pad.
NOTE:II a t)ower outage occurred while
tile oven x+_s in Sabbath, the ovcn will
;+Hltolnaticallv ttlrll ott }tl/d st}iv oil evell
whell the t)ower rettlrl/s. "I]le ovell ( OlltI'ol
IlIIIS[ be reset.
9

Usingthe oven.
Toavoid possible bums, place the shelves in the desired position before you turn the oven on.
_ g in
Before you begin...
The sheb:es have stop-locks, so that when
placed correctly on the supports, they will
stop before coming completely out, and
will not tilt.
_Ahen I)lacin°-, and removing, cookware,
pull the shelf out to the bump on the
shelf support.
Toremove a shelf, pull it toward you,
tilt the fl'ont end up and pull it out.
Toreplace, place the end (ff the shelf
(stoi>locks) on the support, tilt up the
ti'ont and push the shelf in.
The oven has 7 shelf positions.
How to Set the Oven for Baking or Roasting
[] Press the BAKEpad.
] Press the nt/IllbeI" pads to set the
desired temperatm'e.
[] Press the STARTpad.
[] Check food for doneness at
minimmn time on recipe. Cook
longer if necessary,:
[] Press the CLEAP,/OEEpad when
cooking is complete.
NOTE'.Acooh)_gfanmayautomatl?allyturnon
andoff tocoolinternalparts.Thisisnormal,and
thefanmayconfl))uetorunevenaftertheovenis
turnedoff
TypeofFood Shelf Position
Frozenpies Cor D
(oncookiesheet)
Angelfoodcake B
Bundtorpoundcakes B
Biscuits,muffins, Cor D
brownies,cookies,
cupcakes,layer
cakes,pies
Casseroles Cor D
Preheating and Pan Placement
Preheat the oven if the recipe calls fl)r it.
To preheat, set the oven at the correct
temperatm'e. Preheating is necessacv fl:,r
good results when baking cakes, cookies,
past_ T and 1)reads.
Forovenswithout a preheat i))dlcatorl/)ht or
tone,preheat 10ml)_utes.
Baking results will be better if baking pans
are centered in tile oven _lS I//tlch _lS
possible. Pans should not touch each
other or the walls of the oven. If you need
to use two shelves, stagger the pans so one
is not directly above the othe_; and leave
approMmately 1½" between pans, fl'om
the fl'ont, back and sides ot the wall.
ii:il(
Cut slits in flTefoiljust like flTegrid.
Aluminum Foil
You can use ahmfinum foil to line the
broiler pan and broiler grid. However;
you must mold the fifil tightly to the grid
and cut slits in it just like the grid.
Aluminum foil mayalso be used tocatcha
spillover
Never entirely cover a shelf with
ahmfinum toil. This Mll distm4) the heat
drculafion and result in poor baking.
A smaller sheet offlfil may be used to
catch a spillover by placing it on a lower
shelf several inches below the toed.
10

ge.com
If your ovenis comTectedto208
volts,rare steaksmay bebroiled by
preheating thebroiler andpositionflTg
the ovenshelf onepositionhighe_
+TheU.S.DepartmentofAgriculture says
"Rarebeefispopular, butyou should
know that cooking it to only 14_°Fmeans
some foodpoisonhTgorganismsmay
survive." (Source:Safe FoodBook.Your
Kitchen Guide.USDARev.June 1985.)
How to Set the Oven for Broiling
Leavethedooropentothebroil stopposition.
Thedoorstaysopenbyitself, yettheproper
temperatureismaintainedin theoven.
NOTE:Foodcanbebroiledwith thedoor
dosedbut it maynotbrownaswe//because
theovenheatingdement wi// cycleonandoff
[] Place the meat or fish on the broiler
grid in the broiler pan.
[] Follow suggested shelf positions in
the BroilingGuide.
Thesl#e,wel)ht,thickness,startingtemperature
andyourpreferenceforalonenesswi//affect
broilingtl_nes.Thisguideisbasedonmeatsat
refn)eratortemperature.
[] Press the BROILHI/LOpad once fi_r
HIBroil
[]
[]
To change, to LOBroil,press the
BROILHI/LOpad again.
Press the STARTpad.
_,_/ell broiling is finished, press the
CLEAR/OFFpad.
NOTE."Broilwillnotworkif thetemperature
probeispluggedin.
Broifing Guide
Quantity and/ Shelf First Side Second Side
Food or Thickness Position Time(rain.) Time(rain.) Comments
GroundBeef 1 lb.{4 patties) E 10 7 Spaceevenly.Up
Well Done 1/2 to3/4" thick E 10 9 to 8patties take
abouttile saroe
time.
Beef Steaks
Raret
Medium
Well Done
RaW
Mediuro
Well Done
Chicken
LobsterTails
FishFillets
1" thick
1to 11/zIbs.
Pork Chops
Well Done
LambChops
Mediuro
Well Done
Mediuro
Well Done
11/Z'thick
2to 21/zIbs.
1whole
2to 21/zIbs.,
splitlengthwise
24
Bto 8 oz.each
1/4 to 1/2" thick
E
E
E
E
E
E
C
8
10
12
10
15
25
25
13 16
6
8
10
8
14 16
20_5
10
Donot
turn oven
Ham Slices 1" thick D 8 8
(precooked)
2(1/2" thick) E 10 10
2(1" thick)about 1 lb. D 15 15
Slashfat.E
E
E
E
2(1" thick)about 10
to 12oz.
2(11//'thick)about 1lb.
10
12
14
17
9
10
12
12 14
Steakslessthan
1" thick cook
throughbefore
browning.
Panfrying is
recommended.
Slashfat.
Reducetimeabout
5to 10minutes
persideforcut-up
chicken.Brush
eachsidewith
meltedbutter.
Broilskin-side-
downfirst.
Cutthroughbackof
sheikSpreadopen.
Brushwith melted
butterbefore
broilingandafter
half of broiling
time.
Handleandturn
verycarefully.
Brushwith lemon
butterbeforeand
duringcooking,if
desired.Preheat
broilerto increase
browning.
Increasetime5to
10minutesper
sidefor 1FZ"thick
orhome-curedham.
Slashfat.
11

Usingthe clock, timerandcontrollockout.
Make sure flTeclock is set to the
correct time of da_
ToSet the Clock
Tile clock must be set to tile correct time
of day fin" tile aut(mmfic oven tinting
tractions to work properly. Tile time of
da)' cannot be changed durh_g a timed
baking or self-cleaning cycle,
[] Press tile CLOCK pad.
[] Press tile number pads.
[] Press the START pad.
i! iiii )i
Ttie timer is a mflTute timer onl_
The timer does not control oven
operations. Ttie maximum setting on
ttie timer is 9 hours and 59 mfl?utes.
ToSet the Timer
[] Press tile KITCHENTIMERON/OFF
pad.
[] Press tile nmnber pads tmtil tile
[lIllO/lnt of tillle yotl want shows
in tile display: For example, to set
2 hom_ and 45 minutes, press 2, 4
and 5in that order: If you make a
mistake, press tile KITCHEN TIMER
ON/OFFpad and begin again.
[] Press tile STARTpad.
AtierpressingtheSTARTpad,SETdisappears,
thistellsyouthetimeiscountingdown,although
thedisplaydoesnotchangeuntiloneminutehas
passedSecondswillnotbeshownin thedisplay
unt/7thelastminute/scountingdown.
[] X,_q/en tile timer reaches :0(7,
tile control will beep 3 times
fi)llowed b)one beep exe_)
() seconds until tile KITCHENTIMER
ON/OFF pad is pressed.
Tile 6-second tone can be canceled by
following tile steps in tile Special features
of your oven control secdon trader Tones
at the End of a Timed Cycle.
To Reset the Timer
If tile display is still shoMng tile time
remaining, you may change it by pressing
tile KITCHEN TIMER ON/OFF pad, then
press tile mmd)er pads/mtil tile time
you want appea_ in tile display:
If the remaining time is not in tile display
(clock, delay start or cooking time are in
the display), recall the remaining time by
pressing tile KITCHEN TIMER ON/OFFpad
and then pressing tile number pads to
enter tile new tilne vo/i want,
ToCancel the Timer
PressKITCHENTIMERON/OFFpad twice.
@
LOCK/UNLOCK HOLD 3 SECONDS
/2
Control Lockout
Yourcontrolwillallowyoutolockoutthetouch
padssotheycannotbeactivatedwhenpressed
NOTE:Ondoubleovenmode&thisactivatesthis
featureforbothovens.
To lock/retook tile controls:
[] Press tile 9and 0pads at tile same
time fin 3 seconds, tmtil tile displa)
sh(>_:sLOCON.
[] To unlock tile control, press tile 9
and Opads at tile same time for 3
seconds,/mtil tile display sho_:s
LOCOFF.
When this teatm'e is on and tile touch
pads are pressed, tile control will beep
and tile display will show LOCON.
NOTES:
_: Thecontrollockoutmodeaffectsalltouch
pads.Notouchpadswi//workwhenthis
featureisactivated
::Ji::Theadjustmentwi//beretainedinmemory
afterapowerfailure.

Usingthe timedbakingand mastingfeatures.(onso eo elsj ge.com
On double oven models, you can use timed baking in one oven while using self-clean in the other; you can also use
timed baking in both ovens at the same time.
NOTE:Foods that spoil easily--such as milk, eggs, fish, stuffings, poultry and pork--should not be allowed to sit for
more than 1hour before or after cooking. Room temperature promotes the growth of harmful bacteria. Be sure that
the oven light is off because heat from the bulb will speed harmful bacteria growth.
@@@@@
® @ ® @
@ @@ @ @
@@@@
How to Set an Immediate Start and Automatic Stop
Theoven wi// turn on i_nmedlatelyand cook for a
selectedlength of time.At the endof the cooking
tkne, the oven will turn off automatically
Make sure the clock shows the correct
tiille of (lax'.
[] Press the BAKEpad.
[] Using the number pads, enter the
desired temI_eramre.
[] Press the COOKTIME pad.
NOTE."If yourreciperequkespreheatlbg, you
mayneed toadd additional time to the length of
the cooklbgtime.
[] Using the ntm_ber pads, enter the
desired baking time. The oxen
temperatm'e and tile cooking time
that _ou entered will be displa} ed.
[] Press tile START pad.
Tile display will show tile changing
temperature (starting at 100°F) and the
cooking time. The display starts changing
once the temperature reaches 100°E
NOTE:Ondoubleovenmodels, when usingboth
ovensat thesame time,the times showing in the
display wi// be for thelast ovenseL Todisplay the
tl/ne set for the fkst oven set,press the COOK
TIME pad for that oven.
Tile oven will ('onfin/le to cook fin" tile
programmed am aunt (ff tiln e, then shut
off automatically, tmless tile Cook and
Hold teature was set. See the Special
featuresof youroven controlsection.
Press tile CLEAR/OFFpad to clear
the display.
(3)@@@@
if)G)@@
@@@(3)@
if)G)@@
@@if)G)@
(33G) (g)(Zi(3)
START
How to Set a Delayed Start and Automatic Stop
YoucansettheovencontroltodeNy-startthe
oven,cookforaspecificlengthof timeandthen
turnoffautomatically
Make sm'e the clock shows the correct
tiille of (lax'.
[] Press the BAKEpad.
[] Using the number pads, enter the
desired temperatm'e.
[] Press the COOKTIME pad.
NOTE."If yourreciperequkespreheatlbg,you
mayneedtoaddadditionaltimetothelengthof
thecooklbgtime.
[] Using the nmnber pads, enter the
desired baking time.
[] Press the DELAYSTART pad.
[] Using tile number pads, enter tile
time of day }ou want tile oxen to
turn on and start cooking.
[] Press tile STARTpad.
If you would like to check tile times wm
have set, press the DELAYSTARTpa d'to
check tile start time w_u have set or press
tile COOKTIMEpad to check tile length
of cooking time you have set.
XA]/entile oven tm'ns on at tile time
of day you have set, the display will
show tile changing temperatm'e
(starting at 100°F) and the cooking
time. The display starts changing once
the temperatm'e reaches 1O0°E
NOTE:Ondoubleovenmodels,whenusingboth
ovensat thesametlYne,thet/Ynesshowingin the
displaywi//beforthelastovenseLTo&@laythe
tl/nesetforthefkstovenset,presstheBELAY
STARTortheCOOKTIMEpadforthatoven.
Tile oven Mll continue to cook fin" tile
programmed _llll(l/lllt ()J[time, then shut
off automaticall 5 unless the Cook and
Hold feature was set. See the Special
featuresof youroven controlsection.
Press tile CLEAR/OFFpad to clear
tile display.
NOTE."An attention tone wi// soundif you are
using ttYnedbakingand donot pressthe START
pad after entenbg the baklbg temperature. 13

Usingtheprobe.
For many foods, especially roasts andpoultry, internal food temperature is the best test for aloneness. The
temperature probe takes the guesswork out of roasting by cooking foods to the exact doneness you wan_
The temperature probe has a
skewer-like probe at one end and a
plug at the other end that goes hTto
the outlet in the oven.
NOTE" Double oven models have a probe/b the
upper oven only
Use of probes other than the one
I)ro_ided with this product nlay result in
damage to the probe.
Use the handles of the probe and l)lug
when inserting and removing them fl'om
the meat and outlet.
::2_::Toavoiddamagingyourprobe,donotuse
tongstopuffonthecablewhenremovingit
;;Ji:_Toavoidbreakingtheprobe,makesurefood/s
completelydefrostedbeforeinserting.
!,u!
!i>Topreventpossibleburns, donot unplug
theprobefrom the outletuntil the oven
hascooled
iJi:_Never leave yourprobe/bside the oven dunbg
a self-c/ean/bgcycle.
iJi::Do not store theprobe in the oven.
Mter preparing the meat and placing it
on a trivet or on the broiler pan grid,
tollow these directions fi_r proper probe
pla cement.
[]
!_i_I_i! _i___
I,ay the probe on the outside (ff the
meat along the top or side and mark
with your finger where the edge of
the meat comes to on the probe.
The point should rest in the center
of the thickest mea_' part of the
I'oast.
Insert the probe completel) into the
meat, up to the handle. It should
not touch bone, fat or g_isfle.
For roasts with no bone, insert the probe
into the meatiest part of the roast. For
bone-in ham or lamb, insert the probe
into the center ot the lowest large muscle
orjoint.
Insert the probe into the center (ff dishes
such as meat loaf or casseroles. _,_]/en
cooking fish, insert the probe fl'omjust
above the gill into the meatiest area,
parallel to the backbone.
Insert the probe into the meatiest part (ff
the inner thigh from below and parallel
to the leg of a whole turkey:
@@ (3)(3) @
(D@ @(3)@
@ @ (3)@
@
14
How to Set the Oven For Roasting When Using the Probe
] Insert tim probe into tim meat. _ter fl_e internal temperature of fl_e
meat reaches IO0°F, the changing
[] Plug the probe into the outlet in the
oxen. Make sm'e it's I)ushed all the
wm in. Close the oxen (loo_:
[] Press the PROBEpad.
[] Press the number pads to set the
desired internal fi)od or meat
temperature. The maximum
internal temperature fi)r the food
that you can set is 200°F.
[] Press the BAKEpad.
] Press the number pads to set the
desired oxen temperature.
[] Press the START pad.
Thedisplaywi// flash if theprobeis/bserted
into the outlet and youhave not set a probe
temperatureandpressedthe STARTpad
_'_hen the oxen starts to heat, the word
tO will be in the displa);
internal temperature will be shown
in the displa).
[] X._q_en the internal temperature of
the meat reaches the number you
have set, the probe and the oven
turn off and the oven control
signals. To stop the signal, press the
CLEAR/OFFpad. Use hot pads to
remove the prol)e fl'om the food.
Do not use tongs to pull on it--they
might damage it.
To change the oven temperature during
the Roast cycle, press the BAKEpad and
then the number pads to set the new
temperature,
iJi::If theprobe/s removed fromthe foodbefore
the flba/ temperatureisreached,a tonewi//
soundand the displaywi// flash until theprobe
/sremovedfrom the oven.
ij_::Youcanusethefl_nereventhoughyoucannot
usetimedovenoperations.

Usingthe convectionoven. geoom
Multi-shelfposition
ConvectionBake
NOTE'.Theconvectionfan will cycleon and off
while cookingtobest distn#ute hot air in the
oven.
Theconvectionovenfanshutsoff whentheoven
doorisopenedDONOT/eavethedooropenfor
longperiodsoft/_newhileusingconvection
cookingor youmay#orten thefife ofthe
convectionheatingelement
/na convectionoven,a fancimu/ateshotair
over,underandaroundthefood
Thiscirculatinghot air isevenlydistributed
throughouttheovencavity.Asa result,foods
areevenlycookedandbrowned--often in less
time with convectionheal
;;Ji::Idealfor evenlybrownedbaked foodscooked
onmultiple shelves.
iJiiGoodfor largequantities of bakedfoods.
_Goodresultswith cookies,biscuits,muffins,
brownies,cupcakes,creampuffs, sweet roils,
angelfoodcakeand breacL
Tile convection tim circulates tile heated
air evenly over and aI'Otllld tile %o0.
Multi-Shelf Convection Baking
[] Whenconvectionbaking with only I shelf,
follow the shelfpositions recommendedin
[] the Usingthe ovensection.
Because heated air is circulated evenly
throughout tile oxen, fi)ods can be
baked with excellent results using
nlultiple shelves,
Multi-shelf' baking nia,v increase cook
tinies slightly for sonIe fi)ods but tile
overall result is tinie saved, Cookies,
nmflins, biscuits and other quickbreads
give vei T good results with nlulfi-shelf
baking.
X'_l/eIl baking on 3 shelves, place one
shelf in the second (B) position, one
in tile fourth (D) position and one in
tile 6th (F) position.
Adapting Recipes...
You can use your tiwoiite recipes in tile
COlI_, ectioll ()veil,
When convection baking, tile Auto
Redpe'" (_onversion f_'atui'e autoinaficallv
reduces the set regular lx_kiilg
teinpeiature by tile reconmlended 25°E
See Auto Recipe" Conversionin the Special
features of yourovencontrolsection.
_Usepansizerecommended
;;Ji::Somepackageinstructionsfor frozen
casserolesor maindisheshave been
developedusing commercialconvectionovens.
Forbest resu/tsin thisoven,preheat the oven
and usethe temperatureon the package.
15

Usingtheconvection oven.
Grid
Broilerpan
ConvectionRoast
_,.Goodforlargetendercutsofmeat,uncovered
Tile convection tim circulates tile heated
air evenly over and arotmd tile fi)od.
Meat and poult_ y are browned on all
sides as if they were cooked on a
rotisserie. Heated air will be circulated
ove_; trader and arotmd tile load being
roasted. The heated air seals inj uices
quickly tot a moist and tender product
while, at the same time, creating a rich
golden brown exterior.
When w_u are convection roasting it is
important that you use tile broiler pan
and grid fl)r best convection roasting
results. Tile pan is used to catch grease
spills and tile grid is used to l)I'e\'eIlt
grease spatters.
When bakingcooldes,you will
getthebest results if you use a
flat cookie sheetinstead ofa
_anwith low sides.
Cookware for Convection Cooking
Belore using your convecdon oven,
check to see if vain" cookware leaves
room tot air circulation in tile oven.
If you are baking with several pans, leave
space between them. Mso, be sure the
pans do not touch each other or tile
walls at the oven.
Paper and Plastic
Heat-resistant paper and plastic
containers that are recommended tot
use in regular ovens can be used in
convection ovens. Plastic cookware that
is heat-resistnnt to temperatm'es of
400°F can also be used.
Metal and Glass
Any _'l)e _ff cookware will work in w_m"
convection oven. However, I/letnl l)ans
heat tile tastest and are recommended
tar convection baking.
iJGDarkened or matte-hbishedpanswill bake
faster than s&bypans.
iJGGlass or ceramic pans cook more s/ow/g
For redpes like oven-baked chicken,
use a pan with low sides. Hot air cmmot
circulate well arotmd todd in a pan with
high sides.
CONVECTION
e®®®®
How to Set the Oven for Convection Baking or Roasting
[] Press tile CONVECTION BAKE pad
or tile CONVECTIONROAST pad.
] Press tile immber pads to set tile
desired o;en temperatm'e.
[] Press tile STARTpad.
To change tile oven temi)eratm'e, press
tile CONVECTION BAKE ,,r CONVECTION
ROASTpad and then tile nmnber pads
to set tile new temperature.
_]/en tile oven starts to heat, tile
changing temperatm'e, starting at l O0°g
will be displayed. When tile oven reaches
the temperatm'e you set, 3 beeps will
so/Ind,
[] Press tile CLEAR/OFF pad when
finished.
!i>Youwill hear a fan while cooklbg with
convection.Thefan will stop when the dooris
opened,but the heat will not turn off.
!i>Youmay hear the oven clickingduring baking.
Thisis normal.
16

ge.com
For best reselts when roasting large
turkeys and roasts, we recommend
using the probe included in the
convection oven.
CONVECTION
(DOO(DO
(!!tO
G)(Z)O(DO
How to Set the Oven for Convection Roasting when Using the Probe
The display will flash PROBE and the
oven control will signal ff the probe is
inserted into tile otlflet, and you have not
set a probe telllperatt/re and pressed the
STARTpad.
[] Place tim shdfin(_&). ii_se_.t tlle p_._l)etlleint_l_westP{_siti°ntllen_eat.
[] PMg the probe into the outlet hi the
oven. Make sure it is pushed all the
way in. Close the oven dora:
[] Press the CONVECTIONROASTpad.
[] Pressfl_edesired ovennumbertemperamre.Padsto set the
[] Press the PROBEpad.
[] desired internal meat teinperature.Pl_ess the munber pads to set the
[] Press the STARTpad.
_,_lmn the oven starts to heal the \_x)rd
LOwill be in the displa}:
Mter file inten_al tempemtm'e ot the meat
reaches 100°K the changing internal
teiuperature will be shown in the display.
[] the_4]/eniueatrearhestheinternal teIuperatul'etllemunber you°f
have set, the probe and the o;'en
turn off and the oven control
signals. To stop the signal, press the
CLEAR/OFFpad. Use hot pads to
relno;'e the probe ti'oln the food.
Do not use rungs m ptfll on it--they
might dmnage it.
the oven.
NOTE"
_; Youcanusethett_naeventhoughyoucannot
use tl_ned oven operations.
_; Ondouble,ovenmode/s,youwillnotbeableto
To change the oven temperature
during the Convection Roast cycle,
press the CONVECTION ROAST pad
and then press the number pads to
set the new desired temperature.
Convection Roasting Guide
Meats Minutes/Lb. Oven Temp. Internal Temp.
Beef Rib,B0neiessNb, Rare 20_4 325°F 140'_Ft
TopSirloin Medium 24_8 32B°F 160°F
(3to 5 ibs.) Weft 2842 325°F 170°F
BeefTenderloin Rare 1ON4 325°F 140"Ft
Medium 14_ 8 325°F 160°F
Pork Bone-io,Boneless(3to 5 Ibs.} 23_7 325°F 170°F
Chops(1/2to I" thick) 2 chops 30 35total 325°F 170°F
4 chops 35 40total 325°F 170°F
6 cl_ops 40 45total 325°F 170°F
Ham Canoed,Butt,Shank(3to BIbs. fully cooked) 14N8 325°F 140°F
Lamb Bone-in,Boneless(3to 5 Ibs.) Medium 17_0 325°F 160°F
Well 20_4 325°F 170°F
Seafood Fish,whole (3to 5 Ibs.) 30 40total 4OO°F
LobsterTails(6 to 8oz.each) 20 25total 350°F
Poultry WholeChickeu(21/zto 31kIbs.) 24_6 350°F 180°_ 85°F
CornishHensUnstuffed(1to 11/zIbs.) 50 55total 350°F 180°q85°F
Stuffed(1 to 17zIbs.) 55 60total 350°F 180°q85°F
Duckling(4to 5 Ibs.} 24_6 325°F 18O°q85°F
Turkey,whole-*'
Unstuffed(10to 16It)at 8q 1 325°F 180°q 85°F
Uostuffed(18to 24Ibs.) 7_ 0 325°F 180°_ 85°F
TurkeyBreast(4to 6 Ibs.) 16_ 9 325°F 17O°F
* Shljfl'd binls ,Wm'*ul{_n'qllin, 30-45 mh*ue,s addiliona/mdsli_ lime. S/_;e/d/l%s(Hid/m,asl ll';Ik/oi! Iopn_l,*,iit
o'_,*'dm:,m/i_*,< am/(/Uin.g o/ dehL
t7"/.,l\_;. l)(,/_:*Tm(_a o/.l_'HcMlt:n._:0s"lian"be('/is/_olmlm:butloud:o,Ildl,'m:a,lhal(ool,'h/gitto (ml31401"me(n/_
some /ood /:oAonh/_ o_:_:,Ams m(0 su_'_i_:e."(5ounw_@. Foodlh:ol,'.};m_Kik/_:'_(mid*'.('_7).Ilb:I,.]_Im. 197¢5.) 17

Usingthetimed featuresforconvectioncooking.
On double oven models, you can use timed baking or roasting in one oven while using self-clean in the other; you can
also use timed baking or roasting in both ovens at the same time.
Youwill hear a fan while cooking with these features. Thefan will stop when the door is opened, but the heat will not
turn off.
NOTE"Foods that sped easilyISUCh as milk, eggs, fish, stuffings, poultry and porkIShould not be allowed to s# for
more than 1hour before or after cooking. Room temperature promotes the growth of harmful bacteria. Be sure
that the oven light is off because heat from the bulb will speed harmful bacteria growth.
CONVECTION How to Set an lmmediate Start and Automatic Stop
i@@ (:Z)Q @ ¸
i i i i
Theovenwill turnonimmediatelyandcookfora
selectedlengthoftime.At theendof thecookingtime,
theovenwill turnoffautomatical/_
Make stlre tile dock sho_ts tile correct [il-i-|e
of da_.
[] Press tile CONVECTIONBAKE or
CONVECTIONROASYpad.
[] Press the nurrfl)er pads to set tile desired
o_,en tef//perattlre.
[] Press tile COOKTIMEpad.
NOTE:ffyourreciperequirespreheating,youmay
needtoaddadditionaltimetothelengthofthe
cookingtime.
[] Press tile nurrfl)er pads to set tile desired
length of cooking time. The minimum
cooking time you can set is 1 minute.
Tile o\en temperature that you set and
the cooking time that you el=tared will be
ill tile displa?.
[] Press the STARTpad.
Tile (fispla} will sho_ the changing
temperaml_ (starting at 100°F) and die
cooking time. The displa} starts changing
once file temperaml_ reaches 100°E
NOTE:Ondoubleovenmodels,whenusingbothovens
at thesametime,thetimesshowingin thedisplaywill
beforthelastovenset.Todisplaythetimesetforthe
firstovenset,presstheCOOKTIMEpadfor thatoven.
The oven will continue to cook for file
progTammed amount of time, then shut
off automaficall}, unless tile Cook and Hold
teatul_ _s set, See the Specialfeatares of your
ovencontrolsection,
[] Press the CLEAR/OFFpad to clear the
display if necessary. Remo_e tile tbod
fl'om tile oven. Remembeg even though
the o_en shuts off automadca]l}, toed left
ill tile o_en will continue cooking after
tile o_en turns otti
CONVECTION
@3)@3)@@@
@@(3)@@
@@@(DZ!D
@@@@@
@(2)@(3iD
START
18
How to Set a Delayed Start and Automatic Stop
Youcansettheovencontroltodelapstarttheoven,
cookforaspecificlengthoftimeandthenturnoff
automatically
Make sure tile clock shows tile correct dine of
daL
[] Press tile CONVECTIONBAKEor
CONVECTIONROASTp'ad.
[] Press tile number pads to set tile desired
oveI/ tel//perattlre.
[] Press tile COOKTIMEpad.
NOTE:ffyourreciperequirespreheating,youmay
needtoaddadditionaltimetothelengthofthe
cookingtime.
[] Press tile number pads to set tile desired
cooking time.
[] Press tile DELAYSTARTpad.
] Press tile number pads to set tile time of
da_'_Oll "Wail[ tile oven t(t tIlrn Oil and
start cooking.
Ifyouwouldliketocheckthe timesyouhaveset,press
theBELAYSTARTpadtocheckthestarttimeyouhave
set,orpresstheCOOKTIMEpadtocheckthelength
ofcookingtimeyouhaveset.
[] Press the STARTpad.
NOTE:Anattentiontonewillsoundif youareusing
timedbakingorroastingandfionotpresstheSTART
padafterenteringthebakingorroastingtemperature.
_\]len file o_en turns on at tile time of(Ira
_)u hme set, tile displa?, will sho_ tile
changing temper, mu'e (starting at 100°F) and
the cooking time. Tile display starts changing
once the mmperamre reaches 100°E
NOTE:Ondoubleovenmodels,whenusingbothovens
at thesametime,thetimesshowingin thedisplaywill
beforthelastovenset.Todisplaythetimesetforthe
firstovenset,presstheDELAYSTARTorCOOK
TIMEpadforthatoven.
The oven will contintle to cook tor the
programmed amount of time, then shut
off automafical]}; unless tile Cook and Hold
teatul_ _s set, See the Specia/feataresofyour
ovencontrolsection,
[] Press tile CLEAR/OFFpad to clear tile
display if necessary. Remo_e tile toed
fl'om tile oven. Remember, even though
tile o_en shut,s off automaticall}, toed left
ill tile o_en will contim/e cooking after
tile o_en turns ottl

Adjust the oven thermostat--Do it yourself! ge.com
Youmay find that your new oven cooks differently than the one it replaced. Use your new oven for a few weeks
to become more familiar with it. If you still think your new oven is too hot or too cold, you can adjust the
thermostat yourself.
Donot use thermometers, such as those found in grocery stores, to check the temperature setting of your oven.
These thermometers may vary20-40 degrees.
NOTE: This adjustment will only affect baking and roasting temperatures; it does not affect broiling, convection or
self-cleaning temperatures. Theadjustment will be retained in memory after a power failure.
Q OQO
OQQO3Z
START
To Adjust the Thermostat
[] Press tile BAKEand BROILHI/LO
pads at tile same Ome fin" 3 seconds
unOl tile display sho_vs SE
[] Press tile BAKEpad tot tile oven
which you want to use. A two<ligit
number sho_vs in tile display:
Press BAKEagain to alternate
between increasing and decreasing
tile oven temperature.
[] The oven temperature can be
at!lusted up to (+) 35°F hotter or (-)
35°F coole_: Press tile number pads
tile same way you read them. For
example, to change the oven
temperature 15°E press 1and 5.
[] "_'_hen you haxe made tile
a(!iusUnent, press tile START
pad to go back to tile Ome of
day display. Llse your oven as
VOII wotlld nolillallv:
Thetype ofmargarine will affect bakingperformanc!!
Most recipes for baking have been developed using high-fat products such as butter or margarine (80% fat). If you
decrease the fat, the recipe may not give the same results as with a higher-fat product.
Recipe failure can result if cakes, pies, pastries, cookies or candies are made with Iow-fat spreads. The lower the fat
content of a spread product, the more noticeable these differences become.
Federal standards require products labeled "illai'gai'ine" to ('ont;lin at least 80% tilt by weight, i,o\wtiK spreads, on tile
other hand, contain less tilt and mo_e water: The high-moisture content of these spreads affect the texture and flavor
of baked goods. For best results with vot:tr old tilw)cite recipes, use mmgarine, butter or stick spreads containing at least
70% vegetable oil.
19

Usingtheself-cleaning oven.
The oven door must be closed and all controls must be set correctly for the cycle to work properly.
Wipe up heavy soil o17the oven
bottom. (appearance may vary)
Before a Clean Cycle
_e recon/nlend ",enting your kitchen
with an oi)en window or using, a
_entilation tim or hood dtu_ing
the fiISt selfXclean c_cle.
Reinoxe the 1)roiler i)an, 1)roiler grid,
i)robe, all cookware and am ahunintun
foil fl'oIn the oxen.
The o',en shel',es can be self-cleaned, but
they will darken, lose their hlster and
becon/e hard to slide.
Do not rise abrasives or ()veil cleanei_.
Clean the tol), sides and outside of the
oven door with soap and wateI:
Make sure the ()veil light bulb cover
is in I)lace and the ()veil light is ofll
IMPORTANT'.The health of soIne birds
is extrenlelv sensitive to the flunes given
off' during the self:cleaning cycle of
any oven. Move birds to another
well-ventilated roonl,
::Ji::Oil double oven n/odels, you can
set a clean cvcle in both ()veils at the
san/e tiine. The last oven set will
atlton/aticallv delay its start until the
end of the fiist oven's clean cvcle.
!i_:On doul)le o'_en models, )ou can
rise timed baking in one oxen and
selfXclean the other at the san/e tiine.
Q 00 Q O
IQ (DQ ¸
How to Set the Oven for Cleaning
[] Pressthe SELFCLEANSTD/LOW})ad
once It)I" a 4-hotlr (lean [lille or
twice fin a 3-houi clean dine.
A 3-houi sel6clean tin/e is
recoll/illended J[()i" t/se when
cleaning small, contained spills. A
selfk'lean tin/e of 4 houi_ ()r lonoer
is reconm/ended fin" a dirtier oxen.
VN If a dine other than 4 houis or
3 houIs is needed, use the ntunber
i)ads and enter the desired clean
tiine.
You can change the clean dine to am
tin/e between 3 houi_ and 5 houI_,
dei)ending on how di m, your oxen is.
[] Press the STARTI)ad.
Tile door locks autoinadcallv, The disI)lay
will show the clean tin/e ren/aining. It will
not be I)ossil)le to open the ()veil door
until the tenll)erattu'e droi)s below the
lock tenli)eramre and the LOCKEDlight
goes off'.
_41_eil the LOCKED light goes off; you will
be al)le to oi)en the dooi:
_:!iThe words LOCKEDwill flash and the
()veil control will signal if you set the
clean cvcle and fiwget to ch)se the
()veil dooi:
::Ji::To stop a clean cycle, press the
CLEJIR/OFFI)ad. _,_]/ell the LOCKED
light goes off indkating the oven has
cooled below the locking tenli)erature ,
you will be al)le to oI)en the dooi;
2O
Other manuals for JT912
1
This manual suits for next models
1
Table of contents
Other GE Oven manuals
Popular Oven manuals by other brands

Zanussi
Zanussi ZOB 641 Instruction booklet

Philco
Philco POC 828 user manual

Bosch
Bosch HBG517E 1R Series User manual and installation instructions

Bosch
Bosch HBG656R 6B Series instruction manual

Bosch
Bosch VGD553FB0 User manual and installation instructions

Hamilton Beach
Hamilton Beach 31508-220 use & care