STATESMAN CGH60GS User manual
Please read these instructions carefully before use and retain for future reference.
Before switching on your appliance – Always check for any damage that may have been caused in transit.
Instruction Manual
CGH60GS / CGH90GS
CHIMNEY HOOD STAINLESS STEEL
CURVED GLASS
Serial number:

2
CONTENTS
Important Safety Instructions ........................................3
Specication.............................................................. 4-5
Appliance Overview.......................................................6
Installation ................................................................. 6-8
Operating Instructions...................................................9
Cleaning and Maintenance...................................... 9-10
Fuse Replacement ......................................................11
Disposal Information ...................................................11
Trouble Shooting Guide...............................................12

3
IMPORTANT SAFETY INSTRUCTIONS
Read and follow all of the instructions even if you feel you are familiar with the product, and nd a
place to keep this manual handy for future reference.
Important: This product is intended for indoor domestic household use only.
When using electrical appliances, basic safety precautions should always be followed:
1. Only a qualied engineer can install, connect or repair this appliance. Do not install or operate
the appliance if it has been damaged.
2. Ensure the appliance is installed according to the installation instructions provided.
3. Do not change the specications or modify this appliance.
4. Before installing ensure to turn o the gas and electricity supply to the appliance.
5. Check the voltage of the appliance matches the household voltage, which is located on the
rating label. The operating voltage of the appliance is 220-240V at 50Hz. Check the rating label
and specication page for further information.
6. All appliances containing any electrical components must be earthed.
7. This appliance is not intended for use by persons (including children) with reduced physical,
sensory or mental capabilities, or lack of experience and knowledge.
8. Cleaning and user maintenance shall not be made by children
9. Keep the appliance and its cord out of reach of children.
10. Children shall not play with the appliance.
11. The appliance plug must be accessible after installation. Always unplug the appliance before
cleaning.
12. Use of an extension cord is not recommended with this product.
13. The appliance is not intended to be operated by means of an external timer or remote control.
14. When disconnecting from the electricity supply, pull the plug, not the cord.
15. There should be adequate ventilation of the room when using the appliance along with other
appliances burning gas or other fuels.
16. Regular cleaning should be maintained to prevent the risk of re.
17. It is not recommended to expose the appliance to a direct heat source from cooking appliances
below i.e. naked ame from a gas burner or heat from electric hob zones without a pan on.
18. If the cooker hood is installed for use above a gas appliance then the provision for ventilation
must be in accordance with the Gas Safety Codes of Practice, the Gas Safety (Installation
& Use) Regulations, the Building Regulations issued by the Department of the Environment,
the Building standards (Scotland) (Consolidated) Regulations issued by the Scottish
Development Department.
19. It is not recommended to ambé cook under appliance.
20. The appliance only extracts vapours and odours occurred during cooking, it does not
remove steam.
21. Ensure that the appliance is only used in accordance with the instruction manual.
22. Ensure the appliance is switched on when using the cooking appliance below otherwise
condensation may collect in the appliance and cause corrosion.
WARNING: Do not connect the exhaust hose to an existing ventilation system that is
currently in use.
4
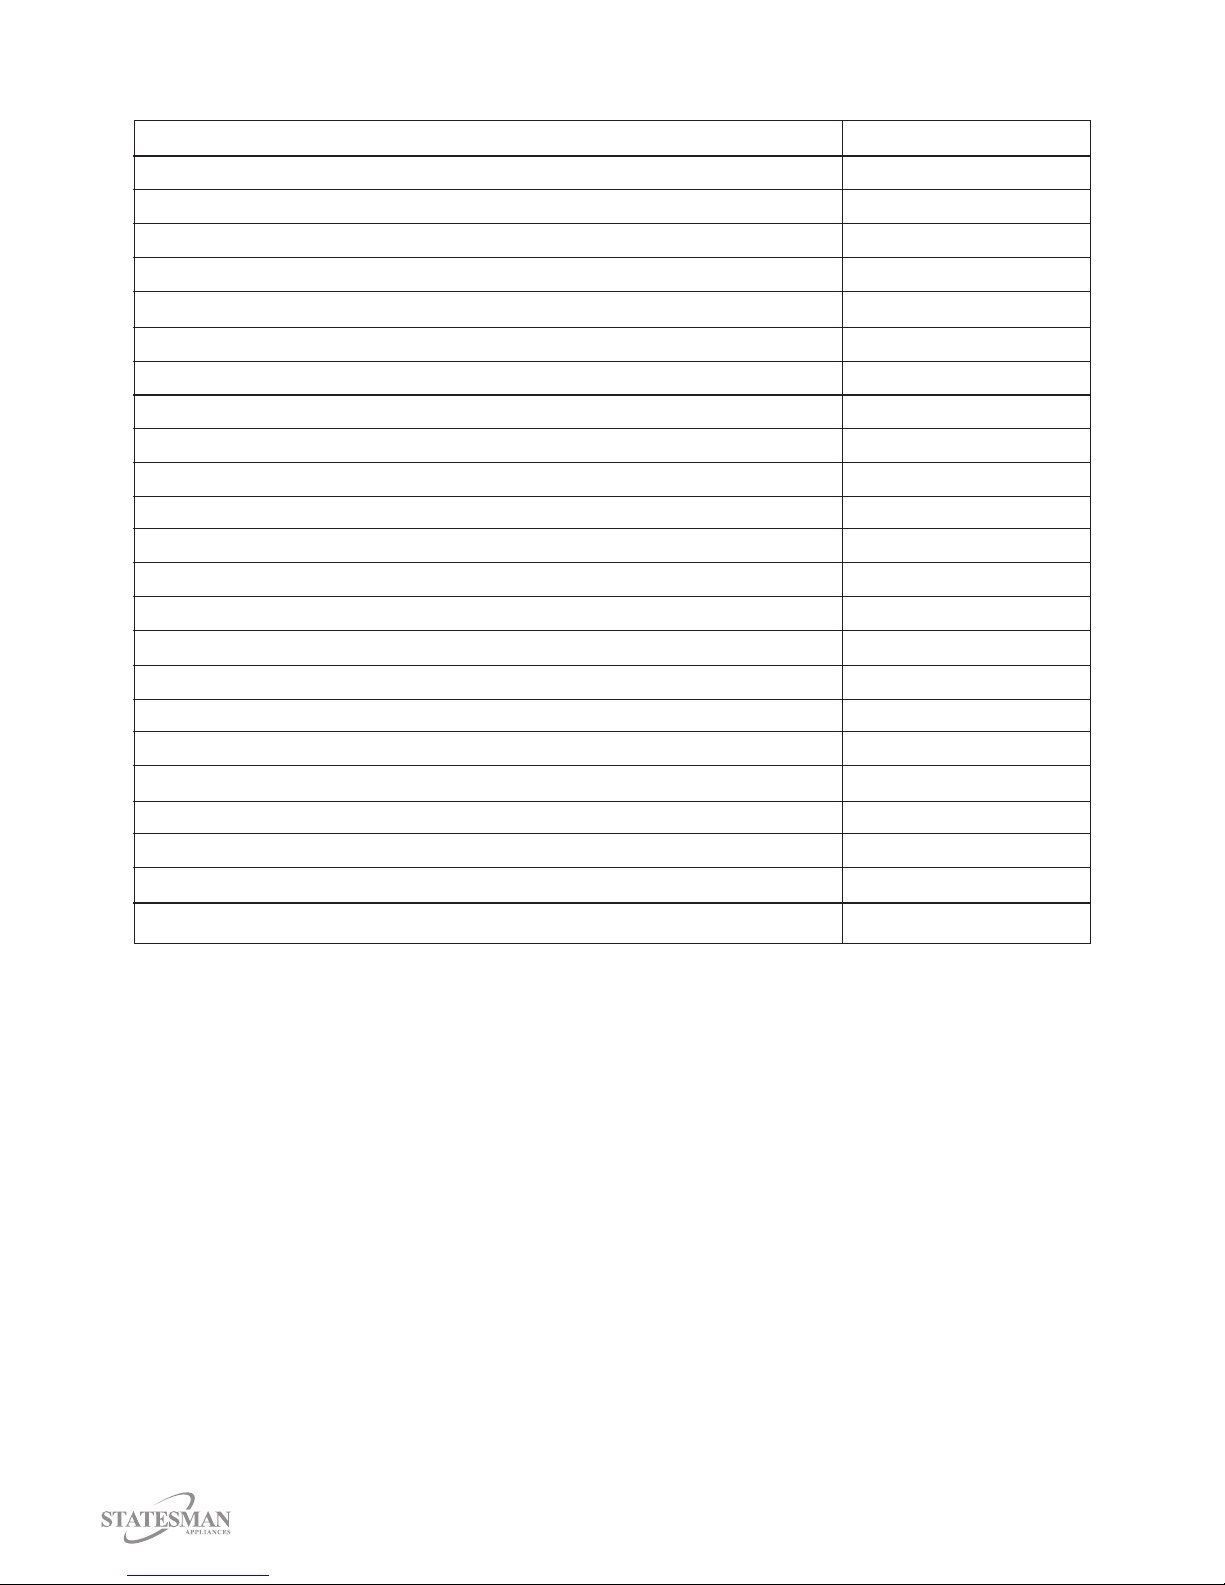
TECHNICAL SPECIFICATIONS - CGH60GS
Trade Mark Statesman
Model Number CGH60GS
Category Type Hood
Energy Eciency Class C
Annual Energy Consumption (kWh/a) 95
Fluid Dynamic Eciency 17.2 (D)
Lighting Eciency 64.6 lux/W (A)
Grease Filter Eciency 81.5 (C)
Time Increase Factor 1.4
Measured Air Flow Rate at Best Eciency Point (m3/h) 341.9
Measured Air Pressure at Best Eciency Point (Pa) 330
Maximum Air Flow (m3/h) 612.5
Measured Electric Power Input at Best Eciency Point (W) 182.0
Nominal Power of the Lighting System (W) 3
Average Illumination of the Lighting System on the Cooking Surface (lux) 181
Measured Power Consumption in Standby Mode (W) 0.41
Measured Power Consumption in O Mode (W) 0
Sound Power Level (dB) 65
Rated Power (W) 213
Voltage (V) 220-240
Frequency (Hz) 50
Dimensions (mm) 485(H) x 600(W) x 500(D)mm
Chimney Height (mm) 455-825
Outlet Dimensions (mm) 150
5
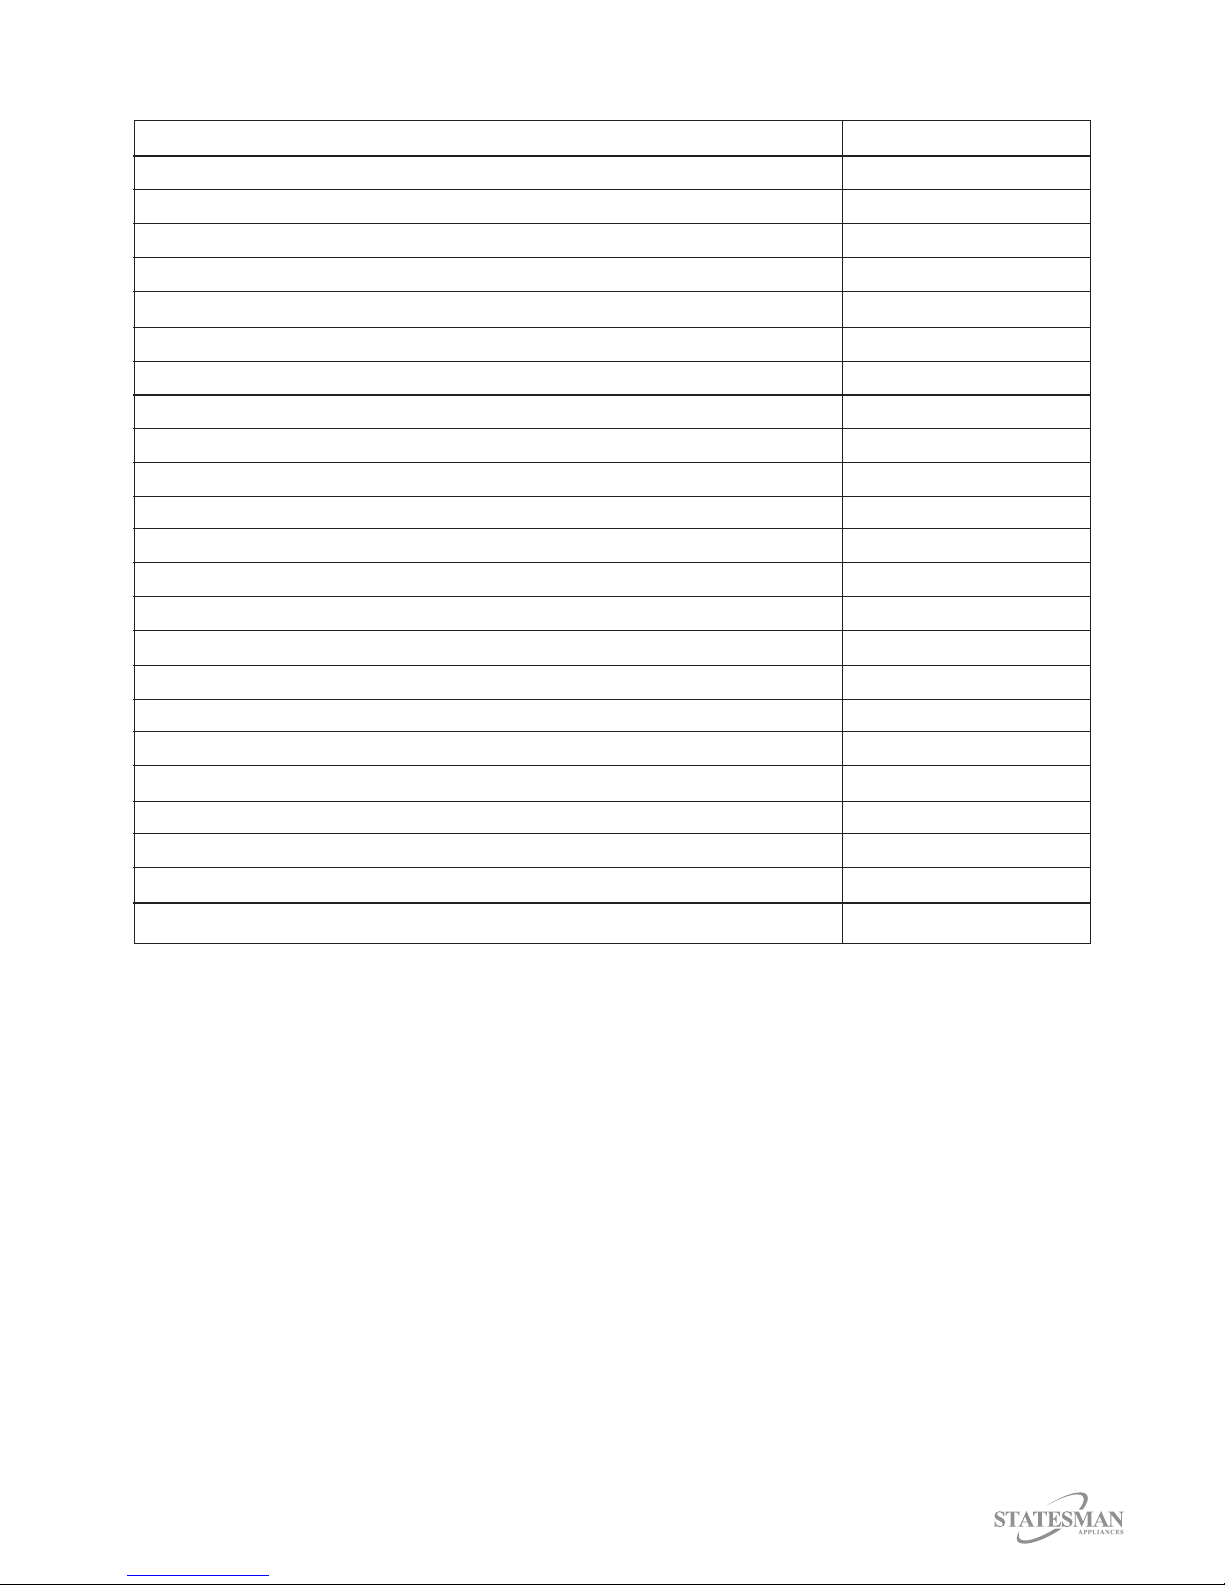
TECHNICAL SPECIFICATIONS - CGH90GS
Trade Mark Statesman
Model Number CGH90GS
Category Type Hood
Energy Eciency Class C
Annual Energy Consumption (kWh/a) 89.4
Fluid Dynamic Eciency 18.3 (C)
Lighting Eciency 34.6lux/W (A)
Grease Filter Eciency 82.8 (C)
Time Increase Factor 1.3
Measured Air Flow Rate at Best Eciency Point (m3/h) 327.6
Measured Air Pressure at Best Eciency Point (Pa) 326
Maximum Air Flow (m3/h) 631.0
Measured Electric Power Input at Best Eciency Point (W) 184.2
Nominal Power of the Lighting System (W) 3
Average Illumination of the Lighting System on the Cooking Surface (lux) 97
Measured Power Consumption in Standby Mode (W) 0.41
Measured Power Consumption in O Mode (W) 0
Sound Power Level (dB) 66
Rated Power (W) 213
Voltage (V) 220-240
Frequency (Hz) 50
Dimensions (mm) 485(H) x 900(W) x 500(D)mm
Chimney Height (mm) 485-855
Outlet Dimensions (mm) 150

6
APPLIANCE OVERVIEW
Main Body
Chimney Chimney Extension Exhaust Hose
INSTALLATION
• Do not connect the exhaust hose to an existing ventilation system that is currently in use.
• It is not recommended to bend the exhaust hose more than 90° as this may aect the
performance of the appliance.
• Ensure the appliance is horizontal to avoid grease collection at one end.
Correct Wrong Side View
Control Panel
Lights
Grease Filter
7
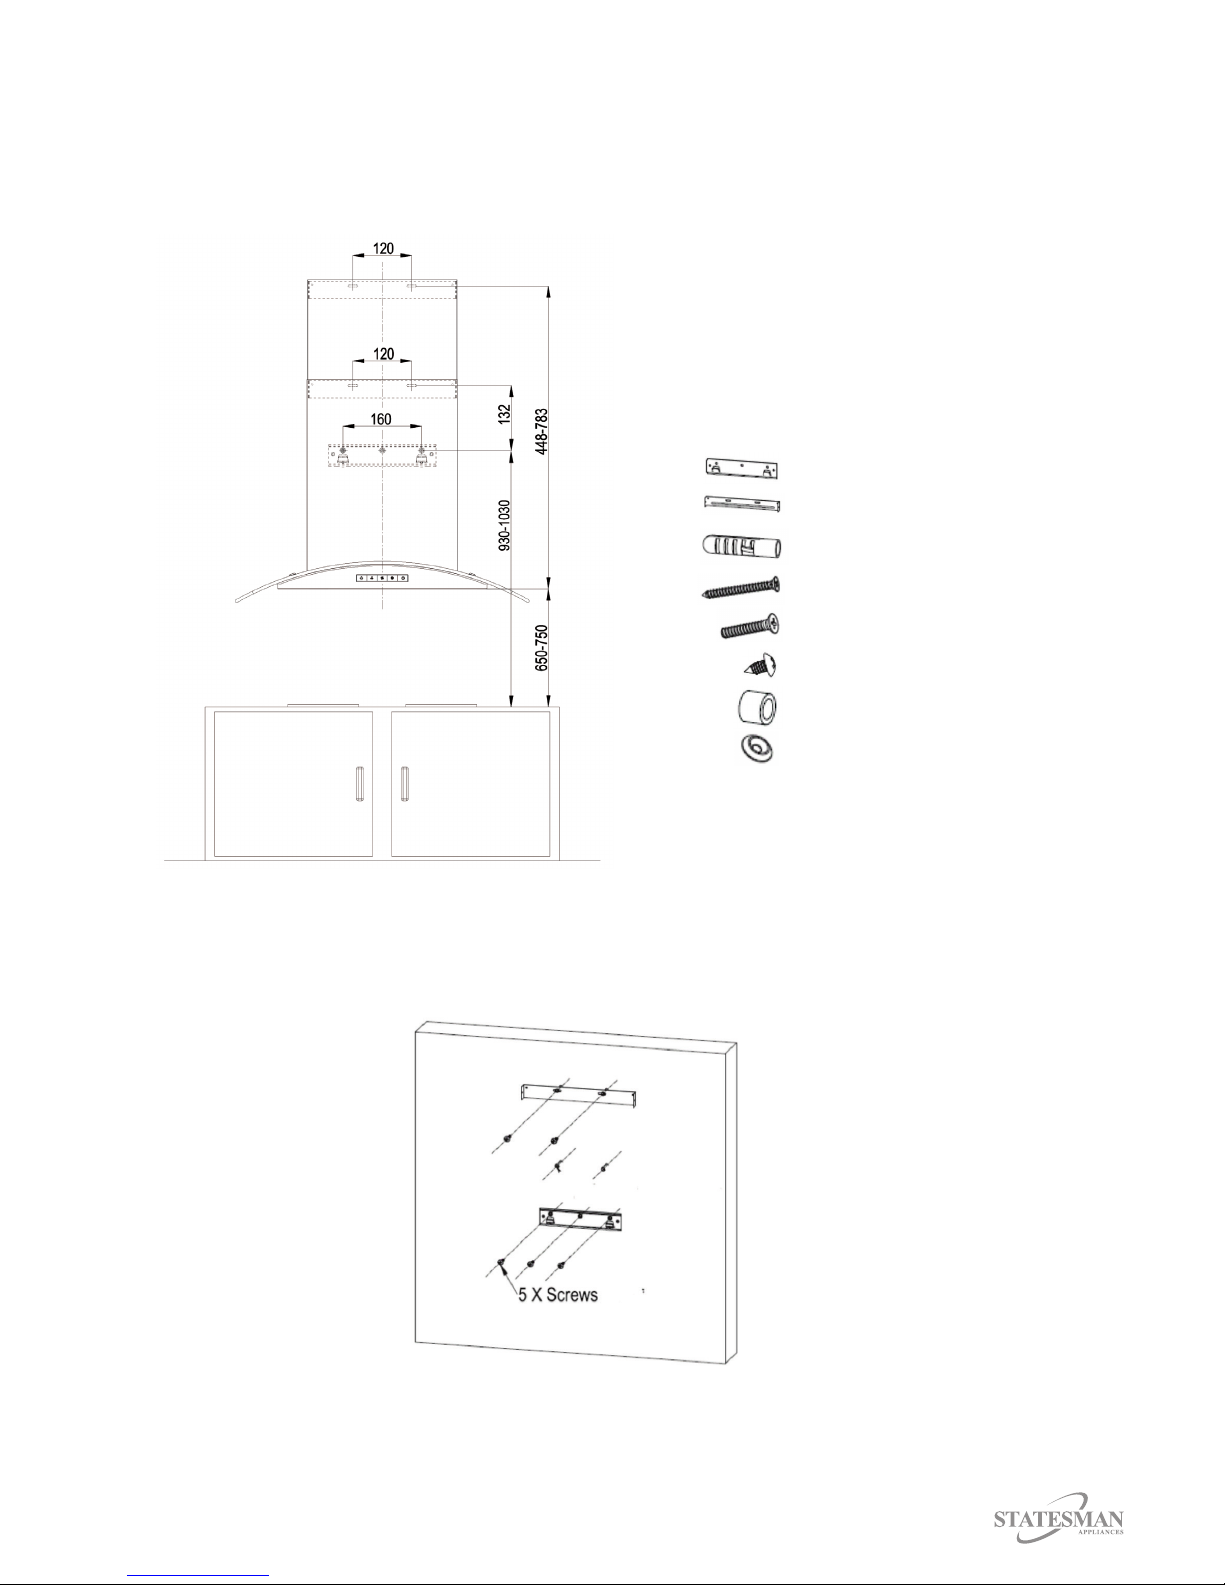
• After installation ensure that the appliances plug can be easily removed.
• The appliance should be placed 650 – 750 mm from the cooking surface below.
• Ensure adequate ventilation in the room whilst the appliance is in operation.
• Ensure all masonry work is complete before installing the appliance.
• It is not recommended to install this appliance above a cooker with a high level grill.
1 x Installation Plate
2 x Chimney Installation Plates
7 x Rawl Plugs
7 x Screws (M5*50)
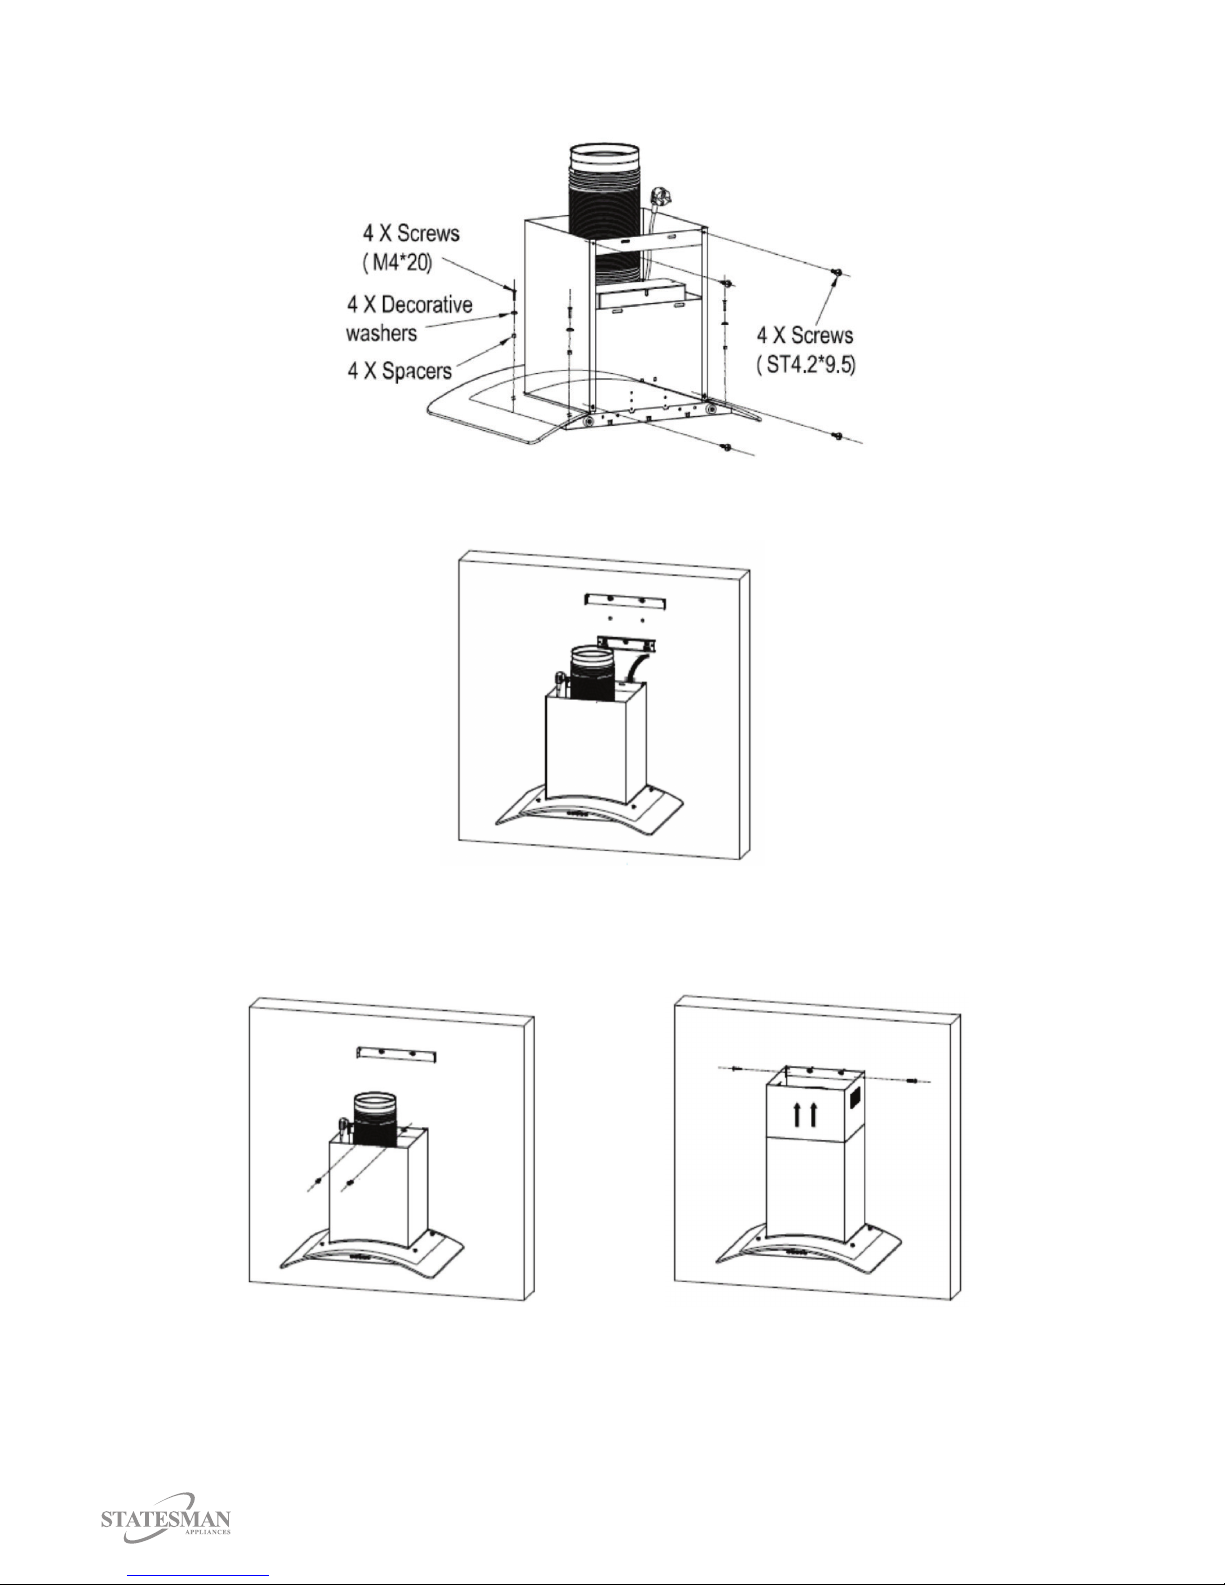
4 x Screws (M4*20)
6 x Screws (ST4.2*9.5)
4 x Spacers
14 x Decorative Washers
1. Drill holes for the 3 Installation Plates; see above diagram for all measurements.
2. Insert Rawl Plugs into the drilled holes.
8
3. Install the Installation Plate and Chimney Installation Plates using the Screws (M5*50) provided.
4. Fit the Exhaust Hose and Chimney onto the Main Body of the appliance.
5. Hang the appliance on the bottom Installation Plate.
6. Connect the exhaust pipe to the pre-drilled ventilation hole.
7. Screw the appliance to the middle Installation Plate using the Screws (ST4.2*9.5) provided.
This will prevent the appliance from accidently sliding o the Installation Chimney Plate.
8. Fit the Chimney Extension to the appliance and Installation Chimney Plate.
9. Use the Screws (ST4.2*9.5) provided to secure the Chimney Extension to the Chimney
Installation Plates.

9
OPERATING INSTRUCTIONS
• It is recommended to only use 4 cooking elements at the same time as using more may aect
the ability of the appliance.
Switching on the Appliance
• Plug the appliance into the mains supply, the appliance will buzz to indicate power.
• Press the button, the fan will switch on at low speed, the power and low speed buttons will
illuminate.
Selecting the Power Level
• Select the required fan setting by pressing the required button, the selected button will
illuminate.
• It is recommended when frying or cooking foods with strong aromas to select the highest
setting.
Lighting
• The light can be used with or without the fan function.
• Press the button once to switch on and press again to switch o.
Delay Shut Down
• When the appliance is on press the button.
• The appliance will automatically shut down within 3 minutes.
• To switch the appliance o without the delay, press the button again.
CLEANING AND MAINTENANCE
Before cleaning and maintenance ensure the appliance is disconnected from the mains electricity
supply.
Important: Do not allow moisture or liquids to get into the appliance.
Important: Do not use abrasive cloths, powders, household cleaners, bleach or wax polish to
clean the appliance as these can damage the appliance.
Cleaning the Exterior
• Use a clean, damp soft cloth to wipe the exterior surface of the appliance and dry thoroughly.
• Dry the appliance thoroughly with a clean dry cloth before connecting into the mains electricity
supply.

10
Cleaning the Filter
• Remove the grease lter by pushing the catch on the handle in and then pulling the grease lter
downwards and away from the appliance.
• Put the lter into a dishwasher set to a temperature below 60°C or if a dishwasher is not available
wash in hot water with a little washing up liquid.
• If washing by hand you may need to soak the lter beforehand for up to 1 hour in warm soapy
water to help dissolve some of the grease.
Inserting a Carbon Filter
A carbon lter is not included with this appliance but can be purchased at your local distributor.
• Remove the grease lter by pushing the catch on the handle in and then pulling the grease lter
downwards and away from the appliance.
• The carbon lter slots are located at both ends of the motor.
• Turn the ends of the motor in an anti-clockwise direction to open.
• Insert the carbon lter and replace the ends of the motor.
• Turn in a clockwise direction to lock.
Important: Carbon lters must not be washed or recycled and should be replaced every
2 to 3 months.

11
DISPOSAL
The European Directive 2012/19/EU on Waste Electrical and Electronic Equipment
(WEEE), requires that old household electrical appliances must not be disposed of in
normal unsorted municipal waste.
Old appliances must be collected separately in order to optimise the recovery and
recycling of the materials they contain and reduce the impact on human health and the
environment.
The crossed out “wheeled bin” symbol on the product reminds you of your obligation,
that when you dispose of the appliance it must be separately collected. Consumers
should contact their local authority or retailer for information concerning the correct
disposal of their old appliance.
FUSE REPLACEMENT
(Moulded Plug Top – Class I)
Remove the fuse cover with a small at head screw driver.
Take out the fuse and replace with a new fuse of the
same Amp. Replace the fuse cover and push back into
place.

TROUBLESHOOTING
If you are having problems with your appliance, please use our troubleshooting guide below. If you
are unable to resolve the issue using this guide please ring our Customer Service Department on
0844 848 5861. Please have the model code and purchase information available.
Light on, but
motor does not
work.
The blades are blocked.
The appliance is broken. Call Customer Services;
0844 848 5861
The internal wiring is damaged,
there may be an unpleasant
smell produced.
Call Customer Services;
0844 848 5861
Mains plug is not plugged in or is
loose.
Fuse has blown or is defective. Check fuse, replace if necessary.
Socket is defective. Mains malfunctions are to be
corrected by an electrician.
Power cut. Check that you haven’t had a
power cut or your fuse box doesn’t
need resetting.
Call Customer Services;
0844 848 5861
Fault Possible cause Solution
Appliance doesn’t
work.
Insert mains plug.
Vibration. The blade may be damaged. Call Customer Services;
0844 848 5861
Call Customer Services;
0844 848 5861
The motor needs tightening.
The appliance is loose on the
brackets.
Unplug from mains and tighten
brackets.
Insucient suction. The distance between the
appliance and the cooker top is
too large.
Check the installation instructions
and if necessary readjust the
distance.
Too much ventilation from open
doors or windows.
Reduce the amount of ventilation
until the appliance is functioning
correctly.
The appliance hangs
forward.
The screws on the installation
plates need tightening.
Tighten screws.
The xing screws need tightening. Tighten screws.
0844 848 5861
38 Bluestem Road,
Ransomes Europark
Ipswich, IP3 9RR
Disclaimer: Statesman operate a policy of continual improvement and development.
We therefore reserve the right to change/alter the specication and appearance of our appliances without prior notice.
All diagrams and images shown in this manual are for illustration purposes only.
This manual suits for next models
1
Table of contents
Other STATESMAN Ventilation Hood manuals


Popular Ventilation Hood manuals by other brands

Gorenje
Gorenje S3 IHGC963S4X manual

KOBE
KOBE ISX2136SQB-1 Installation instructions and operation manual

U.S. Products
U.S. Products ADVANTAGE-100H Information & operating instructions

Kuppersberg
Kuppersberg DUDL 4 LX Technical Passport

Framtid
Framtid HW280 manual

Thermador
Thermador HGEW 36 FS installation manual


