STATESMAN VH60SS User manual
VH60SS
60CM VISOR HOOD STAINLESS STEEL
INSTRUCTION MANUAL

Thank you for purchasing our product. We hope you enjoy using the many features and
benefits it provides. Before using this product please study this entire Instruction Manual
carefully. Keep this manual in a safe place for future reference. Ensure that other people
using the product are familiar with these instructions as well.
Safety Warning-
The installation and repair work must be undertaken by a qualified and competent
person.
The manufacturer disclaims all liability for any damage or
injury caused as a result of not following the instructions of
installation.
The cooker hood supply should be 220V-240V~50Hz
Children less than 8 years of age shall be kept away unless
continuously supervised.
This appliance can be used by children aged from 8 years and
above and persons with reduced physical, sensory or mental
capabilities or lack of experience and knowledge if they have
been given supervision or instruction concerning use of the
appliance in a safe way and understand the hazards involved.
Children shall not play with the appliance. Cleaning and user
maintenance shall not be made by children without
supervision.
Cleaning and user maintenance shall not be mage by children
without supervision.
When the hood is in repair, maintenance, replacement of
parts, please pull out the plug to ensure the safety of people.
Plug the power chord into the power socket outlet with earthing continuity terminal.
The cooker hood is for home use only, not suitable for barbecue commercial
purposes.
The cooker hood and its filter mesh should be cleaned regularly according to the
instructions.
Do not use open flame, or allow oil to go beneath the appliance.
Do not check that status of the filters whilst the cooker hood is operating.
Do not touch the light bulb within half an hour after appliance is used.
If any fault occurs with the appliance, please call after-sale service department.
Please keep the kitchen well ventilated when in use.
Prior to any maintenance or cleaning, ensure the power is off.
Constantly check food frying to avoid the overheating of oil which may become a fire
hazard.
If the supply chord is damaged, it must be replaced by the manufacturer, service
agent or similarly qualified person in order to avoid a hazard. The replaced power
cord should be provided by manufacturer or seller.
If the plug or cord is damaged, please call after-sale service centre.
There is a fire risk if cleaning is not carried out in accordance with the instructions.
In case of a damaged connecting wire, please refer to the manufacturer, after-sale
service personnel or other qualified technicians.
Use the unit according to the instructions to avoid fire hazard.
There shall be adequate ventilation of the room when the range hood is used at the
same time as appliances burning gas or other fuels.
There is a fire risk if cleaning is not carried out in accordance with the instructions.
Do not flambé under the range hood
The air must not be discharged into a flue that is used for exhausting fumes from
appliances burning gas or other fuels.
To protect the main body from corrosion of the long term accumulation of dirt, the
cooker hood should be cleaned with hot water & non-corrosive detergent every 2
months.
CAUTION: Accessible parts may become hot when used with cooking appliance
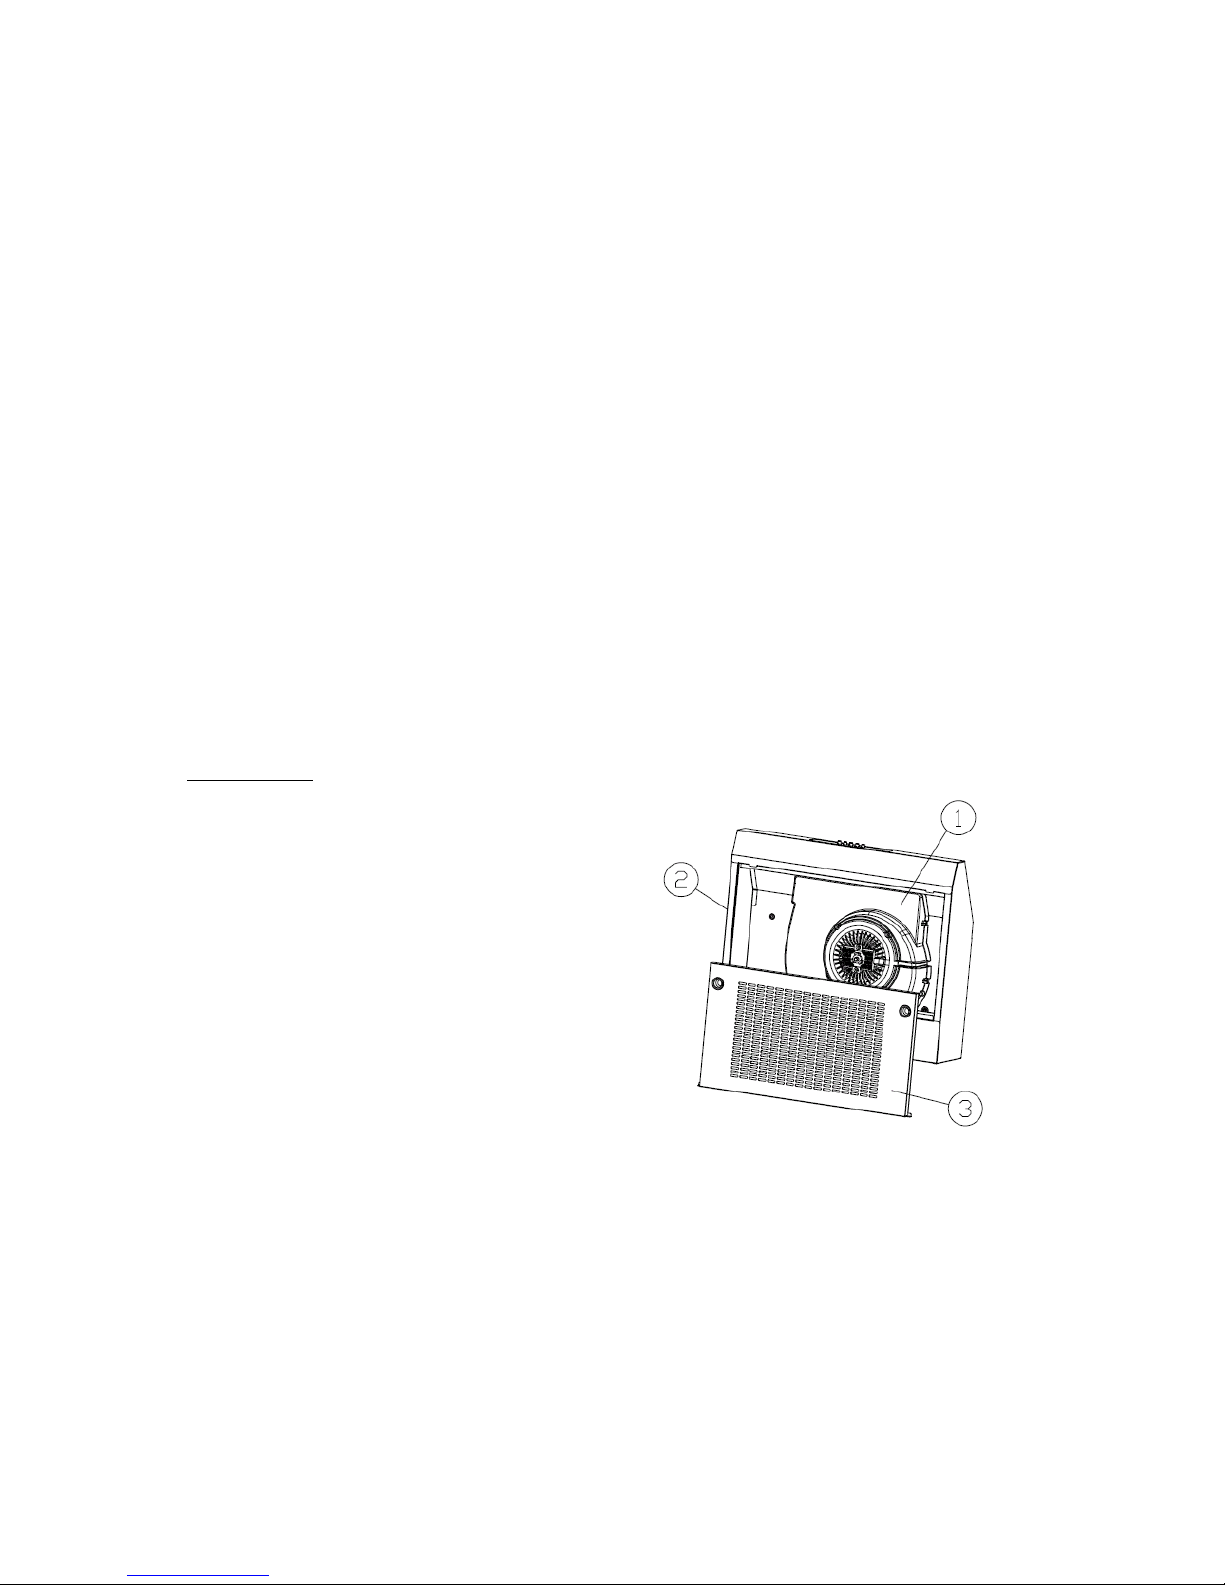
Components-
1. Air duct assembly
2. Main body
3. Filter assembly
Also includes-
Check valve
Air outlet cap
Install screws package
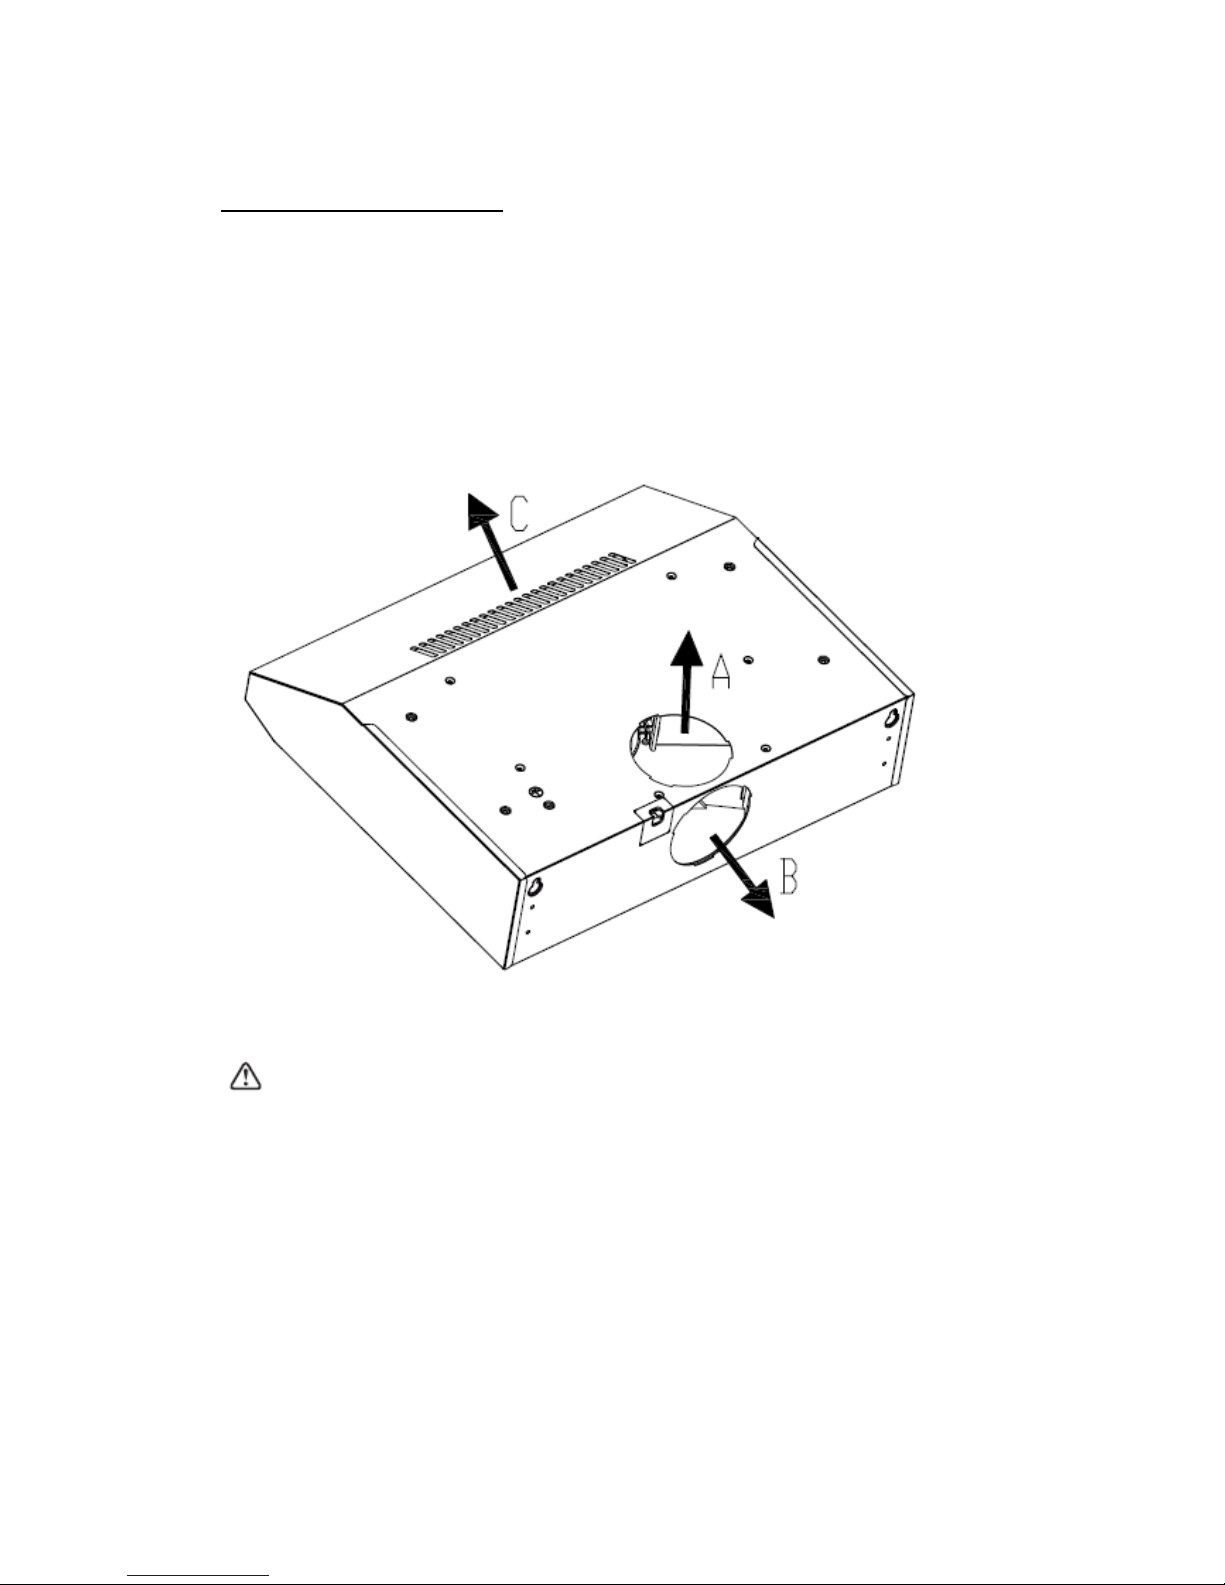
Selection of venting direction-
A. Vertical Discharge
B. Horizontal discharge
C. Ductless
Information!
The air must be discharged into a flue that is used for exhausting fumes from appliance
burning gas or other fuels. Regulation concerning the discharge of are have to be
fulfilled.
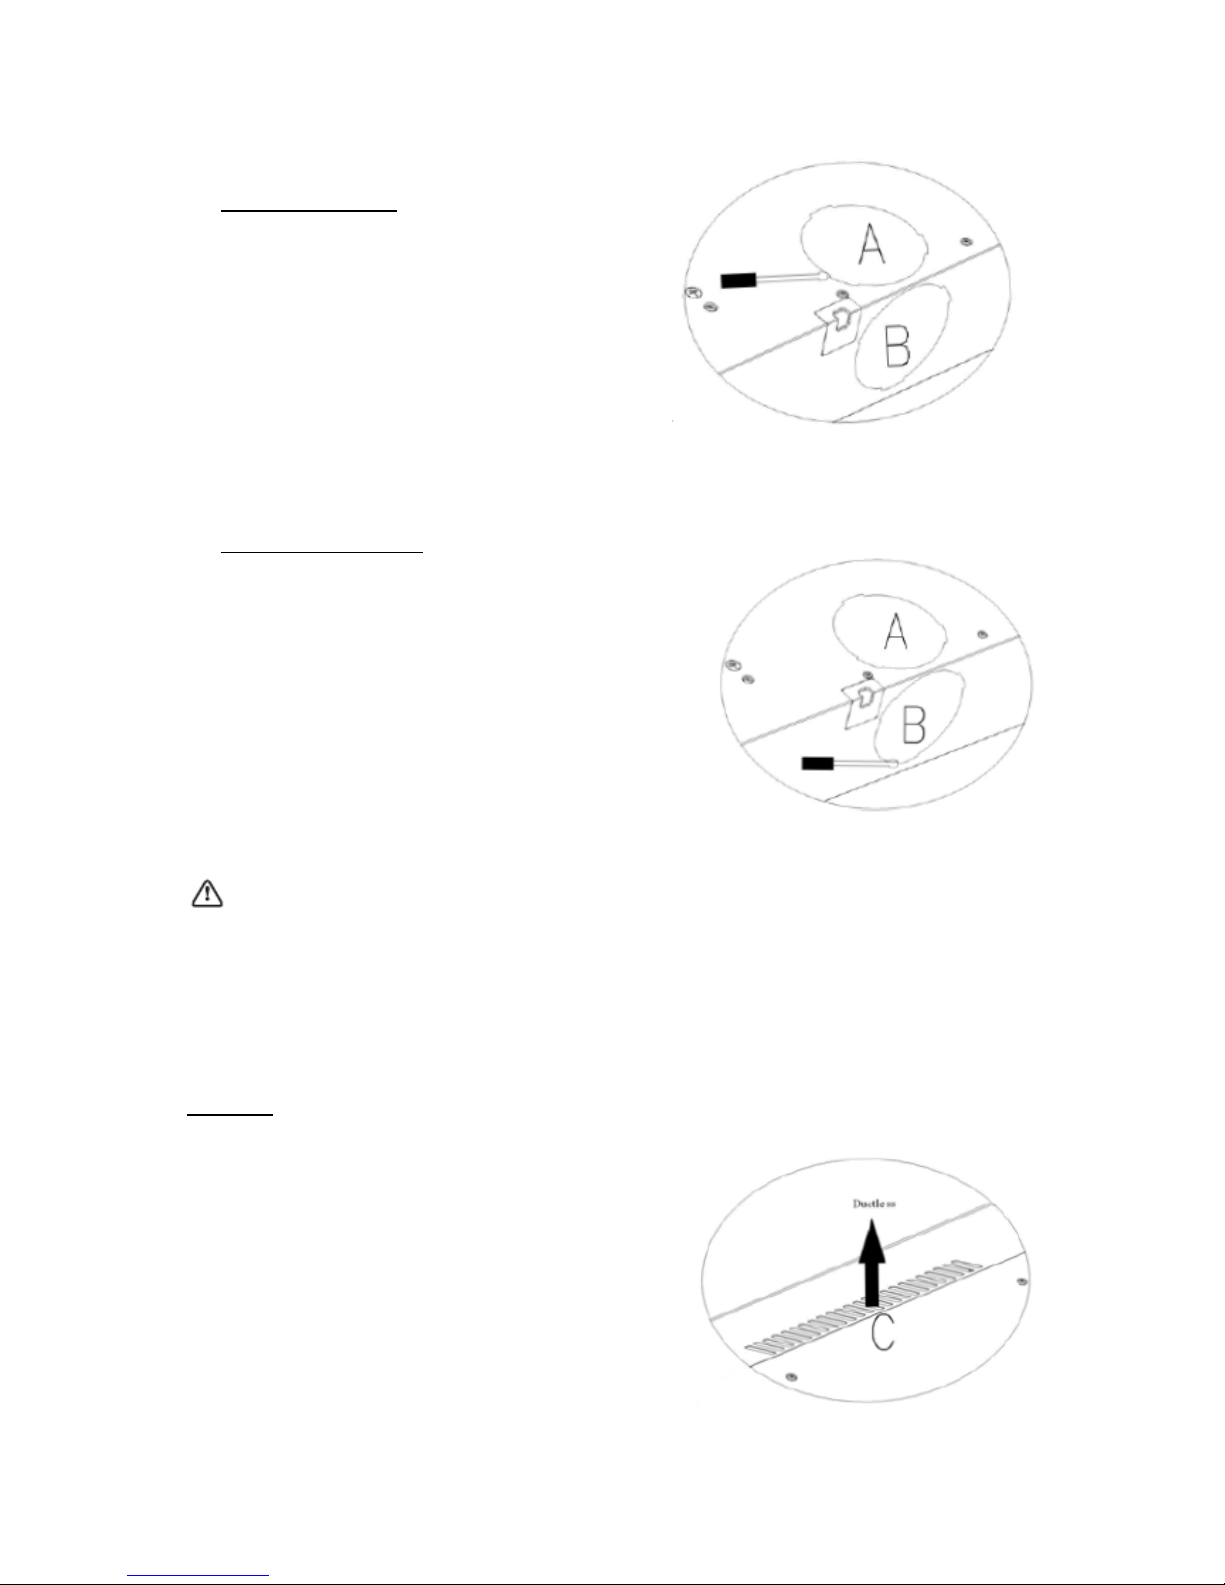
Vertical Discharge-
Vertical is the most common. If you select this
venting direction, you only need to open
ducting knockout by inserting a flat head
screwdriver under one end and prying it up.
Then snip or break the attachment points by
tin snips. Make sure that the ducting knockout
B is not removed.
Horizontal Discharge-
Assuming that the range hood is located against an
outside wall, horizontal discharge is preferred
provided that there are no obstructions such as
wall joists, or where opening are difficult to make.
If you select this venting direction, you only need
to open the ducting knockout B. Make sure that
the ducting knockout A is removed.
Information
Sufficient air is needed for proper combustion and exhaustion of gases through the flue
(chimney) of fuel burning equipment to prevent back drafting.
Ductless-
In a ductless installation the air is re-circulated back
into the kitchen. If you do not anticipate heavy
cooking this method would be preferred. It will not
be necessary to remove any duct knockouts, you
only need Knockout C. You should use filters to help
remove cooking odours. These filters must be
washed and replaced at regular intervals.
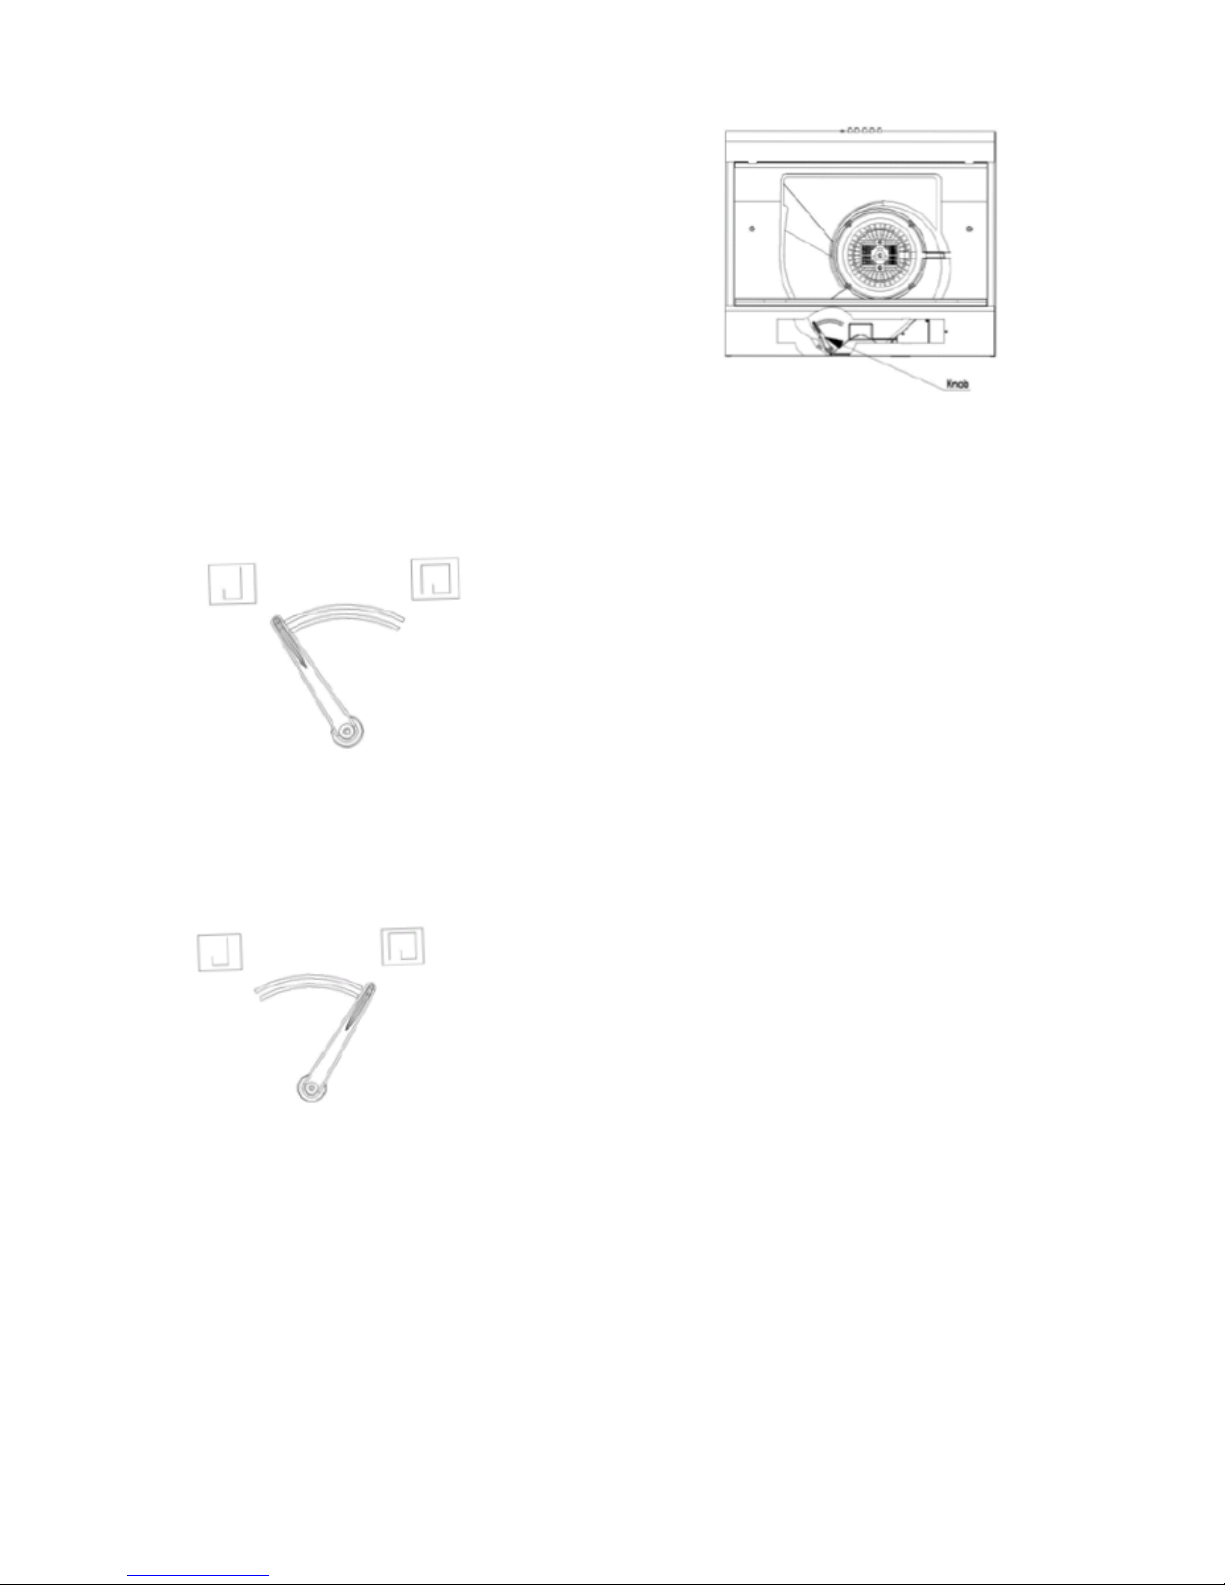
After selecting venting direction and completing
installation, you can turn the knob to achieve ductless
or duct. Open the filter, then you can see the knob.
The knob arrowed here is duct-
The knob arrowed here is ductless-
Installation-
Ensure the power has been turned off before
beginning this installation. Plug must be
assembled in places easy to drag and insert. To
install this hood you will require 2 assistants. You
will need the following tools and materials to
complete the installation-
Drill
Flat head screwdriver
Phillips head screwdriver or cordless drill
and Phillips head bit
Tin snap
3/8”nut driver or ratchet with extension
Measuring tape
Hand saw or jig saw
Electrical tap
Duct tape
1. Remove the range from the carton
2. Lay the hood upside down on a table
covered with cardboard or paper to
prevent scratching of the table or hood.
3. Hood Installation should be within 0.8m
radius range.
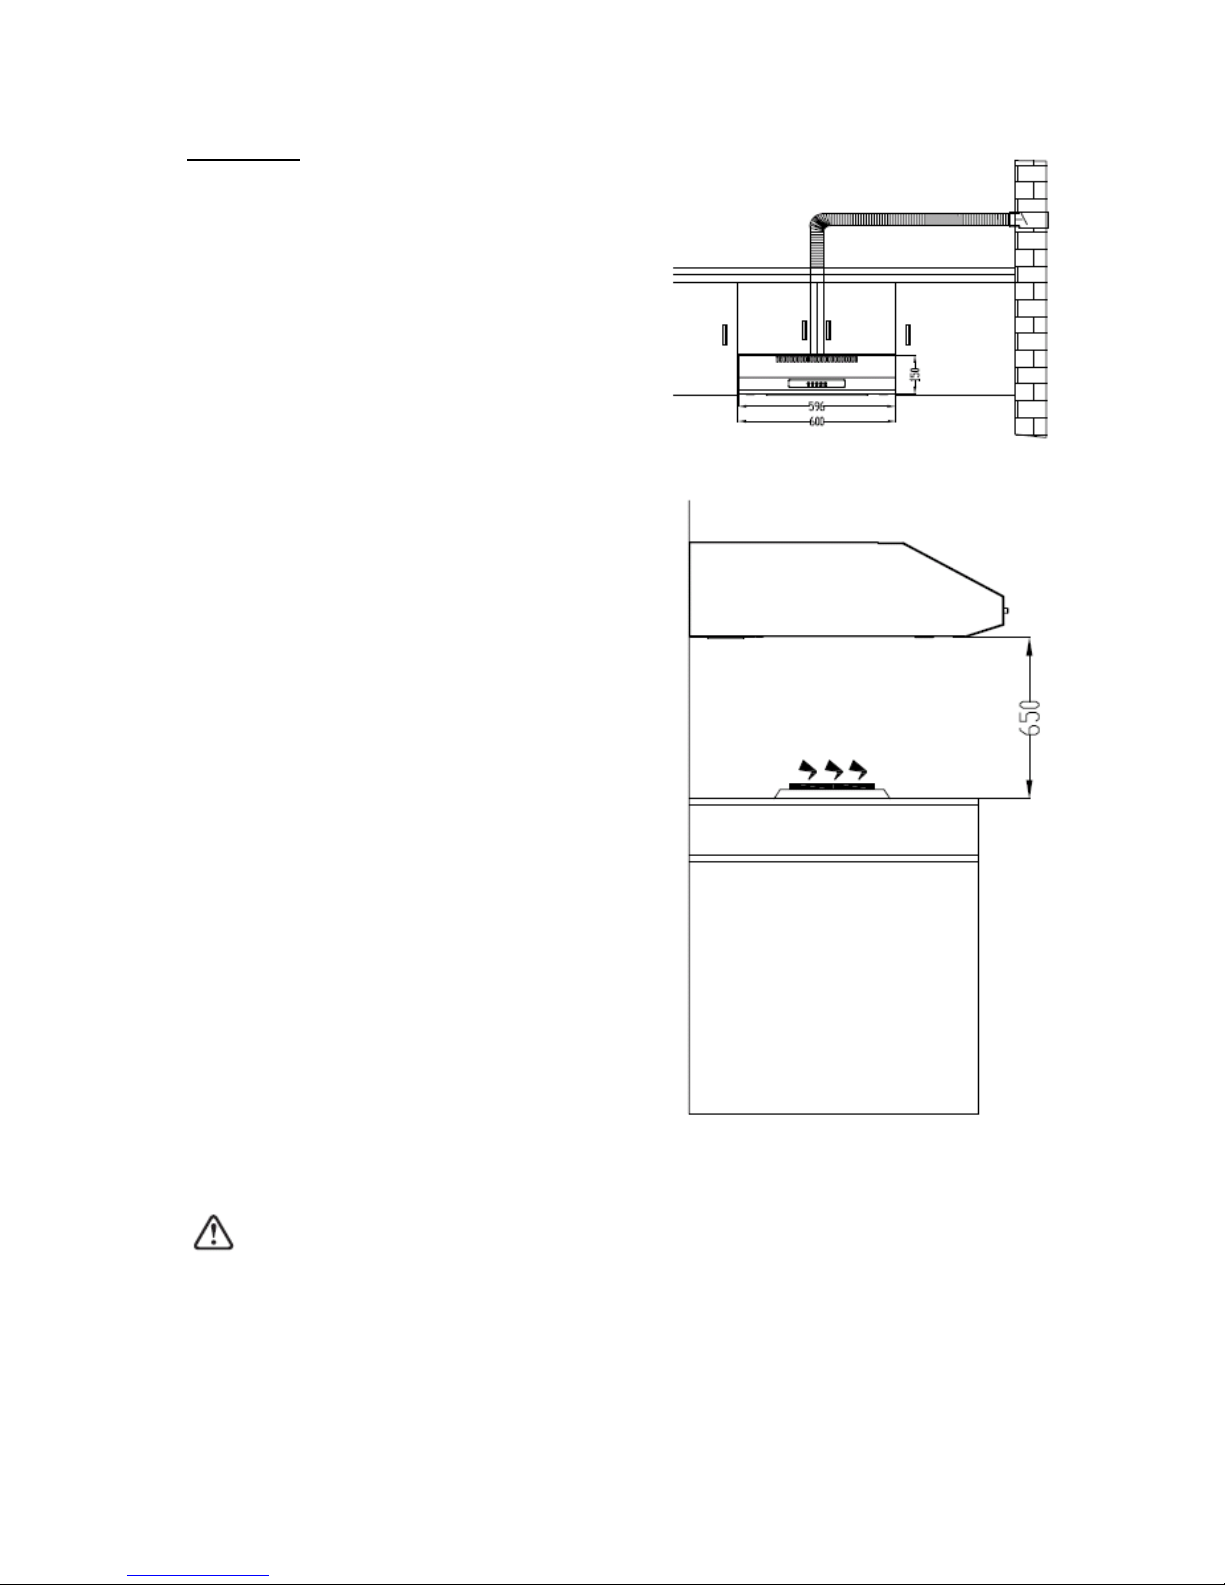
4. We recommend that after installation the
bottom of the hood should be less than
650mm and no more than 750mm above
the stoves heating elements and burners.
Information
Installation work and electrical wiring must be done by a qualified person in accordance
with all applicable codes and standards, including fire rated construction.
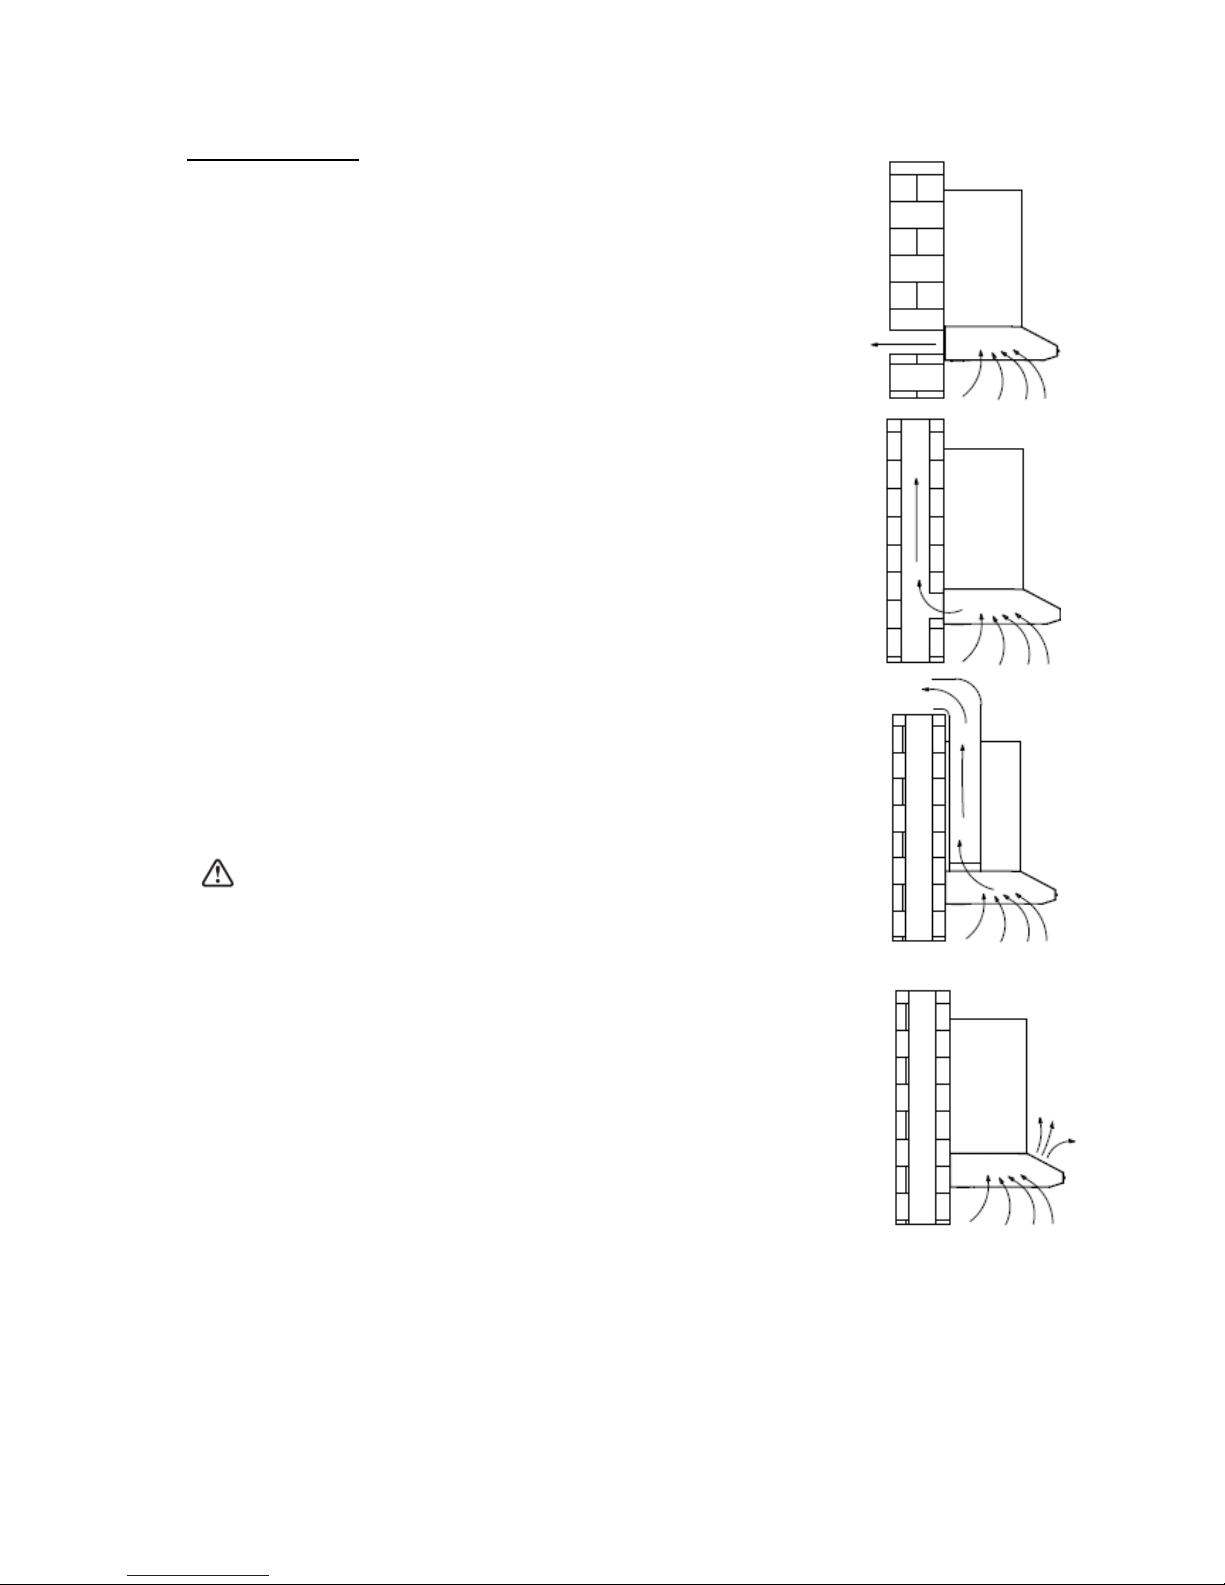
Exhaust-air mode-
The exhaust air is conducted upwards via a ventilation shaft or directly
through the outside wall into the atmosphere.
The exhaust air must not be conveyed into a function smoke flue or
into a shaft which vents a room with a fireplace.
Conveyance of exhaust air in a non-functioning smoke flue or exhaust-
gas flue requires the prior consent of an appropriate heating engineer.
If the extractor hood is in exhaust-gas mode and a flue-type heater is
running at the same time (e.g. gas, oil, or solid-fuel heaters,
continuous-flow heaters, water heaters), ensure that the fireplace has
an adequate air supply for combustion.
Safe operation requires that the low air pressure in the room in which
the fire place is located does not exceed 4 Pa.
This low air pressure can be obtained, provided combustion air can
escape through non-lockable openings, e.g. in doors, windows, air-
intake/exhaust-air wall boxes or by other technical procedures, such
as reciprocal interlocking.
Information-
When assessing the air pressure, the entire ventilation system in the
house/apartment must be taken into account, e.g. hob and or gas
cooker, this rule does not apply.
Government regulations must be observed for the conveyance of exhaust
air.
If the extractor hood is used in circulating air mode with activated carbon
filter, there are no operating restrictions.
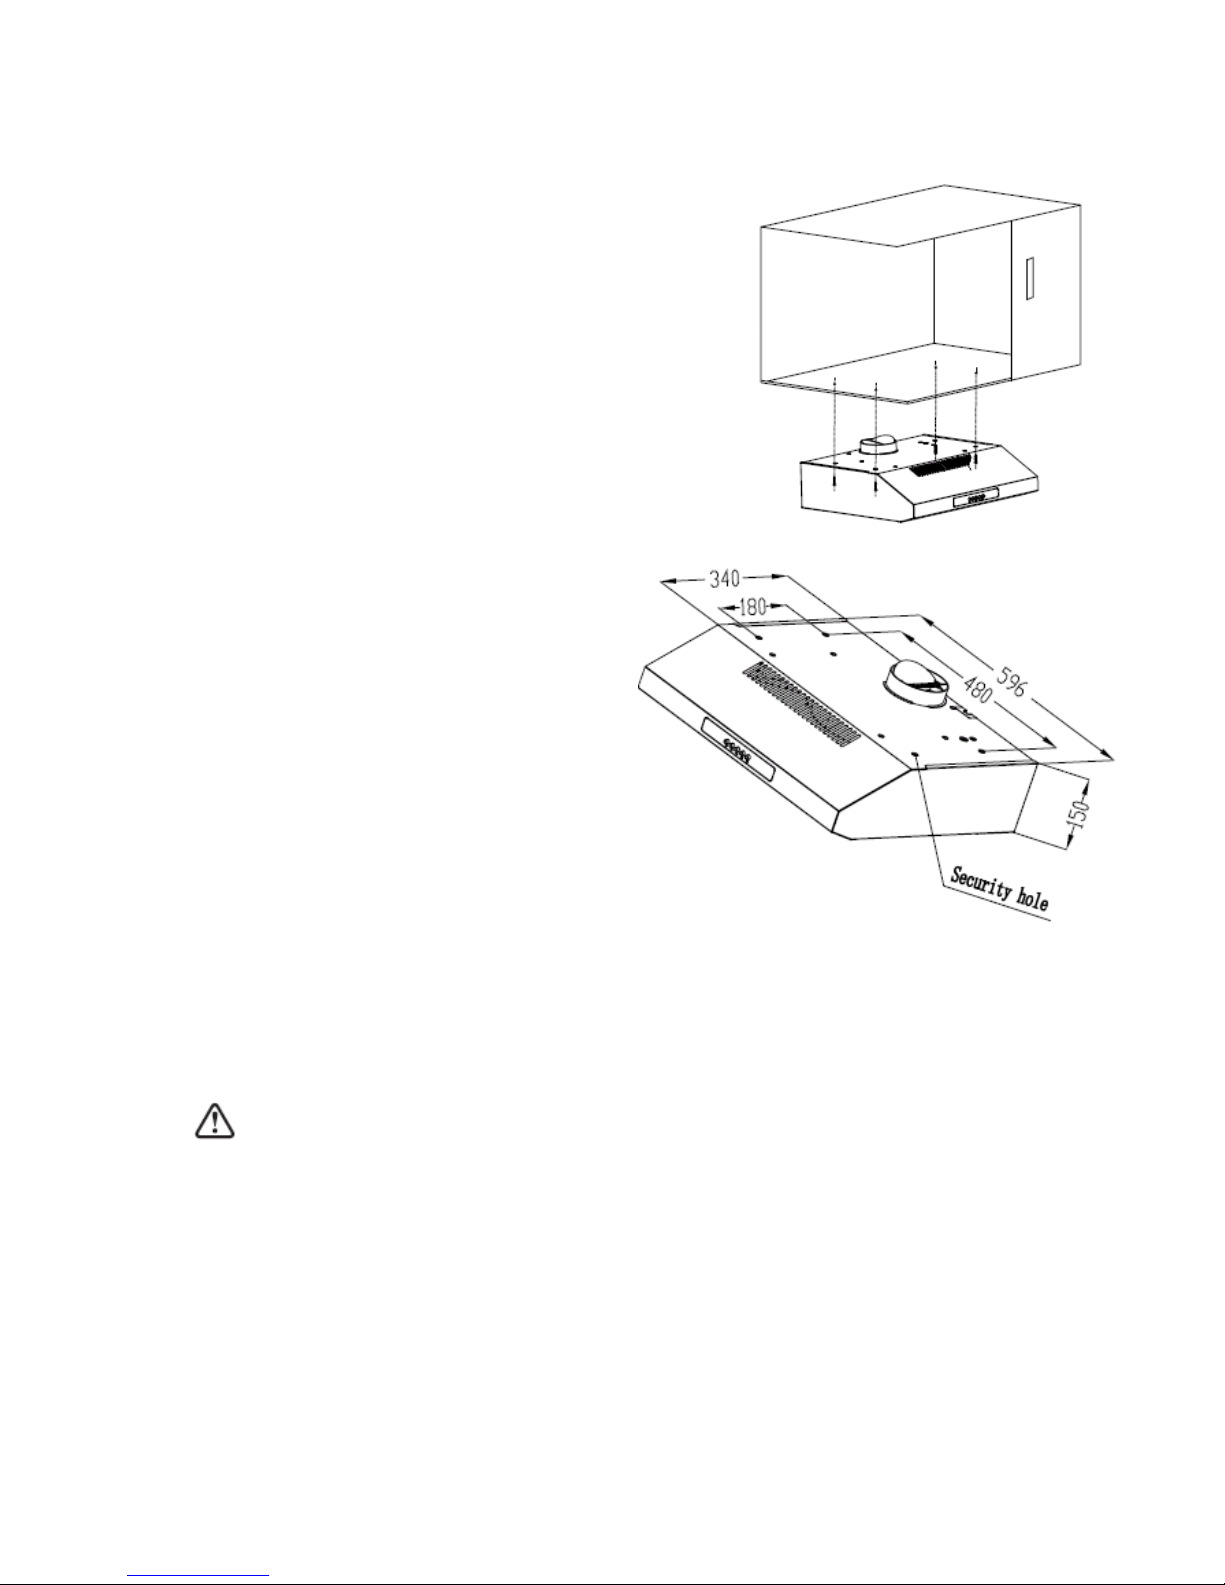
Method 1-
1. According to the figure, make sure the position of
the hood is in the cabinet. The wood strips should
be lined up with the 4 keyhole slots on the top of
the range hood. On the cabinet, install 4 screws
(supplied) according to the relative position of 4
key holes on the bottom of hood. The extent of
screwing should be convenience to the next
installation.
2. Hang the hood and let the 4 key holes aim at the
screws, the 4 screws should be in the
narrow parts of the key holes. Screws
should be fastened firmly, make sure
that the installation between the hood
and the cabinet is fastened enough.
3. Install screws in the security holes, in
case of front and back moving of the
hood, so that the using is safer.
Information
When cutting or drilling into wall or ceiling, do not damage electrical wiring or other hidden
utilities.

Method 2
If the installation surface in the cabinet doesn’t adapt
to install the cooker head, then as per fig, fix the
position of cooker hood on the wall. In the wall, install
2 screws (supplied) according to the relative position
of 2 key holes on the back of the hood. The extent of
screwing should be for the convenience of the next
installation. Also install screws in the security holes, in
case the front and back hood move, so that it is safer
to use.
Installation of goods built in combi cabinets is the
same as previous method.
Information-
The cooker hood must not be installed and connected
to flues where other appliances are installed and
which run off other energy supplied different to
electricity (water heater boiled cookers (range/agas) e.t.c)
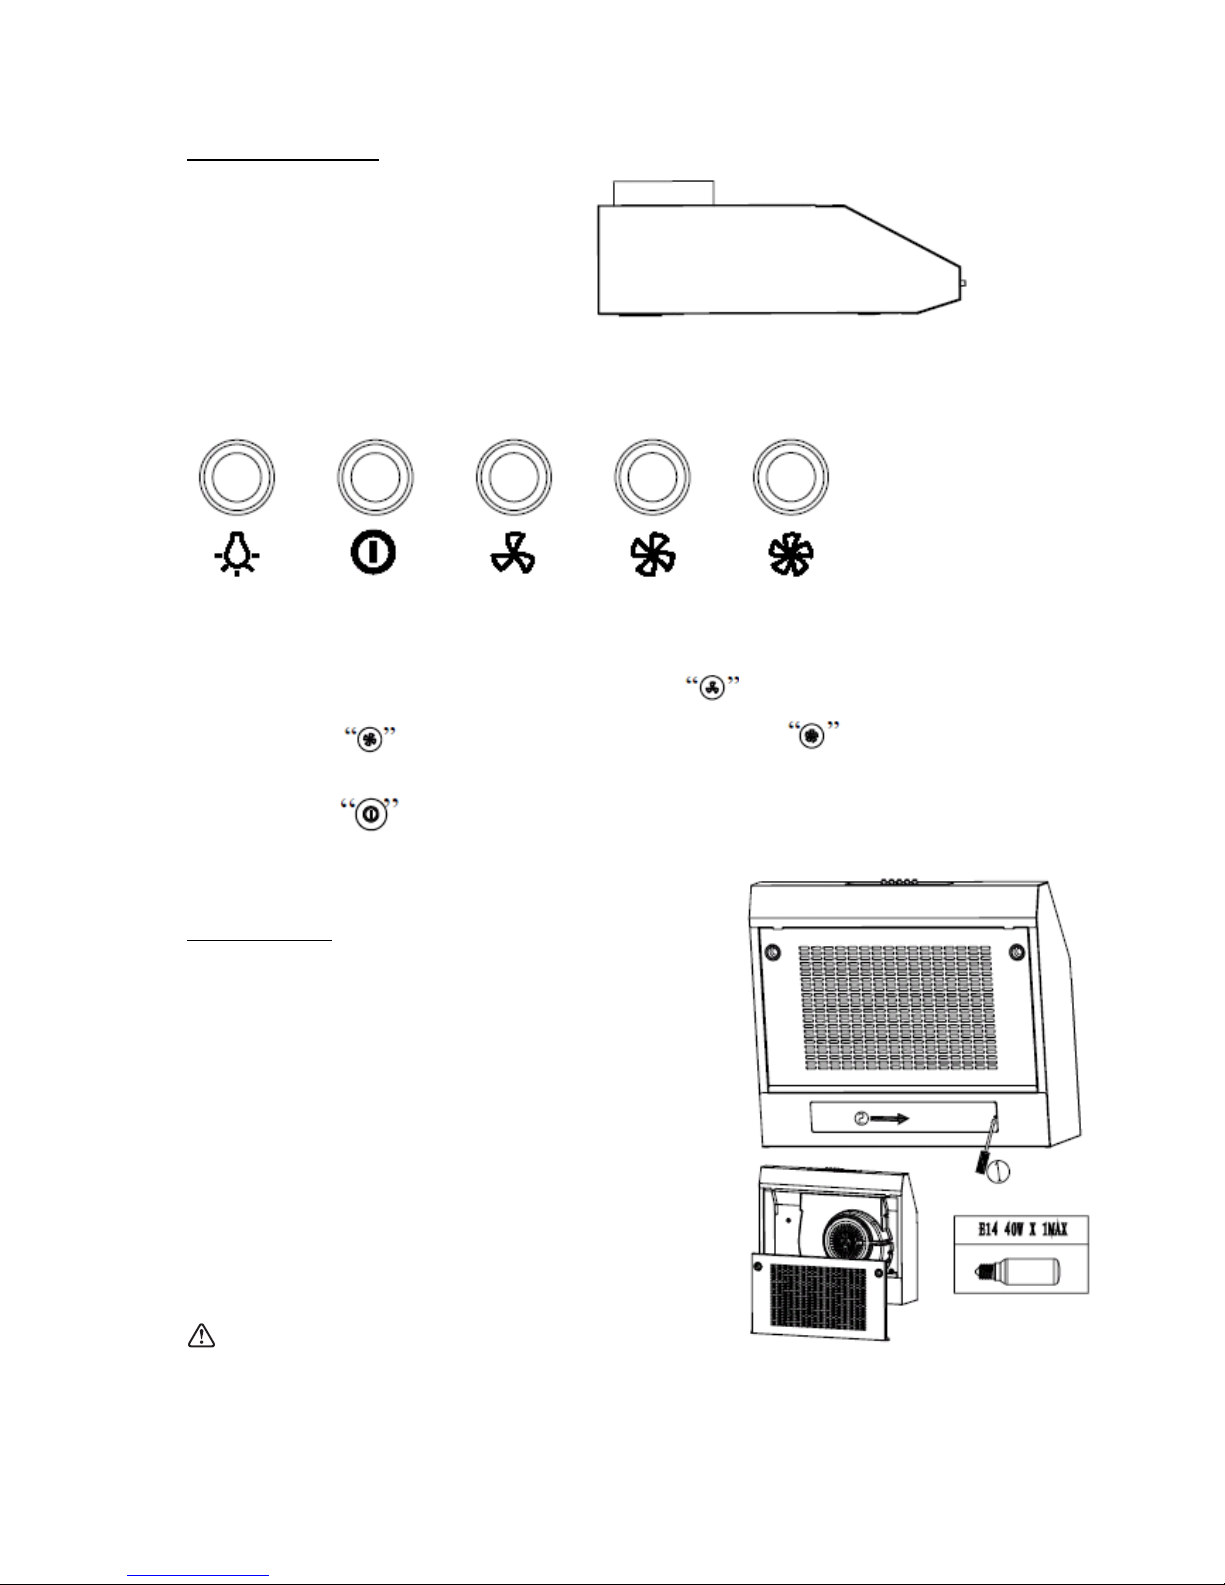
Hood using method-
Turn the hood ON when cooking at high
heat or when cooking flaming foods.
1. Adjust the knob to the correct
position
2. Insert the power plug firmly
Press the light switch on, the bulbs will light. Press the , the motor runs at a low speed.
Press the button , for medium speed and then finally press , for high speed.
When you press the motor will stop running.
Replacing bulb-
1. Switch off the extractor hood and isolate the
extractor hood by pulling out the mains plug or
switching off the fused outlet.
2. Remove the grease filter
3. Replace the lamp (commercially available candle
lamps, max 40 watts, E14 Lamp holder).
4. Reconnect the power by inserting the mains
plug or by switching on the fused outlet.
Information-
Clean ventilation fans frequently. Grease should not be allowed to accumulate or fan or
filter.

Cleaning Instruction-
Disconnect range hood from power supply before cleaning or servicing.
1. Cleaning the surface of hood frequently. Use mild soap or detergent to clean the
hood.
2. Do not use harsh alkalis or abrasives
3. Avoid the use of scouring powers or dishwasher compounds
4. Grease may be washed using mild soap or detergent(heavy grease build-up may not
be cleaned easily and the filter may require replacement)
5. Charcoal filter cannot be cleaned and must be replaced urgently
Information-
When cleaning, water must not enter the motor, control switch or electrical parts
It is recommended to clean the metallic filter every 3 months by carrying out the following
instructions:
Remove the metallic filter from the cooker head and wash it in a solution of water
and neutral liquid detergent, leaving to soak.
Rinse thoroughly with warm water and leave to dry
The metallic filter may alter in colour after several washes
This is not cause for concern or replacement of metallic filter.
Information-
There is a fire risk if cleaning is not carried out in accordance with the instructions.

This appliance is marked according to the European directive 2002/96/EC on Waste
Electrical and Electronic Equipment (WEEE).
By ensuring this product is disposed of correctly, you will help prevent potential negative
consequences for the environment and human health, which could otherwise be caused by
inappropriate waste handling of this product. The symbol on the product indicates that this
product may be treated as household waste. Instead it shall be handed over to the
applicable collection point for the recycling of electrical and electronic equipment. Disposal
must be carried in accordance to with local environmental regulations for waste disposal.
For more detailed information about treatment, recovery and recycling of
this product, please contact your local city office, your household waste
disposal service or the shop where you purchased it.
SERVICE AND SPARE PARTS
Should you experience any difficulty in using your Statesman appliance at any time, you may
contact your Statesman Retailer or call our Customer Service Department on;
0844 848 5861
Please have the following details ready;
Model Name/ Model Number
Serial Number
Date of Purchase
Where Purchased
Customer Name, address and Postcode
Contact Telephone Number
Accurate description of the fault
Spare Parts information can be obtained by calling the Statesman Spare Parts Department
on;
0844 848 5862

Table of contents
Other STATESMAN Ventilation Hood manuals


Popular Ventilation Hood manuals by other brands

Gorenje
Gorenje S3 IHGC963S4X manual

KOBE
KOBE ISX2136SQB-1 Installation instructions and operation manual

U.S. Products
U.S. Products ADVANTAGE-100H Information & operating instructions

Kuppersberg
Kuppersberg DUDL 4 LX Technical Passport

Framtid
Framtid HW280 manual

Thermador
Thermador HGEW 36 FS installation manual


