STATESMAN CHM60SS User manual

CHM60SS
60CM STAINLESS STEEL CHIMNEY HOOD
Cooker Hood
Instruction Manual
Please read these instructions carefully before use and retain for future reference

2

3
Thank you for purchasing our product. We hope you enjoy using the many features and
benets it provides. Before using this product please study this entire Instruction Manual
carefully. Keep this manual in a safe place for future reference. Ensure that other people
using the product are familiar with these instructions as well.
WARNING
• Theinstallationandrepairworkmustbeundertakenbyaqualiedandcompetentperson.
• Themanufacturerdisclaimsallliabilityforanydamageorinjurycausedasaresultof
notfollowingtheinstructionsofinstallation.
• Thecookerhoodsupplyshouldbe220V-240V~50Hz
• Thisappliancecanbeusedbychildrenagedfrom8yearsandaboveiftheyhavebeengiven
supervisionorinstructionconcerningtheuseoftheapplianceinasafewayandunderstandthe
hazardsinvolved.Cleaningandusermaintenanceshallnotbemadebychildrenunlesstheyare
olderthan8yearsandsupervised.
Keeptheapplianceanditscordoutofreachofchildrenagedlessthan8years.
Childrenshallnotplaywiththeappliance.
Appliancescanbeusedbypersonswithreducedphysical,sensoryormentalcapabilitiesorlack
ofexperienceandknowledgeiftheyhavebeengivensupervisionorinstructionconcerninguse
oftheapplianceinasafewayandunderstandthehazardsinvolved.
• Whenthehoodisinrepair,maintenance,replacementofparts,pleasepullouttheplug
toensurethesafetyofpeople.
CAUTION:Accessiblepartsmaybecomehotwhenusedwithcookingappliance
CONTENTS
Warnings.......................................................................3
SafetyWarning..............................................................4
Installation................................................................. 4-7
Useageguide............................................................ 7-8
Maintenance.............................................................. 8-9
Troubleshooting.............................................................9
Disposal,servicing&parts..........................................12
Safety Warning
• Thisapplianceisnotintendedforusebyyoungchildrenorinrmpersons
withoutsupervision.
• Plugthepowerchordintothepowersocketoutletwithearthingcontinuityterminal.
• Thecookerhoodisforhomeuseonly,notsuitableforbarbecuecommercialpurposes.
• Thecookerhoodanditsltermeshshouldbecleanedregularlyaccordingto
theinstructions.
• Donotuseopename,orallowoiltogobeneaththeappliance.
• Ifanyfaultoccurswiththeappliance,pleasecallafter-saleservicedepartment.
• Pleasekeepthekitchenwellventilatedwheninuse.
• Priortoanymaintenanceorcleaning,ensurethepoweriso.

4
Feature
• Thecookerhoodismadeofhighqualitymaterialsinastreamlineddesign.
• Equippedwithhighpowerandlownoiseelectricmotor,thecookerhoodproduces
strongsuctionandlownoise.
• Specialwindtunnelconstruction,freedirtwillbeabsorbedinasecond.
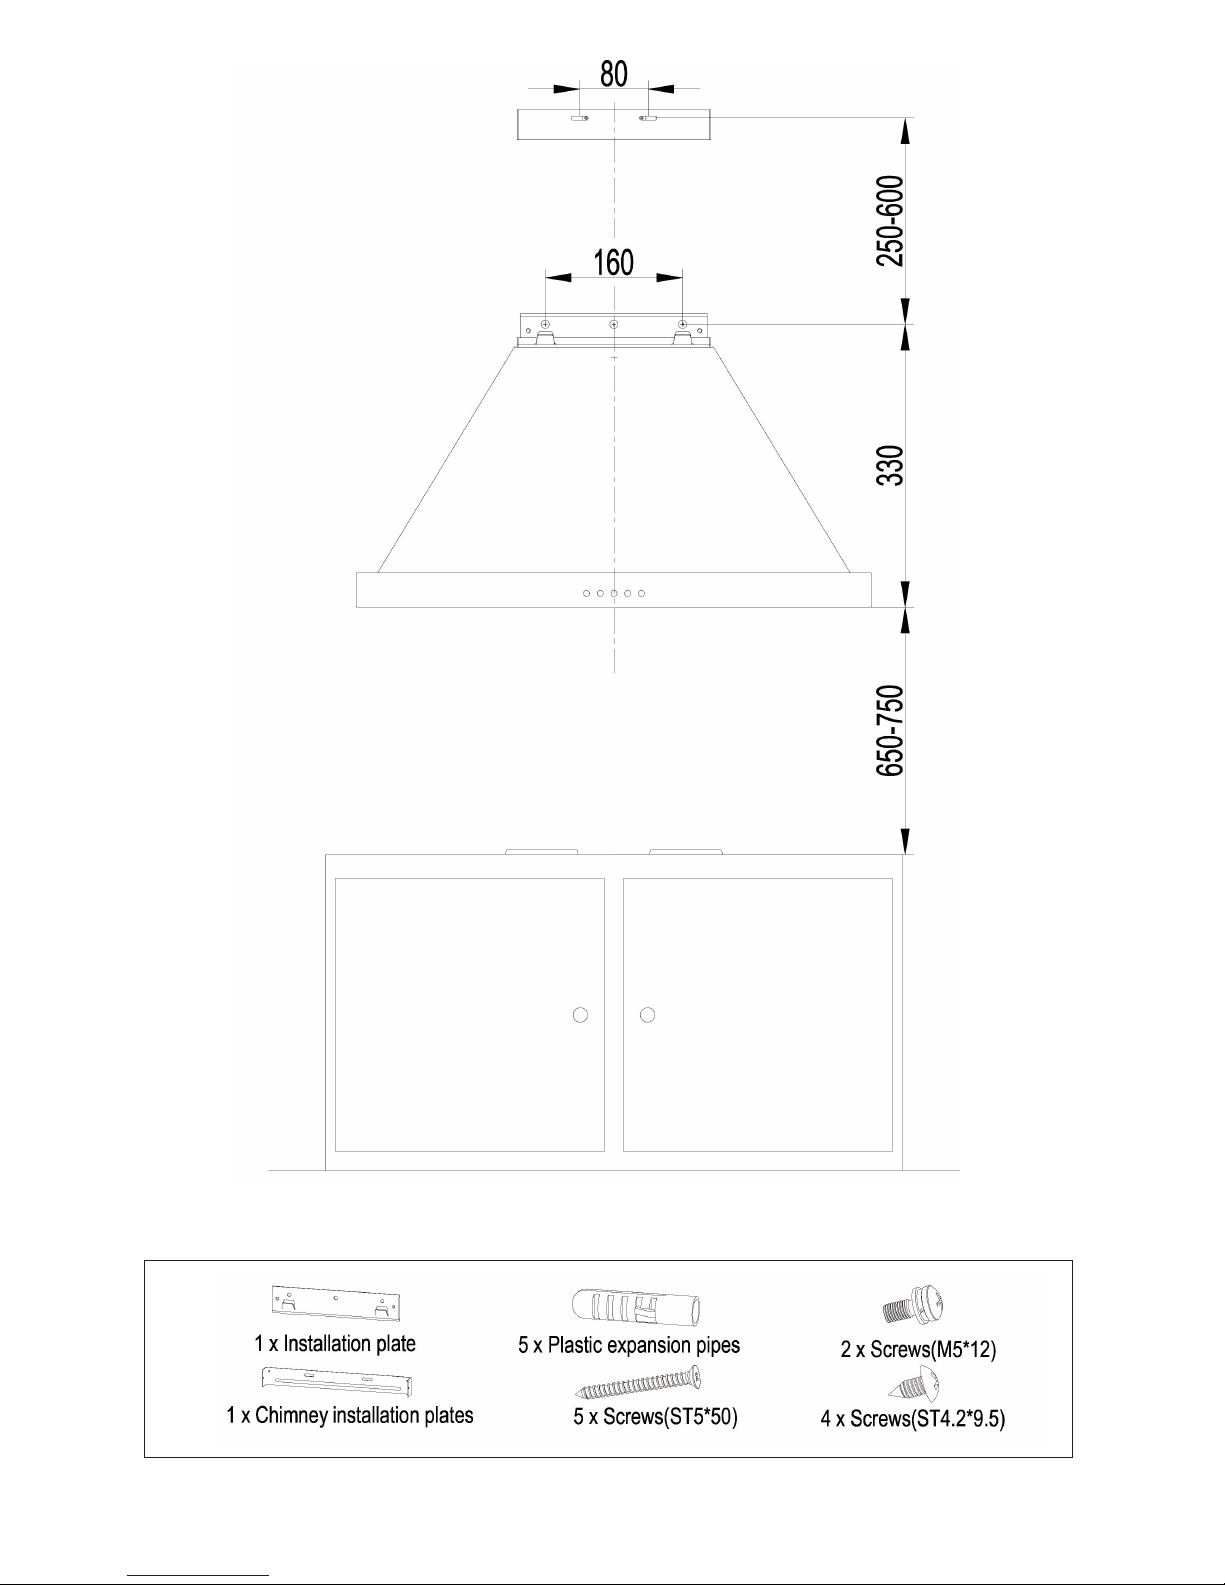
Notice of Installation
• Itcannotsharethesameairventilationtubewithotherappliancesuchasgastube,warmer
tube,andhotwindtube.Therewillbehazardofunderpressure,combustionimpairedand
harmfulgasesdrawnback.
• Thebendingofventilationtubeshouldbe≥120°,parallelorabovethestartpoint/should
beconnectedtotheexternalwall.
• Pleasemakesuretheinstallationplateisplacedhorizontallytoavoidgreasecollectionat
oneend.SeeFig.1.
• Beforeinstallation,makesurethatplugcanbepulledoutifnecessary.
Fig.1
Right Wrong
• Ifthesupplycordisdamaged,itmustbereplacedbythemanufacturer,serviceagent
orsimilarlyqualiedpersoninordertoavoidahazard.Thereplacedpowercordshould
beprovidedbymanufacturerorseller.
• Iftheplugorcordisdamaged,pleasecallafter-saleservicedepartment.
• Thereisareriskifcleaningisnotcarriedoutinaccordancewiththeinstructions.
• Incaseofadamagedconnectingwire,pleaserefertothemanufacturer,after-sale
servicepersonnelorotherqualiedtechnicians.
• Usetheunitaccordingtotheinstructionstoavoidrehazard.
• Theexhaustairmustbenotbeintroducedintoasmokeueorchimneythatisused
forexhaustingfumesfromappliancesburninggas.
• Followthelocallawsapplicableforexternalairevacuation.
• Donotambéunderthecookerhood
5
Fig.2
Fig.3

6
Installation
• Accessories.SeeFig.3.(Typeandquantityofaccessoriesissubjecttoactualdemand.)
• Fixinstallationplateandextensionchimneyinstallationplate,SeeFig.4.
• Fixtheexhaustpipe,SeeFig.5.
• Hangcookerhoodontheinstallationplate.SeeFig.6.
• Afterconnectingtheexhaustpipewell,lockscrews(M5*12)topreventthecookerhoodfrom
accidentlyslidingotheinstallationplate.SeeFig.7.
• Fixthechimney.SeeFig.8.
• Fixtheextensionchimney.SeeFig.9.
• Fixthegreaselteratthebottomofthecookerhood.(Ifremovedatthebeginning.)
Fig.6
Fig.5
Fig.4
Fig.7

7
Usage guide
Speedadjustment.SeeFig10.1
• PressStopbutton,themotorwillstoprunning.
• PresstheLow(speed)button,themotorruns
atlowspeed
• PresstheMid(speed)button,themotorruns
atmidspeed
• PresstheHigh(speed)button,themotorrunsathighspeed.
• PresstheLightbutton,the2lightinglampswillcomeon.
• Pressitagainandthelampswillbeturnedo.
Speedadjustment.SeeFig.10.2(Forsomemodels)
• Afterpluggingin,thecookerhoodwillbuzzonce
todeclareitisconnectedtopowersupply.
• Afterconnection-PressthePowerbuttononce
andmotorwillrunatlowspeedandlightwillcome
on,bothLowbuttonandLightbuttonwillbe
turnedon.IfPowerbuttonispressedwhencookerhoodisturnedon,itwillentera3minute
delayshutdownstate,pressPowerbuttonagaintoturnthecookerhoodoimmediately.
• PresstheLightbuttononceandthelampswillbeon
• PresstheLightbuttonagainandthelampswillbeturnedo
• PresstheLow(speed)button,themotorrunsatlowspeed
• PresstheMid(speed)button,themotorrunsatmedspeed
• PresstheHigh(speed)button,themotorrunsatHighspeed
• IfLow,MidorHigh(speed)buttonispressedwhenin3minutedelayshutdownstate,itwill
cancelthedelayshutdownandthemotorwillcontinuetorunattherequiredspeed
Fig.10.1
Fig.10.2
Fig.8
Fig.9

8
Replace Halogen Lamp
Allowthelamptocooldownbeforereplacing.
• First,removethelampcover
• Unscrewthedefectivehalogenlampandreplaceitwithanewone(power:40W)
• Replacethelampcovercarefully;makingsureit’sinposition.
Cleaning the Cooker Hood
• Beforecleaning,ensurethepoweriso.
• Neverimmersethemotorandanyotherelectricalpartsinwaterorotherliquid.
• Pleasedonotuseabrasivedetergentasitwilldamagethebody
• Toprotectthemainbodyfromcorrosioncausedbylongtermaccumulationofdirt,thecooker
headsshouldbecleanedwithhotwaterandnon-corrosivedetergentevery2months.
Speedadjustment.SeeFig.10.3(Forsomemodels)
• Afterpluggingin,thecookerhoodwillbeepand
allkeylightswillilluminatefor1secondto
declareitisconnectedtopowersupply.
• Afterconnection-PressthePowerbuttononce
andmotorwillrunatlowspeed,thedigital
screenwilldisplay“SettingNo.1”.IfPowerbuttonispressedwhencookerhoodisturnedon,it
willentera3minutedelayshutdownstate,thepowerkeyashesat1secondintervals,indicating
thatdelayedshutdownmodehasbeenset.pressPowerbuttonagaintoturnthecookerhood
oimmediately.
• PresstheLightbuttononceandthelampswillbeonandlightkeywillbeilluminated.
• PresstheLightbuttonagainandthelampswillbeturnedoandthelightkeywillturno.
• Plus(+)buttonwillonlyoperatewheninpower-onstate.Pressonceandthespeedwillincrease
byonesetting,thedigitalscreenwilldisplaythecorrespondingsetting.WhenthePlus(+)key
ispresseddown,thePlus(+)Keywillilluminate.Whenatthehighestsetting,thecookerhoodwill
beeptoindicatemaximumsettingreached.
• Minus(-)buttonwillonlyoperatewheninpower-onstate.Pressonceandthespeedwilldecrease
byonesetting,thedigitalscreenwilldisplaythecorrespondingsetting.WhentheMinus(-)key
ispresseddown,theMinus(-)Keywillilluminate.Whenatthelowestsetting,thecookerhood
willbeeptoindicateminimumsettingreached.
Fig.10.3
Fig.11 Fig.12

9
Troubleshooting
Fault Cause Solution
Lighton,butmotordoes
notwork
Bothlightandmotordo
notwork
Oilleakage
Thebladesareblocked
Thecapacitorisdamaged Replacecapacitor
Themotorisdamaged Replacemotor
Theinternalwiringofmotor
iscuto/disconnected.An
unpleasantsmellmayproduce
Replacemotor
Apartfromtheabovementioned,checkthefollowing:
Lightdamaged Replacelights
Powercordloose Connectthewiresasperthe
electricaldiagram
Outletandtheairventilation
entrancearenottightlysealed
Takedowntheoutletand
sealwithglue
Leakagefromtheconnectionof
U-shapedsectionandcover
TakeU-shapedsection
downandseal
Replacement of the carbon lters (optional)
• RemovetheltersseeFig.11.
• Thecarbonltersarelocatedatbothendofthemotor.Turnthecarbonltersuntilthey
arelocked.SeeFig.12.
• Applyreverseprocedureto
• Itshouldbereplacedafterapproximately2-3monthsofuse.
• Thecarbonlercannotbewashedorrecycled.
• Carbonlterisnotsuppliedwithyourappliance.
Vibration
InsucientSuction
Themachineinclines
Theblade,ifdamaged,can
causevibrating
Replacetheblade
Themotorisnottightlyfastened Fastenthemotortightly
Thecookerhoodisnottightly
xed
Fixthecookerhoodtightly
Toomuchventilationfromopen
doorsorwindows
Closesomedoors/windowsor
chooseanewplacetoinstall
theappliance
Thexingscrewsarenottight
enough
Tightenthexingscrew
andmakeithorizontal
Thehangingscrewsarenot
tightenough
Tightenthehangingscrew
andmakeithorizontal
Thedistancebetweenthecooker
andthecookertopistoolarge
Readjustthedistance
10
Voltage 220-240~50Hz
RatedPower 205W
LightingPower 40WX2
MotorPower 125W
Motor SingleMotor
InnerdiameterofAirtube 150mm
Airoutput 400m3/h
Noise <61dB
Main Parameters
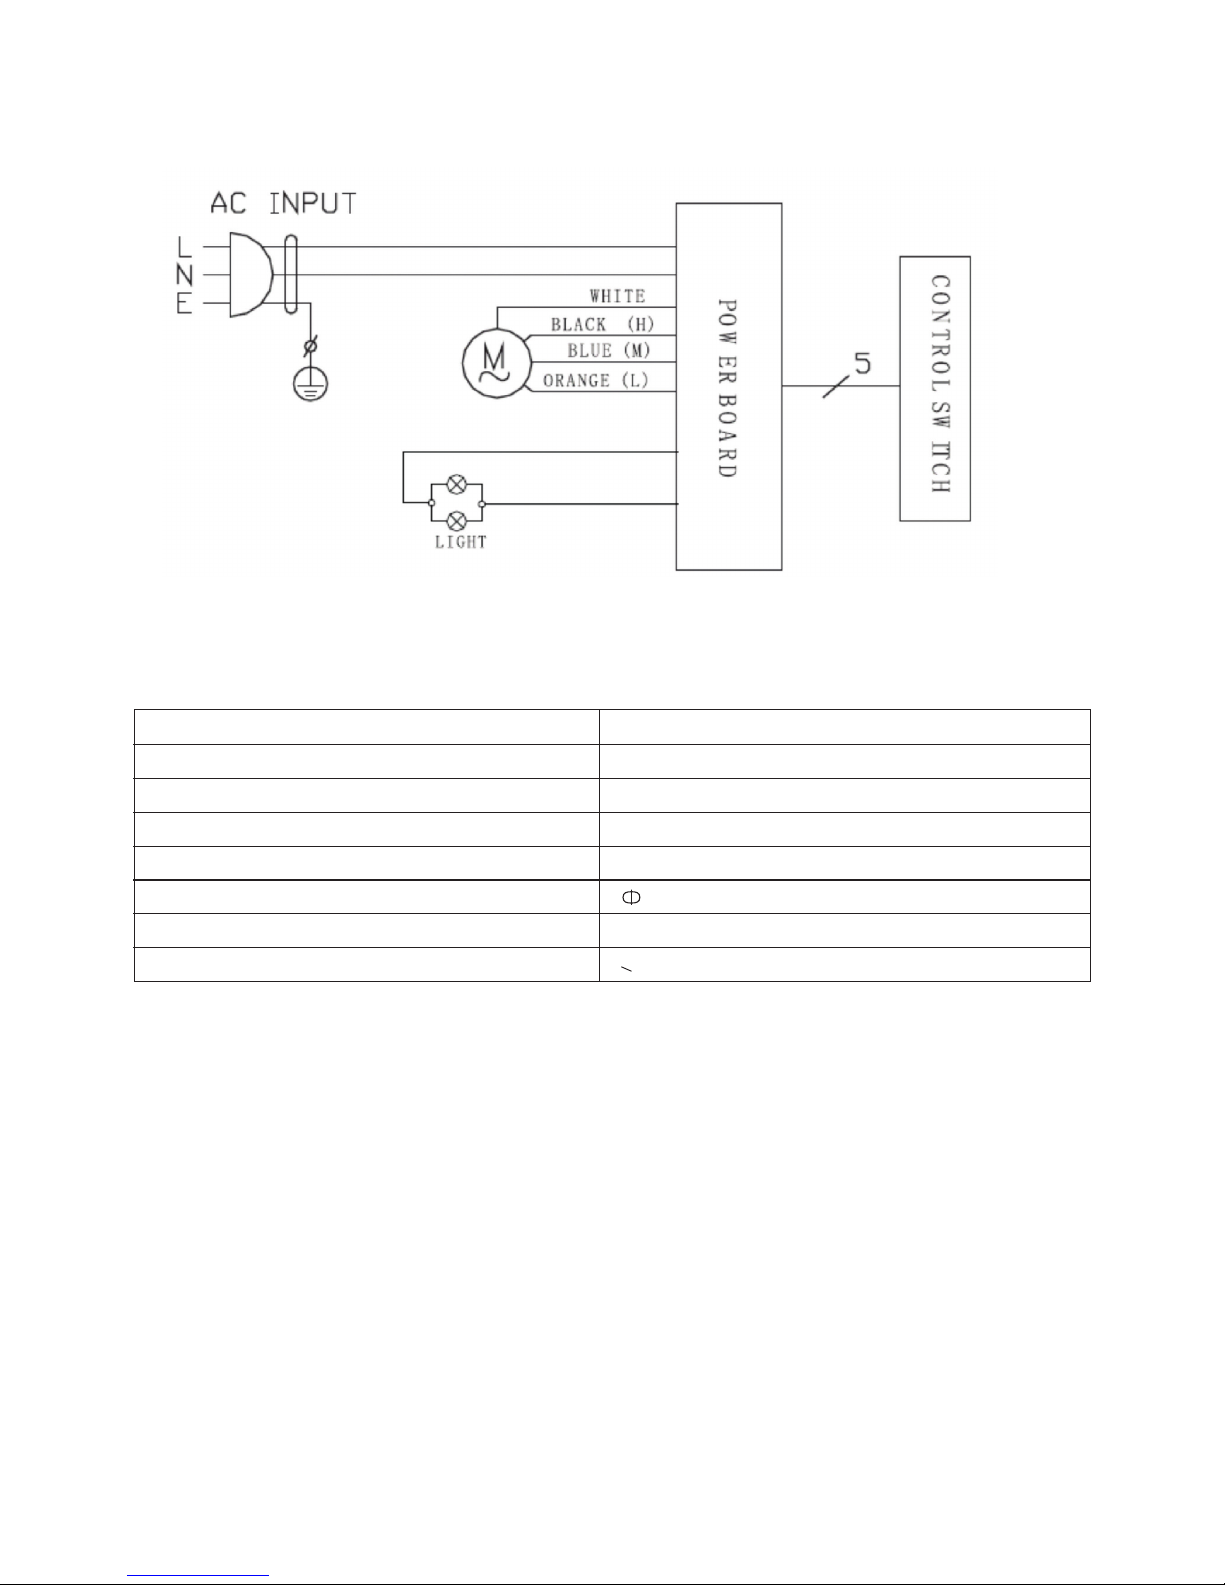
Electrical Diagram
• Seelabelonmainbodyoftheactualproduct.
Theairowparameteristestedunderconditionsof230V50Hzwhenthe
voltageis220-240V~50Hzandwithoutcarbonlters.

11

SERVICE AND SPARE PARTS
ShouldyouexperienceanydicultyinusingyourStatesmanapplianceatanytime,youmay
contactyourStatesmanRetailerorcallourCustomerServiceDepartmenton:
0844 848 5861
Pleasehavethefollowingdetailsready;
• ModelName/ModelNumber
• SerialNumber
• DateofPurchase
• WherePurchased
• CustomerNameandaddressincludingpostcode
• ContactTelephoneNumber
• Accuratedescriptionofthefault
SparePartsinformationcanbeobtainedbycallingourSparePartsDepartmenton:
0844 848 5862
Disposal
TheEuropeanDirective2012/19/EUonWasteElectricalandElectronicEquipment
(WEEE),requiresthatoldhouseholdelectricalappliancesmustnotbedisposedofin
normalunsortedmunicipalwaste.
Oldappliancesmustbecollectedseparatelyinordertooptimisetherecoveryand
recyclingofthematerialstheycontainandreducetheimpactonhumanhealthand
theenvironment.
Thecrossedout“wheeledbin”symbolontheproductremindsyouofyour
obligation,thatwhenyoudisposeoftheapplianceitmustbeseparatelycollected.
Consumersshouldcontacttheirlocalauthorityorretailerforinformationconcerning
thecorrectdisposaloftheiroldappliance.
Table of contents
Other STATESMAN Ventilation Hood manuals


Popular Ventilation Hood manuals by other brands


Gurari
Gurari GCH I 385 PRIME Manual for installation and use

Luisi Air
Luisi Air FONDI SLTR 75 Installation, Use and Maintenance Instruction

AIRFORCE
AIRFORCE F195 Instruction on mounting and use

Miele
Miele DA 2450 Operating and installation instructions

KitchenAid
KitchenAid KHTU105RSS1 Installation & use manual

Univa
Univa U600SC instruction manual

Best
Best PIK33 installation instructions

FALMEC
FALMEC Milano Genova 120 installation manual

Bertazzoni
Bertazzoni Professional Series installation manual

DCS
DCS Professional Island Vent Hood IVS40 Use and care guide

AVG
AVG AVC-276PS2 INSTALLATION GUIDE / USE AND CARE MANUAL

Gorenje
Gorenje WHT621E5X-BR manual