stayer M1010 User manual

Manual de instrucciones
Istruzioni d’uso
Operating instructions
Bedienungsanleitung
Instructions d’emploi
Manual de instruções
M1010K
M1200K
M1200BK
M1200CK
M1500K
M1600K
ES
IT
GB
DE
FR
P
Area Empresarial Andalucía - Sector I
Calle Sierra de Cazorla nº7
C.P: 28320 Pinto (Madrid) SPAIN
Email: info@grupostayer.com
www.grupostayer.com
Instrukcja obsługi
PL
M1010
M1100
M1200
M1200C
M1500
M1600

5
1
6
2
4
3
7

Instrucciones de seguridad
específicas del aparato
-No procese materiales propensos a explotar
(p. ej. disolventes fácilmente inflamables).
Las herramientas eléctricas producen chispas que
pueden llegar a inflamar los vapores emanados.
-Si la herramienta eléctrica se le cae en el pro-
ducto a remover, extraiga inmediatamente el
enchufe de la red y hágala revisar en un servi-
cio técnico. El material que ha penetrado en el
interior de la herramienta eléctrica puede perjudicar
a la misma y acarrearle una descarga eléctrica.
-Utilizar la herramienta eléctrica con las empu-
ñaduras adicionales que se adjuntan con el
aparato. Vd. puede accidentarse si pierde el con-
trol sobre el aparato.
-Trabajar sobre una base firme sujetando la
herramienta eléctrica con ambas manos. La
herramienta eléctrica es guiada de forma más
segura con ambas manos.
-No trabaje materiales que contengan
amianto. El amianto es cancerígeno.
-Tome unas medidas de protección adecuadas
si al trabajar pudiera generarse polvo com-
bustible, explosivo, o nocivo para la salud. Por
ejemplo: ciertos tipos de polvo son cancerígenos.
Colóquese una mascarilla antipolvo y, si su aparato
viene equipado con la conexión correspondiente,
utilice además un equipo de aspiración adecuado.
-Antes de depositarla, esperar a que se haya
detenido la herrami enta eléctrica. El útil puede
engancharse y hacerle perder el control sobre la
herramienta eléctrica.
-No utilice la herramienta eléctrica si el cable
está dañado. No toque un cable dañado, y
desconecte el enchufe de la red, si el cable se
daña durante el trabajo. Un cable dañado com-
porta un mayor riesgo de electrocución.
-Conecte las herramientas eléctricas emplea-
das a la intemperie a través de un fusible dife-
rencial (FI).
ESPAÑOL
2
2
Descripción del funcionamiento
Lea íntegramente estas adverten-
cias de peligro e instrucciones. En
caso de no atenerse a las advertencias
de peligro e instrucciones siguientes, ello
puede ocasionar una descarga eléctrica,
un incendio y/o lesión grave.
Despliegue y mantenga abierta la solapa con la imagen
del aparato mientras lee las instrucciones de manejo.
Utilización reglamentaria
La herramienta eléctrica ha sido diseñada para remover
materiales de construcción en polvo como morteros,
revoques, adhesivos y pinturas, lacas o demás sustan-
cias similares que también estén exentas de disolvente.
Datos técnicos
Mezcladora
1010 W
-1
100-230 / 230-500 min
Ø 120 mm
M14
20/10 Nm
4.5 kg
40 l
Potencia
Giros en vacío
Hélice (x2)
Inserción
Par nominal
Peso
M1010 / M1010K
1200 W
-1
150-300 / 300-650 min
Ø 140 mm
M14
25/12,5 Nm
5.7 kg
65 l
Potencia
Giros en vacío
Hélice (x2)
Inserción
Par nominal
Peso
M1200 / M1200K
1200 W
-1
200-400 / 350-700 min
Ø 120 mm
M14
20.5 Nm
4.8 kg
75 l
Potencia
Giros en vacío
Hélice
Inserción
Par nominal
Peso
M1200C / M1200CK
1100 W
-1
200-400 / 350-700 min
Ø 120 mm
M14
20.5 Nm
4.8 kg
40 l
Potencia
Giros en vacío
Hélice
Inserción
Par nominal
Peso
M1100
1200 W
-1
200-400 / 350-700 min
Ø 120 mm
M14
20.5 Nm
4.8 kg
40 l
Potencia
Giros en vacío
Hélice
Inserción
Par nominal
Peso
M1200BK
Este manual es acorde con la fecha de fabricación de su
máquina, información que encontrará en la tabla de datos
técnicos de la maquina adquirida, buscar actualizaciones
de manuales de nuestras maquinas en la página web:
www.grupostayer.com
1500 W
-1
180-380 / 300-650 min
Ø 160 mm y 140 mm
M14
36/17 Nm
6 kg
90 l
Potencia
Giros en vacío
Hélice (x2)
Inserción
Par nominal
Peso
M1500 / M1500K

Información sobre ruidos y vibraciones
El nivel de presión sonora típico del aparato, determi-
nado con un filtro A, asciende a: Nivel de presión
sonora 87 dB (A); nivel de potencia acústica 98 dB(A).
Tolerancia K=3 dB.
¡Colocarse un protector de oídos!
2
La vibración típica en la mano/brazo es inferior a 2,5 m /s.
El nivel de vibraciones indicado
en estas instrucciones ha sido
determinado según el procedimiento de medición
fijado en la norma EN 60745 y puede servir como base
de comparación con otros aparatos.
El nivel de vibraciones puede variar de acuerdo a la
aplicación respectiva de la herramienta eléctrica,
pudiendo quedar en ciertos casos por encima del valor
indicado en estas instrucciones. La solicitación experi-
mentada por las vibraciones pudiera ser mayor de lo
que se supone, si la herramienta eléctrica es utilizada
con regularidad de esta manera.
ADVERTENCIA
ESPAÑOL
3
3
Componentes principales
La numeración de los componentes está referida a la
imagen de la herramienta eléctrica en la página ilustrada.
Montaje
Antes de cualquier manipulación en la herra-
mienta eléctrica, sacar el enchufe de red de la
toma de corriente.
Cambio de útil
Cesta agitadora con rosca exterior M 14
Enrosque la cesta agitadora 3 en el husillo
motriz 4. Sujete el husillo motriz 4 con una llave
fija (entrecaras 22 mm) y apriete con otra llave fija
(entrecaras 22 mm) y la cesta agitadora 4.
El desmontaje de la cesta agitadora se realiza
siguiendo los pasos en orden inverso.
Funcionamiento
Puesta en marcha y utilización
La utilización incorrecta puede provocar daños en la
herramienta.
Por eso considere las siguientes indicaciones:
- utilice sólo herramientas hasta el diámetro
indicado.
- use la herramienta sin provocar una disminución
excesiva de la rotación o inclusiv e su
inmovilización.
- compruebe si las indicaciones de la placa de
identificación coinciden realmente con la tensión
de la corriente eléctrica. Las herrameintas con 230
V. pueden conectarse a 220 V. / 240 V.
Ajustar mezclador
Atornille lo máximo posible las herramientas con la pieza
final M14 x 2 en el asiento de la herramienta y aprieta con la
llave (22 mm) del accesorio.
1. Selector de velocidad mecánica.
2. Empuñadura adicional.
3. Hélice agitadora
4. Husillo motriz.
5. Interruptor de conexión/ desconexión.
6. Tecla de enclavamiento del interruptor de
conexión/ desconexión.
7. Ajuste de velocidad.
Estos datos son válidos para tensiones nominales de [U]
230/240 V ~ 50/60 Hz - 110/120 V ~ 60 Hz. Los valores
pueden variar si la tensión fuese inferior, y en las ejecuciones
Preste atención al nº de artículo en la placa de características
de su aparato, ya que las denominaciones comerciales de
algunos aparatos pueden variar.
específicas para ciertos países.
1600 W
-1
150-300 / 300-650 min
Ø 160 mm y 140 mm
M14
37/18,5 Nm
6 kg
90 l
Potencia
Giros en vacío
Hélice (x2)
Inserción
Par nominal
Peso
M1600 / M1600K
Determinación de los valores de medición según EN 60745 .
Observación: Para determinar con exactitud la solicitación
experimentad por las vibraciones durante un tiempo de
trabajo determinado, es necesario considerar también
aquellos tiempos en los que el aparato esté desconectado,
o bien, esté en funcionamiento, pero sin ser utilizado. Ello
puede suponer una disminución drástica de la solicitación
por vibraciones durante el tiempo total de trabajo.

ESPAÑOL
4
4
Encender y apagar
Pulse el interruptor 5 manténgalo pulsado para encender el
dispositivo.
Suelte el interruptor 5 para desconectar el dispositivo.
Funcionamiento contínuo
Activar el funcionamiento continuo: Pulse el interruptor
5 hasta el tope y simultáneamente el botón de fijación 6. El
interruptor 5 se bloquea y el funcionamiento continuo se
activa.
Desactivar el funcionamiento continuo: Pulse de nuevo
el interruptor 5 y vuelva a soltarlo. El bloqueo del interruptor
6 se suelta y se desactiva el funcionamiento continuo.
Retirar las herramientas (Mezclador)
Coloque la llave (22 mm) en la pieza final sextavada de la
herramienta (mezclador) y desapriete la de la rosca
girándola hacia la izquierda.
Electrónica del motor / uso de
la electrónica del motor
Límite de corriente de arranque
El arranque suave regulado electrónicamente proporciona
un arranque controlado de la máquina. Simultáneamente,
al conectar el dispositivo, se evita que los materiales
líquidos poco viscosos salpiquen.
Debido a la corriente reducida en el arranque de la
máquina, un fusible de 16 A será suficiente.
Preselección de la rotación
Con la regulación de la rotación se puede preseleccionar
progresivamente la potencia de la rotación.
La rotación necesaria depende del material que se desea
mezclar y es recomendable efectuar previamente una
comprobación a través de un control práctico.
Instrucciones para la operación
La cesta agitadora deberá elegirse de acuerdo al mate-
rial a remover. Si la viscosidad del material a remover es
reducida, como p. ej .pintura de dispersión, barnices,
adhesivo en polvo, material de relleno, pasta de
cemento, emplee una cesta agitadora de espiral a
izquierdas.
Selector de marchas
Se pueden preseleccionar con el selector de marchas 1
dos niveles de rotación:
-1 -1 -1 -1
Marcha 1: 150 min hasta 300 min , (1010W 100 min hasta 230 min )
-1 -1 -1 -1
Marcha 2: 300 min hasta 650 min , (1010W 230 min hasta 500 min )
Las marchas pueden permutarse con la máquina en
funcionamiento. Pero no es recomendable hacerlo cuando
la máquina está con el nivel máximo.
Constant-Electronics
Constant- Electronic mantiene la rotación casi constante
en ralentí y cuando está cargada. Esto permite una mezcla
homogénea del material.
Seguridad electrónica contra sobrecarga
Cuando el dispositivo esté sobrecargado, esta medida de
seguridad electrónica contra sobrecarga protegerá el
motor contra daños. En este caso el motor se detiene y sólo
volverá a arrancarse cuando esté menos cargado
(únicamente el modelo 1600).
Protección contra sobrecarga en
función de la temperatura
En caso de exceso de carga continua y como protección
contra el sobrecalentamiento el sistema electrónico de
seguridad se desactivará cuando el motor alcance una
temperatura crítica.
Tras un periodo de enfriamiento de aprox. 3- 5 min. La
máquina volverá a estar operacional y será capaz de
soportar la carga.
Cuando el dispositivo se encuentra en la temperatura de
servicio, la protección contra la sobrecarga dependiente
de la temperatura reaccionará antes.

Si la viscosidad del material a remover es alta, como
p.ej. enfoscado, hormigón, cemento, solado, emplas-
tecido, resina epóxica emplee una cesta agitadora de
espiral a derechas.
Al mezclar vaya subiendo y bajando la herramienta
eléctrica. Limpie la cesta agitadora después de su uso.
Mantenimiento y servicio
Mantenimiento y limpieza
-Antes de cualquier manipulación en la herra-
mienta eléctrica, sacar el enchufe de red de la
toma de corriente.
-Mantenga limpia la herramienta eléctrica y
las rejillas de refrigeración para trabajar con
eficacia y seguridad.
Si a pesar de los esmerados procesos de fabricación y
control, la herramienta eléctrica llegase a averiarse, la
reparación deberá encargarse a un servicio técnico
autorizado para herramientas eléctricas Stayer.
Eliminación
Recomendamos que las herramientas eléctricas, acce-
sorios y embalajes sean sometidos a un proceso de
recuperación que respete el medio ambiente.
Sólo para los países de la UE:
¡No arroje las herramientas eléctricas a
la basura!
Conforme a la Directriz Europea
2002/96/CE sobre aparatos eléctricos
y electrónicos inservibles, tras su trans-
posición en ley nacional, deberán acu-
mularse por separado las herramientas eléctricas para
ser sometidas a un reciclaje ecológico.
ESPAÑOL
5
5
Declaración de conformidad
Ramiro de la Fuente
Director Manager
5 de Enero de 2015
Declaramos bajo nuestra responsabilidad que este
producto está en conformidad con las normas o
documentos normalizados siguientes: UNE EN 60745-2-
1:2011 de acuerdo con las regulaciones 2006/42/CE,
2004/108/CE 2006/95/CE

Istruzioni di sicurezza
specifiche per la macchina
-Non miscelare mai sostanze esplosive (p. es.
solventi facilmente infiammabili). Elettrouten-
sili generano scintille che possono infiammare i
vapori che si formano.
-Estrarre immediatamente la spina e far con-
trollare l’elettroutensile dal servizio di assi-
stenza qualora lo stesso dovesse cadere nel
materiale da miscelare. Il materiale da miscelare
penetrato nell’elettroutensile può causare danni e
provocare una scossa elettrica.
-Utilizzare le impugnature supplementari for-
nite insieme all’elettroutensile. La perdita di
controllo sull’elettroutensile può comportare il peri-
colo di incidenti.
-Durante le operazioni di lavoro è necessario
tenere l’elettroutensile sempre con entrambe
le mani ed adottare una posizione di lavoro
sicura. Utilizzare con sicurezza l’elettroutensile
tenendolo sempre con entrambe le mani.
-Non lavorare mai materiali contenenti amianto.
L’amianto è ritenuto materiale cancerogeno.
-Prendere dei provvedimenti appropriati in
caso che durante il lavoro dovessero svilup-
parsi polveri dannose per la salute, infiamma-
bili oppure esplosive. Ad esempio: Alcune
polveri sono considerate cancerogene. Portare una
maschera di protezione contro la polvere ed utiliz-
zare, se collegabile, un sistema di aspirazione pol-
vere/aspirazione trucioli.
6
ITALIANO
6
-Prima di posare l’elettroutensile, attendere
sempre fino a quando si sarà fermato comple-
tamente. L’accessorio può incepparsi e compor-
tare la perdita di controllo dell’elettroutensile.
-Mai utilizzare l’elettroutensile con un cavo
danneggiato. Non toccare il cavo danneggiato
ed estrarre la spina di rete in caso che si
dovesse danneggiare il cavo mentre si lavora.
Cavi danneggiati aumentano il rischio di una scossa
di corrente elettrica.
-In caso di elettroute nsili che vengono utiliz-
zati all’aperto, collegarli attraverso un inter-
ruttore di protezione (FI) a corrente di apertura.
Descrizione del funzionamento
Leggere tutte le avvertenze di peri-
colo e le istruzioni operative. In caso
di mancato rispetto delle avvertenze di
pericolo e delle istruzioni operative si
potrà creare il pericolo di scosse elettri-
che, incendi e/o incidenti gravi.
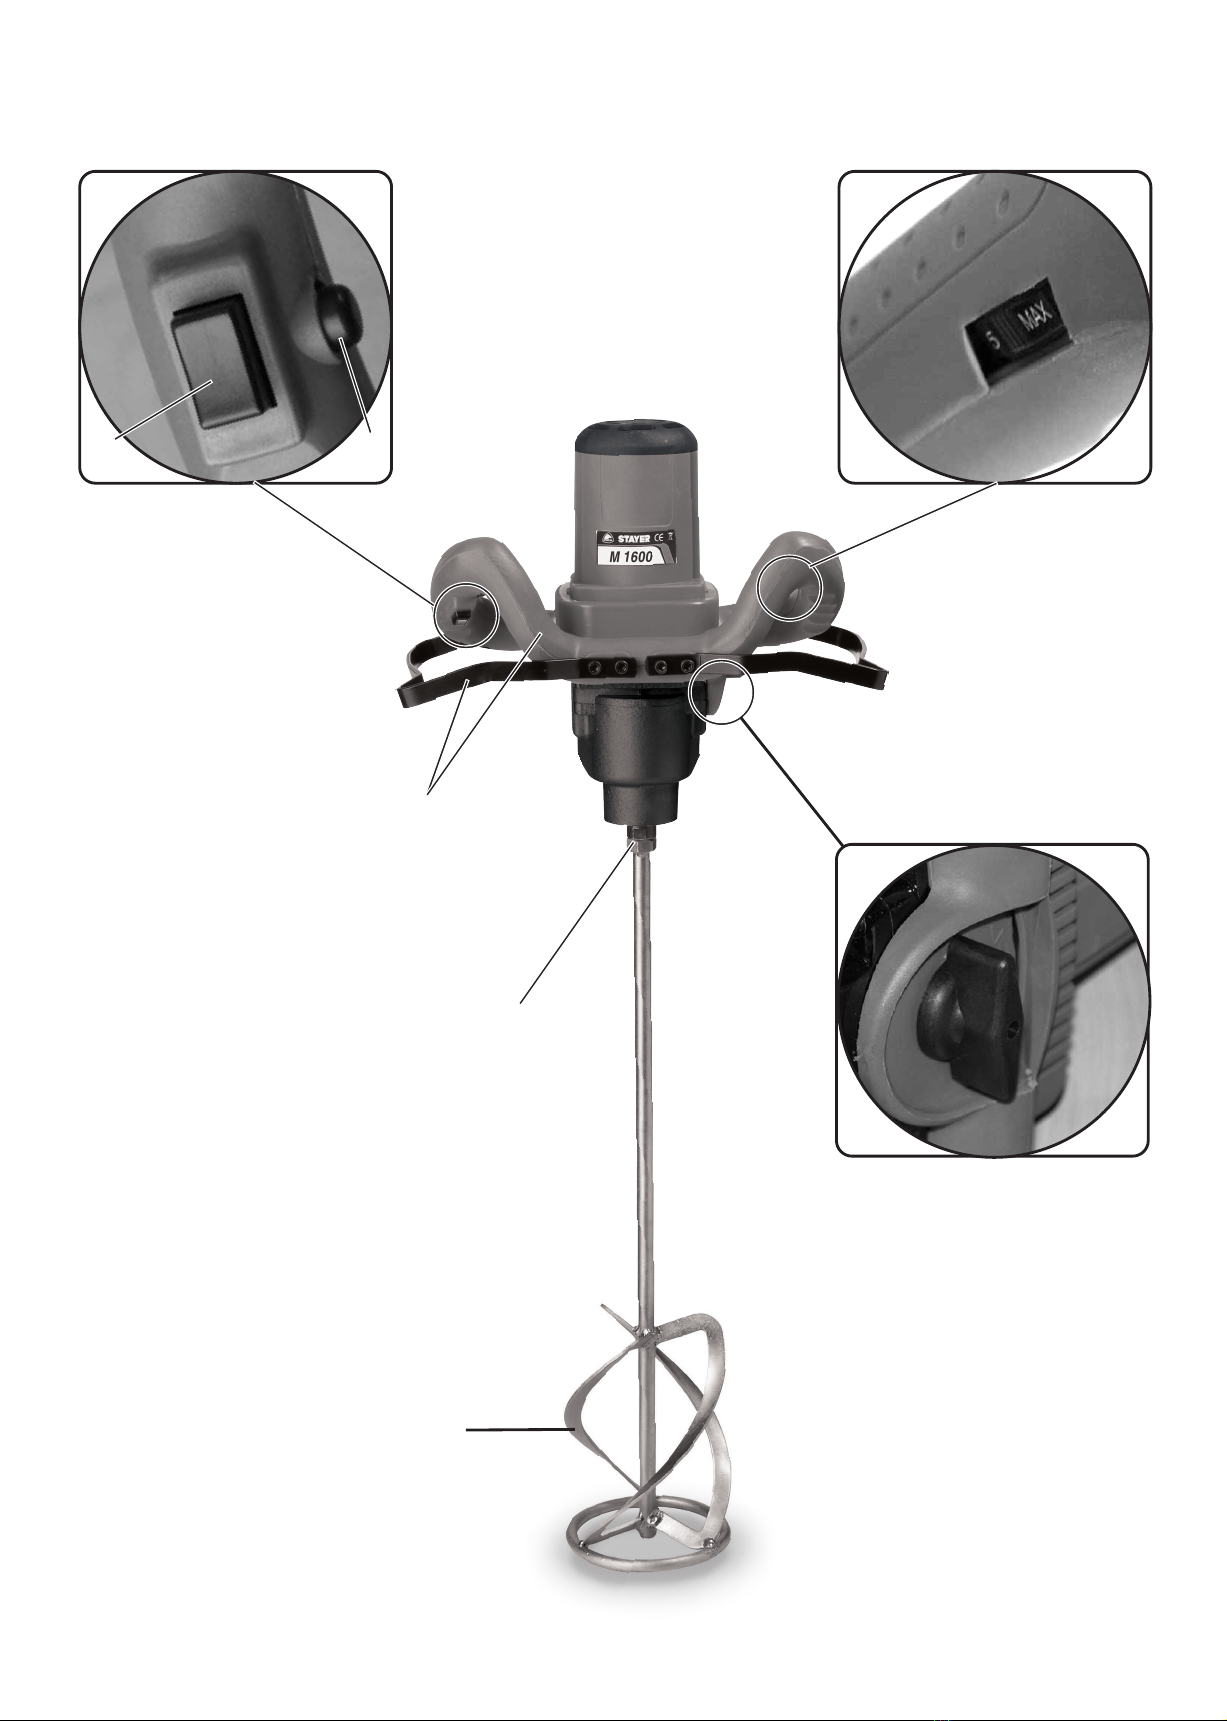
Si prega di aprire la pagina ribaltabile su cui si trova raf-
figurata schematicamente la macchina e lasciarla
aperta mentre si legge il manuale delle Istruzioni per
l’uso.
Uso conforme alle norme
L’elettroutensile è ideale per la miscelazione di materiali
da costruzione in polvere come malta, intonaci, colle,
nonché colori non contenenti solventi, vernici e
sostanze simili.
Dati tecnici
Mescolatore
1010 W
-1
100-230 / 230-500 min
Ø 120 mm
M14
20/10 Nm
4.5 kg
40 l
Potenza
Giri a vuoto
Frusta (x2)
Filettatura attacco frusta
Coppia di serraggio
Peso
M1010 / M1010K
1200 W
-1
150-300 / 300-650 min
Ø 140 mm
M14
25/12,5 Nm
5.7 kg
65 l
Potenza
Giri a vuoto
Frusta (x2)
Filettatura attacco frusta
Coppia di serraggio
Peso
M1200 / M1200K
1100 W
-1
200-400 / 350-700 min
Ø 120 mm
M14
20.5 Nm
4.8 kg
40 l
Potenza
Giri a vuoto
Frusta (x2)
Filettatura attacco frusta
Coppia di serraggio
Peso
M1100
1200 W
-1
200-400 / 350-700 min
Ø 120 mm
M14
20.5 Nm
4.8 kg
40 l
Potenza
Giri a vuoto
Frusta (x2)
Filettatura attacco frusta
Coppia di serraggio
Peso
M1200BK
Questo manuale è coerente con la data di fabbricazione del
vostro computer, potrete trovare informazioni sui dati
tecnici della macchina acquistata controllo manuale degli
aggiornamenti delle nostre macchine sul sito:
www.grupostayer.com
1200 W
-1
200-400 / 350-700 min
Ø 120 mm
M14
20.5 Nm
4.8 kg
75 l
Potenza
Giri a vuoto
Frusta (x2)
Filettatura attacco frusta
Coppia di serraggio
Peso
M1200C / M1200CK

Componenti illustrati
La numerazione dei componenti illustrati si riferisce
all’illustrazione dell’elettroutensile che si trova sulla
pagina con la rappresentazione grafica.
Le caratteristiche si riferiscono a tensioni nominali [U]
230/240 V ~ 50/60 Hz - 110/120 V ~ 60 Hz. I n caso di
tensioni minori ed in caso di modelli speciali a seconda dei
Paesi, le caratteristiche riportate pos sono essere divergenti.
Si prega di tenere presente il codice prodotto applicato sulla
targhetta di costruzione del Vostro elettroutensile. Le descri-
zioni commerciali di singoli elettroutensili possono variare.
7
ITALIANO
7
Informazioni sulla rumorosità e sulla
vibrazione
Valori misurati conformemente alla norma EN 607 45.
Il livello di pressione acustica stimato A della macchina
ammonta a dB(A): livello di rumorosità 87 dB (A); livello
di potenza acustica 98 dB( A). Incertezza della misura K=3 dB.
Usare la protezione acustica!
2
La vibrazione su mano-braccio è inferiore a 2,5 m /s.
Il livello di oscillazione indicato
nelle presenti istruzioni è stato
rilevato seguendo una procedura di misurazione con-
forme alla norma EN 6 0745 e può essere dunque uti-
lizzato per il confronto fra macchine.
Il livello di oscillazione è soggetto a cambiamenti a
seconda di come si usa l’elettroutensile e può in alcuni
casi arrivare a livelli che vanno oltre quello riportato
nelle presenti istruzioni. Il carico dell’oscillazione
potrebbe essere sottovalutato se l’elettroutensile
dovesse essere utilizzato regolarmente in questo modo.
Nota bene: Per una valutazione precisa del carico
dell’oscillazione nel corso di un determinato periodo di
tempo operativo bisognerebbe considerare anche i
tempi in cui la macchina è spenta oppure è accesa ma
non viene utilizzata effettivamente. Ciò può ridurre chia-
ramente il carico dell’oscillazione in relazione al com-
pleto periodo operativo.
AVVERTENZA
Montaggio
Prima di qualunque intervento sull’elettrou-
tensile estrarre la spina di rete dalla presa.
Cambio degli utensili
Frusta di miscelazione con filettatura esterna
M 14
Avvitare la frusta di miscelazione 3
trasmissione 4Tenere il mandrino di trasmissione
4 con una chiave fissa (apertura della chiave 22mm)
e con l’ausilio di una seconda chiave fissa (apertura
della chiave 22 mm) e la frusta di miscelazione 3.
Lo smontaggio della frusta di miscelazione avviene in
sequenza inversa.
sul mandrino di
Uso
Messa in funzione ed uso
L'uso errato può danneggiare l'attrezzo. Osservare le
seguenti istruzioni:
- usare solamente attrezzi fino al diametro prescritto.
- Usare l'attrezzo in modo che non vi sia una forte
diminuzione del numero di giri oppure un fermo
dell'attrezzo stesso.
- Controllate se le indicazioni sulla targhetta
corrispondano alla tenzione della rete di corrente.
Attrezzi previsti per 230 V. possono essere
allacciati anche a prese con 220 V. / 240 V.
1. Selettore di velocità meccanico.
2. Impugnatura supplementare.
3. Propeller agitatore
4. Mandrino del motore.
5. Accendere / spegnere.
6. Blocco interruttore a chiave on / off.
7. Regolazione della velocità.
1500 W
-1
180-380 / 300-650 min
Ø 160 mm y 140 mm
M14
36/17 Nm
6 kg
90 l
Potenza
Giri a vuoto
Frusta (x2)
Filettatura attacco frusta
Coppia di serraggio
Peso
M1500 / M1500K
1600 W
-1
150-300 / 300-650 min
Ø 160 mm y 140 mm
M14
37/18,5 Nm
6 kg
90 l
Potenza
Giri a vuoto
Frusta (x2)
Filettatura attacco frusta
Coppia di serraggio
Peso
M1600 / M1600K
Tensionamento dell'attrezzo per
miscelare
Avvitare gli attrezzi con il pezzo terminale M14 x 2 più
posible nell'accoglimento atrezzo e serrare nuovamente
con la chiave (22 mm.) fornita come accesorio.

ITALIANO
8
Accensione e spegnimento
Premere l'interruttore 5 e tenerlo premuto per accendere
l'apparecchio. Rilasciare l'interruttore 5 per spegnere
l'apparecchio.
Esecizio continuo
Accensione esercizio continuo: Premere l'interrurrore 5
fino al fine corsa e contemporaneamente premere il tasto di
arretramento 6. L'interruttore 5 viene bloccato e l'esercizio
continuo è attivato.
Spegnimento esercizio continuo: Premere l'interruttore
5 nuovamente e rilasciarlo. Il bloccaggio dell'interruttore 6
viene rilasciato e l'esercizio continuo si spegne.
Togliere gli attrezzi (miscelatore)
Portare la chiave piatta (22 mm) sull'esagonale del pezzo
terminale dell'attrezzo (miscelatore) e svitare, girando in
senso antiorario, l'attrezzo dal mandrino.
Abbassamento del numero di giri a vuoto
L'elettronico abbassa il numero di giri della macchina
durante i giri a vuoto. In questo modo si riduce il rumore
come anche l'usura del motore e della trasmissione.
Electtronica del motor/Uso
dell elettronica del motor
Limitazione della corrente di avvio
L'avviamento dolce regolato elettronicamente, garantisce
l'avvio dolce della macchina. In questo modo si impedisce
anche che i materiali liquidi possano spruzzare durante
l'accensione della macchina.
Grazie alla corrente di avvio bassa della macchina è
sufficiente un fusibile 16º.
Interruttore selezione velocità
Con l'interruttore selezione velocità 1 è possibile
selezionare tra dure campi di numero di giri:
-1 -1 -1 -1
Marcia 1: 150 min fino 300 min , (1010W 100 min fino 230 min )
-1 -1 -1 -1
Marcia 2: 300 min fino 650 min , (1010W 230 min fino 500 min )
Le marce possono essere modificate durante l'esercizio
della macchina. Non dovrebbe però avvenire a carico pieno.
Constant- Electronics
La Constant- Electronics tiene quasi constante il numero di
giri in caso di giri a vuoto e sotto carico. Questo garantisce la
miscela omogenea del materiale.
Sicurezza elettronica di sovraccarico
In caso di forte sovraccarico protegge il motore da
danneggiamenti. In questo caso il motore si ferma e si avvia
solamente ad avanzamento diminuito e/o dopo aver
diminuito il carico. (solo modello 1600)
Protezione da sovraccarico dipendiete
dalla temperatura.
Per la protezione da surriscaldamento in caso di estremo
carico continuo, l'elettronica di sicurezza spegne il motore in
caso di temperature critiche.
Dopo un tempèo di raffreddamento di circa 3 – 4 minuti la
macchina è nuovamente pronta per l'esercizio.
Se l'apparecchio è caldo la protezione termica reagisce
conseguentemente prima.
Indicazioni operative
La scelta della frusta di miscelazione dipende dal mate-
riale da miscelare. Per materiale da miscelare con
scarsa viscosità, come p. es. colore a dispersione, ver-
nici, colle, materiale di tenuta, miscela di cemento ed
acqua utilizzare una frusta di miscelazione con spirale
sinistrorsa.
Per materiale da miscelare con alta viscosità, come
p. es. intonaco pronto, calcestruzzo, cemento, mate-
riale per pavimenti, stucco, resina epossidica utilizzare
una frusta di miscelazione con spirale destrorsa.
Durante la miscelazione muovere l’elettroutensile verso
l’alto e verso il basso. Dopo l’uso pulire la frusta di
miscelazione.
8

Manutenzione ed assistenza
Manutenzione e pulizia
-Prima di qualunque intervento sull’elettrou-
tensile estrarre la spina di rete dalla presa.
-Per poter garantire buone e sicure operazioni
di lavoro, tenere sempre puliti l’elettrouten-
sile e le prese di ventilazione.
Se nonostante gli accurati procedimenti di produzione
e di controllo l’elettroutensile dovesse guastarsi, la ripa-
razione va fatta effettuare da un punto di assistenza
autorizzato per gli elettroutensili Stayer.
Smaltimento
Avviare ad un riciclaggio rispettoso dell’ambiente gli
imballaggi, gli elettroutensili e gli accessori dismessi.
Solo per i Paesi della CE:
Non gettare elettroutensili dismessi tra i
rifiuti domestici!
Conformemente alla norma della diret-
tiva CE 2002/96 sui rifiuti di apparec-
chiature elettriche ed elettroniche
(RAEE) ed all’attuazione del recepi-
mento nel diritto nazionale, gli elettroutensili diventati
inservibili devono essere raccolti separatamente ed
essere inviati ad una riutilizzazione ecologica.
9
ITALIANO
9
Dichiarazione di conformità
Ramiro de la Fuente
Director Manager
5 gennaio 2015
Assumendone la piena responsabilità, dichiariamo
che questo prodotto è conforme alle seguenti
normative oppure documenti normativi: UNE EN
60745-2-1:2011 in base alle direttive delle prescrizioni
2006/42/CE, 2004/108/CE 2006/95/CE

Machine-specific
Safety Warnings
-Do not use the power tool for explosive mate-
rials (e. g., easily inflammable solvents).
Power tools produce sparks which could ignite
developing vapours.
-In case the power tool should fall into the
material to be stirred, pull the plug immedi-
ately and have the power tool checked by an
after-sales service agent. Material that has pen-
etrated the power tool can cause damage and lead
to an electric shock.
-Always use the auxiliary handle supplied with
the machine. Loss of control can cause personal
injury.
-When working with the machine, always hold
it firmly with both hands and provide for a
secure stance. The power tool is guided more
secure with both hands.
-Do not work materials containing asbestos.
Asbestos is considered carcinogenic.
-Take protective measures when dust can
develop during working that is harmful to
one’s health, combustible or explosive. Exam-
ple: Some dusts are regarded as carcinogenic.
Wear a dust mask and work with dust/chip extrac-
tion when connectable.
-Always wait until the machine has come to a
complete stop before placing it down. The tool
insert can jam and lead to loss of control over the
power tool.
-Never use the machine with a damaged cable.
Do not touch the damaged cable and pull the
mains plug when the cable is damaged while
working. Damaged cables increase the risk of an
electric shock.
-Connect machines that are used in the open
via a residual current device (RC D).
Functional Description
Read all safety warnings and all
instructions. Failure to follow the warn-
ings and instructions may result in electric
shock, fire and/or serious injury.
While reading the operating instructions, unfold the
graphics page for the machine and leave it open.
Intended Use
The machine is intended for mixing pulverised building
materials such as mortar, plaster, adhesives, as well as
solvent-free paint, varnish and similar substances.
Technical Data
Stirrer/Mixer
ENGLISH
10
10
1010 W
-1
100-230 / 230-500 min
Ø 120 mm
M14
20/10 Nm
4.5 kg
40 l
Power input
No load speed
Mixing whisk (x2)
Spindle thread
Tightening torque
Weight
M1010 / M1010K
1200 W
-1
150-300 / 300-650 min
Ø 140 mm
M14
25/12,5 Nm
5.7 kg
65 l
Power input
No load speed
Mixing whisk (x2)
Spindle thread
Tightening torque
Weight
M1200 / M1200K
1100 W
-1
200-400 / 350-700 min
Ø 120 mm
M14
20.5 Nm
4.8 kg
40 l
Power input
No load speed
Mixing whisk (x2)
Spindle thread
Tightening torque
Weight
M1100
1200 W
-1
200-400 / 350-700 min
Ø 120 mm
M14
20.5 Nm
4.8 kg
40 l
Power input
No load speed
Mixing whisk (x2)
Spindle thread
Tightening torque
Weight
M1200BK
This manual is consistent with the date of manufacture of
your machine, you will find information on the technical data
of the machine acquired manual check for updates of our
machines on the website: www.grupostayer.com
1200 W
-1
200-400 / 350-700 min
Ø 120 mm
M14
20.5 Nm
4.8 kg
75 l
Power input
No load speed
Mixing whisk (x2)
Spindle thread
Tightening torque
Weight
M1200C / M1200CK
1500 W
-1
180-380 / 300-650 min
Ø 160 mm y 140 mm
M14
36/17 Nm
6 kg
90 l
Power input
No load speed
Mixing whisk (x2)
Spindle thread
Tightening torque
Weight
M1500 / M1500K

Product Features
The numbering of the product features refers to the
illustration of the machine on the graphics page.
Noise/Vibration Information
Measured values determined according to EN 60745
Typically the A-weighted noise level of the machine is:
sound pressure level 87 dB(A); sound power level
98 dB (A). Uncertainty K=3 dB.
Wear hearing protection!
2
The typical hand/arm vibration is below 2.5 m /s
The vibration emission level given in
this information sheet has been meas-
ured in accordance with a standardised test given in
EN 60745 and may be used to compare one tool with
another.
The vibration emission level will vary because of the
ways in which a power tool can be used and may
increase above the level given in this information sheet.
This could lead to a significant underestimate of expo-
sure when the tool is used regularly in such a way.
Note: To be accurate, an estimation of the level of
exposure to vibration experienced during a given period
of work should also take into account the times when
the tool is switched off and when it is running but not
actually doing the job. This may significantly reduce the
exposure level over the total working period.
Assembly
-Before any work on the machine itself, pull
the mains plug.
Changing the Tool
Stirrer Paddle with Male Thread, Size M14
Screw the stirrer paddle 3 onto the drive spindle 4
Hold the drive spindle 4 in place with an open-end
spanner (size 22 mm ) and the stirrer
with a second open-end spanner (size 22 mm).
The stirrer paddle is disassembled in reverse order.
WARNING
ENGLISH
11
11
Operation
Operation and use
Improper use can cause damage to the tool. Please observe
the following instructions:
- only use tools up to the prescribed diameter.
- only use the tool at loads which do not reduce the
speed severely or bring the tool to a standstill.
- Check whether the data on the type plate comply
with the actual voltage of mains supply. Tools
intented for 230 V. may also be connect to 220 V. /
240 V.
Fitting the mixing tool
Screw the tools with the end piece M14 x 2 as far as possible
into the tool holding fixture and tighten with the spanner (22
mm.) included in the accessories.
paddle 3
1. Mechanical velocity selector.
2. Auxiliary handle.
3. Propeller stirrer
4. Spindle motor.
5. Switch on / off.
6. Locking key switch on / off.
7. Speed adjustment.
The values given are valid for nominal voltages [U] of
230/240 V ~ 50/60 Hz - 110/120 V ~ 60 Hz. For lower voltage
and models for specific countries, these values can vary.
Please observe the article number on the type plate of your
machine. The trade names of the individual machines may vary.
1600 W
-1
150-300 / 300-650 min
Ø 160 mm y 140 mm
M14
37/18,5 Nm
6 kg
90 l
Power input
No load speed
Mixing whisk (x2)
Spindle thread
Tightening torque
Weight
M1600 / M1600K

Operating Instructions
The choice of stirrer paddle depends on the material to
be stirred. For materials with low viscosity, e. g., disper-
sion paint, varnish, adhesions, casting compound,
cement grout, etc., use a stirrer paddle with left-hand
spiral.
For materials with high viscosity, e. g., ready-mixed
plaster, concrete, cement, screed, filler, epoxy resin,
etc., use a stirrer paddle with right-hand spiral.
While mixing, move the power tool in an up and down
motion. Clean the stirror paddle after use.
ENGLISH
12
12
Removing tools (mixer)
Fit the flat spanner (22 mm) onto the hexagon of the tool end
piece (mixer) and turn to the left to unscrew the tool from the
spindle.
Motor electronics / Operating
motor electronics
Starting current limiting
The electronically controlled soft start ensures that the
machine starts smoothly. This also prevents spray from thin
liquids when the tool is switched on.
The lower starting current means thar a 16 A fuse is large
enough for the machine.
Gear selector switch
Two speed rangers can be selected with the gear selector
switch 1.
Gear 1: 150 rpm hasta 300 rpm, (1010W 100 rpm to 230 rpm)
Gear 2: 300 rpm hasta 650 rpm, (1010W 230 rpm to 500 rpm)
It is possible to change fear when the machine is running.
However , this should not be done wen the machine is at
full load.
Constant electronics
The constant electronics keeps the speed virtually constant
during idling and under a load. This guarantees thar
materials are mixed uniformly.
Electronic overload protection
An electronic overload devide protects the motor against
damage when the tool is under an extreme load. In this
case, the motor stops and only starts up again when the
feed is reduced or the load removed (only model 1600).
Temperature-dependent overload
protection
To prevent the motor from overheating under an extreme
continuous load, the safety electronics switches the motor
off when it reaches a critical temperature.
After a coolong-down time of around 3 – 5 min., the machine
is ready for operation at full load. If the tool is warm from
operation, the temperature-dependent overload protection
will respond earlier.
Continuous operation
To switch on continuous operation: press the switch 5 up
to the stop and at the same time press the locking button 6.
The switch 5 locks, and continuous operation is activated.
To switch off continuous operation: press the switch 5
again and then let go. The lock on the switch 6 is released,
and continuous operation is deactivated.
Switching on and off
To switch the tool on, press the switch 5 and hold it down.
To switch the tool off, release the switch 5.

Maintenance and Service
Maintenance and Cleaning
-Before any work on the machine itself, pull
the mains plug.
-For safe and proper working, always keep the
machine and ventilation slots clean.
If the machine should fail despite the care taken in man-
ufacturing and testing procedures, repair should be
carried out by an after-sales service centre for Stayer
power tools.
WARNING! Important instructions for connecting
a new 3-pin plug to the 2-wire cable.
The wires in the cable are coloured according to the fol-
lowing code:
Do not connect the blue or brown wire to the earth ter-
minal of the plug.
Important: If for any reason the moulded plug is
removed from the cable of this power tool, it must be
disposed of safely.
ENGLISH
13
13
Disposal
The machine, accessories and packaging should be
sorted for environmental-friendly recycling.
Only for EC countries:
Do not dispose of power tools into
household waste!
According the European Guideline
2002/96/EC for Waste Electrical and
Electronic Equipment and its implemen-
tation into national right, power tools
that are no longer usable must be collected separately
and disposed of in an environmentally correct manner.
Declaration of Conformity
Ramiro de la Fuente
Director Manager
January 5, 2015
We declare under our sole responsibility that this
product is in conformity with the following standards or
standardization documents: UNE EN 60745-2-1:2011
according to the provisions of the directives
2006/42/CE, 2004/108/CE, 2006/95/CE

Gerätespezifische
Sicherheitshinweise
-Bearbeiten Sie keine explosionsgefährlichen
Stoffe (z. B. leicht entzündliche Lösemittel).
Elektrowerkzeuge erzeugen Funken, die entste-
hende Dämpfe entzünden können.
-Ziehen Sie sofort den Netzstecker und lassen
Sie das Elektrowerkzeug vom Kundendienst
überprüfen, falls es in das Rührgut fällt. In das
Elektrowerkzeug eindringendes Rührgut kann
Schäden verursachen und zu einem elektrischen
Schlag führen.
-Benutzen Sie die mit dem Elektrowerkzeug
mitgelieferten Zusatzgriffe. Der Verlust der
Kontrolle über das Elektrowerkzeug kann zu Verlet-
zungen führen.
-Halten Sie das Elektrowerkzeug beim Arbei-
ten fest mit beiden Händen und sorgen Sie für
einen sicheren Stand. Das Elektrowerkzeug wird
mit zwei Händen sicherer geführt.
-Bearbeiten Sie kein asbesthaltiges Material.
Asbest gilt als krebserregend.
-Treffen Sie Schutzmaßnahmen, wenn beim
Arbeiten gesundheitsschädliche, brennbare
oder explosive Stäube entstehen können.
Zum Beispiel: Manche Stäube gelten als krebserre-
gend. Tragen Sie eine Staubschutzmaske und ver-
wenden Sie, wenn anschließbar, eine Staub-/
Späneabsaugung.
-Warten Sie, bis das Elektrowerkzeug zum
Stillstand gekommen ist, bevor Sie es able-
gen. Das Einsatzwerkzeug kann sich verhaken und
zum Verlust der Kontrolle über das Elektrowerkzeug
führen.
-Benutzen Sie das Elektrowerkzeug nicht mit
beschädigtem Kabel. Berühren Sie das
beschädigte Kabel nicht und ziehen Sie den
Netzstecker, wenn das Kabel während des
Arbeitens beschädigt wird. Beschädigte Kabel
erhöhen das Risiko eines elektrischen Schlages.
-Schließen Sie Elektrowerkzeuge, die im
Freien verwendet werden, über einen Fehler-
strom-(FI-) Schutzschalter an.
DEUTSCH
14
14
Funktionsbeschreibung
Lesen Sie alle Sicherheitshinweise
und Anweisungen. Versäumnisse bei
der Einhaltung der Sicherheitshinweise
und Anweisungen können elektrischen
Schlag, Brand und/oder schwere Verlet-
zungen verursachen.
Bitte klappen Sie die Aufklappseite mit der Darstellung
des Gerätes auf, und lassen Sie diese Seite aufge-
klappt, während Sie die Bedienungsanleitung lesen.
Bestimmungsgemäßer Gebrauch
Das Elektrowerkzeug ist bestimmt zum Anrühren von
pulverförmigen Baustoffen wie Mörtel, Putze, Kleber,
sowie nicht lösungsmittelhaltigen Farben, Lacken und
ähnlichen Substanzen.
Technische Daten
Rührwerk
1010 W
-1
100-230 / 230-500 min
Ø 120 mm
M14
20/10 Nm
4.5 kg
40 l
Nennaufnahmeleistung
Leerlaufdrehzahl
Mixer (x2)
Werkzeugaufnahme
Eistellbarer drehmoment zwischen
Gewicht
M1010 / M1010K
1200 W
-1
150-300 / 300-650 min
Ø 140 mm
M14
25/12,5 Nm
5.7 kg
65 l
Nennaufnahmeleistung
Leerlaufdrehzahl
Mixer (x2)
Werkzeugaufnahme
Eistellbarer drehmoment zwischen
Gewicht
M1200 / M1200K
1100 W
-1
200-400 / 350-700 min
Ø 120 mm
M14
20.5 Nm
4.8 kg
40 l
Nennaufnahmeleistung
Leerlaufdrehzahl
Mixer (x2)
Werkzeugaufnahme
Eistellbarer drehmoment zwischen
Gewicht
M1100
1200 W
-1
200-400 / 350-700 min
Ø 120 mm
M14
20.5 Nm
4.8 kg
40 l
Nennaufnahmeleistung
Leerlaufdrehzahl
Mixer (x2)
Werkzeugaufnahme
Eistellbarer drehmoment zwischen
Gewicht
M1200BK
D a s H a n d b u c h s t e h t i m E i n k l a n g m i t d e m
Herstellungsdatum Ihrer Maschine, werden Sie
Informationen über die technischen Daten der Maschine
erworben manuelle Prüfung auf Updates unserer
Maschinen auf der Website zu finden:
www.grupostayer.com
1200 W
-1
200-400 / 350-700 min
Ø 120 mm
M14
20.5 Nm
4.8 kg
75 l
Nennaufnahmeleistung
Leerlaufdrehzahl
Mixer (x2)
Werkzeugaufnahme
Eistellbarer drehmoment zwischen
Gewicht
M1200C / M1200CK

Abgebildete Komponenten
Die Nummerierung der abgebildeten Komponenten
bezieht sich auf die Darstellung des Elektrowerkzeuges
auf der Grafikseite.
Geräusch-/Vibrationsinformation
Messwerte ermittelt entsprechend EN 60745
Der A-bewertete Geräuschpe gel des Gerätes beträgt
typischerweise: Schalldruckpegel 87dB(A); Schall-
leistungspegel 98 dB(A). Unsicherheit K=3 dB..
Gehörschutz tragen!
Die Hand-Arm-Vibration ist typischerweise niedriger als
2
2,5 m /s.
Der in diesen Anweisungen angege-
bene Schwingungspegel ist entspre-
chend einem in EN 60745 genormten Messverfahren
gemessen worden und kann für den Gerätevergleich
verwendet werden.
Der Schwingungspegel wird sich entsprechend dem
Einsatz des Elektrowerkzeuges verändern und kann in
manchen Fällen über dem in diesen Anweisungen
angegebenen Wert liegen. Die Schwingungsbelastung
könnte unterschätzt werden, wenn das Elektrowerk-
zeug regelmäßig in solcher Weise verwendet wird.
Hinweis: Für eine genaue Abschätzung der Schwin-
gungsbelastung während eines bestimmten Arbeits-
zeitraumes sollten auch die Zeiten berücksichtigt
werden, in denen das Gerät abgeschaltet ist oder zwar
läuft, aber nicht tatsächlich im Einsatz ist. Dies kann die
Schwingungsbelastung über den gesamten Arbeits-
zeitraum deutlich reduzieren.
Angaben gelten für Nennspannungen [U] 230/240 V ~ 50/60 Hz
- 110/120 V ~ 60Hz. Bei niedrigeren Spannungen und in
länderspezifischen Ausführungen können diese Angaben variieren.
Bitte beachten Sie die Sachnummer auf dem Typenschild
Ihres Elektrowerkzeugs. Die Handelsbezeichnungen einzelner
Elektrowerkzeuge können variieren.
WARNUNG
DEUTSCH
15
15
Montage
Ziehen Sie vor allen Arbeiten am Elektro-
werkzeug den Netzstecker aus der Steck-
dose.
Werkzeugwechsel
Rührkorb mit M 14-Außengewinde
Schrauben Sie den Rührkorb 3 auf die Antriebsspindel
4. Halten Sie die Antriebsspindel 4
Gabelschlüssel (Schlüsselweite 22mm) und ziehen
Sie mit einem zweiten Gabelschlüssel (Schlüs-
selweite 22 mm) und den Rührkorb 3fest.
Die Demontage des Rührkorbes erfolgt in umgekehrter
Reihenfolge.
Bedienung
Inbetriebnahme und Verwendung
Die falsche Anwendung kann zu einer Beschädigung des
Werkzeugs führen.
Beachten Sie deshalb folgende Anweisungen:
- verwenden Sie nur Werkzeuge bis zum
vorgeschriebenen Durchmesser
- belasten Sie das Werkzeug so, dass es nicht zu
einer starken Drehzahlverringerung oder zum
Stillstand kommt
- überprüfen Sie, ob die Angaben auf dem
Typenschild mit der tatsächlichen Spannung im
S t r o m n e t z ü b e r e i n s t i m m t . F ü r 23 0 V.
Vorgesehenes Werkzeug darf auch an 220 V. / 240
V. Angeschlossen werden.
mit einem
1. Mechanische Geschwindigkeitsselektor.
2. Zusatzhandgriff.
3. Propellerrührer
4. Spindelmotor.
5. Ein-/ Ausschalten.
6. Tast-Rastschalter ein / aus.
7. Drehzahlverstellung.
1600 W
-1
150-300 / 300-650 min
Ø 160 mm y 140 mm
M14
37/18,5 Nm
6 kg
90 l
Nennaufnahmeleistung
Leerlaufdrehzahl
Mixer (x2)
Werkzeugaufnahme
Eistellbarer drehmoment zwischen
Gewicht
M1600 / M1600K
1500 W
-1
180-380 / 300-650 min
Ø 160 mm y 140 mm
M14
36/17 Nm
6 kg
90 l
Nennaufnahmeleistung
Leerlaufdrehzahl
Mixer (x2)
Werkzeugaufnahme
Eistellbarer drehmoment zwischen
Gewicht
M1500 / M1500K

DEUTSCH
16
16
Einschalten und Ausschalten
Drücken Sie den Schalter 5 und halten Sier ihn gedrückt, um
das Gerät einzuschalten.
Lassen Sie den Schalter 5 wieder los, um das Gerät
auszuschalten.
Dauerbetrieb
Dauerbetrieb einschalten: Drücken Sie den Schalter 5 bis
zum Anschlag und gleichzeitig den Arretierungsknopf 6. Der
Schalter 5 wird festgesetzt und Dauerbetrieb ist aktieviert.
Dauerbetrieb ausschalten: Drücken Sie den Schalter 5
erneut und lassen ihn wieder los.
Die Festsetzung des Schalters 6 wird gelöst un der
Dauerbetrieb ist ausgeschaltet.
Werkzeuge abnehmen (Rührer)
Setzen Sie den flachen Schlüssel (22 mm.) auf den
Sechskant des Werkzeugendstückes (Rührer) auf und
schrauben Sie durch Linksfrehung das Werkzeug aus der
Spindel.
Anlaufstrombegrenzung
Der elektronik geregelte Sanftanlauf sorgt für ruckreien
Anlauf der Maschine. Dadurch wird gleichzeitig ein
Verspritzen von dünn flüssigen Materialien bei Einschalten
des Gerätes verhindert.
Durch den geringeren Anlaufstrom der Maschine reicht eine
16-A-Sicherung aus.
Motor elektronik /
Motor elektronik bedienen
Leerlaufdrehzahiabsenkung
Die Elektronik senkt die Drehzahl der Maschine bei Leerlauf
ab. Dadurch reduzieren sich Geräusch sowie VerschleiB
von Motor un Getriebe.
Arbeitshinweise
Die Wahl des Rührkorbes hängt vom Rührgut ab. Für
Rührgut mit geringer Viskosität, wie z. B. Dispersions-
farbe, Lacke, Kleber, Vergussmasse, Zementschlemme
verwenden Sie einen Rührkorb mit Linkswendel.
Für Rührgut mit hoher Viskosität, wie z. B .Fertigputz,
Beton, Zement, Estrich, Spachtelmasse, Epoxidharz
verwenden Sie einen Rührkorb mit Rechtswendel.
Bewegen Sie das Elektrowerkzeug beim Arbeiten auf
und ab. Reinigen Sie den Rührkorb nach Gebrauch.
Gangwahlschalter
M i t d e m G a n g w a h l s c h a l t e r 1 k ö n n e n z w e i
Drehzahlbereiche vorgewählt werden:
-1 -1 -1 -1
Gang 1: 150 min bis 300 min , (1010W 100 min bis 230 min )
Constant-Electronics
Die Constant-Electronic hält die Drehzahl bei Leerlauf und
Last nahezu konstant. Dies gewährleistet gleichmäBiges
Vermischen des Materiales.
Elektronische Überlastung
Bei extremer Überlastung des Gerätes schützt eine
elektronische Überlastsicherung den Motor vor
Beschädigung. In diesem Fall bleibt der Motor stehen und
läuft erst bei ermindertem Vorschub bzw. nach Entlastung
wieder an. (nur Modell 1600)
Temperaturabhängiger Überlastschutz
Zum Schutz vor Überhitzung bei extremer Fauerbelastung
schaltet die Sicherheitselektronik bei Erreichen einer
kritischen Temperatur den Motor ab.
Nach einer Abkühlzeit von ca. 3 – 5 min. Ist die Maschine
wieder betriebsbereit und voll belastbar.
Bei betriebswarmem Gerät reagiert der temperatura
bhängige Überlastschutz entsprechend früher.
Rührwerkzeug spanner
Schrauben Sie die Werkzeuge mit dem Endtück M14 x 2 so
weit wie möglich in die Werkzeugaufnahme und ziehen Sie
mit dem Schlüssel (22 mm.) aus dem ZubehOr nach.
-1 -1 -1 -1
Gang 2: 300 min bis 650 min , (1010W 230 min bis 500 min )
Die Gänge können bei laufender Maschine umgeschaltet
werden. Dies sollte jedoch nicht bei voller Belastung
erfolgen.

Wartung und Service
Wartung und Reinigung
-Ziehen Sie vor allen Arbeiten am Elektro-
werkzeug den Netzstecker aus der Steck-
dose.
-Halten Sie das Elektrowerkzeug und die Lüf-
tungsschlitze sauber, um gut und sicher zu
arbeiten.
Sollte das Elektrowerkzeug trotz sorgfältiger Herstel-
lungs- und Prüfverfahren einmal ausfallen, ist die Repa-
ratur von einer autorisierten Kundendienststelle für
Stayer-Elektrowerkzeuge ausführen zu lassen.
Entsorgung
Elektrowerkzeuge, Zubehör und Verpackungen sollen
einer umweltgerechten Wiederverwertung zugeführt
werden.
Nur für EU-Länder:
Werfen Sie Elektrowerkzeuge nicht in
den Hausmüll!
Gemäß der Europäischen Richtlinie
2002/96/EG über Elektro- und Elektro-
nik-Altgeräte und ihrer Umsetzung in
nationales Recht müssen nicht mehr
gebrauchsfähige Elektrowerkzeuge getrennt gesam-
melt und einer umweltgerechten Wiederverwertung
zugeführt werden.
DEUTSCH
17
17
Konformitätserklärung
Ramiro de la Fuente
Director Manager
5. Januar 2015
Wir erklären in alleiniger Verantwortung, dass
dieses Produkt mit den folgenden Normen oder
normativen Dokumenten übereinstimmt: UNE EN
60745-2-1:2011 gemäß den Bestimmungen der
Richtlinien 2006/42/CE, 2004/108/CE, 2006/95/CE.

Instructions de sécurité
spécifiques à l’appareil
-Ne pas travailler de matériaux à risque
d’explosion (p. ex. des solvants facilement
inflammables). Les outils électroportatifs génè-
rent des étincelles risquant d’enflammer les vapeurs
qui se dégagent.
-Au cas où l’appareil tomberait dans le produit
à malaxer, retirer immédiatement la fiche de
la prise de courant et faire contrôler l’outil
électroportatif par le service après-vente. Du
produit à malaxer qui entrerait dans l’outil électro-
portatif peut causer des dégâts et entraîner un choc
électrique.
-Utiliser les poignées supplémentaires four-
nies avec l’outil électroportatif. Le fait de perdre
le contrôle de l’appareil électroportatif peut entraî-
ner de blessures.
-Toujours bien tenir l’outil électroportatif des
deux mains et veiller à toujours garder une
position de travail stable. Avec les deux mains,
l’outil électroportatif est guidé de manière plus sûre.
-Ne pas travailler de matériaux contenant de
l’amiante. L’amiante est considérée comme étant
cancérigène.
FRANÇAIS
18
18
-Prendre des mesures de sécurité, lorsque des
poussières nuisibles à la santé, inflammables
ou explosives peuvent être générées lors du
travail. Par exemple : Certaines poussières sont
considérées comme étant cancérigènes. Porter un
masque anti-poussières et utiliser un dispositif
d’aspiration de poussières/de copeaux s’il est pos-
sible de raccorder un tel dispositif.
-Avant de déposer l’outil électroportatif, atten-
dre que celui-ci soit complètement à l’arrêt.
L’outil risque de se coincer, ce qui entraîne une
perte de contrôle de l’outil électroportatif.
-Ne jamais utiliser un outil électroportatif dont
le câble est endommagé. Ne pas toucher à un
câble endommagé et retirer la fiche du câble
d’alimentation de la prise du courant, au cas
où le câble serait endommagé lors du travail.
Un câble endommagé augmente le risque d’un
choc électrique.
-Brancher les outils électroportatifs qui sont utili-
sés à l’extérieur sur un disjoncteur différentiel (FI).
Description du fonctionnement
Lire tous les avertissements et indi-
cations. Le non-respect des avertisse-
ments et instructions indiqués ci-après
peut entraîner un choc électrique, un
incendie et/ou de graves blessures sur
les personnes.
Déplier le volet sur lequel l’appareil est représenté de
manière graphique. Laisser le volet déplié pendant la
lecture de la présente notice d’utilisation.
Utilisation conforme
L’outil électroportatif est conçu pour le gâchage de
matériaux de construction en poudre tels que mortiers,
enduits, colles ainsi que peintures et vernis exempts de
produits solvants, ou pour le gâchage de matériaux
similaires.
Caractéristiques techniques
1010 W
-1
100-230 / 230-500 min
Ø 120 mm
M14
20/10 Nm
4.5 kg
40 l
Puissance
Tours a vide
Tige mélangeuse (x2)
Filetage tige
Couple de serrage
Poids
M1010 / M1010K
1200 W
-1
150-300 / 300-650 min
Ø 140 mm
M14
25/12,5 Nm
5.7 kg
65 l
Puissance
Tours a vide
Tige mélangeuse (x2)
Filetage tige
Couple de serrage
Poids
M1200 / M1200K
1100 W
-1
200-400 / 350-700 min
Ø 120 mm
M14
20.5 Nm
4.8 kg
40 l
Puissance
Tours a vide
Tige mélangeuse (x2)
Filetage tige
Couple de serrage
Poids
M1100
1200 W
-1
200-400 / 350-700 min
Ø 120 mm
M14
20.5 Nm
4.8 kg
40 l
Puissance
Tours a vide
Tige mélangeuse (x2)
Filetage tige
Couple de serrage
Poids
M1200BK
Mélangeur
Ce manuel est compatible avec la date de fabrication de
votre machine, vous trouverez des informations sur les
caractéristiques techniques de la machine contrôle manuel
acquis pour les mises à jour de nos machines sur le site:
www.grupostayer.com
1200 W
-1
200-400 / 350-700 min
Ø 120 mm
M14
20.5 Nm
4.8 kg
75 l
Puissance
Tours a vide
Tige mélangeuse (x2)
Filetage tige
Couple de serrage
Poids
M1200C / M1200CK

Eléments de l’appareil
La numérotation des éléments de l’appareil se réfère à
la représentation de l’outil électroportatif sur la page
graphique.
Ces indications sont valables pour des tensions nominales de
[U] 230/240 V ~ 50/60 Hz - 110/120 V ~ 60 Hz. Ces indications
peuvent varier pour des tensions plus basses ainsi que pour
des versions spécifiques à certains pays.
Respectez impérativement le numéro d’article se trouvant sur
la plaque signalétique de l’outil électroportatif. Les désigna-
tions commerciales des différents outils électroportatifs peu-
vent varier.
FRANÇAIS
19
19
Bruits et vibrations
Valeurs de mesure déterminées conformément à
EN 60745.
Les mesures réelles (A) des niveaux sonores de l’appa-
reil sont : Niveau de pression acoustique 87 dB(A);
niveau d’intensité acoustique 98 dB(A), Incertitude
K=3 dB.
Porte une protection acoustique !
Les valeurs de vibration ressenties au niveau du bras et
2
de la main sont en général inférieures à 2,5 m /s.
L’amplitude d’oscillation indi-
quée dans ces instructions
d’utilisation a été mesurée suivant les méthodes de
mesurage normées dans EN 60745 et peut être utili-
sée pour une comparaison d’appareils.
L’amplitude d’oscillation change en fonction de l’utilisa-
tion de l’appareil électroportatif et peut, dans certains
cas, être supérieure à la valeur indiquée dans ces ins-
tructions d’utilisation. La sollicitation vibratoire pourrait
être sous-estimée si l’appareil électroportatif est régu-
lièrement utilisé d’une telle manière.
Remarque : Pour une estimation précise de la sollici-
tation vibratoire pendant un certain temps d’utilisation,
il est recommandé de prendre aussi en considération
les espaces de temps pendant lesquels l’appareil est
éteint ou en fonctionnement, mais pas vraiment utilisé.
Ceci peut réduire considérablement la sollicitation
vibratoire pendant toute la durée du travail.
AVERTISSEMENT
Montage
Avant d’effectuer des travaux sur l’outil élec-
troportatif, retirer la fiche de la prise de cou-
rant.
Changement de l’outil
Malaxeur avec filetage extérieur M 14
Visser le malaxeur 3 sur l’arbre d’entraînement 4
Maintenir l’arbre d’entraînement 4
fourche (ouverture 22 mm) et, à l’aide d’une deuxième
clé à fourche (ouverture 22 mm), e t le malaxeur
3
Le démontage du malaxeur s’effectue dans l’ordre
inverse.
avec une clé à
Mise en service et application
Une application non conforme peut endommager l'outil.
Veuillez donc observer les instructions ci-dessous:
- exclusivement utiliser des outils jusqu'au diamètre
spécifé
- ne pas charger l'outil de manière telle que le régime
baisse fortement ou que le moteur s'arrête.
- Contrôler si les indications de la plaque
signalétique correspondent à la tension réelle du
réseau. Les outils indiqués pour 230 V.. peuvent
aussi fonctionner sur 220 V. / 240 V.
Utilisation
Serrer l'agitateur
Visser l'outil avec l'embout M14 x 2 le plus possible dans
le mandrin et le serrer avec la clé de 22 fournie comme
accessoire.
1. Sélecteur de vitesse mécanique.
2. Poignée auxiliaire.
3. Hélice pour un agitateur
4. Moteur de broche.
5. Activer / désactiver.
6. Verrouillage interrupteur à clé marche / arrêt.
7. Accélérer l'ajustement.
1600 W
-1
150-300 / 300-650 min
Ø 160 mm y 140 mm
M14
37/18,5 Nm
6 kg
90 l
Puissance
Tours a vide
Tige mélangeuse (x2)
Filetage tige
Couple de serrage
Poids
M1600 / M1600K
1500 W
-1
180-380 / 300-650 min
Ø 160 mm y 140 mm
M14
36/17 Nm
6 kg
90 l
Puissance
Tours a vide
Tige mélangeuse (x2)
Filetage tige
Couple de serrage
Poids
M1500 / M1500K
Other manuals for M1010
1
This manual suits for next models
11
Table of contents
Languages:
Popular Construction Equipment manuals by other brands

Auto Crane
Auto Crane 10006H SERIES owner's manual

Putzmeister
Putzmeister BSA 1409 D4 operating instructions

Fluid Management
Fluid Management H-1 Operating and instruction manual

Atlas Copco
Atlas Copco LP 8504 Safety and operating instructions

Kessel
Kessel Ultraflat Instructions for installation, operation and maintenance

Allmand
Allmand NIGHT-LITE PRO II Wire Schematic Manual