StayFresh 4H11560US User manual

stayfreshfreezedry.com
1
Stay Fresh Home Freeze Dryer
MODEL 4H11560US

stayfreshfreezedry.com
2
1. Specifications ......................................................................................................................... 4
2. Installation Guide ................................................................................................................... 6
3. Freeze-Drying Process ............................................................................................................ 9
Freezing ...................................................................................................................................... 9
Main drying ................................................................................................................................ 9
Final drying ................................................................................................................................. 9
4. Food Preparation ................................................................................................................. 10
5. Automated Freeze-Drying .................................................................................................... 11
Freeze-drying unfrozen food without the temperature probe ................................................ 12
Freeze-drying unfrozen food with temperature probe ............................................................ 14
Freeze-drying frozen food without temperature probe .......................................................... 16
Freeze-drying frozen food with temperature probe ................................................................ 18
Freeze-drying candies .............................................................................................................. 20
Increase or decrease final dry hours ........................................................................................ 22
Pause and resume the drying process ..................................................................................... 24
What to do after drying is complete ........................................................................................ 25
Troubleshoot vacuum error messages ..................................................................................... 27
6. Defrosting ............................................................................................................................. 29
7. Advanced Freeze-Drying ...................................................................................................... 31
Manual freeze-drying ............................................................................................................... 31
Pre-set curve freeze-drying ...................................................................................................... 32
8. Freeze-Dryer Settings ........................................................................................................... 34
Set parameters ......................................................................................................................... 34
Download data ......................................................................................................................... 34
Set temperature ....................................................................................................................... 34
System reboot .......................................................................................................................... 34
Touch calibration ..................................................................................................................... 35
Reset time ................................................................................................................................ 35

stayfreshfreezedry.com
3
9. Vacuum Pump Oil Change .................................................................................................... 36
10. Touch Screen Info ................................................................................................................. 37
Main-menu ............................................................................................................................... 37
Auto-freezedry-start ................................................................................................................ 38
Auto-freezedry-setting ............................................................................................................. 39
Auto-freezedry-freezing ........................................................................................................... 41
Auto-freezedry-maindry ........................................................................................................... 43
Auto-freezedry-finaldry ............................................................................................................ 43
Auto-freezedry-finaldry-pause ................................................................................................. 44
Auto-freezedry-complete ......................................................................................................... 44
Preset-curve-drying .................................................................................................................. 45
Function-test ............................................................................................................................ 47
Defrosting-setting .................................................................................................................... 47
Defrosting ................................................................................................................................. 48
Defrosting-complete ................................................................................................................ 48
Settings ..................................................................................................................................... 49
Cable-connection-warning ....................................................................................................... 50
Vacuum-leak-warning .............................................................................................................. 50
Vacuum-pressure-abnormal .................................................................................................... 51
Vacuum-not-reached-warning ................................................................................................. 51
stayfreshfreezedry.com
4
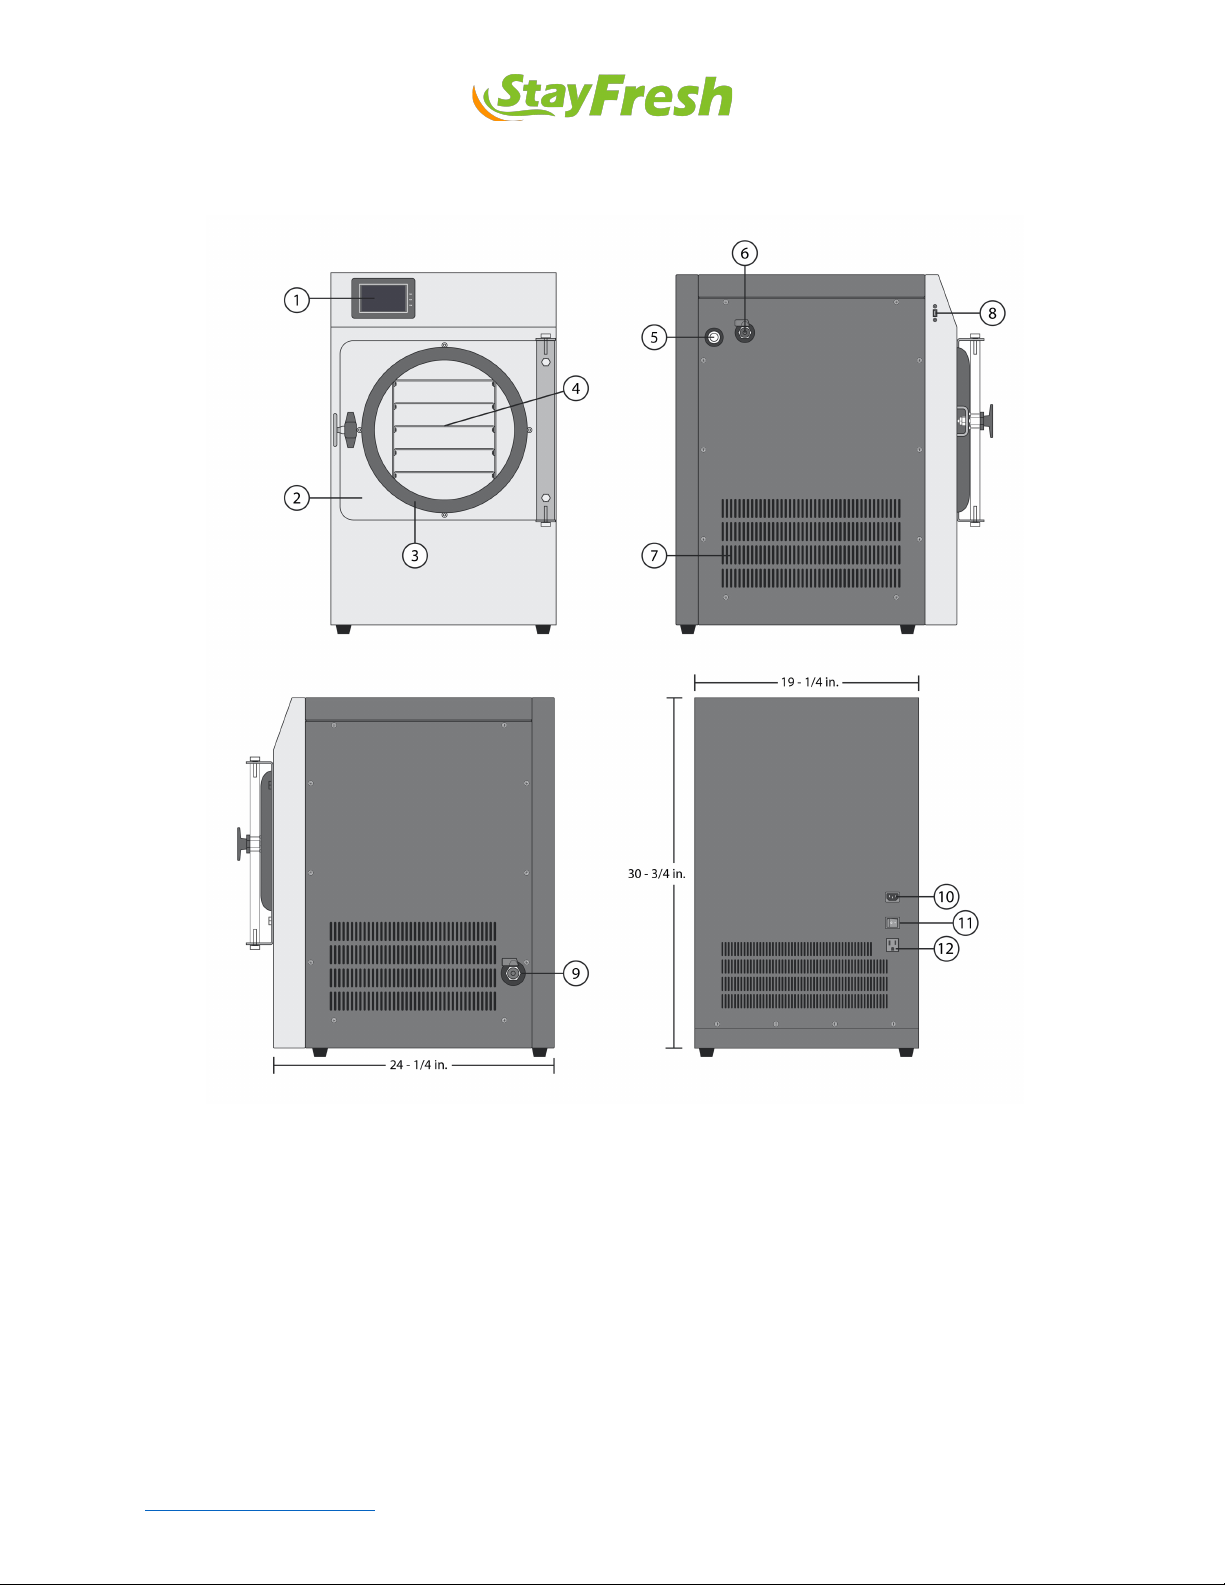
1.
Specifications
○
1 Touch screen controller
○
7 Ventilation grille
○
2 Acrylic door
○
8 USB port
○
3 Door gasket
○
9 Drain valve
○
4 Tray shelf
○
10 Main power inlet
○
5 Vacuum port
○
11 Main power switch
○
6 Vacuum valve
○
12 Vacuum pump power outlet
stayfreshfreezedry.com
5
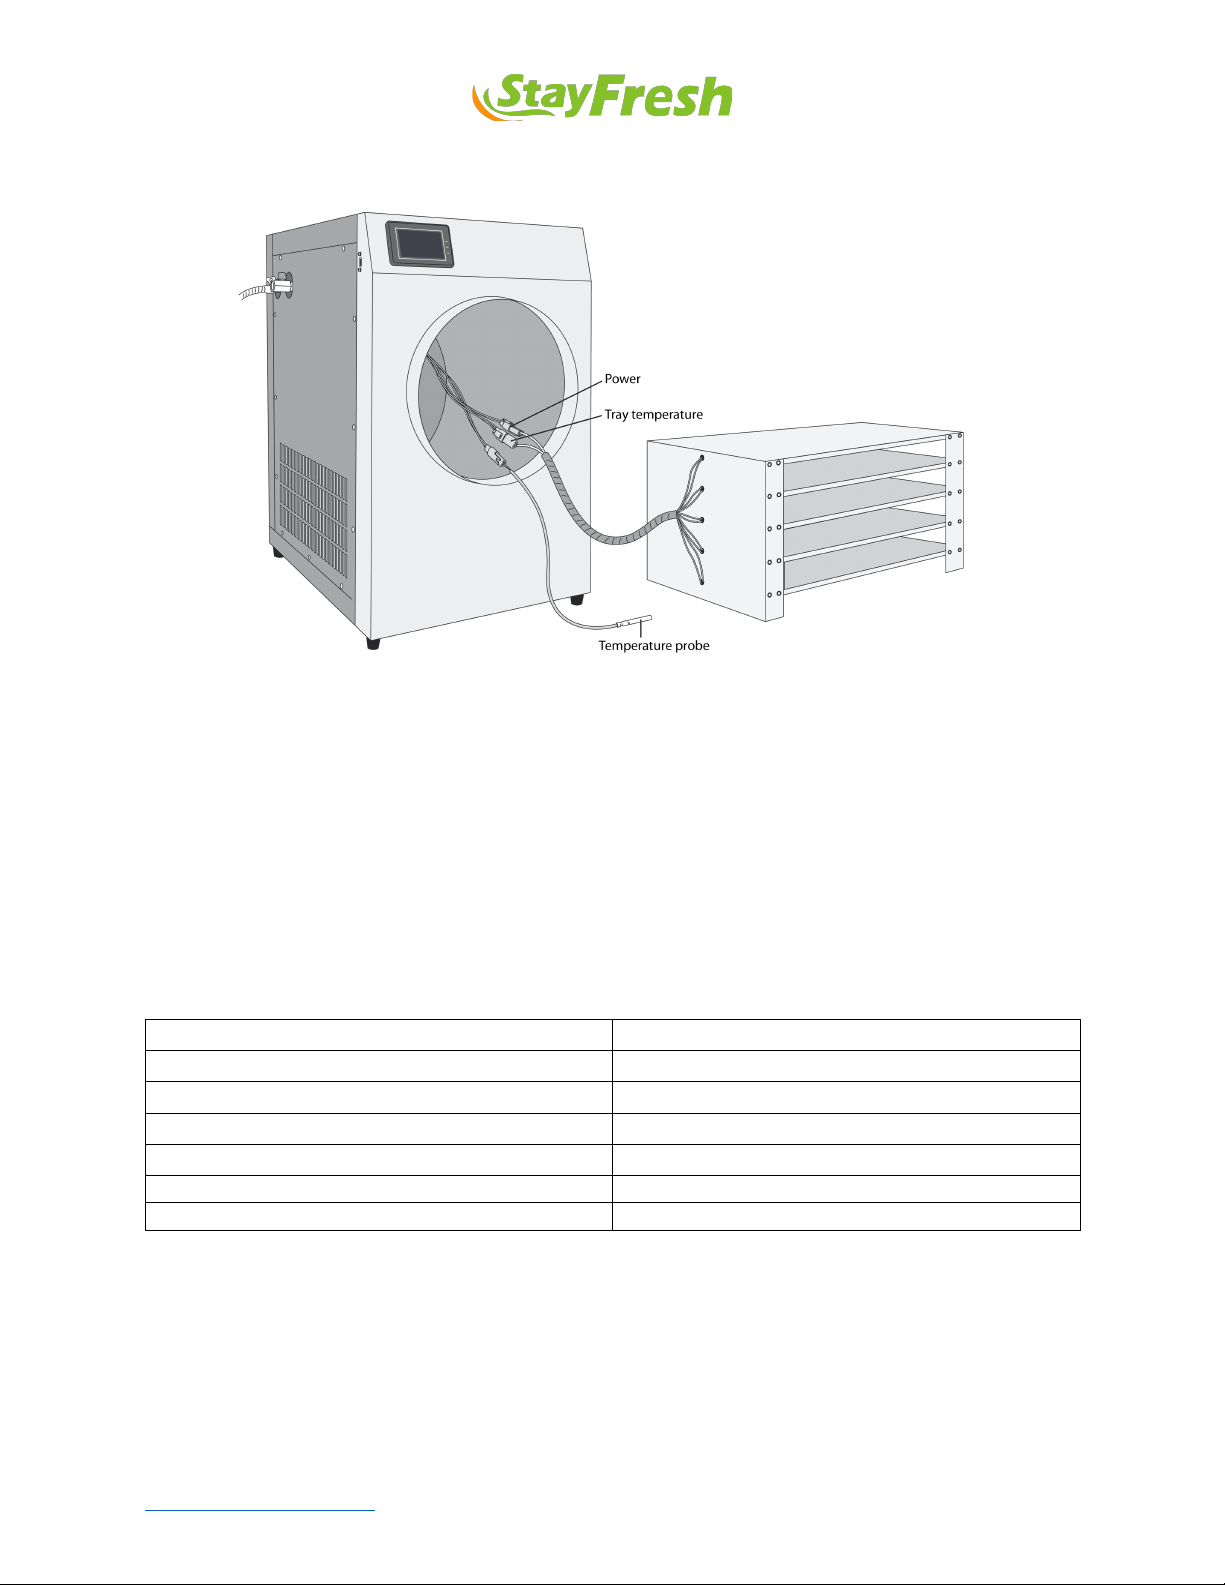
Inside the chamber, there are three cables: one for power, one for shelf temperature, and one
for the temperature probe. The temperature sensors are linked by a three-pin connector, while
the power is connected using a two-pin connector. The cables for power and tray temperature
are bundled together for convenience.
Avoid unplugging the power and sensor cables unless necessary to prevent damage.
Table 1 Technical specifications
Number of trays
4
Tray size
W 8 in. x D 20 in. x H 0.75 in.
Cold trap temperature
-40F
Rated current
15A
Power
115v/60Hz
Weight
165 lbs.
Dimension
W 20 in. x D 26 in. x H 31 in.
stayfreshfreezedry.com
6
2.
Installation Guide
The freeze dryer is designed for indoor use only and performs best in a temperature-controlled
room with temperatures ranging from 60F to 75F. Avoid using the freeze dryer in rooms where
the temperature exceeds 80F. Proper ventilation is necessary when operating the freeze dryer.
To ensure proper operation and safety, keep at least three inches of clearance between the
back of the freeze dryer and the wall, and at least six inches of clearance between the freeze
dryer and the walls on the left and right sides.
The freeze dryer requires a dedicated circuit and a 110V 15-amp outlet that must be within five
feet of the machine. Please ensure that the outlet is in good working condition and meets
electrical requirements before connecting the freeze dryer.
Installation steps:
Step 1.
Unpack the delivery box and ensure that all items on the packing list are present. Position the
freeze dryer in the appropriate location as described in the manual.
Step 2.
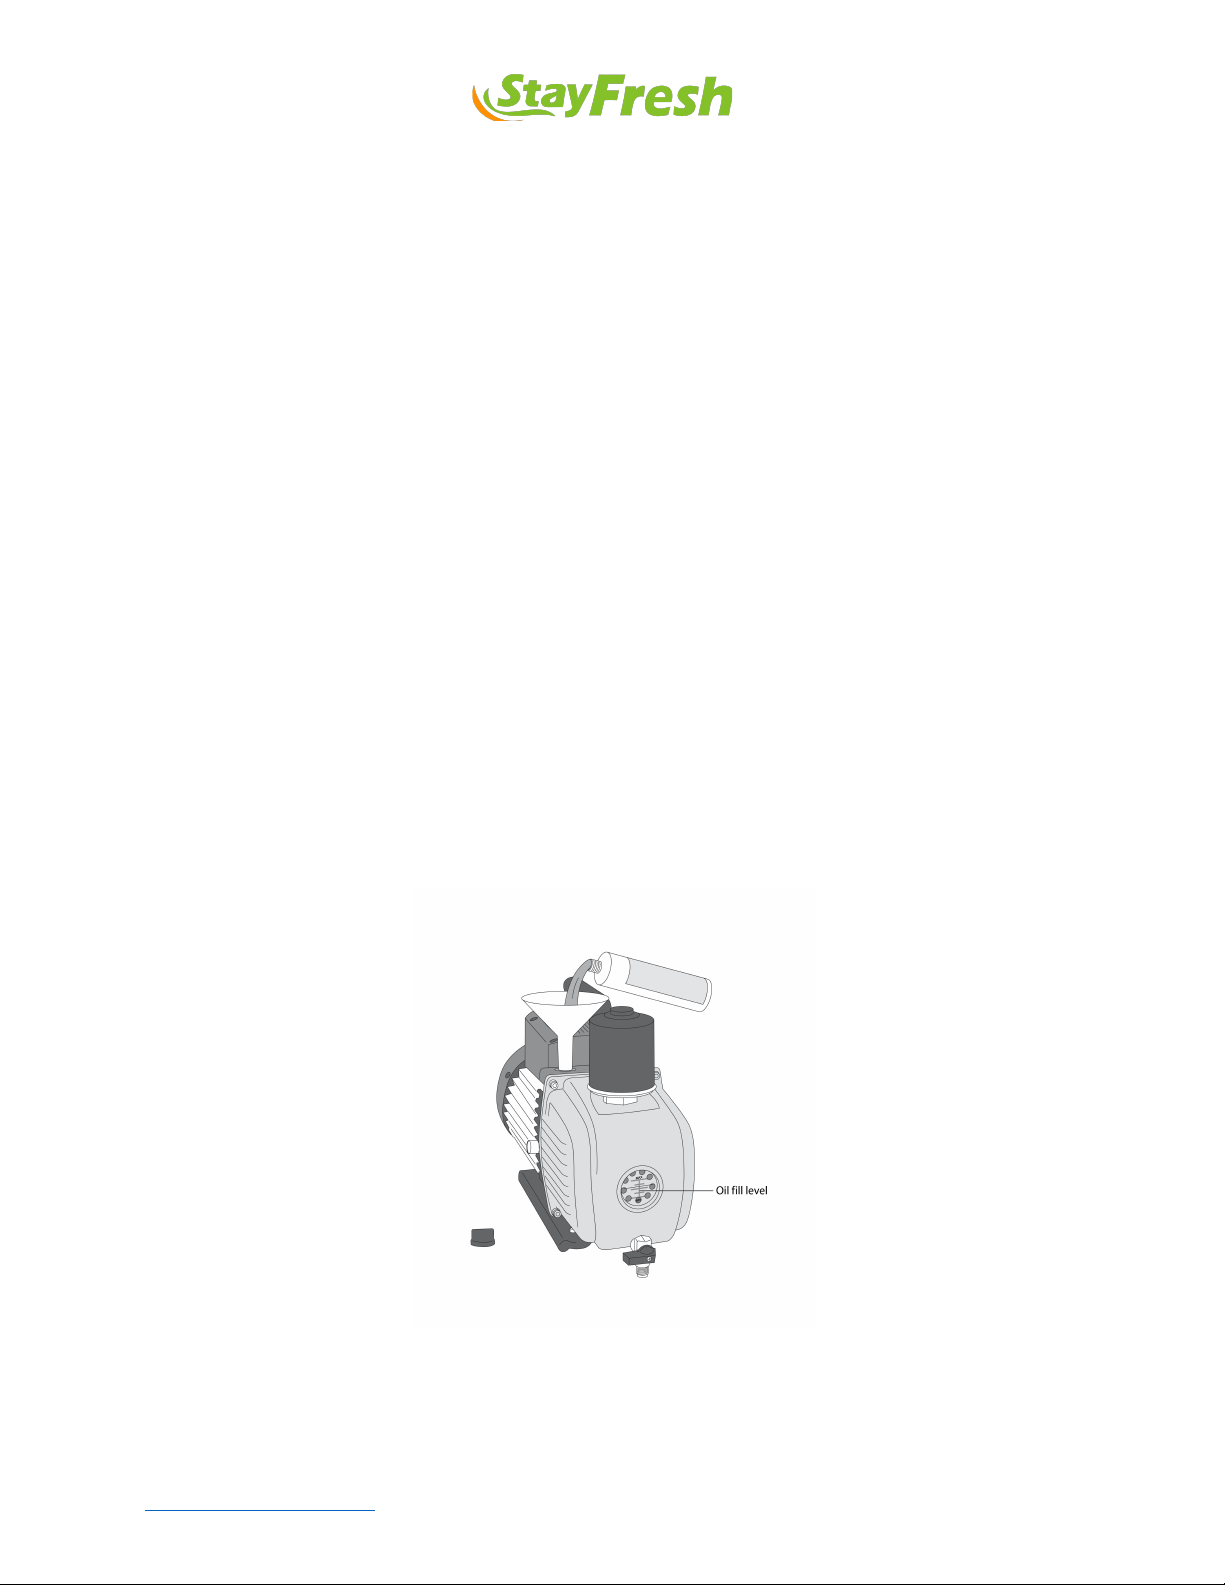
Remove the oil cap and use the funnel to fill the vacuum pump with oil until the oil level in the
sight glass reaches the middle line. Take note that the oil level will not immediately change
when pouring in the oil, but it will rise quickly once it starts to rise. After filling, replace the oil
cap and position the vacuum pump to the left side of the freeze dryer.

stayfreshfreezedry.com
7
Step 3.
Connect the power cord to the wall outlet and the other end to the back of the freeze dryer (○
10
main power inlet on page 4). Plug the vacuum pump cord to the back of the freeze dryer (○
12
vacuum pump power outlet on page 4). Turn on the vacuum pump switch on the back of the
vacuum pump. Refer to the following for the generic schematic of ON/OFF statuses for the
switch.
Step 4.
Connect one end of the PVC vacuum hose to the freeze dryer (○
5vacuum port on page 4) and
the other end to the vacuum pump. Tighten the connection using the hose clamps.
stayfreshfreezedry.com
8
Step 5.
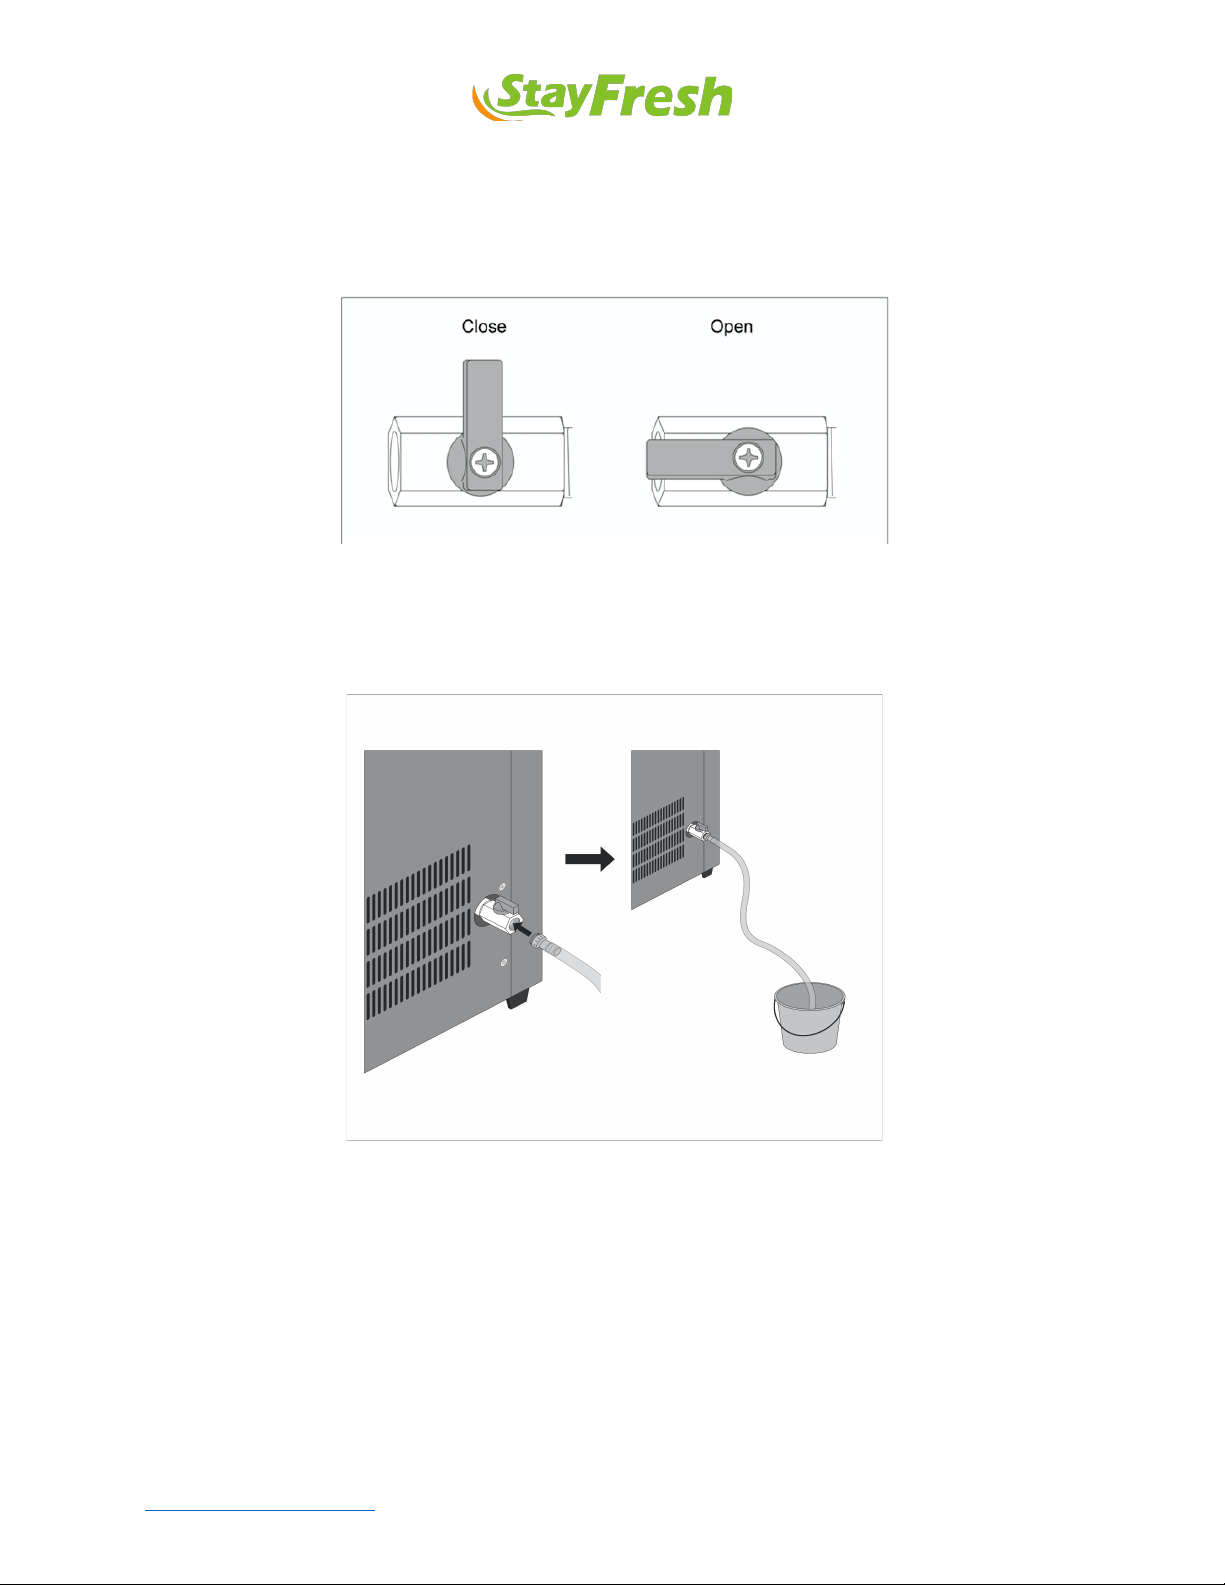
Close the vacuum valve (○
6vacuum valve on page 4) and the drain valve (drain valve on page 4).
Refer to the following for the Open/Close statuses for the valve.
Step 6.
Connect the drain hose to the drain valve (○
9drain valve on page 4). Place the other end of the
hose in a water bucket (not provided).
Step 7.
Turn on the power switch at the back of the freeze dryer (○
11 main power switch on page 4). The
touch screen should light up and display the main menu. Assign a name to your freeze dryer by
pressing the top left corner of the touch screen.
Allow the freeze dryer to settle for 24 hours before using it for the first time. Refer to Section 5
of the manual for instructions on how to run the automated freeze-drying process.

stayfreshfreezedry.com
9
3.
Freeze-Drying Process
The freeze-drying process is divided into three stages: freezing, main drying, and final drying.
Freezing
The freezing stage duration varies depending on the food's type, weight, and thickness, taking
anywhere from 6-15 hours for unfrozen food and 2-4 hours for frozen food. During this stage,
the cold trap temperature drops gradually to around -40F, and only the compressor runs. Frost
may be visible on the interior chamber surface, and condensation may form on the acrylic door
and gasket.
Main drying
The main drying stage begins automatically when the preset freezing time, shelf temperature,
or food temperature is reached, as explained in the Auto-freeze-dry-setting in Section 10.
Alternatively, you can start the drying process by pressing the 'Drying' button. The vacuum
pump operates for a set duration at the beginning of this stage, and the chamber pressure
drops to or below 550mTorr. The heater is then turned on to maintain the pressure at the initial
target pressure, and the patented freeze-drying algorithm is initiated.
During the constant-pressure phase, the pressure remains constant, while the shelf
temperature gradually increases. Once the target shelf temperature is reached, the algorithm
enters the constant-temperature phase, during which the shelf temperature is maintained at a
constant level, and the vacuum pressure gradually decreases. This cycle repeats until the
maximum shelf temperature is reached.
The compressor, vacuum pump, and heater are all running continuously during the main drying
stage, and ice rings may appear on the chamber's interior surface.
Final drying
The final drying stage begins when the maximum temperature is reached or when a preset food
temperature measured by the temperature probe is reached (if the probe is in use). These
indicators suggest that most of the moisture has been extracted from the food. The default
final dry duration is seven hours. The drying algorithm adjusts the final dry time automatically
when the temperature probe is in use. Extra final dry hours can be added manually if necessary.
During the final drying stage, the compressor, vacuum pump, and heater operate similarly to
the main drying stage. When the drying is complete, the heater and vacuum pump are turned
off, and the compressor continues running to keep the chamber cool.

stayfreshfreezedry.com
10
4.
Food Preparation
To prepare food for freeze-drying:
1. Wash the food thoroughly to remove any dirt or debris. Freeze drying won’t kill bacteria
in the food.
2. Cut the food into small pieces if possible, for better drying results. For solid foods, cut
them into pieces that are less than half an inch thick.
3. For liquid or semi-liquid foods, pour them evenly onto the trays.
4. Ensure that foods of similar type and thickness are on each tray for even drying.
5. Avoid mixing frozen and unfrozen foods in the same batch.
6. Foods with high moisture levels should be in one batch for efficiency reasons, as the
drying time will depend on the moisture level of the foods in the same batch.
7. Note that oily foods may not be suitable for freeze-drying, as the process only removes
water from the food and the oil may go rancid after packaging in a mylar bag.

stayfreshfreezedry.com
11
5.
Automated Freeze-Drying
Press the ‘FreezeDrying’ button on the main menu to enter the automated freeze-drying mode.
The automated freeze-drying process may vary slightly depending on whether the food is pre-
frozen or if you're using the temperature probe.
For a more detailed description of the automated freeze-drying process, refer to the following
sections. Each section includes steps that require your action and information enclosed in
boxes. Touch screen names may be underscored in each step, and you can find further details
in Section 10. Touch Screen Info.

stayfreshfreezedry.com
12
Freeze-drying unfrozen food without the temperature probe
Step 1.
Inspect and make sure there is no sign of ice or water in the bottom of the chamber and in the
groove of the door gasket.
Step 2.
Load trays with unfrozen food, insert the trays onto the shelves, and close the acrylic door.
Step 3.
Close the vacuum valve. Remove any residual water in the drain pipe, using the brush (refer to
Section 6 for more details) and close the drain valve.
Step 4.
Press the ‘FreezeDrying’ button on the touch screen to go to the Auto-freezedry-start
screen. Then press the ‘Settings’ button to go to the Auto-freezedry-setting screen. Adjust
trigger conditions that automatically triggers drying to begin. Use the default setting for
beginners. Press the ‘Back’ button to return to the Auto-freezedry-start screen.
Step 5.
Press the ‘Start’ button to go to the Auto-freezedry-freezing screen and the compressor will be
turned on.
Note that the ‘Drying’ button will be disabled for one minute after pressing the ‘start’
button. You can still adjust freezing drying parameters using the ‘Settings’ button on the
right bottom during the freezing stage.
Once the default trigger conditions are met or the ‘Drying’ button is pressed, the freeze
dryer will automatically start the drying process and transition to the Auto-freezedry-
maindry screen.
Upon completion of the main drying stage, the freeze dryer will proceed to the final dry
stage and switch to the Auto-freezedry-finaldry screen. During this stage, you have the
option to increase or decrease the final dry hours. For beginners, it is recommended to
use the default setting.
Step 6.
After the final dry stage is finished, the vacuum pump will stop and the motorized ball
valve will close automatically. The screen will switch to the Auto-freezedry-complete
screen and beep for 30 seconds. In case you're not around when the drying process is
finished, the trays might get excessively cold since the compressor will still be running. If
needed, use the 'Warm Tray' button to heat up the trays.

stayfreshfreezedry.com
13
When the final dry stage is completed, open the vacuum valve to normalize the pressure, then
open the acrylic door. Check if the food is completely dry on each tray.
All pieces of food should be warm immediately after drying is complete if the default
maximum shelf temperature is used. Press the ‘Back to Final Dry’ button to go to the
Auto-freezedry-finaldry-pause screen if more final dry hours are needed. Use the up
arrow to add extra final dry hours to enable the ‘Final Dry’ button. Then press the ‘Final
Dry’ button to restart the drying process.
If the food is completely dry, press ’Exit’ to stop the compressor, seal the freeze-dried food in
the bags as soon as possible. Otherwise, read section ‘What to do after drying is complete’ and
follow the steps.
Step 7.
Remove ice in the chamber. Read Section 6 for defrosting.
Step 8.
Change/filter vacuum pump oil if needed. Check section 9 for details.

stayfreshfreezedry.com
14
Freeze-drying unfrozen food with temperature probe
Step 1.
Inspect and make sure there is no sign of ice or water in the bottom of the chamber and in the
groove of the door gasket.
Step 2.
Load trays with unfrozen food, insert the trays onto the shelves.
If the food consists of solid pieces, pick the largest piece on the second tray (from top to
bottom), and insert the temperature probe into the center of the piece. Place the piece back on
the tray. If the food is liquid/semi-liquid, immerse the temperature probe in the food.
Close the acrylic door.
Step 3.
Close the vacuum valve. Remove any residual water in the drain pipe using the brush (refer to
Section 6 for more details) and close the drain valve.
Step 4.
Press the ‘FreezeDrying’ button on the touch screen to go to the Auto-freezedry-start
screen. Then press the ‘Probe in use’ button.
Press the ‘Settings’ button to go to the Auto-freezedry-setting screen. Adjust the trigger
conditions that automatically triggers drying to begin. Use the default setting for beginners.
Press the ‘Back’ button to return to the Auto-freezedry-start screen.
Step 5.
Press the ‘Start’ button on the Auto-freezedry-start screen to enter the freezing stage.
Note that the ‘Drying’ button will be disabled for one minute after pressing the ‘start’
button. You can still adjust freezing drying parameters using the ‘Settings’ button on the
right bottom during the freezing stage.
Once the default trigger conditions are met or the ‘Drying’ button is pressed, the freeze
dryer will automatically start the drying process and transition to the Auto-freezedry-
maindry screen.
Upon completion of the main drying stage, the freeze dryer will proceed to the final dry
stage and switch to the Auto-freezedry-finaldry screen. During this stage, you have the
option to increase or decrease the final dry hours. For beginners, it is recommended to use
the default setting.

stayfreshfreezedry.com
15
Step 6.
After the final dry stage is finished, the vacuum pump will stop and the motorized ball
valve will close automatically. The screen will switch to the Auto-freezedry-complete
screen and beep for 30 seconds. In case you're not around when the drying process is
finished, the trays might get excessively cold since the compressor will still be running. If
needed, use the 'Warm Tray' button to heat up the trays.
When the final dry stage is completed, open the vacuum valve to normalize the pressure in the
chamber, then open the acrylic door. Check if the food is completely dry on each tray.
All pieces of food should be warm if the default maximum shelf temperature is used. Press
the ‘Back to Final Dry’ button to go to the Auto-freezedry-finaldry-pause screen if more
final dry hours are needed. Use the up arrow to add extra final dry hours to enable the
‘Final Dry’ button. Then press the ‘Final Dry’ button to restart the drying process.
If the food is completely dry, press ’Exit’ to stop the compressor, seal the freeze-dried food in
the bags as soon as possible. Otherwise, read section ‘What to do after drying is complete’ and
follow the steps.
Step 7.
Remove ice in the chamber. Read Section 6 for defrosting.
Step 8.
Change/filter vacuum pump oil if needed. Check section 9 for details.

stayfreshfreezedry.com
16
Freeze-drying frozen food without temperature probe
Step 1.
Pre-freeze the food on the trays in a deep freezer for over 24 hours to make sure the food is
completely frozen.
Step 2.
Inspect and make sure there is no sign of ice or water in the bottom of the chamber and in the
groove of the door gasket.
Step 3.
Close the vacuum valve. Remove any residual water in the drain pipe using the brush (refer to
Section 6 for more details) and close the drain valve.
Step 4.
Press the ‘FreezeDrying’ button on the touch screen to go to the Auto-freezedry-start
screen. Then press the ‘Frozen Food’ button to let the control algorithm know the food is
frozen.
Press the ‘Settings’ button to go to the Auto-freezedry-setting screen. Adjust the trigger
conditions that automatically triggers drying to begin. Use the default setting for beginners.
Press the ‘Back’ button to return to the Auto-freezedry-start screen.
Step 5.
Press the ‘Start’ button on the Auto-freezedry-start screen to enter the freezing stage.
The screen will jump to Auto-freezedry-freezing and the compressor will be turned on.
Note that the ‘Drying’ button will be disabled for one minute. You can still adjust freezing
drying parameters using the ‘Settings’ button on the right bottom during the freezing stage.
Step 6.
After allowing the freeze dryer to run for 1-2 hours, check the shelf temperature. Once it
reaches below -5F, proceed to load the freeze dryer with trays containing frozen food. Close the
acrylic door and then press the ‘Food in Chamber’ button.
The freeze dryer will start the drying process and jump to the Auto-freezedry-maindry
screen when any of the default trigger conditions are met or the ‘Drying’ button is
pressed.
When the main drying stage is completed, the freeze dryer will enter the final dry stage
and the screen jumps to Auto-freezedry-finaldry. You can increase or decrease the final
dry hours during the final dry stage.
Step 7.

stayfreshfreezedry.com
17
After the final dry stage is finished, the vacuum pump will stop and the motorized ball
valve will close automatically. The screen will switch to the Auto-freezedry-complete
screen and beep for 30 seconds. In case you're not around when the drying process is
finished, the trays might get excessively cold since the compressor will still be running. If
needed, use the 'Warm Tray' button to heat up the trays.
When the final dry stage is completed, open the vacuum valve to normalize the pressure, then
open the acrylic door. Check if the food is completely dry on each tray.
All pieces of food should be warm if the default maximum shelf temperature is used. Press
the ‘Back to Final Dry’ button to go to the Auto-freezedry-finaldry-pause screen if more
final dry hours are needed. Use the up arrow to add extra final dry hours to enable the
‘Final Dry’ button. Then press the ‘Final Dry’ button to restart the drying process.
If the food is completely dry, press ’Exit’ to stop the compressor, seal the freeze-dried food in
the bags as soon as possible. Otherwise, read section ‘What to do after drying is complete’ and
follow the steps.
Step 8.
Remove ice in the chamber. Read Section 6 for defrosting.
Step 9.
Change/filter vacuum pump oil if needed. Check section 9 for details.

stayfreshfreezedry.com
18
Freeze-drying frozen food with temperature probe
Step 1.
Disconnect the temperature probe in the chamber.
If the food is of solid pieces, pick the largest piece and insert the temperature probe into the
center of the piece. Place the piece back on the tray. If the food is liquid/semi-liquid, immerse
the temperature probe in the food.
Pre-freeze the food on the trays with the temperature probe in a deep freezer for over 24 hours
to make sure the food is completely frozen.
Step 2.
Inspect and make sure there is no sign of ice or water in the bottom of the chamber and in the
groove of the door gasket.
Step 3.
Close the vacuum valve. Remove any residual water in the drain pipe using the brush (refer to
Section 6 for more details) and close the drain valve.
Step 4.
Press the ‘FreezeDrying’ button on the touch screen to go to the Auto-freezedry-start
screen. Then press the ‘Probe in Use’ button and the ‘Frozen Food’ button to let the controller
know the food is frozen and the temperature probe is being used.
Press the ‘Settings’ button to go to the Auto-freezedry-setting screen. Adjust the trigger
conditions that automatically triggers drying to begin. Use the default setting for beginners.
Press the ‘Back’ button to return to the Auto-freezedry-start screen.
Step 5.
Press the ‘Start’ button on the Auto-freezedry-start screen to enter the freezing stage.
The screen will jump to Auto-freezedry-freezing and the compressor will be turned on.
Note that the ‘Drying’ button will be disabled for one minute. You can still adjust freeze-
drying parameters using the ‘Settings’ button on the right bottom during the freezing stage.
Step 6.
After allowing the freeze dryer to run for 1-2 hours, check the shelf temperature. Once it
reaches below -5F, proceed to load the freeze dryer with trays containing frozen food.
Reconnect the temperature probe in the chamber, ensuring that the female and male
connectors are clean and dry before connecting. Place the piece with the temperature probe on
the second tray from the top.
Close the acrylic door and then press the ‘Food in Chamber’ button.

stayfreshfreezedry.com
19
The freeze dryer will start the drying process and jump to the Auto-freezedry-maindry
screen when any of the default trigger conditions are met or the ‘Drying’ button is
pressed.
When the main drying stage is completed, the freeze dryer will enter the final dry stage
and the screen jumps to Auto-freezedry-finaldry. You can increase or decrease the final
dry hours during the final dry stage.
Step 7.
After the final dry stage is finished, the vacuum pump will stop and the motorized ball
valve will close automatically. The screen will switch to the Auto-freezedry-complete
screen and beep for 30 seconds. In case you're not around when the drying process is
finished, the trays might get excessively cold since the compressor will still be running. If
needed, use the 'Warm Tray' button to heat up the trays.
When the final dry stage is completed, open the vacuum valve to normalize the pressure in the
chamber, then open the acrylic door. Check if the food is completely dry on each tray.
All pieces of food should be warm if the default maximum shelf temperature is used. Press
the ‘Back to Final Dry’ button to go to the Auto-freezedry-finaldry-pause screen if more
final dry hours are needed. Use the up arrow to add extra final dry hours to enable the
‘Final Dry’ button. Then press the ‘Final Dry’ button to restart the drying process.
If the food is completely dry, press ’Exit’ to stop the compressor, seal the freeze-dried food in
the bags as soon as possible. Otherwise, read section ‘What to do after drying is complete’ and
follow the steps.
Step 8.
Remove ice in the chamber. Read Section 6 for defrosting.
Step 9.
Change/filter vacuum pump oil if needed. Check section 9 for details.

stayfreshfreezedry.com
20
Freeze-drying candies
Step 1.
Inspect and make sure there is no sign of ice or water in the chamber, shelving unit, and in the
groove of the door gasket.
Step 2.
Load trays with candies, insert the trays onto the shelves, and close the acrylic door.
Step 3.
Close the vacuum valve. Remove any residual water in the drain pipe, using the brush (refer to
Section 6 for more details) and close the drain valve.
Step 4.
Press the ‘FreezeDrying’ button on the touch screen to go to the Auto-freezedry-start
screen. Then press the ‘Candy’ button go to the setting screen. Adjust max shelf temperature
and final dry hours if necessary.
Step 5.
Press the ‘Start’ button to go to the Auto-freezedry-freezing screen and the compressor will be
turned on.
By default, the pump will start after 15 mins of compressor running, and the heater will
be activated after 15 mins of pump running. Note that the ‘Drying’ button will be disabled
for one minute after pressing the ‘start’ button.
Upon completion of the main drying stage, the freeze dryer will proceed to the final dry
stage and switch to the Auto-freezedry-finaldry screen. During this stage, you have the
option to increase or decrease the final dry hours. For beginners, it is recommended to
use the default setting.
Step 6.
After the final dry stage is finished, the vacuum pump will stop and the motorized ball
valve will close automatically. The screen will switch to the Auto-freezedry-complete
screen and beep for 30 seconds. In case you're not around when the drying process is
finished, the trays might get excessively cold since the compressor will still be running. If
needed, use the 'Warm Tray' button to heat up the trays.
When the final dry stage is completed, open the vacuum valve to normalize the pressure, then
open the acrylic door. Press the ‘Back to Final Dry’ button to go to the Auto-freezedry-finaldry-
pause screen if you want more final dry hours or if you want back-to-back batch runs. Use the
up arrow to add extra final dry hours to enable the ‘Final Dry’ button. Then press the ‘Final Dry’
button to restart the drying process.
Other manuals for 4H11560US
1
Table of contents
Other StayFresh Dryer manuals

Popular Dryer manuals by other brands


ffuuss
ffuuss eos user manual

KitchenAid
KitchenAid 53-3498 installation instructions

Schulthess
Schulthess Spirit topLine TW 8340 operating instructions

Whirlpool
Whirlpool LGR4624BW0 parts list

World Dryer
World Dryer AirMax D M5-972A manual

Alliance Laundry Systems
Alliance Laundry Systems ADEE9BSS user guide


