STC 552-010 User manual

INSTALLATION INSTRUCTIONS
1973-1975 BLAZER/JIMMY
PART #552-010
Thank you for purchasing Specialty’s Convertible Top for your vehicle. It has been designed
for great fit and long wear. Please read and follow, precisely, all installation instructions pro-
vided when installing top. Failure to do so may result in a poor fitting top and could place
occupants in a potentially hazardous situation.
TOOLS REQUIRED:
3/8” WRENCH 7/16” WRENCH
1/2” WRENCH #2 PHILLIPS SCREWDRIVER
1/8” DRILL BIT 5/32” DRILL BIT
3/8” DRILL BIT ELECTRIC DRILL
8’ TAPE MEASURE RUBBING ALCOHOL
INSTALLATION TIPS
Before you begin installing this top, here are a few tips to
make installation easier.
This top should be installed where the temperature
is above 72 degrees Fahrenheit. Below this temperature,
the top may contract making it difficult to install.
It is normal for a top to contract and wrinkle when
stored in the shipping carton. The top will relax and
wrinkles will disappear within a few days of installation as
fabric adjusts to shape of mounting hardware.
INSTALLATION PROCEDURES:
On page 3 of this instruction manual there is an assembly
drawing. Please refer to it for identification of parts and
assembly assistance. Also refer to page 5 to assure that all
parts are included in your kit.
Pg 1 552-010
Step 1. Body Aluminum. Place end of rear body alumi-
num (Item 1) even with rear of notch at tailgate opening. It
should also measure 1 3/4” from inside edge of body to the
inside edge of body aluminum. Mark and drill 1/8” holes
using body aluminum as a template. Secure to body with
#10 x 1/2” sheet metal screws (Item 2). Butt front body
aluminum (Item 3) next to rear body aluminum. Secure to
body using same method as above. See figure 1.
Figure 1

Pg 2 552-010
Figure 2
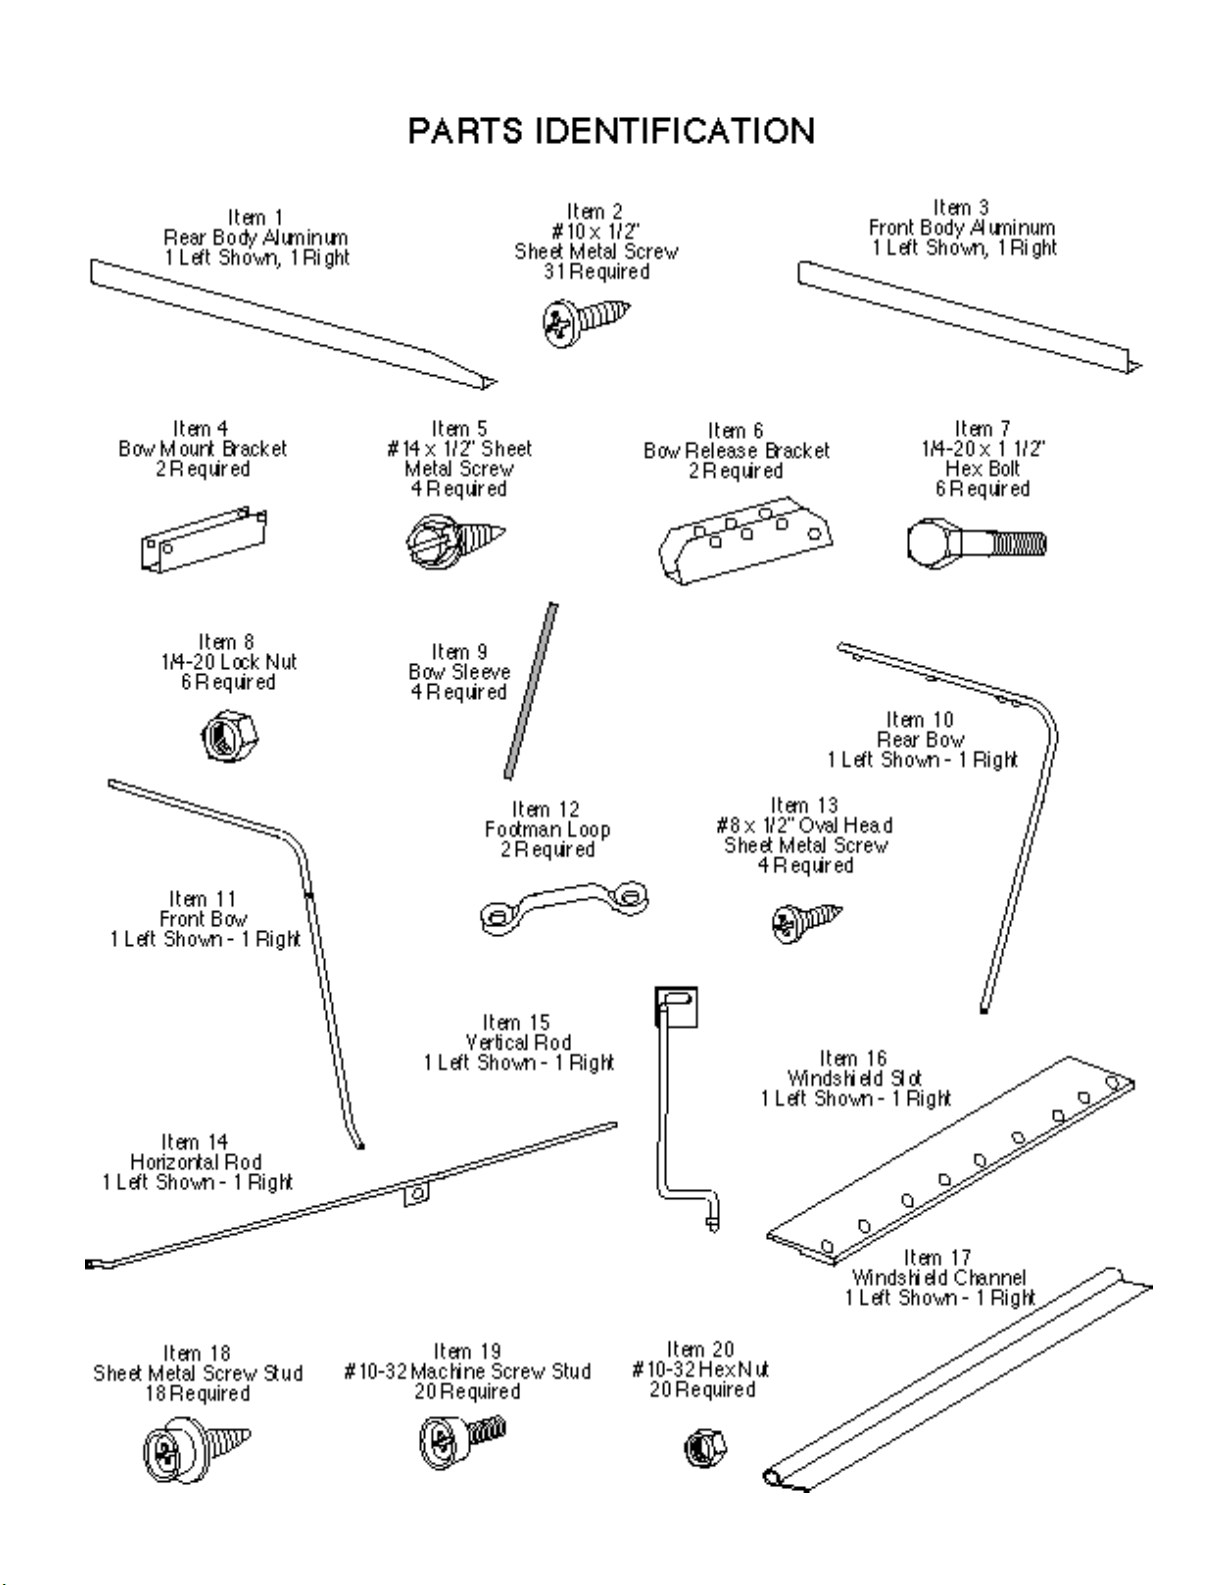
Step 3. Bows. Secure bow release bracket (Item 6) to bow
mount by placing 1/4-20 x 1 1/2" hex head bolt (Item 7)
through one side of bow mount, the bow release bracket
and the other side of bow mount. Secure with 1/4-20 lock
nut (Item 8). These items must pivot so do not over tighten.
Repeat for other side. Place bow sleeves (Item 9) over rear
bow halves (Item 10). Slide rear bow halves together.
Mount rear bow into center set of holes in bow release
bracket by placing 1/4-20 x 1 1/2" hex head bolt (Item 7)
through one side of release bracket, rear bow and then
through the other side of release bracket. Secure with
1/4-20 lock nut (Item 8). Again these items must pivot so do
not over tighten. Repeat for the other side. Slide bow
sleeves (Item 9) over front bow halves (Item 11). Slide front
bows halves together. Place front bow into front of bow
mount so that the large holes in bow are facing towards the
front of vehicle. Place 1/4-20 x 1 1/2” hex head bolt through
one side of bow mount, front bow and through other side of
bow mount. Secure with 1/4-20 lock nut. Once again these
items must pivot so do not over tighten. Repeat for the
other side. See figure 3.
Figure 3
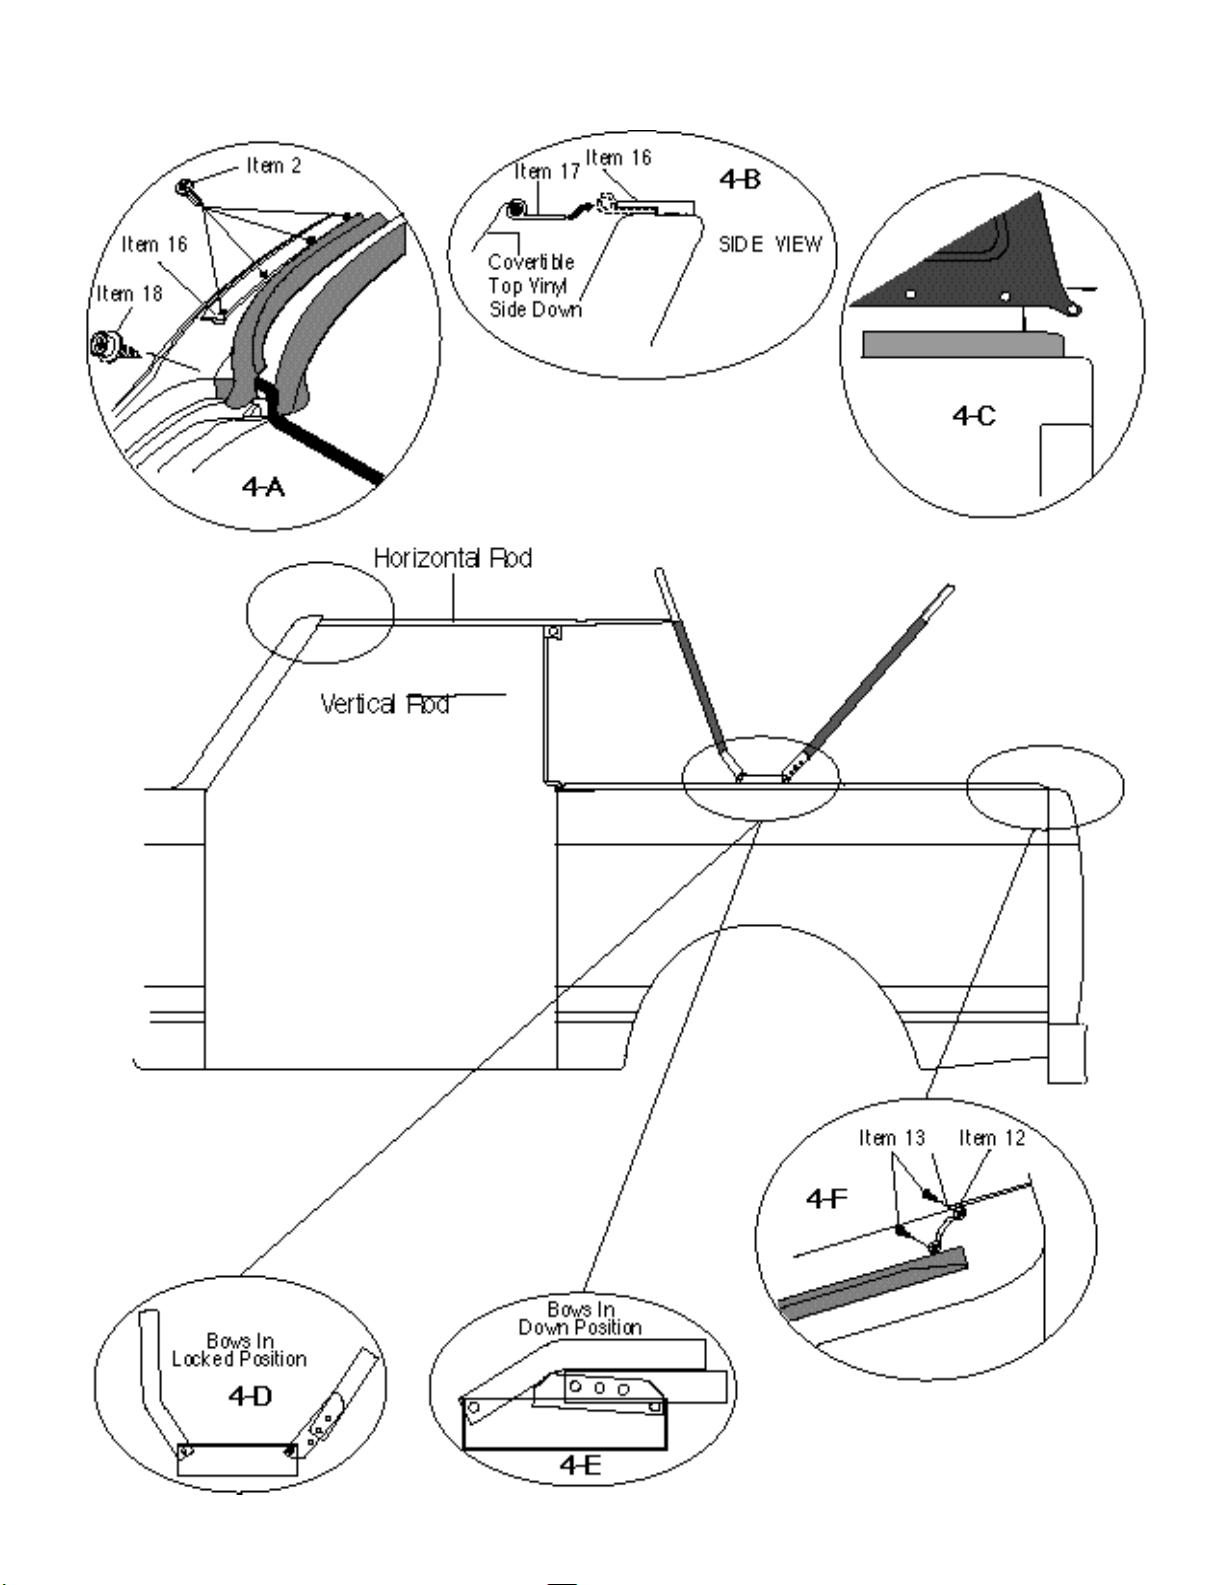
Step 4. Footman Loops. Place footman loop (Item 12) on
top of body at rear corner of vehicle. Mark and drill 1/8”
holes using footman loop as a template. Footman loop
should be approximately at a 45 degree angle to the inside
edge of body. Secure to body with #8 x 1/2” oval head
sheet metal screws (Item 13). See figure 4-F.
Step 5. Horizontal Rods. Pull the front bow forward and
place rear of the horizontal rod (Item 14) into large hole in
the front bow. The right horizontal rod is marked with a
white dot at the front of the rod. With the door closed and
the window rolled up, find the position of horizontal rod hole
at windshield frame. With the horizontal rod parallel with the
top of the door glass mark hole location at windshield
frame. Drill 3/8” hole. The horizontal rod should be approxi-
mately 1/4” above the top of the door glass. The rubber
seal at corners of windshield frame may require trimming to
drill holes for horizontal rods. See figure 4.
Step 6. Vertical Rods. Place vertical rods (Item 15) at rear
of door opening next to window glass with the door closed.
The right vertical rod is marked with a white dot at the
bottom of the rod. Mark and drill a 3/8” hole in the top of the
body at the point where the rod meets the top of body. This
position should be slightly forward of body aluminum and
1/4” from inside of window glass. The window glass should
not come into contact with the vertical rod. Remove wing
nut and washer from horizontal rod. Place vertical rod over
stud on horizontal rod and secure with washer and wing
nut. Repeat for the other side.
Step 7. Windshield Slot. Place windshield slot (Item 16)
on top of windshield frame centered from side to side and
just forward of rubber seal. The weather stripping on
windshield slot should be to the rear of vehicle and facing
down towards the windshield frame. Using windshield slot
as a template mark and drill 1/8” holes windshield frame.
Secure to windshield frame with #10 x 1/2” sheet metal
screws (Item 2). See figure 4-A & B.
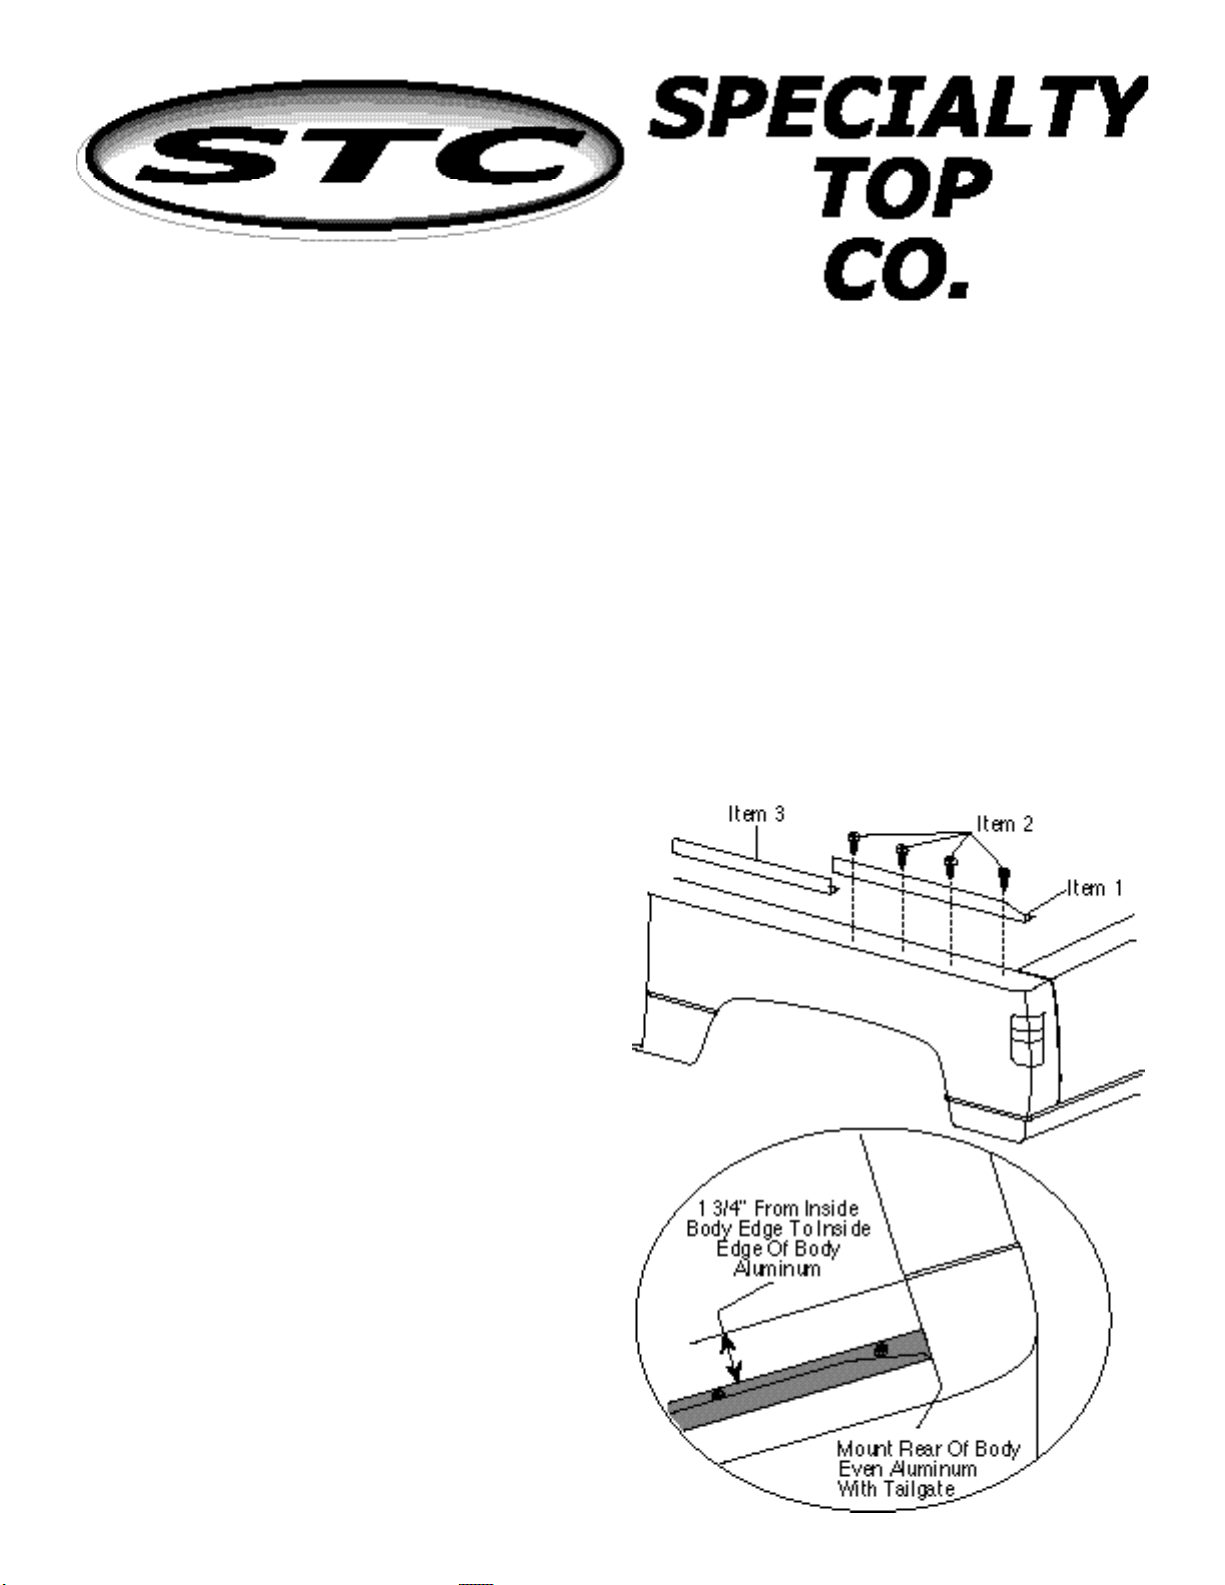
Step 2. Bow Mount. Place bow mount (Item 4) into notch
in body aluminum. Mark and drill two 5/32” holes in body
using bow mount as a template. Drill only one hole at the
front and one at the rear. Secure to body with #14 x 1/2”
sheet metal screws (Item 5). See figure 2.

Pg 3 552-010
Figure 4

Rolling up side curtains. Before rolling up panels,
clean windows with a mild non-detergent soap and water. It
is also advisable to place a soft cloth on your windows
prior to rolling them up to prevent scratching and
marring from retaining straps. To roll up the side panels,
you must unzip rear curtain and unlock the rear bow.
Unfasten snaps, back to front and roll up side panels.
Secure with retaining straps. Lock the rear bow and tighten
hold down straps. To roll up the rear curtain unlock rear
bow, unfasten snaps and roll up rear curtain. Lock rear bow
and secure with retaining straps.
Pg 4 552-010
Installing Vinyl Top. Place windshield channel (Item 17)
over sewn in rope at front of convertible top. See figure
4-B. Slip flat portion into gap between windshield frame and
windshield slot. Flip top up and over front and rear bows.
Snap rear bow flap on vinyl top to rear bow. Start
with the outside snaps on the bow flap first and work your
way to the center. The outer most snaps on the bow will not
be used on this application. Measure and mark a center
line on tailgate. With rear bow in the locked position (see
figure 4-D & 4-E) and zippers closed at the side panels, pull
center snap on rear curtain down to center line and mark
for snap stud. Drill a 1/8" hole at this point centered from
side to side on tailgate. Place sheet metal screw stud (Item
18) at this point. Snap rear curtain to stud just installed.
Continue installing sheet metal screw studs, alternating
from left to right of center using snaps on rear curtain as a
guide. Pull down and to the side on rear curtain when
locating studs. Snap top to each stud before installing next
stud. Install machine screw studs (Item 19) in body
aluminum starting at the rear. Pull side panel to the rear
and down to find location of stud. See figure 4-C. Mark and
drill 3/16" hole, install machine screw stud (Item 19) and
secure with #10-32 hex nut (Item 20). See figure 5. Repeat
for the other side. Install remaining studs on body alumi-
num using snaps on side panel as a guide. The bottom of
the side panel should touch the top edge of vehicle. One
sheet metal screw stud will need to be installed at the rear
corners of vehicle for the last snap on the side panel. Mark
and drill 1/8" hole. Install sheet metal screw stud. Snap top
to stud. Thread buckle strap through footman loop and
buckle. See figure 5. Tighten only enough to put slight
tension on vinyl top. These straps are to keep tension on
the top when the side panels and rear curtain are rolled up.
Wrap flaps around horizontal and vertical rods.
Press hook and loop together.
Pull forward and down on front of top at windshield
frame. Mark and drill 1/8” holes using vinyl top as a guide.
Install sheet metal screw stud at this point. Snap top to
stud. This holds the rain flap over door opening to shed
water away from your door. See figure 4-A. Repeat for the
other side.
FOLDING INSTRUCTIONS
Step 1. Unlock rear bow and unfasten snaps. Lift side
panel up and fold them on top of bows.
Step 2. Lift rear curtain up and fold on top of bows.
Remove horizontal and vertical rods.
Step 3. Fold front of top to the rear, over bows. Continue to
fold top to the rear of vehicle as bows come to rest on
tailgate.
Figure 5

Pg 5 552-010

Pg 6 552-010
CARE INSTRUCTIONS
Convertible tops and accessories require special care if you want to get the maximum usage and enjoyment from them.
The following recommendations, if followed carefully, can extend the life of your top or accessory.
1. Hand wash using a mild non-detergent soap such as Ivory. Use a nonabrasive cloth or sponge. Rinse thoroughly.
2. DO NOT wash in direct sunlight and avoid automatic car washes.
3. When your top is clean, we recommend using “303 Protectant” on both the vinyl top and windows. This product con-
tains a sunscreen that helps protect from the sun’s damaging rays. Stay away from products containing alcohol as it will
cause the fabric and windows to lose their elasticity, thus reducing the life of your top or accessory. If you are unable to
locate “303 Protectant”, please call 1-800-223-4303 for a distributor near you.
4. Direct sunlight and heat are the biggest enemies of the windows. Park in the shade whenever possible. If you must
park in the sunlight, rotate the direction that you park every few days so all windows get even exposure.
5. Our tops are designed so that you may roll up and/or store the rear curtain and side curtains. To prevent scratching of
the windows, be sure that windows are completely clean and free of dust particles. Even a little dirt will badly scratch the
windows. You may want to use a soft cloth when rolling up or storing your windows. Heat may build up on rolled up
windows, so be sure to unroll them frequently. If you roll up the windows at the beginning of summer and leave them, they
may be ruined by fall.
6. DO NOT open or roll up windows at temperatures below 45 degrees F. This could cause them to crack or break.
7. NEVER use ice scrapers or snow brushes on vinyl windows.
WARRANTY INFORMATION:
Specialty Top Co. manufacturing warrants to the original purchaser of any product it manufactures, that the product will be
free of defects in material or workmanship for a period of 90 days from date of purchase. Such obligations under this
warranty shall be limited to the repair or replacement, at Specialty’s discretion, of any assembly or parts which upon
examination by Specialty Top Co. proves to be defective. All defective items must be returned with proof of purchase to
Specialty Top Co. Manufacturing, 200 East 64th Avenue, Denver, Colorado 80221, freight prepaid. This warranty does not
cover damage resulting from abuse, misuse, alteration, accident or damage in transit. Specialty’s obligations under this
warranty are limited to the aforementioned repair or replacement of warranty defects for which the return authorization has
been received during the warranty period, and SPECIALTY TOP CO. SHALL NOT BE LIABLE FOR ANY INCIDENTAL
OR CONSEQUENTIAL DAMAGES ARISING FROM BREECH OF THIS OR ANY IMPLIED WARRANTY.
Some states do not allow the exclusion or limitation of incidental or consequential damages, so the above limitation or
exclusion may not apply to you. This warranty gives you specific legal rights, and you may also have other rights which
may vary from state to state.
If you need assistance or further information, you may contact Specialty Top Co. at 1-866-487-9944 between the hours of
8:00 AM and 5:00 PM, Monday through Friday, Mountain Standard Time.
Table of contents
Other STC Automobile Accessories manuals
Popular Automobile Accessories manuals by other brands

Linear Logic
Linear Logic scangauge2 quick start guide

Aries
Aries 35-2000 installation manual

Prorack
Prorack K567 Fitting instructions

SuperGlide
SuperGlide 3345 installation instructions

Audi
Audi e-tron Sportback (GE) 2020 installation instructions

Black Horse Off Road
Black Horse Off Road B046409-SP installation instructions