Steepletone DORSET User manual

MODEL: DORSET
DAB Digital Radio
It is important to read this Instruction Manual prior to using your new
product for the first time
Installation & Operating Instruction
1501803124!!!25;4:;41

2
Contents
3noitcudortnI
3tnatropmIsiytefaS
4noitamrofnIytefaS
Safety Considerations 4
4gninaelC
4lasopsiDyrettaB
4gnicivreS
5noi
tamrofnIlacirtcelE
Your DAB Digital Radio 5
Location of the Controls 6-8
6weiVtnorF
6weiVraeR
7lenaPlortnoC
8yalpsiD
What is Digital Radio?
01detratSgnitteG
Unpack your DAB Digital Radio 10
01xoBehtn
I
Positioning your DAB Digital Radio 10
Adjusting the Aerial 10
01senohpdaeHgnisU
01noitarepOyrettaB
01noitarepOsniaM
Using Your DAB Radio 11-15
Switching On for the First Time 11
Changing DAB Stations 11
Adjusting the Volume 11
11laiDenoT
Scanning for DAB Stations 11
Station Display Symbols 12
Storing DAB Presets 12
Selecting a Preset Station 12
21teseR
Changing the DAB Display Information 13
Using the Menu System 14
41redrOnoitatS
51enuTlaunaM
51noisreVerawtfoS
Dynamic Range Control 15
Using the AM/FM Radio 16
Switching to AM/FM Mode 16
61oidaRehtgninuT
61lai
DemuloV
61laiDenoT
71nIxuAgnisU
81gnitoohselbuorT
Technical Specification
US93EBC!Vtfs!Hvjef`w5/joee!!!3.4
9
19

3
Introduction
Safety is Important
To ensure your safety and the safety of others, please read the Safety precautions before you operate
this product.
Keep this information in a safe place for future reference.
Thank you for purchasing this DAB digital radio which has been designed and manufactured to give
you many years of trouble-free service.
You may already be familiar with using a similar product but please take the time to read these
instructions which have been written to ensure you get the very best from your purchase.
US93EBC!Vtfs!Hvjef`w5/joee!!!5.6

4
Safety Information
Ensure that you read all of the safety instructions before using this unit.
Safety Considerations
Cleaning
Battery Disposal
Servicing
Position the power cable and other connected cables so that they are not likely to be walked on, pinched or
where items can be placed on or against them.
Do not use the unit in humid or damp conditions.
Do not allow the unit to get wet.
The apparatus shall not be exposed to dripping or splashing and that no objects lled with lipuids,such as
vases, shall be placed on the apparatus.
Do not cover any of the ventilation slots on the unit, as this may cause overheating.
Do not place the unit in closed bookcases or racks without proper ventilation.
Never allow children to insert foreign objects into holes or slots on the unit.
No naked ame sources, such as lighted candles, should be placed on the unit.
Note: Ensure the mains socket is switched off or the 3 pin plug is removed from the socket
before detaching the cable from the rear of the radio.
Disconnect the unit from the mains supply before cleaning.
Do not use any liquids or aerosol cleaners, as this may damage the unit. Use a soft, dust free cloth.
Please ensure that used batteries (not included) are disposed of safely.
Do not dispose of batteries (not included) in re.
Contact local authorities for means of disposal.
There are no user serviceable parts in the unit. When servicing, refer to quali ed service personnel.
Consult your dealer if you are ever in doubt about the installation, operation, or safety of the DAB Digital
Radio.
1501803124!!!25;4:;48
5
Electrical Information
Your DAB Digital Radio
Make sure that the voltage of your electricity supply is the same as that indicated on the rating plate
on the rear of your DAB digital radio. It requires a 230 - 240V, AC ~ 50Hz mains supply. Do not use
any other supply.
If the plug has to be changed because it is not suitable for your socket, or becomes damaged, it should
be removed by Qualified Persons only.
Important
US93EBC!Vtfs!Hvjef`w5/joee!!!7.8
6
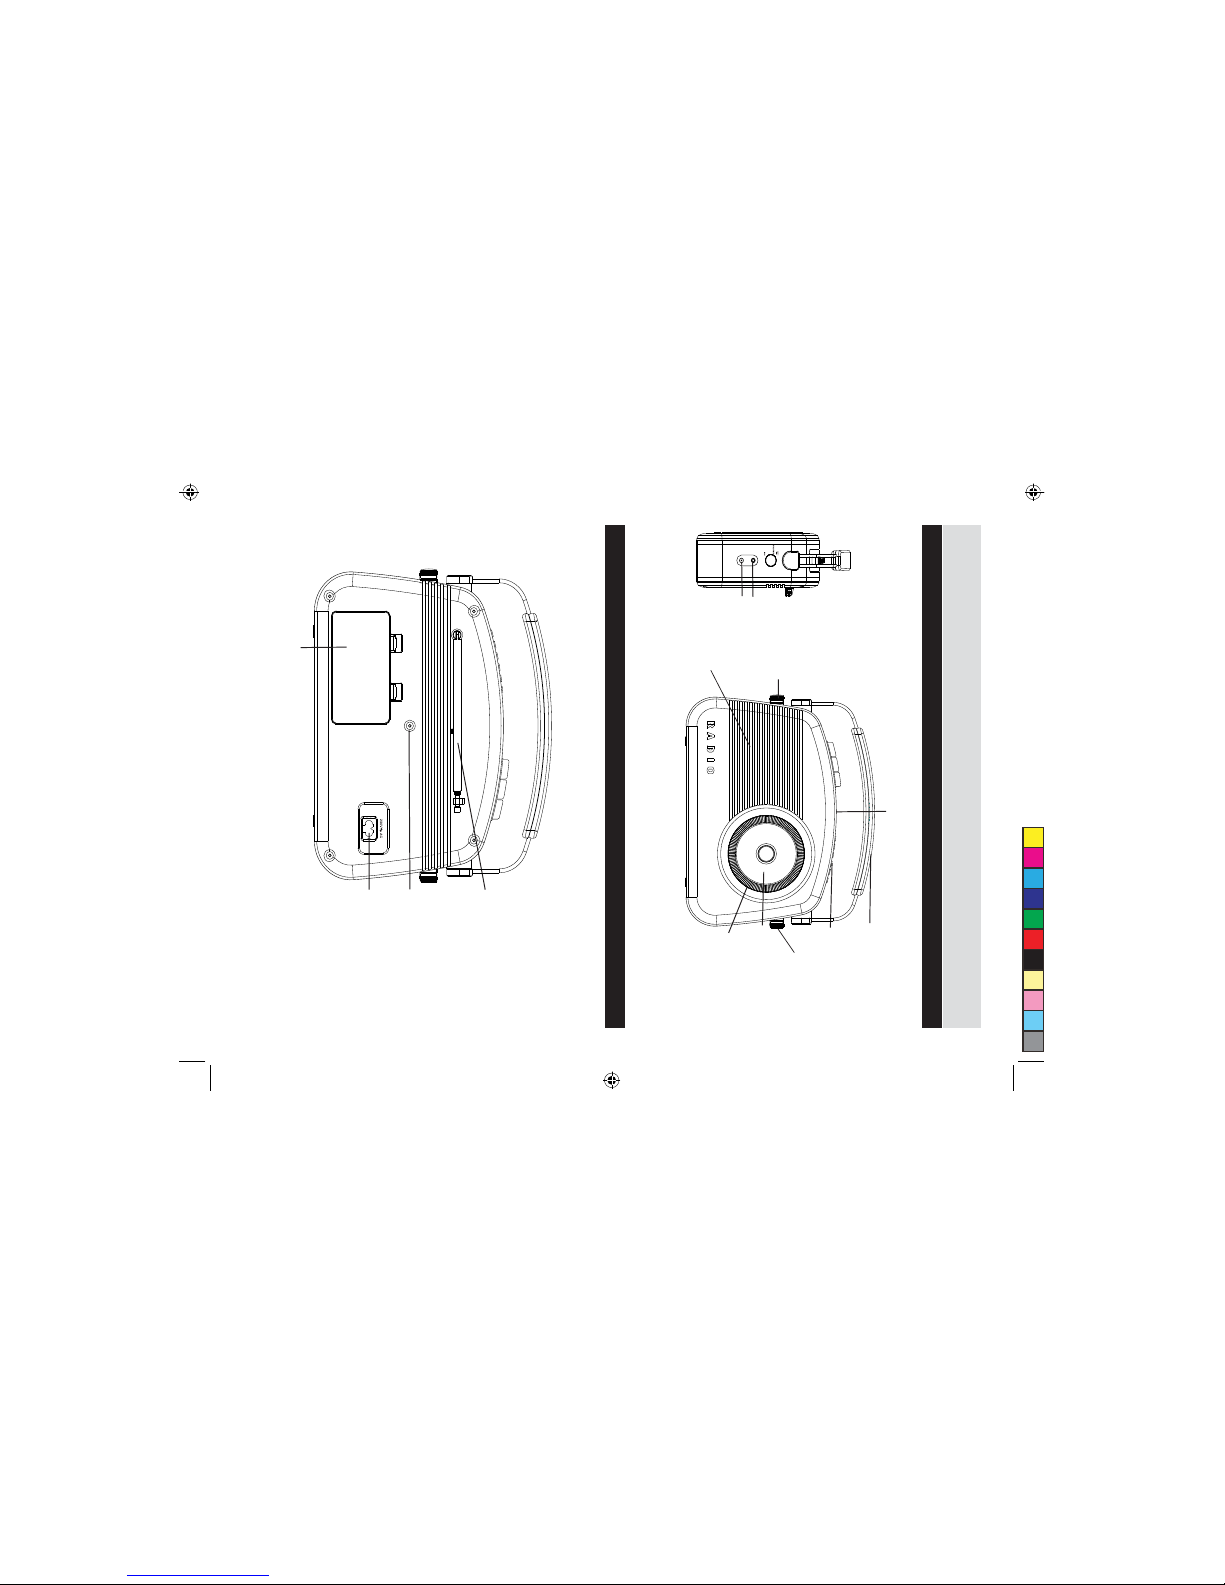
Location of the Controls
Front View
Rear View
Telescopic aerial
Back cover screw
Battery compartment
Mains power socket
Carrying Handle
Display
Control Panel
Tuning Control
Headphone Socket
AUX In Socket
Tuning Dial and
Pointer
Speaker
1501803124!!!25;4:;48
Tone Control
Volume / On / Off

7
Control Panel
Location of the Controls
1 Auto Button (Scan for DAB stations)
2 Menu button
3 Display option button
4 Shift button (for presets 6 to 10)
5 Select button
6 Up button
7 FM select button
8 AM select button
9 DAB select button
10 Preset 1 and 6
11 Preset 2 and 7
12 Preset 3 and 8
13 Preset 4 and 9
14 Preset 5 and 10
15 Down button
16 DAB LCD screen
17 Tone control
18 On/Off & Volume control
US93EBC!Vtfs!Hvjef`w5/joee!!!9.:
1
2
3
4
5
6
7 8 9 10 11 12 13 14
15
16
17 18

8
Display
Location of the Controls
1 Line 1
2 Line 2
3 Line 3
4 Time
5 Signal Strength Indicator
6 DAB Station Name
7 Dynamic Label Segment
1501803124!!!25;4:;4:

9
DAB (Digital Audio Broadcasting) is the next generation of radio.
DAB uses digital compression techniques to transform the source material, i.e. music and speech,
into digital code before it is transmitted. The code consists of electronic ‘ones and zeros’ called binary
digits or bits. The binary code is then multiplexed or grouped together to create a superior signal, when
compared with the older analogue system, with the following key bene ts:
Near CD quality sound.
Because DAB is binary coded, the receiving equipment is only expecting to receive a series of ones
and zeros, so any other interference is ignored, resulting in very high quality audio.
Interference free reception.
Analogue systems suffer from an effect called ‘multipath distortion’. This is caused because waves
do not behave in an orderly fashion, but bounce and reflect off buildings etc. DAB sees this as an
advantage and uses the direct and reflected signals to actually reinforce the end result.
No need to re-tune.
A single DAB frequency can be used to cover the whole of the UK, so solving many of the
problems experienced with the earlier analogue system. DAB can automatically tune-in all of the
available stations in your area.
What is Digital Radio?
US93EBC!Vtfs!Hvjef`w5/joee!!!21.22

10
Carefully remove your DAB Digital Radio from
the box. You may wish to store the packaging
for future use.
Inside the box you will nd:
DAB Digital Radio
Mains power supply lead
User Guide
If any of these items are missing please
contact the Customer Helpline.
Place your DAB Digital Radio on a at, stable
surface that is not subject to vibrations.
Avoid the following locations:
Where it is exposed to direct sunlight.
Where it is close to heat radiating sources.
Where the humidity is high and ventilation
is poor.
Where it is dusty.
The aerial should be fully extended to ensure
good reception in both DAB and FM radio
modes. The DAB digital radio has an internal
aerial for AM. It may be necessary to alter the
position of the DAB digital radio and/or the
aerial to achieve the best signal.
You will require headphones tted with
a 3.5mm diameter stereo plug and an
impedance of 8-32 ohms. The Headphone
socket is located on the right side of this unit,
see Front View on page 6.
Headphones are not supplied with this DAB
Digital Radio.
Unpack your DAB Digital Radio
Getting Started
Positioning your DAB Digital Radio
In the Box
Adjusting the Aerial
Before installing the batteries, ensure that
the DAB digital radio is switched off and
disconnected from the mains supply.
The battery compartment is located in the
bottom left corner. Insert 6 X “C” size batteries
or equivalent inside the batteries holder.
Finally, replace the cover.
If you are not going to use the DAB digital
radio for an extended period, please remove
the batteries to avoid damage.
Caution: Danger of explosion if batteries is
incorrectly replaced. Replace only with the
same or eqivalent type.
Your DAB/AM.FM Radio requires a mains
supply of 230 - 240V, AC ~ 50 Hz. Please
ensure that your mains supply is compatible
before use.
Connect the mains lead and switch the mains
supply socket on.
Disconnect the Power Cord from the mains
when not in use.
Using Headphones
Battery Operation
Mains Operation
1501803124!!!25;4:;52
Helpline: Lo- CALL 08457-585681
11
To increase the volume turn the volume control
to the right.
To decrease the volume turn the volume
control to the left.
The tone dial is used to alter the audio output
of the DAB digital radio between a high (treble)
and low (bass) frequency range.
Turn the tuning control right to enhance the
high frequency (treble) content of the
sound output.
Turn the tuning control left to enhance the
low frequency (bass) content of the sound
output.
Due to the nature of DAB radio, additional
stations and services regularly become
available. If you wish to see if there have been
any new DAB stations introduced in your area
you can initiate a search.
Press the AUTO button to activate a local
search for stations.
The DAB digital radio will automatically
begin to scan for stations. The screen shown
below is displayed. A bar graph indicates the
progress of the search and the number of
stations found as the scan progresses.
To switch on, turn the On/Off &Volume
control to the right. Press the DAB select
button. When DAB Mode is selected for the
rst time, the DISPLAY will illuminate and
‘ Welcome to DAB ’ will be displayed.
The DAB digital radio will automatically
begin to scan for stations. The screen shown
below is displayed. A bar graph indicates the
progress of the search.
When the scan is complete, the DAB digital
radio will select the rst available station -
stations are listed in numerical then alphabetic
order.
The station list is retained in memory so the
next time you switch the DAB digital radio on,
the station search does not take place.
If there are no stations found, check that
adequate DAB coverage exists in your area.
It is possible to perform a manual scan for
stations, see See Manual Tune on page 16.
Press the and buttons to scroll up and
down the list of available stations. The station
names will appear on line 3 of the display.
When the desired station is displayed, press
SELECT. The DAB digital radio will tune to
that station.
Switching On for the First Time
Using your DAB Radio
Changing DAB Stations
Adusting the Volume
Scanning for DAB Stations
Tone Dial
Progress bar
Signal Strength
Symbol
Progress bar
US93EBC!Vtfs!Hvjef`w5/joee!!!23.24
Number of
station found

12
Station Display Symbols
Using your DAB Radio
You may see some symbols displayed
alongside the station names. These are
de ned as follows:
?This is displayed before the station name if
the station is not available or not active.
>> Chevrons displayed after the station name
indicate that this is a primary station with
secondary services.
<< Chevrons displayed before the station
name indicate that this is a secondary station.
Note: Each preset button holds two presets.
For example, the 1/6 preset button, on the
DAB digital radio, holds preset positions one
and six.
You can preset up to 10 DAB stations for easy
access as follows:
1. Tune to the station you wish to preset.
2. Press and hold one of the preset buttons
(e.g. 1/6), located on the top of the DAB
digital radio. ‘Preset # saved’ will appear
on the second line of the display, where # is
the number of the preset position.
3. To save to preset positions 6-10, hold
down the SHIFT button then press and hold
the desired preset button. If you have already
saved a DAB station in that preset location, it
will be over-written with the new station.
To select presets 1-5, press the relevant preset
button.
To select presets 6-10, hold down the SHIFT
button and then press the relevant preset
button.
If you have not already stored a DAB station
in one of the presets, ‘ Empty preset ’
will be displayed. The display will revert to
the previously selected station after a few
seconds.
You can delete all of the preset stations and
return the DAB digital radio to its factory
settings as follows:
1. Press and hold the MENU button.
2. The display will show ‘ Press SELECT
to confirm reset...’
3. Press the SELECT button. The display
will show ‘ Welcome to DAB ’ before
performing a new scan for stations.
The DAB digital radio will be returned to its
factory condition.
If you do not wish to reset the DAB digital
radio, wait a few seconds without pressing any
buttons and the DAB digital radio will revert to
its previous operating condition.
Reset
Storing DAB Presets
Selecting a Preset Station
1501803124!!!25;4:;52
13
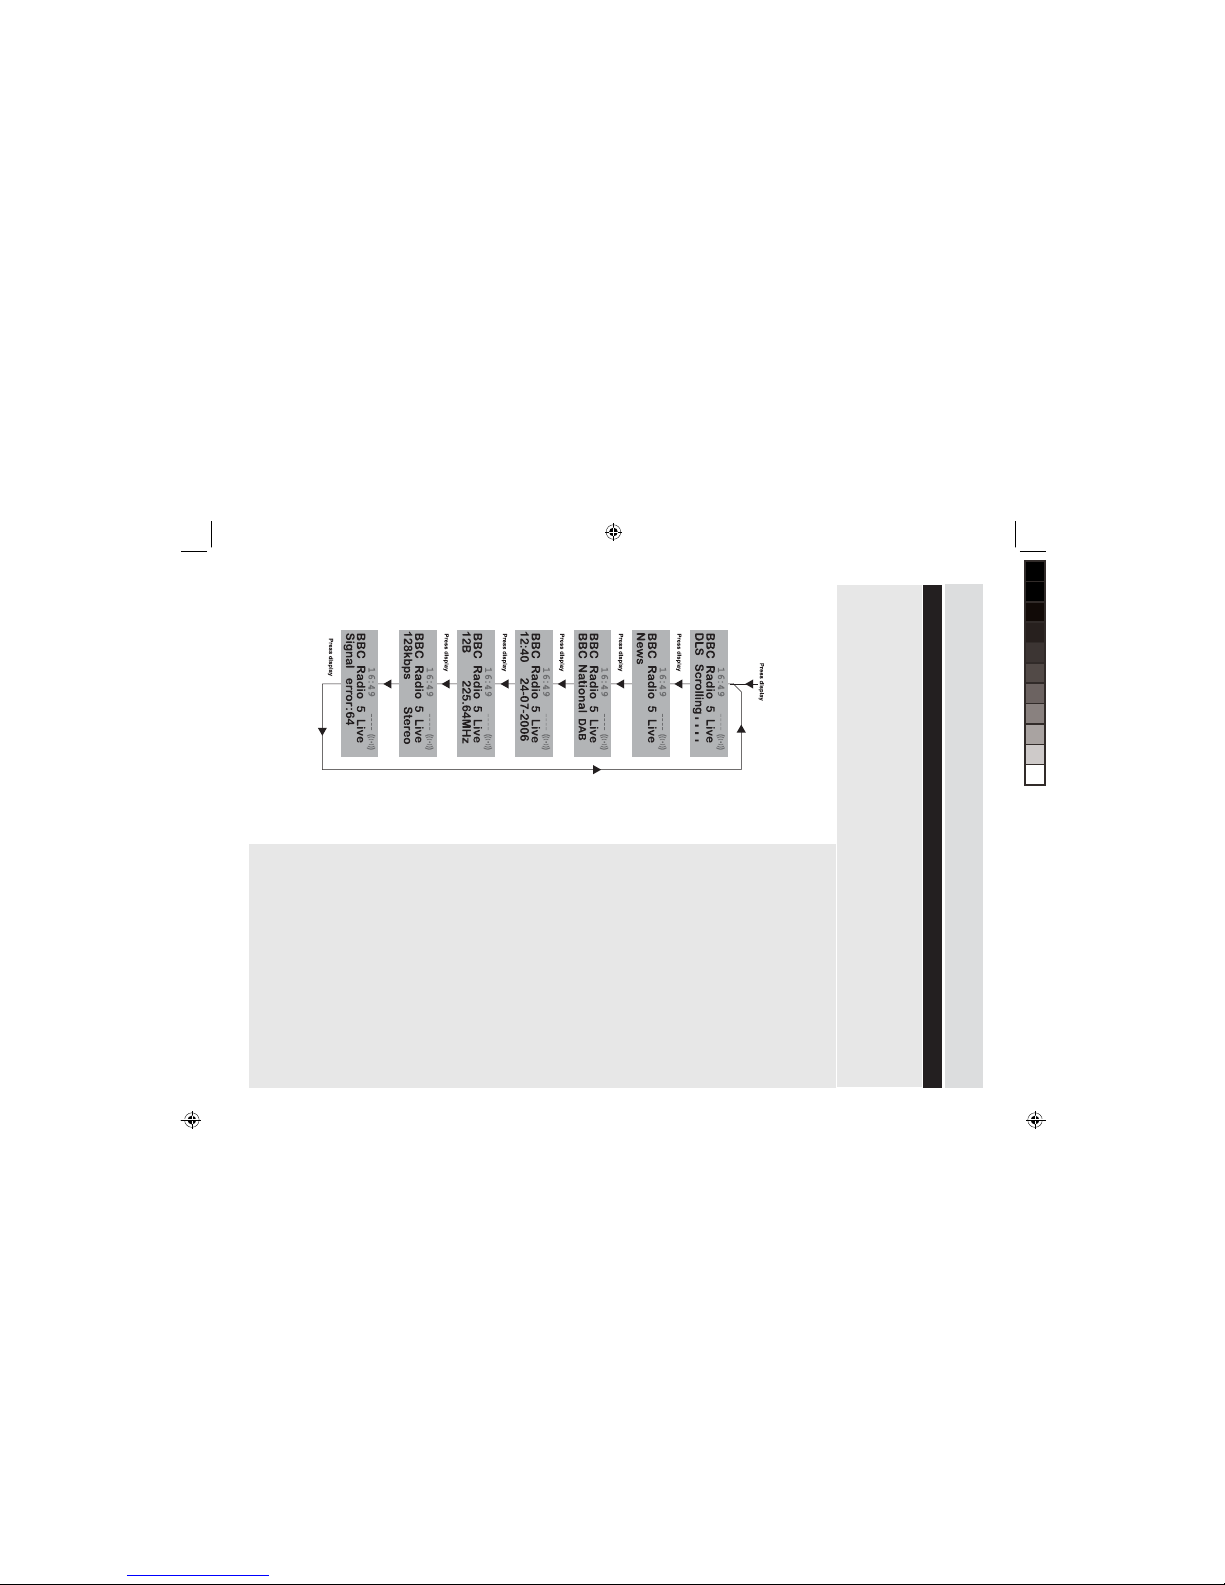
Dynamic Label Segment (DLS)
This is scrolling text information supplied by
the DAB station. It may comprise information
on music titles or details of the programme
and is provided by the broadcaster.
Program Type (PTY)
This is a description of the type of programme
provided by the DAB station and is provided
by the broadcaster.
Multiplex Name
This will show the multiplex that is
broadcasting the programme you are listening
to.
Time and Date
This displays the time and date and is
provided by the broadcaster, so will be
accurate.
Channel and Frequency
This displays the channel number and the
transmission frequency.
Signal Information
This shows the digital bit-rate and the signal
mode.
Signal Error Rate
If the transmission signal contains errors the
system can apply corrections.
The amount of signal correction can be
displayed as a numerical value between 0 and
99. As the value increases, you will hear the
signal degrade.
To improve reception, try adjusting the position
of the aerial.
It is possible to change the information that is displayed on the third line of the display when listening
to a DAB station. Note that this information is not available when listening to conventional AM/FM
stations. There are seven types of information available listed below with examples listed to the right of
the text. To change the information displayed press the display button repeatedly.
Changing the DAB Display Information
Using your DAB Radio
US93EBC!Vtfs!Hvjef`w5/joee!!!25.26
14
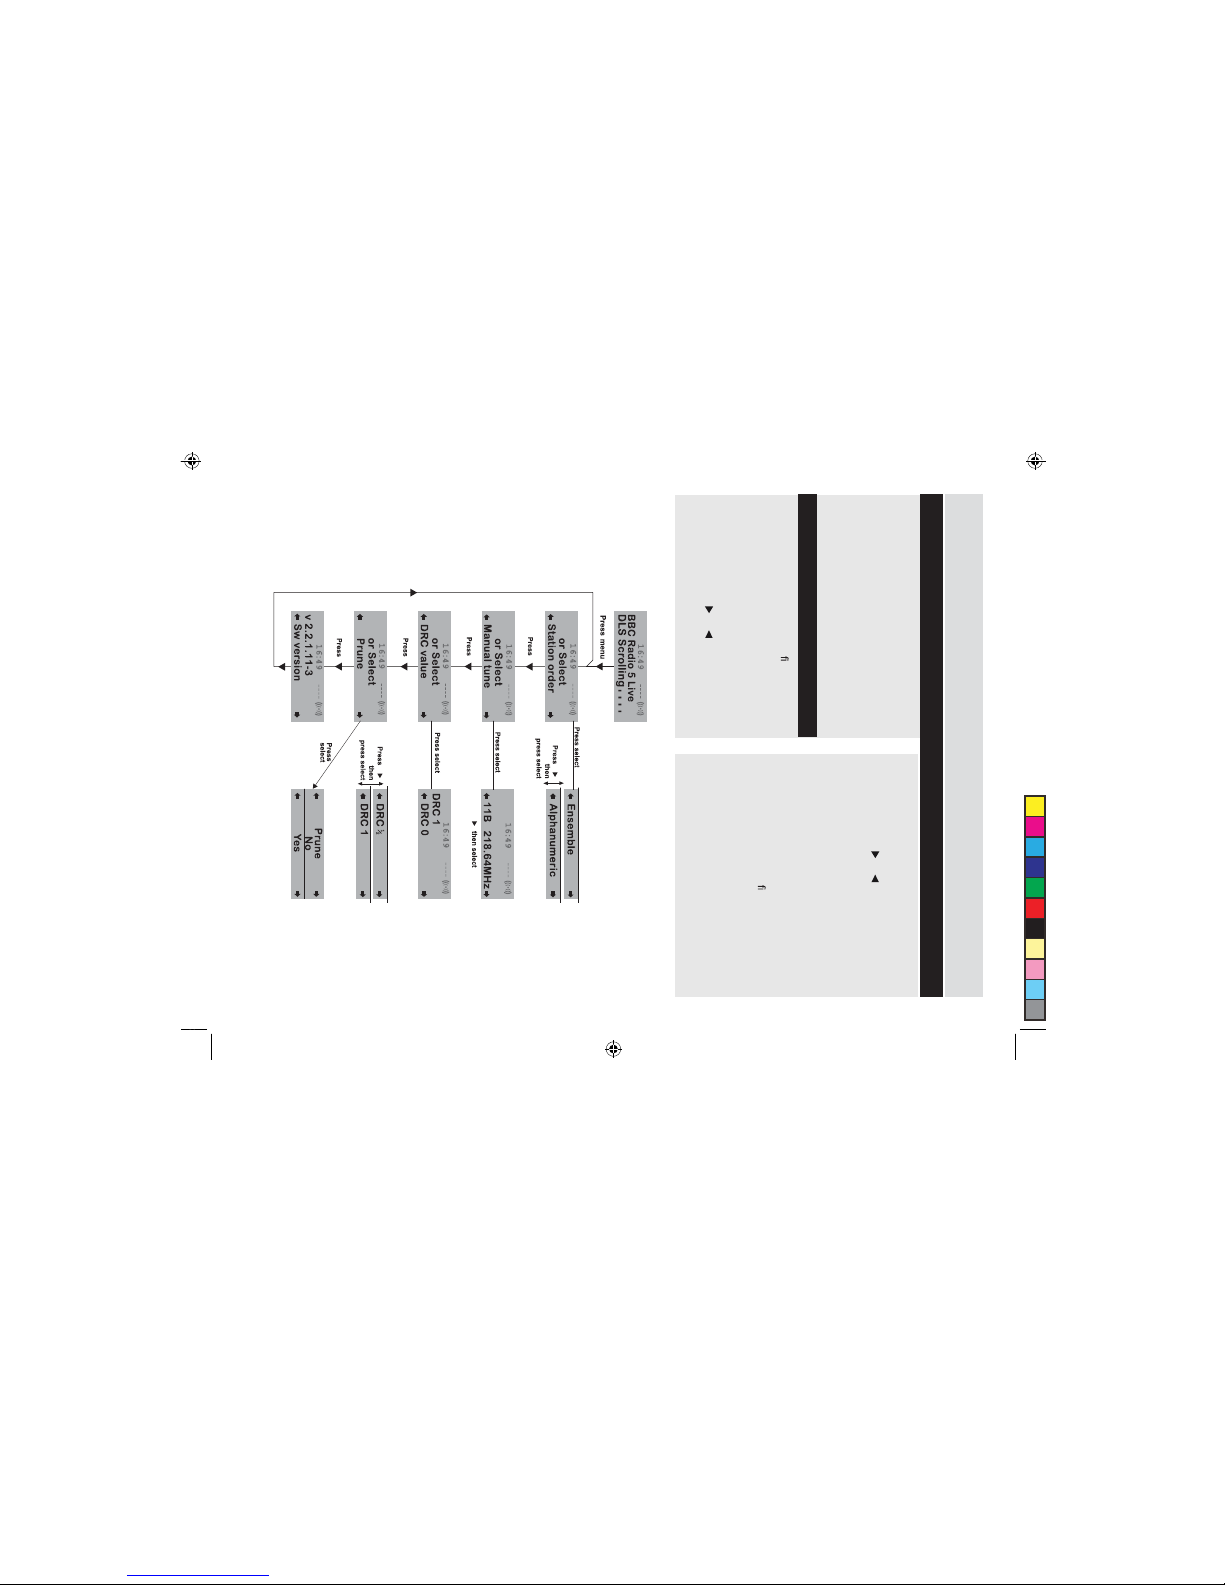
The MENU button allows you to change some
of the system options on your DAB digital
radio. These options are arranged in a menu
structure as shown below.
Pressing the MENU button will enter the menu
control. The options are described below.
This function enables you to de ne how the
stations are arranged when scrolling the
stations list.
1. Press the MENU button to access the
menu control.
2. Press either the or buttons until
‘ Station order ’ is displayed.
Using the Menu System
Using your DAB Radio
3. Press the SELECT button to access
‘ Station order ’.
4. Use either the or to display the desired
option.
There are options available as described
below.
Alphanumeric
This is the default setting. The stations are
arranged in numerical then alphabetical order.
5. Press SELECT to con rm.
Station Order
1501803124!!!25;4:;53

15
Using your DAB Radio
It is possible to manually tune to a speci c
channel/frequency and add this to the station
list.
This function can be used to obtain the
optimum reception for a speci c channel/
frequency, taking into account the position of
the aerial.
1. Press the MENU button to access the
menu control.
2. Press either the or button until
‘Manual tune ’ is displayed.
3. Press the SELECT button to access
‘Manual tune ’.
4. Use either the or button to select
the desired channel/frequency.
5. Press
A rectangle will be displayed on the second
line of the display. The position of this
rectangle indicates the signal strength (the
further towards the right, the greater the signal
strength).
6. Adjust the position of the aerial to
obtain the optimum signal strength.
7. Press the SELECT button to con rm.
This is only provided as an engineers
reference in the unlikely event that servicing
should ever be necessary.
Press the MENU button to access the menu
control.
Press either the or button until ‘ Sw
version ’ is displayed.
The version number will appear on line 2.
Manual Tune Dynamic Range Control
DRC adds or removes a degree of compression
to compensate for the differences in the
dynamic range between radio stations. For
example, a station broadcasting popular
music may have a high level of compression
applied since the emphasis is on a constant
high listening level, whereas a station
broadcasting classical music will have little or
no compression as the listener requires all of
the highs and lows in the music to de ne the
detail.
There are three levels of compression:
DRC 0 No compression applied.
DRC 1 Maximum compression applied (this
is the default).
DRC 1/2 Medium compression applied.
The best way to determine which of these
settings suits you best is to experiment with
them on a variety of source material.
1. Press the MENU button to access the
menu control.
2. Press either the or button until ‘DRC
value’ is displayed.
3. Press the SELECT button to access
‘DRC value’. The current DRC level will
be displayed on line 2 of the display.
4. Press the button to select between
the three DRC values. The available
options appear on line 3 of the display.
5. When the required DRC value is
displayed press SELECT to con rm. You
should be able to hear the difference in
compression immediately.
6. Prune station.
!No
Yes
Software Version
US93EBC!Vtfs!Hvjef`w5/joee!!!27.28
SELECT button.
16
Switching to AM/FM Mode
Using the AM/FM Radio
If the DAB digital radio is in DAB mode, press
the desired frequency band button (AM or
FM). You may hear background noise as no
station has been tuned in. The display will look
something like that shown below:
To tune into a radio broadcast/station turn the
tuning control left or right until the pointer is
aligned with the desired frequency markings
on the tuning dial (see below).
When the pointer is horizontal you have
reached either the start or end of the
frequency range. Do not attempt to force the
dial further in the same direction.
When the DAB digital radio is switched on,
either turn the volume dial right to increase the
volume, or left to decrease the volume.
Tuning the Radio
The tone dial is used to alter the audio output
of the DAB digital radio between a high
(treble) and low (bass) frequency range.
Turn the tuning control right to enhance the
high frequency (treble) content of the
sound output.
Turn the tuning control left to enhance the
low frequency (bass) content of the sound
output.
Tone Dial
Volume Dial
1501803124!!!25;4:;53

17
Using Aux In
The signal from your other home
entertainment system can be connected to the
digital radio via 3.5mm Aux In socket on the
right hand side of the digital radio.
You will require a stereo cable which is
terminated with connectors which match the
sockets on your other audio device.
Adjust the desired volume level by tuning the
volume control of the digital radio.
US93EBC!Vtfs!Hvjef`w5/joee!!!29.2:

18
Troubleshooting
If you believe that something is wrong with
your DAB digital radio, rst check the points
listed below.
There is no sound from my radio
Check that the volume is not set to the
minimum.
Make sure that the radio has been able to
locate DAB/AM/FM stations.
The display shows ‘NO SERVICES
AVAILABLE’ in DAB mode
Make sure that DAB coverage exists in your
area.
Try adjusting the position of the aerial or
location of the radio.
Poor reception
As with any radio service, there will be areas
of weak signal that may cause poor reception.
Follow the instructions for Manual Tuning on
page 16 and adjust the aerial while monitoring
the signal strength until the optimum signal
is obtained. If reception is still poor, try re-
locating the radio to another part of the room.
I cannot access secondary services
At the time of publishing this manual not many
secondary services are available in the UK.
This will increase as more DAB stations start
broadcasting. If a secondary service station is
available, the secondary indicator ‘>>’ will be
displayed next to the station name.
The display has gone blank or says
‘SERVICE OFF AIR’
This may occur if a broadcaster changes the
label of a service or removes a label whilst you
are listening to the station. The radio will try to
re-tune to the station. Alternatively, perform a
scan by pressing the AUTO button.
I cannot hear the station I have selected
The station you are listening to is displayed on
line 2. Line 3 shows the selected option, but
you have to press the SELECT button to tune
to the selected station.
I hear distortion on some stations
This is due to a weak signal. Try re-positioning
the aerial to gain maximum signal strength.
If the trouble persists, consult your dealer or
contact the Customer Helpline.
1501803124!!!25;4:;54

19
Technical Speci noitac
Power
Power supply: 230 - 240V AC ~ 50 Hz
Battery operation: 6 X 1.5V “C”/LR14/ UM2 size
battery ( not included )
DAB Specifications
RF section: Band lll, 174 MHz to 240 MHz
Input: 50R, nominal
ESD Remark
In case of malfunction due to electrostatic
discharge, reset the product as described in
Reset on page 12 (reconnection of the power
source may be required) to resume normal
operation.
Due to the continual improvement of our
products, specifications are subject to
change without notice
US93EBC!Vtfs!Hvjef`w5/joee!!!31.32


