Steinberg PUSHTRONIC 390 2221 User manual

PUSH
TRONIC
TRONIC
INSTRUCTION
MANUAL
390 2221
390 2231
2xG1/2
HOT
2xG3/4
G1/2
G3/4
Ruler
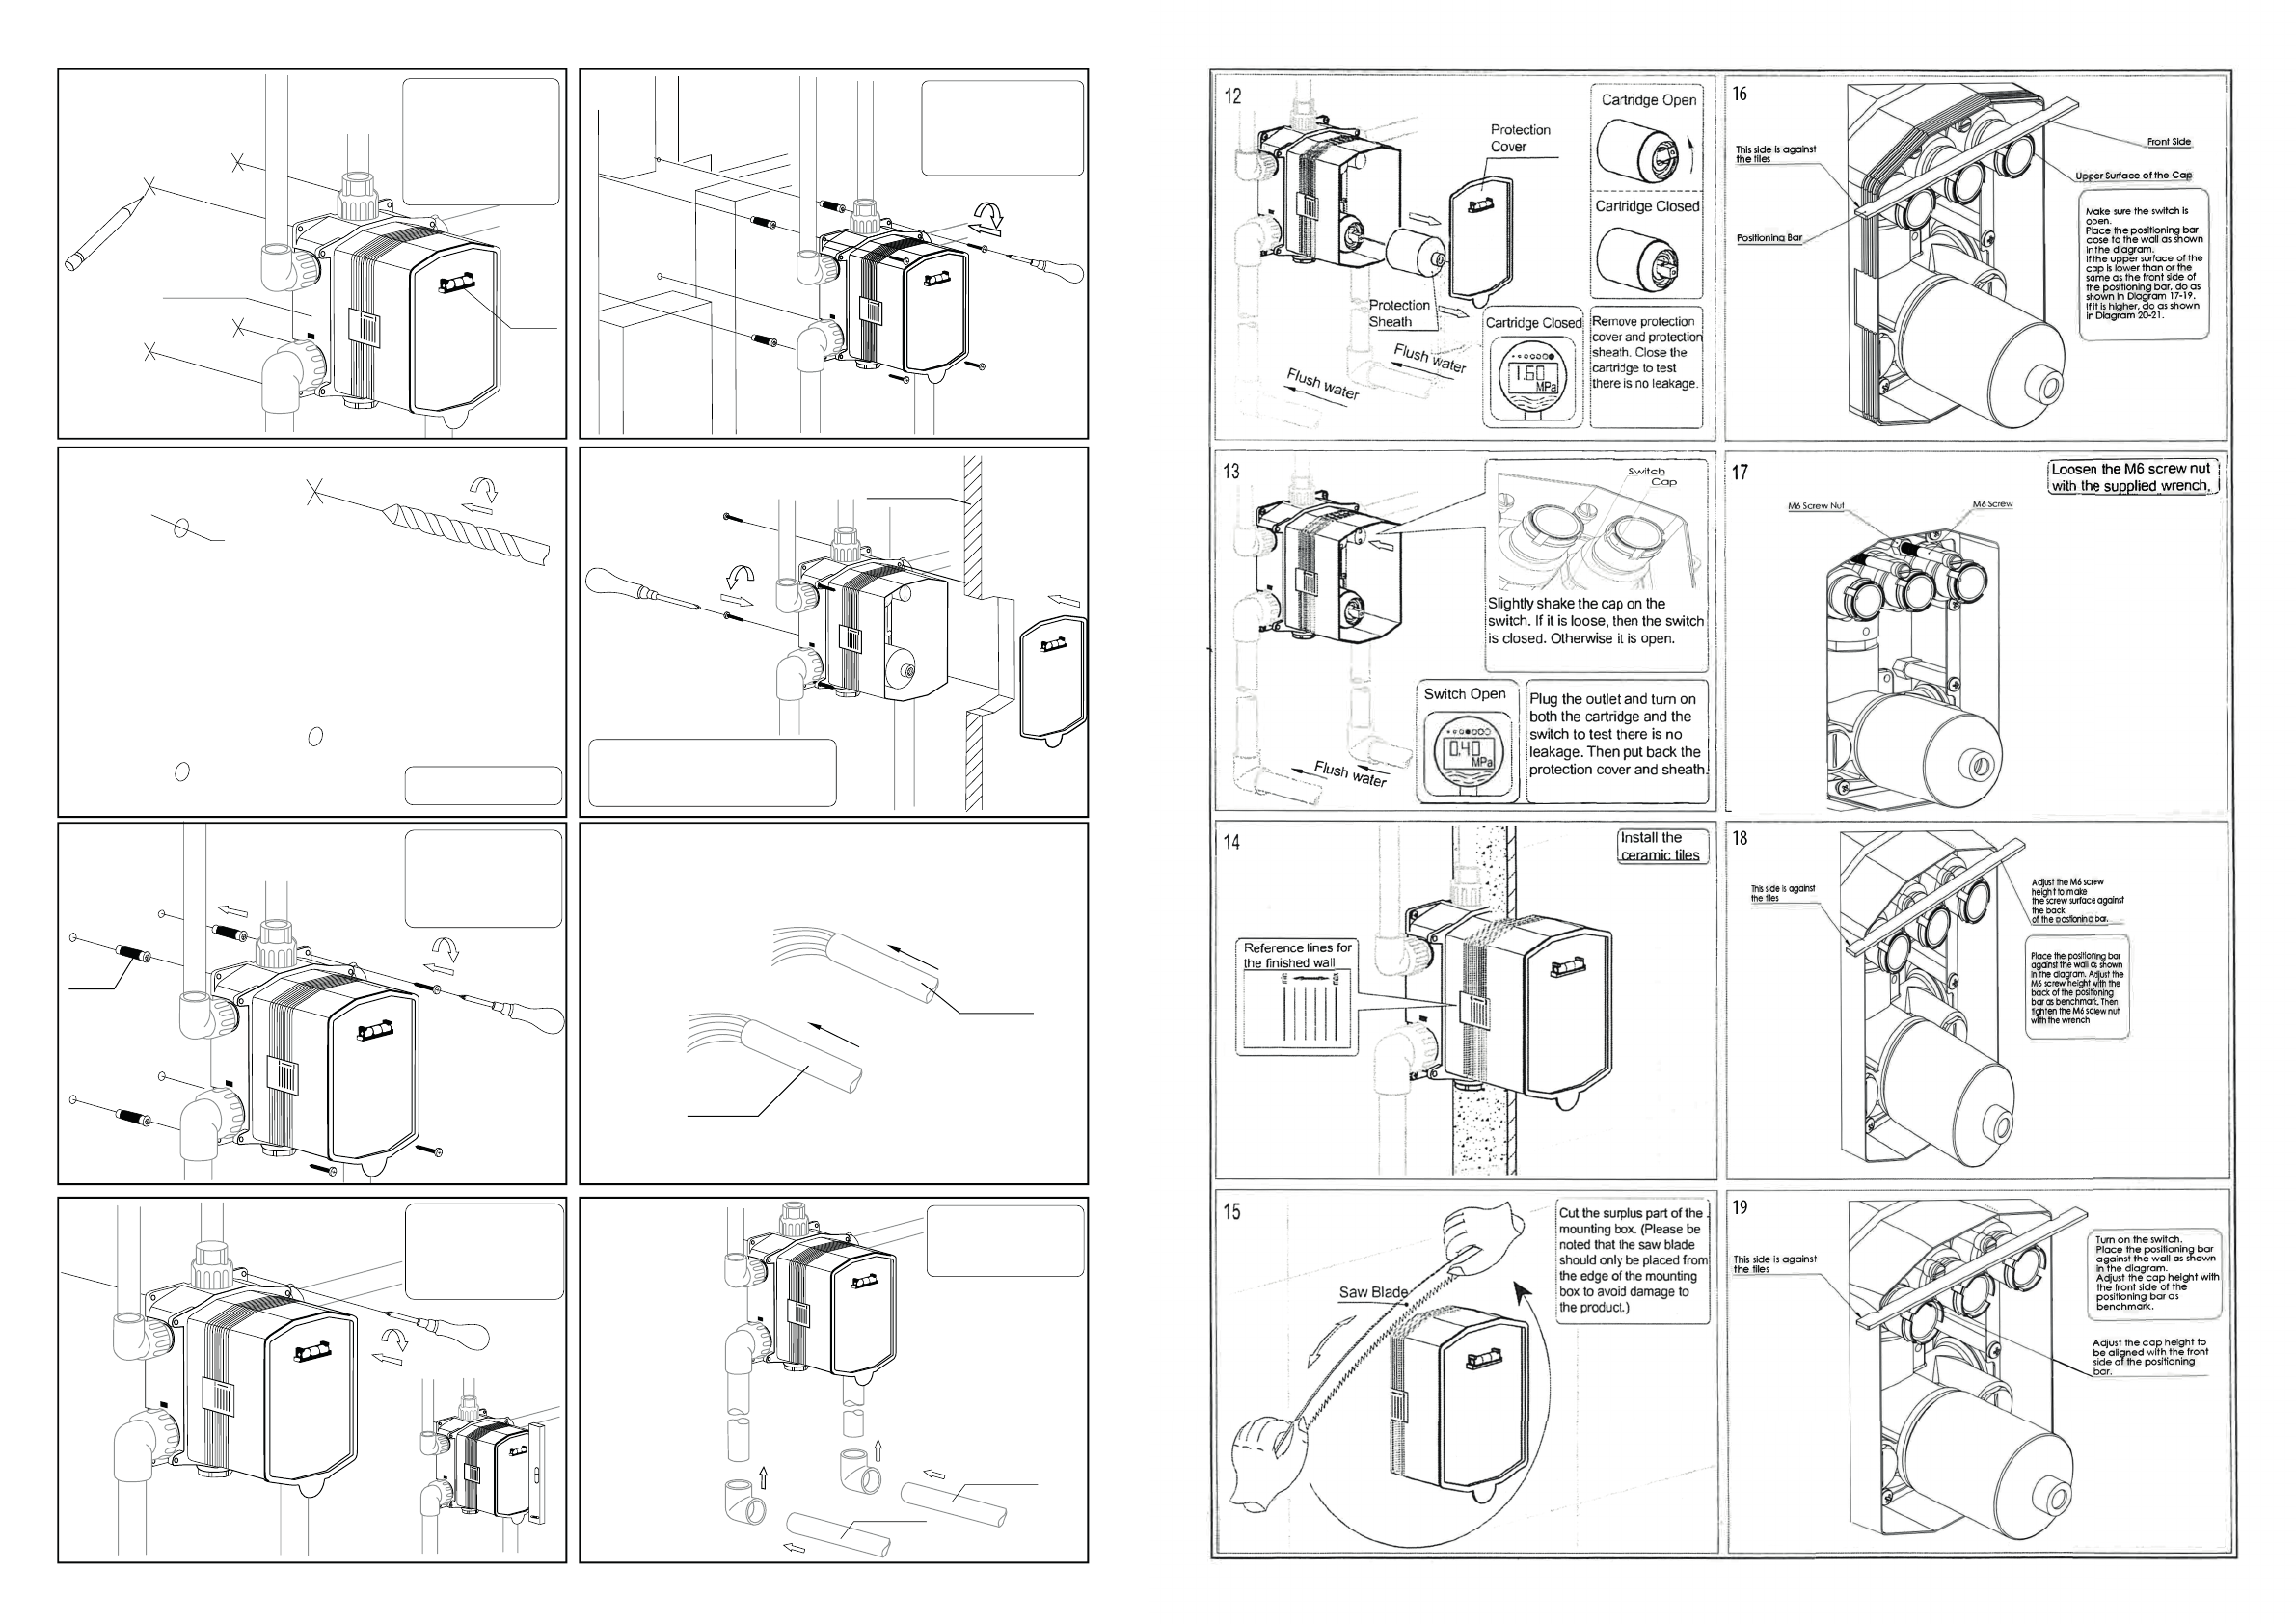
IV. Installation Steps(Fig.1-25) :
III. Installation Diagram
INSTRUCTION
MANUAL
Saw Blade
Guggles
Level
Prepare and check the
following tools.
The installation diagram is only for reference
The product is subject to the real object.
Drill
Teflon Tape
Plier
Philips
Valve Body
Plug
Outlet Outlet
Outlet
Inlet Inlet
Teflon Tape
Pipe Coupling
Slotted
Spanner Wrench
(supplied)
Pencil
Screwdriver
Screwdriver
S2.5Wrench
(supplied)
60~80
200
1
2
3
Wrap pipe coupling and
plug with Teflon tape end
connect them to the vale
body.
Connect outlet pipes as
shown in the diagram.
Connect inlet pipes of
proper length to the inlet
connector.
BS03861729
I. Installation Notice
1. Please lay water pipes in accordance with this manual.
2. Floor drain should be installed on the site.
3. The product should be installed only after the completion
of house
interior decoration in case the paint or other chemicals erode the
mixer surface.
4. Clean pipes to get rid of mud, sand or other debris blocked in pipes
before installation.
5. Check whether the threads can be matched. Otherwise, installing
forcefully will damage the components.
6. After installation,check all the joints to make sure they are firmly
connected. Run the water. Turn on and off repeatedly to ensure no
eaking problem. After that, the product is ready for normal use.
7. Hand the manual to users.
II.
Operation Notice
1. The product is used under water pressure 0.05~1.0 MPa, water
temperature 4~90°C.
2. Do not hang heavy things on the product
3. Remember to turn off the mixer if no water comes out of it
(Especially when nobody in the house or during the decoration period).
4. Clean the surface of the product regularly to keep it glossy. Note: Please
.
do not use inappropriate tools such as sharp brushes, rough sponges,
scouring pads or corrosive detergent. And it is not recommend to use the
detergent sold in the market, because its formula changes frequently.
Please clean the product with wet cloth and soapy water after usage.
Then rinse the soap off with clean water and dry with a soft cotton cloth.
5. When indoor temperature drops below 0ºC, take necessary measures
(Keep the product warm, close windows) to prevent the product from
frost cracking (Especially when windows open for air ventilation while
nobody in the house).
6. Adjust the temperature before use to avoid scald.
7. Do not disassemble the product without help from the professionals.
2xG1/2
HOT
2xG3/4
G1/2
G3/4
Ruler
IV. Installation Steps(Fig.1-25) :
III. Installation Diagram
INSTRUCTION
MANUAL
Saw Blade
Guggles
Level
Prepare and check the
following tools.
The installation diagram is only for reference
The product is subject to the real object.
Drill
Teflon Tape
Plier
Philips
Valve Body
Plug
Outlet Outlet
Outlet
Inlet Inlet
Teflon Tape
Pipe Coupling
Slotted
Spanner Wrench
(supplied)
Pencil
Screwdriver
Screwdriver
S2.5Wrench
(supplied)
60~80
200
1
2
3
Wrap pipe coupling and
plug with Teflon tape end
connect them to the vale
body.
Connect outlet pipes as
shown in the diagram.
Connect inlet pipes of
proper length to the inlet
connector.
BS03861729
I. Installation Notice
1. Please lay water pipes in accordance with this manual.
2. Floor drain should be installed on the site.
3. The product should be installed only after the completion
of house
interior decoration in case the paint or other chemicals erode the
mixer surface.
4. Clean pipes to get rid of mud, sand or other debris blocked in pipes
before installation.
5. Check whether the threads can be matched. Otherwise, installing
forcefully will damage the components.
6.
After installation,check all the joints to make sure they are firmly
connected. Run the water. Turn on and off repeatedly to ensure no
eaking problem. After that, the product is ready for normal use.
7. Hand the manual to users.
II.
Operation Notice
1. The product is used under water pressure 0.05~1.0 MPa, water
temperature 4~90°C.
2. Do not hang heavy things on the product
3. Remember to turn off the mixer if no water comes out of it
(Especially when nobody in the house or during the decoration period).
4. Clean the surface of the product regularly to keep it glossy. Note: Please
.
do not use inappropriate tools such as sharp brushes, rough sponges,
scouring pads or corrosive detergent. And it is not recommend to use the
detergent sold in the market, because its formula changes frequently.
Please clean the product with wet cloth and soapy water after usage.
Then rinse the soap off with clean water and dry with a soft cotton cloth.
5. When indoor temperature drops below 0ºC, take necessary measures
(Keep the product warm, close windows) to prevent the product from
frost cracking (Especially when windows open for air ventilation while
nobody in the house).
6. Adjust the temperature before use to avoid scald.
7. Do not disassemble the product without help from the professionals.
Make sure to connect the feeds for handset, rain shower and waterfall to
separate mixer outlets.
2xG1/2
HOT
2xG3/4
G1/2
G3/4
Ruler
IV. Installation Steps(Fig.1-25) :
III. Installation Diagram
INSTRUCTION
MANUAL
Saw Blade
Guggles
Level
Prepare and check the
following tools.
The installation diagram is only for reference
The product is subject to the real object.
Drill
Teflon Tape
Plier
Philips
Valve Body
Plug
Outlet Outlet
Outlet
Inlet Inlet
Teflon Tape
Pipe Coupling
Slotted
Spanner Wrench
(supplied)
Pencil
Screwdriver
Screwdriver
S2.5Wrench
(supplied)
60~80
200
1
2
3
Wrap pipe coupling and
plug with Teflon tape end
connect them to the vale
body.
Connect outlet pipes as
shown in the diagram.
Connect inlet pipes of
proper length to the inlet
connector.
BS03861729
I. Installation Notice
1. Please lay water pipes in accordance with this manual.
2. Floor drain should be installed on the site.
3. The product should be installed only after the completion
of house
interior decoration in case the paint or other chemicals erode the
mixer surface.
4. Clean pipes to get rid of mud, sand or other debris blocked in pipes
before installation.
5. Check whether the threads can be matched. Otherwise, installing
forcefully will damage the components.
6. After installation,check all the joints to make sure they are firmly
connected. Run the water. Turn on and off repeatedly to ensure no
eaking problem. After that, the product is ready for normal use.
7. Hand the manual to users.
II.
Operation Notice
1. The product is used under water pressure 0.05~1.0 MPa, water
temperature 4~90°C.
2. Do not hang heavy things on the product
3. Remember to turn off the mixer if no water comes out of it
(Especially when nobody in the house or during the decoration period).
4. Clean the surface of the product regularly to keep it glossy. Note: Please
.
do not use inappropriate tools such as sharp brushes, rough sponges,
scouring pads or corrosive detergent. And it is not recommend to use the
detergent sold in the market, because its formula changes frequently.
Please clean the product with wet cloth and soapy water after usage.
Then rinse the soap off with clean water and dry with a soft cotton cloth.
5. When indoor temperature drops below 0ºC, take necessary measures
(Keep the product warm, close windows) to prevent the product from
frost cracking (Especially when windows open for air ventilation while
nobody in the house).
6. Adjust the temperature before use to avoid scald.
7. Do not disassemble the product without help from the professionals.
2xG1/2
HOT
2xG3/4
G1/2
G3/4
Ruler
IV. Installation Steps(Fig.1-25) :
III. Installation Diagram
INSTRUCTION
MANUAL
Saw Blade
Guggles
Level
Prepare and check the
following tools.
The installation diagram is only for reference
The product is subject to the real object.
Drill
Teflon Tape
Plier
Philips
Valve Body
Plug
Outlet Outlet
Outlet
Inlet Inlet
Teflon Tape
Pipe Coupling
Slotted
Spanner Wrench
(supplied)
Pencil
Screwdriver
Screwdriver
S2.5Wrench
(supplied)
60~80
200
1
2
3
Wrap pipe coupling and
plug with Teflon tape end
connect them to the vale
body.
Connect outlet pipes as
shown in the diagram.
Connect inlet pipes of
proper length to the inlet
connector.
BS03861729
I. Installation Notice
1. Please lay water pipes in accordance with this manual.
2. Floor drain should be installed on the site.
3. The product should be installed only after the completion
of house
interior decoration in case the paint or other chemicals erode the
mixer surface.
4. Clean pipes to get rid of mud, sand or other debris blocked in pipes
before installation.
5. Check whether the threads can be matched. Otherwise, installing
forcefully will damage the components.
6. After installation,check all the joints to make sure they are firmly
connected. Run the water. Turn on and off repeatedly to ensure no
eaking problem. After that, the product is ready for normal use.
7. Hand the manual to users.
II.
Operation Notice
1. The product is used under water pressure 0.05~1.0 MPa, water
temperature 4~90°C.
2. Do not hang heavy things on the product
3. Remember to turn off the mixer if no water comes out of it
(Especially when nobody in the house or during the decoration period).
4. Clean the surface of the product regularly to keep it glossy. Note: Please
.
do not use inappropriate tools such as sharp brushes, rough sponges,
scouring pads or corrosive detergent. And it is not recommend to use the
detergent sold in the market, because its formula changes frequently.
Please clean the product with wet cloth and soapy water after usage.
Then rinse the soap off with clean water and dry with a soft cotton cloth.
5. When indoor temperature drops below 0ºC, take necessary measures
(Keep the product warm, close windows) to prevent the product from
frost cracking (Especially when windows open for air ventilation while
nobody in the house).
6. Adjust the temperature before use to avoid scald.
7. Do not disassemble the product without help from the professionals.
8.
Drill four Ø8 holes at
marked positions
Flush water to get rid
of dirt in pipes.
Connect water piper.
(Please note that inlets
must be connected for
hot left anf cold right.)
Insert anchors into Ø8
holes. Lightly fix the
mounting box to rough
walls by self-tapping
screws.
Adjust the mounting box
by its own level and use a
second level to adjust the
vertical aligment. Then
tighten self-tapping screws
Cold Water
Cold Water
Shower Board
Mounting Box
Hot Water
Hot Water
Flush water
Flush water
4
5
6
7 11
10
9
8
ø8
Another installation
mathod can also be
suggested. Cut slots in
the wall to fit in the
mounting box.
A third way of installation is to install the
mofunting box on the shower board. (Drill
holes first on the shower board in accor-
dance with the size of the mounting box.)
Adjust the mounting
box by its level.
Take the holes on the
mounting box as
benchmark to make
marks on rough walls.
Adjust the mounting box
by its own level and use a
second level for the vernier
adjustment and to adjust
the vertical alignment. Then
tighten self-tapping screws.
Other manuals for PUSHTRONIC 390 2221
1
This manual suits for next models
1
Other Steinberg Bathroom Fixture manuals


Popular Bathroom Fixture manuals by other brands


Hans Grohe
Hans Grohe 27438 1 Series installation instructions

GRE
GRE AR1130 instruction manual

antoniolupi
antoniolupi STECCA600 Usage and installation manual

Victorian Plumbing
Victorian Plumbing bower Fitting instructions

Fleurco
Fleurco Apollo STA40-11-40 instruction manual

Artika
Artika NeptuneTM instruction manual


