Steiner CINDER 9501 User manual


2
Safety Precautions
Please read carefully before proceeding.
WARNING
Ensure polarity is observed when installing the battery to the thermal sight.
The unit is a precision optical device and must be handled carefully to prevent
damage.
Always remove the batteries when the unit is not in-use
DO NOT scratch the external lens surface or touch them with fingers.
To prevent thermal damage to the unit, never point it directly at the sun or any
other source of high intensity light that the unprotected human eye cannot
tolerate (such as a welding arc).
DO NOT attempt to service the product yourself. For any service requests, contact
Steiner Customer Support
3
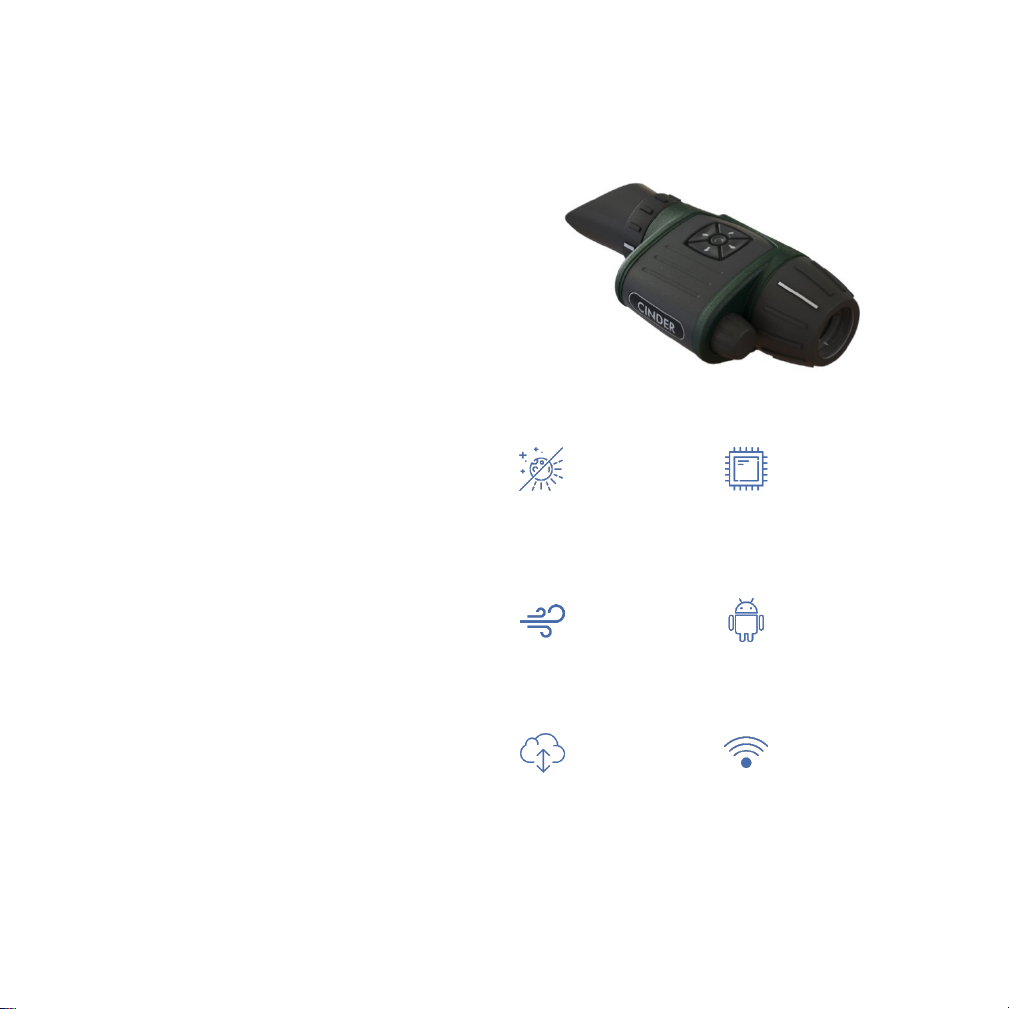
About
Steiner is one of the largest manufacturers
of high-quality optics in the world. The
Cinder thermal sight is designed for use in
day, night, and poor weather conditions
(fog, smog, dust). In addition to an
extensive on-board feature set including
multiple color palettes, photo and video
storage, and electronic zoom, this cutting-
edge device runs a custom Android OS
allowing wireless connection to
smartphones, tablets, and the Cloud.
With a compact design and low power
consumption, the Cinder is particularly well-
suited for hunting or other outdoor
activities, including detecting items through
a variety of obstacles (bushes, grass,
foliage).
This innovative system includes several
features to improve your targeting
experience, including multiple reticles,
instant-on video, and a straightforward
zeroing methodology.
Day and Night
Operation
Powered by
Qualcomm
Snapdragon
Weatherproof
Imaging
Effortless
Operation via
IOS/Android
Cloud-based
WiFi Enabled
4
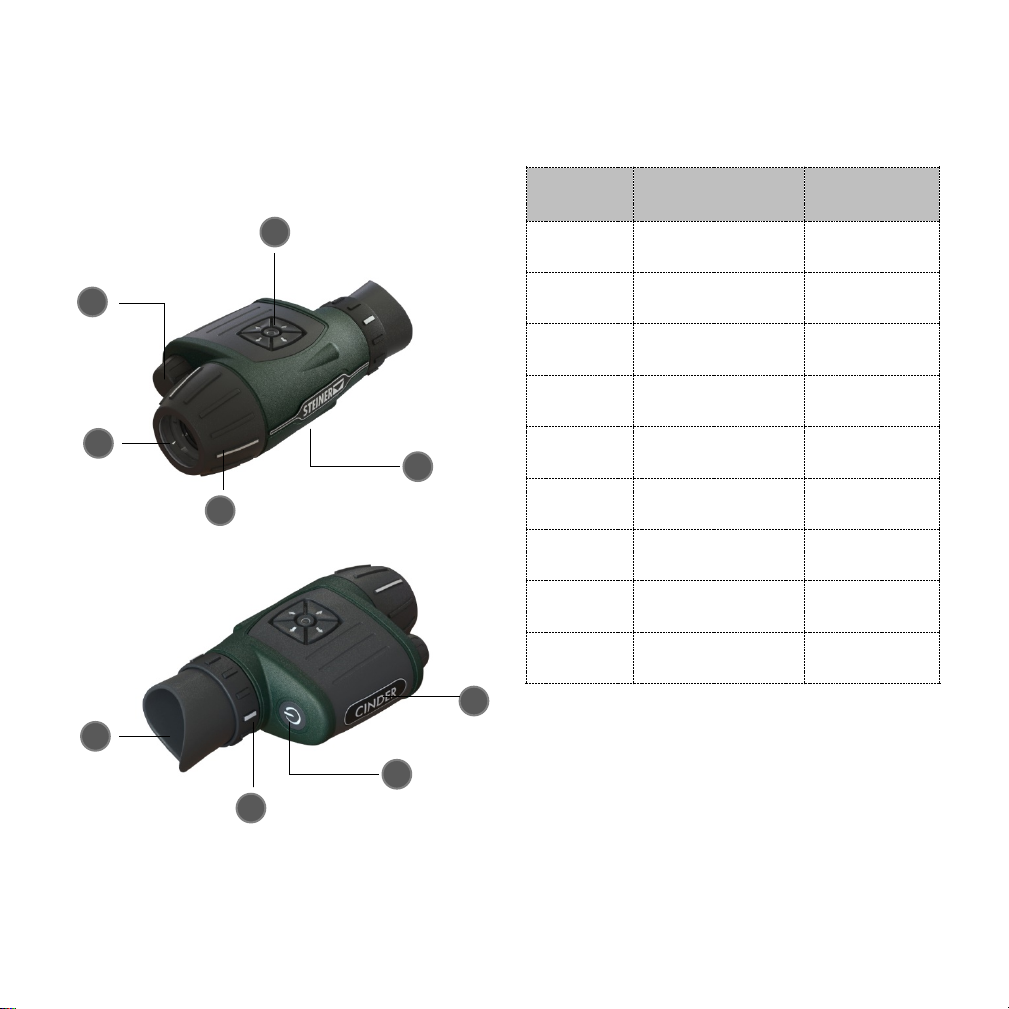
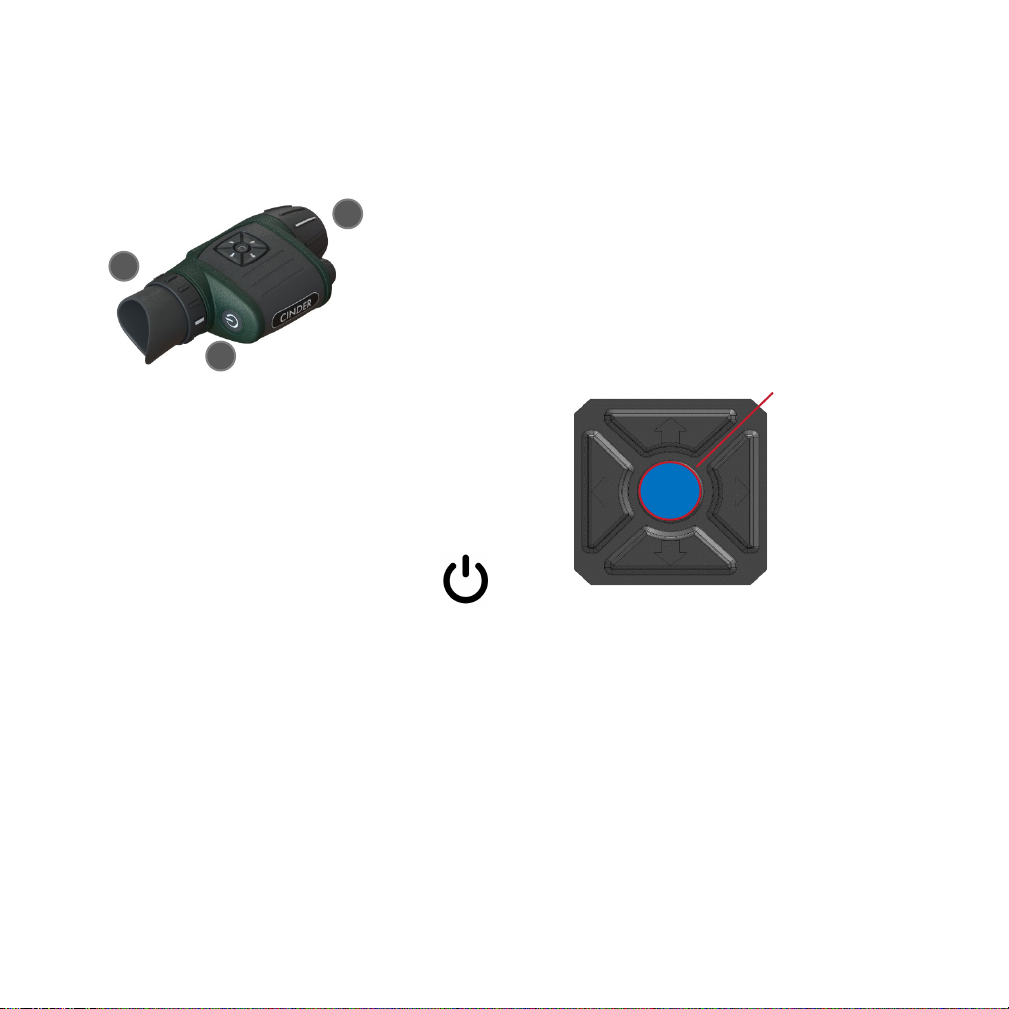
Major Components
Dwg. Ref. Part Name Location (on
sight)
1 Keypad Top Right
2 Focus Ring Front
3 Objective Lens Front
4 Eyepiece Rear
5
Eyepiece Diopter
Ring
Rear
6 Power Button Rear Right
7
Battery
Compartment
Front Right
8
Battery
Compartment Cap
Front Right
9
Weapon Rail
Adapter
Bottom
1
2
3
4
5
6
8
7
9
5
The Steiner Cinder App
Steiner has created a companion app to the
Cinder sight, which is available in both the
Google Play store and the App Store, under
the name “Steiner Cinder”.
The app can be installed on the appropriate
mobile device (Android or iOS) and allows:
WiFi connection to the Cinder
Easy remote control of the camera
View, capture, and share thermal
photos / videos in real time
Upload/download waypoints for
navigation cues in the Cinder or
Google Maps
After downloading and installing the app,
you will be required to allow the app access
to photos, media, and device location.
Platform Login Details Comments
Steiner
Cinder
Thermal
App
00000000
Default
hotspot
password
for Cinder
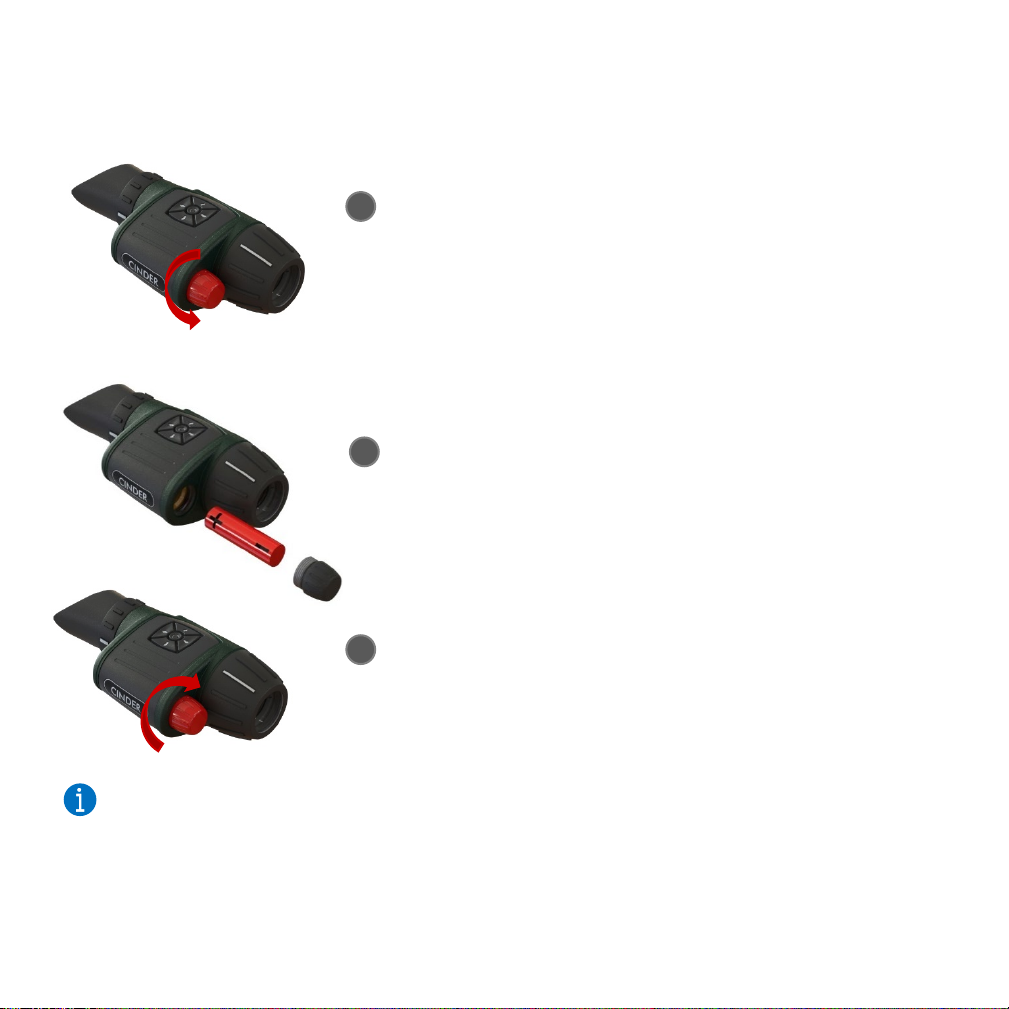
6
1
Rotate
clockwise to
secure cap
Insert battery
+ end first
Rotate
counterclockwise
to open
2
3
Insert Battery
Install Cinder on Weapon
The Cinder comes with a mount suitable for
attachment to a Picatinny-style weapon-rail
pre-installed. Proper tightening of the
mount on the weapon rail requires a 3mm
or 1/8 inch hex key.
To install on your weapon:
Locate the Cinder on your weapon’s
rail such that the eyepiece will be
fully visible when you’ve assumed a
normal firing position. In most
cases, the Cinder will be towards
the back of the weapon.
Ensure the recoil lug engages one of
the grooves in the rail, and tighten
the mount to finger tight.
Check that the sight does not
wobble and is fully engaged on the
rail.
Fully tighten the mounting screws
to the rail.
Zero the sight per instructions in
the Using Reticles section.
Always insert battery positive
(+) end first.
Note:
7
Power On
To power the Cinder “On”:
1. The power button is located on the
rear right of the thermal sight,
marked with this symbol.
2. Press and hold for 3 seconds and
look into the eyepiece to see the
display light up. The Steiner logo
will appear, followed by thermal
imagery after a short boot-up.
3. Once powered on, adjust the
eyepiece diopter ring to bring the
display into focus.
4. The system will boot up in “camera”
mode. Focus the objective lens to
bring the scene to a sharp image.
Controls
Cinder is controlled using a 5-button
keypad, with up/down/left/right/select
functions.
The Control Pane at the bottom of the
display indicates keypad function for each
screen. These functions change depending
upon what screen you’re in. After a brief
time on each screen, the control pane will
disappear.
Press and hold
for 3 seconds
Adjust diopter
to ensure
3
1
2
Adjust focus to
ensure scene
Menu
/Select
8
Hot Key Function
The hot key control on the keypad allows
quick access of frequently used settings. By
default, the hotkeys are set to zoom in/out,
click a snapshot and to start/stop recording.
When viewing a scene in the display,
use button to zoom in - up to 4x and
the button to zoom out.
Use button to capture a snapshot
and to start and stop recording a
scene.
You can configure the
hotkeys to perform other
functions by navigating to
Settings > Hot Keys.
Note:
9
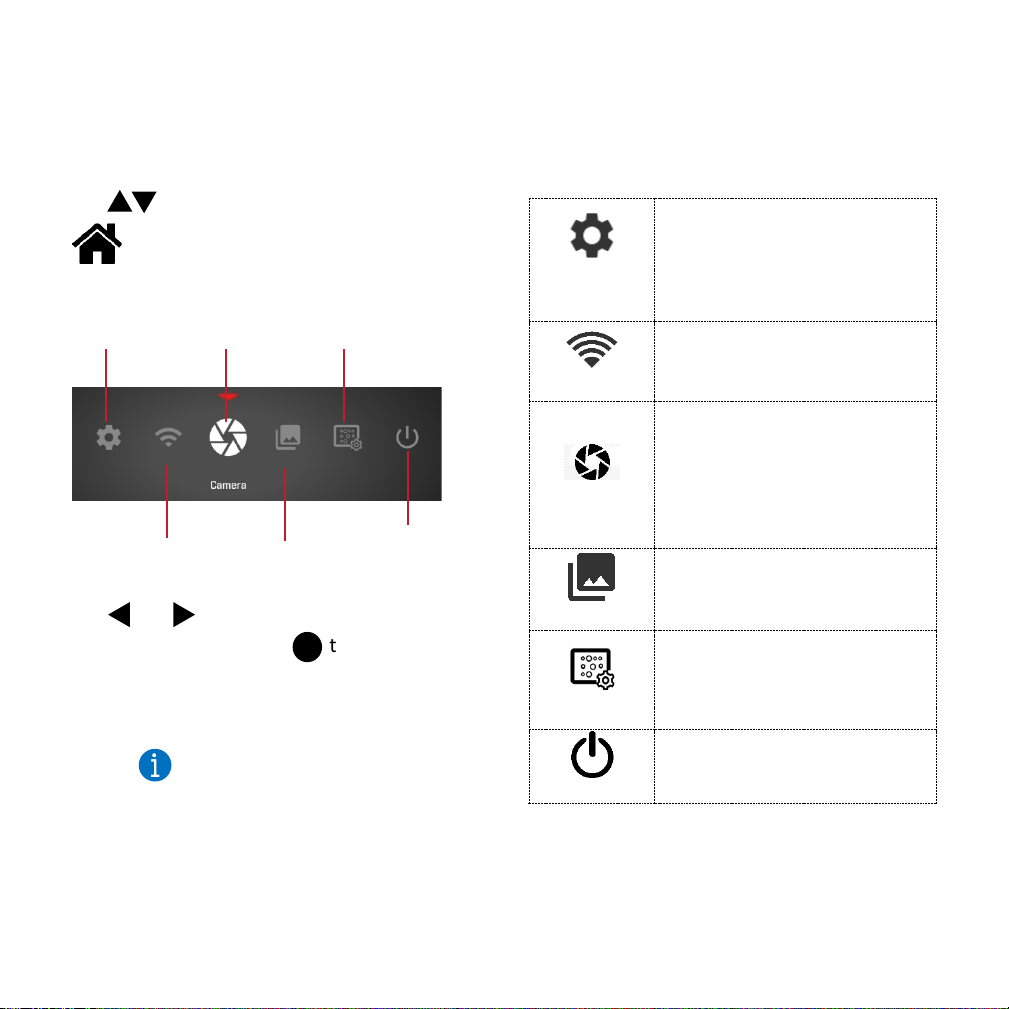
Home Screen Functions
To access Home Screen, open Menu and
use to navigate to Home Screen
Use and buttons to navigate between
these functions and use to select a
function.
System
Settings
View system info, perform
software upgrades, change
screen and interface settings,
enable/ disable user pin and
profile, configure hot keys
Connectivity
To choose how the thermal
sight connects with external
devices
Camera
To view and control camera
settings including configuring
and selecting presets,
brightness, polarity, sharpness
settings, bad pixel and non-
uniformity
Gallery
To view stored media – images
and videos
Pixel Repair
To fix bright or dark spots on
the display.
Refer to section Fixing Bad
Pixels for detailed information.
Power
To reboot or shutdown the
sight
To view and control video
output, click Camera in the
Home Screen of your thermal
sight.
Note:
System
Settings
Connectivity
Camera
Gallery
Pixel
Repair
Power

10
System Settings
Device
Information
Read-only information
about the device and its
components
System
To check and download
system updates. Before
updating the device,
ensure that the battery is
fully charged. Steiner will
occasionally make system
updates available for new
features or bug fixes.
Also send system logs to
the cloud for
troubleshooting if
necessary.
Screen
To adjust screen position,
size and increase/decrease
brightness and contrast for
the OLED
Timezone
To set the date and time
zone for the device.
Interface
To change language
settings, enable/disable
display widgets, set up
duration until screensaver
is activated and to enable
display indicators auto-
hide. When this setting is
enabled, the menu options
and display indicators are
auto-hidden after 10-
seconds of inactivity.
Video
Recording
To define recording
quality, set a maximum
recording time, and
allow/disallow “screen-
recording.” Screen-
Recording allows video to
include on-screen display
items such as the
rangefinder, but at a lower
frame rate than standard
recordings.
Streaming
To set bitrate and
maximum latency for
streaming.
User
Management
Reserved for future
firmware release.
Hot Keys
To change the hot key
functions assigned to the
Up, Down, Left, Right
buttons.
Location and
Compass
To setup and calibrate
compass, and to turn
on/off current GPS
location.

11
Wireless Connectivity
If you desire to use the LAN/Wi-Fi as the
connection, once you power the Cinder
“On”, navigate to Connectivity and click
Wireless Networks. Toggle Wi-Fi to On and
select the network you wish to connect to.
If there are no WiFi networks available in
the region, Cinder can establish a Hotspot
connection with your smartphone/Tablet
PC for remote wireless operation.
Navigate to Connectivity and click
Hotspot.
If using the Steiner Cinder app: Android
devices may be connected to Cinder via
Private (Peer to Peer) connectivity, or via
Wi-Fi (LAN); iOS devices may be connected
to Cinder via Hotspot or Wi-Fi (LAN).
Connecting to external
wireless devices is optional.
Turn Wi-Fi On only if you wish
to allow wireless access to the
thermal sight.
System works with 2.4GHz
networks.
Once Hotspot is enabled,
Cinder remains in hotspot
mode even after system
reboots, until the setting is
manually disabled from the
Connectivity menu.
Note:
Note:

12
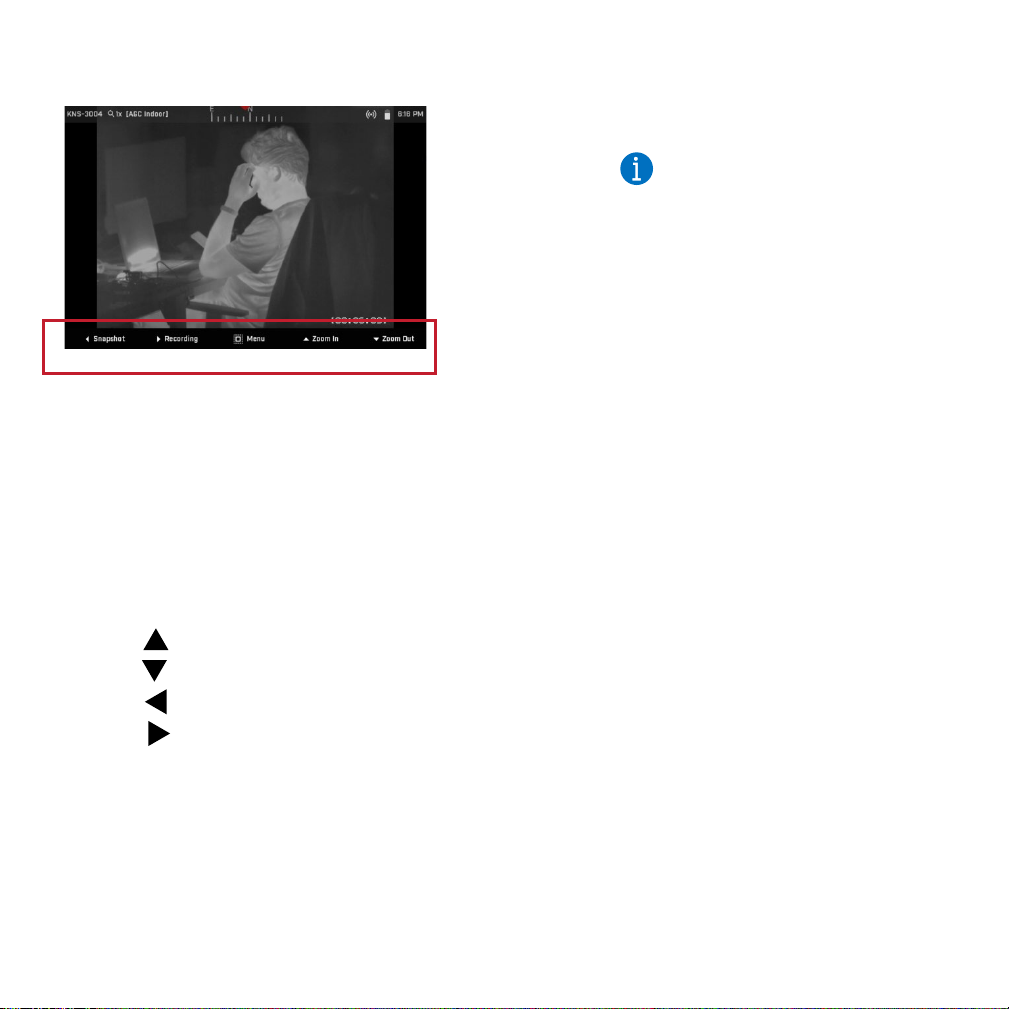
Camera
When powered on, the sight displays the
camera feed.
To go back to the camera feed from the
Home Screen, click the Camera icon.
The following are the default display
indicators on the camera screen:
Status Bar
These are the status bar indicators:
1 Status Bar
Displays indicators for
active modes, current
zoom level, Wi-Fi status,
and current time
2 Control
Pane
Displays the keypad
functions for each screen
1
Device ID
2
Displays current Zoom level
3
Displays current AGC mode
(Regular/Enhanced)
4
Compass – Displays direction
(magnetic north)
5
On Screen Recording – Displays logo
when this option is selected in System
Settings
6
Stream – Icon is visible when Cinder is
streaming video
7
Connectivity Mode – Displays Hotspot
icon when mode is enabled
8
Location – Icon is visible when GPS is
turned on
9
Connectivity – Displays WiFi icon when
mode is enabled
10 Time – Displays current time
1
2
5
6
7
8
1
2
3
4
9
10
13
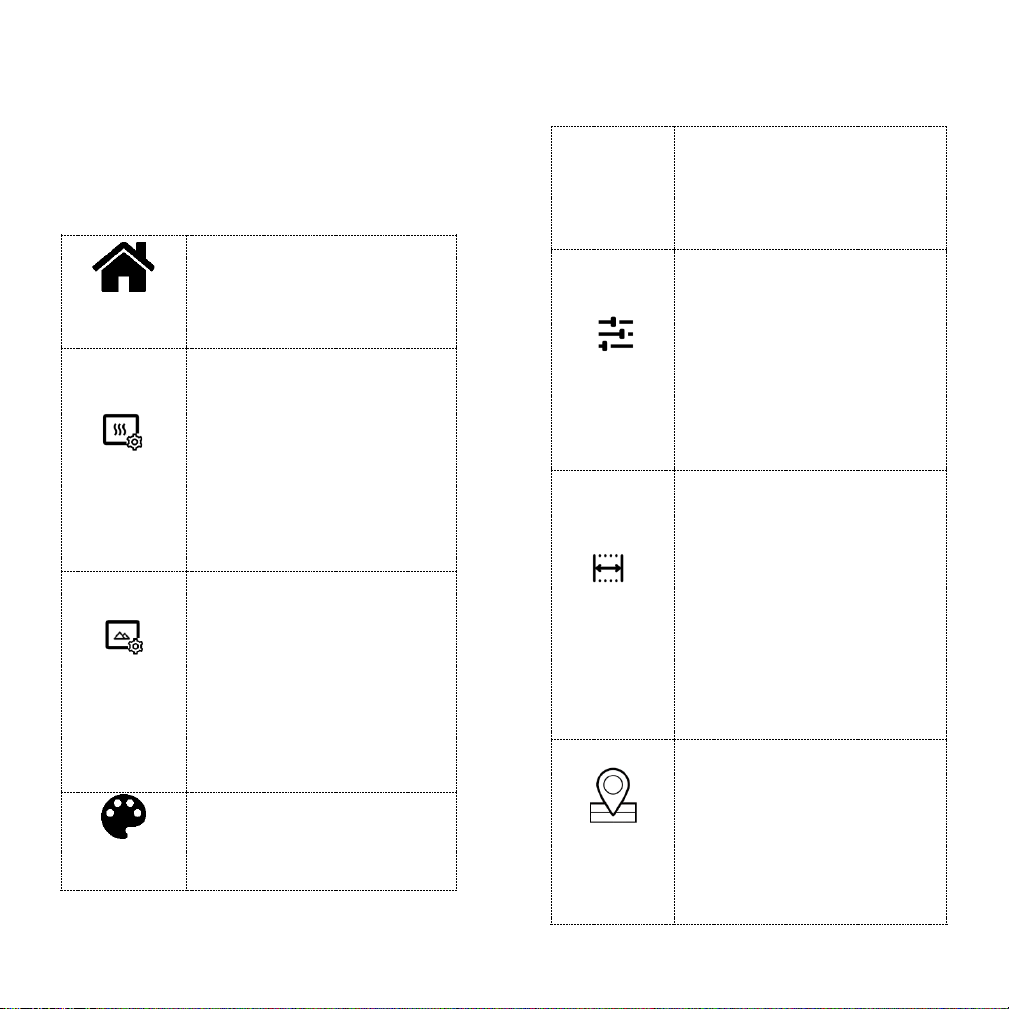
Menu
Use Menu to select or modify the following
settings:
Home
Screen
Change settings and wireless
connections, view gallery or
power off the sight.
Thermal
Settings
Perform NUC, set contrast
enhancement, select from
predefined AGC modes, set
gain.
Refer to the Changing
Thermal Settings section for
detailed information.
Image
Settings
To adjust Brightness,
Contrast, Sharpness, Edge
Detection, Zoom, Picture in
Picture, FPS, Video
Orientation and Aspect Ratio.
Refer to the Changing Image
Settings section for detailed
information.
Color
Settings
Select from various color
palettes, change polarity and
apply selective coloring to
targets.
Refer to the Color Settings
section for detailed
information.
Preset
Select from built-in presets:
Indoor, City, Forest, Fixed,
Semi-Auto, or Auto: or save
your own custom preset.
Refer to the Using Presets
section for detailed
information.
Rangefinder
To estimate the distance to a
target of known size. You can
either select one of the three
built-in targets or adjust it by
moving the two horizontal
bars on the display
Refer to the Using
Rangefinder section for
detailed information.
GPS
Waypoints
To save waypoints or set
navigation to a waypoint via
GPS.
Refer to the Using GPS section
for detailed information.
14
Reticle
To ready the unit to target.
Select from five reticles,
multiple mesh (grid) sizes, and
reticle colors.
You can also move the reticle
along the horizontal and
vertical axis for precise
targeting using the Reticle
Position setting.
Refer to the Using Reticles
section for detailed
information.
Changing Thermal Settings
NUC
Single Point Non-Uniformity
Correction levels the
temperature of the
microbolometer and
eliminates image flaws like
fixed pattern noise, vertical
stripes etc. Use of this
feature may improve image
quality at a given
temperature, particularly a
very cold or hot
temperature. Select
between On and Off. Default
is Off – selecting this option
will temporarily overwrite
the factory thermal
calibration to optimize for a
given temperature.
Restarting Cinder (or setting
to Off) will return the device
to factory settings.
Contrast
Enhancer
Selectively increases the
target contrast to make it
stand out from the
background. Select a
numerical value between 1
and 10 to suit user
preference.
AGC
Auto Gain Control makes
internal contrast
enhancements to display the
best output for a given
scene. Options are “Regular”
or “Enhanced”. Change to
suit individual user
preference.
Image Boost
Manually controls the AGC
algorithm for a given scene.
Select a numerical value
between 0 and 36 to suit
user preference.
15
Changing Image Settings
Brightness
Adjusts scene brightness.
Select a numerical value
between 0 and 20 to suit
user preference.
Contrast
Adjusts scene contrast.
Select a numerical value
between 0 and 20 to suit
user preference.
Sharpness
Applies a sharpness filter
to the scene. Select a
numerical value between
0 and 10 to suit user
preference.
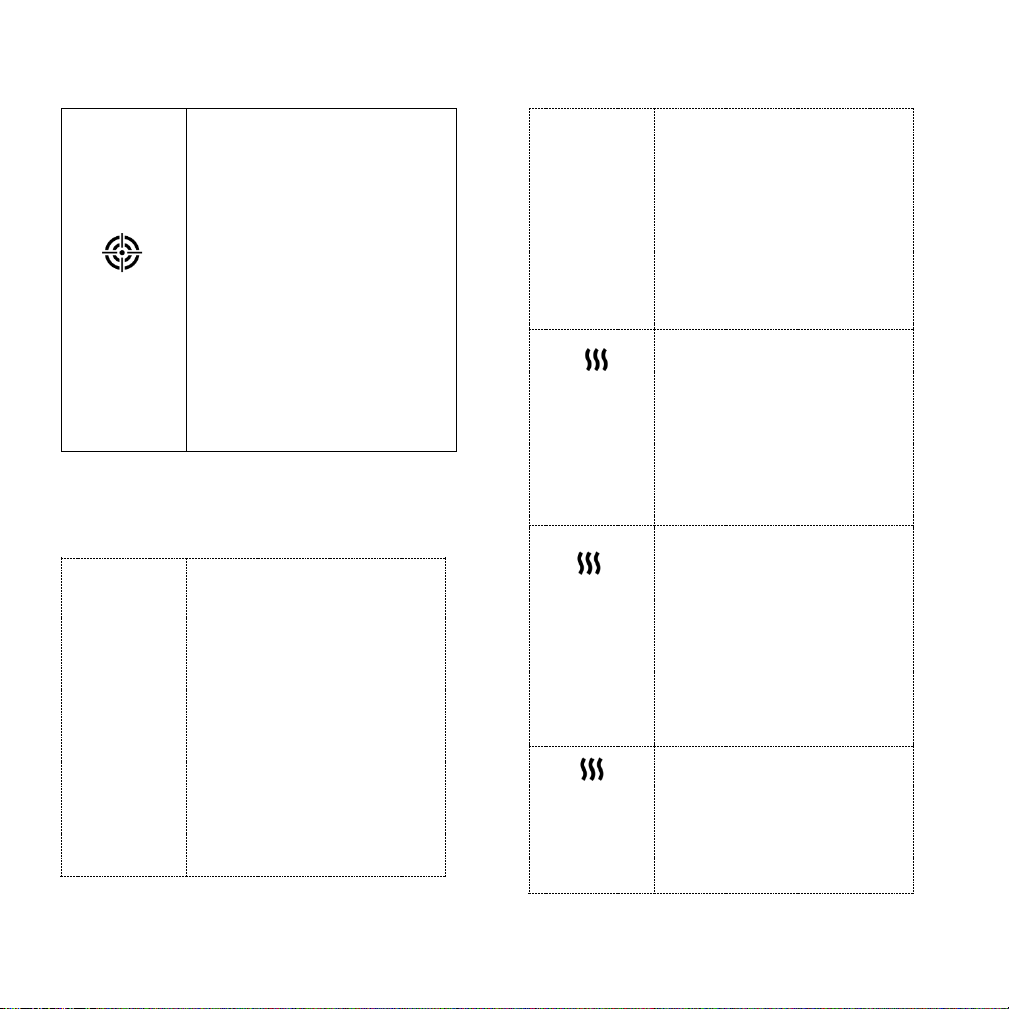
Edge
Detection
Displays only the outlines
of objects in the scene.
Often useful for target
detection. Toggle on/ off
to suit user preference.
Zoom
To zoom into or out from a
subject in the scene,
digitally. Available values
are: 0.5x, 1x, 2x, 3x and 4x
Edge Detection
Picture In
Picture
When active, the zoomed
in/out view is displayed
only at the center of the
screen. Often use for
situational awareness.
Toggle on / off to suit user
preference.
Picture In Picture
16
FPS
Adjusts the frames per
second (imager refresh
rate).
Rotation
Switches video orientation
180 degrees (upside
down).
Aspect
Ratio
To switch between two
available aspect ratios:
Expanded or 4:3. Default is
4:3.
Video
Displacement
Shifts the thermal image
left to right on the display.
Available values are -200
to 200. Default is 0.
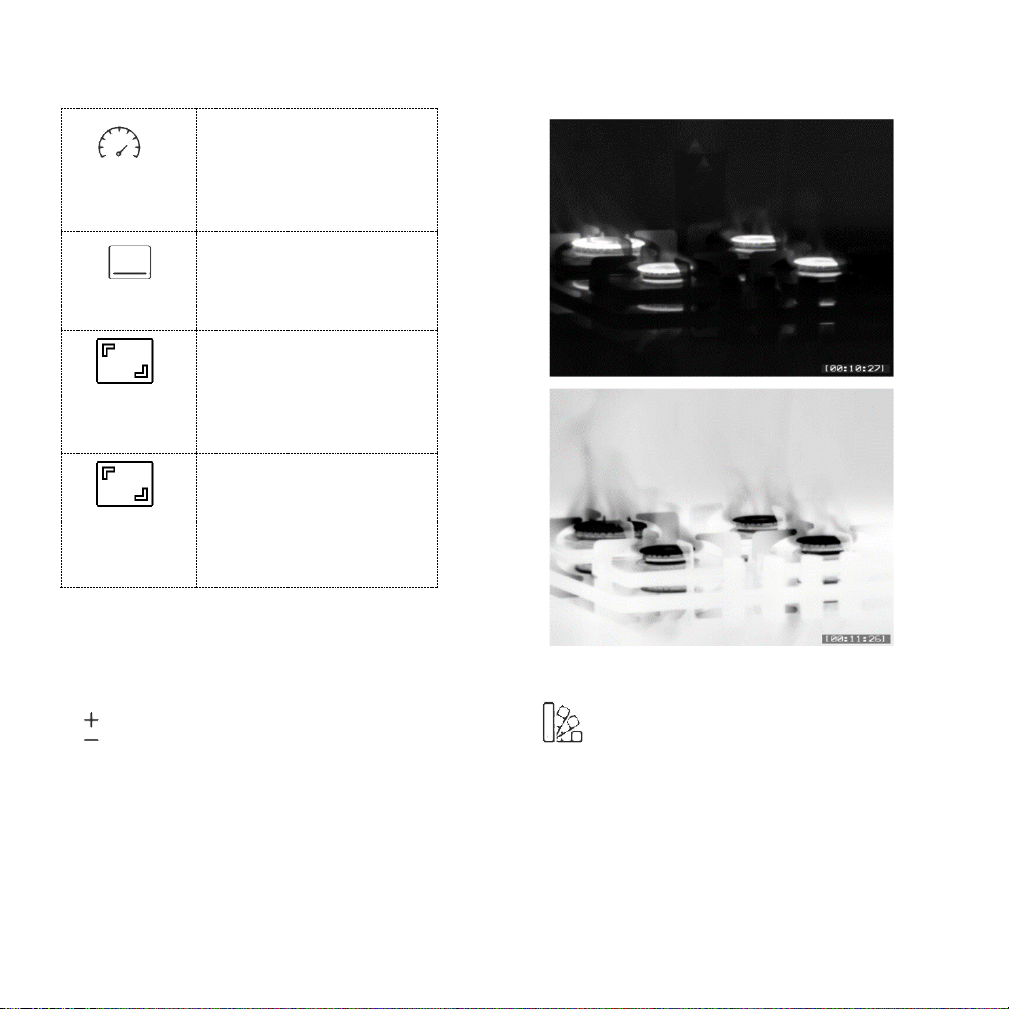
Changing Color Settings
Polarity
To select between two polarities: Positive
and Negative. The default polarity is set to
Negative. Polarity selection applies to
palettes and selective coloring.
Palette
To select from 10 built-in palettes to suit a
given scene. The following image shows all
the palettes with negative polarity:
Positive
Negative

17
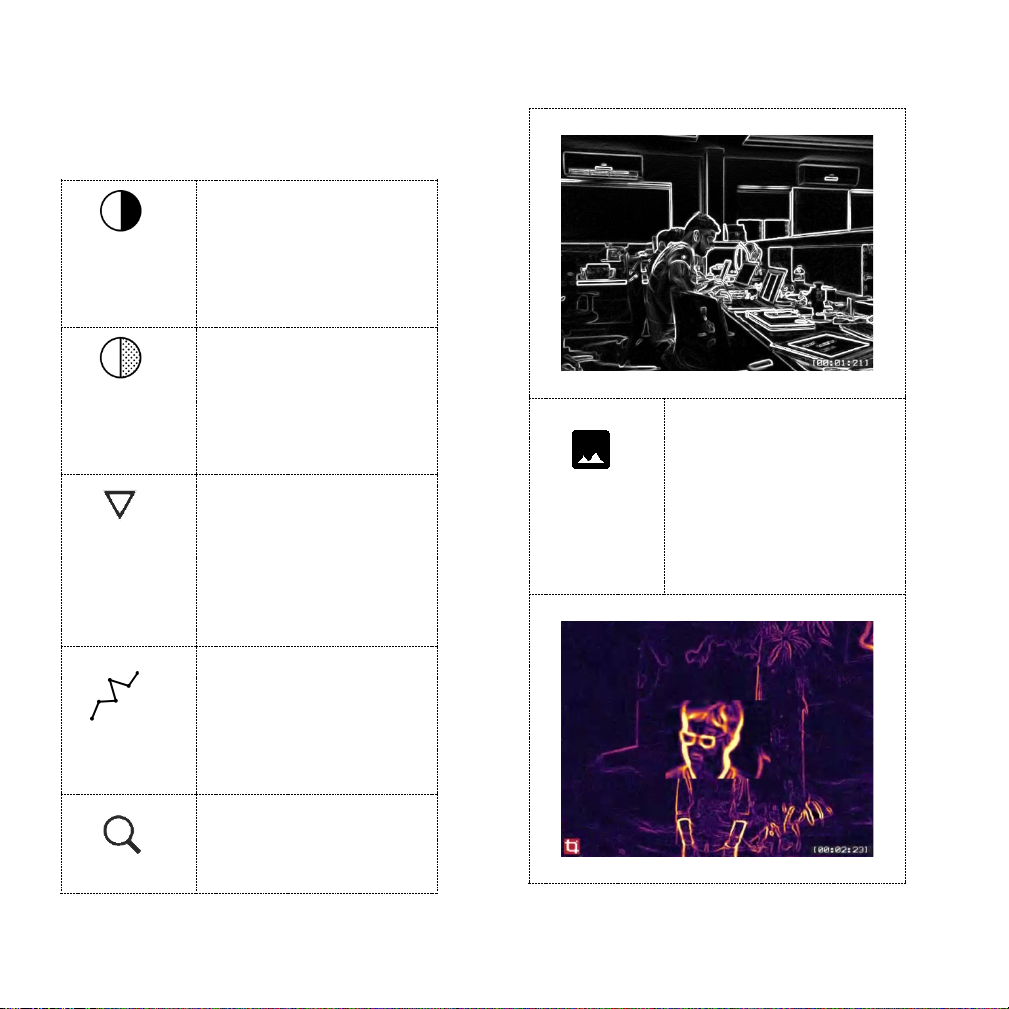
Selective Coloring
To selectively apply a palette on a target.
The rest of the scene is shown using the
previously selected color palette (ie. Teals,
Inferno, etc.)
Off: No selective coloring
Hot: Works best when the target is hotter
than the scene. This is the most commonly
used preset.
Moderate: Works best when the target is of
a moderate temperature compared to
other hot and cold objects in the scene.
Cold: Works best when the target is colder
than the scene.
Custom: To manually set a minimum and
maximum range to apply the palette.
The following image shows a scene where
selective coloring is applied with a Hot
preset:

18
In the image, the palette is only applied to
the objects in the scene that fall within the
threshold defined for the Hot preset.
Hottest areas are shown in red, moderate in
yellow, and lower temperature areas are
shown in blue. The palette is not applied to
the rest of the scene where the
temperatures are relatively lower.
Using Presets
Each preset is an optimal combination of
brightness, contrast, sharpness, polarity and
gain to deliver the best possible image in a
given environmental condition. There are 6
built-in presets:
Indoor
Enhanced brightness mode
to add more light to
shadow areas and even out
contrast.
City
Enhanced contrast mode to
view target against busy
skyline.
Forest
Low contrast mode perfect
to view animals against
foliage and vegetation.
Fixed
Recommended for fixed or
static scenes.
Semi-Auto
Provides enhanced
information in the scene,
but increases noise.
Automatic
Default template, should
work well in most cases.
Custom
User-defined presets
To configure and save a custom preset:
1. Navigate to Thermal or Image
settings using from Menu and

19
perform your scene adjustments as
required.
2. To save current settings as a custom
preset, navigate to Presets >
Save to Custom Preset
3. Select from the available custom
slots and click to save the
preset.
Using Rangefinder
Cinder has a built-in Stadiametric
Rangefinder to estimate the approximate
distance of a target of known size.
Inside the Rangefinder setting you will see
four built-in targets: Rabbit (0.30m height),
Boar (0.75m height), Deer (1.00m height),
and Custom (user defined height).
71.3m
178.3m
237.7m
358.5m
1.50m
Custom
To calculate the distance to target:
1. Place bottom arrow / lower bar at
the bottom of the target (use
buttons to position the bar, and
center button to finalize
placement ).
2. Place the top arrow / upper bar at
the crown of the target, using same
buttons.
3. Read the distance to the target in
the table to the right, using the icon
most similar in size to your target.
You can save up to two
custom, user-defined presets.
Note:

20
The distance to the target is
recalculated automatically when
you move the upper bar to the
target on the display.
4. Selecting the button will allow
you to alter the custom target size
by entering a sub-menu. Press e
button to exit that sub-menu.
5. If GPS has been enabled and the
Cinder has achieved good GPS lock,
a Waypoint can be created to the
target that was just ranged. This
waypoint takes into account the
orientation of the Cinder (ie uphill /
downhill), the compass direction
the Cinder is pointed in, and the
range to the target. Press to
create and name your waypoint.
You can then navigate to that
waypoint using the GPS Waypoints
menu.
GPS Waypoints
Cinder features navigation to a set point via
GPS.
Turning On / Off GPS
1. On the camera screen, click on
Menu and then select GPS
Waypoints.
2. Ensure that GPS is turned on via the
Enable/Disable GPS Menu
and has a 3D location fix. During the
first time the Cinder GPS is turned
on in a new location, it may take up
to 15 minutes to locate sufficient
satellites for a 3D fix. Subsequent
uses in the same location should
If using the Cinder App, then
waypoints generated in this
manner will also be navigable
using Google Maps.
Ensure that the compass
is calibrated before using
the waypoint feature.
Compass calibration can
be done by following the
steps mentioned in the
Calibrating Compass
section.
Note:
Warning:
Table of contents


