Steren CAL-250 User manual

Product / Producto: 2-COLOR
PRINTING CALCULATOR /
SUMADORA DE ESCRITORIO DE 12
DIGITOS CON IMPRESION
Model / Modelo: CAL-250
Brand / Marca: Steren
CONDICIONES
1. Para hacer efectiva esta garantía se requiere: La presentación de esta póliza y del producto, en el lugar en donde fue adquirido o en ELECTRONICA STEREN S.A. DE C.V.
2. ELECTRONICA STEREN S.A. DE C.V. se compromete a reparar el producto en caso de estar defectuoso sin ningún cargo al consumidor.
3. El tiempo de reparación en ningún caso será mayor a 30 días contados a partir de la recepción del producto en cualquiera de los sitios en donde pueda hacerse efectiva la
garantía.
4. El lugar donde puede adquirir partes, componentes, consumibles y accesorios, así como hacer válida esta garantía es: En cualquiera de las direcciones arriba mencionadas.
ESTA GARANTIA NO ES VALIDA EN LOS SIGUIENTES CASOS:
1. Cuando el producto ha sido utilizado en condiciones distintas a las normales.
2. Cuando el producto no ha sido operado de acuerdo con el instructivo de uso.
3. Cuando el producto ha sido alterado o reparado por personas no autorizadas por ELECTRONICA STEREN S.A. DE C.V.
Nota: El consumidor podrá solicitar que se haga efectiva la garantía ante la propia casa comercial, donde adquirió el producto. Si la presente garantía se extraviara, el
consumidor puede recurrir a su proovedor para que le expida otra póliza de garantía, previa presentación de la nota de compra o factura respectiva.
DATOS DEL DISTRIBUIDOR
DISTRIBUTION / NOMBRE / DISTRIBUIDOR:
ADDRESS / DOMICILIO:
PRODUCT / PRODUCTO: BRAND / MARCA:
MODEL / MODELO: SERIAL NUMBER / No. DE SERIE:
DATE OF DELIVERY / FECHA DE ENTREGA:
Call Center / Centro de Atención a Clientes
del Interior 01 800 500 9000
Mexico City / Cd. de México: 53 54 22 90
Warranty
CONDITIONS:
1. This warranty card with all the required information, the invoice or purchase ticket, the packing or package, must be presented with the product when warranty
service is required.
2. If product hasn’t exceed warranty period, the company will repair it free of charge including transportation charges.
3. The repairing time will not exceed 30 natural days, from the day the claim was received.
4. Steren sells parts, components, consumables and accessories to customer, as well as warranty service, at any of the following addresses:
THIS WARRANTY IS VOID ON THE NEXT CASES:
If the product has been damage by an accident, acts of God, mishandling, leaky batteries, failure to follow enclosed instructions, improper repair by unauthorized
personnel, improper safe keeping.
Notes:
a) The customer can also claim the warranty service on the purchase establishment.
b) If you lose the warranty card, we can reissue it just showing the invoice or purchase ticket.
Póliza de Garantía
This Steren product is guaranteed under
normal usage against defects in
workmanship and materials to the original
purchaser for one year from the date of
purchase.
Garantiza este producto por el término de
un año en todas sus partes y mano de obra
contra cualquier defecto de fabricación y
funcionamiento, a partir de la fecha de
entrega.
V0606

INSTRUCTIVO DE USO DE SUMADORA DE ESCRITORIO DE 12
DIGITOS CON IMPRESION
Modelo: CAL-250
Marca: Steren
Antes de utilizar su nueva Sumadora de Escritorio lea este
instructivo para evitar cualquier mal funcionamiento. Guárdelo para
futuras referencias.
Su nueva sumadora de escritorio cuenta con una pantalla de LCD de 12
dígitos. Permite imprimir las operaciones realizadas en dos colores (negro
y rojo). Incluye funciones matemáticas básicas así como funciones de
impuestos, horario mundial, porcentaje, raíz cuadrada, memoria,
conversiones, cálculo de tiempo, entre otras.
IMPORTANTE
No exponga el equipo a temperaturas extremas.
Siempre utilice un paño suave limpio y seco para limpiar el equipo.
No use ni almacene este equipo en lugares donde existan goteras o
salpicaduras de agua. Puede causar un mal funcionamiento o un choque
eléctrico.
No deje caer la calculadora ni tampoco la someta a fuertes impactos.
No intente abrir el equipo, puede ocasionar malfuncionamiento y
anulación de la garantía.
Asegúrese de apagar el equipo cuando ya no vaya a utilizarlo.
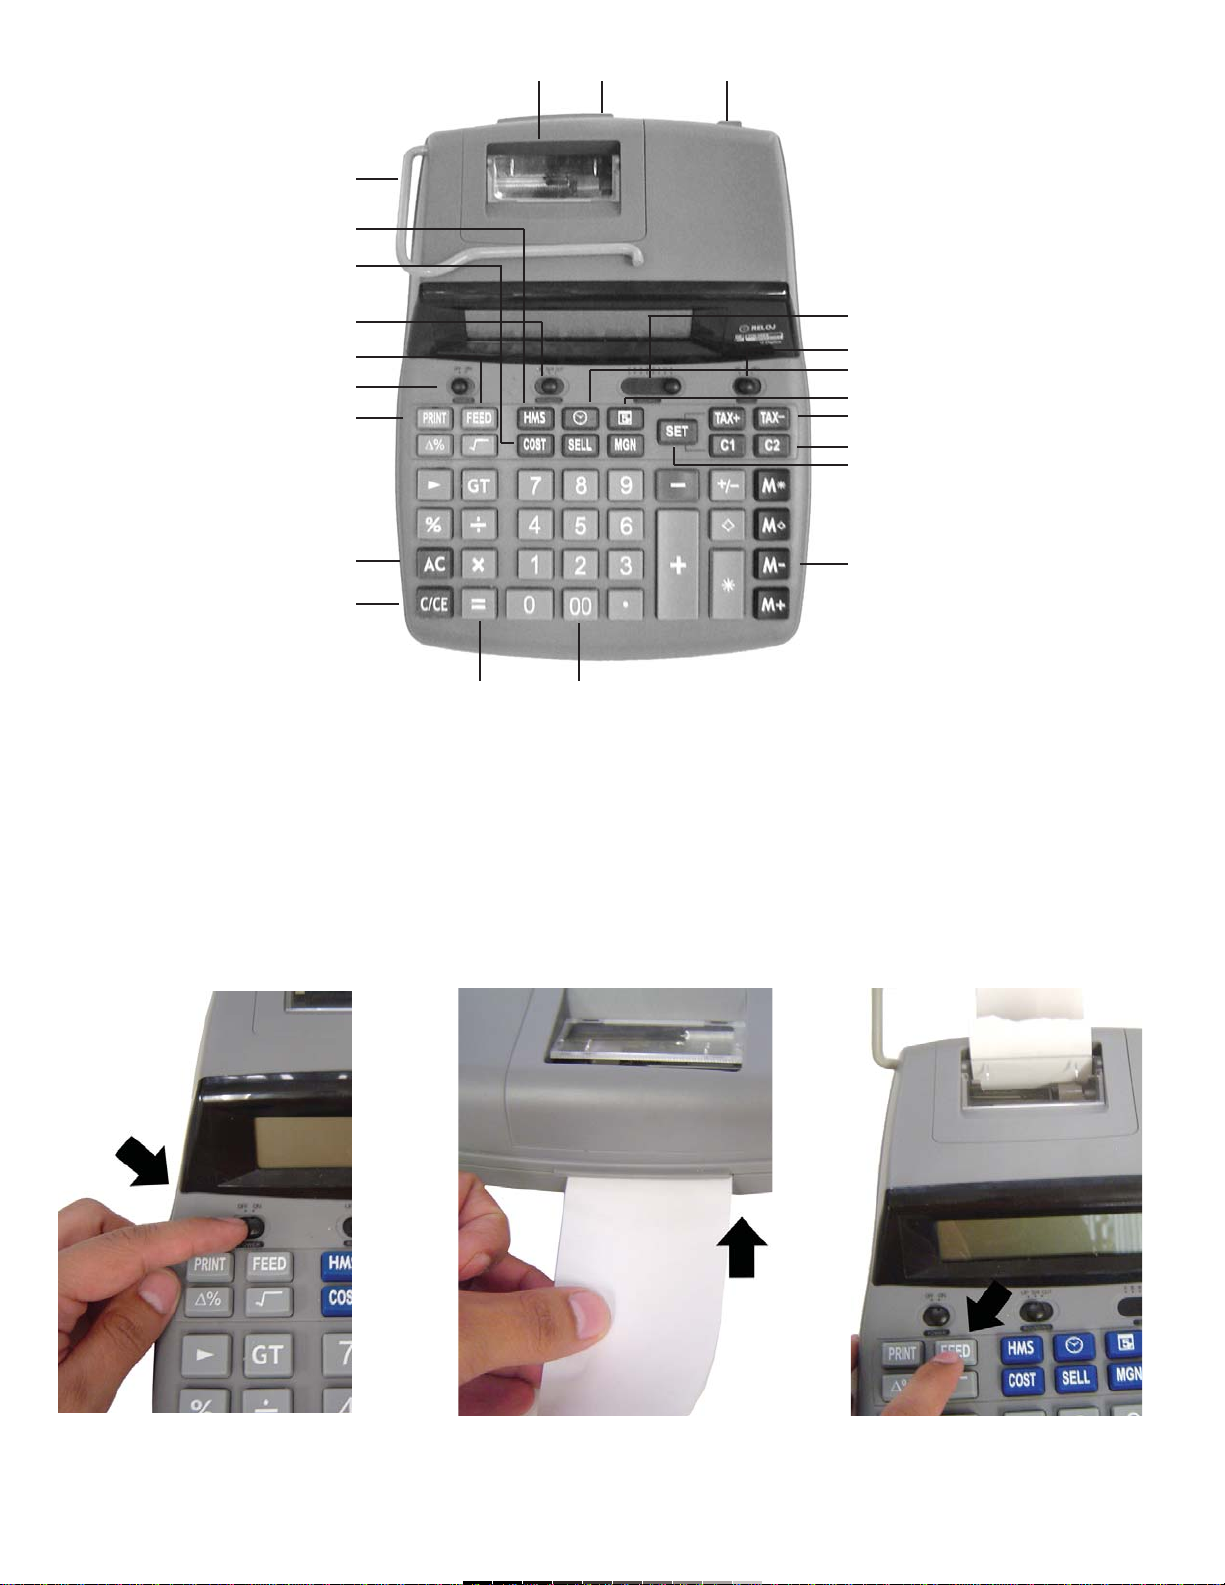
CONTROLES
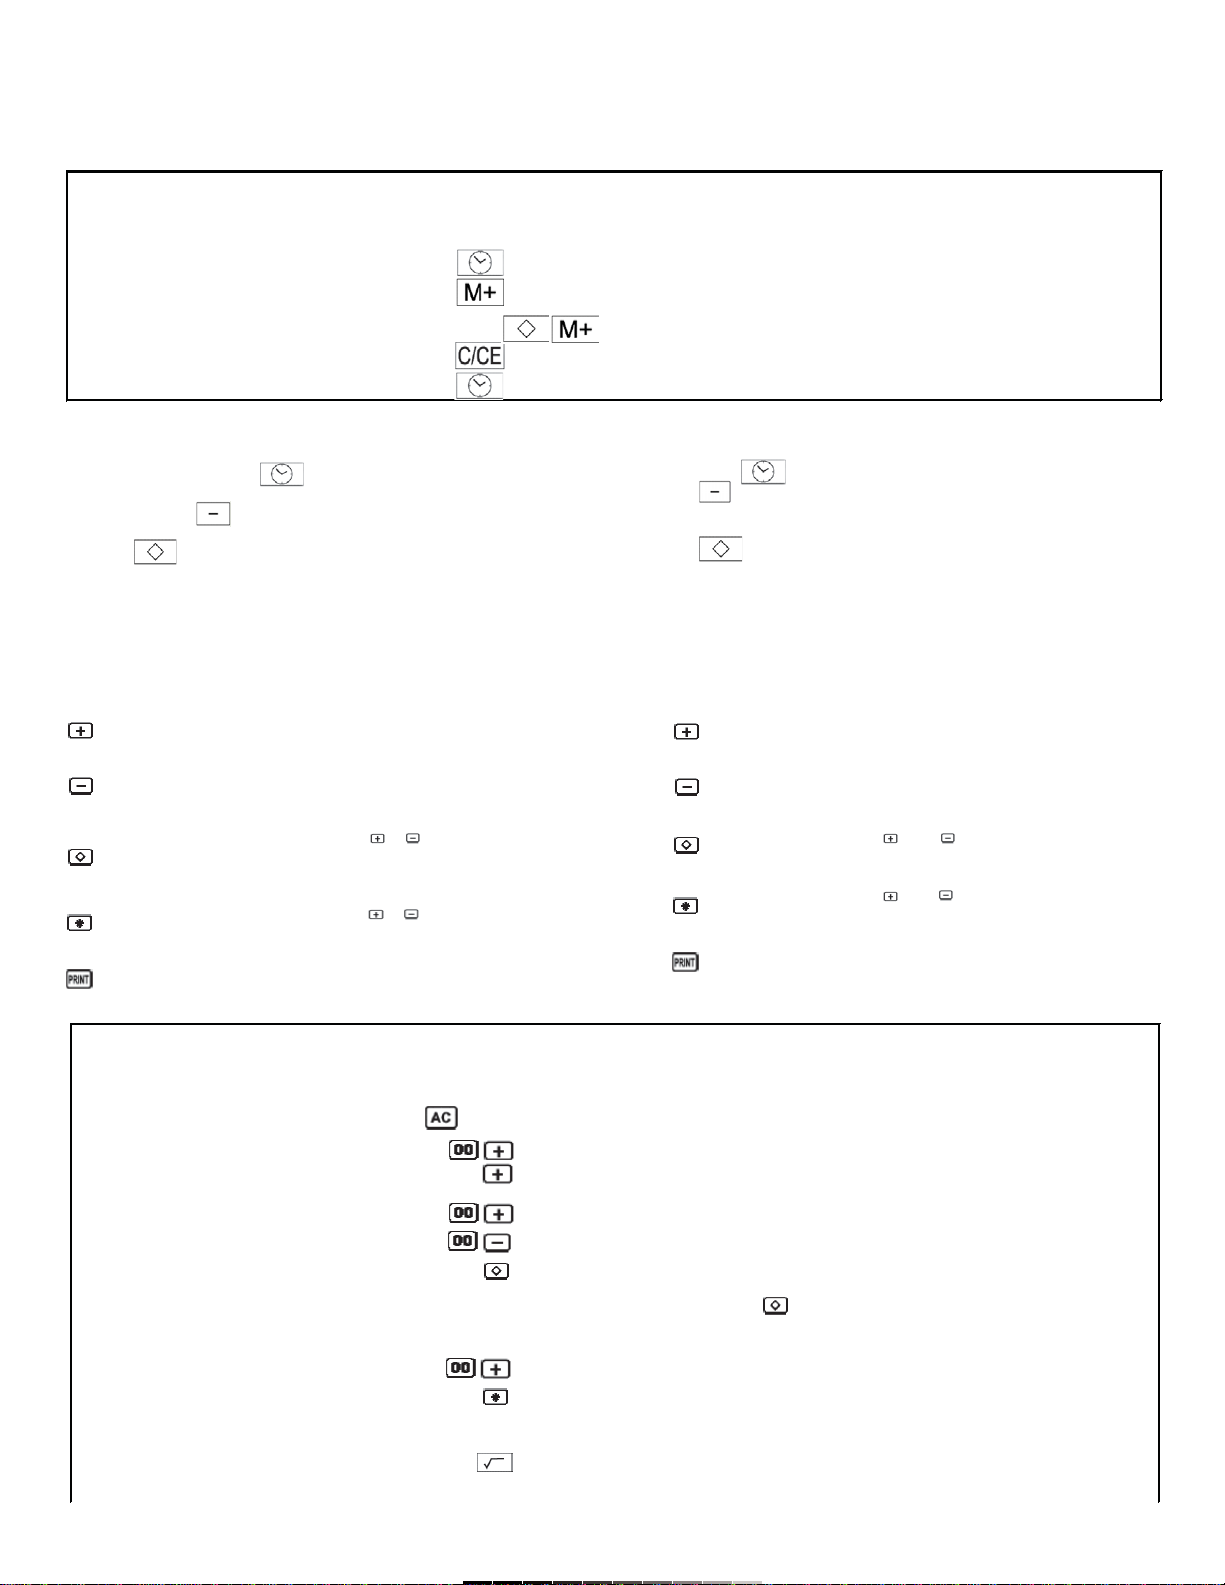
1.- Encendido / Apagado ............... Enciende / Apaga el equipo
2.- Imprimir .................................... Envía a impresión la cantidad
mostrada en pantalla
3.- Alimentación ............................ Permite introducir el rollo de
papel en la calculadora
4.- Funciones matemáticas
5.- AC ........................................... Borra todas las operaciones
6.- C/CE …………………………… Borra las entradas
7.- Teclas numéricas
8.- Memoria .................................. En modo de calculadora permite
acceder a la función de memoria /
cambia entre diferentes opciones
9.- Cálculo de tiempo ................... Permite realizar operaciones de
tiempo
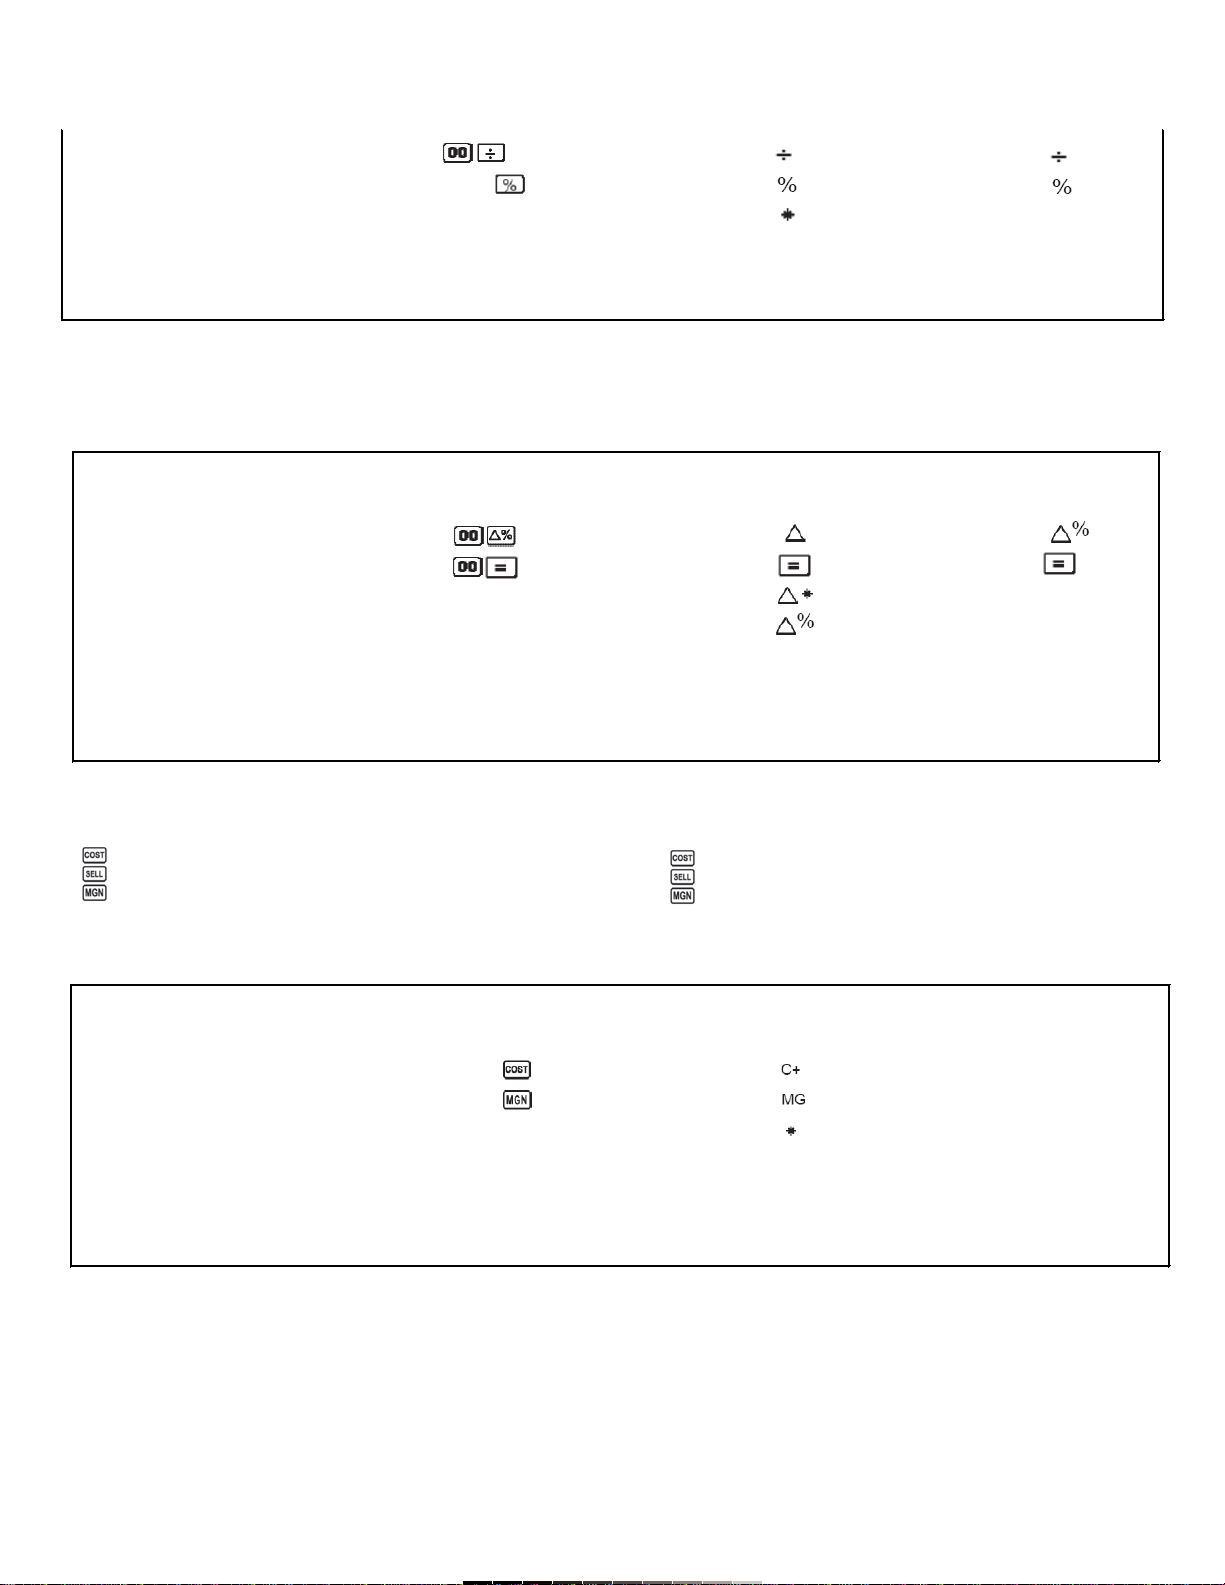
10.- Cálculo de costos ................. Permite realizar operaciones de
costos, ventas y márgenes de
utilidad
11.- Fecha ................................... Visualiza la fecha actual
12.- Hora ...................................... Visualiza la hora actual
13.- Ajustes .................................. Permite introducir un valor de
impuestos (TAX) y/o valor de
conversión
14.- Impuestos ............................. Calcula cantidades con y sin
impuestos
15.- Conversión ........................... Permite realizar conversiones de
cantidades
16.- Redondeo .............................. Redondea las cantidades
desplegadas en pantalla
17.- Decimales .............................. Especifica el número de
decimales a desplegar en
pantalla
18.- Impresión ............................... Activa / desactiva la impresión de
las operaciones
19.- Soporte de papel ................... Permite colocar el rollo de papel
de impresión
20.- Abertura para papel ............... Permite insertar el papel de
impresión
21.- Impresora
22.- Adaptador de corriente .......... Permite conectar el adaptador de
corriente suministrado
INSTRUCTION MANUAL FOR 2-COLOR PRINTING
CALCULATOR
Model: CAL-250
Brand: Steren
Before using your new 2-Color Printing Calculator, please read this
instruction manual to prevent any damage. Put it away in a safe place
for future references.
Your new electronic printing calculator includes a foldable 12-digit LCD
screen. Allows you to print in two colors (black and red). Some of the
features are: basic math functions, tax function, world time, percentage,
square root, memory, conversions, time calculating, among others.
IMPORTANT
Do not expose to extreme temperatures.
Clean only with a soft, dry cloth.
Do not use or store the equipment near wet places. May cause
malfunction or shock hazard.
Do not drop or hit the device.
Do not try to open the equipment, may cause malfunction and warranty
repeal.
Turn the equipment off when you don’t need to use it.
CONTROLS
1.- On / Off ................................... Power on / off the equipment
2.- Print ........................................ Print the displayed operation
3.- Feed ........................................ Allows you to put the paper roll
into the calculator
4.- Math functions
5.- AC ........................................... Erase all operations
6.- C/CE ........................................ Delete all entries
7.- Numeric keys
8.- Memory buttons ..................... On Calculator mode, allows you
to get access to Memory
functions / switch different
functions
9.- HMS .................. ...................... Allows you to make time
operations
10.- Cost, Sell, Margin ……………. Allows you to perform cost, sells
and margin operations
11.- Date …………………………… Visualize current date
12.- Time ...................................... Visualize current time
13.- Set …………………………….. Allows you to enter a Tax value
and / or conversion value
14.- Tax ……………………………. Calculate operations with or
without taxes
15.- Conversion ............................ Allows you to make numeric
conversions
16.- Rounding ............................... Use this function to round
operations
17.- Decimals ................................ Use this option to specify the
number of decimals to use
18.- Print ........................................ Activate / Deactivate print
function
19.- Papel holder ........................... Allows you to place the paper roll
20.- Opening .................................. Allows you to insert the leading
edge of the paper
21.- Printer
22.- AC power adaptor .................. Allows you to connect the
supplied AC power adaptor

COLOCANDO EL PAPEL
1.- Encienda el equipo, deslizando el botón de Encendido a la posición
ON (Fig. 1).
2.- Coloque el principio del rollo en la Abertura de papel (FIg. 2).
3.- Presione el botón de Alimentación (Feed), varias veces hasta que el
papel salga a través de la impresora (FIg. 3).
Nota:
Se recomienda utilizar papel de 58mm de ancho x 80mm de diámetro o
menor.
PAPER ROLL PLACEMENT
1.- Turn the equipment on (Fig. 1).
2.- Insert the leading edge of the paper roll into the opening (Fig. 2).
3.- Feed the paper by pressing Feed button, until the paper out through
the printer (Fig. 3).
Note:
We recommend to use a 58mm W x 80mm or less of diameter paper roll.
1
2
3
4
5
6
7
8
9
10
11
12
13
14
15
17
16
18
19
2021 22
Fig. 1 Fig. 2 Fig. 3

REEMPLAZANDO EL ROLLO DE TINTA
Reemplace el cartucho de tinta cuando las impresiones sean demasiado
claras o ilegibles.
1.- Abra el compartimiento de la impresora (Fig. 4).
2.- Remueva el cartucho de tinta jalando hacia arriba (Fig. 5).
3.- Inserte el nuevo cartucho. Asegúrese de que el cartucho está colocado
firmemente.
4.- Coloque nuevamente la cubierta de la impresora.
Notas:
No utilice tinta líquida para volver a utilizar el cartucho, puede dañar el
equipo.
Utilice solamente cartuchos IR-40T compatibles
RELOJ Y CALENDARIO
Ajuste de la fecha
Antes de comenzar, deslice el botón de Impresión (Print) a la posición “P”
y el botón de Decimales (Decimal) a la posición “F”.
Presione el botón de Fecha para visualizar e imprimir la fecha (en modo
de impresión).
Presione el botón en modo de calendario para cambiar el formato
de fecha:
AÑO – MES - DÍA >>>> MES – DÍA – AÑO >>>> DÍA – MES – AÑO
INK ROLLER REPLACEMENT
If printing is blurry even when the ink roller is in the proper position,
replace the roller.
1.- Remove the printer cover. (Fig. 4)
2.- Hold the top of the ink roller and remove the roller by pulling it toward
you and then upward (Fig. 5).
3.- Install the new ink roller in the correct position. Make sure that the roller
is securely in place.
4.- Put back the printer cover.
Notes:
Applying ink to worn ink roller or use of unapproved ink roller may cause
serious damage to printer.
Use compatible IR-40T ink cartridges only.
CLOCK AND CALENDAR
Date setting
Before to start, slide Print button to “P” position and Decimal button to “F”
position.
Press Date button to visualize and print the date (on Print mode).
Press button on calendar mode to toggle the date format.
YEAR –MONTH–DAY >> MONTH–DAY–YEAR >> DAY–MONTH–YEAR
Fig. 4 Fig. 5
Ejemplo Operación Impresión Visualización
Example Operation Printout Display
Enero 15 2006 2005-01-01.......... 2005-01-01
January 15 2006
060115 2006-01-15.......... 2006-01-15
0.c 0.
2006-01-15........... 2006-01-15
Presione por 2 segundos / Hold 2 seconds

Ejemplo Operación Impresión Visualización
Example Operation Printout Display
100 0.c 0.
100 1 100.+ 100.+
300 100.+ 200.+
-200 3 300.+ 500.+
(300) (Subtotal) 2 200.- 300.-
600 004.......................
900 (Total) 300 300.
6 600.+ 900.+
005.......................
900.G+ GT900.
900.
30. GT30.
Ajuste de la hora
Antes de comenzar, deslice el botón de Impresión (Print) a la posición “P”
y el botón de Decimales (Decimal) a la posición “F”.
Presione el botón de Reloj para visualizar e imprimir la hora (en
modo de impresión).
Presione el botón para cambiar entre el formato de 12 horas o de
24 horas.
Presione para cambiar entre AM y PM en modo de 12 horas.
SUMAS Y RESTAS
Antes de comenzar, deslice el botón de Impresión (Print) a la posición
“PIC+” y el botón de Decimales (Decimal) a la posición “F”.
Las teclas que se van a utilizar son:
Presione este botón después de introducir un valor para
especificar que debe ser agregado al total.
Presione este botón después de introducir un valor, para
especificar que debe ser restado del total.
Presione este botón después de y para imprimir y
visualizar el subtotal hasta ese momento y mantener el
resultado en memoria.
Presione este botón después de y para imprimir y
visualizar el resultado de una suma o resta.
Presione este botón para imprimir el contenido de la pantalla de
LCD, esto no afecta los cálculos.
Time setting
Before to start, slide Print button to “P” position and Decimal button to “F”
position.
Press Clock button to visualize and print the hour (On print mode).
Press button on calendar mode to toggle the time format (12 or
24-hour format).
Press to change between AM and PM format in 12-hour mode.
ADDITION AND SUBTRACTION
Before to start, slide Print button to “PIC+” position and Decimal button to
“F” position.
This keys will be used:
Press this button after entering a value to specify that the value
should be added to the total.
Press this button after entering a value, to specify that it should
be subtracted to the total.
Press this button after and to print and visualize the
subtotal and keep the result on memory.
Press this button after and to print and visualize the result
of an addition or subtraction.
Press this button to print the LCD screen content, this operation
doesn’t affect calculations.
Ejemplo Operación Impresión Visualización
Example Operation Printout Display
4:17pm 12-05........... AM 12-05-38
0417 04-17........... PM 04-17-00
0.c 0.
04-17........... PM 04-17-00
Presione por 2 segundos / Hold 2 seconds

Suma y resta con función de repetición
MULTIPLICACIÓN Y DIVISIÓN
Multiplicación y División
Antes de comenzar, deslice el botón de Impresión (Print) a la posición “P”
y el botón de Decimales (Decimal) a la posición “F”.
Addition and subtraction using repeat operation
MULTIPLICATION AND DIVISION
Multiplication and Division
Before to start, slide Print button to “P” position and Decimal button to “F”
position.
500
200 0.c 0.
-400 5 500.+ 500.+
(300) (Subtotal) 2 200.+ 700.+
700 4 400.- 300.-
1000 (Total) 003....................... 300.
300.
7 700.+ 1'000.+
004.......................
GT1'000.+
1,000.G+
Ejemplo Operación Impresión Visualización
Example Operation Printout Display
0.c 0.
3
300.+ 300.+
300.+ 600.+
480 480.+ 1'080.+
250 250.+ 1'330.+
4
400.+ 1'730.+
400.+ 2'130.+
400.+ 2'530.+
007.......................
2,530. G+ GT 2'530
Cantidad Precio Unit Monto
Quantity Unit price Amount
2$300$600
1480480
1250250
3 400 1200
Cantidad total: 7
Total quantity: 7
Monto total: $ 2,530
Total amount: $ 2,530
Ejemplo Operación Impresión Visualización
Example Operation Printout Display
(100 + 400) x 100 0.c 0.
= 50000
1
100.+ 100.+
4 400.+ 500.+
500.x 500.x
1 100.= 50'000.=
50'000.

Deslice el botón de Impresión (Print) a la posición “P” y el botón de
Decimales (Decimal) a la posición “0”, así como la función de Redondeo a
la posición 5/4.
CÁLCULOS EN MODO “A”
En este modo son asumidos por omisión dos posiciones para decimales,
tanto para entrada de datos como para resultados, en todas las
operaciones de suma y resta.
Si utiliza el punto decimal cuando introduce datos, éste se conservará en
el mismo lugar que lo especificó .
Este modo no afecta a las operaciones de multiplicación y división.
Antes de comenzar, deslice el botón de Impresión (Print) a la posición “P”
y el botón de Decimales (Decimal) a la posición “A”.
USANDO LA MEMORIA INDEPENDIENTE
Presione este botón al final de una multiplicación o división para agregar
el resultado de la operación a la memoria. Presionar este botón en otro
momento agregará el valor desplegado en la pantalla en memoria.
Presione este botón al final de una multiplicación o división para restar el
resultado de la operación de la memoria. Presionar este botón en otro
momento restará el valor desplegado en la pantalla, de la memoria.
Presione este botón para mostrar el contenido de la memoria.
Presione este botón para borrar el contenido de la memoria.
Guardar valores
Antes de comenzar, deslice el botón de Impresión (Print) a la posición “P”
y el botón de Decimales (Decimal) a la posición “F”.
Slide Print button to “P” position, Decimal button to “0” position, and
Rounding selector to 5/4 position.
CALCULATIONS ON MODE “A”
2 decimal places are assumed for entries and results of addition and
subtraction operations.
If you use floating decimal point while entering data, decimal point is
included in the same position as you specified.
This mode doesn’t affect multiplication and division operations.
Before to start, slide Print button to “P” position and Decimal button to “A”
position.
USING INDEPENDENT MEMORY
Press this button at the end of a multiplication or division to add the result
to memory. Pressing this button at other moment, will add the displayed
value on screen to memory.
Press this button at the end of a multiplication or division to subtract the
result from memory. Pressing this button at other moment, will subtract the
displayed value on screen from memory.
Press this button to display memory content.
Press this button to erase memory content.
Storing values
Before to start, slide Print button to “P” position and Decimal button to “F”
position.
39600 ÷ 1600
=25 396 39,600.÷ 39'600.÷
16 1,600.= 25.=
25.
Ejemplo Operación Impresión Visualización
Example Operation Printout Display
$23.25 0.c 0.
45.75
-12.50 2325+ 23.25+ 23.25+
96.25 4575+ 45.75+ 69.00+
152.75 12 5 12.50- 56.50-
9625+ 96.25+ 152.75+
152.75G+ GT152.75

CALCULANDO PORCENTAJES
Utilice este botón para calcular porcentajes, agregar, descontar, razón, así
como incrementos o decrementos.
Si desea encontrar el cambio de porcentaje entre dos valores, presione
este botón.
Cálculo de porcentajes, adiciones y descuentos
Antes de comenzar, deslice el botón de Impresión (Print) a la posición “P”
y el botón de Decimales (Decimal) a la posición “F”.
PERCENTAGE CALCULATIONS
Use this button to calculate percentages, add-on, discount, ratio, and
increase / decrease calculations.
Press this button, if you want to find the percentage change between two
values.
Percentage, add-on and discounts calculations
Before to start, slide Print button to “P” position and Decimal button to “F”
position.
Ejemplo Operación Impresión Visualización
Example Operation Printout Display
140
250 0.c 0.
-90 140+ 140.+ 140.+
300 (Total) 250+ 250.+ 390.+
90- 90.- 300.-
300.G+ GT300.
950 300.M+ MGT300.
750 950+ 950.+ MGT950.+
1700 (Total) 750+ 750.+ MGT1'700.+
1,700.g+ MGT1'700.+
550 1,700.>m+ MGT.1'700
650 550+ 550.+ MGT550.+
(1200) (Subtotal) 650+ 650.+ MGT1'200.+
300 1,200. MGT1'200
1500 (Total)
3500 3 300.+ MGT1'500.+
Total acumulado 1,500.G+ MGT1'500
Acummulated total 1,500.M+ MGT1'500
3,500.M MGT3'500
3,500.M+ GT3'500.
Ejemplo Operación Impresión Visualización
Example Operation Printout Display
12% de 3574 3574 3,574.x 3,574.x
12% of 3574 12 12. 428.88
428.88

Ejemplo Operación Impresión Visualización
Example Operation Printout Display
Porcentaje de / Percentage of 654 654 654. 654.
against / contra 852 852 852. 76.76
76.76
Deslice el botón de Impresión (Print) a la posición “P” y el botón de
Decimales (Decimal) a la posición “2”, así como la función de Redondeo a
la posición 5/4.
Deslice el botón de Impresión (Print) a la posición “P” y el botón de
Decimales (Decimal) a la posición “F”.
Deslice el botón de Impresión (Print) a la posición “P” y el botón de
Decimales (Decimal) a la posición “F”.
Para calcular la razón, incrementos y decrementos
Antes de comenzar, deslice el botón de Impresión (Print) a la posición “P”,
el botón de Decimales (Decimal) a la posición “2” y el Redondeo a “5/4”.
Slide Print button to “P” position, Decimal button to “2” position, and
Rounding selector to 5/4 position.
Slide Print button to “P” position and Decimal button to “F” position.
Calculating ratios, increases, and decreases
Before to start, slide Print button to “P” position, Decimal button to “2”
position. And Rounding selector to “5/4”.
6% de 1590 / 6% of 1590 6 6.X 6.X
6% de 3698 / 6% of 3698 1590 1,590 95.40
95.40
3698 3,698 221.88
221.88
Agregar el 15% a 1500 15 1,500.X 1'500.x
15% add-on of 1500 15 15. 225.
225.
1,725.+ 1,725.+
25% de descuento de 1950 1950 1,950.x 1'950.x
25% discount of 1950 25 25. 487.5
487.5
1,462.5- 1'462.5-

Deslice el botón de Impresión (Print) a la posición “P”, el botón de
Decimales (Decimal) a la posición “2” y el Redondeo a “5/4”.
Cálculo de porcentaje delta
Antes de comenzar, deslice el botón de Impresión (Print) a la posición “P”,
el botón de Decimales (Decimal) a la posición “F”.
CÁLCULO DE COSTOS, VENTAS Y UTILIDADES
Utilice este botón para introducir el costo.
Utilice este botón para introducir el precio de venta.
Utilice este botón para introducir el valor de ganancia.
Antes de comenzar, deslice el botón de Impresión (Print) a la posición “P”,
el botón de Decimales (Decimal) a la posición “F”.
Slide Print button to “P” position, Decimal button to “2” position. And
Rounding selector to “5/4”.
Delta percentage calculation
Before to start, slide Print button to “P” position, and Decimal button to “2”
position.
CALCULATING COST, SELL, PROFIT
Use this button to enter cost value.
Use this button to enter selling price value.
Use this button to enter profit rate.
Before to start, slide Print button to “P” position, and Decimal button to “F”
position.
Si ganó $110 la semana pasada 1 100. 100.
y $100 esta semana. 110 110. 90.91
Que porcentaje decreció? 90.91
If you earned $110 last week
and $100 this, what percentage
did your income decrease?
Ejemplo Operación Impresión Visualización
Example Operation Printout Display
La ganancia del año pasado fue de 15 1,500. 1'500.
$1500. Para este año es de $1800. 18 1,800. 20.
Cuál es el porcentaje de 300.
incremento? 20.
The profit for lsat year was $1500.
For this year is $1800.
What's the increased
percentage?
Ejemplo Operación Impresión Visualización
Example Operation Printout Display
Cuál será el precio de venta y la 480 480. 480.
ganancia cuando el precio de 40 40. 800.
compra es de $480 y el valor de 800. (Precio de Venta)
utilidad es del 40% (Selling Price)
What will be the selling price and
profit when purchasing price is $480
and profit rate is 40%

Para determinar el costo
Deslice el botón de Impresión (Print) a la posición “P”, el botón de
Decimales (Decimal) a la posición “F”.
Para determinar el margen
Deslice el botón de Impresión (Print) a la posición “P”, el botón de
Decimales (Decimal) a la posición “F”.
CÁLCULO DEL GRAN TOTAL
Muestra e imprime el contenido del gran total de la memoria y la borra.
To determine cost
Slide Print button to “P” position, and Decimal button to “F” position.
To determine profit
Slide Print button to “P” position, and Decimal button to “F” position.
GRAND TOTAL
Allows you to print and visualize grand total memory content and erase it.
Ejemplo Operación Impresión Visualización
Example Operation Printout Display
Si el precio de venta de un 36.55 36.55c- 36.55
artículo es de $36.55 y el margen 20 20.MG 29.24
es de 20%, encuentra el 29.24
costo del artículo
If the selling price is $380 and
the margin is 20%, find the
cost of the item
Ejemplo Operación Impresión Visualización
Example Operation Printout Display
Si el costo de un artículo es 380 380.c 380
de $380 y el precio de venta es 400 400.c 5
de $400, encuentra el margen 5
If the cost of an item is
$380 and selling price is
$400 find the margin
Ejemplo Operación Impresión Visualización
Example Operation Printout Display
456 0.c 0.
254 456+ 456.+ 456.+
710 (Total) 254+ 254.+ 710.+
710.G+ GT710.
773 773+ 773.+ GT 773.+
1048 1048+ 1048.+ GT 1821.+
(2000) 2000- 2000.- GT -179.-
-179 (Total) -179.G+ GT -179.
531.G GT 531.
531 531.G 531.
(Gran total / Grand total)

CÁLCULO DE IMPUESTOS
Calcula el valor de un artículo con impuesto incluido.
Calcula el valor de un artículo restando el valor del impuesto.
Permite introducir el valor del impuesto a utilizar.
Antes de comenzar, deslice el botón de Impresión (Print) a la posición “P”,
el botón de Decimales (Decimal) a la posición “F”.
Ajuste del porcentaje de impuesto (17%)
Cálculo de impuestos
CONVERSIÓN
Utilice estos botones para realizar las conversiones.
Presione para ingresar el valor de la conversión
Ajuste del valor de conversión a 8.65 (C1=8.65 C2)
Antes de comenzar, deslice el botón de Impresión (Print) a la posición “P”,
el botón de Decimales (Decimal) a la posición “F”.
TAX CALCULATIONS
Calculate the value of an item plus tax.
Calculate the value of an item less tax.
Allows you to set the tax value.
Before to start, slide Print button to “P” position, and Decimal button to “F”
position.
Setting tax value (17%)
Tax calculation
CONVERSION
Use this button to perform conversions.
Press this button to input conversion value.
Setting conversion rate to 8.65 (C1=8.65 C2)
Before to start, slide Print button to “P” position, and Decimal button to “F”
position.
Ejemplo Operación Impresión Visualización
Example Operation Printout Display
0.c 0.
17
17.% 17.
Ejemplo Operación Impresión Visualización
Example Operation Printout Display
Agregar un 17% a $200 0.c 0.
Add 17% to $200 200 200. 234.
17.%
34.+
234.+
El precio después de impuestos es 0.c 0.
de $58.5, y el impuesto es de 58.5 58.5 50.
17%. Calcule el precio 17.%
antes de impuestos -8.5+
50
Price after tax is $58.5.
Tax=17%. Calculate the
price before tax
Ejemplo Operación Impresión Visualización
Example Operation Printout Display
0.c 0.
8.65 8.65.% 8.65

Conversiones
Deslice el botón de Impresión (Print) a la posición “P”, el botón de
Decimales (Decimal) a la posición “F”.
Deslice el botón de Impresión (Print) a la posición “P”, el botón de
Decimales (Decimal) a la posición “2” y el botón de Redondeo a “5/4).
CÁLCULOS DE TIEMPO
Botón de tiempo
Especifica un valor de entrada como un “valor de tiempo” (sexagesimal)
Cambia entre el valor decimal desplegado y el valor sexagesimal (tiempo).
Deslice el botón de Impresión (Print) a la posición “P”, el botón de
Decimales (Decimal) a la posición “F”.
Ejemplo:
Calcular 2 horas con 15 minutos y 36 segundos más 20 minutos y 40
segundos.
Ejemplo:
Calcular 5 horas 20 minutos menos 98 segundos (1 minuto 38 segundos).
Conversions
Slide Print button to “P” position, and Decimal button to “F” position.
Slide Print button to “P” position, Decimal button to “F” position and
Rounding button to “5/4” position.
TIME CALCULATION
Time button
Specify an input value as time value (sexagesimal)
Switch between a displayed decimal value and sexagesimal value (time)
Slide Print button to “P” position, and Decimal button to “F” position.
Example:
Calculate 2 hours, 15 minutes and 36 seconds plus 20 minutes and 40
seconds.
Example:
Calculate 5 hours 20 minutes minus 98 seconds (1 minute and 38
seconds).
Ejemplo Operación Impresión Visualización
Example Operation Printout Display
Convertir 5 C2 a C1 0.c 0.c
Converting 5 C2 to C1 5 5. 43.25
8.65x
43.25
0.c 0.
Convertir 1085 C1 a C2 1085 1085. 125.43
8.65+
125.43
Ejemplo Operación Impresión Visualización
Example Operation Printout Display
0.c 0.
2 15 36 2.15,36 + 2-15'36" +
0 20 40 0.20,40 + 3-36'18" +
2.36,16 G+ GT 2-36'16"
Ejemplo Operación Impresión Visualización
Example Operation Printout Display
0.c 0.
5 20 5.20,00 + 5-20'00" +
0 0 98 0.1,38 - 5-18'22" -
5.18,22 G+ GT 5-18'22"

Multiplicación y división (cálculos de tiempo)
3 horas 58 minutos y 5 segundos
x 4 horas 17 minutos y 18 segundos
/ 8 horas 12 minutos
ESPECIFICACIONES
Entrada: 6V 300mA
Convertidor
Entrada: 125V ~ 60Hz 5W
Salida: 6V 300mA
Dimensiones: 210 x 210 x 65mm
Peso: 868g
Nota:
El diseño del producto y las especificaciones pueden cambiar sin previo
aviso.
Multiplication and division (time calculation)
3 hours 58 minutes and 5 seconds
x 4 hours 17 minutes and 18 seconds
/ 8 hours 12 minutes
SPECIFICATIONS
Input: 6V 300mA
AC Power Adaptor
Input: 125V ~ 60Hz 5W
Output: 6 V 300mA
Dimensions: 210 x 210 x 65mm
Weight: 868g
Note:
Product design and specifications are subject to change, without notice.
Ejemplo Operación Impresión Visualización
Example Operation Printout Display
0.c 0.
3 58 5 3.96805555555x 3.96805555555x
4 17 18 4.28833333333/ 17.0163449073/
8 12 8.2= 2.07516401308=
2.07516401308
2.04,31 2-04'31"=
Table of contents
Other Steren Calculator manuals