Steren AUT-200 User manual

Product / Producto: AUTOMOTIVE
ALARM / SISTEMA DE ALARMA
AUTOMOTRIZ
Model / Modelo: AUT-200
Brand / Marca: Steren
CONDICIONES
1. Para hacer efectiva esta garantía se requiere: La presentación de esta póliza y del producto, en el lugar en donde fue adquirido o en ELECTRONICA STEREN S.A. DE C.V.
2. ELECTRONICA STEREN S.A. DE C.V. se compromete a reparar el producto en caso de estar defectuoso sin ningún cargo al consumidor.
3. El tiempo de reparación en ningún caso será mayor a 30 días contados a partir de la recepción del producto en cualquiera de los sitios en donde pueda hacerse efectiva la
garantía.
4. El lugar donde puede adquirir partes, componentes, consumibles y accesorios, así como hacer válida esta garantía es: En cualquiera de las direcciones arriba mencionadas.
ESTA GARANTIA NO ES VALIDA EN LOS SIGUIENTES CASOS:
1. Cuando el producto ha sido utilizado en condiciones distintas a las normales.
2. Cuando el producto no ha sido operado de acuerdo con el instructivo de uso.
3. Cuando el producto ha sido alterado o reparado por personas no autorizadas por ELECTRONICA STEREN S.A. DE C.V.
Nota: El consumidor podrá solicitar que se haga efectiva la garantía ante la propia casa comercial, donde adquirió el producto. Si la presente garantía se extraviara, el
consumidor puede recurrir a su proovedor para que le expida otra póliza de garantía, previa presentación de la nota de compra o factura respectiva.
DATOS DEL DISTRIBUIDOR
DISTRIBUTION / NOMBRE / DISTRIBUIDOR:
ADDRESS / DOMICILIO:
PRODUCT / PRODUCTO: BRAND / MARCA:
MODEL / MODELO: SERIAL NUMBER / No. DE SERIE:
DATE OF DELIVERY / FECHA DE ENTREGA:
Call Center / Centro de Atención a Clientes
del Interior 01 800 500 9000
Mexico City / Cd. de México: 53 54 22 90
Warranty
CONDITIONS:
1. This warranty card with all the required information, the invoice or purchase ticket, the packing or package, must be presented with the product when warranty
service is required.
2. If product hasn’t exceed warranty period, the company will repair it free of charge including transportation charges.
3. The repairing time will not exceed 30 natural days, from the day the claim was received.
4. Steren sells parts, components, consumables and accessories to customer, as well as warranty service, at any of the following addresses:
THIS WARRANTY IS VOID ON THE NEXT CASES:
If the product has been damage by an accident, acts of God, mishandling, leaky batteries, failure to follow enclosed instructions, improper repair by unauthorized
personnel, improper safe keeping.
Notes:
a) The customer can also claim the warranty service on the purchase establishment.
b) If you lose the warranty card, we can reissue it just showing the invoice or purchase ticket.
Póliza de Garantía
This Steren product is guaranteed under
normal usage against defects in
workmanship and materials to the original
purchaser for one year from the date of
purchase.
Garantiza este producto por el término de
un año en todas sus partes y mano de obra
contra cualquier defecto de fabricación y
funcionamiento, a partir de la fecha de
entrega.
V1006

INSTRUCTIVO DE USO DE SISTEMA DE ALARMA AUTOMOTRIZ
Modelo: AUT-200
Marca: Steren
Antes de utilizar su nuevo Sistema de Alarma Automotriz lea este
instructivo para evitar cualquier mal funcionamiento. Guárdelo para
futuras referencias.
El nuevo sistema de alarma automotriz es perfecto para aquellas
personas que requieran un sistema de seguridad confiable para su auto.
Cuenta con todos los componentes necesarios para su instalación, así su
automóvil estará a salvo de robos potenciales. La alarma cuenta con
varias características, y el control remoto de llavero es ideal para
mantener su automóvil seguro.
IMPORTANTE
No intente abrir el equipo, puede ocasionar malfuncionamiento y
anulación de la garantía.
No use ni almacene este equipo en lugares donde existan goteras o
salpicaduras de agua.
No utilice el equipo en lugares con temperaturas extremas.
Si no tiene conocimiento de instalación de alarmas automotrices, acuda
con un especialista.
Siempre utilice un paño suave, limpio y seco para limpiar el equipo.
CARACTERÍSTICAS
Armado automático
Modo silencioso
Seguros eléctricos controlados por ignición
Apertura de cajuela eléctrica
Corte de encendido
Modo Valet
Sirena de 6 tonos
CONTROLES
1.- Mientras el auto esté apagado ................. Activa la alarma /
búsqueda mediante un
tono y parpadeo del
LED
2.- Mientras el auto esté encendido ............ Cierra las puertas de
forma automática
Mientras el auto está apagado ............... Desactiva la alarma
3.- Mientras el auto esté encendido ............ Abre las puertas de
forma automática
Mientras el auto está apagado ............... Activa el modo
silencioso / búsqueda
mediante el parpadeo
del LED
4.- Mientras el auto esté apagado ............... Activa la alarma de
pánico
Mientras el auto está encendido ............. Activa el modo
anti-asalto
INSTRUCTION MANUAL FOR AUTOMOTIVE ALARM
Model: AUT-200
Brand: Steren
Before using your new Automotive alarm, please read this instruction
manual to prevent any damage. Put it away in a safe place for future
references.
Your new STEREN automotive alarm is perfect for people that require a
trustworthy security system for their cars. This device has all the
necessary components for its installation. This way your car will be
completely safe against potential robbery. This alarm has several
characteristics for the safety of your car and the included keychain remote
control is ideal for keeping your car safe.
IMPORTANT
Do not attempt to open this device; doing so could lead to malfunctions in
the device and the annulment of the warranty.
Do not use or store this device anywhere it might get wet.
Do not use this device in extreme temperatures.
If you do not have knowledge on the installation of automotive alarms,
make sure to go to a professional.
Always use a clean, soft, and dry rag in order to clean this device.
CHARACTERISTICS
Automatic arm
Silent mode
Automatic locks controlled by ignition
Electric trunk opening
Ignition shut-off
Valet mode
6 tome siren
CONTROLS
1.- While the car is off................................ Activates the alarm /
search through a tone
and LED blinking
2.- While the car is on ............................... Automatically closes
the doors
While the car is off ............................... Deactivates
the alarm
3.- While the car is on ................................. Opens the doors
automatically
While the car is off ................................. Activates silent mode /
search through LED
blinking
4.- While the car is on .................................. Activates the panic
alarm
While the car is off .................................. Activates anti-assault
mode
12
34

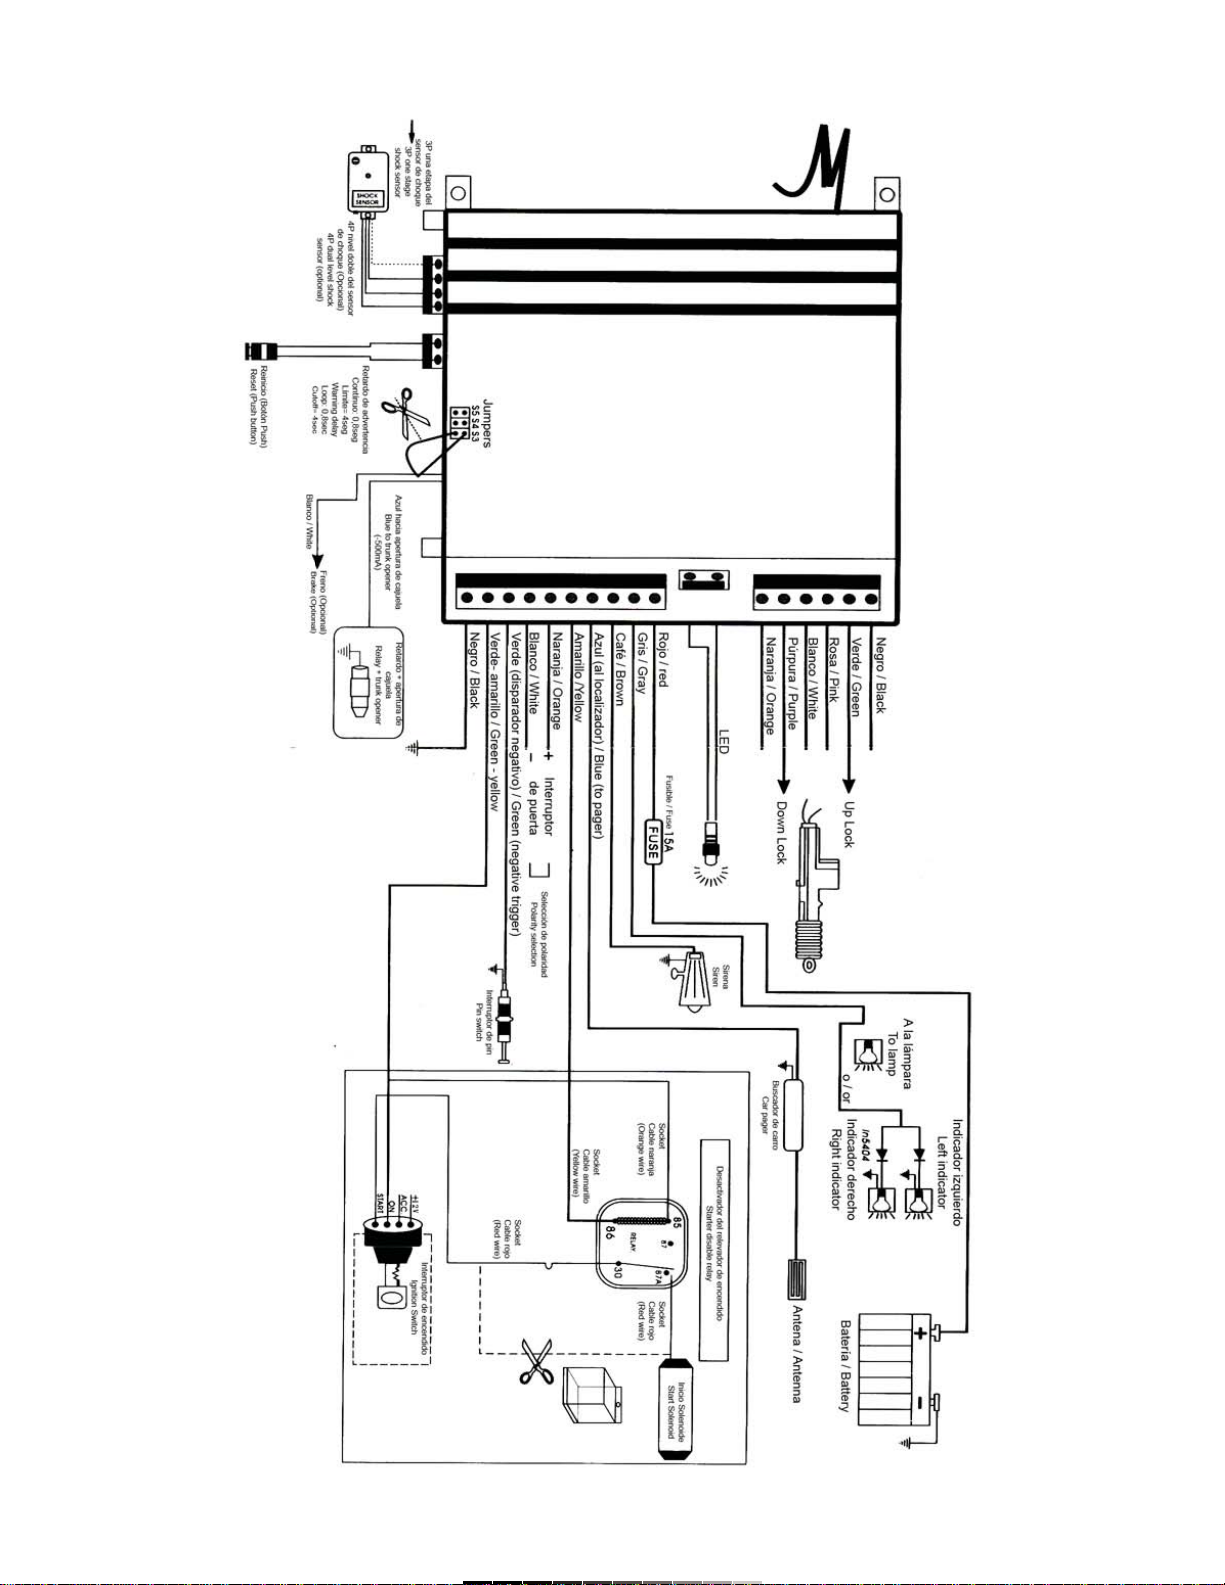
COMO PROGRAMAR EL TRANSMISOR
1.- Presione el interruptor de Reinicio y coloque el interruptor de
encendido del carro en ON.
2.- Inserte el conector de 10 pines en la unidad principal, para encenderla.
3.- 4 bips se escucharán y el LED indicador parpadeará, indicando que ha
entrado en modo de programación.
4.- En un lapso no mayor a 30 segundos, presione el botón 1 en el
transmisor.
5.- La unidad principal se sincronizará con el receptor y la sirena emitirá
un bip.
6.- Para programar el segundo transmisor, presione el botón 1 en el
segundo transmisor.
7.- Cuando la unidad principal se sincronice con el receptor, escuchará 2
bips.
Nota:
Puede programar hasta 4 transmisores.
ARMADO
Presione el botón 1 del transmisor una vez, escuchará un bip. Las luces
comenzarán a parpadear indicando que se encuentra en el modo de
armado.
Una vez que la alarma ha sido armada, el circuito de encendido
desactivado, se activará instantáneamente y el LED indicador comenzará
a parpadear lentamente.
SILENCIAR LA ALARMA
Mientras la sirena esté activada en modo de armado, presione el botón 1
para desactivarla. Aun cuando la sirena esté silenciada, el sistema seguirá
en modo de armado.
ARMADO SILENCIOSO
Presione el botón 3 del transmisor, las luces parpadearán una vez para
confirmar que entró al modo de armado silencioso.
Esta función es recomendada para sistemas que usan el accesorio
“Buscador de Alarma” (Alarm Pager).
Bajo este modo, si existen cualquier interferencia en el vehículo, se
transmitirá una señal directamente al “buscador” y las luces parpadearán
por 30 segundos.
Si el interruptor de encendido se accesa, esto hará que el “buscador” y la
sirena se activen.
CÓMO DESARMAR EL SISTEMA DE ALARMA
Presione el botón 2 una vez, la sirena emitirá 2 bips y las luces
parpadearán 3 veces. El sistema de alarma está desactivado.
Para propósitos de seguridad, mientras el sistema está desarmado y el
interruptor de ignición está en posición de encendido (ON), únicamente la
función de abrir y cerrar están activadas así como el sistema anti-robo, el
resto de las funciones serán desactivadas.
RE-ARMADO AUTOMÁTICO
En caso de que no logre alguna puerta en un lapso de 20 segundos, el
sistema volverá a rearmarse automáticamente.
Escuchará un bip y las luces indicadores parpadearán una vez para
confirmar que entro al modo de rearmado.
BÚSQUEDA DE AUTOMÓVIL
1.- Durante el modo de Armado, presione el botón 1 del transmisor, la
sirena sonará una vez y las luces parpadearán una vez.
2.- Presione el botón 4 para activar la función de pánico
3.- Una vez que ha identificado a su vehículo, presione el botón 2 para
desactivar la función de pánico.
4.- Presione el botón 3, las luces encenderán una vez.
SISTEMA ANTIRROBO
Para probar esta función, siga estos pasos:
1.- Mientras el sistema está desarmado y el interruptor de encendido esta
en la posición ON, presione el botón 4.
2.- Las luces y el LED indicador parpadearán por 10 segundos. En el
período de estos 10 segundos, presione el botón 4 una vez más para
entrar al modo antirrobo.
3.- Una vez que el sistema se ha activado, el LED comenzará a parpadear
por 30 segundos, después la sirena se activará y las luces comenzarán a
parpadea.
HOW TO PROGRAM THE TRANSMITTER
1. Press the restart button and set the power switch on the car to the ON
position.
2. Insert the 10 pin connector to the main unit in order to turn it on.
3. You will hear 4 beeps and the LED indicator light will blink indicating that
you have entered programming mode.
4. In a lapse of no more than 30 seconds, press the “1” button on the
transmitter.
5. The main unit will synchronize with the receiver and the siren will emit a
beep.
6. In order to program the second transmitter, press the “1” button on the
second transmitter.
7. Once the main unit synchronizes with the receiver, you will hear two
beeps.
Note:
You can program up to 4 transmitters.
ARMING
Press the “1” button on the transmitter once and you will hear a beep. The
lights will begin to blink indicating that you are in armed mode.
Once the alarm has been armed, the deactivated power circuit will
instantaneously activate and the LED indicator light will slowly blink.
SILENCING THE ALARM
While the alarm is activated in armed mode, press the “1” button in order
to deactivate it. Even when the alarm is silenced, the system will remain in
armed mode.
SILENT ARMING
Press the “3” button on the transmitter, the lights will blink once in order to
confirm that you have entered silent armed mode.
This function is recommended for systems using the alarm pager
accessory.
In this mode, if any interferences in the vehicle occur, a signal will be
transmitted to the “pager” and the lights will blink for 30 seconds.
If the ignition switch is accessed, this will make the “pager” and the alarm
activate.
HOW TO DISARM THE ALARM SYSTEM
Press the “2” button once, the siren will emit two beeps and the lights will
blink three times. The alarm system will be deactivated.
For security purposes, while the system is disarmed and the ignition switch
is in the on position, only the open and close functions are activated along
with the anti-theft system, the rest of the functions will be deactivated.
AUTOMATIC RE-ARMING
If you do not open a door in the lapse of 20 seconds, the system will
automatically re-activate.
You will hear a beep and the indicator lights will blink once in order to
confirm that you have entered re-armed mode.
AUTOMOBILE SEARCH
1. While in armed mode, press the “1” button on the transmitter, the siren
will sound once and the lights will blink once.
2. Press the “4” button in order to activate the panic function.
3. Once you have identified your vehicle, press the “2” button in order to
deactivate the panic function.
4. Press the “3” button, the lights will blink once.
ANTI-THEFT SYSTEM
In order to test this function, follow these steps:
1. While the system is armed and the ignition switch is in the on position,
press the “4” button.
2. The lights and the LED indicator light will blink for 10 seconds. During
this 10 second period, press the “4” once more in order to enter anti-theft
mode.
3. Once the system has been activated, the LED indicator light will blink for
30 seconds. Afterwards, the siren will activate and the lights will begin to
blink.

4.- Posteriormente el circuito de encendido desactivado se encenderá.
5.- Para desactivar esta función, presione el botón 2 o reinicie el
sistema.
ALARMA AUDIBLE DE ZONA
Esta opción le permitirá conocer si alguien o algo golpeó su automóvil
durante el tiempo que estuvo la alarma armada.
Cuando desactive la alarma, sonará 3 veces si algo golpeó al automóvil.
MEMORIA DE LAALARMA CUANDO HAY INTERRUPCIÓN DE
ENERGÍA
Cuando la batería del automóvil es desconectada y conectada
nuevamente, la alarma se activará inmediatamente.
La sirena se activará y las luces parpadearán, así como también el circuito
de encendido desactivo será inhabilitado.
Nota:
No deje las llaves dentro del vehículo si cambia o desconecta la batería
del vehículo.
ALARMA DE INTRUSO
Si la alarma suena más de dos veces cuando se desarma, significa que el
vehículo ha sido objeto de un golpe, de un intento de abrir las puertas o
de encenderlo.
Si escucha tres bips: se activó el sensor de choque
Si escucha 4 bips: se activo el circuito de las puertas
Si escucha 5 bips: se intentó activar el interruptor de
encendido
SELECCIÓN DE ENCENDIDO – PUERTAS CERRADAS / APAGADO –
PUERTAS ABIERTAS
Esta opción viene predeterminada como Encendido – Puertas cerradas.
Es decir, cuando enciende el auto, automáticamente se cerrarán las
puertas y cuando se apague se abran las puertas. Si desea desactivarla,
presione el botón 2 y 3 al mismo tiempo mientras el auto está encendido,
de esta forma, solo se activará la función de apagado – puertas abiertas.
ENCENDIDO – PUERTAS CERRADAS PRESIONANDO EL PEDAL DE
FRENO
Si la función de Encendido – Puertas cerradas está desactivada, todavía
puede obtener la facilidad de cerrar las puertas automáticamente
presionando el pedal de freno dos veces, siempre y cuando el cable
blanco adicional está conectado al freno.
INTERRUPTOR DE EMERGENCIA
Encienda el automóvil, y presione el interruptor escondido de reinicio para
desarmar el sistema de seguridad.
ACTIVACIÓN DE LAALARMA DE PÁNICO DE FORMA REMOTA
La sirena de la alarma puede ser activada desde un rango de 20 a 30
metros del auto, presionándole botón 4 del transmisor por 3 segundos.
La sirena se encenderá y las luces parpadearán por 30 segundos. Para
salir del modo de Pánico, presione el botón 2.
DESACTIVACIÓN DEL SENSOR DE CHOQUE
Mientras la alarma está en modo de armado, presione el botón 1 y 2 al
mismo tiempo para desactivar el sensor de choque.
Para volver a activar el sensor de choque, entre en modo de armado.
Nota:
Todos los sensores se mantendrán activos mientras el sensor de choque
está desactivado.
ARMADO DE LA ÚLTIMA PUERTA
Una vez que todas las puertas han estado cerradas por 30 segundos y la
llave no está en la posición de ON, el sistema se armará de forma
automática.
Esta opción puede ser desactivada.
4. Afterwards, the deactivated power circuit will activate.
5. In order to deactivate this function, press the “2” button or restart the
system.
AUDIBLE ZONE ALARM
This option allows you to know if someone or something has hit your car
during the time when the alarm was activated.
When you deactivate the alarm, it will sound three times if anything hit
your car.
ALARM MEMORY WHEN THERE HAS BEEN AN INTERRUPTION IN
POWER
When the car’s battery is disconnected and connected again, the alarm
will immediately activate.
The siren will activate and the lights will blink. The deactivated power
circuit will also be unhabilitated.
Note:
Do not leave your car keys inside the vehicle if you are going to change or
disconnect your car battery.
INTRUSION ALARM
If the alarm sound more than two times when you disarm it, this means
that the vehicle has been subject to a breach such as it being hit, someone
trying to open the doors, or someone trying to turn the ignition switch.
If you hear three beeps: The shock sensor was activated
If you hear four beeps: The door circuit was activated
If you hear five beeps: The ignition switch circuit was activated
SELECTION OF: POWER – DOORS CLOSED/OFF – DOORS
OPEN
This option is defaulted to on/doors closed. This means that when you
turn your vehicle on, the doors will automatically lock and when the car is
turned off, the doors will automatically unlock. If you wish to deactivate
this function, press the “2” and “3” buttons at the same time while the car is
on. This way, only the off/doors open function will remain active.
CAR ON / DOORS CLOSED PRESSING THE BRAKE PEDAL
If the car on/doors closed function is deactivated, you can still easily get
the automatic door lock by pressing the car’s brake pedal twice. For this
function to work, the additional white cable must be connected to the
brake.
EMERGENCY SWITCH
Turn your car on and press the hidden restart switch in order to disarm the
security system.
REMOTELY ACTIVATING THE PANIC ALARM
The alarm’s siren can be activated from a range of 20-30 meters from the
car by pressing the “4” button on the transmitter for three seconds.
The siren will activate and the light will blink for 30 seconds. In order to
exit panic mode, press the “2” button.
DEACTIVATING THE SHOCK SENSOR
When the alarm is in armed mode, press the “1” and “2” buttons at the
same time in order to deactivate the shock sensor.
In order to reactivate the shock sensor, reenter armed mode.
Note:
All other sensors will remain active when you turn the shock sensor off.
LAST DOOR ACTIVATION
Once all the doors have been closed for 30 seconds and the ignition key is
not on the on position, the security system will automatically activate.
This option can be deactivated.

APERTURA DE CAJUELA
Presione el botón 2 y 3 por 3 segundos, la alarma se desarmará y la
cajuela se abrirá (si la cajuela está configurada de forma eléctrica).
MODO DE VALET
Este modo desactivará temporalmente el sistema de alarma. Cuando el
modo de valet está activado los botones 1 y 2 solamente operarán la
apertura y cierre central. El resto de las funciones serán desactivadas.
Para activar el modo de valet, siga estos pasos:
1.- Con el interruptor de ignición en posición de apagado (OFF), presione
los botones 1 y 2 al mismo tiempo por 2 segundos.
2.- La sirena emitirá un bip, así como también las luces y el LED indicador
parpadearán.
3.- Si desea desactivar este modo, repita los pasos 1 y 2.
INDICADOR DE ENTRADAS ABIERTAS
Si el LED indicador está encendido constantemente y la alarma se
encuentra en modo desarmado y el modo de valet está apagado, el
sistema está indicando que hay alguna entrada abierta.
Nota:
Si las luces parpadean cuando el interruptor de ignición está en posición
de encendido (ON) también significa que alguna entrada se encuentra
abierta.
INDICADOR DE PUERTAS ABIERTAS
Cuando la alarma se encuentre desarmado y el interruptor de ignición
esté en la posición de encendido (ON), presione el botón 3 por 2
segundos, la sirena emitirá 3 bips para confirmar que la función está
activada.
Cuando esta función esté activada, y cualquier puerta se encuentra
abierta, las luces parpadearán 10 veces para indicar que alguna puerta
está abierta.
Para desactivar esta función, presione el botón 3 por 2 segundos.
Esta función viene activada de fábrica.
MODO DE EMERGENCIA
Mientras el interruptor de ignición está en la posición de apagado (OFF),
presione el botón 4, la sirena se encenderá y las luces parpadearán por
30 segundos.
Para desactivar este modo, presione el botón 2.
ESPECIFICACIONES
Entrada: 12V
Peso: 1018g
Nota:
El diseño del producto y las especificaciones pueden cambiar sin previo
aviso.
OPENING THE TRUNK
Press the “2” and “3” buttons for three seconds. The alarm will deactivate
and the trunk will open (if the trunk is electronically configured).
VALET MODE
This mode will temporarily deactivate the alarm system. When valet mode
is activated, the “2” and “2” buttons will only control the central opening
and closure. The rest of the functions will be deactivated.
In order to activate valet mode, follow these steps:
1. With the ignition set to the off position, press the “1” and “2” buttons at
the same time for 2 seconds.
2. The siren will emit a beep and the lights and LED indicator lights will
blink.
3. If you wish to deactivate this mode, repeat steps 1 and 2.
OPEN ENTRY INDICATOR
If the LED indicator light is constantly on and the alarm is in disarmed
mode and the valet mode is off, the system is indicating that there is an
open entry.
Note:
If the lights blink when the ignition switch is in the on position, this also
means that there is an open entry.
OPEN DOOR INDICATOR
When the alarm is disarmed and the ignition switch is in the on position,
press the “3” button for two seconds, the siren will emit three beeps in
order to confirm that this function is activated.
When this function is activated, and any door is open, the lights will blink
ten times indicating that a door is open.
In order to deactivate this function, press the “3” button for two seconds.
This function is activated by default.
EMERGENCY MODE
While the ignition switch is in the off position, press the “4” button, the siren
will turn on and the lights will blink for 30 seconds.
In order to deactivate this mode, press the “2” button.
SPECIFICATIONS
Input: 12V
Weight: 1,018 g
Note:
Product design and specifications are subject to change without previous
notice.

DIAGRAMA DE INSTALACIÓN INSTALLATION DIAGRAM

Jumper Función / Function Cerrado / Close Abierto / Open
S3 Tiempo activo del actuador 0,8s 4s
Actuator working time
S4 Acción del actuadir mientras la última puerta activa el sistema de "armed" Abierto Cerrado
The action of the actuator while last door arming set to "enable" Unlock Lock
S5 "Armado" de la última puerta Activado Desactivado
Last door arming Enable Disable
Ajuste de Jumpers (ajuste en la tarjeta impresa de la alarma)
Jumpers setting (adjust on PCB of alarm)
DIAGRAMA DE INSTALACIÓN
ACTIVACIÓN POSITIVA, SISTEMA CENTRALIZADO CON RETARDO
(TIPO A)
ACTIVACIÓN NEGATIVA, SISTEMA CENTRALIZADO CON RETARDO
(TIPO B)
INSTALLATION DIAGRAM
POSITIVE-TRIGGERED, RELAY-DRIVEN SYSTEMS
(TYPE A)
POSITIVE-TRIGGERED, RELAY-DRIVEN SYSTEMS
(TYPE B)
Negro Lock #87A normalmente cerrado
Black Lock #87A normally closed
Verde Lock #30 común (salida)
Green Lock #30 common (output)
Rosa Lock #87 normalmente abierto
Pink Lock #87 normally open
Blanco Unlock #87A normalmente cerrado
White Unlock #87A normally closed
Púrpura Unlock #30 común (salida)
Purple Unlock #30 common (output)
Naranja Unlock #87 normalmente abierto (entrada)
Orange Unlock #87 normally open (input)
Sin usar
Not used
Sin usar
Not used
Circuito de activación
de cerraduras (+)
Vehicle lock trigger
circuit (+)
+12V constante
+12V constant
Circuito de
desactivación de
cerraduras (+)
Vehicle unlock trigger
circuit (+)
A relevador
de fábrica
To factory relay
#87 #30
#87A
#87 #30
#87A
Relevador
cerrada
Lock relay
Relevador
abierta
Unlock relay
Negro Lock #87A normalmente cerrado
Black Lock #87A normally closed
Verde Lock #30 común (salida)
Green Lock #30 common (output)
Rosa Lock #87 normalmente abierto
Pink Lock #87 normally open
Blanco Unlock #87A normalmente cerrado
White Unlock #87A normally closed
Púrpura Unlock #30 común (salida)
Purple Unlock #30 common (output)
Naranja Unlock #87 normalmente abierto (entrada)
Orange Unlock #87 normally open (input)
Sin usar
Not used
Sin usar
Not used
Circuito de activación
de cerraduras (-)
Vehicle lock trigger
circuit (-)
+12V constante
+12V constant
Circuito de
desactivación de
cerraduras (-)
Vehicle unlock trigger
circuit (-)
A relevador
de fábrica
To factory relay
#87 #30
#87A
#87 #30
#87A
Relevador
cerrada
Lock relay
Relevador
abierta
Unlock relay

POLARIDAD INVERTIDA (TIPO C)
AGREGANDO UNO O MÁS ACTUADORES (TIPO D)
REVERSING-POLARITY (TYPE C)
ADDING ONE OR MORE ACTUATORS (TYPE D)
Negro Lock #87A normalmente cerrado
Black Lock #87A normally closed
Verde Lock #30 común (salida)
Green Lock #30 common (output)
Rosa Lock #87 normalmente abierto
Pink Lock #87 normally open
Blanco Unlock #87A normalmente cerrado
White Unlock #87A normally closed
Púrpura Unlock #30 común (salida)
Purple Unlock #30 common (output)
Naranja Unlock #87 normalmente abierto (entrada)
Orange Unlock #87 normally open (input)
+12V constante
+12V constant
#87 #30
#87A
#87 #30
#87A
Relevador
cerrada
Lock relay
Relevador
abierta
Unlock relay
Cable de cierre de
motor (+)
Motor lock wire (+)
NC NO NO NO
Cable de apertura de
motor (+)
Motor unlock wire (+)
C C
x x
x x
Cortar
/ Cut
Cortar / Cut
+12V
Abierto / UnlockCerrado / Lock
Negro Lock #87A normalmente cerrado
Black Lock #87A normally closed
Verde Lock #30 común (salida)
Green Lock #30 common (output)
Rosa Lock #87 normalmente abierto
Pink Lock #87 normally open
Blanco Unlock #87A normalmente cerrado
White Unlock #87A normally closed
Púrpura Unlock #30 común (salida)
Purple Unlock #30 common (output)
Naranja Unlock #87 normalmente abierto (entrada)
Orange Unlock #87 normally open (input)
A tierra
To ground
#87 #30
#87A
#87 #30
#87A
Relevador
cerrada
Lock relay
Relevador
abierta
Unlock relay
Verde / Green
A tierra
To ground
+12V 7,5A / Motor
MAzul / Blue

BOMBA DE VACÍO ELÉCTRICAMENTE ACTIVADA (TIPO E)
SISTEMA DE UN CABLE - CORTAR PARA CERRAR, ATERRIZAR
PARAABRIR (TIPO F)
ELECTRICALLY-ACTIVATED VACUUM (TYPE E)
ONE-WIRE SYSTEM - CUT TO LOCK, GROUND TO UNLOCK
(TYPE F)
Negro Lock #87A normalmente cerrado
Black Lock #87A normally closed
Verde Lock #30 común (salida)
Green Lock #30 common (output)
Rosa Lock #87 normalmente abierto
Pink Lock #87 normally open
Blanco Unlock #87A normalmente cerrado
White Unlock #87A normally closed
Púrpura Unlock #30 común (salida)
Purple Unlock #30 common (output)
Naranja Unlock #87 normalmente abierto (entrada)
Orange Unlock #87 normally open (input)
A tierra
To ground
#87 #30
#87A
#87 #30
#87A
Relevador
cerrada
Lock relay
Relevador
abierta
Unlock relay
+12V
x
x
Cortar / Cut
Cable de activación
en el carro
Trigger wire in car
A la bomba de vacío
eléctrica
To electric vacuum pump
Negro Lock #87A normalmente cerrado
Black Lock #87A normally closed
Verde Lock #30 común (salida)
Green Lock #30 common (output)
Rosa Lock #87 normalmente abierto
Pink Lock #87 normally open
Blanco Unlock #87A normalmente cerrado
White Unlock #87A normally closed
Púrpura Unlock #30 común (salida)
Purple Unlock #30 common (output)
Naranja Unlock #87 normalmente abierto (entrada)
Orange Unlock #87 normally open (input) A tierra
To ground
#87 #30
#87A
#87 #30
#87A
Relevador
cerrada
Lock relay
Relevador
abierta
Unlock relay
x
x
Cortar / Cut
Conexión cuando
las puertas están
cerradas
Connection when
doors are
locked
Módulo de cerradura
de fábrica
Factory lock module
Sin usar
Not used
Conexión cuando
las puertas están
abiertas
Connection when
doors are
unlocked
Interruptor de fábrica / factory switch
Other manuals for AUT-200
1
Table of contents
Other Steren Car Alarm manuals
Popular Car Alarm manuals by other brands

Directed Electronics
Directed Electronics 446 Series installation guide

Directed Electronics
Directed Electronics Cyber 76XV user guide

Clifford
Clifford 520.4X owner's manual

Directed Electronics
Directed Electronics PYTHON 480XP installation guide

Audiovox
Audiovox Prestige Platinum 128-4629B owner's manual

ENFORCER
ENFORCER 100LB owner's manual