Steren MIX-130 User manual


Before using your new Steren mixing console, read this
instruction manual.
SECURITY INSTRUCTIONS
Precaution
In order to reduce the risk of an electrical discharge, do not
remove the front or back covers. There are no pieces within the
device that can be fixed by the user. See a qualified technician.
Attention
In order to reduce the risk of fire or electrical shock, do not
expose this device to rain, humidity, or any other sources of
water.
When this symbol appears, it warns of the
presence of a dangerous un-isolated voltage
within the device. This voltage may be strong
enough to constitute a discharge or electrical
shock danger.
When this symbol appears, it signals that the
following instructions are important for operation
and maintenance.
ENGLISH
ENGLISH-2
Before usin
g
y
our new Steren mixin
g
console, read this
i
nstruction manual
.

Important
Place the device on a flat surface that is stable and well
ventilated
Always disconnect the device before cleaning it.
Always use a soft, dry, and clean rag in order to clean the
device.
Do not use or store the device in areas where it might come
in contact with water. This could cause this device to
malfunction or it could create an increase in the risk of an
electrical shock.
Do not try to open the device. This could cause a
malfunction and the voiding of the warranty.
Do not use this device in areas where there might be
flammable or combustible products.
Do not use this device if the power cable is damaged.
If the power cable is damaged, see your nearest Steren
dealer in order to have it replaced.
Do not expose this device to extreme temperatures.
Characteristics
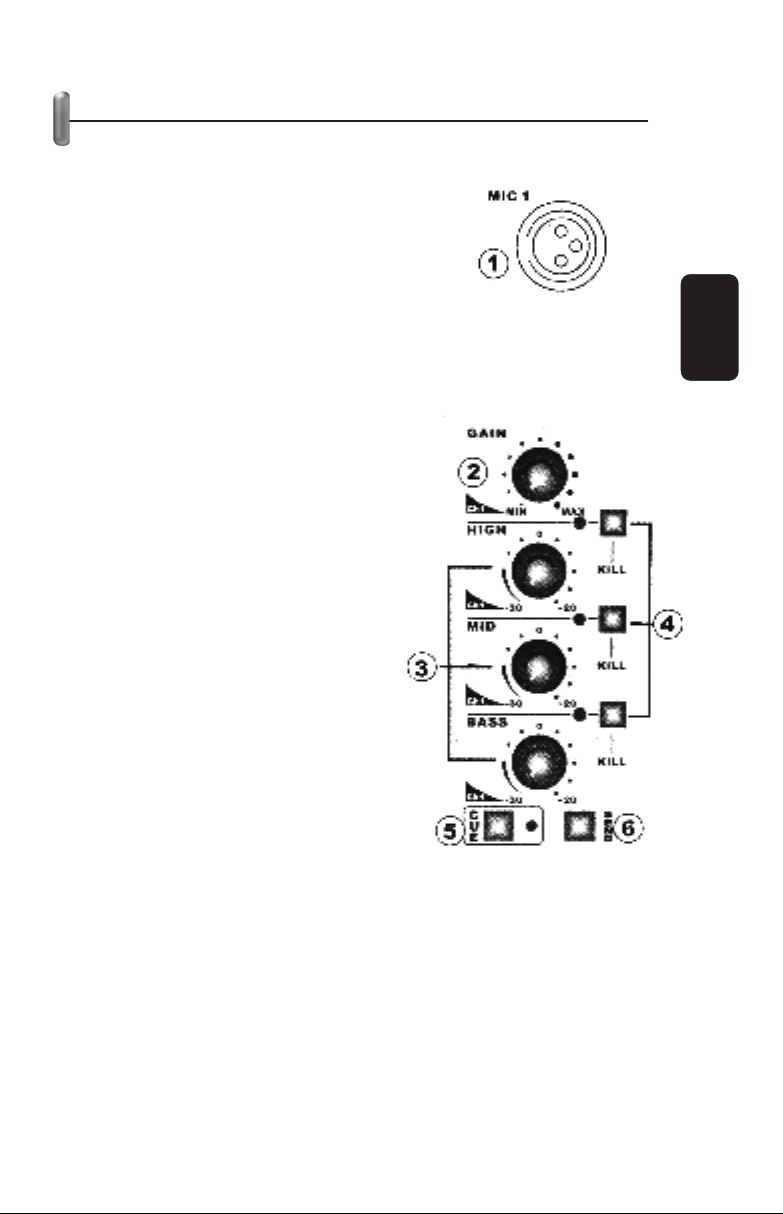
Controls for bass, treble, and mid per channel
Gain controls per channel
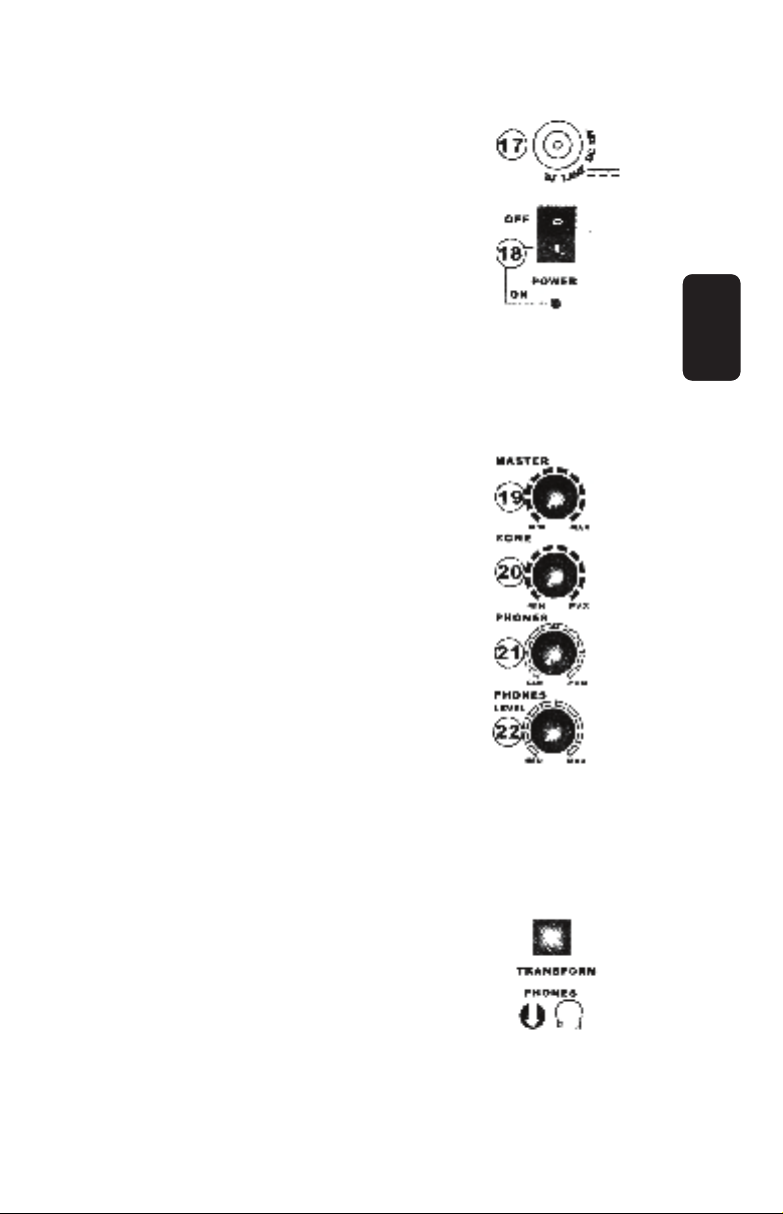
BNC plug for connecting a lamp in order to illuminate the
panel
Main power switch
Master volume control
Master zone control
Mute button for each channel
Controls for listening separately or simultaneously to the
program or material; controlled by CUE
Master headphone control
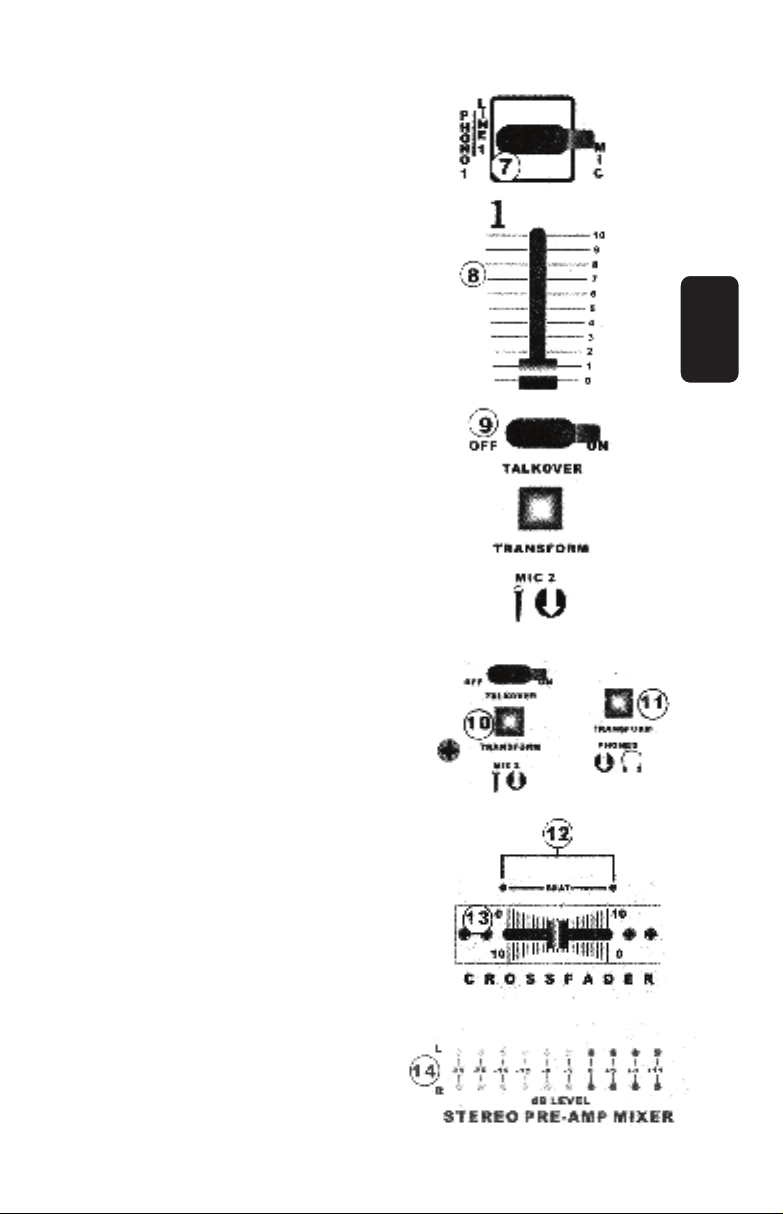
Mixer control for channels 1 and 2
Independent volume controls for each channel
•
•
•
•
•
•
•
•
•
•
•
•
•
•
•
•
•
•
•
•
ENGLISH
ENGLISH-3

Controls
1.- Microphone 1
This input allows you to connect a
balanced or unbalanced
microphone with an XLR plug. You
can also connect balanced
microphones with high or low
impedance.
2.- Gain Control
Allows you to adjust the input level
for each channel
3.- Channel Frequency Controls
Allows you to control the high,
medium, and low frequencies on the
panel independently.
Mutes the independent frequency
switch (see kill switch)
Response frequency.
4.- Kill Switch (Silence Mode)
Diminishes the noise in the high,
medium, and low frequencies
The LED indicator light will
illuminate when the switch is
activated (in silence mode)
5.- CUE Button for each Channel
Allows you to monitor the selection
of the mixing input source
Prepares the audio selection
before mixing it and sending it to the
final output.
6.- Send
Allows you to use an external
signal-processing source in order to
send the audio signal.
ENGLISH
ENGLISH-4

7.- Input Channel Selection
Allows you to choose between the
different available channels in each
of the controls
8.- Control Level
Allows you to adjust the input level
for each channel
9.- Microphone / Talk Over Button
Allows for the microphone to be
heard over the music being played
10.- Transformation Button
Allows you to reactivate or
deactivate channel 2 (microphone)
11.- Transformation Button
Allows you to reactivate or
deactivate channel 3 (headphones)
12.- Beat
Displays the beat for channel 2
and 3
13.- Fade
This option allows you to change
gradually between one source and
another.
14.- LED Indicator
Allows you to graphically view the
volume level of the signal in 10
digit LED’s for both the left and right
channels
15.- Input Jack
Allows you to connect a balanced or
unbalanced microphone with a 1/4”
plug.
Allows you to connect a balanced
microphone with high or low
impedance
ENGLISH
ENGLISH-5

16.- Input Jack 1
Allows you to connect headphones
with a 1/4” plug
17.- Lamp Jack
Allows you to connect a 12V / 3W
lamp with BNC plug
18.- Power Button
Allows you to power the device on or
off. When the device is powered on,
the LED indicator will illuminate.
19.- Master Volume Control
Use this control in order to adjust the
general volume level
20.- Volume Control for each Zone
Allows you to control the volume
levels for each zone when you have
configured remote speakers or cabin
monitors for a DJ
21.- PGM / CUE Control
These controls allow you to
simultaneously or separately listen
to the CUE material or the active
program.
22.- Headphones Volume Control
Allows you to adjust the volume
level on the connected headphones.
ENGLISH
ENGLISH-6

23.- Input Channels
Allows you to connect cassette
players, CD players, or any other audio source.
24.- Input Selector
Allows you to select the input source you wish to use.
Allows you to use a turntable with high-level magnetic sources
25.- Send / Return Jack
Allows you to use external signal processors for the final mix
Also allows you to connect any
electrical instrument such as
synthesizers, samplers, etc.
26.- Output Jack for Recording
High-impedance output that allows you to connect any
audio-recording device
Use this output in order to record the mixed program
27.- Zone Output
Output for the master mix Includes independent fade for zone
control
High impedance RCA stereo plugs
ENGLISH
ENGLISH-7

28.- Master Output
The master output allows you to connect to an amplifier and can
be adjusted with the MASTER control.
29.- Ground Switch
When the mixer is powered on, place the system in wait mode
(without any signal present) and place the switch to the left side.
Power the device off and then place the switch to the right side.
Power the mixer on and in wait mode listen in order to determine
which of the two switch sides has the least
background noise.
30.- Voltage Selector
Before connecting the power cable, make sure the voltage
switch is in the correct position depending on where the mixer
will be installed.
ENGLISH
ENGLISH-8

Specifications
Inputs
Microphone 10kohms balanced Cannon connector
Line: 10kohms
Earphone: 47kohms
Output
Line: 9V RMS max.
Earphone: 1W 47ohms
THD: < 0,01% S/N vs maximum output
Line: > de 90dB
Microphone: > 84dB
Earphone: < 80dB
Frequency response
Microphone: 20Hz – 20kHz + 0,5dB
Line: 20Hz – 20kHz + 0,5dB
Earphone: 20Hz – 20kHz + 1dB
EQ
Bass -30/+20dB @ 40Hz
Middle -30/+20dB @ 1,35kHz
Treble -30/+20dB @ 20kHz
Suppressed channel
Bass: -66dB @ 50Hz
Middle: -31dB @ 1,2kHz
Treble: -66dB @ 15kHz
Dimensions 360 x 255 x 135mm
Weight 2kg approx.
Product Design and specifications are subject to change
without previous notice.
P
roduct Desi
g
n and specifications are sub
j
ect to chan
g
e
w
ithout
p
revious notice
.
ENGLISH
ENGLISH-9


Antes de utilizar su nueva Consola Mezcladora de 3 canales
lea este instructivo para evitar cualquier mal
funcionamiento. Guárdelo para futuras referencias.
INSTRUCCIONES DE SEGURIDAD
PRECAUCIÓN
Para reducir el riesgo de descargas eléctricas, no quite la tapa
(o parte posterior). No hay piezas que puedan ser reparadas por
el usuario en el interior; remita el servicio al personal calificado.
ATENCIÓN
Para reducir el riesgo de incendio o descargas eléctricas, no
exponga este aparato a la lluvia o la humedad.
Este símbolo siempre que aparece, le advierte
de la presencia de voltaje peligroso sin aislar
dentro del equipo, que puede ser
suficientemente fuerte para constituir un riesgo
de descarga.
Este símbolo siempre que aparece, le advierte
sobre instrucciones operativas y de
mantenimiento importantes.
ESPAÑOL
ESPAÑOL-2
A
ntes de utilizar su nueva Consola Mezcladora de 3 canales
l
ea este instructivo
p
ara evitar cual
q
uier mal
f
uncionamiento. Guárdelo
p
ara futuras referencias
.

IMPORTANTE
Coloque el equipo en una superficie plana, estable y con
buena ventilación.
Siempre desconecte el equipo antes de limpiarlo.
Siempre utilice un paño suave, limpio y seco para limpiar el
equipo.
No use ni almacene este equipo en lugares donde existan
goteras o salpicaduras de agua. Puede causar un mal
funcionamiento o un choque eléctrico.
No intente abrir el equipo, puede ocasionar
malfuncionamiento y anulación de la garantía.
No utilice el equipo en áreas donde pueda haber productos
flamables o combustibles.
No utilice el equipo si se encuentra dañado el cable de
corriente.
Si el cable de corriente se encuentra dañado, acuda con un
distribuidor Steren para su reemplazo.
No exponga el equipo a temperaturas extremas.
CARACTERÍSTICAS
Controles para graves, medios y agudos por canal
Control de ganancia por canal
Conector BNC para colocar una lámpara para iluminar el
panel
Interruptor general de energía
Control maestro de nivel de volumen
Control maestro de Zona
Botón de supresión por banda por canal
Control para escuchar por separado o simultáneamente el
programa o el material controlado por CUE
Control maestro de audífonos.
Control mezclador de nivel canales 1 y 2
Control de volumen deslizable independiente por canal.
•
•
•
•
•
•
•
•
•
•
•
•
•
•
•
•
•
•
•
•
ESPAÑOL
ESPAÑOL-3

CONTROLES
1.- Micrófono 1
Esta entrada permite conectar un
micrófono con conector XLR
balanceado o no balanceado.
Así mismo permite conectar
micrófonos balanceados de baja o
alta impedancia.
2.- Control de ganancia
Ajusta el nivel de entrada de cada
canal.
3.- Controles de frecuencia de canal
Controla las frecuencias altas,
medias y bajas en la perilla de
control independiente.
Silencia el interruptor de frecuencia
independiente (vea botón Kill)
Frecuencia de respuesta de
desplazamiento
4.- Botón Kill (modo de silencio)
Disminuye el ruido en las
frecuencias altas, medias y bajas.
El LED indicador se enciende
cuando el interruptor está activado
(en modo de silencio).
5.- Botón CUE para cada canal
Permite monitorear la selección de
la fuente de mezcla.
Prepara la selección de audio antes
de mezclarla hacia la salida final.
6.- Envío (Send)
Permite utilizar una fuente
procesadora de señal externa para
enviar la señal de audio.
ESPAÑOL
ESPAÑOL-4

7.- Selección de canal de entrada
Permite elegir entre los diferentes
canales disponibles en cada uno de
los controles
8.- Control de nivel
Permite ajustar el nivel de entrada
por cada uno de los canales
9.- Botón de Micrófono / Talk over
Permite que el programa que se
está reproduciendo se escuche por
encima de la música.
10.- Botón de transformación
Permite activar o desactivar el
canal 2 (Micrófono)
11.- Botón de transformación
Permite activar o desactivar el
canal 3 (Audífonos)
12.- Beat
Muestra el beat del canal 2 y 3
13.- Desvanecido
Mediante esta opción podrá
cambiar entre una fuente y otra de
entrada de forma gradual.
14.- Indicador LED
Permite mostrar gráficamente el
nivel de volumen de la señal en
indicadores LED de 10 dígitos, para
el canal izquierdo y derecho.
15.- Conector de entrada
Permite conectar un micrófono
balanceado o no balanceado con
un conector de ¼” Permite conectar
también micrófonos balanceados
de baja o alta impedancia.
ESPAÑOL
ESPAÑOL-5

16.- Conector de entrada 1
Permite conectar audífonos con un
conector de ¼”
17.- Conector de lámpara
Permite conectar una lámpara de
12V / 3W con conector BNC.
18.- Botón de energía
Permite encender o apagar el
equipo. Cuando el equipo está
encendido, el LED indicador se
enciende.
19.- Control de nivel maestro
Utilice este control para ajustar el
nivel de volumen general
20.- Control de nivel por zona
Permite controlar el volumen por
zona cuando a configurado bocinas
remotas o monitores de cabina para
DJ
21.- Control PGM / CUE
Estos controles permiten escuchar
simultáneamente o de forma
separada el material CUE o el
programa activo.
22.- Control de audífonos
Permite ajustar el nivel de volumen
de los audífonos conectados
ESPAÑOL
ESPAÑOL-6

23.- Canales de entrada
Permite conectar lectores de casete, reproductores de CD o de
MD
24.- Selector de entrada
Permite seleccionar la fuente de entrada a utilizar.
Permite utilizar un tornamesa con fuentes magnéticas o de alto
nivel.
25.- Conector de envío / retorno
Permite utilizar procesadores de señal externos para la mezcla
final.
Así mismo puede conectar cualquier instrumento eléctrico como
sintetizadores, samplers, etc.
26.- Conector de salida para grabación
Salida de alta impedancia que permite conectar cualquier
dispositivo de grabación de audio. Utilícelo para grabar el
programa mezclado.
27.- Salida por zona
Salida de mezcla maestra. Cuenta con desvanecido
independiente para salida con control de zona. Conectores RCA
estéreo de alta impedancia.
ESPAÑOL
ESPAÑOL-7

28.- Salida maestra
La salida maestra sirve para la conexión con un amplificador y
se ajusta mediante el control MASTER.
29.- Interruptor de tierra
Cuando el mezclador esté encendido, coloque el sistema en
modo de espera (sin alguna señal presente) y coloque el
interruptor hacia la izquierda.
Apague el equipo y posteriormente coloque el interruptor en la
posición derecha. Encienda la mezcladora y estando en modo
de espera escuche cual de las dos posiciones del interruptor
envía menor ruido de fondo.
30.- Selector de voltaje
Antes de conectar el cordón de energía asegúrese de que el
interruptor de voltaje se encuentre en la posición correcta de
acuerdo al lugar donde va a instalar la mezcladora.
ESPAÑOL
ESPAÑOL-8

Especificaciones técnicas
Entradas
Micrófono 10kohms Balanceado conector Cannon
Línea: 10kohms
Audífono: 47kohms
Salidas
Línea: 9V RMS máx.
Audífonos: 1W 47ohms
Distorsión (THD): < 0,01% S/N vs máx. salida
Línea: > de 90dB
Mic.: > 84dB
Audífono: < 80dB
Respuesta en frecuencia
Mic.: 20Hz – 20kHz + 0,5dB
Línea: 20Hz – 20kHz + 0,5dB
Audífono: 20Hz – 20kHz + 1dB
Ecualización
Graves -30/+20dB @ 40Hz
Medios -30/+20dB @ 1,35kHz
Agudos -30/+20dB @ 20kHz
Canal suprimido
Graves: -66dB @ 50Hz
Medios: -31dB @ 1,2kHz
Agudos: -66dB @ 15kHz
Dimensiones 360 x 255 x 135mm
Peso 2kg aprox.
El diseño del producto y las especificaciones pueden
cambiar sin previo aviso.
E
l diseño del producto
y
las especificaciones pueden
c
ambiar sin
p
revio aviso
.
ESPAÑOL
ESPAÑOL-9

WARRANTY
This Steren product is warranted under normal usage against defects in workmanship and materials
to the original purchaser for one year from the date of purchase.
CONDITIONS
1.- This warranty card with all the required information, invoice or purchase ticket, product box or
package, and product, must be presented when warranty service is required.
2.- If the product stills on the warranty time, the company will repair it free of charge.
3.- The repairing time will not exceed 30 natural days, from the day the claim was received.
4.- Steren sell parts, components, consumables and accesories to costumer, as well as warranty
service, at any of the addresses mentioned later.
THIS WARRANTY IS VOID IN THE NEXT CASES:
If the product has been damaged by an accident, acts of God, mishandling, leaky batteries, failure
to follow enclosed instructions, improper repair by unauthorized personnel, improper safe keeping,
among others.
a) The consumer can also claim the warranty service in the purchase establishment.
b) If you lose the warranty card, we can reissue it, if you show the invoice or purchase ticket.
RETAILER INFORMATION
Name of the retailer
Address
Product
Brand
Part number
Serial number
Date of delivery
In case your product fails or have any doubt, please contact your nearest retailer. If you are in
Mexico, please give a call to our Call Center.
Call Center
Mexico City: 53 54 22 90
Province: 01 800 500 9000
Product: 3 channel mixing console
Part number: MIX-130
Brand: Steren

PÓLIZA DE GARANTÍA
Esta póliza garantiza el producto por el término de un año en todas sus partes y mano de obra,
contra cualquier defecto de fabricación y funcionamiento, a partir de la fecha de entrega.
CONDICIONES
1.- Para hacer efectiva la garantía, presente ésta póliza y el producto, en donde fue adquirido o en
Electrónica Steren S.A. de C.V.
2.- Electrónica Steren S.A de C.V. se compromete a reparar el producto en caso de estar defectuoso
sin ningún cargo al consumidor. Los gastos de transportación serán cubiertos por el proveedor.
3.- El tiempo de reparación en ningún caso será mayor a 30 días, contados a partir de la recepción
del producto en cualquiera de los sitios donde pueda hacerse efectiva la garantía.
4.- El lugar donde puede adquirir partes, componentes, consumibles y accesorios, así como hacer
válida esta garantía es en cualquiera de las direcciones mencionadas posteriormente.
ESTA PÓLIZA NO SE HARA EFECTIVA EN LOS SIGUIENTES CASOS:
1.- Cuando el producto ha sido utilizado en condiciones distintas a las normales.
2.- Cuando el producto no ha sido operado de acuerdo con el instructivo de uso.
3.- Cuando el producto ha sido alterado o reparado por personal no autorizado por Electrónica
Steren S.A. de C.V.
El consumidor podrá solicitar que se haga efectiva la garantía ante la propia casa comercial donde
adquirió el producto. Si la presente garantía se extraviara, el consumidor puede recurrir a su
proveedor para que le expida otra póliza de garantía, previa presentación de la nota de compra o
factura respectiva.
DATOS DEL DISTRIBUIDOR
Nombre del Distirbuidor
Domicilio
Producto
Marca
Modelo
Número de serie
Fecha de entrega
ELECTRONICA STEREN S.A. DE C.V.
Camarones 112, Obrero Popular, 02840, México, D.F. RFC: EST850628-K51
STEREN PRODUCTO EMPACADO S.A. DE C.V.
Biólogo MaximIno Martínez No. 3408 Int. 3 y 4, San Salvador Xochimanca, México, D.F. 02870,
RFC: SPE941215H43
ELECTRONICA STEREN DEL CENTRO, S.A. DE C.V.
Rep. del Salvador 20 A y B, Centro, 06000, México. D.F. RFC: ESC9610259N4
ELECTRONICA STEREN DE GUADALAJARA, S.A.
López Cotilla No. 51, Centro, 44100, Guadalajara, Jal. RFC: ESG810511HT6
ELECTRONICA STEREN DE MONTERREY, S.A.
Colón 130 Pte., Centro, 64000, Monterrey, N.L. RFC: ESM830202MF8
ELECTRONICA STEREN DE TIJUANA, S.A
Calle 2a, Juárez 7636, Centro, 22000, Tijuana, B.C.N. RFC: EST980909NU5
Producto: Consola Mezcladora de 3 canales
Modelo: MIX-130
Marca: Steren
En caso de que su producto
presente alguna falla, acuda
al centro de distribución más
cercano a su domicilio y en caso
de tener alguna duda o pregunta
por favor llame a nuestro Centro
de Atención a Clientes, en
donde con gusto le atenderemos
en todo lo relacionado con su
producto Steren.
Centro de Atención a Clientes
Ciudad de México:
53 54 22 90
Interior de la República:
01 800 500 9000
Table of contents
Languages:
Other Steren Music Mixer manuals
Popular Music Mixer manuals by other brands

Apex Digital
Apex Digital dBZ-48 user manual

SoundCraft
SoundCraft Vi Series Update instructions

Compex
Compex Professional Portable Mixing Console SONOSAX... user manual

Stageline
Stageline MMX-22 instruction manual

Pyle Pro
Pyle Pro 4 CHANNEL PROFESSIONAL MIXER PYD2400U user manual

SYNQ
SYNQ SMP 16.42 Operation manual

SoundCraft
SoundCraft Signature 16 user guide

Behringer
Behringer Europower PMH3000 Technical specifications

RSS
RSS M-380 owner's manual

Fostex
Fostex 1240 owner's manual

Beta Three
Beta Three TQ-22 Reference manual

Core Health & Fitness
Core Health & Fitness StarTrac Stairmaster 15" Capacitive Touch OpenHub Embedded... owner's manual