Steren MIX-150 User manual

0418mV0.2
Manual de instrucciones
MIX-150
MEZCLADORA PORTÁTIL USB
Y BLUETOOTH DE 3 CANALES
MIC/LINE 1
LINE 2/3 2TK
IN
MAIN
MON.
PWR
OUT
IN IN
LL
R R
OUT
LEVEL PEAK
12KHz
80Hz
CH1
LEVEL
12KHz
80Hz
CH2/3
MAIN MIX
0
15
∞
0
10
∞
0
6
∞
R R
HIGH LOW PAN
CLIP
MONITOR
L R
L
HIGH LOW PAN
15
15
L
0
GAIN
LINE IN TO
MAIN
TO
MONITOR
USB PLAY
LINE / USB 2 TK / BT
PAIR
MAIN
2TK
15
0
15
0
10
∞
500

1
IMPORTANTE
PRECAUCIONES
Lea cuidadosamente este instructivo para evitar cualquier mal funcionamiento.
La información que se muestra en este manual sirve únicamente como referencia sobre el producto.
Debido a actualizaciones pueden existir diferencias.
Por favor, consulte nuestra página web www.steren.com para obtener la versión más reciente de
este manual.
• No intente abrir el equipo, puede ocasionar un mal funcionamiento y anular la garantía.
• No exponga el equipo a temperaturas extremas.
• No use ni almacene este equipo en lugares donde existan goteras o salpicaduras de agua;
puede causar un mal funcionamiento o un choque eléctrico.
• Este aparato NO está destinado para ser utilizado por personas con capacidades diferentes, a
menos que cuenten con la preparación y supervisión adecuadas.
• Este producto NO es un juguete; manténgalo fuera del alcance de los niños.
La operación de este equipo está sujeta a las siguientes dos condiciones: (1) es posible que este
equipo o dispositivo no cause interferencia perjudicial y (2) este equipo o dispositivo debe aceptar
cualquier interferencia, incluyendo la que pueda causar su operación no deseada.

2
CONTROLES
PWR
OFF
ON
MIC/LINE 1
LINE 2/3 2TK
IN
MAIN
MON.
PWR
OUT
IN IN
LL
R R
OUT
LEVEL PEAK
12KHz
80Hz
CH1
LEVEL
12KHz
80Hz
CH2/3
MAIN MIX
0
15
∞
0
10
∞
0
6
∞
R R
HIGH LOW PA N
CLIP
MONITOR
L R
L
HIGH LOW PA N
15
15
L
0
GAIN
LINE IN TO
MAIN
TO
MONITOR
USB PLAY
LINE / USB 2 TK / BT
PAIR
MAIN
2TK
15
0
15
0
10
∞
500
VISTA POSTERIOR
VISTA SUPERIOR
1
2
4
11
15
12
13
14
10
3
17
18
8
9
19
20
21
22
5 6 7
16

3
Correa
1. PUERTO USB
Este tipo de puerto se utiliza como interface entre la mezcladora y una computadora. También
puede utilizarse como fuente de alimentación a un tomacorriente eléctrico.
2. INTERRUPTOR PRINCIPAL
Enciende / Apaga la unidad.
3. LED INDICADOR DE ENCENDIDO
Se iluminará cuando el equipo esté encendido.
4. ENTRADA MIC / LINE
Inserte un cable XLR (cannon) o de 6,3 mm con señal monoaural. Para evitar daños, NO conecte
ninguna señal cuando la unidad esté encendida.
5. ENTRADA DE LÍNEA
Conectores tipo RCA para señal estéreo.
6. ENTRADA AUXILIAR
Conecte un cable RCA a un dispositivo MP3, lector de CD, tablet o computadora.
7. SALIDA AUXILIAR
Conecte un cable RCA a un Grabador.
8. SALIDA PRINCIPAL
Utilice un cable de 3,5 mm para conectar un amplificador o unas bocinas activas.
9. SALIDA DE MONITOR
Utilice un cable de 3,5 mm para conectar un amplificador, un bafle activo o unos audífonos.
10. CONTROL DE GANANCIA
Ajusta la cantidad de señal de entrada.
11. CONTROL DE AGUDOS
Ajusta las frecuencias altas y nivela los tonos agudos.
12. CONTROL DE GRAVES
Ajusta las frecuencias bajas y nivela los tonos graves.

4
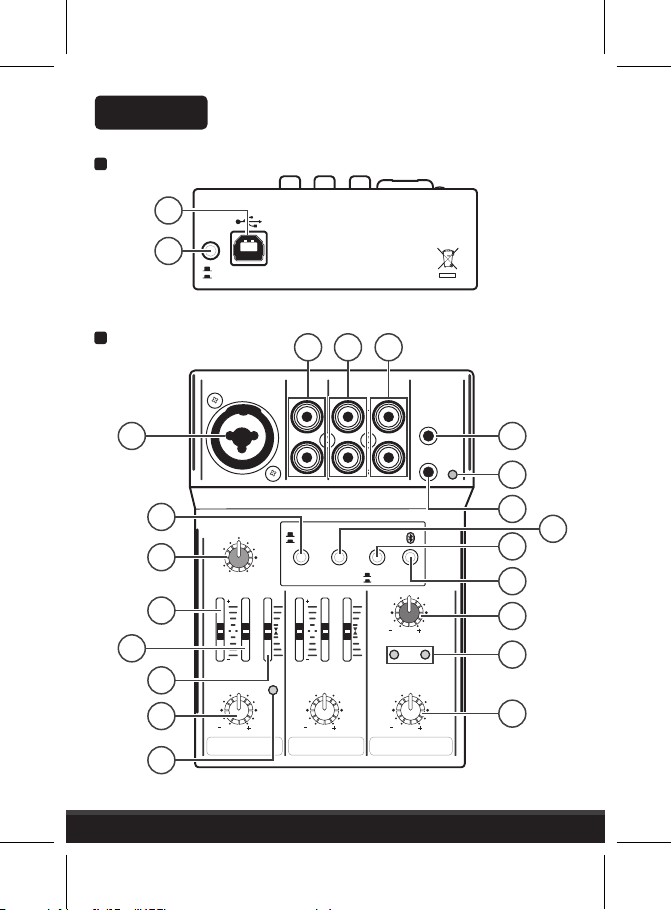
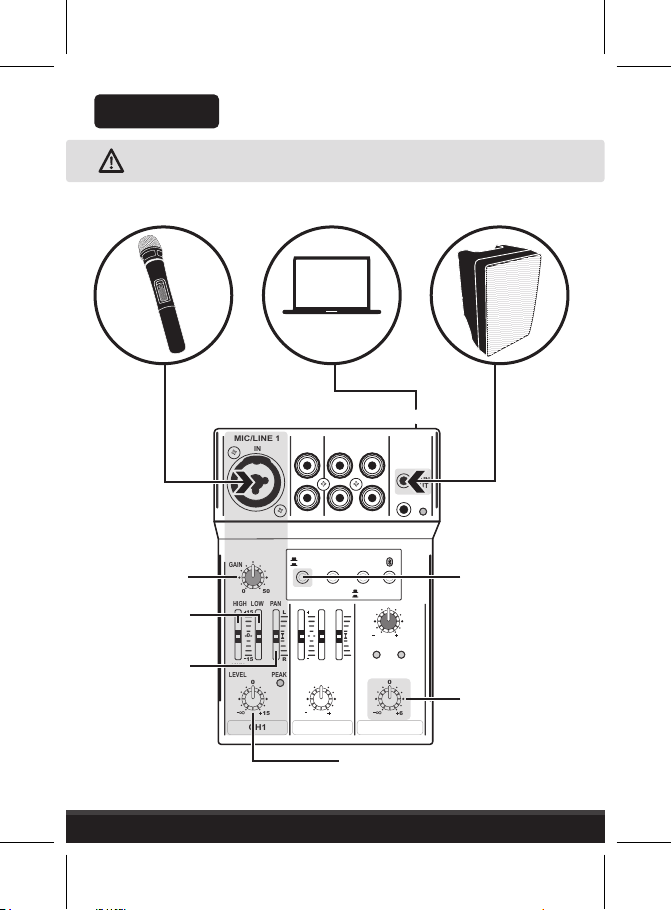
13. CONTROL DE PAN (Panorámico)
Determina la cantidad de señal que envía a cada lado de la mezcladora (derecha o izquierda). En la
posición central, la señal se dirigirá al medio del campo estéreo.
14. LED INDICADOR DE PICOS
Se enciende cuando la señal de entrada es muy alta y está saturada. Regule dicha señal para evitar
saturación o distorsión.
15.VOLUMEN DE CANAL
Controla el volumen de cada canal en la mezcla final.
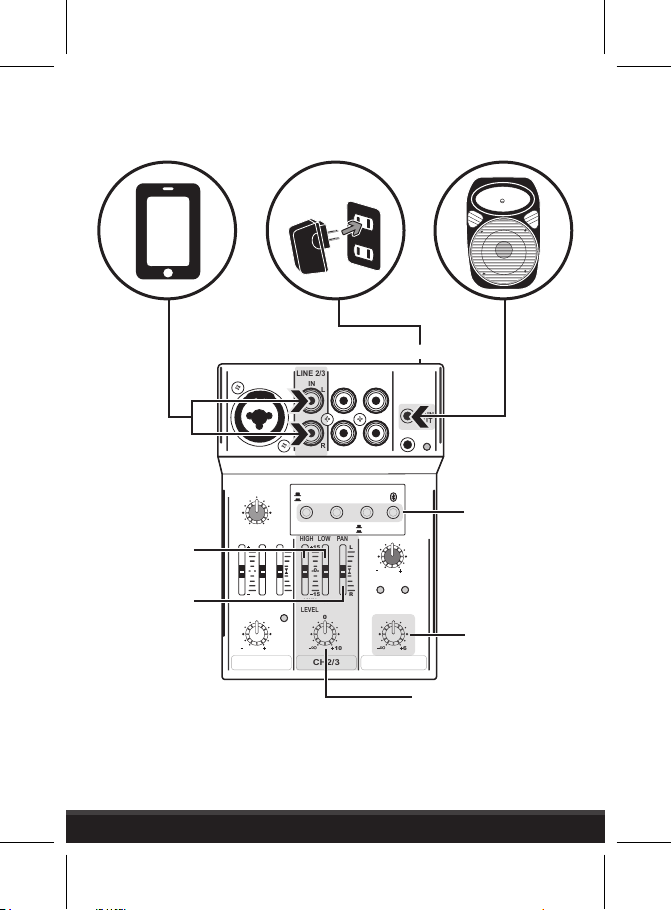
16. SELECTOR DE ENTRADA DE LÍNEA / USB
Selecciona la señal de entrada al canal ya sea de línea, conectores RCA 2/3 o del puerto USB.
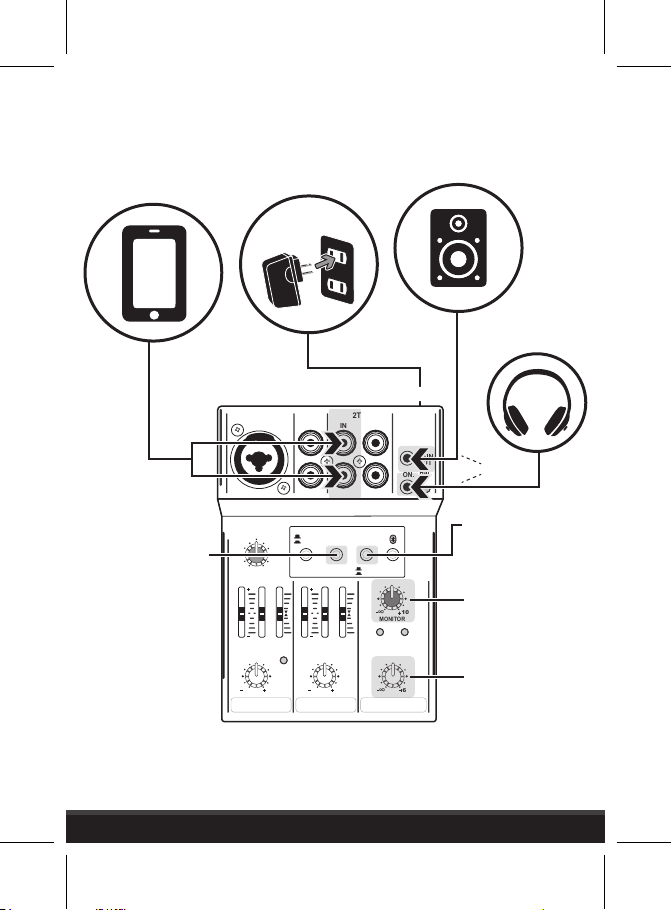
17. SELECTOR DE ENVÍO DE SEÑAL 2TK A PRINCIPAL
Selecciona la señal de entrada o salida auxiliar a la mezcla principal (2TK o BT).
18. SELECTOR DE ENVÍO DE SEÑAL 2TK A MONITORES
Selecciona la señal 2 TK a la salida de monitores.
19.VINCULACIÓN BLUETOOTH
Mantenga presionado hasta que el indicador comience a destellar rápidamente. En el dispositivo
que desea vincular busque y seleccione BT2.1. Si la vinculación es exitosa el indicador permanecerá
encendido.
20. CONTROL DEVOLUMEN DE MONITORES
Ajusta el volumen de la salida de monitores.
21. CONTROL DE VOLUMEN PRINCIPAL
Ajusta el volumen de toda la unidad. Regula la salida principal.
22. INDICADORES DE CLIP L/R
Indicador de salida de la mezcla principal.

5
1. Conecte la consola a una fuente de alimentación (USB o corriente eléctrica).
2. Encienda el equipo con el botón PWR.
Asegúrese de bajar los niveles de volumen al mínimo para evitar sonidos fuertes que dañen los oídos al
encender el equipo.
ANTES DE EMPEZAR
OPCIÓN A
OPCIÓN B

6
Los siguientes diagramas sirven como ejemplo,diríjase a la sección de “CONTROLES” para verificar los datos
de conexión y funcionamiento.
CONEXIONES
MIC/LINE 1
LINE 2/3 2TK
IN
MAIN
MON.
PWR
OUT
IN IN
LL
R R
OUT
LEVEL PEAK
12KHz
80Hz
CH1
LEVEL
12KHz
80Hz
CH2/3
MAIN MIX
0
15
∞
0
10
∞
0
6
∞
R R
HIGH LOW PAN
CLIP
MONITOR
L R
L
HIGH LOW PAN
15
15
L
0
GAIN
LINE IN TO
MAIN
TO
MONITOR
USB PLAY
LINE / USB 2 TK / BT
PAIR
MAIN
2TK
15
0
15
0
10
∞
500
Ajustar ganancia
Conectar Conectar
Conectar
Presione el botón
para escuchar la
entrada de línea o USB
Ajustar graves
y agudos
En caso de tener 2
fuentes de salida de
audio, ajustar la señal
de PAN (derecha,
izquierda o central)
USB
Ajustar la salida
principal
Ajustar el volumen
del micrófono

7
MIC/LINE 1
LINE 2/3 2TK
IN
MAIN
MON.
PWR
OUT
IN IN
LL
R R
OUT
LEVEL PEAK
12KHz
80Hz
CH1
LEVEL
12KHz
80Hz
CH2/3
MAIN MIX
0
15
∞
0
10
∞
0
6
∞
R R
HIGH LOW PAN
CLIP
MONITOR
L R
L
HIGH LOW PAN
15
15
L
0
GAIN
LINE IN TO
MAIN
TO
MONITOR
USB PLAY
LINE / USB 2 TK / BT
PAIR
MAIN
2TK
15
0
15
0
10
∞
500
Conectar
Conectar
En este caso, NO será
necesario presionar
los botones. El audio
se escuchará
automáticamente
Ajustar graves
y agudos
En caso de tener 2
fuentes de salida de
audio, ajustar la señal
de PAN (derecha,
izquierda o central)
USB
Conectar
Ajustar la salida
principal
Ajustar el volumen
del dispositivo de
música

8
MIC/LINE 1
LINE 2/3 2TK
IN
MAIN
MON.
PWR
OUT
IN IN
LL
R R
OUT
LEVEL PEAK
12KHz
80Hz
CH1
LEVEL
12KHz
80Hz
CH2/3
MAIN MIX
0
15
∞
0
10
∞
0
6
∞
R R
HIGH LOW PAN
CLIP
MONITOR
L R
L
HIGH LOW PAN
15
15
L
0
GAIN
LINE IN TO
MAIN
TO
MONITOR
USB PLAY
LINE / USB 2 TK / BT
PAIR
MAIN
2TK
15
0
15
0
10
∞
500
Conectar
Conectar
USB
Conectar
Ajustar la salida
principal
En caso de vincular
un dispositivo, presione
el botón PAIR (consulte
la sección “CONTROLES”).
Presione el botón para
escuchar la entrada de
audio 2 TK o BT.
Cuando utilice esta
entrada, deberá
manipular desde el
dispositivo móvil
REC

9
MIC/LINE 1
LINE 2/3 2TK
IN
MAIN
MON.
PWR
OUT
IN IN
LL
R R
OUT
LEVEL PEAK
12KHz
80Hz
CH1
LEVEL
12KHz
80Hz
CH2/3
MAIN MIX
0
15
∞
0
10
∞
0
6
∞
R R
HIGH LOW PAN
CLIP
MONITOR
L R
L
HIGH LOW PAN
15
15
L
0
GAIN
LINE IN TO
MAIN
TO
MONITOR
USB PLAY
LINE / USB 2 TK / BT
PAIR
MAIN
2TK
15
0
15
0
10
∞
500
Conectar
Conectar
USB
Conectar
Ajustar la salida
principal
Ajustar la salida
de monitor
Presione el botón para
escuchar la entrada de
audio en monitor.
Presione el botón para
escuchar la entrada de
audio 2 TK o BT.
Cuando utilice esta
entrada, deberá
manipular desde el
dispositivo móvil

ESPECIFICACIONES
Entrada de alimentación: 5 V - - - 550 mA
Entradas Micrófono: 20 mV, desbalanceado
Entrada USB: 16 bits, 44,1 KHz
Entrada de línea: 1 V, desbalanceado
Salidas audífonos: 300 mW @ 1 % THD
Distorsión (THD): < 0,01 % S/N vs máx. salida
Respuesta en frecuencia: 20 Hz - 22 KHz
Relación señal ruido: >70 dB
Convertidor de CA a CC
Alimentación: 100 - 240 V~ 50/60 Hz 300 mA
Salida: 5 V - - - 550 mA


0418mV0.2
Instruction manual
MIX-150
USB PORTABLE MIXER
WITH BLUETOOTH
MIC/LINE 1
LINE 2/3 2TK
IN
MAIN
MON.
PWR
OUT
IN IN
LL
R R
OUT
LEVEL PEAK
12KHz
80Hz
CH1
LEVEL
12KHz
80Hz
CH2/3
MAIN MIX
0
15
∞
0
10
∞
0
6
∞
R R
HIGH LOW PAN
CLIP
MONITOR
L R
L
HIGH LOW PAN
15
15
L
0
GAIN
LINE IN TO
MAIN
TO
MONITOR
USB PLAY
LINE / USB 2 TK / BT
PAIR
MAIN
2TK
15
0
15
0
10
∞
500

1
IMPORTANT
CAUTIONS
Read these manual to avoid any damage. The instructions of these manual are for reference about
the product.
There may be differences due to update.
Please check our web site www.steren.com to obtain the latest version of the instruction manual.
• Do not attempt to open the device, it may cause a malfunction and void the warranty.
• Do not expose the equipment to extreme temperatures.
• Do not use or store this product in places where there are dripping or splashes water; May
cause malfunction or electric shock.
• This product is NOT intended for use by persons with different capacities, unless they are
properly prepared and supervised.
• This product is not a toy; Keep out of reach of children.
The operation of this device is subject to the following two conditions: (1) it is possible that this
device may not cause harmful interference and (2) this device must accept any interference,
including interference that may cause undesired operation.

2
CONTROLS
PWR
OFF
ON
MIC/LINE 1
LINE 2/3 2TK
IN
MAIN
MON.
PWR
OUT
IN IN
LL
R R
OUT
LEVEL PEAK
12KHz
80Hz
CH1
LEVEL
12KHz
80Hz
CH2/3
MAIN MIX
0
15
∞
0
10
∞
0
6
∞
R R
HIGH LOW PA N
CLIP
MONITOR
L R
L
HIGH LOW PA N
15
15
L
0
GAIN
LINE IN TO
MAIN
TO
MONITOR
USB PLAY
LINE / USB 2 TK / BT
PAIR
MAIN
2TK
15
0
15
0
10
∞
500
REAR VIEW
TOP VIEW
1
2
4
11
15
12
13
14
10
3
17
18
8
9
19
20
21
22
5 6 7
16

3
Correa
1. USB PORT
This type of port is used as an interface between the mixer and a computer. It can also be used as a
power source to an electrical outlet.
2. MAIN SWITCH
Turns on / off the unit .
3.TURN ON LED INDICATOR
Will illuminates when the device is power on.
4. MIC / LINE INPUT
Insert an XLR cable (cannon) or 6.3 mm cable with monaural signal. To avoid damage, DO NOT
connect any signal when the unit is on.
5. LINE INPUT
RCA connectors for stereo signal.
6. AUXILIARY INPUT
Connect an RCA cable into an MP3 device, CD player,tablet or computer.
7. AUXILIARY OUTPUT
Connect an RCA cable into a (CD Recorder).
8. MAIN OUTPUT
Use a 3.5 mm cable to connect an amplifier or an active speakers.
9. MONITOR OUTPUT
Use a 3.5 mm cable to connect an amplifier, an active speaker box or headphones.
10. GAIN CONTROL
Adjusts the amount of input signal.
11.TREBLE CONTROL
Adjusts high frequencies.
12. BASS CONTROL
Set low frequencies.

4
13. PAN CONTROL (Panoramic)
Determines the amount of signal sent to each side of the mixer (right or left).In the middle position,
the signal will be directed to the middle of the stereo space.
14. PEAKS LED INDICATOR
Illuminates when the input signal is too high and saturated.Adjust this signal to avoid saturation or
distortion.
15. CHANNEL VOLUME
Controls the volume of each channel in the final mix.
16. LINE / USB INPUTSELECTOR
Selects input signal to channel either line, RCA 2/3 connectors or USB port.
17. 2TK TO MAIN SIGNALSENDING SELECTOR
Selects the auxiliary input or output signal to the main mix (2TK or BT).
18. 2TK TO MONITORS SIGNAL SENDING SELECTOR
Selects the 2 TK signal at the monitor output.
19. BLUETOOTH PAIRING
Press and hold until the indicator flashes quickly. In the device that you want to pair, search and
select BT2.1.If the pairing is successful the indicator will remain on.
20. MONITORS VOLUME CONTROL
Adjusts the volume of the monitors output.
21. MAIN VOLUME CONTROL
Adjusts the volume of all unit. It regulates the main output.
22. CLIP L/R INDICATORS
Output indicator of main mix.

5
1. Connect the console to a power source (USB or electrical outlet).
2.Turn on the device with PWR button.
Be sure to lower the volume levels at minimum to avoid loud sounds that may damage ears when turn on the
device.
BEFORE TO START
OPTION A
OPTION B

6
The following diagrams are for example,only refers to the "CONTROLS" section to verify the connection and
operation data.
CONNECTIONS
MIC/LINE 1
LINE 2/3 2TK
IN
MAIN
MON.
PWR
OUT
IN IN
LL
R R
OUT
LEVEL PEAK
12KHz
80Hz
CH1
LEVEL
12KHz
80Hz
CH2/3
MAIN MIX
0
15
∞
0
10
∞
0
6
∞
R R
HIGH LOW PA N
CLIP
MONITOR
L R
L
HIGH LOW PA N
15
15
L
0
GAIN
LINE IN TO
MAIN
TO
MONITOR
USB PLAY
LINE / USB 2 TK / BT
PAIR
MAIN
2TK
15
0
15
0
10
∞
500
Gain adjust
Connect Connect
Connect
Press the button to listen
the line or USB input
Treble and
bass adjust
If you have 2 audio
output sources, adjust
PAN signal (right, left
or middle)
USB
Main output adjust
Microphone volume adjust

7
MIC/LINE 1
LINE 2/3 2TK
IN
MAIN
MON.
PWR
OUT
IN IN
LL
R R
OUT
LEVEL PEAK
12KHz
80Hz
CH1
LEVEL
12KHz
80Hz
CH2/3
MAIN MIX
0
15
∞
0
10
∞
0
6
∞
R R
HIGH LOW PA N
CLIP
MONITOR
L R
L
HIGH LOW PA N
15
15
L
0
GAIN
LINE IN TO
MAIN
TO
MONITOR
USB PLAY
LINE / USB 2 TK / BT
PAIR
MAIN
2TK
15
0
15
0
10
∞
500
Connect
Connect
In this case, it is
NOTnecessary to
press the buttons.
The audio will be
heard automatically
Treble and
bass adjust
If you have 2 audio
output sources, adjust
PAN signal (right, left
or middle)
USB
Connect
Main output adjust
Adjust the music
device volume
Other manuals for MIX-150
1
Table of contents
Languages:
Other Steren Music Mixer manuals