En caso de que su producto
presente alguna falla, acuda al
centro de distribución más cercano
a su domicilio y en caso de tener
alguna duda o pregunta por favor
llame a nuestro Centro de Atención
a Clientes, en donde con gusto le
atenderemos en todo lo relacionado
con su producto Steren.
Centro de Atención a Clientes
01 800 500 9000
PÓLIZA DE GARANTÍA
Esta póliza garantiza el producto por el término de un año en todas sus partes y
mano de obra, contra cualquier defecto de fabricación y funcionamiento, a partir de
la fecha de entrega. CONDICIONES
1.- Para hacer efectiva la garantía, presente ésta póliza y el producto, en donde fue
adquirido o en Electrónica Steren S.A. de C.V.
2.- Electrónica Steren S.A de C.V. se compromete a reparar el producto en caso de
estar defectuoso sin ningún cargo al consumidor. Los gastos de transportación serán
cubiertos por el proveedor.
3.- El tiempo de reparación en ningún caso será mayor a 30 días,contados a partir de
la recepción del producto en cualquiera de los sitios donde pueda hacerse efectiva
la garantía.
4.- El lugar donde puede adquirir partes, componentes, consumibles y accesorios,
así como hacer válida esta garantía es en cualquiera de las direcciones mencionadas
posteriormwente.
ESTA PÓLIZA NO SE HARA EFECTIVA EN LOS SIGUIENTES CASOS:
1.- Cuando el producto ha sido utilizado en condiciones distintas a las normales.
2.- Cuando el producto no ha sido operado de acuerdo con el instructivo de uso.
3.- Cuando el producto ha sido alterado o reparado por personal no autorizado por
Electrónica Steren S.A. de C.V.
El consumidor podrá solicitar que se haga efectiva la garantía ante la propia casa
comercial donde adquirió el producto. Si la presente garantía se extraviara, el
consumidor puede recurrir a su proveedor para que le expida otra póliza de
garantía, previa presentación de la nota de compra o factura respectiva.
DATOS DEL DISTRIBUIDOR
Nombre del Distribuidor
Domicilio
Producto
Marca
Modelo
Número de serie
Fecha de entrega
ELECTRONICA STEREN S.A. DE C.V.
Camarones 112, Obrero Popular, 02840, México, D.F. RFC: EST850628-K51
STEREN PRODUCTO EMPACADO S.A. DE C.V.
Biólogo MaximIno Martínez No. 3408 Int. 3 y 4, San Salvador Xochimanca, México, D.F. 02870,
RFC: SPE941215H43
ELECTRONICA STEREN DEL CENTRO, S.A. DE C.V.
Rep. del Salvador 20 A y B, Centro, 06000, México. D.F. RFC: ESC9610259N4
ELECTRONICA STEREN DE GUADALAJARA, S.A.
López Cotilla No. 51, Centro, 44100, Guadalajara, Jal. RFC: ESG810511HT6
ELECTRONICA STEREN DE MONTERREY, S.A.
Colón 130 Pte., Centro, 64000, Monterrey, N.L. RFC: ESM830202MF8
ELECTRONICA STEREN DE TIJUANA, S.A. de C.V.
Calle 2a, Juárez 7636, Centro, 22000, Tijuana, B.C.N. RFC: EST980909NU5
Producto: Reloj checador de huella digital
Modelo: CLK-910
Marca: Steren
Antes de utilizar su nuevo reloj checador Steren, lea esta guía rápida para
evitar cualquier mal funcionamiento. Guárdela para futuras referencias.
Before using your new Electronic insect killer, please read this
instruction manual to prevent any damage. Put it away in a
El diseño del producto y las especificaciones pueden
cambiar sin previo aviso.
1. Teclado numérico
2. Encendido / Apagado
Mantenga oprimida para encender /
apagar el equipo.
3. Tecla OK
Presione para conrmar una opción en
el menú.
4. Tecla ESC
Use para regresar un paso.
5. Tecla MENU
Presione para ingresar al menú.
Alimentación: 9V - - - 1A
Convertidor de voltaje:
Alimentación: 100-240 V~ 50/60Hz 300mA
Salida: 9V - - - 1A
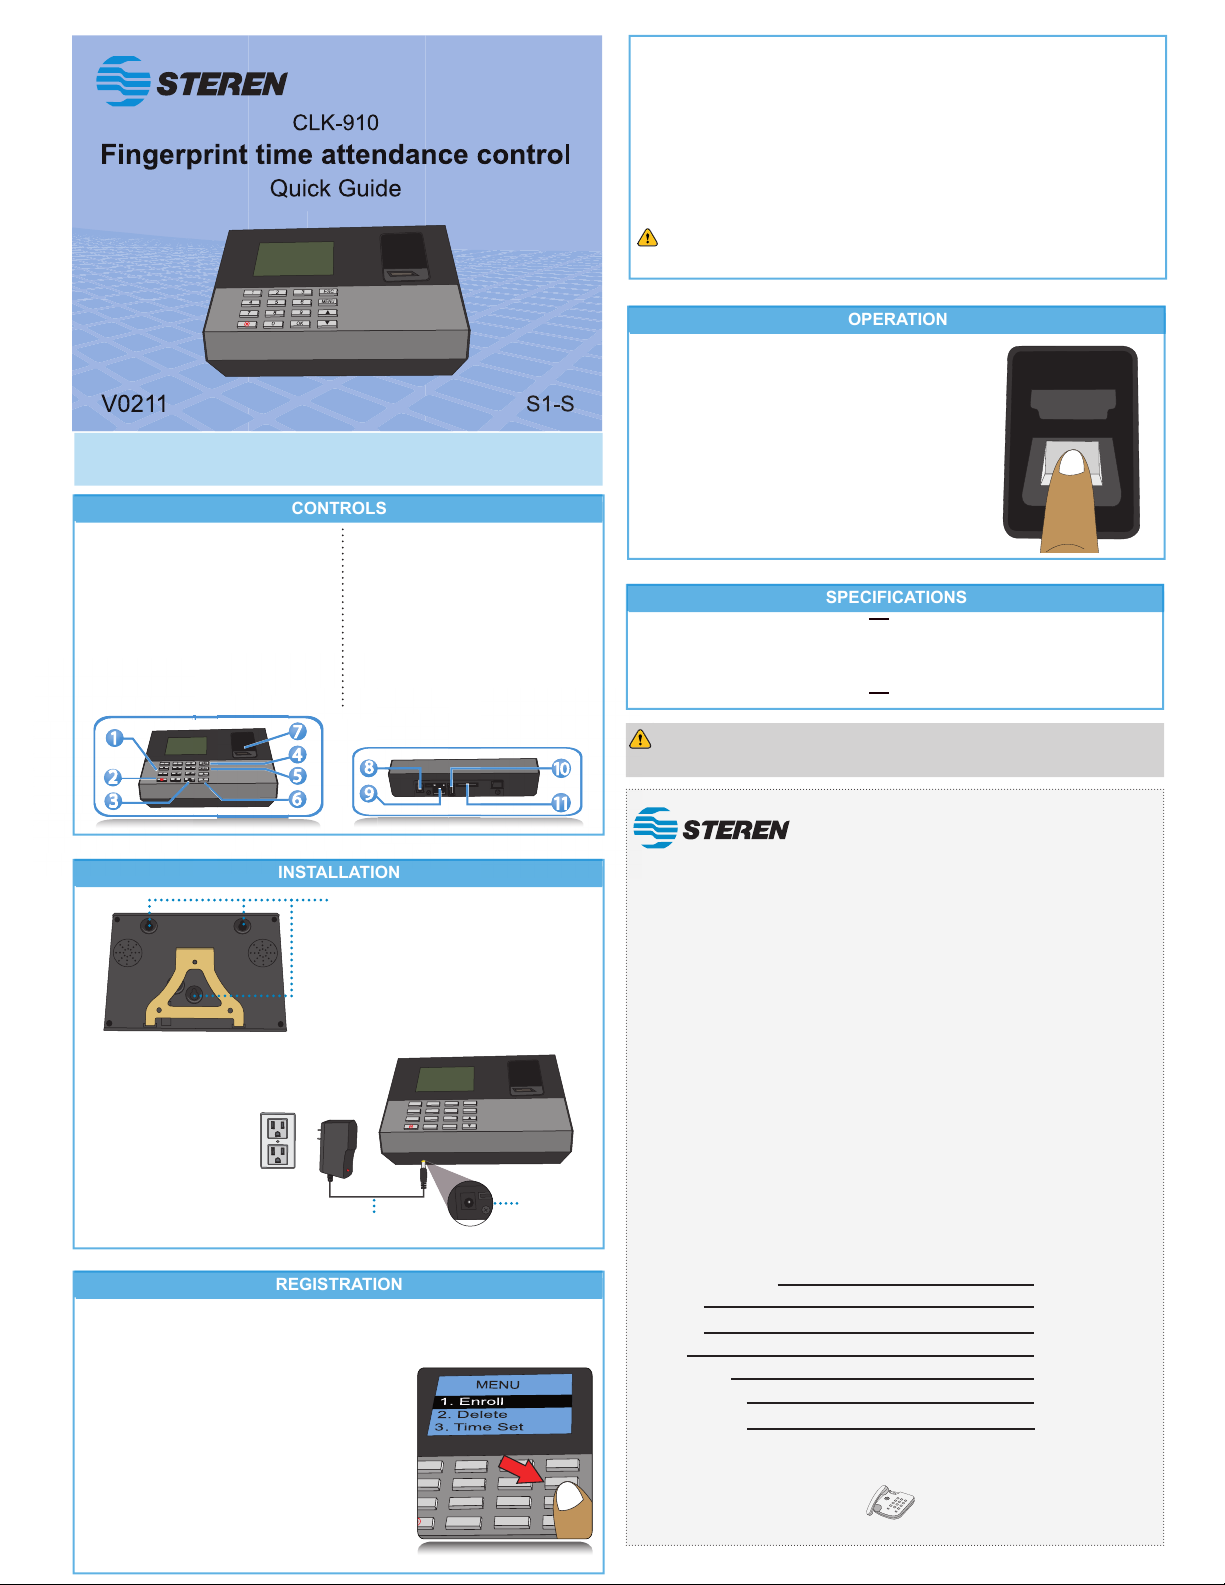
Una vez que un usuario está dado de alta, simplemente
tendrá que colocar el dedo sobre el lector durante dos
segundos (máximo), pasar su tarjeta o introducir el
código asignado.
Los registros de entrada y salida se generarán
automáticamente.
En el caso de una lectura de la huella exitosa, se
encenderá un LED de color verde en la parte superior
del lector.
1.- Localice el lugar donde desea instalar
el checador.
2.- Marque los lugares donde se van a
realizar las 3 perforaciones.
3.- Una vez que realizó las perforaciones,
inserte 3 taquetes y coloque 3 tornillos, no
los inserte los tornillos hasta el fondo de
manera que queden como sujetadores.
4.- Coloque coloque el checador en los
tornillos.
5. Inserte el adaptador de
corriente en la entrada de
alimentación del checador.
6. Conecte el adaptador a
un contacto eléctrico cercano.
7. Para encender mantenga
presionado el botón de
ENCENDIDO /APAGADO
6. Teclas ▲▼
Use para desplazarse por los
elementos del menú.
7. Lector de huellas digitales y
tarjetas RFID
8. Alimentación
9. Puerto Ethernet
10. Puerto USB
11. Puerto para tarjeta SD
Para agregar un usuario acceda al menú presionando la tecla “MENU” y seleccione la
opción INSCRIBIR con la tecla “OK”. A continuación se describen las opciones para
dar de alta a un usuario, elija la opción que desee.
1. Inscribir
Este menú se utiliza para agregar un usuario.
- Selecci. nivel
• Inscribir usu: Podrá agregar un nuevo usuario.
• Supervisor: La persona inscrita como
supervisor tiene acceso a modicar todos los
aspectos del sistema.
ADAPTADOR
DE CORRIENTE
ENTRADA DE
ALIMENTACIÓN
• Inscribir Adm: En el dispositivo, se puede congurar el usuario especial que tiene
derecho de administración para cambiar la conguración del dispositivo.
Al agregar o modicar un usuario usted tendrá diferentes opciones:
1. Dedo: Agregará a un usuario identicándolo por su huella digital.
2. Contraseña: Podrá identicar al usuario mediante una contraseña.
3. Tarjeta: El usuario accederá mediante una tarjeta.
1
4
78
0
5
23
6
9
OK
ESC
MENU
Cuando registre un nuevo usuario usando su huella digital se le pedirá que
coloque tres veces para conrmar una lectura correcta.