Stewart Audio TriStar User manual

Stewart TriStar
Quick Start Guide
Full length User’s Guide available at
Stewartsigns.com/support
Page 1
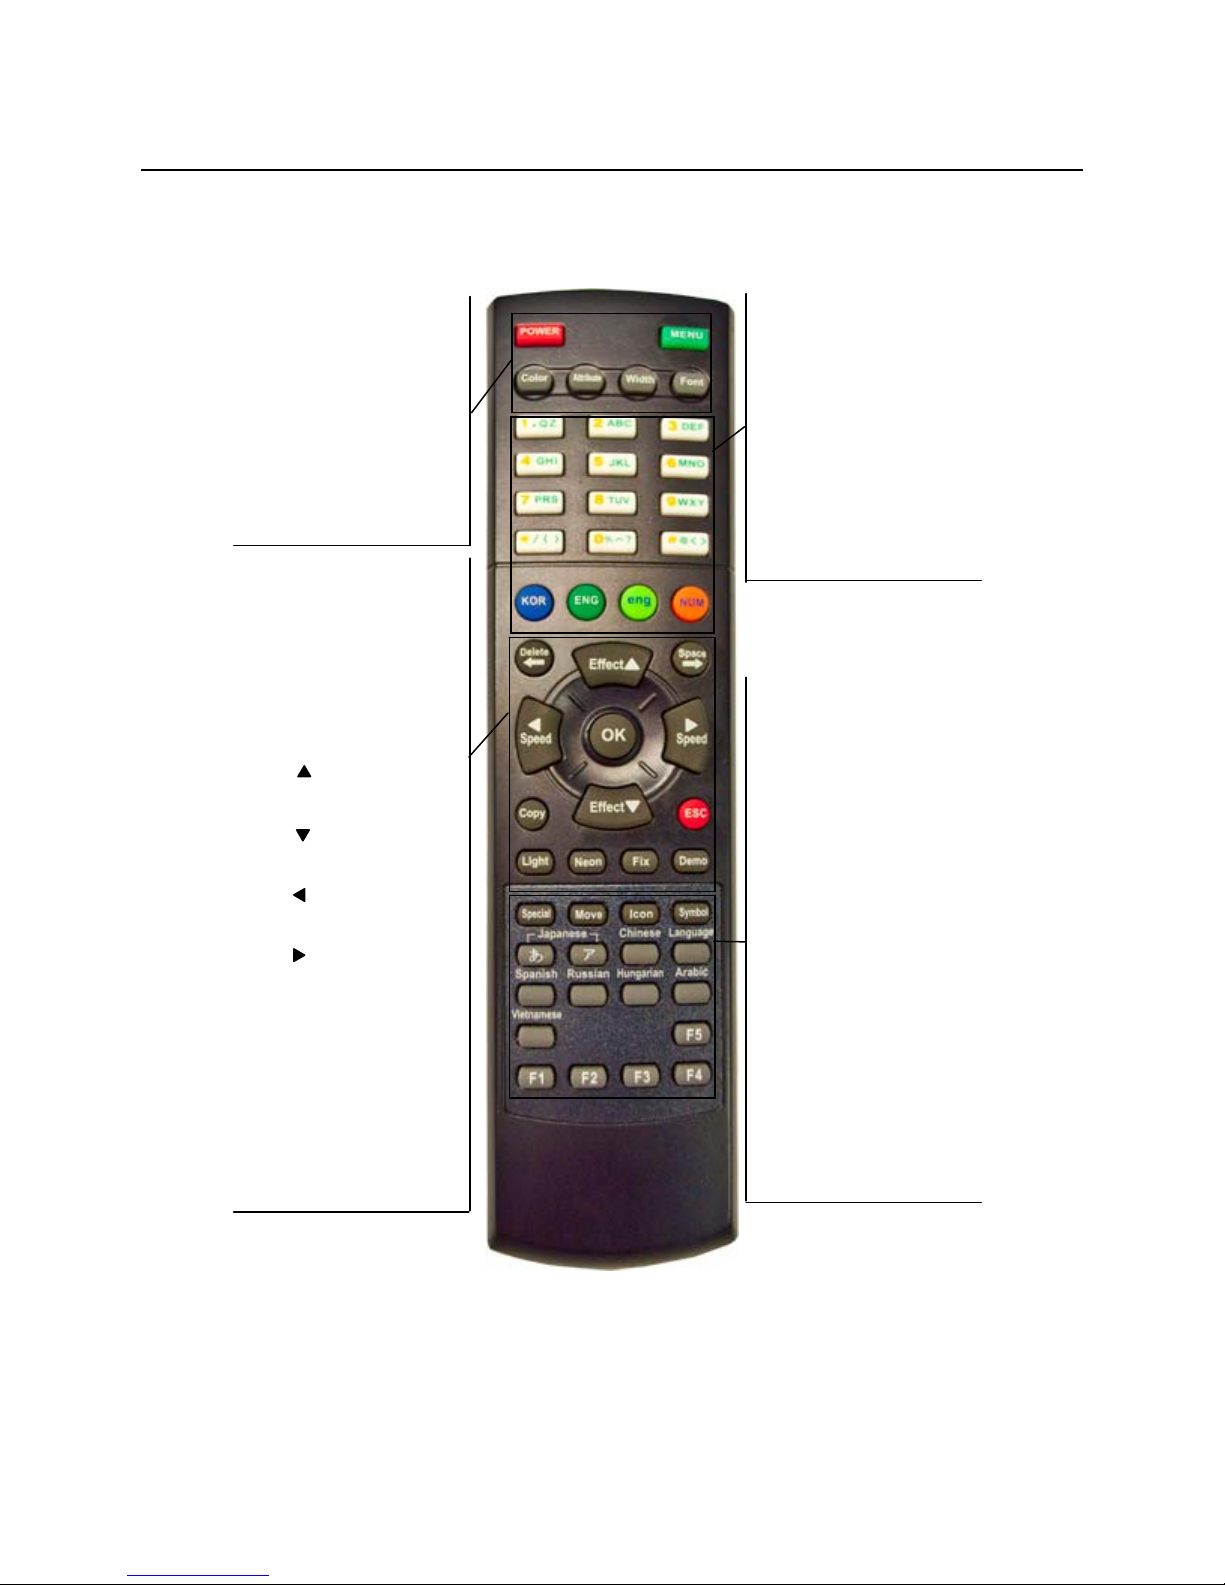
REMOTE CONTROL
BUTTON FUNCTIONS AND DESCRIPTIONS
CHARACTER
/
NUMBER
Displays the corresponding
letter, number, or symbol.
KOR
Enables input of Korean
characters.
ENG
Enables input of English
upper-case characters.
eng
Enables input of English
lower-case characters.
NUM
Enables input of numbers.
SPECIAL
Alternate character selection.
MOVE
Moving animation selection
ICON
Stationary animation selection.
SYMBOL
Symbol selection.
HE-RA
Set 1 of Japanese characters.
GA-DA
Set 2 of Japanese characters.
CHINESE
Not supported.
SPANISH
Spanish characters selection.
F1
Preprogrammed headlines
selection.
F2
No Function
F3
European characters selection.
F4
Russian characters selection.
POWER
Turns the display ON and OFF.
MENU
Program/Modify sign settings.
COLOR
Change font color.
WIDTH
Change font width.
ATTRIBUTE
Apply font effect.
FONT
Change font type.
DELETE
Remove unwanted characters.
SPACE
Inserts a space between words
or characters.
LIGHT
No function.
ESC
Cancels menu selection or
character entry.
EFFECT
Scroll Up key for menu and
effects selection.
EFFECT
Scroll Down key for menu and
effects selection.
SPEED
Left key for cursor placement
and speed selection.
SPEED
Right key for cursor placement
and speed selection.
COPY
No Function.
DEMO
Activates factory
demonstration message.
NEON
Applies a border effect
FIX
Automatically adjusts the width
a word to fit the screen.
Page 2
SETTING TIME AND DATE
SET CURRENT TIME AND DATE
Set Time – Set current time.
1) Press the [MENU] button.
2) Press the arrow button until the Set Time option appears.
3) Press [OK]. The Set Time option appears.
4) Use the and arrow buttons to set the time.
5) Use the and arrow buttons to move the cursor
6) Press [OK] to confirm your changes.
7) Press [ESC] twice to exit the Set Time option.
Set Date – Set current date.
1) Press the [MENU] button.
2) Press the arrow button until the Set Time option appears.
3) Press [OK]. The Set Time option appears.
4) Press the arrow button until the Set Date option appears.
5) Use the and arrow buttons to set the date.
6) Use the and arrow buttons to move the cursor
NOTE: The date format is YEAR/MONTH/DAY.
7) Press [OK] to confirm your changes.
8) Press [ESC] twice to exit the Set Date option.
[ ]
[ ] [ ]
[ ]
[ ] [ ]
[ ]
[ ]
[ ]
[ ]
[ ]

Page 3
NEW CONTENT
CREATE A SINGLE LINE MESSAGE
Enter the Edit Mode
1) Press the [MENU] button.
2) The Add Contents option appears. Press [OK].
3) The Add Message option appears. Press [OK].
NOTE: When a momentary prompt appears, simply wait until it disappears
from the display before proceeding to press a button. If a button is
pressed during a prompt, simply press the designated button again.
4) When you see the flashing cursor to the left, you are ready to proceed.
Input the word “HELLO WORLD”
5) Press [3 GHI]. The letter “G” appears.
6) Press [3 GHI] again. The letter “H” appears.
NOTE: Each Character/Number button supports multiple letters.
7) Now press [2 DEF] twice. The letter “E” appears.
8) Press [4 JKL] three times. The letter “L” appears.
TIP: Correct mistakes easily by using the [DELETE] button.
9) Now press the arrow button to advance the cursor.
NOTE: If necessary to use the same Character/Number button to display an
additional letter, simply press the arrow button to advance the cursor
to the right, than press the designated Character/Number button again.
10)Press [4 JKL] three times again. The letter “L” appears.
11)Press [5 MNO] three times. The letter “O” appears.
12)Press [SPACE] and continue to input the word “WORLD”.
TIP: The [FIX] button resizes the word to fit the entire display. Go ahead, try it!
Exit the Edit Mode
13)Press [OK].
14)The Automatic Effect option appears. Press [OK].
15)You are now returned to the Add Contents option.
Run your message
16)Finally press [ESC] to run your message.
[ ]
[ ]

Page 4
NEW CONTENT (continued)
CREATE A DOUBLE LINE MESSAGE
Enter the Edit Mode
1) Press the [MENU] button.
2) Press [OK].
3) Press the arrow button once. The Add Dual Message option appears.
4) Press [OK].
5) When you see the flashing cursor to the left, you are ready to proceed.
Input the word “THANK YOU”
6) First let’s input the word “THANK”.
7) Press [7 STU] twice. The letter “T” appears.
8) Press [3 GHI] twice. The letter “H” appears.
9) Press [1 ABC]. The letter “A” appears.
10)Press [5 MNO] twice. The letter “N” appears.
11)Press [4 JKL] twice. The letter “K” appears
12)Now press the arrow button once to place the cursor on the second line below.
13)Continue to input the word “YOU”.
Exit the Edit Mode
14)Press [OK].
15)The Automatic Effect option appears. Press [OK].
16)You are now returned to the Add Contents option.
Run your message
17)Press [ESC] to run your message.
PRACTICE
17)Go ahead! Try adding a couple more Single-Line and Double-Line messages.
NOTE: All new messages created will run in succession.
[ ]
[ ]

Page 5
CONTENT MODIFICATION
MODIFY, INSERT AND INDEX CONTENT
By now you should have a good feel for creating new content. Now let’s try to make some
changes.
Modify Contents – Revise an existing custom message.
1) Press the [MENU] button.
2) Press the arrow button. The Modify Contents option appears.
3) Press [OK].
4) Use the and arrow buttons to scroll through your existing messages.
5) Select any custom message to revise by pressing [OK].
6) You are now free to delete, add or modify your message.
7) When your revisions are complete, exit the edit mode and run your message.
Insert Contents – Inserts new content before an existing message.
1) Press the [MENU] button.
2) Press the arrow button until the Insert Contents option appears.
3) Press [OK].
4) Use the and arrow buttons to scroll through your existing messages.
5) When you have selected the location of the new content to be inserted, press [OK].
6) Use the and arrow buttons to select an insertion option type.
NOTE: Insertion options: (1) Sentence Insertion (2) Dual Message Insertion
(3) Image Insertion (4) Picture Insertion (5) Video Insertion
(6) Display Date (7) Display Time (8) Dday Insertion (9) Dtime Insertion.
7) Select your option by pressing [OK].
8) Enter your content accordingly and, exit the edit mode and run your message.
NOTE: All insertion options have been covered earlier in this manual. Please
review the sections previous to this one for assistance.
Index Content – Organize your message playlist.
1) Press the [MENU] button.
2) Press the arrow button until the Index Contents option appears.
3) Press [OK].
4) Use the and arrow buttons to scroll through your existing messages.
5) Press [OK] to change enable/disable a message. Selecting “X” will disable the
message from running in your message playlist. Selecting “O” will enable the
message to run in your playlist.
NOTE: By default, all messages are enabled to run in the playlist.
6) When you are satisfied with your changes press [ESC].
7) Now press [ESC] again to run your message.
[ ]
[ ] [ ]
[ ]
[ ] [ ]
[ ] [ ]
[ ]
[ ] [ ]

Page 6
CONTENT DELETION
ERASE UNWANTED MESSAGES
Select to delete a single message or all your messages from memory.
Delete Option – Erase a single message.
1) Press the [MENU] button.
2) Press the arrow button until the Delete Contents option appears.
3) Press [OK].
4) The Delete Option will appear.
5) Use the and arrow buttons to scroll through your existing messages.
6) Select the message you would like to delete by pressing [OK].
7) The Delete? (OK/ESC) prompt will appear.
8) Press [OK] to confirm deletion or [ESC] to cancel deletion.
9) The Delete Option will appear. Press [ESC]
10)Now press [ESC] again to run your message.
Delete All – Erase all stored messages.
1) Press the [MENU] button.
2) Press the arrow button until the Delete Contents option appears.
3) Press [OK].
4) The Delete Option will appear.
5) Press the arrow button. The Delete All option appears.
6) Press [OK].
7) The Delete? (OK/ESC) prompt will appear.
8) Press [OK] to confirm deletion or [ESC] to cancel deletion.
9) The Delete All option will appear. Press [ESC]
10)Now press [ESC] again to run your message.
NOTE: ANY MESSAGES DELETED WILL BE PERMANENTLY REMOVED FROM
THE DISPLAY MEMORY AND CANNOT BE RECOVERED FOR FUTURE USE.
[ ]
[ ] [ ]
[ ]
[ ]

Page 7
EFFECTS CONTENT
APPLY EFFECTS TO YOUR MESSAGE
Now let’s customize a new message using the effects that fit your preference.
Enter the Edit Mode
1) Press [MENU].
2) Press [OK] twice.
Input the phrase “Stewart Signs”
3) Use the designated Character/Number buttons to input the phrase “Stewart Signs”.
4) When your message is complete, press [OK].
Insertion Effect – The effect used to control how your message will jump on the display.
14)Use the or arrow buttons to scroll through the categories.
NOTE: Press [OK] to preview the effect with your message. Press [ESC] to go
back to the effects selection menu.
TIP: When previewing an effect, try using the or arrow buttons to see a
variation of the selected effect. Also try using the or arrow buttons to
manipulate the speed of the effect.
15)When you are satisfied with your effect preview, press [OK].
Preservation Effect – The effect used when your message is stationary on the display.
16)Use the or arrow buttons to scroll through the effects.
17)When you are satisfied with your effect preview, press [OK].
Hold Time – How long your message will remain on the display before Release Effect.
18)Use the or arrow buttons to select a number from 01 – 99.
19)Use the or arrow buttons to select between seconds [S] or minutes [M].
20)When you are satisfied with your setting, press [OK].
Release Effect – The effect used to remove your message from the display.
21)Use the or arrow buttons to scroll through the effects.
22)When you are satisfied with your effect preview, press [OK].
NOTE: Refer to the Appendix Section for a list of all effects.
Connection – This setting has no function at this time.
23)Press [OK].
Run your message
24)Press [ESC] to run your message.
[ ] [ ]
[ ] [ ]
[ ] [ ]
[ ] [ ]
[ ] [ ]
[ ][ ]
[ ] [ ]

Page 8
VISUAL CONTENT
GRAPHIC ANIMATIONS
Add eye-catching messages with moving graphics!
Add Image – Graphic animations with headlines.
1) Press the [MENU] button.
2) Press [OK].
3) Press the arrow button until the Add Image option appears.
4) Press [OK].
5) Use the and arrow buttons to scroll through all the available Images.
6) Press [OK] to add the Image to your message.
7) Press [ESC] to run your message.
NOTE: Visual content is added as a standalone messages separate from your
custom message. Visual content is designed to automatically run with
your custom message.
Add Picture – Large graphics.
1) Press the [MENU] button.
2) Press [OK].
3) Press the arrow button until the Add Picture option appears.
4) Press [OK].
5) Use the and arrow buttons to scroll through all the available Pictures.
6) Press [OK] to add the Picture to your message.
7) Press [ESC] to run your message.
Add Video – Large graphic animations.
1) Press the [MENU] button.
2) Press [OK].
3) Press the arrow button until the Add Video option appears.
4) Press [OK].
5) Use the and arrow buttons to scroll through all the available Videos.
6) Press [OK] to add the Video to your message.
7) Press [ESC] to run your message.
TIP: When previewing Images, Pictures, or Video content, use the and
arrow buttons to set the speed of the graphic or animation.
NOTE: Refer to the Appendix Section for a list of all Graphic content.
[ ]
[ ] [ ]
[ ]
[ ] [ ]
[ ]
[ ] [ ]
[ ][ ]
Page 9
VISUAL CONTENT (continued)
TIME, DATE
Display Date – Change the appearance of the Date with your custom message.
1) Press the [MENU] button.
2) Press [OK].
3) Press the arrow button until the Display Date option appears.
4) Press [OK].
5) Use the and arrow buttons to select a number
6) Now apply any one or a combination of Font Styles to the numbers.
NOTE: The [ATTRIBUTE] Font Style is not applicable to the Date and Time.
NOTE: The Date cannot be set from this option. Please refer to the
TIME/DATE AND TIMER section for Date settings.
7) When you are satisfied with your changes, press [OK].
8) The Automatic Effect option appears. Choose a preferred effect or press [OK] to
continue (refer to the Effects Content section for assistance).
9) The Add Contents option appears press [OK].
10)Press [ESC] to run your message.
Display Time – Change the appearance of the Time with your custom message.
11)Press the [MENU] button.
12)Press [OK].
13)Press the arrow button until the Display Time option appears.
14)Press [OK].
15)Use the and arrow buttons to select a number
16)Now apply any one or a combination of Font Styles to the numbers.
NOTE: The Time cannot be set from this option. Please refer to the
TIME/DATE AND TIMER section for Time settings.
17)When you are satisfied with your changes, press [OK].
18)The Automatic Effect option appears. Choose a preferred effect or press [OK] to
continue (refer to the Effects Content section for assistance).
19)The Add Contents option appears press [OK].
20)Press [ESC] to run your message.
Full length User’s Guide available at
Stewartsigns.com/support
[ ]
[ ][ ]
[ ]
[ ][ ]
Table of contents
Popular Remote Control manuals by other brands


Panasonic
Panasonic CZ-RWSU2N operating instructions

Philips
Philips SRU 5010/87 Instructions for use

Aqualisa
Aqualisa AQLS user guide

TerraTec
TerraTec Cinergy 200 TV manual

Durablow
Durablow TR2001 Installation & operating instructions

Universal Remote Control
Universal Remote Control UR4U-MDVR2 operating instructions


